It's no secret that any house consists of several basic elements - a foundation, walls, ceilings and, of course, a roof. All these elements are equally important, and each of them must be given a lot of attention during the construction process. Continuing the theme of construction frame house with our own hands, in this article we will deal with the question of how to build the walls of a frame house? Together with the website, we will deal with two technologies for their construction and study in detail the design of the walls.
Do-it-yourself frame house walls photo
Walls of a frame house: device and main elements
The wall of a frame house is a combination of various building materials combined into one block. Some of them provide rigidity, others create protection from the wind, others help keep the heat in the house. All of them are very important and by no means superfluous - this means that throwing away any one element, saving money, as some kulibins do, is tantamount to shortening the life of the building as a whole. With this, I think, everything is clear, and now is the time to study the question of what kind of important elements and what they are for. Let's start in order.
- Frame. This is the basis of the walls, which is fully responsible for their shape, size, rigidity and the ability of the house to withstand loads. The frame of the walls is made either from special metal profiles, or from a wooden beam with a cross section of at least 100 by 50 mm - this is if we talk about the thickness of the outer walls of the frame house. Internal walls, if they are not load-bearing, are made somewhat thinner, although this should not be done for purposes.
- Internal lining. This is a plate (OSB-3, as a rule) - it is screwed onto the frame using self-tapping screws. With a serious approach to business, it is also glued with a special glue.
- Vapor barrier. Installed with inside walls under the OSB - its task is to metered supply of moisture vapor contained in the air into the wall. It allows just enough moisture to pass through so that it does not get wet and does not lose its qualities and at the same time manages to bring it out.

Construction of the walls of a frame house photo
- Wall insulation. In most cases, this is mineral wool, or to be more precise, a basalt slab. If we are talking about factory sip panels, then they are insulated with polyurethane foam sealant.
- Wind protection. It has a dual purpose - outer side it creates a wind-impermeable barrier (hence the name), and from the inside it releases excess vapors that accumulate in the thermal insulation material.
- Outer cladding. Again OSB, which, as in the case of the inner lining, is screwed to the frame with self-tapping screws and additionally fastened with glue. By the way, in most cases, OSB 12 mm thick is used for both external and internal cladding.
- Facade. In most cases it is, but sometimes in the process of finishing frame buildings and is used, which is somewhat cheaper, but in terms of labor costs it is more difficult.

Pie walls frame house photo
In principle, that's all - this is exactly what the so-called wall pie of a frame house looks like from the outside. The only thing that can be added here is to clarify the point that the ventilated facade must be assembled on the crate without fail - that's why it is ventilated, so that the space behind it is ventilated.
Frame house wall construction: assembly sequence
Again, despite two various technologies construction of a frame house, the assembly of walls is carried out almost the same way. The only difference is that by using prefabricated panels, you bypass the mass various stages works. But if you decide to assemble these panels yourself, then assembling them will look almost exactly the same as building a conventional frame house. You will have to complete the following steps.
- Assembly of wall frames. As a rule, each individual wall of the house is one or two parts of the frame - so to speak, segments that are assembled separately. In fact, these are rectangles assembled from a wooden beam, inside of which there are vertical stiffeners installed in 625 mm increments in the centers - this is half the width of the OSB sheet. If the beam (its length) allows, then it is better to make the frame in the entire width of the wall. If not, then you can split it into parts. By the way, if we are talking about a two-story building, then it is better to reduce the step of the stiffeners to 316.5 mm. It is better to prepare such frames immediately, so that after assembly they completely form the outer walls of the house.
- Installing frames on . Let's start right away with the fact that the top of the foundation needs to be processed with high quality bituminous mastic and paste over with roofing felt in a couple of layers. Then everything is simple, but, nevertheless, you will need the help of reliable and strong male hands. At the same time, you will have to lift and hold two frames at once (angular) - while several people hold them, one must twist them together. After the fastening is done, the frames can be released and installed according to. Substituting the blocks (if necessary), the frame, clearly installed in the level, is attached to the foundation with anchor bolts. In this way, all the frames are mounted into a single whole product, namely the walls of the frame house with their own hands.

Walls of a frame house photo
- Further work on the manufacture of walls, as a rule, is postponed until the moment it is assembled - in most cases, the frame of the house is assembled completely, but there are exceptions. In general, on next step the construction of the walls of a frame house involves their sheathing from the inside. Everything is simple here - the OSB is cut with a jigsaw to a given size and simply screwed to the frame, which is previously upholstered with a vapor barrier film using a stapler. Even one person can easily cope with this work, and, as a rule, it does not cause difficulties.
- Now we move outside and lay a heater between the beam of the frame. This is also an elementary job, with which it is quite possible to cope on your own. We cut the insulation to size and push it inside the wall. We do not press strongly, since it is not cotton wool that retains heat in the house, but the air that is between its fibers.
- And then we stretch the windproof film with a stapler and sheathe the frame of the OSB house.

The correct wall of the frame house photo
In principle, everything, the correct wall of the frame house is ready, and there is not so much left to add - in particular, to remind about. As a standard, it is laid inside the walls and this is done before they are insulated and sheathed on the second side. You should not forget about this moment, since subsequently it will be very difficult to stretch, if not impossible.
This is how the walls of a frame house are made. Naturally, there may be some variations, but in general, their layer cake remains the same. Speaking of variations, we mean a change in the sequence of work - for example, you can first complete the exterior cladding of the house, and then go inside the room and not suffer from wind and bad weather. It will even be more logical and more convenient to conduct internal communications.
Principles embedded in construction technology frame houses, determine the specifics of all its structural elements. Speaking of internal walls, one cannot help but pay attention to their similarity with external walls. Both in design and materials used. Naturally, the functions of internal and external walls differ from each other, moreover, there are differences among the internal walls themselves. And all this affects their design features.
The main purpose of the walls inside the frame house is to divide it into zones, that is, rooms. This function is performed by all walls without exception. Other functions, depending on the intention of the architect or wall designer, are implemented differently. Therefore, different types of internal walls can be distinguished.
- Deaf walls or walls with openings. A blank wall is the easiest to manufacture. But in view of the fact that such walls usually separate rooms with a high degree of insulation, they must have increased noise protection. On walls with openings, windows or doors are usually placed. The opening violates the integrity of the wall structure and requires additional measures to strengthen its rigidity. At the same time, since an internal door or window between rooms is rarely highly soundproof, it makes no sense to present high requirements according to this indicator to the wall.
- Free and loaded walls. They differ in that various pieces of furniture and household appliances will be hung on the latter. For example, it could be top part kitchen set or heavy TV. Loaded walls are reinforced at the stage of the frame construction. In addition, linings are pre-installed in the places where any objects are supposed to be attached to them. This is necessary so that nails or screws do not fall into the void.
- Bearing walls and partitions. This is probably the most significant difference between interior walls. Load-bearing walls are, in fact, inside common frame of the house. They form a single structure and provide it with the required rigidity. The task of partitions is a simple allocation of rooms inside the house. No special design requirements is not presented to them.
Installation of load-bearing walls
Plan your location bearing walls, unlike partitions, it follows even at the stage of designing a frame house. After all, too many factors are linked to their location, and also affect it. Firstly, the load from the roof, ceilings, the own weight of the walls and furnishings of the frame house is distributed along its outer walls to the foundation. And not always four external walls can satisfactorily cope with this task.
Secondly, the presence of intermediate supports, which are load-bearing walls, makes it possible to more rationally and economically use the existing Construction Materials.
For example, floor beams and floor logs have a certain deflection under load, proportional to the span length and inversely proportional to their thickness.
 So, in most cases, it is more economical to arrange additional supports under the beams than to use thicker boards or timber. Usually used for the floor of the second floor (they are also floor beams of the first floor), boards of 200X50 mm in size limit the maximum span to 4 meters. If the room is larger, then there is a need for additional support, which is a load-bearing wall. And a load-bearing wall cannot simply “hang in the air” on the second floor. On it, on the first floor, it is necessary to install the same load-bearing wall, resting it on its own foundation. This implies the third factor, namely the need to design and build a foundation for the load-bearing walls of a frame house.
For the manufacture of the frame of load-bearing walls, the same materials are usually used as for the frame of external walls. If these are boards, then with a section of 200x50 mm. If a bar, then with a section of 200x80 or 250x100 mm. Vertical racks are installed on the first crown of the lower harness. The walls are sheathed with almost any sheet material: drywall, fiberboard, OSB, plywood, chipboard, as well as a grooved board or lath. A sound-absorbing material is placed inside the wall, usually acoustic mineral wool is used in this capacity. For better sound insulation it is recommended to arrange a so-called acoustic sandwich. It consists of alternating layers of drywall and acoustic mineral wool with a thickness of at least 80 mm. For a tangible effect, there should be 4-5 such layers. Of course, thickening the wall will reduce usable area rooms, but will significantly increase the comfort of living in it.
Partitions
This type of internal walls is distinguished by the fact that it does not bear any significant load, except for its own weight. And also, perhaps, pieces of furniture or other equipment. Therefore, to install partitions, you do not need to arrange your own foundation. Bearing capacity the floor is usually enough to mount the partitions directly on it or on the logs. In the event that the wall falls between the lags, it is advisable to arrange additional jumpers perpendicular to the boards or timber from which the floor lags are made. 

It is recommended to assemble interior partitions in a frame house from a board with a section of 100x50 mm. Or even narrower, if you're doing the aforementioned acoustic sandwich. In this case, your wall thickness can grow up to 400 mm with four-layer sound insulation. The distance between the vertical posts of the internal walls (partitions) usually corresponds to standard size mineral wool sheet and is 1.2 m. Otherwise, the installation interior partitions produced in exactly the same way as internal load-bearing walls.
loadable walls
Free walls are assembled "monotonously", that is, by uniform repetition of the same building elements, both horizontally and vertically. Loaded, that is, designed to be mounted on them heavy objects, the walls are more complex. In those places where it is supposed to place fasteners (dowels, brackets, etc.), supports from boards of the same standard size that were used to mount the frame itself are additionally installed between the vertical racks of the frame. And it, in turn, is reinforced by braces that prevent the walls from bending from transverse loads.
If sound reproducing equipment is to be installed on such walls, damping should be provided. fasteners special gaskets, washers or sound-absorbing compounds. Otherwise, the inner wall of your frame house can turn into a sound amplifier, which is unlikely to please those in the next room.
 Features of walls with openings
The internal walls of a frame house are either deaf or with openings. And if during the installation of a blank wall there are usually no difficulties, then the installation of window or door openings requires taking into account certain points. Firstly, the wall of the frame house is formed by a number of vertical posts installed at an equal distance from each other. And the tie-in of any opening violates this integrity, which requires additional reinforcement of the structure. Secondly, the rupture of the vertical struts causes the weakening of that part of the frame, which is located above the opening. To replace the missing vertical supports, apply various options load distribution, for example, installation of crossbars, that is, additional horizontal strapping boards. Thirdly, in view of the fact that vertical racks are installed periodically, the location of the openings should be chosen so as to minimize the integrity of the structure. Ideally, the opening should have a width that is a multiple of the pitch of the uprights. If this is difficult to achieve, the opening should at least start from the rack (or end at it).
Doors or windows are weakness in soundproofing. Especially internal doors and decorative windows. Thin single doors are an excellent conductor of any noise, especially low-frequency ones. The same applies to windows, unless they consist of a double glazing unit with a thickness of more than 40 mm. Therefore, it hardly makes sense to seriously soundproof the inner wall with openings.
A few general questions
Often, future owners of frame houses, which they are going to build with their own hands, are wondering about the need for vapor barrier and thermal insulation of internal walls. We believe that thermal insulation is not necessary if you are not going to selectively heat your home. Of course, this option cannot be completely ruled out, but it is rather a temporary measure. And thermal insulation is a fairly constant thing, and it’s also not cheap. Moreover, we highly recommend the use of high-quality sound insulation. And it does a good job with noise reduction.
As far as vapor barrier is concerned, it is useful if acoustic mineral wool is used in the internal walls. The insulating layer must be protected from condensation, which can form when water vapor passes through the wall. Naturally, this is true for walls in rooms with constantly or periodically high humidity, for example, in the kitchen. In addition, the vapor barrier layer, especially with bituminous impregnation, is in itself a good protection against extraneous sounds, especially high-frequency ones.
Sometimes questions arise regarding the laying of communications through the internal walls of a frame house. Usually all wire pipes, hoses, boxes, etc. are laid inside the wall before sheathing it. However, in Russia, unlike many foreign countries, building codes and the rules only allow outdoor wiring. These norms are old, developed back when high-quality electrical insulation was not carried out in industrial scale. Therefore, there will be nothing shameful if you lay an electrical wire inside the wall, but only of good quality. Well, if you still intend to comply with the requirements of SNIPs, you will have to hide electric wires in corrugated hoses or in special boxes that are mounted on top of the wall. Naturally, in this case, you will have to select the electrical fittings in such a way that it does not spoil the interior of the room.
As we can see, the do-it-yourself installation of the inner wall of a frame house of any type does not present any particular difficulties and can even be done alone. The main thing for obtaining a positive result is to understand the purpose and mechanism of action of all structural elements.
Today we will consider with you frame walls, the principle of construction of which is simple and ingenious at the same time. For example, consider wooden frame, which is currently used for the construction of 80 percent of all frame residential low-rise buildings.
So, wooden frame walls. The principle of construction is simple and in essence resembles, on the one hand, a children's designer, on the other hand, labor lessons at school. Remember, we beat stools at labor lessons? So, the principle of construction frame wall- exactly the same. Each adjacent rack, each element of the frame support each other through fasteners and ties.

It turns out that any individual part of the supporting frame, whether it be a stand or a jib, is individually rather fragile. However, in a bundle, when all the frame parts are correctly mounted and secured, the frame elements create an amazingly strong system.

This page presents general schemes frame walls and individual elements. As can be seen from the drawings, the following principles must be followed when installing a frame wall:
- Structural rigidity.
- Reasonable use of material.
- Construction speed.

In fact, these are racks that are interconnected by jibs. With the help of the lower and upper strapping, the load is transferred from the roof through the racks to the foundation. Power elements of window and doorways unload these nodes and relieve the load on the window and door blocks.

The outer skin of the frame wall also acts as a strength element. Sometimes amplification is not performed through outer skin, but through the internal. Sheathing can be done either with any rigid slab material (plywood, OSB), or with thin boards (20-30 mm thick) diagonally.

The use of DSP to reinforce the frame is unreasonable, since in this material the hardware (nails, self-tapping screws) do not have a rigid fastening. Over time, the design will begin to "walk", which will be contrary to principle number 1.

-
Any design of a frame house, the nodes of which are calculated and correctly executed, is reliable by default. You can count the nodes of the frame yourself on a calculator, or you can use ready-made ... -
To imagine how the pie of the wall of a frame house with mineral wool as a heater looks like, just look at the diagrams located on this page. For different conditions... -
This page shows a frame wall in section along with a heater, which is mounted between the racks of the frame. Simply put, a sectional frame wall looks like this ... -
Vapor barrier during the construction of a frame house is used to prevent moisture from entering the house into the heat-insulating materials located in the walls of the frame. One of the main conditions for the use of a heat insulator ... -
The simplest design of the walls of a frame house is vertical posts connected by upper and lower strapping and tied with jibs for additional structural rigidity. When using plate...
The category of frame buildings can be attributed to any buildings, the walls of which are a combination of strong load-bearing elements (racks and strapping) and lightweight materials with good heat-insulating properties. This refers to both foam block buildings with reinforced concrete columns, and half-timbered buildings, and from finished SIP panels. However, most often this is the name of Canadian-type houses - with a wooden frame, the cells of which are filled with insulation during the construction process, and then covered with sheeting. The walls of this design will be discussed in the article.

ADVANTAGES OF MODERN TECHNOLOGIES
The frame technology has many advantages. It allows you to do without powerful equipment and a large number of workers: a team of two people is quite capable of bringing a house under the roof under the roof and preparing for finishing a house with an area of 150–200 m2 in a season. Important advantage before using bricks and expanded clay concrete blocks lies in the small mass of the walls: it is possible to save on the foundation by choosing, for example, a structure made of screw piles and steel rand beams. If we compare the classical canadian house with assembled from factory panels, the first one will cost significantly less (1 m2 of a wall made of 200 mm thick SIP panels, including installation, costs 2600–2900 rubles, and a frame wall costs 1800–2200 rubles). However, in practice, things are far from being so clear cut.

Structure of the frame wall: 1, 2 - plasterboard sheets; 3- vapor barrier film; 4 - mineral wool; 5 - windproof membrane; 6 - imitation of timber or blockhouse
It is well known that in shield country houses, built 20-30 years ago, it is uncomfortable to spend the night even in May, and it is simply impossible to live in them in winter. In addition, in a short time, most of these structures were very dilapidated and lopsided. Of course, it's not the shortcomings. frame structure as such, but in the extreme negligence of the then builders, the unsatisfactory quality and the ridiculous amount of materials used. Shields with a thickness of no more than 100 mm were filled with rolled glass wool at best, and at worst with fragments of foam. The elements of the walls were somehow knocked down with nails, not paying attention to the cracks, because the finish would close them. Well, when constructing wind protection and vapor barrier, they relied entirely on short-lived glassine.

Frame wall construction: 1 - drywall sheet; 2 - vapor barrier; 3, 5 - OSB; 4 - mineral wool; 6 - windproof membrane; 7 - vinyl siding
Since then, the level of building culture in our country has noticeably increased, a detailed set of rules SP 31-105-2002, developed on the basis of Canadian experience, has appeared, materials with improved properties have become available. And yet… There are many contradictions and dark places in the standards and instructions, which each designer interprets in his own way. In addition, sometimes customers, in an effort to save money, make their own adjustments to the adopted technology - and contracting firms implement the wrong decisions without objection. Understanding will help you avoid mistakes. general principle"work" of the frame wall and the nuances of its construction. Or you can go.
When insulating frame walls, first of all, pay attention to thermal insulation properties material and ease of installation. We recommend using the innovative Light Butts Scandic material. One edge of the plates is springy, which simplifies their installation in the structure, the work is accelerated, and the amount of waste is reduced - the plate is inserted between the racks with a slight pressure and fits snugly against them. With this installation, the qualifications of the builder are not important, so the work can be done independently. As for the thickness of the thermal insulation layer, it depends on climatic conditions and structural material walls. An online calculator developed by Rockwool Design Center specialists and presented on the company's website will help to correctly calculate this parameter for each specific case.
Natalya Pakhomova
Rockwool Design Center Design Engineer
Pile and tape (c) deep foundations will last at least 50 years, and wooden floor may require repair much sooner.
STAGES OF CONSTRUCTION OF A FRAME HOUSE BOX
Consider the main stages in terms of construction theory and practice.
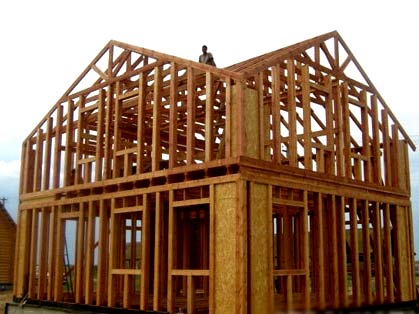
Frame assembly
The classic technology provides for the so-called platform frame with floor racks. It is assumed that first, on a slab, tape or grillage of the foundation, they erect beam ceiling first floor with subfloor. Further on this site in horizontal position they assemble the frames of the walls of the first floor, which are then lifted and fastened with the upper strapping. After that comes the turn of the interfloor overlap, and then - roof structure attic. The cross section and pitch of the frame elements are selected based on the calculated load and thickness of the insulation. Usually boards 40 × 150 mm and bars 50 × 200 mm are used.
In practice, the order and principle of assembly may be different. For example, if there are not enough working hands and there are no devices to lift vertically and fix the finished frames of extended walls, the structure is made up of fragments 2–4 m long. Often such fragments are immediately sheathed with moisture-resistant oriented strand boards (OSB-3), which makes it possible to do without temporary stiffness bonds.
There is no "crime" in mounting the frame in a vertical position, rack by rack, on the bottom trim, anchored to the foundation. True, in this case, the assembly accuracy will decrease (deviations in cell sizes will be at least 10 mm), and time will increase.
A gross mistake should be considered the construction of a frame made of wood natural humidity and without amplification by horizontal jumpers ("bridging"). Big troubles threaten to exceed the maximum allowable step of the racks (60 cm), as well as the wrong choice of fasteners, for example, the use of non-galvanized plates and self-tapping screws.
Installation of wind protection
To prevent blowing through the wall and the destruction of the insulation by air flows formed in the thickness of the structure, rolled windproof materials help. They are placed on the outer side of the frame, pressed against the racks with slats with a section of 25–40 × 40 mm, to which sheet sheathing is subsequently attached. The strips are mounted horizontally, starting from the bottom, with an overlap of at least 10 cm. With this design, sufficient reliable protection from wind and atmospheric moisture, as well as ventilation of the insulation (due to the gap under the skin).
If the wall is assembled from panels already sheathed with OSB, the wind protection is placed on top of the slabs. In this case, it is necessary to provide a ventilation gap under the facade cladding. Materials with a vapor permeability coefficient of less than 0.05 mg/(m ● h ● Pa) should not be used for wind protection. Such films prevent water vapor from leaving the building envelope, and the insulation becomes damp.

As a rule, walls or their fragments are assembled in a horizontal position on a floor platform, and then lifted vertically. This method greatly simplifies the installation of the frame. Photo: Green Building

Sometimes, in order to save money, customers refuse sheet outer cladding, limiting themselves to lining. This solution is acceptable, but the frame will need to be reinforced with struts. Photo: Vladimir Grigoriev/Burda Media

The assembly of the frame will be simplified if you use modern fasteners - special ties and plates. A power tool, such as a nail gun, will significantly speed up the work. Photo: "Canadian hut"

Fiber cement facade panels much more durable wooden lining and even vinyl siding. Such a finish is non-combustible, able to imitate wood, brick and stone well, but its installation is quite laborious. Photo: Enterit

Often, the project provides for the same design of external and internal walls, although it is better to use drywall rather than OSB for partitions. Photo: Vladimir Grigoriev/Burda Media
House cladding outside
Sheet material, attached to the frame from the street side, increases the strength of the walls, imparts spatial rigidity to the frame of the house and serves as an additional barrier to wind. The outer skin, as a rule, is made of OSB-3 boards with a thickness of 10-15 mm. They are nailed or screwed with self-tapping screws from 50 mm long in increments of 150-200 mm. Plates must be mounted with a distance of at least 20 mm from the base, and between them, compensation gaps of about 5 mm wide should be left; to increase the geometry of the wall, they are remembered with foam or elastic sealant.
Instead of OSB, you can use windproof panels made of paraffin impregnated fiberboard and polymer coated(in this case no diffusion membrane is needed) or slabs on cement base, which will increase the strength and fire resistance of the fence. Warming. According to traditional technology, the frame cells are filled with soft plates made of natural or synthetic fibers. Today, mineral wool insulation is out of competition. It is important that the material does not shrink over time, so when choosing, you should ask if the manufacturer has carried out the appropriate tests. And pay attention to the vapor permeability coefficient - it must be at least 0.3 mg (m ● h ● Pa).
AT middle lane In Russia, the required thickness of mineral wool slabs in the walls is 200 mm, and the “skeleton” of the house is often assembled from boards 40 × 150 mm, since 50 × 200 mm beams are supplied only to order and, in terms of cubic meters, are more expensive than standard lumber. In this case, they resort to two-layer insulation, that is, they mount an additional layer of extruded polystyrene foam on the outside of the frame (of course, after a ventilation gap of at least 25 mm).
The thermal conductivity of expanded polystyrene is lower than mineral wool, and some customers insist on using this material as the main insulation. The result is always negative: it is extremely difficult to cut foam sheets so that the resulting fragments fit snugly between the frame elements. There will be voids in the structure that will become conductors of cold.
As for ecowool, taking into account the mechanized application service (only the wet-glue method is suitable), it will cost 20-25% more than mineral wool boards and will limit the work to the warm season.
For exterior finish frame house, you can use a wide range of modern facade materials, but you should choose a specific option, taking into account the specifics of the installation of the finish and the design features of the wall. For example, it is desirable to attach siding to the leveling sheathing, and not directly to the OSB boards, so as not to damage the membranes that protect the insulation from moisture and provide a windproof wall. Heavy, such as fiber cement, decorative panels cannot be mounted on wooden crate- it is necessary to apply special metal profiles and fasteners provided by the manufacturer. For a plaster facade, silicate and acrylic compounds, which are applied to OSB or XPS with a polymer mesh reinforced on them.
Timofey Tesin
Head of the design and technology department of the company "TEREM-PRO"
Vapor barrier installation
The best insulating films are made of two layers of polyethylene or polypropylene and reinforced synthetic fiber; they are strong and elastic, so they are difficult to damage during installation. The strips of the film are placed perpendicular to the racks of the frame, starting from the upper section of the walls and providing an overlap of strips of about 10 cm.
Sheathing from the inside
inner lining it is advisable to perform with two layers of moisture-resistant drywall, providing a gap of at least 30 mm between the gypsum board and the vapor barrier, which is necessary for laying cables and mounting sockets and switches.

THE MAIN ENEMY OF THE FRAME WALL
Almost main enemy- this is moisture, and not atmospheric, but contained in room air. In winter, a diffusion flow can form inside the fence, directed towards the street. At the same time, vapors from the room penetrate into the insulation, as they approach outer surface the walls cool down and turn into water. As a result, the insulation becomes damp, its thermal conductivity increases, which means that heating costs increase. Moisture inside the walls also threatens with more serious troubles - the deterioration of the microclimate in the house, the destruction of the frame and cladding. Vapor barrier helps to fight condensate, the main requirement for which is the integrity and continuity of the layer. But even a well-made vapor barrier does not guarantee that the insulation will not get wet: during rains with wind, water can “crawl” under the external wind and moisture protection. Therefore, it is necessary to allow the material to dry, providing a ventilation gap under outer skin or wall decoration.
TYPICAL ERRORS IN THE CONSTRUCTION OF FRAME WALLS
- Assembling the frame from wood of natural moisture and using fasteners that are not resistant to corrosion.
- Incorrect selection of the section and pitch of the frame elements, insufficient number of connections between them.
- Use as the main insulation polystyrene boards. They cannot be precisely adjusted to the size of the frame cells, which is why cold bridges are formed.
- Refusal of outdoor ventilation gap. As a result, the insulation does not dry out, the wall loses its insulating properties and collapses faster.
- Laying communications in the thickness of the outer walls. As a result, the integrity of the vapor barrier is violated and the likelihood of dampening of the walls increases.

3 FEATURES OF THE MICROCLIMATE OF THE FRAME HOUSE
Fast warm-up capability
A house, the walls of which consist mainly of insulation, can be warmed up relatively quickly, which is very convenient if you spend the weekend in the country not only in the warm season. In addition, compared to a stone and log (timbered) building, such a building suffers less from crossing zero, that is, it can withstand large quantity freeze/thaw cycles (if the vapor barrier is properly installed).
Probability of sudden changes in room air temperature
Alas, the coin also has a downside: to maintain comfortable living conditions in the rooms. temperature regime very difficult. Since the walls do not have a heat storage capacity (thermal inertia), you have to carefully monitor heating equipment and weather, or purchase expensive automated equipment.
The complexity of organizing air exchange
In a frame house, it is difficult to deal with an increase in air humidity and carbon dioxide content in it. The fact is that when airing through open windows, the room cools down as quickly as it is heated, and until the street air is heated by a radiator (which takes from 15 to 45 minutes), the room is chilly and uncomfortable. Solving the ventilation problem different ways. Best Choice- installation of a modern channel system with heat recovery. If this option is not possible, they will help to increase the comfort of the home. air heating, water heated floor, as well as window supply valves.

Before you start building your house, you should decide on the technology of its construction. Its choice depends primarily on the cost of money and time for a future new building. Frame house- This is a low-rise prefabricated housing built on the basis of a structure made of wood or metal.
Mounted wooden frame cottage
Every year it is gaining popularity due to the fact that it is less susceptible to external influences, warm, light, has a modern attractive look.
Wooden frame housing is not inferior in quality to concrete houses, and surpasses them in some parameters:
The disadvantage of frame housing, like all wooden buildings, is a fire hazard. And if you use for decoration cheap materials containing phenol-formaldehyde resins, then there is also no need to talk about environmental safety. Therefore, when building a house, you should select building materials very carefully.
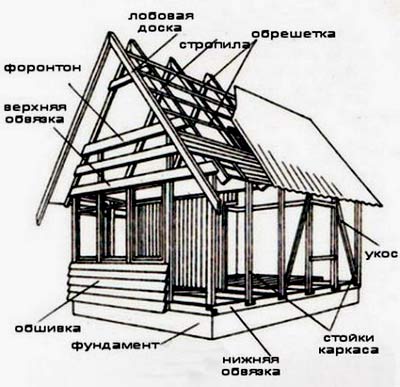
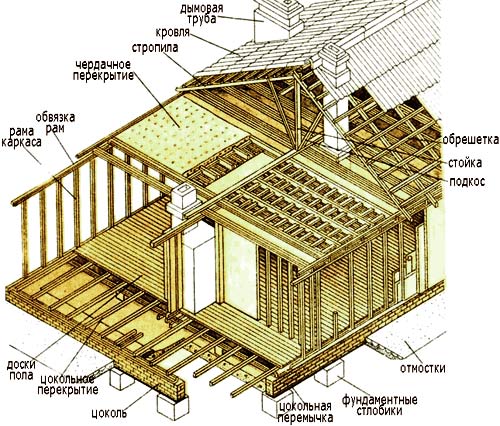
Main components
The frame of a low-rise wooden structure consists of:

Vertical racks are angular and intermediate. The purpose of both is to connect the upper and lower straps. It is usually carried out in the following ways: metal corners or with the help of a full cut and dowels. The slopes are used to ensure that the frame does not warp, does not change its position when exposed to strong wind.
materials
If, then the following main elements should be made of wood:
- timber for the embedded crown, upper strapping and side racks of the structure;
- boards for cross members and rough sheathing of the frame;
- bars for supporting slopes.
In addition to wood, the installation of the house is carried out using materials for roofing, vapor barrier, and insulation.

Scheme of flooring in a frame house
We should not forget about antiseptics, as well as flame retardants for wood processing. The roof is usually made of flexible Finnish tiles. Very attractive finish frame dwelling, imitating wooden beam. For thermal insulation, foam or mineral wool is used. The insulation from the outside of the walls is protected by moisture-resistant plywood, cement-bonded particle boards.
Construction of a frame wooden house
To become the owner of frame housing, you can buy ready-made elements made at the factory, transport them home and assemble them. This is called shield technology, the dignity of which is determined by the speed of construction of a new building. It requires the use of a crane to install the finished panels and, as a rule, pour the strip foundation.
Can be built with my own hands from scratch, which will cost much less, in addition, the homeowner will receive great satisfaction from the implementation of his ideas in the construction process.
Drawing for the construction of a frame cottage
The frame of the dwelling can be made of metal beams. But they are not used very often. This is due to the fact that the metal more expensive than a tree, and for the installation of the structure, lifting equipment is needed.
The use of wooden beams allows you to build a house on your own, without the involvement of qualified builders and special equipment. As in the construction of any building, the frame of the future building is worked out on paper or in a special computer program. It can be developed by the home master himself, special skills are optional. On, their dimensions, fit, connection methods, fastening of the main parts.
When performing construction work, you can not do without the following tools and materials:
Foundation
Construction begins with laying the foundation. Thanks to the low weight wooden building it can be light tape or columnar. Having chosen one or another option, they mark the territory.
The foundation pit for the foundation tape should be of such size that it itself is 5–7 centimeters wider than the wall and goes into the ground by about 30 cm.
At the bottom of the dug trench they pour sand cushion 5 cm and rammed. It is necessary in order to reduce the influence of shifting soil layers. Then the pit is reinforced with formwork made of boards or other sheet material. After that, the reinforcement is mounted on the rods. They are hammered into the ground in order to hold on to them. reinforcing mesh, for the installation of which you can use the longitudinal metal parts of unsuitable bicycles or baby carriages.

Ready-made tape-column foundation for a frame house
They are connected using metal wire. cement mortar House master can prepare and pour it himself, using cement in certain proportions high brand, water, sand, plasticizer, crushed stone or gravel. Before installing the frame, the finished foundation must be covered with a waterproofing material.
If or basement, then a columnar foundation is used. Concrete, brick or metal poles installed at the corners of the future building, as well as at the intersection of internal and external walls. From above, these elements are combined with a thick strapping beam, on which the structure will stand. The strapping is isolated from the foundation supports with two layers of roofing material.
Otherwise, condensation may appear at the points of contact between wood and concrete, brick or metal, and the wood will begin to rot.
strapping
For the installation of the lower and upper strapping, a bar with dimensions of 150x150 mm is required. It can be oak, larch or pine. It is pre-treated with a flame retardant and an antiseptic solution. The corners are reduced according to the tenon-groove principle with a tight fit, without gaps.
It can be connected using metal fasteners, but in contact with wood, they oxidize, causing wood to rot over time.
As a result, the entire structure loses its original strength. The frame is mounted on the bottom trim. It should occupy the entire perimeter of the strip or column foundation, to which it is attached with anchor bolts. For greater strength during pouring concrete or installing piles at the corners of the foundation, you can concrete metal pins for fastening the strapping frame to the foundation base. 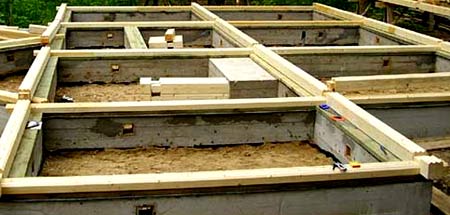 When the strengthening of the lower trim is completed, you need to make sure that it is laid strictly horizontally. Later, distortions of the structure are very difficult to correct. Now you can lay the logs for the floor.
Vertical support bars along the length should provide a ceiling at a height of about 2.7 m. Above - there may be problems with heating, below - it will be stuffy in summer.
They are placed in the corners, and intermediate between them.
Initially, the vertical posts are strengthened with temporary slopes, two for each support, but by installing top harness, they are replaced by constants. For mounting the ceiling strapping frame, bars with grooves are used. When it is ready, it is placed on vertical racks and nailed. Ceiling beams fit into the grooves and fasten with steel brackets or corners.
Walls
It is preferable that the board for warm walls was at least 10 cm thick.
Drawing of the construction of the walls of the frame cottage
And the choice of material for warming the house is determined by the preferences of the owner. Today, polystyrene foam is recognized as the most high-quality insulation. It is inexpensive, breathable, is a good heat insulator.
It does not stray in the insulating niche, does not slide down, as it happens with mineral wool. After that, the walls are finished from the inside, often with clapboard. They also help keep you warm installed double-glazed windows with double or triple glazing.
Roof
Initially, a strong beam is laid, on which all other elements will rest. The rafters are connected with nails and at an angle in the shape of the letter "A".

An example of fastening the roof rafters of the frame roof
Then a crate is made, knocked together from boards one from the other at a distance of 10 cm. Its upper part, using construction stapler, covered with roofing material. On top of it, starting from the bottom, a profiled sheet, slate or tile is overlapped.
The ridge strip after the completion of the flooring should be strengthened with self-tapping screws. Along the edges of the roof, catchment areas with a drain are made. After this procedure, doors, windows are installed, a porch is built, and, if desired, an attic.