Overlappings different types have their own installation technology, which should be strictly observed.
The general rule is that the ceiling is aligned with the ceiling of the lower floor. Since it is it that gives the structure of the house spatial rigidity, all its parts are rigidly connected to each other and to the walls (welding, concreting, anchors).
It is not allowed to punch holes in the floor slabs that are not provided for by the project (so as not to damage the ribs and reinforcement in the slab), shorten (cut off) the floor slabs, and also overload them during installation in excess of the standard load. The most common mistake is reduction of the floor support area on the wall(compared to the design).
Effects. Deflection and collapse of ceilings, cracks in walls and ceilings (for example , allowable deflection for a hollow core slab with a span of 6 m is 15 mm).
Elimination. If the deflection is more than acceptable, the load on the slab should be reduced or strengthened in the manner indicated by the specialist.
How right. It is necessary to strictly observe the project and instructions on the technology of installation of floors. If, due to an error during the construction of the wall, the problem of insufficient support area arose, the specialist must develop a node for this section that allows it to be increased.
Roof building mistakes
Attic wall not fortified
Effects. Inclined rafters act on the attic wall in a horizontal direction, creating a thrust, which causes the wall to collapse.
Elimination. Convert a hanging truss system to a layered one.
How to . When erecting an attic wall, it is initially necessary to provide for a layered truss system (with a fulcrum in the ridge area).
Vapor barrier film not sealed
Effects. There are pockets of steam penetration into the insulation, which is why moisture accumulates in the under-roof space. .jpg)
Elimination. Disassemble the structure, inspect the rafters, replace the damaged elements. The insulation must be dried or replaced.
How right. When installing a vapor barrier, a film around the perimeter of the attic is brought onto the walls. Joints and junctions with structures are carefully sealed with a special wide mounting tape. The use of nails is prohibited.
There is no ventilation layer in the roofing "pie"
Effects. Moisture can accumulate in the insulation, which makes it lose its properties.
Elimination. Disassemble the structure, inspect the rafters, repair damage, mount the roofing "pie" again.
How right. The under-roof space must be ventilated through the air gap, which is left between the insulation and waterproofing film. Without a gap, only a superdiffusion membrane can be laid on the insulation.
When installing bituminous and metal roofs(seam, metal tile), under which condensate forms, ventilation gap also suit directly under roofing. Under the roof overhang, holes are left for air inflow, and devices for its outflow are mounted in the area of \u200b\u200bthe ridge.
The type of coating has been changed to a heavier one.
Effects. The rafters die, as a result of which the roof is deformed, begins to leak and may collapse.
Elimination. Gain truss system.
How right. When changing the type of roof, it is necessary to order a recalculation of the truss system for a more massive roof from the design engineer.
Before embarking on the construction of the most interesting and convenient design roofs, it is worth evaluating correctly - what advantages and disadvantages lie behind the attractive external facade of the idea. The hip roof is no exception. It is worth noting that making a hip roof is enough expensive pleasure requiring funds, knowledge and practical experience.
Features of hip roof construction
If you look closely at the classic hip roof, it becomes clear that it was created primarily for two or three-story houses, for conditions with large quantity rainfall and changeable direction strong winds. No wonder such designs are also called Dutch or Danish. It is there that the advantages of a hip roof are obvious. But the beauty of the design sometimes makes it necessary to make hips precisely for the sake of the appearance of the roof and facade of the house, and not for some special properties.
If we compare the dimensions and material costs on a gable layout and a four-slope hip roof, we can draw the following conclusions:
- Making two additional roof slopes instead of flat gables is beneficial due to lower costs for a wooden frame beam, but unprofitable in terms of roofing materials consumption;
- If you make the walls of the house from modern aerated concrete blocks or bricks from wood concrete mix, this will reduce heating costs, but the cost of reinforcement will increase significantly load-bearing frame hip roof, by almost 25-30%;
- make a roof hip design advantageous if the house is in conditions of constant strong winds and heavy rainfall. In this case, heat loss on a gable roof is 5-10% higher than on structures with hips;
- With the same consumption of materials, making a simple hip roof is more expensive due to the need to pay for the services of more qualified builders and specialists;
- The design with hips, with the same quality of construction, is considered more durable and durable in comparison with gable roof schemes.
Important! The hip roof today has become almost a classic of the genre in architecture. low-rise construction cottages and country houses.
Make a hip roof and make no mistake
The hip roof today can look very beautiful and original. Modern developments of hip roof structures make it possible to make it on almost any modern building, with or even without a foundation. If the building does not even have a tape foundation of normal depth, a hip roof can be made according to the simplest scheme - with a very small slope of the roof slope, a large extension of the hanging rafters and a wide roof overhang. Naturally, complete attic space and the overlap device will be impossible due to the weak stability of the box at home. This approach will make it possible to make the minimum aerodynamic load from the wind, good protection walls and foundations from rain flows, and will reduce heat loss through the upper parts of the house. Great option for a small country house.

The main schemes for assembling the hip roof frame:
- Construction based only on walls, without the use of floors or ceiling beams;
- The sloping version of the frame installation allows you to increase the size hipped roof in height;
- The beam-supported roof of the house is the most commonly used option for houses with light walls with insufficient rigidity of the building box;
- A hip roof based on floor slabs is the most common option in modern construction of two and three-story houses.
Hip roof supported by floors
Unlike conventional gable roofs, in which the angle of inclination of the flooring can be from 30 - 65 °, hip schemes have an optimal angle of 45 °. Almost all constructions and calculations are performed based on the specified angle of inclination of the main elements of the frame - diagonal rafters. This option provides maximum structural strength.
The use of layered schemes and supports on the beam ceiling
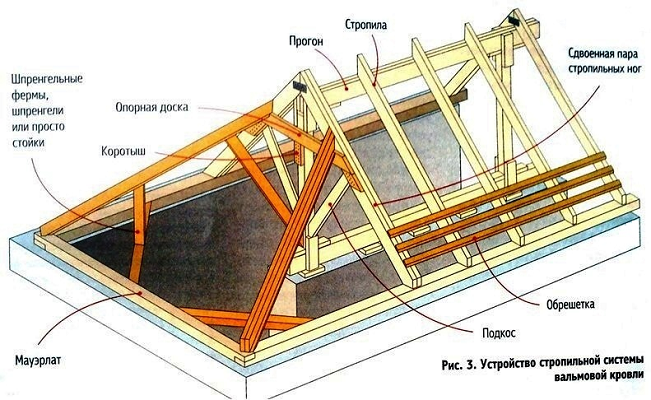
Most often, such a roof rests bottom rafters on a Mauerlat made of timber or thick boards, fixed to the upper end of brick or concrete walls future home. Together with the foundation, the walls form a rigid semi-closed system capable of withstanding vertical and horizontal loads from the rafters. Installing a floor from a log, beam or board in such schemes is necessary to form the ceiling and attic floor. The overlap itself in holding the roof or individual elements does not carry a hip structure.
In a layered design truss supports there is also usually an option ceiling made from wooden beams. At small sizes at home, the specific strength of the floor is enough to partially take on the load from the ridge run and rafters. If the length of the beam increases by more than 5 m, the strength of such an overlap to hold the roof is clearly not enough. Therefore, supporting columns or even part of the walls are built in the central part, on which the central part of the floor beam rests. The load from the ridge run is transmitted through the vertical supports to one powerful central beam, called the bed. Sometimes the force from the weight of the structure is transmitted through the bed directly to the stone supports, without the participation of the ceiling itself.
Thanks to this load redistribution scheme, the rafters can be thinner and lighter, and the pressure on the walls of the house is reduced by 30-40%.
Using joist to hold rafters
Often in the construction of a house, the ability of the main walls to hold the vertical load from the weight of the roof and frame is not always the decisive factor. A similar situation often arises in the construction of panel houses, in buildings with lightweight walls, or when using blocks with low rigidity as the main material for the walls, for example, arbolite stone.
In these cases, even partial unloading and transfer of most of the pressure from the weight of the hip roof from the perimeter external walls to domestic stone walls and support does not solve the problem. The rigidity and strength of the main box of the building is not enough to securely hold even a hip roof, not to mention a gable scheme. The problem of additional rigidity can be solved if a special overlap is made at the base of the roof wooden beam, with a section of 20x20 cm or 20x15 cm. The beams are laid on top of the finished Mauerlat, with a projection beyond the walls by 60-70 cm, in increments of half a meter. The overlap of the beam must be supported by one of the internal walls.
The ends of the beam protruding beyond the walls are used to fasten the lower parts rafter legs, and in the central part of the ceiling, a frame with supports supporting ridge run and upper part rafters. The main part of the structure - diagonal rafters are installed at the corners of the floor and connected at one point on the ridge run.
Hip roofs with supports on floor slabs
Constructions with hip triangles have long become an obligatory attribute of two or three-story brick and stone cottages built according to classical technology with reinforced concrete slab ceilings. Due to the high strength of the plates and brick walls the problem of providing the required rigidity of the supporting surface under the frame is not worth it.
To hold the weight of the frame, the same scheme is used as in the layered version. A frame with vertical struts and struts, which takes the force from the ridge beam and rafters, rests on a bed fixed on concrete slab overlap.
Features of building a hip roof
Designed to withstand any wind load, but subject to strict observance of the geometry of the connection of the four main diagonal rafters.

The accuracy of the connection and geometry of the rafters
All efforts can be in vain if violated optimal angles slope of the hip rafters to the ceiling and the angle between them. The best option a scheme is considered in which the corner hip rafters are connected to each other at an angle of 90 °.
The optimal angle between hip beams- an important but insufficient condition for the strength of the hip roof frame. If you look at the roof frame in profile, both hip planes should have exactly the same size and the same angle of inclination. Otherwise, the structure will be overloaded on one of the sides, and this is the first step towards deformation and destruction. If you look at the frame from above, you can see that with an ideal assembly, the opposite corner hip rafters should be parallel.
Methods for connecting beams and hip roof rafters
Despite the efforts made to unload part of the structure, it is difficult to make the frame absolutely ideal in terms of the arrangement of beams and load-bearing elements. Therefore, in all main power beams and rafters, metal overlay plates and wooden overhead elements are used when fastening and fixing on walls.

Most often, beams and rafters at the setup stage are “drafted” together, the easiest way to do this is with the help of self-tapping screws and clamps. After adjusting the dimensions of all joints, it is necessary to check the position of the beams and rafters, then all the fasteners are finally connected, it is easier to do this with nails, hammering them in pairs at different angles.

The ligaments of the diagonal hips are fixed first on the ridge run, while the withdrawal from the calculated place of the opposite beams is necessarily checked. This is the most responsible and difficult stage of the assembly of the structure, and it is important to do this procedure slowly and very efficiently. Builder Qualification hip roofs manifests itself precisely at this stage, all subsequent work is quite capable of being done by an ordinary carpenter who has general idea about the device of diagonal rafters and hips.

The load on the diagonals of hip roofs exceeds the force on an ordinary rafter by more than one and a half times. Therefore, the adjusted and fixed corner hips are first knocked out with struts and stops. Each of the retaining elements is adjusted individually and is also fastened with a reinforced connection. On the next step it is important to correctly install the sprigs and ordinary rafters; upon completion, you need to tighten the fastening of the rafter legs on the Mauerlat or floor beams.
Before laying the vapor barrier, it is imperative to treat with preservative solutions. It's easier and safer, you can use the most popular Tikkurila formulations in an organic solvent.
Conclusion
It is not so difficult to make a roof with hips if there is a real specialist in the team who can be entrusted with monitoring the implementation of the main, especially critical junctions of power elements. It is possible to do these works yourself, without having practical experience in building hips, but the construction itself will stretch for several months, and the cost of damaged material will just amount to the cost of the services of a qualified specialist.
Semyonovich, I did not find an answer on the Internet to this question. Sabbath. in a reinforced concrete workshop, the total area is 80 by 24 meters, the slope is about 5 degrees, it is filled with bitumen. It is proposed to tie the rafters directly on it with wire to the floor slabs. But how, I have no idea. It is clear that you need to drill holes in the slabs, but how to stick the wire into one hole and pull it out again into the next one to tie the rafter? From below it is impossible, there is nothing to walk on. Maybe there is another real and simple way to fix the rafters, please advise. Insulation between the rafters is also assumed.
Alexey, Vologda.
Hello, Alexey from Vologda!
Very non-standard question how to fix wooden rafters to the shop floor. Therefore, the answer to it is not visible on the Internet.
More and more similar ones are simply again covered with roofing material (rubemast, glass isol and the like) directly on its old layers, including the layer of poured bitumen. Sometimes these old layers of the roof are torn off. But this is, of course, difficult. New electrical installations are completely fixed roofing material the old way without deleting it. But they are still a rarity for our great and immense.
I confess that I have never blocked the workshop spans according to your method.
Smaller areas accounted for in several other variations.
At the same time, we laid wooden beams (and boards), an analogue of your rafters, and fastened them to reinforced concrete slabs not with wire, but somewhat differently.
They took a steel corner with a shelf of about 63 - 75 millimeters, cut it with a grinder into pieces 50 - 100 millimeters long. Holes were drilled in these scraps on both shelves. Holes / 2 - 3 pieces / were made for self-tapping screws in vertical shelves (about 5 millimeters in diameter), and in horizontal shelves one hole with a diameter of about 12 - 14 millimeters. (As an option - they took steel sheet 1.5 mm thick, cut into strips, then bent into a corner and drilled holes).
After that, the trimmings of the corner were applied with a vertical shelf to the surface of the wooden beam and fastened to it with self-tapping screws.
And the second horizontal shelf lay on the surface of a reinforced concrete slab.
Through a hole in the lower shelf of the corner, a hole in the plate was drilled with a perforator or through hole(when it was opposite the cell-cavity of the plate).
Then they took anchor bolts (you can use an anchor wedge), inserted them into the hole, and drove them with a hammer. Then, with a drill with a head for a bolt, the anchors were screwed up to the stop. True, the number of anchors was decent, but they are not cheap.
Received a perfectly normal fit. In doing so, the following features were taken into account.
First, they calculated the approximate step of the reinforcement, which was in the reinforced concrete floor slabs, so that they would not get into them with a perforator and the anchor could be pushed in.
Secondly, when viewed from below, the view was not always presentable, potholes were visible in some places on the surface of the slabs (where the perforator drill hit large gravel, constituent part concrete, and it fell out.
Thirdly, the rafters were not immediately attached to the slabs, but the longitudinal logs. And only then they put rafters on them and fastened them with staples, nails, self-tapping screws. This results in fewer fastening points, respectively, less labor intensity.
All pieces of wood were impregnated with KSD, "Senezh". So the customer demanded in accordance with the regulations. Experienced customers always exercise author's control and often require the use of not colorless compositions, but with color. Then you can see if there is coverage or not. You know, covens are not always scrupulous in this matter.
I can't say anything about other methods. You can, of course, lay out the rafters, drill holes next to them with a perforator and, driving around on overhead crane inside the shop bay, push the wire into these holes and twist it. But this is somewhat difficult. Yes, and there may not be a crane, but you can’t jump with a ladder.
But this is all speculation on a free topic.
And now what would I personally do in your place.
In your case, floor slabs are most likely used. If memory serves, with spans like yours, their dimensions are about 9 meters by 1.5 (or 1.8) meters. The load-bearing reinforcement in such slabs is located along the perimeter. And over the entire area there is a welded mesh with a large cell. Wire diameter from 3 to 5 millimeters. The plate itself has stiffeners. And the thickness fluctuates around 50 millimeters.
The slabs are supported on reinforced concrete truss arches. The joints of the plates along the strobes are castle or simple.
Then it is most advisable not to use logs, as we did with ordinary rectangular flat reinforced concrete floor slabs, but to take for rafters edged board section 40/150 millimeters. Lay it flat on the surface. "40" is more suitable here than "50", it bends better. Laying, respectively, from the edge to its center.
Then the boards of the crate can be taken measured, six meters long and placed along them without any bends.
Press the rafter boards well to the surface. That is, fix one end of the board, then a couple of people from the brigade should stand on the other end of the board. It will bend and will fit the slope of the roof. Then make fasteners for the next anchor bolt. Fastener pitch - about 1.5 meters. Drill holes for anchor bolts directly in the boards at their centers. And then drilling in the plates themselves.
Drive the anchor also with a hammer, wrap it with a drill with a head. It is most likely impractical to use a screwdriver, its power may not be enough. To prevent the head of the anchor bolt from falling into the wood, you can play it safe and put a large diameter washer under it. The length of the anchors should be approximately equal to the total thickness of the board, bitumen layer, plus the thickness of the floor slab.
Along the perimeter of the roof there should not be many different kinds of holes in order to exclude the so-called windage, when the top wind hits closed space and is able to tear the roof from its base. Such an extreme is rare, but it happens.
Everything proposed does not quite fit into the SNiPs, they would recommend putting the rafters on the edge for greater rigidity, using a 50/150 board, adjusting its surface along the slope, and using an edged board also 50 millimeters thick as a crate. Or remove layers of old roofing material, do concrete screed, or even completely rip off old floor slabs and install new ones with a new layer soft roof. But your customers are unlikely to go to such costs.
Once again, you can have simple reinforced concrete slabs, and maybe floor slabs, respectively, and mounting options may be different.
Focus on circumstances. Try, experiment.
As for the insulation, there will be no special problems. Izover, ursa, mineral wool, polystyrene foam, whatever your heart desires. If you observe all decorum, then you need air gaps, various thermal films, in the worst case, glassine and all this on a counter-lattice. If the insulation is soft and 50 millimeters thick, then it's okay, the "40" board will pass completely, you just need to press it down a little.
However, this is my vision. The decision is still yours to make.
Other questions about roofs.