Do not deny yourself comfort even in the country. There are a huge number of projects for country toilets that every person can bring to life. But first you need to decide on the drawing and, according to it, build the future structure.
A huge amount of materials and all kinds of projects for country toilets leads to the fact that people are simply lost in the background of all this diversity. That is why the theoretical part is so important. Based on the information in this article, you will be able to choose optimal design for your cottage.
Typical projects of country toilets
Basically, to create a country toilet project, the following types of structures are used:
- toilet house with cesspool,
- dry closet,
- closet powder.
Each of these designs has its own advantages. That is why it is so important to determine the type before starting construction.
Country toilet with a cesspool
In the project, it is imperative to provide for a pit. You also need to take care of its arrangement. For this it can be used plastic barrel or brickwork reinforced with reinforcement.
In your project, you must include right amount brick and cement, also do not forget about the fittings. The walls you created are subsequently covered with plaster. It is the pit that sets the character of the ground building. This is usually small wooden house, created from improvised materials. It can be in the form of a hut, a miniature house and even a tower.
According to this country toilet project, all waste will accumulate in the pit. For its further cleaning you will need a sewer. The main disadvantage of the project is bad smell. That is why it is very important to provide ventilation at the planning stage.
Ventilation can be either natural or forced. In the first case, two holes are made in the design from below and from above. Their purpose is extremely simple - to create air disturbances. Thus, the unpleasant smell will not linger inside for a long time.
Forced ventilation is a simple fan that blows all the bad smells out of the toilet. When installing it, you need to think about a compensation hole through which air will penetrate inside. Its diameter should not be less than the diameter of the fan. All this is written in the project.
Important ! Don't forget the cesspool. It also needs air circulation. For this, it is set ventilation tube.
Powder closet
When creating this project of a country house, a cesspool is not provided. All waste is collected in a tank under the toilet seat. It is best to include two containers in the design different size. In the smaller one, you need to make several different-sized holes and insert it into a large container, on the side of which there will be a round exit. A drain hose is connected to it.
Through the hose, the liquid goes into the ground or drainage system. The main role in this country toilet project is played by the container for the filler. Peat is most often used as a mixture. The filler helps to contain unpleasant smells. As soon as the tank is full, it should be taken out to the compost heap.
When you make a drawing, it is important to take into account the convenience of extracting the container. There are two possible solutions to this problem. In the first of these, the tank is removed when the seat is raised. In the second, a small door is cut out at the back of the building. It allows you to easily remove the filled container.
dry closet
You don't even need to build anything here. In fact, you are buying finished project country toilet. All you need is to install the product in a convenient place. In this case, you can purchase both a finished design and a whole booth.
Advice ! The finished structure is easy to install even in the house. All you need to do is take care of the drainage.
Shower and toilet under one roof
Now projects of a country toilet combined with a shower are very popular. This is especially beneficial from a financial point of view. In addition, such a project allows you to significantly save free space on the site.
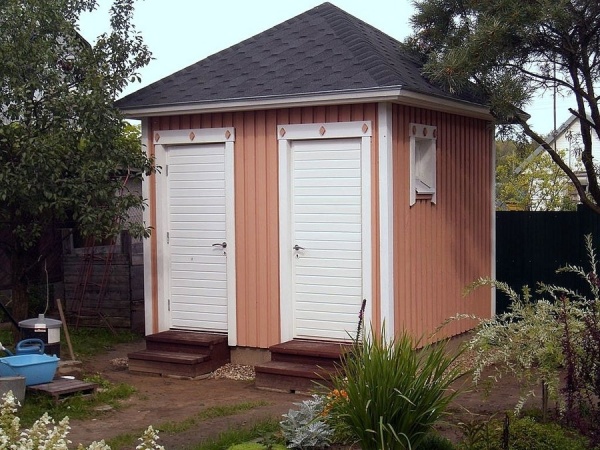
In the project, a toilet with a shower will have one common wall. The result is savings building materials. At the same time, the bathroom can work both on the basis of a tank with a mixture, and on the basis of a cesspool.
How a drawing is created
The main task of the drawing when creating a project for a country toilet is to detail the design. The size, shape and type of building are clearly indicated on the paper. At the same time, there are a number of standards that must be observed.

Firstly, the distance of the country toilet for the place of water supply cannot be less than 30 meters. This must be specified in the project. Secondly, a residential or commercial building should not be closer than 15 meters. Of course, there are exceptions in the form of the same septic tank with a biological treatment system.
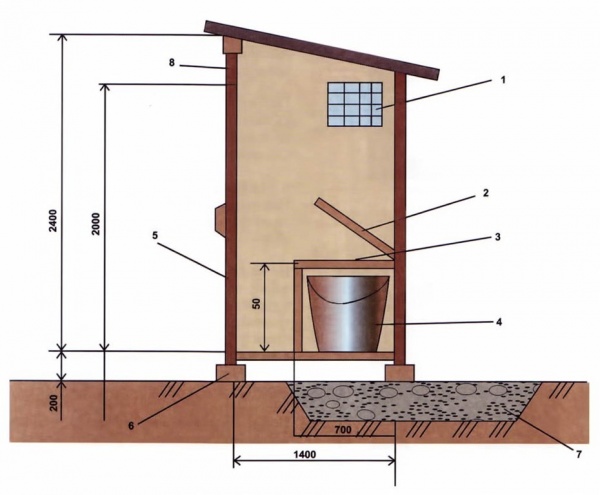
Dimensions are of particular importance in the drawing. You are free to ask them yourself. But there are certain standards that allow you to create a beautiful and comfortable building with a high guarantee.
The height of the future dacha building should not exceed two and a half meters. In this case, the minimum indicator is at the level of 2 meters. The length of the building is from 1.2 to 1.8 m. The width is in the range from 1 to 1.2 m.
Many novice builders do not attach sufficient importance to the parameters of the cesspool. It is unacceptable. After all, it must also be included in the drawings. The estimated depth is 1.5-2 m, the diameter is from 2 to 2.5 m. If the groundwater is close to the surface, then the pit will have to be abandoned.
Projects of superstructures for a country toilet
When choosing a suitable country toilet project special meaning has a choice of material. It is he who sets the parameters of the future building to the greatest extent. There are several typical options, which will be discussed further.
Brick toilet
The advantages of this material can be listed indefinitely. It is resistant to atmospheric influences, retains heat and cool equally well, and is environmentally friendly. Moreover, it allows you to give the structure any shape.
The basis of this project is the foundation. Without it, the creation of a country toilet made of bricks is simply impossible. Separately, it is necessary to mention the quality of the masonry. This is the real art of laying bricks for centuries. From above, the structure is covered with a roof, a material for which, in most cases, slate serves.

In the picture you see an example of a related project. In one design, a toilet and a shower are combined. This is not only practical, but also allows you to save a lot on the cost of building materials.
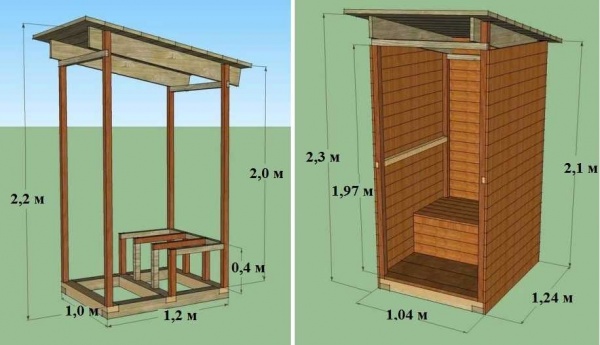
wooden toilet
The project of a wooden country toilet is a classic. Its construction takes a minimum of time, but in order for the structure to serve you faithfully, it is necessary to strictly follow the plan in the process of work.

The picture shows one of the most popular options among summer residents - a teremok. As you can see, it has a small internal space and small dimensions. This allows you to install it anywhere. Also worth noting is the aesthetic appearance.
metal toilet
This version of the project will appeal to those who want to save time and money. When building, you can use sheets of metal left over from building a house. The only thing you need to take care of is the inner lining. Of course, you can do without it, but in winter it will be very problematic to be in such a structure.
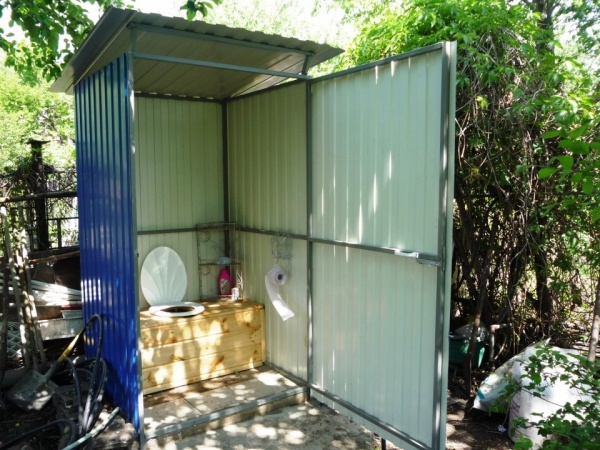
The main advantage of the project is the absence of the need for any knowledge. Almost anyone can build such a country toilet. This is the most cost effective option imaginable. The only thing you need to pay attention to is the toilet seat. It is best made of wood so that it is comfortable to sit on.
Types of wooden cabins
It is wooden cabins that are most popular among summer residents. This is explained quite simply. The beam is inexpensive, but provides good thermal insulation and has a pleasing appearance. During construction, the following projects are most often used:

Results
As you can see, there are many different projects for country toilets. During construction, you yourself choose the material, type of construction and internal organization. Any of the above options has its own advantages and disadvantages. Therefore, it is very important to weigh all the pros and cons of each project and make a choice in favor of the optimal one.
August 2, 2016Specialization: professional in the field of construction and repair ( full cycle holding finishing works, both internal and external, from sewerage to electrical and finishing work), installation of window structures. Hobbies: see column "SPECIALIZATION AND SKILLS"
A warm toilet and sewerage in a village house is the dream of every summer resident. And this is quite understandable: if a person at least once in the rain ran out into a wooden structure standing near the fence, then he will definitely appreciate the benefits of the bathroom located in the house itself.
In principle, the arrangement of the toilet is not one of the most complex tasks. After reviewing the specialized literature and developing suitable project, it is quite possible to implement it with your own hands. Of course, you will have to work hard, but in one season you will definitely cope.
Circuit diagrams: 2 options
At one time, thinking about how to build warm toilet in a private house, I analyzed several projects of such structures. By and large, they all came down to the implementation of one of two options:

In terms of comfort - not the best solution
- We make a classic bathroom with water supply, toilet bowl and removal Wastewater through the pipeline to the drive - a cesspool or. A variation of this option is to connect the sewer circuit to a centralized sewerage system, but in the private sector, where my house was located, there was no such blessing of civilization.

- We equip a separate room in which we install a dry closet. In principle, for the operation of such a system, there is no need to lay a water pipe: it is enough to install a small washstand for hygiene procedures, and collect drains (there will be very few of them) in a container and pour them into a cesspool on the street.
By and large, the choice between these two options depends on the availability of water supply: if there is a water supply system, or we plan to do it, then we lay in the project a scheme with a toilet bowl and a drain through the sewer pipe. But for a small country house in which we do not spend much time, a dry closet would be a perfectly acceptable solution.

Since in my case the water supply was available, I chose the scheme with a septic tank. However, I also analyzed the options with a cesspool and dry closet in sufficient detail, so in the descriptions I will pay attention to the features of their implementation.
Place for drains
Cesspool
Before being done in wooden house a comfortable bathroom, care must be taken that we have where to dispose of drains. There are two solutions here - one is simpler, the second is more convenient to use.
A simple solution is to equip a cesspool - a reservoir in which effluents accumulate until they are pumped out by a sewage plant. Making a cesspool is worth it if country house you use relatively infrequently: the smaller the volume of drains, the less often you will have to pump out, therefore, the financial costs will be less.

A cesspool is made very simply:
- We choose a place in the lowland, at a distance of at least 5 m from the wall of the house and at least 12 - 15 m from the water intake points (well or well).
- We remove the fertile soil layer to a depth of about 0.5 m and an area of about 3-5 m2. The excavated earth can be used in the beds, or it can be returned to its place by covering the cover of the pit with turf.
- We dig a pit up to a depth of 2.5 m and an area of 2-3 m2.
- To avoid soil contamination and ground water faecal matter, seal the bottom of the pit. I would use a 20cm layer of clay laid over three layers of plastic sheeting.

If finances allow, or you want to achieve maximum reliability, then about 10 cm of concrete can be poured over the clay.
- The option with earthen walls is quite viable, but short-lived. To fix the structure, it is better to use a crate of tightly fitted boards (serves up to 10 years). Well, if possible, fold a box of old ceramic bricks: if you believe the experts, then such a pit will definitely serve for 20-25 years.
- From above, the structure is covered either with thick boards or concrete slabs. A hole must be made in the ceiling for a hatch through which pumping will be carried out.

septic tank
The obvious minus of the cesspool is its inevitable overflow. To avoid the need for frequent pumping, I equipped a two-chamber septic tank in my suburban area.

The instructions for making a septic tank may differ depending on its configuration, but since my task was to realize the maximum economical option, I did this:
- At first, at a distance from the house and from the well with installed pump a pit was dug 2.5 m deep, 3 m long and 1.5 m wide. Since the volume of excavated soil was impressive, I had to involve two assistants in the work, otherwise the work would have been delayed.
- Then two adjacent chambers of ceramic bricks were built inside the pit. At the same time, the first chamber was folded "solid", and holes were made in the lower part of the second chamber.
Under no circumstances should you use silicate brick, which does not withstand prolonged contact with a liquid, especially one as aggressive as sewage. alternative ceramic brick can become monolithic concrete chambers, concrete rings for sewer wells and even tires from heavy vehicles.
The ideal option is generally to buy a plastic container for a septic tank, but here a rather high price stopped me.

- The bottom of the first chamber - a sump - was covered with clay with a layer of 15 cm, after which I concreted it for maximum tightness.
- In the bottom of the second chamber - the filtration well - I made about a dozen holes with a depth of 0.5 m using an old auger ice drill to improve drainage. Coarse gravel was poured into the holes, and the same gravel was laid on the bottom with a layer of about half a meter.

- An overflow pipe was installed between the chambers at a height of approximately 1.7 m from the bottom.
- In the sump at a distance of 50 cm from the ground level, I made a hole for a drain pipe.
- From above, the entire structure was blocked concrete slab with holes for two hatches. Separately, I had to drill a groove in concrete to install a pipe 1.5 m high.

The advantage of this solution, despite its complexity, was long time Autonomous operation: effluents, falling into the sump, are divided into fractions, while the clarified liquid is poured into the second chamber, where it is gradually filtered into the ground.
Since I add special bacterial cultures to the septic tank and use country sewerage not so often, then pumping out has to be done every three years. And then, to be honest, for prevention - according to my estimates, the system can work for a couple more years without compromising the quality of cleaning.
Pipe laying for the house
Installation in a private house of sewage in general and a toilet in particular involves the transportation of wastewater to a cesspool / septic tank / collector. To do this, we need to lay an underground pipe:
![]()
- From the house to the tank we dig a trench at least 70 cm deep. The deeper the pipe is located, the less risk that in winter time its contents will freeze.
- We make the bottom of the trench with a slope of about 2.5 - 3 cm per 1 m.
- Under the pipes we lay a bed of sand. Optimal Thickness bedding - 10-15 cm.
- We lay pipes (we use only products for outdoor work) and carefully seal all joints.
In my case, the pipe went in a straight line, but if you need to make a turn or lay a pipeline with a length of 15 m or more, then it is mandatory to equip at least one revision well. I became convinced of the usefulness of such a structure when I had to help in cleaning the sewers in a neighboring area: it is much easier to remove the blockage if there is access to the problematic point of the pipe.
- We insulate the pipes with mineral wool or fiberglass, then fill them with soil and carefully ram it.

- We pass the pipe outlet into the hole that we left in the wall of the cesspool or septic tank.
- At the entrance to the house, we lead the pipe into the hole in the basement and attach it to the internal riser.
Toilet in a country house
Arrangement of the premises
Making a toilet in a wooden house with our own hands, we often encounter constant humidity in the selected room. You can solve the problem if you approach it as responsibly as possible:

- We choose the room itself in such a way that it is located at outer wall at home, as close as possible to the cesspool. So we will save on pipes, and we won’t have to pull communications through the rooms.
- If the bathroom was not originally laid out in the project of the country house, at the first stage we make a partition, separating it from other rooms with a frame wall with plywood or OSB sheathing. To make the toilet really warm, we lay heat-insulating material inside the frame.
- We install a door separating the bathroom with all its sounds and smells from other rooms. To ensure airflow between the lower edge of the door and the threshold, there must be a gap of at least 5 mm.
- We make holes in the walls and in the floor through which we enter the room water pipes and sewer pipe. We fix adapters / taps on the walls to connect the toilet bowl and washstand.

- The floor is either left wooden, covering it with several layers waterproofing compound with an antiseptic, or we veneer with ceramic tiles.

- We also protect walls from moisture by treating them with waterproofing or sheathing. plastic panels. In the second case, one can additional insulation, laying foam plastic under the frame of the skin, mineral wool or foiled polymeric fabric.
- We must do it under the ceiling air vent. You can get by with a simple air vent, but I preferred to install a simple electric fan, and brought its power to a separate switch - this made forced ventilation of the bathroom much more convenient.

Option with toilet
As I noted above, it is best to make an ordinary toilet in a private house with a classic toilet and sink. Installation of equipment in a room with communications connected is a fairly simple task:

- First fix the toilet. To do this, we fix a thick board impregnated with moisture to the floor (wooden or tiled) with anchors. protective composition. We put the base of the toilet bowl on the board and fasten it with the fasteners included in the kit.
- We attach the toilet drain to the outlet of the sewer pipe coming out of the floor or wall using a rubber cuff. To seal this node, we use sanitary silicone.
- We install a tank on the base of the toilet bowl, to which we attach a hose for supplying water from the water supply. Connect the other end of the hose to the faucet at the end of the water pipe.

- We hang the sink on the wall in the chosen place. We attach the drain elbow of the sink to the pipe, which is then brought into the general sewer circuit.
- Either on the sink or on the wall above it, we install a mixer. We fasten hoses with hot (from the boiler) and cold water to the mixer outlets.

The whole system we have created will only work effectively if both the toilet and the sink are above the level of the drain. Otherwise, and also if you plan to use the sewer very actively, I would recommend additionally installing sewer pump, which will ensure the forced removal of drains.
Option with dry closet
Make a comfortable toilet in the country without a cesspool and internal plumbing is also possible. Naturally, this will also have to equip the premises, but the direct disposal of waste will be carried out using biological treatment systems.

To date, there are several types of dry closets suitable for use in private homes:
| Device type | Description |
| compost | Partial waste disposal systems operate either on peat or on a mixture of peat and sawdust. When interacting with fecal masses, the material is effectively composted, and the following portions are poured into the container using an autosampler. Total recycling systems work on a similar principle, but composting is more efficient, and we additionally get a fairly effective fertilizer as a result. |
| Separation | In the waste disposal process, wastewater is separated into a liquid and solid fraction: solid feces are then removed for composting, and the liquid is filtered in a special unit. |
| Thermal | The system requires about 5 kW of power to operate, so you can install a toilet only in houses with a good power supply. During disposal, the waste is burned to ash, and the moisture evaporates through a special condenser. |
| cryogenic | The fecal masses that enter the dry closet are frozen, which allows you to destroy almost all microorganisms and get rid of bad smell. The downside is the dependence of the system on the presence of voltage in the network, therefore, for a private house, I would not recommend such a device. |

Even if we limit ourselves to the simplest models that run on peat, you can provide yourself with a fairly high level of comfort. However, this system is unlikely to be compared with a full-fledged toilet bowl, therefore I would still advise considering the possibility of creating a full-fledged waste disposal system - albeit based on the simplest cesspool.
Reference materials for budgeting
Getting started, you need to draw up an estimate that takes into account all costs. Doing the basic operations with your own hands allows you to significantly optimize the budget, but you still have to buy materials. At this stage, a table containing indicative prices will help you.
Using the information given in it, you will be able to predict at least the order of the amount that you will need.
| Material | Unit/capacity | Estimated cost, rubles |
| Sewer pipe for outdoor work 110 mm | 1 m. | 125 — 200 |
| Sewer pipe for interior work 50 mm | 1 m. | 75 — 150 |
| Metal-plastic water pipe 16 mm | 1 m. | 70 — 120 |
| storage tank for septic tank | 1 m3 | 18000 |
| Septic tank TANK-1 | 1.2 m3 | 19500 — 22000 |
| Impregnation waterproofing for wood | 10 l | 800 — 1500 |
| Penetrating primer with antiseptic | 5 l | 250 — 500 |
| Waterproofing mastic | 5 kg | 1200 — 1700 |
| Tile adhesive CM 9 | 25 kg | 220 — 400 |
| Grout for tiles | 5 kg | 600 – 1200 |
| Tile budget | m2 | 45 — 90 |
| Mid-Range Tiles | m2 | 250 -500 |
| PVC lining for wall cladding | m2 | 150 -250 |
| Wooden beam for the frame | Panel 6 m | 80 — 200 |
| Galvanized steel profile | Panel 3 m | 150 — 350 |
| Sink Rosa Standard | PCS. | 850 — 950 |
| Toilet-compact Santek | PCS. | 3100 — 3500 |
| Dry closet Thetford Porta Potti Qube 145 | PCS. | 4000 — 4500 |
| Dry toilet Biolan (separation) | PCS. | 26500 and above. |
Naturally, only some items of expenditure are taken into account here. To implement the project, you will need a lot more materials, including various mortars, sealants, fasteners, fittings, plumbing fittings, etc.
Conclusion
As practice shows, it is possible to make a warm toilet in a village house with your own hands. Of course, this is not a quick business, and it will require financial investments, but if you follow the advice I have given, and also carefully study the video in this article, then everything should work out.
In addition, questions that arise during the design process can be asked in the comments - I will answer you in the most detailed way.
August 2, 2016If you want to express gratitude, add a clarification or objection, ask the author something - add a comment or say thanks!
Even if the dacha is just a bare piece of land without a single building, you still can’t do without the main thing - the toilet. The need for this uncomplicated building arises after a few hours of stay on suburban area. Despite the fact that we all imagine how a toilet should look like and what needs to be done, it’s still not worth rushing. First of all, you should study the site in order to understand what type of country toilet can be built in a particular case, because there are several of them. Then you need to decide where exactly you can put the toilet, while observing sanitary rules and regulations. And only after that you can proceed directly to the construction. There is nothing complicated in making a country toilet with your own hands. However, it is not necessary to make a toilet box yourself. Modern market can offer ready-made toilet houses for every taste. In this article, we will analyze the instructions on how to make a toilet with your own hands, starting with choosing the type of toilet and ending with making a house.
What kind of toilet in the country can be equipped - types and features
In a well-equipped dacha, where there is a house and you can actually live, it is advisable to have two toilets - one in the house and the second on the street. The toilet in the house is convenient to use at night or in bad weather when it rains. Still, the house is warmer and more comfortable. An outdoor toilet for a summer residence is necessary in order to use it during the day after garden work on the site and not carry dirt from the street into the house.
In total, there are several types of toilets that can be used in the country:
- Outdoor toilet with a cesspool.
- Powder closet.
- Backlash closet.
- Dry closet.
- Chemical toilet.
The choice of toilet is influenced by such an indicator as the level of groundwater. If the water is far away (deeper than 2.5 m) and never rises above this mark, even during the rainy season or spring floods, then any of the proposed toilet options can be used. If the groundwater level is high, the water is close to the surface, then it is impossible to equip a toilet with a cesspool.

Outdoor pit toilet- the good old time-tested design. It is a cesspool up to 1.5 m deep, on top of which there is a toilet house. Impurities in the pit accumulate and gradually decompose. If the intensity of use of such a toilet is high, then the filling of the pit occurs rapidly, the sewage does not have time to ferment. Previously, such a problem was solved simply - they rented a toilet house, dug in an old hole, and dug a new one in another place and put a toilet on top. Now they prefer to clean cesspools either with the help of a sewage machine or manually.

Powder closet- a toilet option for areas where water is close. In its design there is no cesspool at all. Instead, a container (bucket, barrel, box) is used, which is installed immediately under the toilet seat. So that sewage does not remind too much of itself with an unpleasant odor, after each trip to the toilet they are sprinkled with dry peat, sawdust or ash. The process itself resembles powdering, from which the name of this type of toilet "powder-closet" came from. After filling, the container is taken out and emptied in compost pit, heap or other place. Over time, sewage, sprinkled with peat, will turn into a wonderful fertilizer.

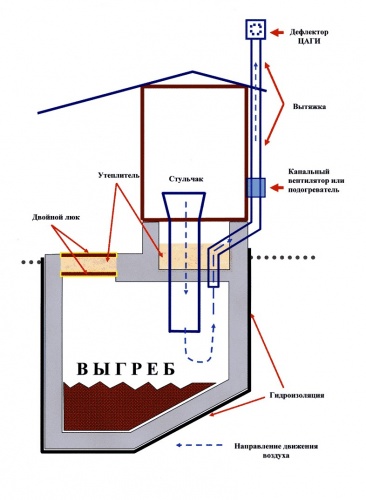
play closet- a toilet with a sealed cesspool, which is cleaned with a cesspool machine. Usually backlash closets are equipped directly in the house next to the outer wall of the house. The cesspool is located outside, sewage enters it through a pipe. The pit itself has a slope away from the house for easy cleaning.
dry closet- a booth familiar to urban residents with a container into which active microorganisms are poured to process sewage. Probably the easiest way to equip a toilet in the country, since you don’t need to build anything - you can buy a ready-made dry closet of any size, both outdoor and home.
chemical toilet differs from a dry closet only by means of sewage processing. Chemical reagents are used here, so the contents of the container after processing cannot be used as fertilizer in the garden, unlike a dry closet.

peat toilet- this is home version closet powder. In fact, the powder closet is also a peat toilet, because in it peat is used to powder feces. The home peat toilet is a modernized achievement of civilization. It is very similar to an ordinary toilet, only in the water tank instead of water there is dry peat, and instead of sewer pipes, a sewage container.

Such a toilet can be safely installed inside the house. To eliminate unpleasant odors, ventilation is provided in its design, which must be taken outside.
The choice of a toilet for a summer residence depends entirely on your personal preferences and on the conditions that dictate the rules of SanPin.
There are certain restrictions on the placement of an outdoor toilet. First of all, they concern those toilets in which sewage can come into contact with soil and groundwater.
- There must be at least 25 m from the toilet to the water source. Whether it is a well, well, lake, stream or other water body. If the summer cottage is located under a certain slope, then the toilet must be installed below the source of water intake. This will prevent effluents from entering drinking water.
Important! Please note that you should consider not only your source of water, but also the nearest neighbors.
- From the toilet to the house and the cellar or basement there should be at least 12 m.
- From summer shower or baths, saunas at least 8 m.
- The distance from the building for keeping animals to the toilet should be 4 m.
- From tree trunks - 4 m, from shrubs - 1 m.
- From the fence to the toilet should be at least 1 m.
- Also, the wind rose must be taken into account when choosing the place and location of the outdoor toilet, so as not to annoy either yourself or your neighbors with unpleasant amber.
- The door to the toilet should not open towards the neighbors.
- If groundwater is below 2.5 m, then you can equip any outdoor toilet. If it is higher than 2.5 m, then a toilet with a cesspool cannot be made, only a powder closet or backlash closet, and dry closets can also be installed. Such structures are safe in the sense that sewage cannot enter the groundwater and pollute them.
Please note that when choosing a place for a toilet, you need to focus on objects not only on your site, but also on the neighbor's. This applies to trees, and sheds, and houses, and everything else. For toilets of the powder-closet and backlash-closet types, the above restrictions do not apply, since sewage does not come into contact with the ground in them. The only thing that will have to be considered when placing them is the wind rose and ease of use.
Do-it-yourself toilet in the country - instructions for building a powder closet
It’s not so difficult to equip a country toilet with your own hands, it’s enough to have basic carpentry skills, engineering thinking and stock up on the help of a friend. Let's consider an example of building a toilet in a country house like a powder closet. As we already wrote, its peculiarity is that there is no cesspool under the toilet. And this makes the task much easier. Firstly, such a toilet can be located next to a residential building. Secondly, the construction technology itself is somewhat easier; you don’t have to dig a foundation pit. Thirdly, groundwater pollution is excluded.
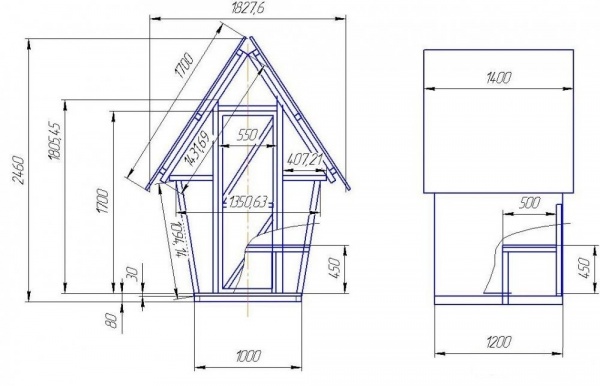
The construction of the toilet must begin with a drawing so that all elements and details have the appropriate dimensions, and not by eye. Due to the fact that there is no cesspool in the powder closet, only the design of the toilet house will be shown in the drawing.
Schematically powder closet can be represented as follows:

The dimensions of the toilet are selected so that it is convenient to use. For example, the most common size: width 1.5 m, depth 1 m, height 2.2 m. Dimensions can be increased if the dimensions of the owners require it. The material for making a toilet can be different: the most common are wooden toilets, but you can sheathe the walls with a metal profile, slate or other material, as well as build brick walls.
Country wooden toilet - sectional drawing.
Example 1.


Example 2.

You can use the ready-made drawing, or you can make your own. The main thing is compliance with the dimensions during construction.
Foundation and support for the toilet

country toilet is a structure that does not require a heavy foundation. In some sources you may come across a suggestion to pour under the toilet strip foundation. In fact, this is superfluous, especially if the toilet is wooden. A support for a toilet house can be made in two ways: the first is to bury the pillars, the second to lay bricks around the perimeter or concrete blocks.
As pillars-supports, you can use both a wooden beam or a log, and concrete columns. The latter are more resistant to aggressive environments and will last longer.
- First of all, we mark the area. It is extremely important to accurately determine the angles of the structure.
- We take 4 asbestos-cement pipes with a diameter of 150 mm and coat them outside with bituminous mastic.
- In the corners of the toilet house, we dig wells and bury the pipes to a depth of 50 - 70 cm. The depth of the pipes may be more, it depends on the structure of the soil. Can be made 90cm or 1m.
- To a height of 1/3 of the pipe they must be poured concrete mortar. Carefully compact the concrete to remove air bubbles.
- Inside the pipes we insert wooden or concrete pillars-supports. To fix them, add concrete mortar.
Support pillars in this case can perform and vertical part frame, i.e. they must be driven to a height of 2.3 m from the ground. It is also necessary to constantly check that the location of the pillars is even relative to the corners.
There are cases when it is enough to fix concrete blocks or bricks as a support, on which the frame will then be installed. In this case, you must remove upper layer soil to a depth of 20 - 30 cm and compact the base tightly. For greater reliability, a layer of sand can be covered at the bottom. Concrete blocks, bricks or concrete curbs are installed on top.
We make the frame of an outdoor toilet

The frame of a country toilet can be made from a wooden bar 50x50 mm or 80x80 mm. It is not necessary to take a thicker and more massive timber 100x100 mm and more. You can also use metal corners.

The frame should be a structure:
- 4th bearing vertical supports.
- Toilet roof lining. The longitudinal bars for the roof should protrude 30 - 40 cm beyond the toilet body. In front, the canopy will serve as a visor, and in the back - to drain rainwater away from the toilet.
- Strapping or screed at the level of the future toilet seat. Usually, the strapping bars of the toilet seat are attached to the bearing vertical supports. The height of the toilet seat should be comfortable - 40 cm from the floor of the toilet.
- Diagonal struts for structural strength on the rear and side walls of the toilet.
- Frame for fastening the door. Two vertical supports to a height of up to 1.9 m and a horizontal lintel on top at the same height.
Be sure to calculate the height of the toilet seat, as too high a seat will be uncomfortable, especially if there are short people among the owners. Indicate at what level the final floor in the toilet will be, and set aside 38 - 40 cm from it upwards. Please note that on top of the strapping there will be a sheathing 20 - 25 mm thick.
We sheathe the body of the toilet, make the roof
Further construction of the country toilet is to sheathe the frame. Since wooden toilets are always popular due to their original beauty, convenience and comfort, then the walls of the country toilet can be sheathed wooden planks.

Wooden boards 15 - 25 mm thick are nailed to the frame, tightly fitting them to each other. Boards must be placed vertically. Since the roof will be located with a slope towards the rear wall, then upper part boards will have to be carefully cut at an angle.
Instead of wood, you can use sheets of corrugated board, slate or other material. They are much easier to work with, as you only need three sheets for the back and two side walls. But in such a toilet it is much less comfortable to be than in a wooden one. And all because there is no natural moisture and air exchange through the walls.
On the back wall of the toilet, it is necessary to make a door through which it will be possible to remove the container with sewage. Usually it is made over the entire width of the back wall to a height of 40 cm (up to the height of the toilet seat). Such a door is fixed on hinges. You can make it from the same wooden boards.
The roof of a country toilet is usually covered with the same material as all the buildings on the site so that the buildings do not stand out from the composition. You can use sheets of corrugated board or metal tiles. A hole must be made in the roof for the ventilation pipe, which should then be carefully sealed.
If you want to make the roof of the toilet wooden, then it must be covered with roofing felt or other roll material so that the tree does not get wet.
We hang the door
The door for a country toilet is usually made of wood. We hang the door on hinges. The number of hinges 2 or 3 depends on the severity and massiveness of the door. The heavier the door, the more hinges should be. The mechanism for closing the door to the toilet, everyone does as he likes: a latch, a hook, a latch or a wooden latch. A latch must also be installed inside the toilet.
A window should be made above the door through which natural light can penetrate. Usually it is made as close to the roof as possible so that water does not get inside during rain. The window can be glazed, then neither rain nor insects that often fly through such windows will be terrible. What a country wooden toilet looks like can be seen in the photo.
Country toilet: photos - examples


We equip the toilet seat
The seat or toilet seat in the country toilet is made of wooden boards, lining or moisture-resistant plywood. It is better to use pure wood without additives, so we exclude plywood. The frame of the future toilet seat was made at the stage of arranging the frame, so now it is enough to carefully sheathe it with wooden boards and paint it. In the middle we cut a hole through which we will relieve ourselves. Be sure to check at what depth from the beginning of the toilet seat a hole should be made so that it is convenient to use it.

Under the toilet seat we install a container for sewage with a volume of 20 to 40 liters. By the way, the toilet seat cover can be made reclining on hinges, or it can be stationary.
We hang a container for peat on the wall in a convenient place. Below we put a bucket for toilet paper. A washbasin can be installed inside the toilet, if the dimensions of the building allow it. Then we install a bucket for slops under the washbasin.
How to build a toilet in a country house with a cesspool

The construction of a pit latrine is somewhat more complicated, as a waste pit will have to be equipped. The toilet house for this type of toilet is no different, so we will not touch it. We will only indicate how to make communications. The diagram shows how the cesspool should be located relative to the toilet house. Based on this, we carry out the marking of the site and proceed to earthworks.

- We dig a cesspool with a slope towards the rear wall of the toilet with a depth of 1.5 m.
- We tamp the bottom and walls of the pit with clay with a layer of 15 - 25 cm. Some people make the walls of the pit from wood, brick or concrete instead of clay. If the groundwater is at a sufficient depth, then it is not necessary to make the walls of the cesspool completely airtight. Enough clay castle.
- We knock down the base for the toilet from a wooden bar 100x100 mm. You can also use a sidewalk curb or concrete blocks, laying them on the ground. If you use a wooden beam, then it must be treated with an antiseptic.
- Above the cesspool we equip the flooring from the boards. First, we knock down the frame of the bars. We make such a distance between them that it is convenient to clean the pit. Please note that the flooring is done outside the toilet house, there is free space under the house of sufficient size for sewage to fall into the pit.
- The flooring must be upholstered from below with roofing material or other rolled material.
- Behind the toilet we install a hatch, which is a hinged lid. The hatch will be used when clearing the pit. wooden hatch treated with an antiseptic.
- We lay the ventilation pipe from the pit. We install it next to the back wall of the toilet, display it 70 - 100 cm above the roof of the toilet. For these purposes, you can use a regular sewer pipe. We fix a visor on top of the pipe so that water and debris do not get inside. We fix the pipe to the back wall with clamps. The bottom edge of the ventilation pipe should be 15 - 20 cm below the level of the toilet floor.
- A toilet house is installed on top.
- Around the toilet with a cesspool, it is imperative to make a blind area and drain rainwater so that it does not flood the sewage pit.
If in the future it is planned to clean the cesspool with the help of a sewage truck, then the toilet must be located on the site so that the car can drive up to a sufficient distance. Remember, the sleeve of such a machine is only 7 m.
Country toilet backlash-closet and its features

Most often, a country toilet of the backlash-closet type is installed next to a residential building or inside the house. The sewer pit is located outside the building, behind its walls. A toilet of this type can only be built where it is possible to heat sewer in winter period. If they don’t use the toilet in winter, then before the end of the season, the cesspool must be completely cleaned.
The main difference between the backlash closet and other types of toilets is that the cesspool in it is completely sealed and is regularly cleaned using a cesspool machine. Here are a few differences in the construction of a backlash closet:
- A sealed pit so that sewage does not soak into the ground. You can fill a pit of concrete, make it out of brick and plaster, or you can use ready-made plastic containers- caissons.
- There must be a ventilation pipe from the cesspool. It must be carried out through the chimney of the stove or fireplace. In turn, a pipe should go from the chimney into the pit, through which warm air. This is necessary so that the pit does not freeze. The material of the exhaust pipe is asbestos-cement or ceramic.
- If the house does not have a conventional stove or fireplace, but only gas heating, then the cesspool must be heated using a low-power electric heater.
- A cover / hatch is made over the pit. To prevent the lid from freezing, it is made double: the upper one is metal or cast iron, and the lower one is wooden. Between the covers we lay heat-insulating material.
- The slope of the pit should be away from the house for easy cleaning.
AT recent times peat toilets for summer cottages are becoming increasingly popular. Their convenience is that they can be safely placed in the house in any room. Peat toilets are easy to clean, practically do not emit a smell, even a fragile woman or woman can cope with them. old man. Also, such toilets can be made on the street, the same powder-closet is just the predecessor of the modern peat toilet.
Having got used to city comfort, we try to make our country life comfortable. Agree, what kind of convenience can we talk about if there is no restroom on the territory? The organization of a latrine must be taken care of even at the initial stage of arranging your own land plot.
Having step-by-step construction instructions, building a toilet in the country with your own hands is not so difficult, it is more difficult to choose a place for it and a model that suits you best. But we will help you do it.
We will introduce the rules of arrangement and typical types of country toilets. In the article you will find step-by-step instructions with drawings that will help you build a full-fledged bathroom on the site. And to help the novice master, a video is attached to the article, clearly demonstrating the process of building a closet on the site.
The toilet is not simple outbuilding. When constructing it, you need to remember some rules, the observance of which will help you not to spoil relations with your neighbors in the country and eliminate possible problems during the subsequent operation of the latrine.
Based on the rules listed below, we will choose appropriate place for the future building.
It is important that the country toilet is located as far as possible from the water intake point, and if The groundwater approach the surface of the earth closer than 2.5 meters, a latrine with a cesspool cannot be installed at all
The list of requirements for the remoteness of the toilet from other objects located on the site:
- 12 meters- to the house, as well as a barn or garage, in which there are underground structures such as a basement or cellar;
- 25-30 meters- to the source of water intake for drinking;
- 8 meters- to a bathhouse and a barn or garage without basement structures;
- 1 meter- to the fence.
Of course, all areas have individual characteristics which must also be taken into account. If the territory has a difficult terrain, then for the restroom you need to choose a flat area below the source drinking water. It is important that feces do not come into contact with groundwater.
If sewage needs to be periodically pumped out, it should be possible to drive a sewage truck to the place of work. Of course, you should take into account the wind rose of your area so that spicy smells do not annoy either you or others.
All these rules are easy to remember, because they are dictated by common sense. It is this approach that should be followed when choosing a structure that you will build on your own site.
Types of country toilets
The main feature that is used to classify outdoor toilets is the way the accumulated waste is disposed of. All the rest, including the construction material, are secondary.
Do-it-yourself country toilets are divided into two large categories: those that have in their design and those that do not have it.

Of course, the types of cabins mentioned below are far from a complete list, because there is also a fantasy, the flight of which cannot be limited. For example, here is a cabin-carriage in which a dry closet and a washbasin are installed.
Cabins for latrines can be bought at ready-made or do it yourself.
They are divided into several types:
- house;
- hut;
- hut;
- birdhouse.
They differ from each other in appearance, size, etc. Usually summer residents choose a booth that best suits their aesthetic perception.
Image Gallery
The construction of such a toilet, as a rule, does not cause any difficulties. In fact, the sewer complex in this case is represented by a booth and a deep pit. It is in it that the waste of the life of the inhabitants of the cottage comes. There they accumulate, evaporating or partially soaking into the ground.

When it comes to a toilet with a pit, the imagination immediately draws a building with a hole that you have to aim at, but after all, everything can be conceived and made much more modern and neat
Of course, to maintain the cesspool, it is still better to involve a sewage machine, with the help of which waste is removed and disposed of. The size of the pit, the number of users and the intensity of use of the latrine are factors that affect the frequency of calling vacuum trucks.
Sometimes the problem is not solved the best way: they simply fill up the cesspool, digging a new one nearby. This can only be done if the pit was shallow, and the groundwater is located no closer than 2.5 meters from the surface. As a rule, a fast-growing tree is planted over a filled container.
As for the part of the restroom that is located above the ground, a variety of materials can be used for its construction:
- traditional wood;
- metallic profile;
- slate;
- bricks, etc.
The durability of any of these structures depends on the strength of the frame, and ease of use - on thermal insulation and ventilation quality.
Option 1. Budget building made of wood
The obvious advantages of using wood for the construction of a latrine are the relative cheapness of this material and the simplicity of the work performed. The plank frame is quite simple to build. You don't need any special skills to do this job.

A brand new wooden latrine looks very elegant, especially if it is impregnated with a special protective compound for wood and varnished
In addition, the structure made of wood is lightweight, and hence mobility. If there is a need for a new cesspool, the above-ground structure does not have to be disassembled and reassembled in a new location. You can just move it gently.
There is one more obvious advantage wooden toilet. If you use fantasy, then this building can become a real decoration of a summer cottage. It can be stylized as a fabulous house or teremok.
However, along with the advantages, wood has a whole list of disadvantages:
- drying out, cracking and deformation under the influence of direct sunlight;
- burnout from ultraviolet radiation;
- deformation of the frame, mold and fungi - the result of the influence of high humidity.
We should not forget about wear and tear - the effect of time.

If this building is not looked after, then in just a few years it can turn into a wretched wreck from horror films.
Yes, the building located on outdoors, needs protection. To this end, the boards are treated with a primer, after which a special exterior paint or varnish is applied to their surface, which beautifully shows the specifics of the wood.
Option #2. Steel profile construction
There are several options for creating a simple and functional design from a metal profile, which differ from each other in the material used to manufacture the frame of the structure. In the first case, the frame will be wooden, and in the second - metal.
Metal carcass can be welded, for example, from a corner. But, of course, to solve this problem, you will need a welding machine and skills in its operation.
On the next step work, the base with the help of self-tapping screws or rivets is sheathed with a metal profile. When using self-tapping screws, protective washers should be used to prevent moisture from entering the attachment point.
Washers will protect structures from corrosion, and it will last longer. Protective properties are also possessed by a special coating applied to the sheets of the metal profile even in the process of its production.
It is better to place a metal profile structure in a shaded place, because in the heat the metal is very hot. Reduce the negative effects of overheating inner space foam sheets, which are used for the interior lining of the restroom, will help.
Option #3.Major brick bathroom
A brick building is indeed a capital structure. On the one hand, this is good: she is less exposed to negative external factors and will last a long time. But a capital structure, especially if it is, cannot be moved from place to place.
Therefore, it is necessary to think in advance and well not only the location of the toilet itself, but also the method of cleaning the pit under it.

The brick toilet looks monumental: pay attention to it concrete base. It cannot be moved, but it does not matter, because the choice of a place for it must have been well thought out.
It is advantageous to build such a structure in the case when the brick remains after the construction of the main cottage or garage. This, by the way, will give unity to the entire complex of buildings.
Please note that between the above-ground structure with and the underground parts of the structure there should be concrete floor. The total cost of such a toilet will be decent.
Toilets without a pit
If rocky soils lie close to the surface in your area or there is a high level of groundwater, then you cannot dig a hole. How to make a toilet in such a country house? The way out of this situation is the construction of a structure that functions in accordance with other principles.
These restrooms include:
- bio or chemical toilet;
- powder closet;
- play closet.
Each of these restrooms has its own design features that are worth talking about.
No. 1. Hygienic backlash closet
The German word "luft" means air. Backlash closets got their name because they have separate ventilation for the bathroom and cesspool. In this design, a pit dug in the ground is replaced by a sealed container.
Moreover, this storage tank for waste may be located outside the bathroom itself. As a rule, it is placed at the back wall of the main heated structure with a toilet.

In this particular case connecting pipe between the toilet seat and the tank is installed vertically so that waste products can fall into a sealed storage tank by gravity
The storage tank and the toilet are connected by a pipe. If the toilet is located above the room with the tank, then the pipe is installed vertically.
For the tank located behind the wall, an inclined pipe is intended. Sewage must enter the drive under the influence of gravity - by gravity.
To maintain the backlash closet, you need to contact the vacuum trucks, which will periodically empty the drive. To facilitate their work, the sewage tank is given an elongated shape. Of course, this version of the toilet is more hygienic than those considered earlier.
Difficulties in the operation of the backlash closet arise in the cold season, when the drive has to be heated in order to clean it.
No. 2. Waste-free powder closet (peat toilet)
A distinctive feature of the powder closet is a small capacity, only 20 liters, which is placed directly under the toilet seat.
This type of restroom is considered the most effective in cases where the groundwater level at the location of the cottage is close to the surface and because of this excavation limited.
The first building that is being built at their summer cottage is a toilet. The toilet in the country differs from the city bathroom in the absence of a sewerage system. Therefore, the construction of a toilet in the country is not only the construction of a cabin, but also the organization of a place for the collection and disposal of waste. There are several possible options for arranging a toilet in the country about them and how to build a toilet in the country with your own hands will be described in detail in this material.
Outdoor toilet for a summer residence
Most dachas are used only in the warm season, so the summer or outdoor toilet for dachas is the most popular. This design is simple and well-tested by time. You can build a summer toilet in the country with your own hands from available materials, which is certainly a great advantage.

Fig.1.

Fig.2.

Fig.3.
An outdoor toilet for a summer residence consists of a toilet cubicle and a pit for collecting waste under it. The toilet cubicle in the country can be made of any materials. The pit for the toilet in the country can be made of any size. The depth of the toilet pit depends on the number of users.

Fig.4.

Fig.5.

Fig.6.
However, a cesspool for a toilet in a country house will only work well if the groundwater level is low. If the groundwater level is high, then the cesspool will constantly be heated, and it will overflow all the time. In this case, this type of toilet will have to be abandoned, or a waterproofed container will have to be used instead of the pit. However, then it is necessary to call a sewer at least once a year.

Fig.7.

Fig.8.

Fig.9.
Do-it-yourself wooden toilet for a summer residence
The construction of a toilet in a street-type cottage can be divided into three stages, preparing a waste collection pit, laying the foundation and making a toilet cabin. During construction, it is important to remember that the toilet will serve for a very long time only if the installation of the toilet in the country is done correctly.

Fig.10.

Fig.11.
Cesspool for a toilet in the country
A toilet pit in the country is made with reinforced walls. If you do not strengthen the pit under the toilet in the country, then in a short period of time it will quickly collapse. To strengthen the walls of the pit, it is convenient to use a toilet tank from a two hundred liter barrel.

Fig.12.
If there is danger high level groundwater, it is necessary to use a plastic sealed tank. The barrel is dug into the ground in the place of the cesspool. As the toilet is used, it will have to be cleaned. To facilitate this matter and at the same time not to think about where to put the contents, during the operation of the toilet, it is necessary to add a special composition to it. This composition can be purchased at any country store. It includes bacteria that will process all the waste, after which they can be used as fertilizer.

Fig.13.
If there is no groundwater, then it is good to use metal barrel. Holes are made in it so that the liquid phase of the waste goes into the ground. The barrel is filled not with soil, but with gravel. Thus, a drainage for the liquid fraction is obtained. A cesspool for a toilet in the country, built according to this principle, can work for more than 10 years and does not require cleaning.

Fig.14.

Fig.15.

Fig.16.
How to make a foundation for a toilet in the country
By and large, such a structure as a wooden toilet does not require a special foundation. However, in order for the building to serve for a long time, the foundation for the toilet in the country is still needed. In addition, if the booth is raised above the ground by at least 10 cm, then the ventilation of the toilet in the country will be ensured in this way.

Fig.17.

Fig.18.
The easiest option for a foundation for an outdoor toilet is to dig holes in the corners of the toilet with a depth of 20 - 30 cm, fill them with sand, and put blocks or blocks on the sand. curbstone. It will be just as easy to install pile foundation, for this you can purchase four screw piles 1 m long.

Fig.19.

Fig.20.

Fig.21.
Drawings of a wooden toilet for a summer residence
The toilet cabin for a summer residence may have a different appearance, but in design it is always the same type. It is made from wooden beams on frame technology. First, a frame is assembled from bars, and then sheathed with clapboard or any other material.

Fig.22.

Fig.23.

Fig.24.
A timber 60x80, 80x80 or 100x100 mm is well suited for the frame. You can use a beam of a smaller section, but then you need to put several diagonal jumpers for the stability of the structure.

Fig.25.

Fig.26.
A frame toilet for a summer residence begins to be built from the assembly of the base from 4 bars 1.5 m long. Next, vertical racks are installed. Be sure to install racks for the door. The distance between the posts should be equal to the width of the door with the frame. As rafters, you can use a board 40x120 mm. A board 20-25 mm thick is laid on top of the rafters, a profiled sheet is laid on top of it.

Fig.27.

Fig.28.
How to make a hood in the toilet in the country
For a summer toilet, it is important to provide a window above the door, this will be the ventilation of the toilet and the source of lighting. Do not glaze this window otherwise the toilet will be hot and smelly.

Fig.29.

Fig.30.
How to sheathe a toilet for a summer residence outside
Outside, to protect against rain, the frame of the toilet cubicle can be sheathed with any material, for example, profiled sheeting or siding. However, the most popular material is lining or block house. For the roof of the toilet, any roofing material is used, for example, profiled sheet.

Fig.31.

Fig.33.

Fig.34.
Toilet seat in the country
Can be used as a seat various designs starting with the platform and ending with a hole in the floor. In my opinion, it is most convenient to use a special toilet seat in the country.

Fig.35.

Fig.36.

Fig.37.
Odorless cottage toilet
There are several options for organizing a toilet for an odorless cottage: a dry closet, a peat toilet, a cesspool and a septic tank. All these options differ in cost, complexity of maintenance and labor intensity of construction.
Chemical dry closet in the country
A dry closet is a type of toilet that does not require a sewerage system. Waste products accumulate in a special tank.

Fig.38.
Chemical dry closets are equipped with a tank for waste accumulation and flushing, water and deodorizing liquid are poured into the flushing tank, and a disinfectant-splitting liquid is added to the waste tank. The use of such a toilet is almost the same as the city one.

Fig.39.
The advantage of chemical dry closets is autonomy, and, therefore, it is possible to install them anywhere, including in the house, and not build a special structure.

Fig.40.

Fig.41.
The disadvantage is the need for constant waste disposal. It should be noted that not all chemical liquids allow waste to be discharged into the soil, which means that you will have to have a special place for waste disposal.
Finnish toilet for a summer residence
A peat toilet for a summer residence differs from chemical ones in a simpler design. They do not use chemicals in their work. Structurally, peat toilets are a small tank with a liquid drainage mechanism. To split the waste after each use, it is necessary to pour a little peat into the toilet.

Fig.42.
Fig.48. The septic is autonomous system sewer for home. Due to the complexity of installation and the need for year-round use, they are usually used in country houses. Sewage getting into the septic tank is subject to decomposition. A septic tank does not require regular cleaning.
Given the complexity of installation and the cost of equipment, septic tanks are usually used in year-round country houses.

Fig.49.
We've covered everything possible options cottage toilets. Despite the abundance of options, the septic tank and the traditional outdoor toilet for summer cottages are most widely used. The septic tank is good for its autonomy and the ability to organize a full-fledged sewerage system. Typically, a septic tank is used in country houses and year-round cottages. If the dacha is visited only in summer period, then the easiest option for organizing a toilet is a rustic option. For a village toilet, it is necessary to install a cesspool, the role of which is usually played by a barrel, and build a booth on top. Usually the cabin is built of wood. If you decorate the toilet house well, then in addition to fulfilling its intended purpose, it will also be a wonderful decoration of the site.