Owners of private houses, as a rule, use a cellar for food storage. But due to the lack of windows, the room is deprived of a normal level of air exchange. This leads to increased humidity, the formation of fungus with mold, accelerated spoilage of products, which is very unpleasant, isn't it?
Do you want to prevent such problems, but don't know how? We will show you a solution - after all, properly organized ventilation of the cellar with two pipes will help ensure the flow of air. And you can do it yourself.
The main stages of the work and the rules of arrangement are discussed in detail in our article. The material is complemented by visual photo instructions and provided with detailed video recommendations for organizing optimal climatic conditions in the cellar. Having studied which even a beginner will be able to understand the basics of the device of the ventilation system at home.
The basement, as a rule, is in every private house. Many residents of the private sector equip it with utility rooms, a cellar, arrange saunas, gyms, rest rooms, which requires the arrangement of a complex system.
However, most often the basement is used to store food stocks, which, although they need a certain microclimate, do not require a device. forced exhaust.
In this case, it will be enough to make a natural one.
Lack or insufficient ventilation of the cellar is the main reason for the increase in humidity and the formation of mold.
However, in order to ensure the safety of products and the proper functioning of the cellar, it is necessary to adhere to some rules in the arrangement of this room.
Let's consider them in more detail:
- Eliminate natural light in the basement. There should be no windows in the basement; periodic use of electric lighting is allowed.
- arrange a favorable temperature regime. To do this, the cellar is equipped in such a way that one of its sides is in contact with the outer wall of the house.
- Ensure adequate air circulation in the room provided with ventilation.
- Maintain the required room humidity. The optimal indicator is about 90%. This parameter also depends on ventilation.
- Arrange good waterproofing to prevent groundwater from entering the cellar.
From the above list of requirements for the proper arrangement of the basement, it can be seen that ventilation provides two of the five necessary conditions.
But in order for it to function effectively and create the optimal mode for storing products, you need to follow certain rules for its installation.

The most elementary ventilation system is air vents, which are installed in the basement on opposite sides of the house. They are suitable for small basements with a ceiling height of no more than two meters. So that garbage does not get into the cellar, and rodents do not crawl through, the holes are closed with a grate
Insufficient ventilation of the room leads to an increase in humidity and the formation of mold, excessive ventilation can cause excessive dryness of the basement, which will also adversely affect the safety of the crop.
Therefore, here you need to adhere to the rule of the golden mean, but in order to comply with it, it is important to do correct calculations, which depend on the size and characteristics of the room.
Image gallery
Rules for installing air ducts
To organize a supply and exhaust ventilation system, you will need. To ensure uniform air circulation, pipes of the same diameter are used. To speed up the removal of stagnant air, it is allowed to install an exhaust pipe of a slightly larger cross section.
Air ducts are located at a considerable distance from each other in opposite walls of the room. This creates the most favorable conditions for airing the cellar.
It is desirable that along the route of the pipes, there should be as little as possible, and even better, there should be no sovey, bends and turns.

The exhaust pipe is installed in one of the corners of the basement. Its lower end should be near the ceiling itself (about 1.5 m from the cellar floor) so that all the warm air heading to upper part rooms, fully exposed to the outside.
The air duct passes through all the premises of the house and is displayed on the roof at an elevation of one and a half meters above the ridge.
When air masses pass through the pipe, condensate accumulates, and in winter frost forms inside it. To avoid this, it is necessary to insulate the air duct located on the street.
To do this, a larger pipe is put on top, and any insulation is placed in the resulting space.
The outlet is closed fine mesh. But best of all on the pipe head, around which an artificial vacuum is created, which helps to increase traction.
The supply air duct is located in another corner of the cellar, its open end should rise 40-50 cm above the basement floor. It is necessary that the opening of the supply pipe be one meter below the exhaust pipe. The pipe can be put through the house and make an exit to the roof of the building.
At the same time, it should be taken into account that the intake air inlet on the roof should also be lower than the exhaust one, in this case a large air pressure difference is created at the inlet and outlet, which contributes to increased draft and improves air flow. Therefore, the outer edge of the pipe is raised on the roof no higher than 20-25 cm.
Often, when arranging a basement under a residential building, the supply air duct is led out through the basement ceiling into a hole made in the outer wall of the building.
Outside, a grate is put on the supply pipe, which prevents dust and debris from entering the hole and does not allow rodents to get into the cellar.
Inside the basement, special dampers must be installed in each duct, the opening or closing of which regulates the intensity of air inflow and outflow.

The supply pipe can be removed from the basement by installing it outside the house. In this case, the duct opening is raised above the ground by about 80 cm
Installation of a natural ventilation system
It is desirable to design and install the ventilation system at the stage of building a house. During this period, all work is much easier to carry out than to mount the air duct in a finished box.
However, this is not always possible, often the air duct is installed in an already finished structure.

If ventilation is laid during the construction of the cellar, a recess is made in the ground for laying the exhaust duct. AT brickwork leaving a hole for the pipe
If the installation of ventilation is carried out in a separate cellar, then a hole is made in its ceiling, where the exhaust pipe is led out. It is strengthened inside and outside the premises in accordance with the recommendations given above.
When arranging the ventilation of a cellar located under a residential building, the exhaust duct must be installed in the place where the general house ventilation duct goes to the roof of the building.
FROM opposite side basement in the ceiling or in the upper part of the wall, a hole is made to install the supply pipe. In a separate cellar, the pipe is brought to the roof below the level of the exhaust duct.
In the cellar under the residential building, the outlet is made to the outer wall of the building. Inside the basement, the pipe is lowered to a distance of 30-50 cm from the floor.

The exhaust duct of the basement located under the house, as a rule, is built into a common air duct, and the supply pipe is led out into the side wall
After installing the supply and exhaust air ducts, it is necessary to close their outer openings, and install dampers inside the pipes. Condensation can accumulate in the outlet channel even when insulated in severe frosts, so it is recommended to install a tap to drain the water at the bottom of the pipe.
To check the operation of the ventilation system, thin paper should be attached to the inlet. If the air duct is working properly, the leaf will flutter.
Photo guide for chimney installation
Consider a practical option for enhancing cellar ventilation by installing a high exhaust pipe.
According to the calculations made earlier, such a solution will increase the hood, in addition, it will allow you to get out of the zone of wind backwater created by neighboring buildings and trees. As planned, the pipe is installed on the ventilation duct:
Image gallery
Ventilation of the basement or cellar is an important component of the competent operation of the premises. Without an air exchange system, dampness actively spreads, excess moisture forms. Cellars and basements store not only conservation, but also stocks of vegetables and fruits, which tend to "breathe". The lack of inflow of fresh air and outflow of moist invariably leads to the accumulation of condensate.
During the construction of the basement and foundation, mistakes are often made in terms of the construction of the waterproofing layer. In this case, the walls can accumulate dampness from the outside space in their structure, absorb it from the soil. To level all the listed omissions and undesirable manifestations is quite simple - to organize effective ventilation of the cellar or basement of an apartment building, for example.
- Strict temperature regime. It is customary to equip the cellar in such a way that the room is in contact with outer wall residential building.
- No light source. This condition is mandatory. It is allowed to turn on the lighting for a short period.
- supply of pure oxygen. The condition is easy to implement if the ventilation in the basement functions efficiently and copes with the removal of dirty air.
- Humidity regime. The humidity level in the cellar should not fall below 90%.
- The air exchange system for the basement is laid at the construction stage of the facility itself. This approach simplifies the supply of channels to the walls, where elements of the ventilation system will subsequently be placed. The location of the pipes should be indicated in the project documentation.
- Pipes for supplying and exhausting air must be of the same diameter, which will ensure uniform circulation of oxygen around the perimeter of the room. If we are talking about a ready-made basement, where it is necessary to quickly get rid of damp air, it is allowed to use an exhaust pipe of a slightly larger diameter. Reverse order impossible, because there is a high risk of oxygen retention, gas contamination of the cellar.
- It is customary to place the pipes of the ventilation system in opposite corners of the room. It takes some time for a fresh stream to pass through the entire room and then exit to the street.
- An air duct hole is made under the ceiling, as warm masses rush up, which in turn provides the room with constantly pure oxygen.
- Experts strongly recommend installing a chimney 1.6 m above the ridge of the cellar, which is necessary to generate sufficient traction. As for the pipes themselves, the most suitable option is sewer plastic solutions.
- If the object is placed under a garage or residential building, the total number of turns of the duct system is kept to a minimum. Perfect option- an absolutely even and straight pipe of the same diameter along the entire length.
- From the side of the street, the base of the supply pipe is located slightly above ground level. The outlet channel must be covered with a protective grill so that small debris, birds and animals do not get into the system.
- Pipes installed in a strictly vertical position require protection from precipitation. The easiest way is a metal umbrella, but more complex, but much more functional -
- The level of humidity in the room decreases due to regular ventilation. In summer, it makes sense to open dampers, hatches, etc. Due to the temperature difference in the cellar, ventilation will be provided.
- To increase humidity, the practice of spraying water with a spray gun is used. You can install a box with moistened sand or wet sawdust in the room.
Show all
Basic requirements for carrying out work on the arrangement of ventilation of the cellar
Almost all modern private houses are built with a basement. This is one of the most effective ways to obtain several tens of square meters. usable area without damage to the main dwelling. Here it is customary to equip Sport halls, saunas, pantries and food storage areas. Even in the 21st century, most cellars are used as cellars.
When arranging them, you must adhere to certain recommendations:
Key moment - high-quality ventilation basement and the availability of an appropriate system in principle. Efficient air exchange will not only keep products much longer, but also eliminate the risk of mold and mildew, which often happens in high humidity conditions. Functional ventilation of the cellar is an important component necessary for the formation of optimal storage conditions for vegetables, fruits and other products.


How the system works
The principle of operation of the system is based on the basic laws of physics. Having carefully looked at the ventilation scheme in the cellar, one can state the fact that it is extremely simple, but at the same time reliable.
To organize a complete system, it is enough to provide 2 ventilation holes for the basement. One of them is necessary to remove excess fumes and air from the room, and the second is to ensure the flow of pure and fresh oxygen. To ensure optimal efficiency, such a system requires two pipes, supply and exhaust.
An important condition for the high-quality operation of ventilation in the cellar is the correct location of the air ducts, especially with regard to placing them above the soil level.
Ventilation in the cellar under the house
An equally important stage is the installation of pipes at the optimum height from the floor and their subsequent withdrawal into the external space. Incorrectly placed air ducts can bring in too much air, which is extremely undesirable for fresh food and vegetables stored on the shelves. Too much small diameter pipes will not allow you to quickly remove musty air masses from the room.


Proper ventilation of the cellar involves careful preparation, development of design documentation and study of recommendations for installation work:
In any case, the pipe located outside must be insulated without fail, which will help to avoid the formation of condensate on the walls of the duct during the cold season.
A properly organized ventilation system is supplemented with dampers, through which you can adjust the volume of air supply and output, which is very important for maintaining an optimal microclimate.


Varieties of cellar ventilation systems
Before you make ventilation in the cellar, you need to decide on the type of system that will be equipped in the room. It can be either forced or natural. The choice in favor of one or another option is determined by the features of the layout of the basement, its total area.
Forced air exchange system
Use of a fan in the system
The main feature of such a ventilation system is the automatic supply and removal of air, which is achieved by fans located in the pipes. Her work does not depend on the vagaries of the weather and external factors. In the very simple version it is enough to place the fan near the exhaust duct. Thanks to this design, artificially discharged air is formed in the room in a few minutes, which is actively discharged into the external space.
For large basements with complex architecture, it makes sense to install 1 fan for both the exhaust and supply channels. Naturally, one cannot do without the help of a specialist who can suggest optimal solutions for a coordinated and uniform output and supply of oxygen.
Forced ventilation of the cellar in the garage
Natural air exchange equipment
The principle of operation of natural ventilation is based on physical laws. The temperature and pressure inside and outside are different. The effectiveness of such a system depends on the proper placement of air ducts. The exhaust opening should be located 10-20 cm below the ceiling zone, and the supply - 25-30 cm from the floor.
For a small basement near a residential country house this is quite enough, and in all other cases it is better to resort to a forced system.
Calculation of ventilation duct diameters
So, how to make ventilation in the basement? - The task of paramount importance is to select pipes of the required diameter. On average, 26 cm 2 of the air duct area is provided for the “square” of the cellar. If we are talking about a small square room, the dimensions of which are 3 x 3 m, then the diameter of the pipe is calculated in the following sequence.
S\u003d 3 x 3 \u003d 9m 2 - total basement area
T \u003d 9 x 26 \u003d 234 cm 2
The radius of the duct is calculated by the formula:
R = √ (T/n) =√ (234/3.14) ≈ 8.6 cm
Pipe diameter (for inflow):
DP.≈ 170 mm.
Experts advise stopping at the pipe option with a margin of 15% for the exhaust duct. Respectively:
Din. = Dp. + 15% = 170 + 26 = 196 mm.
Before installing all the elements, it is necessary to make calculations. Only then will the system provide optimal conditions in the room.
Installation of ventilation
Having completed the preparatory measures, you can proceed directly to the installation of the system. There are rules that should be followed, regardless of what kind of air exchange we are talking about natural or forced.
Step-by-step instructions on how to properly ventilate the cellar:
Do-it-yourself ventilation in the cellar begins with the selection of material, installation in this case we will carry out with the help of asbestos and plastic pipes. We make two holes in asbestos, one in each pipe (for placing plastic pipes in these holes). The holes must be equal to the diameter of the plastic pipes.
To make holes, use a drill or screwdriver.
Next, we install pipes. An inflow will be carried out along the lower pipe, and an outflow will be carried out along the upper one. The outflow pipe is mounted at a distance of at least 1.5 m above the ground or roof surface. And the supply air at a distance of 20 to 50 cm above the surface.
We bring plastic pipes into the room, while we lead the supply pipe to the far corner of the basement. We leave the distance from the floor the same - 20-50 cm. As for the exhaust pipe, it is better to mount it as high as possible to the ceiling, since there is the warmest air and thus it will be easier to bring it out.
The pipe on the left is outflow, the pipe on the right is inflow
We also cement outside.
Cellar Depth 3.5 meters Ventilation system
The nuances of maintaining an optimal microclimate
To maintain an optimal microclimate in such a confined space, it is necessary to follow a certain sequence of actions.
Automated installation is much easier to maintain an optimal microclimate in space. If necessary, it can be quickly adjusted at your own discretion.
Cellar drying
An important aspect of ventilation measures is the drying of the cellar. Experts identify several effective ways to eliminate excess moisture. It is better to spend them in the summer, when there are no products, vegetables and fruits in the room. Hatches, openings and dampers open completely and leave the space in this form for at least 3-4 days. (effective in warm, dry weather) We will also tell you about several forced drying options.
hygroscopic substances
In 80% of cases, to dry the room, it is enough to confine ourselves to installing a small-sized box with coarse table salt or lime in the cellar. Them main feature- hygroscopic structure, due to which they actively absorb unwanted moisture from the surrounding space.
Installing a domestic fan
Household fans are in every residential building. They effectively remove excess moisture. The device itself is placed in the central part of the basement and left on for 3-4 days. Previously, all hatches and dampers open completely.
Waterproofing treatment
After the cellar is completely dry, waterproofing treatment is carried out for the floor and walls. For this purpose, special protective compounds are used. For concrete walls, it is optimal to use impregnations with structural penetration. They are applied in 3-4 layers.
The consistency will close the pores in the structure of the base, which creates a waterproof material that can "breathe".
The dried basement is often covered with a layer of roofing material. Despite its affordability, it is one of the best waterproofers. It is very important to lay the roofing felt on a completely flat base. The floor surface is pre-treated with a layer of mastic, on which a protective layer is laid.
A gardener's dream is to have his own spacious and dry basement for storing vegetables from the garden, conservation and other household items. How to make technologically correct ventilation of the home cellar? To equip a good storage in a private house, it is necessary to equip it with a supply and exhaust air exchanger. A competent extract in the cellar will ensure optimal humidity and temperature conditions.
Optimization and quality of ventilation depend on the correct arrangement of it. Scheme correct operation air exchange system is simple. The space in the basement provides for 2 channels of the supply and exhaust structure. Through one - fresh air enters the room, through the other, fumes are removed from the cellar.
When underground storage has small area, air exchange is created in the cellar with one pipe. But the efficiency of a single channel system will be low.
Proper cellar ventilation is characterized by the following factors:
- maximum performance is achieved due to risers of a certain diameter connected to the holes;
- the quality of the system is determined by the location of the exhaust and air inlet above the basement
- cellar ventilation pipes are mounted in the walls if the basement is located under the garage or under the house, or they are brought out through the ceiling if the storage is located on the street;
- when building a hood for a cellar with your own hands, you need to take into account the installation height of the inlet and outlet channels from the floor;
- The hole diameter must be the same on all channels. Too small - leads to musty air, and vice versa, the flow a large number cold leads to icing of products;
- the ventilation device in the cellar involves the installation of supply and output risers on opposite corners or walls. A certain distance is required between the pipes. This arrangement ensures the maximum passage of fresh air through the room, pushing out stagnant air;
- openings for the removal of stagnant air are made under the ceiling;
- the ventilation exhaust duct is arranged above the embankment of the basement. Its length, for the normal functioning of the air duct system, must be at least 150 cm:
- to organize the ventilation of the underground, PVC pipes of the same diameter are used;
- when arranging the supply and exhaust structure, it is necessary to achieve a direct location of communications. Curves and turns make it difficult for air to pass through;
- to maintain an optimal microclimate in the basement, it is recommended to install dampers. In the cold season, they regulate the flow of cold air;
- segments of air circulation channels from the outside are covered with a grill, mushrooms and are necessarily insulated.
Guided by the above tips for arranging ventilation in the cellar, you can achieve optimal ventilation of the underground storage. 
Varieties of supply and exhaust air exchange systems in basements
Depending on the layout and area of the subfloor, the type of hood is selected. There are several types of air exchange systems in basements.
Natural ventilation
The extraction device in the cellar according to the type of natural ventilation is based on the difference in temperature indicators and pressure in the street and indoors. Efficiency depends on the correct location of the holes. The supply channel is placed at a height of 25 - 30 cm from the floor, and the exhaust passage - 10 - 20 cm from the ceiling.
Forced system
The forced air exchange design consists of two pipes with built-in fans that force the air to move, creating an artificial vacuum in the room. Their power depends on the dimensions of the basement.
Combined ventilation
When creating air exchange inside the subfloor, choosing hoods, it is necessary to take into account the features of the building. It can be located under a residential building or garage, located separately on the street. These factors affect the correct capacity of the duct. 
Subfloor in the house: we create air vent communications
Ventilation in the cellar under the house has two purposes: it provides the comfort of living in the house and storing food in accessible place. An improperly functioning ventilation system negatively affects the comfort of living - it leads to the penetration of stale and stale air into the home
What should be the hood for the cellar so that the storage conditions are optimal, and the owners' accommodation is comfortable? To arrange ventilation of a room under a residential building, use the forced method, with the installation of a stationary fan on the exhaust opening or a natural view. 
System Features
Ventilation of the cellar under the house has its own nuances:
- the supply channel is mounted through the foundation of the building;
- the pipe for fresh air intake should not have many bends, turns, constrictions and expansions;
- when bringing the holes out, it is necessary to ensure that they are not covered with dirt, snow;
- to prevent condensation, the outer part is insulated;
- the exhaust elbow is placed along the wall.
Most often in residential buildings, a basement is built under the kitchen. 
Basement under the garage
The arrangement of ventilation of the cellar under the garage implies maintaining the microclimate in the underground room for storing things and products, as well as to prevent dampness. Structurally, the hood is divided into the following options:
- natural - due to the difference in pressure and temperature inside and outside. Natural air circulation is popular cheap option. It assumes the presence of two holes with pipes made of metal, plastic or PVC.
- Artificial cellar ventilation - ventilation occurs forcibly with the help of installed fans. Their work is controlled by a monoblock control.
- a combined method that allows you to combine the above two types.
What hole diameter is required for the ventilation system?
Determination of the required pipe size, provides optimal performance cellar ventilation systems. Professional designers perform a complex algorithm for calculating the diameter of pipes, but a simplified form is used for independent construction:
- for a basement area of 1m², a channel cross-sectional area of \u200b\u200b26 cm² is needed. Let's take an underground storage 4x3 m as a standard.
- we calculate the area: S \u003d 3x3 \u003d 9 m².
- for such dimensions, a pipe with a cross section is required: T \u003d 9x26 \u003d 234 cm².
) \u003d √ (234 / 3.14) \u003d 8.6 cm - the diameter is calculated as Dp ≈17 cm = 170 mm.
Knowing the required dimensions, you can proceed to subsequent installation activities. 
Installation work
Do-it-yourself ventilation in the cellar is easy. But the correctness of its construction depends on the knowledge and skills of the owners of the house. Guided by the advice of professionals, you can independently build air exchange in the basement.
- If the ventilation system is set up in a finished basement, then a hole is made in the ceiling for the outlet of the air duct.
- An exhaust pipe is carried through the niche and fixed under the ceiling.
- From the street, the outlet channel rises 150 cm above the ground.
- In the opposite corner, the air inlet through the wall is mounted and lowered down. It is located at least 20 cm from the floor.
- The intake hole in the yard should be lower than the supply one. This ensures natural traction.
- A deflector, fungus and mesh are installed on all outputs of the supply and output system.

Underfloor drying
Drying is considered the simplest method of cellar ventilation. If the room is observed high humidity then it needs to be warmed up.
- to ensure a favorable microclimate, it is recommended to open all doors and hatches in the basement. The room is completely dried and ventilated.
- containers with hygroscopic substances are used: table salt or quicklime, which perfectly absorb moisture and dampness, and disinfect the air.
- the installation of a burning candle in the exhaust duct helps to increase the intensity of the draft. Air circulation increases significantly, and harmful fumes are removed from the room.
- drying the room with wind-blown heaters, portable stoves and electric heaters is considered the easiest and most affordable way.
It is better to start drying in the summer. Natural ventilation with warm air gives the maximum effect. 
Waterproofing measures
Covering the underground space with waterproofing compounds allows you to maintain optimal temperature and humidity conditions inside.
There are several options for isolation:
- for concrete walls, deep penetration impregnations are used, which treat all surfaces. Each layer penetrates the concrete, creating a waterproof and breathable surface.
- ruberoid is used as an insulating material. The sheet is laid on a surface treated with mastic.
- clay is an environmentally friendly material that also retains moisture well.
In addition to the above options, other means are used, but the above ones differ in availability and safety of use. 
How to properly ventilate the cellar? There are some tips:
- AT winter time it is better to cover the hood so as not to contribute to the strong cooling of the basement. For this, old blankets and rags are used, which are laid on a steel grate in a manhole.
- Overdrying the cellar is also harmful. Raise humidity to optimal level you can use a spray gun (spray water occasionally) or boxes with wet sand.
- The air temperature in the basement should not coincide with the street. To expel musty fumes in the underground room, fans installed in the system channels are used.
A well-equipped air exhaust system is the key to maintaining the microclimate in the basement. Do-it-yourself cellar ventilation is an opportunity to create the perfect storage for vegetables and preservation.
Competent ventilation device in the cellar - theory and practice

The cellar is a brilliant invention of man, which can be put on a par with the invention of penicillin and automatic washing machines. Thanks to the presence of this underground room, a person was able not only to grow a crop, but also to preserve it. A special shape, a thick layer of earth above its top and proper ventilation of the cellar created a special microclimate, in which practically all year round it kept the same temperature and humidity. The correct microclimate did not allow human agricultural stocks to deteriorate, as in the heat of summer and in the most severe winters. And in this important, and perhaps the main role is played by ventilation.
Basement and cellar: purpose and main differences
We want to make a reservation right away that the cellar and basement are absolutely different rooms, with different tasks. The cellar is called ground floor buildings that are part of the house. This floor can be used as a storage room for any supplies, various things, sports and tourist equipment. In the basements, many owners of private houses equip boiler rooms, garages and gyms.
In fact, the basement is a place for installation engineering communications at home. Thanks to this space, a person has good access to them. In addition, the basement plays a role air gap between the floor and the ground, which is very important in terms of thermal insulation of the premises of the house.
A cellar is a room made, as a rule, underground, which is intended exclusively for storing products, mainly for agricultural purposes. It can be safely called an underground storage. It can be located both inside the house and as a separate building. If it is part of the house, then very often and ventilation system it uses a common house. If the underground storage is a separate element from the house, then it has its own ventilation.
Air duct requirements
Air outlets are divided into two groups, supply and exhaust. In addition, they can be round or rectangular. Round pipes are the most popular, but take up more space, and rectangular boxes, with the same cross section, occupy a smaller area, but have a high cost. They also differ in the material from which they are made. The most common is a PVC pipe and a metal galvanized air outlet.

Advice:
The higher the exhaust pipe, the better the draft, and, accordingly, the ventilation in the cellar. If the underground storage is not part of the basement of the house, then the issue of fixing the exhaust pipe becomes quite acute. It can be secured with stretch cables, with lanyards installed on each for tensioning. The most simple and effective method fixing the air duct, this is its conclusion in a wooden insulated box, which is strengthened in the ground with the help of concrete.
Calculation of the cross-section of air ducts and selection of fan power
For effective ventilation of the underground storage, it is necessary that the air ducts can pass through right amount air masses, and this depends on their diameter. How to find out what cross-section of air ducts is needed to equip an effective cellar ventilation system with your own hands? There are two ways to find out the exact diameter of the air ducts:
- Order a calculation in the relevant organization. This will give you a guarantee that all calculations will be made correctly. True, this procedure is not the cheapest and for the calculation you will need to pay an amount that may exceed the cost of organizing the entire cellar.
- Perform the calculations yourself, while you have to remember the arithmetic, but it will be absolutely free. Which way to choose is up to you.
 In order to do the ventilation of the cellar with our own hands, we need to know the volume of the room for storing food and the frequency of air exchange. The recommended air exchange (how many times the air in the cellar is changed) is from 2 to 4, depending on the products stored in it.
- To find out the volume of a room, you need to multiply its length by the width and height. Consider a cellar with dimensions of 2 m x 3 m x 2.5 m = 15 m3
- To find out the amount of air passed per hour, you need to multiply the volume of the cellar by the recommended air exchange rate. Consider the average value of 3. As a result, we get that in 1 hour 15 cubic meters x 3 = 45 cubic meters should pass through the cellar
We find the cross-sectional area of air ducts using the following formula:
- S- recommended air speed
- L- air flow.
In our case, the speed of air flow is 1 m/s. (norm for natural ventilation).
We get the cross-sectional area of the duct:
45 / (1 m / s x 3600) \u003d) 0.0125 sq.m
We calculate the radius data of a round pipe:
- R- duct radius (mm)
- F- section of the air duct (mm.kv)
- π - constant = 3.14
Based on the data, we get:
The radius of the round duct we need must be at least 125 mm
Now let's move on to calculating the performance of the exhaust fan. You can use a simplified method. To do this, you need to multiply the volume of the room by 12. In our case, this is 15 cubic meters x 12 = 180 cubic meters / hour. The performance of the exhaust fan for the cellar, with an area of 6 square meters, with a ceiling height of 2.5 meters, is 180 cubic meters per hour.
We equip the cellar ourselves
Many people ask: "How to make ventilation in the cellar?" Now that all the calculations have been made, the money has been saved, we proceed to the purchase of air ducts and equipment. To install a combined ventilation system, we need:
- The required amount of PVC pipe, with a diameter of 125 mm.
- One end tee for condensate drain.
- One brass or plastic stopcock for tapping into the end tee.
- Fasteners for a pipe.
- Exhaust fan, capacity 180 m3/h. Important! The fan is installed inside the exhaust pipe, so look for a model that will fit the diameter of your ducts.
- The required amount of wire, with a cross section of at least 1.5 mm2, plug.
- Round air intake grille with a diameter of 125 mm - 2 pcs.
- Metal mesh, from the penetration of rodents into the cellar 15 cm x 15 cm.
- Deflector. Buying a deflector is optional. It serves to increase the draft in the exhaust duct in the event of a power outage and the fan stops.
It is somewhat easier to ventilate in an underground food storage room, which is located under the house. Moreover, all calculations remain the same, but it is easier to fix the air ducts. Exhaust - must go through the basement, and pass from outer side at home. The height of the exhaust pipe should be 0.5 m higher than the roof ridge.
Master's advice:
Before installing the exhaust pipe, install a fan in it and secure it with standard fasteners.
Using our tips, we hope that you will easily equip your underground storage with the right ventilation system.
Proper ventilation in the cellar of the garage
It is unnecessary to talk about how important proper ventilation is in the cellar of the garage. Everyone knows that without ventilation in the cellar it is damp and the food stored there quickly deteriorates. In addition, if damp air from the cellar enters the garage, then this leads to corrosion of metal objects in the garage, including the car.

Natural ventilation of the cellar in the garage - scheme
In general, everyone is aware of the need for proper ventilation in the garage cellar. But not everyone knows how to make ventilation in the cellar of the garage.
Let's start with the fact that the ventilation of the garage, cellar and observation room can be one of three types:
- natural,
- combined,
- mechanical.
Natural ventilation in the cellar of the garage
Natural ventilation is used in small garages and cellars. Its main advantage is accessibility. However, in summer such ventilation is inefficient or does not work at all, and in winter it is necessary to periodically check the condition of the ventilation ducts. They can be clogged with snow or overgrown with frost inside.
- Advantages:
- no energy source needed
- noiselessness,
- availability.
- Flaws:
- job instability,
- the need for periodic checks and cleaning of pipes,
- the impossibility of any adjustments,
- inability to use filters.
Natural ventilation in the cellar of the garage is done in accordance with the following rules:
- supply and exhaust pipes are usually located in opposite corners of the basement;
- in the cellar, the end of the supply pipe must be located at a height of 0.3-0.5 m from the floor;
- in the cellar, the end of the exhaust pipe should be at a height of 1.5-2 m from the floor;
- if the exhaust pipe is mounted completely outside the garage, it must be insulated (it should be distinguished through installation of the pipe - through the garage room, and wall - from the outside);
- the minimum height difference between the suction and outlet openings of the ventilation system (they are located on the street) is 3 meters;
- the inlet from the side of the street is closed with a grate or mesh (from rodents and large insects);
- it is advisable to cover the exhaust pipe with a visor, and even better - with a diffuser that increases draft;
- The approximate diameter of the exhaust pipe in centimeters can be obtained by multiplying the area of \u200b\u200bthe garage (in square meters) by 1.5;
- The diameter of the exhaust pipe can be 10% of the diameter of the supply pipe.

Natural ventilation in the cellar of the garage - device options
Remember that each additional bend in the ventilation pipe reduces the efficiency of the entire system. By the way, pipes from almost any material can be used to ventilate a garage, cellar and viewing room.
Combined ventilation in the cellar of the garage
You can increase the efficiency of natural exhaust by installing a light bulb in the exhaust pipe, which will heat the air and further enhance the draft. As an alternative to a light bulb, you can use a candle - in this case, you can do without electricity. But still it is better to install a fan. This is the best way to turn a natural ventilation system into a combined one.
As you guessed, the combined and natural ventilation in the cellar of the garage differ from each other only in the presence of a fan on one of the air ducts. When off, the fan will create a slight additional resistance to airflow. But by turning it on, you can ensure effective ventilation of the cellar, regardless of the time of year and weather conditions.

Forced ventilation in the cellar of the garage
Forced ventilation in the cellar of the garage
Forced ventilation in the cellar of the garage is provided by permanent job fan. Let's look at the advantages and disadvantages of such a system:
- Benefits:
- work stability;
- the ability to adjust the efficiency, air heating;
- the possibility of using an air filter.
- limitations:
- constant energy consumption;
- complexity of installation;
- significant cost of some components;
- wear and tear parts.
Forced ventilation is built on the same principles as natural ventilation. After all, the natural movement of air should help, and not interfere with the operation of the fan.

Forced ventilation in the cellar of the garage can be provided by a duct fan
Particular attention when installing forced ventilation in the cellar of the garage should be given to safety. This applies to wiring, installation of switches and fans. Fans are best to choose channel.
As for filters, air heating and adjusting the operation of the hood - all this requires additional costs and is done as needed.
Cellar
The microclimate in the cellar depends not only on ventilation. The material of the walls and floor, the quality of waterproofing and insulation work are all very important factors. Do not save on such things, do not think that proper ventilation in the garage cellar can fully compensate for flaws in its construction. Try to make a quality cellar in the garage, it is quite possible that you can then get by with natural ventilation.

Hi all! Sandwich garages are my passion. I can talk about them day and night. I can tell =)
Dry cellar: do the right ventilation

The dream of every gardener is to have a dry and spacious cellar, the air in it should be fresh, but without drafts. In order to build such a miracle storage with your own hands, it is necessary to provide it with supply and exhaust ventilation. Competent ventilation The cellar will allow you to maintain the optimal temperature and humidity conditions for storing vegetables in it, save it from excessive dampness and humidity, and protect it from the appearance of mold. Knowing the basic rules for natural ventilation, you can make the cellar dry on your own.
Natural ventilation - the right device:
- to ensure good ventilation, 2 pipes are installed: supply and exhaust;
- air exchange will be better if the ventilation pipes are located in two levels and, if the storage design allows, in different places, which will avoid the suction of fresh air;
- the exhaust ventilation pipe is placed at the top - just under the ceiling;
- the cellar ventilation supply pipe, on the contrary, at the bottom at a height of 50-60 cm from the floor;
- the figures below show the correct and incorrect cellar exhaust device;


- using more ventilation pipes with a smaller cross section is undesirable, which is especially important for the northern regions;
- with such a cellar ventilation device, air exchange occurs due to the difference specific gravity warm indoor air and cold outdoor air. This is a natural process, so the ventilation of the cellar according to this scheme is called natural;
- the exhaust pipe must be brought out above the roof ridge and insulated (it is made double) in the place where it passes through the cellar or attic. The draft in the exhaust ventilation pipe is the greater, the higher it is;
- the cross section of the ventilation pipes depends on the size of the cellar. So, with a cellar area of \u200b\u200b6-8 square meters. m exhaust requirement is made with a section of 120x120 mm, but if the cellar is equipped with only one pipe, then its section should be at least 150x150 mm;
- for the manufacture of ventilation pipes, boards with a thickness of 30-40 mm are used. They are well adjusted, tightly knocked together and supplied with valves (latches) and dampers that will allow you to regulate air exchange and temperature and humidity conditions;

- if the cellar has small size, then one two-channel pipe with wind trapping is sufficient for its ventilation (see figure). With this design, the pipe has two channels - one for air flow into the cellar, the other for exhaust. Each channel can be equipped with an independent valve;
- ventilation of some types of cellars (for example, if it is located under a garage) can be equipped through a hatch closed with a grate. From above, the grate is insulated with an old blanket or other insulation;
- verify effective work ventilation, you can attach sheets of thin paper to the outlets of the pipes. If there is convection, then the paper will begin to sway;
- The second way to check if the ventilation of the cellar is working is to put a bucket of hot coals in it. By the movement of smoke from the coals, one can observe the air currents inside the vegetable store;
- lack of ventilation can be easily detected by the following features: stale and musty air; mold; feeling of dampness; condensation on the ceiling, bins, walls, racks;
- to reduce humidity, the cellar must be ventilated. To do this, internal doors are made lattice and in the fall they open everything that can be opened - hatches, doors, latches. At the same time, a box filled with coarse table salt or quicklime is brought into the cellar (they not only absorb moisture, but also disinfect the air);

- if, on the contrary, it is necessary to increase the humidity in the cellar built by oneself, then one can sprinkle water, sprinkle the floor in the cellar with wet sawdust, or place a box filled with wet sand.
When the cellar is in the garage
The ventilation of the cellar in the garage is important not only to maintain the temperature and humidity necessary to ensure the safety of food, but also to keep the garage damp. Cellar hood options in the garage:
- natural - based on the temperature difference between the outside and inside the basement, causing continuous air circulation. Natural ventilation of the cellar in the garage is the cheapest hood option.
- forced (artificial) - the air flow is forced by fans. Fully mechanized basement ventilation under the garage using a monoblock or software-controlled modular system starts at $1,000;
- combined - includes elements of natural and forced ventilation of the cellar.
as in the case of a cellar in a house, in most cases natural ventilation is used for the cellar ventilation in the garage, the performance of which is quite sufficient for small volumes of vegetable storage. The scheme of natural ventilation of the cellar in the garage also provides for at least two pipes made of resistant materials. The most suitable material for ventilation pipes is metal or plastic, such as PVC. Below is the ventilation scheme: on the left - the standard scheme; on the right - a diagram of the cellar ventilation device in the garage, which provides ventilation for the garage itself.

As can be seen from the diagrams, proper ventilation of the cellar in the garage includes:
- supply and exhaust, located on different sides of the room. Best Accommodation- in far opposite corners;
- ventilation pipes must have one cross-sectional diameter along the entire length;
- the fewer bends and turns in the supply and exhaust ventilation pipes of the cellar in the garage, the better. Ideally, they should not be at all;
- the supply pipe is located as close to the floor as possible. The pipe opening is closed with a mesh from the penetration of rodents and other small animals;
- the bottom of the exhaust pipe - as high as possible (closer to the ceiling);
- the top of the exhaust pipe is located as high as possible - at a distance> 0.8 - 1 m above the ridge, and in the case of a shed roof, the countdown is from its highest part. The high location of the cellar ventilation exhaust pipe in the garage improves traction and eliminates the drift of its outlet end with snow;
- air exchange is adjusted through control dampers built into the supply and exhaust ventilation of the cellar in the garage. The dampers allow you to dry the cellar, regulate both the inflow and outflow of air. The dampers are indispensable for the ventilation of the cellar in the garage in the winter in frosts, when it is necessary to dose the amount of air renewal, otherwise you can freeze the stored vegetables and preparations;
- from above, both pipes are protected by visors, protective covers or deflectors. This will prevent atmospheric precipitation from getting inside, and also, if a deflector is used for the hood, it will create a rarefaction area around it, which will increase traction;
- warm air exits through the chimney, so condensation can form inside it in frosty weather. The condensate freezes, which reduces the area of the air passage up to the complete blockage of the air duct. To prevent such a situation, the pipe must be insulated without fail, especially in the place where it passes through the roof. For insulation use materials that are resistant to water. In addition, the pipe in winter must be periodically cleared of snow, and to facilitate the process, the outlet part of the pipe is made removable. This will allow only the clogged part of the pipe to be cleaned.
Proper natural ventilation of the cellar in the garage will ensure constant air circulation, and air exchange will be involved most of premises. The cost of natural ventilation of the basement is insignificant, it will not require large expenses, you can meet 1,500 rubles (purchase consumable, and make the ventilation device with your own hands). The main disadvantage of natural exhaust: in the case when the air temperature in the street is equal to or greater than the air temperature in the cellar, the air exchange stops.
allows you to equip the cellar hood in the garage so that the air exchange process does not depend on weather conditions. To do this, it is necessary to modernize the exhaust pipe: an electric fan is placed in it, creating an air vortex. Thus, the air is expelled from the room, which ensures the flow of fresh air through the supply pipe. It is possible to organize air exchange through one passage (use a double-leaf pipe). The forced method allows you to organize the ventilation of the cellar in the garage and ensure constant air exchange in the summer, when the natural method is powerless.
If you wish, you can arrange ideal conditions for storing food for the cellar in the garage, for which a fully mechanized basement ventilation is installed. At the same time, the air supply and exhaust in the room is provided by a monoblock (modular system) and controlled by software. The cost of such installations can exceed $1,000.
When the cellar in the house
Cellar ventilation in the house performs two functions at once: it provides suitable storage conditions for food and prevents deterioration comfortable living people in the house. Improper ventilation of the cellar in the house can adversely affect comfort and coziness: dampness in the cellar and musty, stale air easily penetrate into the living quarters, and all residents of the house will have to breathe this air. A tightly closed lid or cellar door will not save the situation.
 The optimal cellar ventilation scheme in the house is shown in the figure. The scheme is suitable for both natural and forced (artificial) ventilation:
- the forced method involves the installation of a stationary fan; this method is used for air exchange in large-volume vegetable stores. The fan for the cellar is placed on the exhaust duct;
- for natural ventilation, the fan is also used, but not permanently, but temporarily - it is installed for several days to dry the storage.
Features of cellar ventilation in the house:
- the supply pipe is laid through the part of the foundation above the ground, then through the basement of the house;
- the supply pipe must have a minimum number of bends and a minimum length, must not have narrowings and expansions;
- when arranging the ventilation of the cellar in the house, it must be ensured that in winter the supply pipe is not covered with snow;
- the part of the exhaust pipe located in a cold place must be insulated to prevent condensation;
- the cellar ventilation hood is located inside the wall of the house or in a special ventilation duct, which usually runs along the wall (for example, from the kitchen). In order to collect all the ventilation ducts together, it is better to make a cellar under the kitchen.
How to make ventilation in the cellar of a garage and a private house

Unlike ground structures, basements private houses do not have conditions for ventilation and removal of excess moisture. To keep vegetables and fruits stored there longer fresh look, it is necessary to organize a constant air circulation - supply and exhaust. There is no need to hire specialists for the cellar ventilation device, since you can do it yourself when you read our publication.
Basement ventilation methods
There are 2 types of ventilation systems used in the basements of residential buildings, garages and other sheds:
- With a natural urge. In a vertical channel facing the street, draft arises due to the difference in heights and temperatures outside and inside the cellar.
- With compulsion. The movement of air masses is provided by one or more fans.

Reference. In the right cellar, the air temperature fluctuates within very narrow limits throughout the year (from 5 to 12 ° C), so it is relatively warm in winter and cool in summer.
For the vast majority of underground storage facilities, it is quite enough natural air exchange even if it has a large area. In winter, indoor air is warmer and lighter than outdoors, which encourages it to rise through the ventilation duct leading outside. The only condition: the inflow must be compensated by the exhaust so that the cold and heavier air mass displaces the heated one, otherwise there will be no circulation.
In summer, when it is cool in the basement and hot outside, the natural draft is significantly weakened. And although most of the storage facilities are empty during this period, they need to be prepared for winter - ventilated and dried. How to do this, we will tell further.

Ventilation ducts are best laid at the construction stage
Forced ventilation is an expensive pleasure and is not used unless absolutely necessary. This need arises in the following situations:
- during long-term storage of fruits and foodstuffs that require certain climatic conditions;
- when the basement is used for other purposes, for example, as a gym or boiler room;
- if the storage consists of several rooms where you need to create a different microclimate;
- in summer, when drying is needed, artificial air exchange is organized temporarily.

Supply unit in a vegetable store
An important point. The air flow forced into the cellar must be heated in winter. Thoughtless installation of a supply or exhaust fan without an additional heating system will lead to rapid deterioration of vegetables as a result of freezing.
Calculation of the dimensions of the ducts
In order for the ventilation in the cellar to function efficiently and at the same time minimally affect the temperature in the room, it is necessary to choose the right pipe diameters. The latter must pass a certain amount of air, no more, no less. According to generally accepted methodology, the cross section of the duct is calculated as follows:
F = L / 3600 x ϑ, where:
F is the size of the section, expressed in m²
ϑ – air flow velocity in the pipe, m/s;
· L – required amount of air, m³/h.
Now in order. With natural and forced ventilation, the flow moves through the channels at different speeds. In the first case, it is 0.5-1 m/s, in the second it can reach 8 m/s. To calculate natural draft, put the value 0.5 m/s in the formula.
To correctly determine the value of L, you need to calculate the volume of the basement and multiply it by the air exchange rate (a number indicating how many times in 1 hour you need to update the air environment of the room). For storing vegetables, the multiplicity rate is 2, which means that for a cellar measuring 3 x 2 x 2 m, you will need 12 x 2 = 24 m³ of fresh inflow per hour. If we continue to count according to this example, we get the cross section:
24 / 3600 x 0.5 = 0.013 m².
Using the formula for the area of a circle, we determine the diameter of the channel, in our example it is 0.13 m or 130 mm. We select a pipe from the assortment, the nearest one is 150 mm (you need to take a larger size, not a smaller one).
When it is necessary to arrange ventilation of the basement with mechanical motivation, air ducts are considered according to the same method. The optimal speed of movement is 8 m/s, and the demand L is taken according to the purpose of the room. For example, the exchange rate for the gym is 3, then the amount of inflow in the basement 5 x 10 x 3 m is 150 x 3 = 450 m³ / h. The fan performance should be the same, and the diameter of the air ducts due to the high speed will be the same - 150 mm.
Scheme of forced exhaust using a duct fan
Natural exhaust device
As a rule, the hood in the cellar is carried out according to the standard scheme with two channels - supply and exhaust. The latter are inexpensive sewer PVC pipe of the same diameter.

Supply duct outlet
Air ducts must be installed according to the following rules:
- The exhaust pipe starts in the upper zone of the vegetable store, not lower than 20 cm from the ceilings, otherwise the ceiling will “sweat” from below.
- The top of the exhaust channel rises as high as possible in order to provide good traction. Ideally, the pipe cut should be at the level of the roof.
- Place the bottom of the supply air duct 30-50 cm above the floor, it is enough to bring the top to the level of the basement.
- If the cellar is a separate structure, then place the channels vertically with a passage through the ceiling, avoiding turns. A similar scheme can be implemented in the garage by passing pipelines through the floors.
- Lay air ducts from basements arranged under a private house or barn with the minimum number turns. To pass through the wall and bring the channel out, 2 bends are enough.
- Close the ends of the pipes from precipitation with metal umbrellas, and additionally cover the supply with a mesh. Since it stands low, you need to block the path to the cellar for rodents.

Advice. To prevent condensation from forming inside the exhaust channel and freezing on the walls, insulate it with mineral wool mats 50-70 mm thick wrapped with roofing material.

Ventilation with one pipe will work if you organize the inflow through the front door
In some cases, it is customary to carry out ventilation in the basement of the garage with one combined pipe, divided into 2 sections by a longitudinal partition. It serves as an inlet and outlet at the same time. This method is not efficient, since there is no height difference between the channels. In addition, the holes are located in one place, and not spaced apart at the corners of the cellar for better circulation. How to arrange proper ventilation under the garage, shown in the video footage:
Often on the Internet there are tips on improving natural draft with the help of deflectors - metal nozzles on the exhaust duct. The device shown in the photo below, when blown by the wind, creates a rarefaction zone around the pipe head, which increases the thrust. The stronger the wind blows, the more air the deflector helps to suck in from the basement. But for winter period it's not too much good decision and that's why:
- in order for the deflector to function normally, it must be removed from the leeward zone, that is, raised above the roof;
- how much air goes outside, so much will come through the supply air duct, because of which, in severe frost and wind, all supplies can freeze;
- if you try to regulate the air flow with a damper, then you will have to adjust it every time the weather changes.

Read more about the natural ventilation of the cellars in the following video:
Drainage of basements
The cellar must be prepared annually for the winter season - well ventilated and dried. There are several ways to get rid of moisture and musty odors:
- The simplest remedy is to open the door or hatch to the basement and ventilate it before the onset of cold weather.
- In the summer, when the natural hood weakens, the temporary installation of a deflector helps to resolve the issue.
- A fan attached to the lower end of the exhaust pipe allows you to dry the room quickly and well.
- Folk remedy - a lit candle, installed under the exhaust duct. By heating the air around it, the flame initiates an increase in natural draft.
- Put a wood-burning stove in the cellar or bring in a brazier with glowing coals.

Good effect give electric heaters - heat guns and convectors. But since it will take 2-3 days to drain the basement, such devices will have time to wind you up a decent amount for electricity.
Conclusion
From the above, the conclusion is: the best option cellar ventilation is a natural exhaust and a do-it-yourself inflow. Done right, your basement storage will be dry and warm during the winter, which is exactly what your food supplies need. The costs are minimal: only pipes are needed, and any - PVC, asbestos cement, galvanized metal, and so on. The main thing is that their diameter is close to the calculated one.
According to building regulations and requirements, all rooms in which there are no windows are equipped with ventilation systems. Therefore, the ventilation duct on the roof is a common thing these days.
The main thing to pay attention to is that the design parameters of the ventilation system correspond to the actual state of the channel, in addition, the tightness of the passage of the ventilation pipe through the roof structure is also considered an essential condition, every carelessness during the installation of such units leads to leakage through the roof.
ventilation pipes
The pipe is the main element of the hood and heating system. Its organization is a rather difficult task, in particular if the structure is large. Carrying out the design of premises, specialists without fail take into account the location of the ventilation hood.
The optimal solution is the presence in all rooms of ventilation windows located opposite the window, under the ceiling. In the process of creating walls using TISE technologies, the construction of a chimney and a ventilation hood becomes easier due to the presence of a vertical channel in the wall.
All rooms can be equipped with exhaust ventilation windows that communicate with them.
What do you need
A ventilation duct is removed on the roof, often in order to:
- ventilation of internal premises;
- attic ventilation;
- installation fan pipe that comes from the sewer.
Principle of operation
 Removal of ventilation through the roof
 In accordance with building regulations: any room where there is no window must be equipped with a ventilation duct. This can be verified by a thorough inspection of the premises. Most likely there are characteristic gaps on the wall of the bathroom and toilet, pantry, wardrobe, etc.
In the kitchen, despite the presence of windows, it is also necessary to have a ventilation system. True, not only the presence of such communications is required, but also their proper operation: installing and bringing a ventilation pipe to the roof is not an easy task.
And you need to carefully study necessary information associated with the installation process.
Types of ventilation pipes
The following types of ventilation pipes are distinguished by shape:
- pipes having a circular cross section;
- pipes having a rectangular cross section;
- pipes unusual shape(combined, cropped, truncated, etc.)
Pipes are made from the following materials:
- Cink Steel.
- Stainless steel.
- Plastic.
- polyester fabric.
- Aluminum.
Requirements for ventilation ducts
The essence of the requirements for the ventilation pipeline is the following characteristics:
- The cross section of the ventilation duct must be at least 15 cm in diameter. These are the parameters that standard galvanized steel materials will withstand.
- When arranging supply and exhaust ventilation- the pipeline on its outlet part has a rather large ring stiffness. Since a significant wind load “presses” on the section of the ventilation pipe elevated above the roof.
- The ventilation pipe must be not only durable, but also have thin walls. The thinner its walls, the greater their throughput.
- A home chimney should not rust. Since the water vapor contained in the room settles on the inner walls of the pipeline. In addition, the ventilation in the house should not be subject to combustion or the release of harmful substances during the combustion process.
- The piping system itself must have a minimum weight. Selection in the category of ventilation pipes can be arranged by comparing the masses running meter"candidates".
It should be noted that the traditional material from which ventilation is made in a private building - a brick or a pipe made of galvanized steel - has almost all of the above qualities. But, the mass of the brick pipeline meets all standards. Moreover, the metal pipe is impregnated with static electricity, which attracts dust.
 The design of the pass-through unit for the ventilation pipe output to the roof
 Installation of ventilation pipes
Prior to the construction of the outlet of the ventilation pipes, you need to complete the installation internal communications and fix the ducts. The list of required tools depends on the type of roof material. In addition, you will need building level to control the correct location of the ventilation pipe and the marking marker.
Necessary materials and tools
- drill;
- chisel;
- building level;
- electric jigsaw;
- metal scissors;
- insulation;
- screwdrivers;
- marker (for marking);
- sealant;
- , screws;
- sealing gaskets;
- passage node;
- rags;
- work uniform.
Walkthrough
In the case of self-installation of the system, it is optimal to use the assembled passage assembly, which will only need to be installed, which is simple:
- You need to choose a place. According to the requirements of SNiP and taking into account the features of the roof, it is necessary to determine the best place to make a pass.
- Markup. Using a marker, notes are made with the assembly layout of the assembly.
- Then make a cut. A hole is cut (with any tool suitable for this purpose, given the material of the roof).
- Holes are cut using the same method. in insulation and waterproofing.
- Markup in progress to install the node.
- Removes dirt and debris from the top layer of the roof.
- Slots for self-tapping screws are drilled in accordance with the markings.
- “Trying on” the passage element.
- Knot is fixed through self-tapping screws.
- Ventilation pipe installed, the structure is fixed with screws.
Nuances
Planning and installation of ventilation systems is quite a serious task, all shaft ventilation pipes used must comply with all calculations and rules in the instructions. Therefore, only a professional should be involved in the design, taking into account all the possible subtleties and features of the structure.
Length and section of pipes
- The ventilation pipeline for arranging the channel is selected so that the perimeter of the section of the ventilation duct is at least 0.016 sq. m.
- Each side of the channel is at least 10cm, but in the process of creating the structure of the exhaust channel, the parameters of its walls are not actually calculated.
- The choice is made according to the standard- 14 by 14 cm. Its length basically reaches at least 3 m.
- If the section is 14 by 27 cm length is selected in the calculation of more than 2 m.
All necessary calculations, of course, are carried out in advance, until the moment when the ventilation pipe is closed if necessary.

Temperature dependence of ventilation
The temperature difference between the air at the outlet and inlet of the channel dramatically affects the draft in the ventilation ducts. The draft inside the duct increases to the extent that the temperature outside and inside the room differs.
This is the reason why ventilation is much more efficient in winter than in summer.
Even in the planning process, it is necessary to carry out thermal insulation of the channels passing under the roof so that the air draft does not decrease, and the exhaust channels are protected from the occurrence of condensate on top layer inside.
The ventilation shaft pipe is heated if the layout assumes its location along the chimney pipe during use. furnace heating or along supply pipes hot water and heating.
Channels with this arrangement will not become cold, in addition, the quality of ventilation improves. But there is also a tangible minus: the draft in such ducts is slightly greater than in other ventilation ducts in the building, as a result of which there will be a risk of disruption in their functioning.
In the process of creating a ventilation project, this should not be forgotten.
Air duct resistance
In the process of working with the roof, ondulin is used to create ventilation - a polymer ventilation pipe that lets in air and prevents precipitation.
It is used in conjunction with the ondulin roofing sheet - the ventilation duct is an important link for ensuring proper circulation of air masses.
The air draft is also very dependent on the inner surface of the ventilation duct, more precisely, on the resistance created by it. It will be weaker if the surface is slightly rough.
How to reduce resistance:
- To reduce resistance, all connections of the parts that make up the pipe must be carefully aligned.
- The seams should not have recesses and protrusions, should be the smoothest, excess mortar must be removed.
- The cross section of the channel remains unchanged over the entire plane. There are no smoothness on the channel, kinks, bends, incorrect connections of ventilation pipes, various deviations from the vertical have a negative effect on the traction force.
- In a situation where it is impossible to refuse them from the technical side, the deviation angle should be maintained no more than 30 degrees.
- Horizontal platforms must be completely excluded.

Exit ventilation pipes through the roof
The ventilation duct on the roof during the operation of the system is of great importance. Therefore, in the process of construction and planning of natural ventilation, special attention should be paid to the literacy of the output of the channel above the roof of the building.
Such a drain should not harm the functioning of the ventilation system, since the height of the pipeline must be carefully calculated. It is necessary to take into account the performance of the hood, affecting the quality of the system, other external factors, the shape and type of the pipe.
When the pipe on the roof is placed very low, there may be insufficient draft and the work of the hood will go to reverse direction. This problem is easily solved by mounting nozzles on the pipe that protect against wind influence.
Height of pipes above the roof (SNiP)
The height of the pipe on top of the roof should have the following indicators, taking into account the conditions:
- Above a flat roof - at least 0.5 m.
- Above the parapet or roof ridge, when the distance from the ridge to the pipeline reaches at least 2 m - not less than 0.5 m.
- When the chimney is located at a distance of 2 to 3 m from the ridge - on the same level as the parapet or ridge and above.
- In a situation where the chimney is located further than 3 m from the ridge - on the same line that goes from the roof ridge at an angle of 10 degrees to the horizon and above.
Insulation of ventilation pipes
To insulate pipes, the following materials are used:
- mineral wool;
- polyurethane foam;
- polypropylene;
- basalt fiber.
The pipe is insulated in the form:
- shells;
- cylinder;
- half-cylinder;
- cords.
 Roof pipe waterproofing
 The cost of ventilation pipes
The price of a galvanized pipeline directly depends on:
- pipeline wall thickness;
- pipe diameter;
- its length.
For example, the price of a pipe with a diameter of 10 cm, a wall thickness of 0.5 mm, a length of 1.25 m will be no more than 150 rubles, and a pipeline with a diameter of 8 cm with the same length and from the same metal will cost 10 times more. .
Pipeline made of galvanized steel cost a little. It is necessary to correctly calculate the required number of pipes and fittings.
Often the ventilation system is installed during the construction process, in the event that it becomes possible to plan the exit, calculate the perimeter, choose optimal location on the roof, etc. It is more difficult to equip ventilation in a built house. An external change inside the room can adversely affect the elements of the roof: rafters, crates, etc.
Incorrect installation can lead to the following consequences:
- weak traction;
- the penetration of smell from one room to another;
- penetration of moisture into the dwelling;
- high humidity;
- lack of oxygen;
- the occurrence of fungal bacteria on the wall, ceiling, floor;
- bad smell in room;
- the appearance of soot in the kitchen;
- penetration deep into the building of smoke from other pipes;
- increase in the intensity of illnesses of residents;
- freezing of parts of the structure.
Proper installation of ventilation pipes on the roof is the key to a comfortable home and a healthy state of residents.
Having made a competent choice of the location of the outlet of the ventilation pipeline on the roof, observing the technology of its installation and using auxiliary devices, it is quite easy to create a favorable movement of air inside the system and create cozy atmosphere inside the dwelling.
Almost all residential buildings during construction or reconstruction are equipped with one or another air purification system. And no matter what type of ventilation, the passage through the roof is an important step in its construction. For each type roofing materials the device of the passage nodes should be carried out according to its own scheme. In order for the system to serve without fail for more than one year, all actions for its installation should be carried out with skill. Familiarize yourself with the methods of installing a roof vent pipe, and this information will help you in your work.
Extraction of exhaust air from the house
If you are starting to build a cottage from scratch, then be sure to consider the construction of ventilation ducts in the brick walls of the interior. Natural ventilation does not require expensive equipment and will constantly provide rooms in your home with fresh air.
If necessary, you can supplement the system with a forced exhaust fan. But extra expenses will not be needed if you wisely draw ventilation to the roof.
The higher the ventilation pipe on the roof of a residential building, the stronger the draft will be in it.

Often, designers pay insufficient attention to the installation of risers and the height of ventilation shafts above the roof of the building. Due to their shortcomings, a number of unpleasant phenomena can occur:
- smells penetrate from the bathroom and from the kitchen into living rooms due to the unlawful combination of ventilation ducts into one common roof ventilation duct;
- the effect of the hood is insignificant due to the insufficient length of the pipe;
- the hood operates in reverse mode due to the wrong choice of location for installing the ventilation pipe on the roof slope;
- ventilation ducts and pipes cold roof freeze without proper insulation.

The cause of problems when installing ventilation pipes on the roof is often complex structure modern roofing, which is called the "roofing pie" for its multi-layeredness.
When incorrect installation ventilation pipe on such a roof, the rafters and the crate can be damaged. There may also be gaps in the places where the cover is installed. air vent, and through them will seep inward rainwater. Therefore, in order to maintain the tightness of the roof, it is recommended to use passage elements specially designed for this.
Planning passages for ventilation
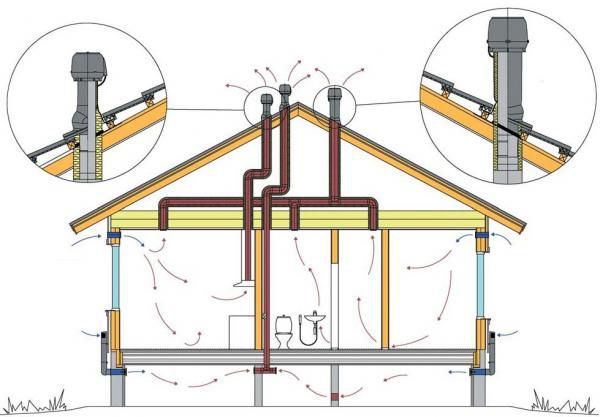
It is necessary to start equipping the ventilation system properly with thinking through and compiling circuit diagram ventilation throughout your home.
Let's take this situation as an example: according to the plan for the reconstruction of a residential building, the roof is to be replaced. Through the new roof, you need to remove the hoods from the rooms, from the bathroom, the ventilation duct from the basement and kitchen hood. The question arises, what will happen if we do not make four passes, but bring all the channels together and put only one ventilation pipe on the roof?
Knowledgeable people say that nothing good will come of such savings. Nevertheless, it is desirable that there be a separate ventilation passage through the roof for each of the air ducts. Otherwise, if all of them are combined, an unpleasant smell may spread throughout the house when weather will cause backlash.
When installing a new roof, you can plan in advance the location of the ventilation pipes on the roof and make passages for them, if the exact location is known.
Purpose and types of roof penetrations

Passages through the roof are arranged for the withdrawal of different types of ventilation:
- internal living quarters of the building;
- sewer riser pipe;
- attic under roof space.
In addition, it may be necessary to arrange the exits of chimneys and television antennas.
The final top element of the duct system is a specially made section of pipe called a vent outlet. A properly installed ventilation pipe on the roof provides air exhaust from the premises and does not allow water to leak under the roof. In those places where it is necessary to arrange the passage of ventilation through the roof, install passage elements corresponding to certain type roofing materials.
Homeowners can purchase ready-made kits of various ventilation outlets for installation on hard and soft roofs. With their help, it is easy to bring the ventilation riser to the roof in such a way that the roof does not leak and does not lose its aesthetic appearance. Such devices also protect the ventilation ducts from the ingress of dirt and precipitation.
Depending on the roof structure of your home and the type of ventilation that is being vented, you may have a passage through the roof. various heights and forms. In addition to round exhaust pipes, rectangular roof ventilation ducts are also used.
In order for the ventilation pipes on the roof not to cause a violation of the tightness of the roof, the places of their passage should be equipped with special care.
The device of the ventilation penetration unit

The design of the simplest nodes for the passage of a ventilation pipe through the roof is metal pipe, which is inserted into the hole and fixed on a reinforced concrete or steel glass. The roof outlet can be equipped with a closing valve and a condensate collection ring. An outlet air duct is connected to the pipe from below through a flange. From above, this node can be equipped with a deflector or a simple protective umbrella. There is an option with insulation, which is used as mineral wool.
Products for roof ventilation of a new level of quality are considered to be more relevant to the technical and aesthetic requirements of the modern era. The principles of the device of such ventilation outlets are almost the same regardless of the manufacturer, they are distinguished only by small differences. From a number of similar products, the most popular are roof ventilation outlets, ventilation covers and ventilation fungi on the roof of the Vilpe Vent brand.

Their advantages:
- the inner tube is made of galvanized steel, and the outer tube is made of durable and lightweight polypropylene;
- the outlets are mounted on a reliable pass-through element of the appropriate shape;
- pipe height varies different options executions from 400 to 700 mm;
- the lower part of the pipe is equipped with a seal and can be inserted into the air duct to a depth of 300 mm;
- the inner diameter of the ventilation outlet pipe is from 110 to 250 mm;
- the ventilation outlet pipe is thermally insulated to prevent the formation of condensate and ice plugs;
- it is possible to put an electric fan on the ventilation outlet;
- a cap with a deflector protects the pipe from precipitation and enhances traction.
In some cases, the passage element is not included in the kit and must be purchased separately. Choose it taking into account that the shape of the overlay of the passage element matches the type and profile of the roofing.
Pass-through elements provide the versatility of installing a ventilation pipe on any roof. Their installation can be carried out both simultaneously with the construction of the roofing, and on finished roof. With the help of these products, there is no doubt about the stability and tightness of the ventilation outlets.
The importance of roof aerators

Winter time inside roof structures and condensation forms in attics. In order to protect the roof from dampness, the formation of fungus and mold, you will need to ensure ventilation of the space under the roof.
The roof ventilation unit is extremely simple in design. Air must move naturally from bottom to top under the roof. For its entry, holes in the eaves will serve, and it will exit through aerators with a ventilation hole cover, arranged in the roof closer to the ridge.
To cover the hole from precipitation, use a ventilation cover various configurations, including a ventilation fungus on the roof, which is actually a decorative cap.
Location of ventilation outlets on the roof

Experts advise making the location of the ventilation pipes on the roof exactly above the corresponding riser. In this case, without bending the channel, the efficiency of the air flow will be maximum. If this is not possible, then you will have to use corrugated adapters to connect. On the pitched roofs arrange rationally roof penetration closer to the horse. The advantages of this option are that the long inner part of the pipe will remain warm under the roof, and the shorter top element will be much more resistant to wind blows.
The height of the ventilation shafts above the roof of the building is also important. At a low location, the thrust will be weak, and a pipe that is too long will have to be fixed with braces. Guided by building codes, you should mount the ventilation pipe on sloping roof to a height of 50 cm above the roof. If the roof is flat, the height of the pipe can reach 30 cm. In the case when flat roof there are recreation areas or it is operated in a different way, then the height of the ventilation outlet must be at least 2 meters.
Whichever option you choose for the location of the ventilation pipes on the roof, the main thing is that their ends are above the so-called wind backwater zone. Otherwise strong wind can block the airflow and even direct it back.
Proper installation of duct penetrations

Consider an example of how to install a ventilation pipe on a roof made of metal. The design of a roof ventilation unit will be similar for other types of roofs, with only a few differences.
The sequence of steps for mounting the ventilation outlet on the roof:
- Determine the installation location on the roof of the pass-through element.
- Outside, on the upper wave of the metal tile, draw the contours of the hole according to the template supplied with the product.
- Cut a hole in the tile with a chisel and metal scissors for the ventilation pipe to exit to the roof.
- Cut appropriate holes in the bottom waterproofing layers of the roof.
- Mark according to the template and drill a series of holes for self-tapping screws.
- Clean the surface of the metal tile around the hole from moisture and dust.
- Apply a layer of sealant to the bottom surface of the gasket.
- Lay the gasket in place.
- Install the passage element on the gasket and fix it with self-tapping screws.
- Insert the exhaust outlet pipe into the passage element and check it for verticality.
- Fix the pipe with screws in the correct position.
- Ensure the tightness of the ventilation outlet for metal tiles to the roof from the attic side.
At the end of the installation of ventilation on the roof, the base of the passage element must be pressed so tightly against the roof that excess sealant is squeezed out from under the gasket.
On the video brought to your attention, you can familiarize yourself with the process of installing a ventilation pipe on a corrugated roof. In the same simple way, you can install a ventilation outlet on the metal roof of your house.
Time to take stock
You could see that there are no particular difficulties in the process of installing ventilation on the roof and installing the pipe that we have considered. Your ventilation system will certainly be effective if you calculate in advance the height of the ventilation shafts rising above the roof of the building. And the service life of the roof, disturbed by the passage of a ventilation outlet through it, will not be reduced at all if you take a responsible attitude to the quality of installation work.