In the last century, the Russian stove was a multifunctional device. This is the heating of rooms in the winter, at the same time it is hot and healthy food, the possibility of preserving the crop due to drying, and household amenities in the form hot water. It cannot be argued that the Russian brick oven is an ideal device. The disadvantage of the furnace as heating is uneven heating. Modern stoves are designed to heat the room to its full height.
The Russian stove consists of the following parts and elements:
- Opechek- used for storing and drying wood.
- cold stove- a small recess in which various dishes are stored.
- Shestok- the area on which you can put the pot.
- Under- This is the floor of the cooking chamber. It has a slight slope to the mouth, for easy movement of heavy dishes. It needs to be polished well.
- cooking chamber- a place for laying firewood, and cooking. The vault of the furnace also has a slope.
- retrumpet- camera above the pole. The chimney pipe is located above.
- Dusnik- a special hole for connecting the samovar pipe.
- view- cover door.
- Bed- a horizontal surface, located behind the chimney. You can easily sleep on it in winter.
More common at present is the improved Russian stove.  It differs by heating the underfloor part, due to which the heating of the room becomes more comfortable.
For laying the furnace part, refractory bricks are used, made of fireclay clay. The rest of the structure is made of ceramic bricks.
Almost every oven has metal or cast iron parts, such as doors and dampers. They can also be prepared in a certain quantity. You will need the following items:
- Doors: furnace and blower, as well as a cleaning door, ventilation for the chimney.
- Grate;
- Metal gate valves;
- View;
- Furnace damper;
- Water box;
- Plate;
- Steel strips.
To bookmark certain details - arches and vaults - easily collapsible templates are needed. They are produced from wooden and plywood elements and parts. 
Preparation of masonry mortar
Masonry mortar, unlike the usual one, is much more difficult to prepare for furnace work. You can also buy ready-made mixture in the store. But, if you decide to build a Russian stove with your own hands, then you can prepare the solution yourself.
Mortars for laying furnaces are selected depending on:
- If a solid brick of the M150 brand is used for masonry, then apply clay-sand mortar. It is also used for lining the furnace with special ceramic tiles;
- Used for laying refractory bricks based on special refractory clay with the addition of sand;
- When using fireclay bricks, use refractory clay solutions;
- Between the attic brick pipes are placed using cement-sand mortar;
The oven is usually located at inner wall, which has a shallow foundation. For the independence of the foundations, it is necessary to leave a gap of about 5 cm between them, and pour sand into it. And the upper edge of the foundation should not reach the floor level by 14 cm.
If the furnace is placed against the outer wall, on a recessed strip foundation, then it will be necessary to expand the pit and make sand and gravel backfill with careful tamping. Further, furnaces are arranged with a certain gap from the base of the house, the so-called retreat. Sand is poured into it, and its end walls are formed with brickwork.
If you decide to install the oven in the opening, then you just need to connect the ends of the lower crown. This can be done using strips of steel, which are placed on logs on both sides and pulled together with special bolts. Further, the opening is framed with special wooden racks. Be sure between them and the future furnace there must be a circulation gap, also called cutting. A gap should be provided under the wall in the foundation of the house, which will be equal to the width of the base of the furnace on each side.
Do-it-yourself laying of a Russian stove ordering
The main requirement for laying the furnace is tightness. That is why only whole bricks without any cracks go to the oven, and the seams are made thin - no more than 5 mm. It is not necessary to achieve airtightness by coating all the walls of the furnace with clay from the inside - this will reduce thermal conductivity and increase the deposits of soot and soot. In addition, the clay exfoliates and clogs the channels inside the furnace, which will be quite problematic to clean. The following methods are currently in use:
- bricklaying- with this method, the wall thickness will be equal to the length of the brick;
- half-brick laying- here the brick will be laid flat along the wall;
- masonry in a quarter- i.e. the brick will be laid on edge.
The dressing of the seams will be due to the use of alternately tychkovy and spoon masonry in the corners or not a full-sized building material.
If a ceramic brick is used, it must first be soaked, as it will "pull" all the moisture out of the solution.
Be sure to remove excess mixture during the laying process, and especially on the inside of the oven. Lay the outer walls of the furnace “in brick”, and the inner walls - “in half a brick”. The laying of the rows is the order of the laying in each subsequent row. Due to this process, anyone can build a Russian stove.
First row they are made of burnt brick, it absorbs moisture a little. For the first row, the corners are laid out from cut bricks.
Second row begins with the laying of the walls of the furnace, the cleanings are laid in front and on the left side. On the front with right side furnaces form, as a rule, an ashpit.
 IN third row purges on the left are laid without mortar. On the front side, blower and cleaning doors are installed. The doors are mounted using burnt steel wire, it is installed in cuts in bricks and fastened with masonry mortar.
IN fourth row the channels are blocked.
On fifth row install the grate of the grate of a small firebox. To install the inside of the firebox, refractory bricks are used, it is also placed without the use of mortar.
IN seventh row the grate of the stove furnace is being installed, the walls and the first firebox are being mounted. The right wall must be reinforced with a steel strip.
IN eighth and ninth row the laying of walls and internal channels continues. The doors of the furnace stove and a small firebox are mounted.
IN tenth row vaults of the first and second firebox will be connected. Cover the bottom of the furnace. And the smoke circulation channels are led into the crucible.
IN next row a steel corner is mounted on the leading edge of the masonry, a plate is installed on top. The space of the right firebox is covered with a special removable grate.
IN twelfth row the laying of the front walls of the furnace and the side walls of the slab begins with the use of refractory bricks. The burner damper is installed. To the left of the stove begin to form the lower part of the chimney.
WITH 13th to 16th row the laying of the walls of the furnace continues and the mouth of the crucible is blocked.
IN seventeenth row y begins a certain narrowing of the arch of the crucible and the expansion of the main chimney. And the back wall of the furnace is strengthened with a steel tie.
IN 18th row the roof of the crucible will be blocked, and the laying of the front wall of the furnace, which forms the overtube, will begin.
 IN 19th row the front wall of the crucible is strengthened with a screed, the walls are being installed above the crucible, forming a certain space for backfilling.
IN 21st row the stove is closed, and the overtube will gradually narrow towards the chimney.
Since ancient times, it so happened that the stove in the house served not only for heating. She could feed, and provide hygiene, and put to bed. The stove is the warmest and most privileged place in the house, not without reason in all fairy tales old people and children sat on the stove - those who most of all needed comfort and warmth. Today, the functions of a traditional heater, Swedish or Dutch stove are reduced mainly to a heating and decorative function, which does not prevent them from being used for cooking fragrant and healthy meals from the arsenal of many world cuisines. The article will focus on brick ovens for the home.
Folding the oven is a whole science that has been known for more than one year of study. If there is no qualified stove-maker among your friends, and you really want to have a hearth in the house, then you will have to take on the implementation of a bold idea yourself. Here's what you need to know before you get started.

We decide on the design of a brick oven
Depending on what hopes real estate owners have with their home, it is worth considering the options that satisfy all desires. Do not forget about the dimensions of various furnaces and their weight. It is necessary to calculate not only your own forces and means, but also the strength of the foundation.
Russian oven
- Suitable for connoisseurs of tradition. This design performs the maximum number of functions, so it will take up a lot of space in the house. Traditionally, it is placed in the corner closer to the door, but in modern interiors it can be placed in the center of the room.
- The lounger is provided for rest; Depending on the dimensions of the stove, it can have impressive dimensions. The crucible (or otherwise the firebox) is located directly below it. Continuous air supply for better burning fuel is provided by the blower. The hearth and the stump are the compartments preceding the mouth of the furnace. Cooked food left in this area is guaranteed to stay warm for a very long time. The undercoat and the underplate were used to store kitchen utensils, tongs, pokers. Pechurki are recesses of small diameter located along the side wall of the stove. They served to dry small things, for example, mittens covered with snow dried out very quickly in them.
- Those who wish to lay down a Russian stove in the house will have to provide for it a place of at least two meters in height, one and a half meters in width and two and a half in length. A design with such dimensions will easily provide uniform heating of rooms of 30-40 m². But such a furnace also requires a lot of fuel. Those owners who cannot boast of significant volumes of the room or are not fans of the traditional color should pay attention to another version of the stove.
Brick oven photo

Swede
- A model that is more compact than a Russian stove, designed for space heating and cooking, is Swedish.
- She has the same height requirements - two meters. But the dimensions in length and width are reduced to one meter. The firebox provides enough heat to cook food on two burners of a cast iron stove at the same time.
- There is also an oven, which the housewives will appreciate. The Swede has many modifications, they are named after the developers (a stove designed by Potapov, Buslaev, Kuznetsov). Each is slightly different in size, appearance, heat dissipation, so choose suitable option won't be difficult.
Brick oven video

Dutch
- It will serve only for heating the house. It, contrary to its name, has Russian roots, as it is an invention of domestic stove-makers. Its main advantages are high heat transfer with compact dimensions. If there are no severe frosts outside the window, then the Dutch woman is able to keep warm for a day. Design features include a winding chimney and a low (compared to a Russian stove) located firebox. Thanks to this, the Dutchwoman warms up evenly from the bottom up.
- Its walls are thin - one, less often two bricks, the base in the form of a circle or rectangle fits on an area of 1 m². To heat a medium sized room country house, this is more than enough. And in terms of weight, it is noticeably lighter than its competitors, and in terms of fuel consumption it is the most economical. The design of the firebox is not complicated by the abundance of details, but this only plays into the hands of the issue of increasing thermal conductivity. The silhouette of the Dutch stove is very attractive; to improve its appearance, it is often finished with tiles.

Preparatory stage before making a brick oven
At the preparation stage, you need to attend to the search for a project brick wall suitable in all respects, consider its location, take into account all fire safety requirements. You will need to pick up tools, make a purchase the right material and invite helpers.
The draft scheme can be ordered from specialized agencies or trusted resources on the Web. For those who wish, detailed courses are even filmed on video.
Of the tools you will need:
- a mesh (sieve) for sifting sand, with a mesh size not exceeding 2 mm;
- shovel;
- grinder (you have to cut a brick);
- a pickaxe hammer will help chop a solid brick into small pieces and hew them to the desired shape and size;
- stitching for seams. This is a special tool that allows you to give the seams between the bricks a neat and aesthetic look. If the stove is planned to be subsequently plastered or covered with decorative tiles, then this device will not have to be used. And when the master wants to leave the brickwork in its original form, the jointing will ensure the same density and width of the seams;
- trowel (trowel) for applying the solution;

- nozzle-mixer on the perforator. The solution will be needed in large volumes, and such a mass can be evenly mixed only using a power tool;
- tape measure is better to take with a margin of length. Five meters will be more than enough;
- a plumb line will help control the verticality of the masonry in the corners;
- a rule is needed to check the evenness of the masonry. Suitable and smooth wooden lath more than a meter long;
- the building level checks whether the masonry has “fallen” relative to the horizontal;
- the work will be “dirty”, so cleaning equipment: buckets, rags, rags and mops should be kept ready. It is better to clean the solution before it dries.
The list of materials will not differ in variety (depending on the chosen furnace configuration). Significant changes will only be in the number of bricks and additional accessories: a cast-iron stove, the number of doors. Brick, sand and clay are the main items of expenditure.
- Sand must fall under the following characteristics: clean, fine, uniform. This result can be achieved by sifting.
- Clay is skinny, normal and oily. The proportions of the preparation of the working solution depend on its variety. Many experts advise choosing the "golden mean", that is, clay of a normal degree of fat content.
Brick is produced in four main types.
- Ceramic. This is a classic among materials for housing construction. Lay the foundation, build a load-bearing wall, build a country house - all this can be done from red brick. True, now it is produced not only in red and orange, but in almost any shade.
- silicate brick has a different composition and color than ceramic. It is less moisture resistant, but dampens sounds well. But these characteristics are completely irrelevant for the construction of foundations, pipes and furnaces.
- Refractory brick type used in industries where constant heating up to high temperatures- is the norm. Metallurgists and glassblowers, for example, work with furnaces built from this material. Its high thermal conductivity and ability to withstand extremely high temperatures make refractory (fireclay) bricks the best for building a furnace. It is divided into four types:
- carbon steel is rarely found in free sale, it is intended for the use and construction of highly specialized production facilities;
- lime-magnesia brick is used in metal smelting enterprises;
- the quartz look, for all its fire resistance, is very unstable to the effects of alkalis or iron oxide. But for walls and vaults of furnaces it can be used;
- alumina fireclay brick is the most common, but it will not withstand heating over 1300 ° C.

Refractory bricks are more expensive than conventional ones. Russian manufacturers offer this building material at prices lower than those of foreign competitors.
Facing brick, as the name implies, is used only for decoration. To improve the appearance of the furnace, it is used quite often. The variety of shades makes it possible to fit the stove into any interior.
Foundation for the installation of a brick oven
- The furnace foundation is formed (ideally) at the stage of laying the foundation for the house. They must be independent of each other. This requirement is explained by the difference in the level of natural shrinkage. It will arise in any case, and the loads on both bases and temperature effects will be different.

- The base should exceed the dimensions of the future structure by about 15 cm in each direction. Waterproofing - mandatory requirement to the base of the oven.
How to lay a Russian brick oven
- What else needs to be considered before starting work? A classic Russian stove will require about 1,700 bricks, a view with a half-door that will regulate access to it, a valve (hole dimensions 26 × 24 cm), sand and clay in sufficient quantities. You will need to make about 80 buckets of mortar.
- As for the layer of the applied mixture, in this case Rule more - means better, does not work. A masonry seam of moderate thickness will help the bricks to grasp faster and stronger.
- According to the classical canons of laying out the furnace, the vault of the furnace should go at an angle relative to the mouth. A protrusion in the form of a nut cuts off sparks from the crucible on the pipes and traps soot.

- Orders have been developed to help the master. Thanks to these cuts, you can clearly imagine how the laying of a particular row should be done. The top view allows you to understand when you need to use a whole brick, and where you need to beat off a half. The orders also indicate the installation locations of cast iron and other parts of the stove.
Drawing of a brick oven

- The base of the furnace must be covered with a layer of waterproofing material. Roofing felt or roofing material is quite suitable. The first row will be laid out directly on it. Burnt (overheated) bricks at this stage of masonry will be more preferable, as they are not afraid of moisture.
- In order for the dressing of the seams in the initial and subsequent rows to be of high quality, in the corners starting row lay three bricks ¾ in size. That is, a triangle is formed from these incomplete bricks: one in the center and one on the sides. They need to be made on a bevel to ensure maximum fit.
- Second row serves as the initial for laying out the guard.
- Since masonry involves the installation of bricks apart, in order to avoid the coincidence of the seams, third row will require the presence of four bricks in the corners with dimensions of ¾.
- When laying fourth row you need to take whole bricks. A pair of bricks that are stacked opposite each other, forming the entrance to the under-furnace, should have beveled corners. Thus, support for the arch will be obtained. In order for the stove to turn out to be even, a wooden formwork is built in its opening.

- When the arch is completed, you can return to laying fifth row. Three ¾ bricks are placed in the corners. The peculiarity of laying bricks in this row is that 20 of them (those that form side walls) must be beaten off with a hammer with a pick so that they form a support for the vaults of the furnace.

- Sixth row provides for laying the side walls in one brick, and the back and front in two. It is important that the formwork is designed in such a way that, after completion of work, it can be easily removed through the entrance to the underfurnace. If you can't give bricks desired shape, you should use the usual ones, and fill the voids with mortar and pieces of broken bricks. But ideal strength is ensured when laying a whole brick with neatly made bevels.
- Seventh row in terms of execution technique it resembles the first one, for the eighth solid brick is used. The eighth row involves arranging a platform for a cold stove.
- Ninth row- as the first, connected with the walls of the stove. Dry sand is placed between the walls.
- Eleventh row must completely cover the sandy backfill and the stove itself.
- Thirteenth row involves the start of work on laying the walls of the hearth and furnace. A strip of metal passes between them, which in its shape exactly repeats the furnace mouth. You can fix it in the masonry as follows: the strip should be with holes through which steel wire is passed.
- All other rows are performed in order to build up the walls of the firebox and hearth up to up to the seventeenth row. It requires that pre-chip and hewn bricks in the amount of eight pieces become a support for the vault of the furnace. The crucible-furnace itself is laid out similarly to a guardianship.
- The completed arch of the crucible is an occasion to start laying eighteenth row. A pair of heels - supports is fixed on the side of the hearth window. The arch, of which they are the beginning, will be small. When laying out the next rows, do not forget that the free space must be filled with a mixture of well-dried sand, brick, gravel and broken glass.
- twenty first row serves as a cover for the backfill and the crucible, and twenty second forms an additional layer.
- twenty third row should strengthen the shield walls and the retube. In the last element, a stuffing box is fastened, it is needed to connect a samovar pipe to it, if it is planned to heat it indoors. When the subsequent rows are laid, another hole for the view is formed in the overtube. And the next two rows fix the half-door of the view.
- Laying technology thirty-first row requires that a gutter be formed next to one of the walls (an additional row of three bricks). The next row can completely block the overtube. The only caveat is that on the right side it is supposed to leave a hole in it, blocked by a valve.
- From the thirty-fourth row you need to build up the walls of the chimney. Almost at the very ceiling, cutting is carried out in order to let the bricks in a little. This achieves two effects: decorative and practical. The last value is that the groove increases heat transfer and serves as a barrier separating the ceiling structures from the pipe itself.
- After the masonry dries, they proceed to the final finishing of the brick oven, make a trial heating (not at full strength) and enjoy the work done.
Do-it-yourself Dutch brick oven
The Dutch oven is much simpler than the Russian one, but it has its own nuances. The classic version looks like this:
- the design has rectangular shape(even if it is different, the configuration of the firebox will not change and remains rectangular);
- there is no grate;
- structural elements:
- a firebox, which is located at the base in the lower half of the furnace;
- a chimney consisting of an exhaust pipe with a six-channel passage of gases through the system: three lowering and three lifting channels;
- cleaning door;
- blew.
You will need to purchase:
- refractory bricks - 200 pcs;
- well bending wire;
- a piece of roofing material for waterproofing;
- crushed stone, clay, sand and cement;
- masonry glue;
- firebox door, blower, valve;
- a standard set of level, tape measure, trowel, plumb line.
Scheme of a Dutch brick oven

Stages of work
When the foundation for the stove dries out, it is covered with roofing material, and that, in turn, is covered with a layer clay mortar. Preparation: clay is soaked in water for at least two days, after which it is taken in a volume of 8 liters, 0.9 kg of glue for laying stoves, two buckets of sand are added. The resulting consistency should resemble thick sour cream. Let the solution dry.
- First row spread over a layer of sand moistened with water. A sand cushion is poured over the entire surface of the foundation. Without forgetting the rules of dressing, two continuous rows are laid between the bricks.
- In the third row begin to form an ash chamber, the door is installed later.

- Fourth row perform in order to build up an array of the furnace, the door is immediately installed. To fix it in the masonry, a metal wire is used. If the first three rows of bricks were laid out flat, then in the fourth row they are placed on edge until the firebox door is closed.
- The ash pan is installed in the fifth row, and sixth row- simple increase in the height of the walls. When the lining of the ash pan door is finished, it is covered with the seventh row, and the bricks are again laid flat. Eighth row- Height increase.
- Some homeowners equip a hob in a Dutch stove. If it is provided for by the project, then ninth and tenth row are shifting back. At the top of the ninth row, an asbestos cord is laid around the perimeter, on which a cooking surface is installed. The tenth row involves the beginning of laying the foundation of the chimney. To facilitate the design, a metal chimney is sometimes mounted.
- IN eleventh row a valve is being installed (using an asbestos cord), and the masonry is made in a quarter of a brick.
- IN fourteenth row the firebox is covered from above, a hole is formed along the back wall for the exit of excess smoke. Similar work is done in the next row.
- IN two rows, sixteenth and seventeenth form a cleaning door. You can simply leave a brick in its place without bonding it with mortar.
- Eighteenth row- this is the basis of the chimney. When all the bricks in this row have taken their places, they install the finished pipe or continue to form it through masonry.
- Experts advise soaking the brick in water for some time (until air bubbles stop actively entering the surface). It is believed that a wet brick will not absorb water from the mortar, it will grab better, and in the future the seams will not collapse under the influence of heat.
- For maximum heat transfer, the walls are laid out in one brick. It is not recommended to drown the Dutch woman with those types of fuel that are characterized by rapid combustion (brushwood, straw, dried reeds). The furnace does not have time to warm up, and all efforts literally fly out into the chimney.
- Fuel, which forms a lot of ash during combustion, will also not contribute to heating the room, but it forms a lot of soot in the chimney. This increases the risk of fire.
- The best option is a fuel that can smolder for a long time.
- It is worth adding to the issue of fire safety that the Dutch oven cannot be heated too much. It will emit carbon monoxide when overheated. The degree of heating is checked by the usual touch of the palm to the masonry: if the hand tolerates heat, then the temperature is about 50 ° C. This is the norm.
- For those who are laying stoves for the first time, it is worth doing a test laying in a “dry” way. That is, to perform all the work in stages, without fastening the bricks with mortar. So you can fill your hand and at the same time decide whether you need outside help.
Making a stove with your own hands is not the kind of activity that can be submitted the first time. Careful study of schemes, test masonry without the use of mortar, tips experienced craftsmen make the task easier. Work and patience, according to the saying, greatly contribute to the positive outcome of any business.
The need for warmth and comfort in a private house arises already in the middle of autumn, and it is good if it is carried out to the house central heating. Those who have to heat their home autonomously will have to thoroughly prepare for the autumn-winter season. Modern boilers or electric fireplaces can solve the problem today, but they will not create that special unique atmosphere of a live fire in the stove, accompanied by crackling firewood. Therefore, it is quite correct if the following question arises for you: “How to fold a brick oven with your own hands?”. In this article, we will consider the process of creating a brick oven in stages, taking into account the schemes and all the materials and tools necessary during the process of laying. You just have to repeat all the described processes correctly, and you will become the owner of a solid home stove that will warm you on cold winter evenings.
It is very easy to make a brick oven if you have a clear idea of what type of oven will fit perfectly into the conditions of your building. For this you need to familiarize yourself with brief characteristics private houses, and based on the information received, make the right choice. So, the types of furnaces are relative to the type of buildings.
- Furnace in a wooden house. An oven of this type needs a very solid foundation. It is better to provide for the presence of a furnace even at the stage of building a house, then you can significantly reduce the cost of creating a foundation for furnace equipment. If the stove was not included in the house construction project, then you will have to spend money on the partial dismantling of the floors and subsequent finishing work. There is no other way out. The best option For wooden house there will be a compact stove made of heating and cooking type bricks of medium heat capacity, as well as a fireplace stove or a variant with a bread machine.


- Classical Russian stove for a cottage. This option is losing popularity due to the massiveness and complexity of the masonry. Such a large-sized stove with the functions of cooking, heating water, heating and a sleeping place, that is, a lounger, is very convenient, but does not fit into a small house, and also requires the creation of an individual monolithic reinforced base.

- Furnace in a country house. Ideal option for country house will bake with hob and hot water tank.

- The stove in the cottage or in the country. A cottage and a summer residence imply a visit only during a certain season or on weekends, which means that in such a building it will be sufficient to install a small brick oven with hob. In this case, it is worth taking a closer look at the furnace structure, folded along summer version when the heated air is sent directly to the chimney, and not to the heat exchange channels.


- The furnace for the house with a bath. If a bathhouse is attached to your house, it is quite acceptable to build a brick stove-heater with a built-in boiler for heating residential premises.

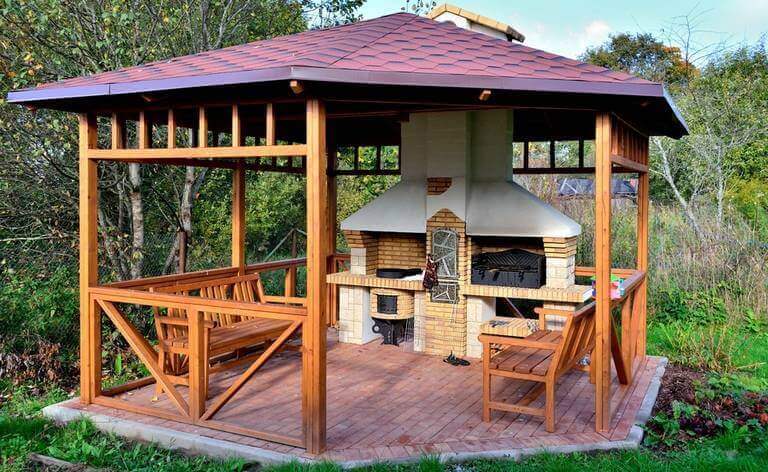
- Barbecue oven. Such units are usually installed in attics, gazebos or summer kitchens. They can be modest in size or very impressive, but they are equally used only for cooking, therefore they are equipped, for example, with hobs, ovens, barbecue grills, barbecue grills, cast-iron cauldrons, etc.


Barbecue hob with oven
This is all that needs to be taken into account in order to correctly determine the type of suitable furnace equipment. You can move on.
Baker's advice. When deciding on the size of the furnace structure, first of all, pay attention to such points as comfort of use and fire safety!
Stage 2. Building material: choice
When choosing a brick, one must consider how resistant it will be to the effects of high temperatures, while the main emphasis should be placed on the integrity of the material after repeating the heating and cooling procedure. The characteristics of brick as a building material will determine the life of the furnace. It is important!
Choosing a brick

Any brick is marked. One of them stands for density. For furnaces, it is optimal to purchase bricks marked from 75 to 250, while it is worth remembering that the denser the product, the more slowly the furnace will have to be melted, and the slower it will heat up. On the other hand, a well-heated solid brick oven will slowly cool down, giving off its soft heat to the atmosphere.

If you plan to build a stove in a bathhouse, it is better to choose the least dense brick (but higher than M100) so that it does not take a lot of time to kindle. And for appliances intended for heating residential premises and cooking, it is worth buying a denser brick.

It is worth knowing that the density indicator is not a sign of brick quality. However, it is better to clarify the composition so as not to purchase a product with chemical impurities hazardous to health.
The next marking is the frost resistance of the product. This indicator is especially important (and should be the highest) for that part of the chimney that is located above the roof. Frost resistance itself is the property of a product to absorb moisture, which deforms the material during crystallization. Top performance frost resistance of hollow facing bricks, while the inner part of the chimney can be laid out of solid red brick. High-quality products with a high level of frost resistance are produced in the Novgorod region, the city of Borovichi.
It is advisable to purchase red bricks made by plastic molding. There are few pores in these products, they withstand temperature changes well, the masonry does not crack even after a long downtime of the furnace. Products silicate, pressed, cast by the method of slip casting, unfired raw materials are not suitable for the construction of furnaces.

The fireclay brick, made in accordance with GOST, can withstand up to 1350 degrees. From such a brick, you can build the entire furnace or use it only for lining the internal working surfaces of the furnace. For laying the firebox, you can use straw-yellow products of the Sh8 brand with dark patches, fireclay bricks Sh22 - Sh45 are suitable for the furnace vault. However, this recommendation does not apply to sauna stoves, because fireclay bricks are operated only at a humidity of less than 60%. In the bath, it is better to use clinker brick or ceramic refractory.


Prices for fireclay bricks
fireclay brick
How to check the quality of bricks:
- if you drop the product on the floor, it will break into large pieces. If the brick crumbled into crumbs, discard the batch;
- if you touch a brick, it does not generate dust;
- If quality product hit with a hammer, there will be a clear sonorous long sound;
- the edges of a good brick are even, the color is rich and even.

GOST 530-2012. CERAMIC BRICK AND STONE. Download file
GOST 8691-73. REFRACTORY PRODUCTS OF GENERAL PURPOSE. SHAPE AND DIMENSIONS. Download file
Choosing a mortar

Choice mortar- an important point. If the solution is not correct, the stove will smoke, and cracks may appear on the surface of the structure very soon.
More often masonry mortar prepared from river fine-grained sifted sand (grains of sand maximum 1.5 mm each) and clay, which must be soaked for several hours before kneading. Soaked clay is rubbed through a sieve to get rid of lumps, because the masonry seam should not exceed five millimeters in thickness.

Clay mortar - preparation
The proportions for the clay solution depend on the quality of the clay - the fatter it is, the more sand, but it is important not to make the mortar too thin, which will dry out and crack. It is recommended to make several test mixing solutions to determine the desired proportions of sand and clay, while it is important to mix the sand thoroughly, adding it in several steps.
A test for fat content is done by taking half a fist of the material, moistening it and kneading it well, rolling it into a ball, and then placing and squeezing it between two smooth planks. If the ball was squeezed by a third of its diameter and no cracks appeared, then the solution is suitable for laying the furnace. Additional quality control - drying a ball with a diameter of 5 cm in air for 20 days. A dried ball of good quality will not crumple when pressed against it.


How much water to pour? Again we make test batches and check the degree of fluidity of the solution. We draw a trowel over the mixed solution and look at the trace:
- if it is torn, then there is not enough water;
- if almost instantly swam, - an excess of moisture;
- if the trace is clear, and the edges are even, then the mortar is suitable for laying the furnace.
Figures 5 and 6 show a trowel that has been dipped into the solution. In the first case, it is too greasy, streaky stains remain on the trowel, you need to add a little sand, and in the second case (Fig. 6) the solution is good, the metal is slightly translucent, and the stains are patterned.
Note! For mixing the masonry mixture, it is desirable to use soft water. Too hard, that is, 8 degrees and above, will reduce the degree of strength of the solution.
The last suitability test is carried out by spreading a layer of 3 mm on the bed of bricks. The second brick is glued to the first, tapped with a mallet and wait up to 5-10 minutes. During the specified time, both bricks should stick together. If the bricks do not spill even when shaken, the furnace is guaranteed to stand for a hundred years.


Note! For laying the firebox, either chamotte sand or a mixture of equal parts of chamotte and quartz sand is added to the solution.
Video - Preparation of clay mortar for laying the oven
Clay mortar for laying the foundation and fluffing the chimney is not used. For these elements, a classic cement mortar or with the addition of lime paste is used (cement M500 or M600 - 1 part, lime dough - from 9 to 16 parts).

Important! If you think that you cannot cope with the preparation, testing and kneading of the clay solution, purchase ready-made oven mixtures, for example, Terracotta (20 kg 306 rubles). For red brick, a mixture with red clay is suitable, and refractory mixtures gray color ideal for both red and fireclay bricks. Do not purchase ready-made mixtures containing cement.

Prices for cement M600
cement M600
Stage 3. Selection and calculation of the number of bricks for masonry

At the second stage, it is necessary to carry out the optimal calculation of the dimensions of the brick oven. By setting the final size of the furnace structure, you can set the required number of bricks. Brick red solid unary has a fixed size of 250 (length) x 120 (width) x 65 (thickness) mm with a deviation of +/- 2 mm.

Refractory fireclay bricks, from which the firebox is laid out in almost all furnaces, are manufactured and marked in accordance with GOST 8691-73. See table for size information.

For one square meter of half-brick masonry you will need:
- excluding mortar joint - 61 bricks;
- taking into account mortar joints- 57 pieces and 0.011 cubic meters of masonry mortar.
Accordingly, for two square meters of brickwork, 122 or 113 solid red bricks will be needed, and the estimated amount of mortar used will be 0.022 m3.
Please note that when laying in one brick, that is, if the furnace wall thickness is not 120, but already 250 mm, then 128 or 115 bricks will be used for each square meter, respectively, excluding and taking into account mortar joints, and the amount of masonry mixture will increase up to 0.027 m3.

How is a simplified calculation of the approximate number of bricks for the entire furnace:
- the number of bricks in the first row is calculated;
- the resulting value is multiplied by the number of oven rows;
- the found number is multiplied by 0.8 (for heating appliances) or 0.65 (for appliances with a heating shield).

For example, let's calculate the number of bricks per oven with dimensions of 90x90 cm. There are 3.5 bricks per 900 mm. That is, in the first row there will be 24.5 pieces. We multiply by the number of rows 24.5x30, we get 735 pcs. We accept a coefficient of 0.65x735 pcs. = 477.75 pieces, round up to 480 and add 10% for rejection.
The number of bricks per pipe is considered separately. Its height and design are accepted in accordance with SP 60.13330.2012 (“Heating, ventilation and air conditioning”) and SNiP 2.09.03-85 (“Chimneys”), which will be detailed below. For a straight four-meter pipe you will need:

We consider: 4x56 = 224 pcs. For the otter, cutting and fluff, add another 56 bricks and multiply the result by 10%. It remains only to sum the number of bricks for the stove with the same amount for the chimney.

You can more accurately calculate the amount of material by compiling or taking into work an existing ordering scheme, which shows longitudinal and cross sections stoves, recommendations are given for laying the chimney and the dimensions of all elements, including doors.
This information can be used in practice, forming an individual plan for the cost of brick material.
It is worth noting: if you want to end up with a perfect brick oven that fits perfectly into your home, be as careful as possible, starting with the choice of furnace equipment and ending with its commissioning. This approach will allow you to enjoy your personal creation for a long time in the future.
Stage 4. Stove location selection
So, after you have decided on the type of furnace, determined the area of \u200b\u200bthe furnace structure, and also chose construction material and mortar, proceed to the choice of a place for installing the furnace.
Typically, the stove is installed in one of the corners of the room or against the wall - this saves precious meters of living space.

The heating stove can be located in the center of the house, at the same time being in several neighboring rooms at once with its different faces, for example, a firebox will go into the kitchen, and three other walls will heat the rooms.
It is better to build a sauna heater near the door to the steam room. This will ensure proper temperature and humidity conditions and allow air masses to circulate efficiently (provided that the exhaust and supply vents are correctly located).

However, you need to remember about the distances between the surfaces of the furnace, chimney and walls, ceiling. According to SNiP 2.04.05-91, it is worth adhering to the following distances:

Heating furnaces, smoke and ventilation ducts of residential and public buildings. Rules for the production and acceptance of work
Stone and furnace works. Downloads pdf
Stage 5. Foundation
A furnace made of bricks has a large specific gravity, therefore, without a reliable foundation, the structure cannot be installed.
The foundation for the furnace can be monolithic reinforced concrete, piled, columnar, laid out of blocks, pile-screw.


Regardless of the type, the foundation of the stove should not be connected to the base of the house. The type of foundation is chosen, as for the house, starting from the type of soil.
- Gravel-sandy soil allows you to equip a shallow base.
- If the soil is clayey or sedimentary, it is better to pour the foundation on a crushed stone pillow, while deepening it to the level of freezing.
- In permafrost zones, a pile-screw base is equipped, paying special attention to the thermal insulation of piles.
- On dry rocky soils, the foundation may have minimum thickness or absent altogether.
- Bulk soil is not suitable for installing a brick oven.

Consider the method of arranging solid bases for a brick oven.
Step 1. Depending on the type of soil and the level of its freezing, we dig a pit. We accept the width and shape based on the dimensions of the furnace and adding 10-15 cm to its length and width, respectively. Immediately pay attention to the location of the ceiling beams - a chimney pipe will have to pass between them, and taking into account the indents regulated by SNiP. It is also recommended to make drainage (drainage) from the foundation of the furnace in order to reduce moisture and heaving of the soil.

Step 2 The bottom of the pit is rammed and leveled horizontally as much as possible. We pour a ten-centimeter layer of small broken bricks, rubble stone or rubble. We repeat the tamping procedure.
Step 3 We prepare a liquid cement mortar (the ratio of cement and sand is 1 to 3) and fill it with an embankment.

- combine 10 cm layers of crushed stone backfill with cement fill. This option is acceptable for bases of small depth, namely up to 50 cm;

- install the reinforcing cage and pour it with concrete. The frame is knitted with a wire made of reinforcement with a diameter of 10 mm. The cell size is 10x10 cm. Formwork is installed in the pit, the frame must be 5 cm from its walls and bottom, for which plastic clamps or pieces of brick are used. Concrete is poured inside, the mixture is compacted during pouring with a deep vibrator or a metal bar. top point pouring should be 15 cm below the level of the finished floor;


- pour concrete reinforced slab, on top of which lay the foundation walls from silicate or red brick, and pour the inside with concrete with backfill (loose aggregate should be less than or equal to the volume of concrete).

The first and third versions of the bases are completed with a layer cement mortar. The filled layer is checked with a level and, if necessary, leveled with a rule or other suitable tool.
Further work is carried out after the complete drying of the solutions used in the process of pouring the foundation.
Step 5 We lay the waterproofing in three layers, fix it with mastic (for roofing we use tar, for roofing material - bituminous).
Step 6. We lay out a continuous row of bricks. We put whole bricks around the edges, halves - inside. The brick base should be 5-7 cm of the existing foundation, but 5-7 cm wider than the stove itself.


We do not use cement to bind bricks together. On top of the masonry, which we also check for horizontality, we put another layer of waterproofing, then lay out the second layer of brick, observing the dressing between the two rows. The brick base should ideally be exactly flush with the finished floor or rise 3-4 cm above it.
Important note! Do not use bricks for construction that have lain on the street all winter and have been repeatedly wet and frozen. Such products can quickly collapse, which will greatly reduce the service life of the furnace.
We cover the space between the foundation of the furnace and the house with river sand.
Stage 6. Construction of a stove-heater with your own hands. Step-by-step instruction

This project can be implemented as separate bath, and in a steam room attached to a residential building. The stove does not have a tank for heating water and a heat exchanger, but there is a hob on which it is easy to heat water for 4-6 people. At the same time, the oven cools down very slowly, so there will be warm water even the next morning after the procedures, and in the room, even in winter, the temperature will not drop below +15 degrees for more than a day. The stove will heat up a steam room measuring 3.3x5 meters and with a ceiling height of 2 meters up to eighty degrees in about 5-6 hours.

The heater itself will be located in the steam room, and fuel will be loaded from the rest room. Bath stones, which hold about 40 kg (soapstone), are loaded into a special oven, where they are evenly heated, so that the steam in the bath is dry and quite thick, hot.

The height of the furnace will be approximately 1.33 meters. The oven is square, side 0.89 meters. Using these data, calculate the dimensions of the foundation and lay / fill it in advance.
During the construction of the furnace (the chimney is not taken into account), the following will be used:
- 269 red bricks;
- 63 refractory bricks ShA-8;

- furnace door cast iron dimensions 0.21x0.25 m;

Stove door - example
- door for blower 0.14x0.25 m;
- two cleaning doors 0.14x0.14 m;
- grate 0.38x0.25 m;
- two-burner cast iron hob 0.51x0.34 m;

- oven for laying stones with dimensions of 0.25x0.25x0.44 m;
- one valve for the "summer" mode with dimensions of 0.13x0.13 m;

- one valve for the chimney, size 0.13x0.25 m;

- pre-furnace steel sheet with a size of at least 50x70 cm.

- the key in brickwork is the construction seam. It should be uniform for each row, carefully smeared. Only in this way will you get the solidity of the furnace structure, and eliminate the leakage of smoke from the fuel chamber. Follow the process with the utmost care;
- before laying the brick, it must be well moistened. To do this, prepare a container with water and lower the bricks for 5-10 minutes in water. This time is enough for the adhesion of clay and brick, in the future, to be at its best. high level. Wet brick after drying eliminates the occurrence of cracks in the finished furnace structure. We keep the bricks in the water until air bubbles stop coming out. Refractory bricks are not soaked, but only moistened with water;
- before laying each subsequent row, use building level and plumb - the use of these tools in the workflow is a guarantee that the design will be free from geometric distortions and distortions.

The first row is laid out of red brick. In total, you will need 24 whole and one brick sawn in two. Lay the row very evenly, check the horizontal position along the sides and axes of the masonry with a meter level. Check with a tape measure for squareness and alignment. We adjust the bricks with a rubber mallet. We make seams no more than five millimeters.

The second row does not differ from the first either in the quantity of bricks or in its quality. One has only to carefully observe the dressing between the two rows. It is better to start laying from the corners, gradually filling the middle.

For the third row, take twenty red bricks and an ash chamber door. We lay sixteen bricks whole, we cut four more with a grinder or a hacksaw for metal with a tungsten carbide blade (see the drawing for the accuracy of cutting the elements).

Wet the brick before cutting and fix it securely. We comply with safety regulations!!!

Cutting a brick with a grinder - photo

Video - How to cut a brick
Video - Sawing an oven brick with a grinder
We are not in a hurry to apply the solution, first we lay out the entire row dry! Bricks must not be laid with the cut (cut off) side inside the firebox or chimney. It is also strictly forbidden to lubricate the inner surfaces of the channels and the firebox with clay.
If the brick is laid unsuccessfully, we remove it, clean it from the mortar, soak it again, apply a new mortar with a trowel, and then re-adjust it.
We fix the door in the same row, for this we wrap the door frame around the perimeter with an asbestos cord, cover it with a solution, insert and twist a steel knitting wire (diameter 3-4 mm, length 1-1.2 m, the number of bars for twisting from 3 to 4 ) into the holes in the corners of the frame, and the resulting wire twists are passed between the rows of bricks.


Fastening the door with wire - the upper ends of the wire are laid between the bricks

Installing the oven door - photo
Video - How to attach the wire to the door
Video - How to fix the oven door blower
Clay mortar and the weight of the bricks will securely hold the door frame.
Another way to install the door is using metal strips or plates that are widened at the ends. The elements are attached to the door frame by riveting, after which they are fixed in the masonry joints. If the plates are too thick, it is better to carve grooves on the bricks.

The accuracy of the door installation is checked by a plumb line and level.
Advice. To make the cleaning door fit more accurately and accurately, chamfer the bricks that will be located around the perimeter of the door frame. That is, the hole for installing the door should be 5 mm longer and wider than the frame.
Don't worry if you can only lay out three rows in a day. Soaking, trimming, trimming and laying require time, patience and precision.

In the fourth row, we continue to form the ash chamber, additionally laying out the lower horizontal channel. For the entire row, 16 bricks are required. For the channel, we immediately put a door 0.14x0.14 m. The door can be fixed without asbestos, just on the solution, since in this place the temperature will be low, and the thermal expansion of the metal is minimal.


For the fifth row, we take 16 and a half red bricks. We cut four of them obliquely to make the door overlap using the “lock” method. Bricks are laid with the beveled side up. We cut off two more bricks obliquely, forming an overlap.

Row 6
In the sixth row, fireclay bricks will be used in the amount of six and a half pieces and red brick - 12 pieces. It is shown in yellow on the diagram. We lay out the base of the fuel chamber from fireclay. We make slots for laying the grate. The hole for the grating should be 5-7 mm larger than it so that the expanding metal does not destroy the masonry. The space between the grate and the bricks (bevels) is covered with sand.


Experienced stove-makers advise laying the grate with a slight, up to three centimeters, slope towards the stove door.

We close the cleaning door with one brick.
In this row of 9 red and 5 fireclay bricks we form a fuel chamber. The brick, which is placed in the back of the firebox, is cut obliquely at an angle of 45 degrees.

We install the door using asbestos cord. Door size 21x25 cm.
We also place a welded oven made of steel 8 mm thick. The back of the cabinet will be in the fuel chamber. The door of the closet is slightly less than its height, that is, it is raised, due to which the bath stones will not fall out on the floor.

We carry out laying according to the ordering schemes. For work, we take seven bricks of red and fireclay.

For the ninth row, you will need 6.5 red and 7 fireclay bricks. We build the walls of the firebox.

In this row, by the “lock” method already discussed above, we close the furnace door. The whole row will take 7 red, 8 fireclay bricks and another 1 fireclay hewn with a wedge.

We take 10 and a half fireclay and 6 and a half red bricks. Close the door and back of the oven. We lay bricks, connecting the firebox with the nearest vertically located channel. Another channel is formed above the cabinet - we install a door there.

We take 12 red and 9 fireclay bricks. We make squeezing, as shown in the diagram, we also make a recess for the hob, taking into account the required five-millimeter gaps. We lay the hob 51x34 cm, we do not use the solution.


We install the valve in the near vertical channel. To install a metal element, we make slots in the brick, as shown in the diagrams. The far vertical channel, starting from this row, bifurcates.


Gate valve in the furnace - photo
For work, we take 9 fireclay and 6 and a half red bricks.

We begin to form a decorative niche, for which we use 15.5 red bricks. Chamotte is no longer used.

We combine the near channel and the central one. We use 13.5 bricks.

We continue laying in order. We take 14 and a half bricks.

We block the far channel and the central one. We cut two bricks over the niche obliquely to make a castle floor. We also cut the brick obliquely over the hob. We lay the wedge brick in the castle. Consumption per row - 18 pcs.


We block the furnace completely, with the exception of the near channel. We make cutouts in this channel to install a 13x25 cm valve. We cut another brick obliquely above the slab. Consumption - 16 pcs.


From 17 and a half bricks we make a second overlap, leaving only a smoke channel measuring 13x13 cm.

From four bricks we form the base of the chimney pipe.

With dressing we put the second row of the pipe.

Video - Description of the construction of the furnace
The inner surfaces of the stove should be as smooth as possible so that soot does not accumulate on them, therefore, during the masonry process, the protruding clay must be cleaned off or scraped off.

How to dry the oven? We leave the unit with the valves and doors open for about a week. Without closing the doors, we put quite a bit of fuel into the furnace to slightly warm the walls. The next day, we repeat the operation, increasing the amount of fuel. However, the doors are not closed. When there are no wet marks left on the walls, and condensate on the valve, the stove is ready for the first real firebox.
Video - Do-it-yourself stove in the bath
Video - Drying oven
After drying, the stove can be heated and the draft in it can be checked by opening the valves, then bringing a burning match to the open door of the firebox. If the flame deviates into the furnace, then there is a draft.

The draft depends on the chimney, which in turn must be at least five meters long, if you count from the grate. More precisely, the height of the chimney above the roof can be determined from the picture. But remember that wet pipes will have slightly weaker traction.


It is recommended to whitewash a brick pipe in two layers with chalk or lime so that furnace gas leaks immediately become noticeable. A faulty pipe is immediately repaired. Above the roof, the chimney pipe must be plastered, and cement, cement-lime or just lime mortar is used for masonry, while the brick is chosen to be of the highest quality, without chips, cracks, or other defects.


Do not forget to clean the stove - in the spring if you plan to heat the bath in the summer and twice a year if you use it constantly. If cracks appear, immediately repair them with clay mortar, applying and leveling it with a trowel.


Video - How to fold the oven with your own hands
Video - Laying the first row of bricks
Folding the oven with your own hands for a beginner can be an overwhelming task in this age of advanced industry and high technology. The cost of construction work, especially if they require some special knowledge and skills, is high.
It is understandable that many developers are trying to get by on your own. Where there is not enough own qualification, advice from friends or specialized reference publications help.
The disadvantage of this approach is that not all professions in demand are very common. Often there is a problem to find a specialist in a particular field. Alas, some types of work are already so scarce that they have passed into the category of art or are striving to do so.
Therefore, they are overgrown with some kind of myths and inaccuracies, which are extremely difficult for a non-professional to weed out. The furnace business has ceased to play an important role, therefore, many of its nuances, quite recently understood by every inhabitant, slip out of the field of vision of a modern person - there is not enough daily practice.


Big Picture
Furnace drawings can be found in abundance on the Internet or on the pages of monographs devoted to this matter. The difficulty is not in this. It is much more difficult to choose the optimal project that best suits the specific conditions, requirements and expectations of the developer.

Yes, and to observe the subtleties of technology can be an overwhelming task for a beginner - as in many traditional crafts, experience plays a big role in furnace business. Too much in the technological chain is tied to some kind of tactile sensations, intuition. It is almost impossible to teach these nuances remotely - too much is transmitted only through personal contact between the master and the student.
Fortunately, now the burden on the stoves is not the same as before, when they were the main way to heat a home during the cold season. Now these designs play the role of fun or an additional, backup heater. Consequently, the former thoroughness of their installation is no longer so in demand.
The furnace, which is not so often operated and not with such intensity, does not require careful observance of technological subtleties during masonry. Although, of course, one should still strive for this.

In cities, stoves are no longer installed - engineers have long come up with better and cheaper ways to warm a home. But outside the urban area, in the country, a stove that is simple in design and unpretentious in maintenance may still be in demand.
Design choice
Before finally dwelling on some design, it is necessary to clearly localize the range of tasks facing the future furnace system. What is expected from it, how often they plan to operate it and for what purpose. And then make a choice.
Traditionally, all furnaces are divided into two main classes according to their functional characteristics. The design can be:
- heating;
- heating and cooking.
The difference is clear from the name of each class. Heating stoves narrowly specialized and can only heat. True, everything in their design is subject to the fact that they perform their task as efficiently as possible.
The heating and cooking design is already universal. You can still cook food on it. It doesn’t matter what exactly is added to the ability to heat a home: an oven, a bread chamber, a stove, a smokehouse. The important thing is that the furnace has become dual-purpose.
In the dacha sector, heating and cooking are the most popular, because it is simple and practical - as a rule, this is the only stove in the house, and therefore versatility does not interfere with it.

Also, the increased popularity of suburban areas, if not created, then reanimated a class of stoves, rare to this day, intended only for cooking. They are now united under the very vague and widely interpreted name "barbecue".
Although it would be more correct to define them in the group of stove complexes, since they can include not only a primitive barbecue, but also an additional set of services limited only by the desires and capabilities of the owner. And they cannot be attributed to any single furnace organism - this is really a complex created from a peculiar set of furnace modules.
Accordingly, a country stove with equal success can stand on the street (garden grill) or be designed exclusively for the home, so there is simply no universal step-by-step instruction - home and street types of stoves are only partly relatives, but structurally this is completely different types. Therefore, their masonry technology is slightly different - one of them requires increased moisture resistance, for which cement is added to the masonry mortar, which slightly reduces the fire resistance of the array.

About home ovens
They just don't put stoves in the house. This is a tool. And the main requirement for it is this: to make up for heat loss at home. Accordingly, the size of the furnace must correspond to the living volume heated by it.
In theory, hoping that the dacha will be operated only in the warm season and quite a bit in the off-season (late spring-early autumn), you can slightly cut the required figure and fold the stove less than would be required according to theoretical calculations. But practice shows that in 99% of such cases there is a temptation to visit a house in the wilderness at least once a year. As a result of an attempt to warm up too large area a small stove cracks - its power is initially not enough.
And almost always a small furnace structure is operated with constant overload - often such forcing occurs involuntarily, unconsciously. Just trying to create at least for a while comfortable conditions for living. So the result is quite natural: the masonry cracks and collapses rather quickly.
The point here is not the depravity of the chosen design or violations in the construction technology. The reason is the discrepancy between the dimensions of the furnace and the tasks assigned to it.

In the villages today you can find many different ovens, including obsolete, archaic designs. And it is important to understand that the age of the scheme does not always indicate its quality. Unfortunately, many old stove fantasies are not suitable in a number of ways for repetition in modern realities.
For example, the once popular Dutch woman was once (in the 17th century) a truly revolutionary notion. But a lot of time has passed since then, and this scheme is very inconvenient today, from the point of view of safety and ease of use. The large length and the total number of successive smoke cycles lead to intense soot precipitation and the appearance of cracks in the furnace mass - the difference (gradient) of heating of various parts of the structure body is too large.
The traditional Russian stove also does not always meet the conditions of a country house - first of all, because it takes up too much space. In addition, the body of this design, even if we are talking about an improved one, is too massive. As a result - a large thermal inertia.

That is, the stove will have to be heated for a long time to warm up. Although it will take a long time to cool down. But it may turn out to be pleasant and necessary when permanent residence, but with irregular visits it will only interfere and annoy.
Probably, the best choice the summer resident will be the so-called Swede - a simple universal brick oven with a hob for one or two burners, limited by a cooking chamber and with an oven powered by one firebox with a stove. Structurally, the Swede is a slightly modified typical kitchen hearth with a heating shield.
The Swede is distinguished from the basic idea by the cooking chamber - a niche above the stove. Accordingly, a certain volume is formed above the cooking chamber (the so-called niche in which the stove is enclosed), which can also be used somehow. Sometimes stove-makers place a dryer there, but it is more practical to include this array in an active block involved in heat transfer.

It is this scheme that will be discussed below. Moreover, the ordering is not so complicated and is quite understandable for a beginner.
Outdoor stove - wild domestic
The garden stove only conditionally has the status of a street stove. In fact, the open installation of a brick oven leads to its rapid failure - any moisture in the masonry (even capillary), frozen in winter, will lead to breaks. Therefore, barbecues are placed in gazebos or under a separate canopy to protect them from rain.
At the heart of any garden stove complex is always a kitchen stove in one variation or another. This can be a blind repetition (with the exception of the masonry mortar - cement is added to it) of a typical kitchen hearth, but more often (for ease of execution and saving materials), the need to warm up the room is simply ignored and all elements that carry only heat storage load are removed from the structure. In the bottom line, there is only pure functionality: some kind of kitchen element for the heat treatment of products and a smoke oven (although they are sometimes donated to it, although extremely rarely).

The universality of a separate element of the furnace complex, as a rule, is avoided. Only if it promises the benefit of the layout plan - more services in a smaller area. If you want to add functionality, then a new unit with such a service is standardly attached. The only exception, probably, can be considered a Russian stove included in such a complex. But it itself is already universal initially.
Another moment. No matter how it was planned in advance, but in life the decision to cook this or that dish on the stove complex is almost always spontaneous. Therefore, it is worth considering that the start-up of the furnace takes a minimum of time and does not require any preliminary complex manipulations. This is a stone in the garden of those linkers who are trying to combine all the achievements of culinary thought in the Russian oven.
Very convenient in theory and extremely clumsy in life is a variation invented by someone, according to the recommendations of which a cast-iron stove with burners is embedded in a lowered hearth, and a welded barbecue box is piled on top of all this. And, before you use the stove or the crucible of the furnace, you have to drag back and forth a completely light iron brazier and each time look for a place for it. It is much easier when there is a separate, specialized module for such tasks.
Materials and other general points
First, let's talk about stoves, as a typical phenomenon, without particulars. What you need to observe, regardless of the layout, size and location:

- foundation. It is better when he has his own at the stove in the house, independent of the foundation of the house. But laid to the same depth as the foundation of the walls. Although the option with a common grillage and a covering plate is also quite acceptable. For a barbecue, it is better if the gazebo and oven are based on a common stove. Mandatory waterproofing in two layers. The first is at the level of the soil, the second is at the level of the finished floor or slightly lower;

- a solution of red clay and quarry sand. Normal fat content - the ratio is selected empirically. For laying fireclay bricks, mortar is used - this is a ready-made mixture of fireclay (ground shards of fired ceramics) and refractory clay. It is worth adding cement to the barbecue masonry mortar - about one trowel per bucket of masonry mortar;

- brick. Apply full-bodied, red, ceramic, wet plastic molding. The brand is not lower than the M150. The frost resistance class is better higher - no less than 50. In critical places (the firebox and the first chimney), it is better to replace the ceramic brick with fireclay. Any kiln masonry is carried out exclusively on soaked red brick. Fireclay is only rinsed from dust;
- permissible thickness of the masonry joint 1–5 mm for ceramic red and 1–3 mm for fireclay refractory. Fireclay and ceramic bricks should not be tied up in an array;

- imported iron casting with fine grain can be put in place immediately. Domestic casting with large grains (means that the casting went into an earthen mold, and not a metal mold) is better (not necessary) to anneal before installation to eliminate internal stresses - heat up to about 250 degrees and leave to cool without forcing the process;
- immediately after laying, the operation of the furnace is unacceptable- the structure must be completely dry. It's better if it happens naturally. Another thing is that such a luxury is not always available - not everyone has the opportunity to wait a month and a half or two until the array is completely freed from moisture. So, artificial drying is more often used, for which the stove is heated daily with small portions of absolutely dry fuel - literally a bunch of wood chips. Firewood has a hut in the firebox - this will give a high, but not hot flame.
swedish oven

There are a lot of Swedes. Each stove-maker has at least one variation of such a stove in his arsenal. The differences of most of them lie in small, insignificant details, but each author is inclined to attribute a lot of originality and innovation to his own vision of the issue.
In fact, everything is not so. Everything is almost the same. Therefore, disputes that it will be correct to arrange the chimneys in this way, and any interference in them mutual arrangement akin to desecration of shrines, it is fundamentally wrong. The Swede is a stove that allows for a free approach to layout without loss of efficiency.
In the forefront, the Swedes bring out an ash pan, a channel under the oven and a passage connecting the lower and lifting channels. They put cleaning doors and one blower.

It is better to mow the corners of the brick protruding into the internal channels so that the resistance to gases is minimal and less turbulence is created.

The oven is placed one row below the hearth. Do-it-yourself oven cabinet - right size industry does not produce.


The firebox must be lined with masonry on the edge or with longitudinal halves of bricks. This will help even out the heating of the array.

The partition between the firebox and the oven is a row below the stove - through this heil, the gases from the firebox go under the stove above the oven, and then go around it, and already under the oven they are sent to the vertical smoke circulation system.

When laying the side walls of the chamber above the stove, make sure that they do not clamp the hob floor plate - otherwise, the expanding metal will either burst or tear the brickwork.

The niche above the stove is covered with steel corners. It is worth saying that sometimes they put doors in it. It is very convenient, because it not only allows you to isolate the chamber from the kitchen space, but also creates some kind of oven, only large. While this step is possible, it is not required.

The gases in the chamber above the slab are forced to pass through the dividers before exiting into the pipe, which also work as racks that support the ceiling. At the same time, they increase the heat storage capacity of the furnace.

The stove is covered with three rows of masonry - this is the standard safe thickness of the ceiling of household stoves.

The oven can be slightly adjusted to the parameters of the room in which it is installed. Simply add or remove rows of the same type above or below the slab.
In support of the thesis about the existence of a large number of Swedes, we show a video where the scheme is basically the same, but implemented a little differently.
Simple Garden Barbecue Oven
And it makes sense to consider this design in detail, step by step, with an explanation of the main points of the circuit.
Materials:
- corner 32: 1.7 m for faience - 1 pc., 1 m for the barbecue ceiling - 4 pcs., 1.25 m for the table top ceiling - 4 pcs.;
- kiln brick- 1300 pieces;
- blower half-door 130x140 mm - 1 pc.;
- furnace door 240x280 mm - 1 pc.;
- cast iron stove under the cauldron single burner 705x530 mm or 600x600 mm - 1 pc.
Additionally:
- asbestos or basalt cord (kaolin wool can be used) for fixing the furnace door;
- knitting wire;
- clay;
- cement;
- sand;
- sheet asbestos (one sheet) or kaolin wool - for installing a stove under a cauldron;
- metal grill.
Among the owners summer cottages Lately became popular garden barbecues. Most people are content with store-bought metal variations of these outdoor stoves. It’s easier, it doesn’t require the construction of some kind of special canopy to protect the structure from the weather, and less space is required to allocate on the site.
Meanwhile, many people prefer something more stationary and monumental. It's about a brick barbecue oven.
The very concept of "barbecue" is polysemantic. This is a dish cooked on coals (the shish kebab that we are used to is also, in fact, a variety of this dish), and the culinary process itself, and an oven specially adapted to a specific method of cooking.
Most often, this is the name of the outdoor stove complex in the garden, equipped with a barbecue, which does not interfere with putting it on large kitchens in cottages (or on the veranda). Moreover, according to today's standards, a heating function is not always required from an oven - an outdoor barbecue, as a tool, is very utilitarian and is more "sharpened" specifically for cooking.
This does not prevent equipping the design with all sorts of additional options. The brazier can be accompanied by Russian ovens or “Pompeian” pizza ovens, stoves with ovens or smokehouses - everything, including washbasins and cupboards. It depends on wealth, rampant imagination and the availability of free space.
The most common set can be considered a brazier, a cutting table and a stove for a cauldron. We will consider this configuration in the version that is the simplest for independent execution. Let's add only a woodcutter - a niche for firewood under the barbecue.

Furnace location and foundation
The entire system weighs over five tons, so it is important to understand that the appropriate base will be required. Of course, this massiveness is to some extent compensated by a large supporting surface. Still, the foundation must be strong.
It is important to protect the masonry from rain and other troubles, especially from getting wet in autumn and freezing in winter. So, whatever one may say, but in our climate it is better to hide the barbecue in the gazebo. The degree of closeness of the latter is at the discretion of the owner. The main thing is to have a roof.
Such a restriction on the location has its advantages - as a foundation, you can use a common slab with a gazebo. The main thing is that when pouring it on the site of the future furnace, provide for reinforced reinforcement, in comparison with the rest of the floor of the gazebo.
If there is no concrete floor at the gazebo, as such, then you can cast a separate platform on a sand cushion or use the option with screw piles. It is important to remember the wish: either they don’t play the stove with the gazebo, or they do it together, synchronously. In a word, as it happens on a slab foundation.

Composition and preparation of the solution
It is customary to lay stoves on a clay mortar with a thinner made of sand (for red clay) or fireclay (ground shard - for refractory clay). But with a barbecue, difficulties may arise due to street deployment.
A cement-based mortar is more suitable for the street. The downside is that he does not endure fire very steadfastly. The way out is in a compromise: add cement to the furnace clay-sand composition, approximately a trowel for a bucket of mortar. But above the roof, anyway, the pipe is laid on cement-sand.
The sand is taken from a quarry. River or sea is not suitable - its grains are rounded, which adversely affects the strength of the solution. Sand must be sown through a mesh with a cell of up to 3 mm.
Clay is taken as ordinary red. It is pre-soaked until small lumps disperse. Then filter through a sieve with a cell of about 2 mm to remove all sorts of stones and debris.
Next, the fat content of the clay and the need for sand are determined - the proportions necessary to obtain a normal solution. Usually these ratios are in the range of 1:1 to 1:6 (clay:sand). It all depends on the fat content of the clay, which, in turn, depends on the geology of the deposit. Simply put, in each place the clay has its own fat content.
Too greasy solution cracks due to strong shrinkage. Skinny (loam) does not hold firmly and crumbles from the seams.
There are many methods for determining fat content, but we can recommend this tactile one: we make several samples in different ratios and rub everything between the fingers (thumb and index). That lot wins, where solid grains will be felt, but the feeling of fatness, oiliness will not disappear.

If greasy areas without abrasive grains come across, then it is worth adding a leaner. If the grains under the fingers do not glide well, then add clay dough.
Final quality check: we throw a lump of mortar the size of a fist onto a sheet of iron (bayonet of a shovel, sidewall of a bucket, and something like that). You should get a cake with a thickness of 3-5 mm, as well as the optimal masonry seam for the oven. We dry the cake in the shade from twenty minutes to an hour.
Then we try to pick it off from a sheet of iron. It flakes off like a pancake from a frying pan - you need sand. It crumbles like dry earth from shoes - add clay. It is torn off with difficulty and has no cracks - they guessed right with the proportion.
The solution can be prepared in advance in a large container and covered during the break to reduce water evaporation. But cement is added to it directly into the bucket immediately before laying: a trowel per bucket, that is, a handful per ten liters of mortar.
For refractory bricks (if there is one in the structure), refractory masonry mortar should be taken. It is easier with it - it is sold dry in construction stores. The same amount of cement is added to it.
Features of buying a brick

The easiest way is to buy refractory (chamotte) bricks. It's pretty much the same everywhere. More difficult with red ceramic.
You should take only full-bodied (without any pits and voids) and only plastic molding. Please ask the seller for this feature. And stay away from the dry-pressed variety.
Next, pay attention to geometry and integrity. No cracks, no deformations. When tapped, such a brick makes an even sonorous sound, without admixture of hoarseness and deaf tones. Its brand is usually M150 and above.
And we pay special attention to such a line in the specification as “frost resistance”. good brick withstands at least 50 winter-summer cycles. If more, then better.
Clinker, for example, holds 100 and above, but it bites in price. So, if there is no particularly free budget, then we take at least 50 cycles. But from such a brick, you can add the entire array of barbecue.
In extreme cases, in critical places, instead of red, we use fireclay bricks. But he, too, it should be noted, is not cheap. And he does not like humidity - crumbles over time, like old foam.

As already mentioned, before laying the red brick, we must soak it - immerse it in water and hold it there until the air bubbles disappear. It's three or five minutes. Then we take it out and let the excess water drain. It's about a minute. And only then we carry out masonry from it. The soaking stage is mandatory, otherwise the masonry will be fragile.
Fireclay requires less preparatory effort. It is simply rinsed from dust.
If two types of bricks (chamotte and red) are used in the masonry of the array, then dressings are not made between them. And the fireclay array, hidden inside the red one, is made 3–4 centimeters lower. This is done because, when heated, the expansion coefficient of these types of building stone is different.
All doors are mounted on flagella of twisted knitting wire or with riveted metal plates - clamps. The frame of the furnace door is pre-wrapped with a cord of basalt or asbestos soaked in a clay solution. You can use kaolin wool. They do this in order to compensate for the same CTE when heated - the linear expansion of the metal is several times higher than that of any type of brick.
Masonry stages

Let's start laying. We make seams no thicker than 5 mm (on fireclay - 3 mm). We check verticality and horizontality for each row. We do not allow voids in the solution.
We put the solution on the bed with a margin. We squeeze out the excess - on a wet brick it is not very difficult - and cut it off. We are not in a hurry so that the masonry does not float.
The given order is not the final version, but one of them. The main thing for a beginner is to understand the logic of organizing voids inside the furnace.
The order is presented from two angles. The first drawing is the location of the bricks in only one row. The second figure shows the big picture.
There are no internal cuts and other additional excesses - practice shows that beginners only get confused with such a presentation of material. But, having traced all the layers of ordering, you can easily understand the design of the stove. Thankfully, it's not that complicated.
Waterproofing is necessarily arranged under the furnace, even if it is provided for at the foundation.
1 row
Everything is simple. This is the base of the oven. A kind of marking of the heel of the contact.

The length of the table can be shortened. It depends on desire and appetite. You can also reduce the width of the barbecue, but no more than a brick, otherwise it will be inconvenient to use. You should not reduce the depth of the place under the barbecue - you need to leave room for manipulating skewers.
2 row
A barbecue area may not be erected - immediately put on the foundation slab. But with a small platform under the whole complex it is more convenient. From the second row on the site, we outline the main functional elements of the structure - its nodes.
We put the door of the blower-ashpit on a wire and clay mortar, without a compensatory cord - it does not heat up.

3 row
We outline the course for the gases of the stove.


4 row


5 row
We install the grate freely, without fixing anything. We select a nest in the brick for it, with a backlash of about 5 mm on each side. We do not fill the gap with anything, in case of thermal expansion.


6 row
The lining (additional inner lining) of the firebox is uneven. This is explained by the fact that most barbecues are attached to the wall. You can increase the lining of the back wall, but then the plate will extend too much - it will become uncomfortable.
The lining of the back wall can be done by laying on edge. But it is better to line with halves - a brick spread along.
The lining can just be made of fireclay bricks. We put the firebox door, as mentioned above, with a refractory winding around the frame.


7 row
We continue to lay. Especially carefully we carry out the overlap of the console of the right wall - the table top of the cutting table will rest on it.


8 row
The woodcutter's niche is covered with 32 corners. Some shelves are made of it, a seat for a brick. If there is a desire to reduce the visibility of this power element, then the first corner to the outer edge is shifted inward, and a cut is made in the brick, in which the corner is heated.


9 row
Make a small lap under the grill. This makes it easier to use the barbecue. When you approach the niche of the brazier, the toes of your feet do not rest against the wall.


10 row
Slightly increase the overlap of the barbecue. The overlap of the firebox door is also done by overlapping the side walls. If it doesn’t work out - with a wedge jumper, that is, like an arch, but going along such a wide arc that the deflection is not noticeable.
At the corners they cover the table top of the cutting table.

11 row
They make a niche for the barbecue. He should not reach the side walls. We need a margin of two or three centimeters - for expansion. Also, the brazier should not occupy the entire niche in depth - you need at least 5 cm so that the skewers do not rest against the back wall.
Now you can make the barbecue box itself. Actually, this metal box(wall thickness approx. 3–5 mm) in which the coals are placed. Its height is 15 cm or so. A smaller height will give dryness to the barbecue, a large one - smoked meat.
Along the perimeter of the box, it would be nice to put an additional strip of metal of a slightly greater thickness. It will not allow the walls to warp when heated.
At a height of 5 cm from the bottom, holes of 15 mm (plus or minus) were made in the walls of the box along the entire perimeter every 5-6 cm - for air to enter the combustion zone.
In general, there are designs with some kind of complex niches equipped with an air blowing system. But only in execution they are complicated, and in operation they are inconvenient. Option with a plug-in brazier from sheet metal, anyway, the most practical.
A little about the surface of the tabletop. You can leave it like that or put some kind of wear-resistant ceramic tiles like porcelain stoneware. Any option will do.


12 row
Install the plate. Ideally, 704x530, but 600x600 is also possible. You may have to make changes then, but they will be minimal.
Faience from the corner is required. This is the name of the corner that protects the edge of the masonry from destruction. It lies freely, but its edges go into the masonry and are pressed.
The slab is placed on a layer of clay mortar with the addition of soaked sheet asbestos. You can cut a recess under it. But again, the rule of free installation: about a centimeter on each side for the difference in expansion. No fixation.
Asbestos is torn up and thrown into the water. There he quickly soaks, turning into gruel. It is then added to the solution.
Second option. The masonry under the slab is smeared thinly with a solution, on which a strip of kaolin wool about 5 mm thick is placed, and the slab is already thrown onto this pillow.
An important point: the Finnish plate (differs in casting technology in a metal mold) can be installed immediately. It is better to first anneal the domestic stove (it is poured into the ground - it can be seen from the large grain in the structure) at the stake to relieve internal stresses. Otherwise, there is simply a chance that it will suddenly burst. They simply heat the stove on a fire (or in a thermal oven, if possible) and leave it to cool, without forcing cooling in any way.
You can install a slightly smaller plate, but you will have to modify the seat for it in advance.


13 row
The wall behind the slab is not bent to the side - the masonry is protected by faience. At the cutting table, the back wall is bent and holds the extreme bricks. Then she gradually fades away.

14 row


15 row


16 row


17 row


18 row
A small console is produced to support the overlapping of the barbecue niche.


19 row


20 row
You can overlap with an arch or a straight jumper. The niche can be made a little lower than in order. The main criterion: when approaching the barbecue niche, you need to see the far edge of the barbecue - this will come in handy during operation.


The question of how to fold a brick oven for a house with your own hands does not cease to be relevant today, since comfort and warmth have always remained important conditions for a person to good rest after a hard day at work. Therefore, recently more and more urban residents are moving from panel high-rise buildings to private houses, where it is possible to create a comfortable environment at any time of the year.
Due to demand various models furnaces, engineers continue to develop new options that are acceptable for buildings with different areas. It should be noted that even in the case when all the "benefits of civilization" are present in the house, a small cozy stove will never be superfluous and will help out in various situations. For example, it can be heated on cold spring or autumn evenings, when it is wet or raining outside, without starting the heating system. Such a structure will help create an optimal balance of temperature and humidity in the house, which will be comfortable for a person. In addition, the oven will be an excellent assistant in cooking or drying vegetables, herbs and fruits.
Since there is a large number of various models of heating structures, then you should choose for self-laying stoves with the most affordable, easy readable diagrams, especially if there is little or no experience in this craft. Naturally, in this case, other factors that directly affect the efficiency of the furnace should be taken into account - these are its power, dimensional parameters, functionality, and the aesthetic appearance is also important. And in order to choose the right furnace model, you need to consider the criteria that you need to focus on when determining the right option.
How to choose the best oven option?
Choosing a place to install the furnace
In order for the furnace to be fireproof, efficient, and its power used to the maximum extent possible, this structure must be properly installed, taking into account some nuances.
- First, it is decided what area can be allocated for installing the furnace.
- Then, you need to decide on a specific place:
- the stove is installed in the center of the room, dividing it into separate zones;
- built into the walls, between two or three rooms;
- is erected near the wall, with an indent from it of 250 ÷ 300 mm, if you need to heat only one room. However, it must be taken into account that this option is the most losing, since most of the heat generated by the rear walls will not be fully used.
- Having chosen an approximate place, it must be immediately marked, starting from the ceiling, using a plumb line, since the pipe must pass through the attic floor between the beams and rafters, and at a distance of at least 120 ÷ 150 mm from them.
- When allocating an area for the furnace, it is taken into account that for its foundation it is necessary to provide more space than its base, by 100 ÷ 150 mm on each of its sides.
- In order to avoid any problems with regulatory organizations, when choosing an installation site, it is necessary to take into account not only the above recommendations, but also the standards developed by specialists and specified in SNiP 41-01-2003.
Calculation of the required power and estimation of firewood consumption
The stove will not be efficient and will not be able to heat the house if its power is not enough for a specific area. This also takes into account the winter temperatures of the region where the heated building is located, the number of windows and doors in it, the level of wall and floor insulation, ceiling height and many other conditions.
For example, the higher the ceiling, the more air will have to be heated, and the larger the glazing area, the faster the heat will leave the house, which means that you will have to choose a furnace with increased power. Usually, for buildings with non-standard glazing and other parameters that do not fall under the average level, calculations should be made by a specialist individually, based on the specific characteristics of the house.
But in general, you can rely on average values. So, for well-insulated houses with ordinary glazing, with an area of 50 to 100 m², with a ceiling height of 2.5 to 2.7 m, the following heat output standards per unit area (Wsp) are acceptable:
This value can be found more precisely in the local construction organization. And for fans of independent calculations, we can recommend a more detailed and fairly accurate algorithm.
How to accurately calculate the required heat output?
Each room is unique in its own way, and heating two seemingly equal rooms may require different quantity thermal energy. The methodology for calculating the power of heating equipment is set out in a special publication of our portal dedicated to.
Having data for a particular region and the size of the heated area (S), the furnace power for it is calculated by the formula:
Wtotal \u003d S (m²) × Wsp (kW / m²)
For example, consider the power of the furnace for brick house, located in the Central part of Russia and having an area 75 m².
Wtotal = 75 × 0.14 = 10.5 kW
Usually, furnace developers immediately indicate the thermal power of their designs. True, other units of measurement are often found - kilocalories per hour or megajoules. It's not scary - they are easy to convert to watts and kilowatts:
In our case, for example, the calculated power in kilocalories will be equal to:
10500 × 0.86 = 9030 kcal/hour
Now you can calculate the profitability of the future stove, which largely depends, among other things, on the quality and type of wood used as fuel. At the same time, we must not forget that usually brick wood-burning stoves do not have high efficiency. It is usually estimated at about 70%. If there is data for a specific furnace model, then a specific value is substituted.
Each type of solid fuel has its own calorific value - the amount of thermal energy that is released when burning 1 kilogram. It is clear that only bulk fuels are usually estimated in kilograms and tons - coal or, and firewood, as a rule, is measured in storage cubic meters. This indicator, therefore, depends on the specific density of a particular type of wood. Indicators of the energy potential (from the mass and from the storage volume) of the main types of solid fuels are shown in the table.
| wood species | Average calorific value of dry firewood by weight, Qm (kW/kg) | Average calorific value of dry firewood by storage volume, Qv (kW / m³) (for coal and briquettes - kW / t) | The same - for wet wood (not past at least a yearly drying cycle) |
|---|---|---|---|
| Firewood: | |||
| Beech | 4.2 | 2200 | 1930 |
| Oak | 4.2 | 2100 | 1850 |
| Ash | 4.2 | 2100 | 1850 |
| Rowan | 4.2 | 2100 | 1850 |
| Birch | 4.3 | 1900 | 1670 |
| Elm | 4.1 | 1900 | 1670 |
| Maple | 4.1 | 1900 | 1670 |
| Aspen | 4.1 | 1750 | 1400 |
| Alder | 4.1 | 1500 | 1300 |
| Willow (willow) | 4.1 | 1400 | 1230 |
| Poplar | 4.1 | 1400 | 1230 |
| Pine | 4.4 | 1700 | 1500 |
| Larch | 4.4 | 1700 | 1500 |
| Fir | 4.4 | 1600 | 1400 |
| Spruce | 4.3 | 1400 | 1200 |
| Charcoal and briquettes: | |||
| Anthracite | 8.1 | 8100 | - |
| Charcoal | 8.6 | 8600 | - |
| Coal | 6.2 | 6200 | - |
| Brown coal | 4.2 | 4200 | - |
| Fuel briquettes | 5.6 | 5600 | - |
| Peat briquettes | 3.4 | 3400 | - |
The calorific value of undried firewood is shown for contrast - how much the generated power is lost. Naturally, one should still count on firewood that has passed the necessary drying cycle.
Preparing firewood is a serious matter!
In order for the stove to justify its purpose and serve as long as possible, it should be “fed” with the right fuel. About that, about their main characteristics, rules for harvesting, drying and storage - in a special publication of our portal.
The average daily weight consumption of fuel to ensure the necessary heat transfer is determined by the formula:
V(kg)= (Wsum /Qm) × 24 hours
To calculate the volume - everything is the same, but instead of calorific value by mass Qm value is substituted Qv.
Knowing the daily consumption, it is easy to determine the weekly, monthly, and even for the entire proposed heating period - in order to have an idea of the upcoming costs of purchasing or harvesting the required amount of firewood.
To facilitate self-calculation, below is a convenient calculator, which already contains the necessary ratios. The calculation is carried out for dried wood.