Before deciding to restore a wooden window block, you should carefully listen to the voice of common sense, sometimes repair and restoration wooden windows turns out to be more expensive complete replacement for a new product. The advantages of wooden windows are not discussed or disputed; among the disadvantages of a modern wooden window, sky-high prices for double-glazed windows in a wooden frame can be noted. A person who is not spoiled by special frills in repairs, but is savvy and has carpentry skills, should try to do the restoration of wooden windows with his own hands.
Restoring old wooden windows requires patience and precision. Among the many various options Restoration is most accustomed to the method of restoration of the Swedish technology. Although it would be more accurate to say - the restoration of old wooden windows using Swedish materials. Even a cursory glance at the offers of branded repair and restoration of wooden windows on the Internet, one way or another, are based on the use of products from the VARNAMO concern (Sweden). All the secrets of the popularity of the restoration are hidden in the outstanding properties of the rubber seal:
- The material is not afraid of severe cold (up to -50 ° C) and heat (up to +130 ° C);
- High abrasion resistance guarantees a service life of more than ten years.
- High elasticity to compensate for surface curvature wooden frames, which guarantees tightness around the entire perimeter of the window.
The practical application of the restoration of wooden windows using Swedish technology collects good reviews about the effectiveness of the method.
Step one - we get the skills of restoring a wooden window using Swedish technology
The complexity of the restoration work according to the Swedish scheme, it consists in the need to make a rectangular groove 5 mm wide at an angle of 45 ° along the perimeter of the end surface. A conventional electric milling cutter allows you to do this without any problems, but you can do the job well after 2-3 hours of practice on the material at hand. At the same time, the tool for restoration can be rented for symbolic money.
The second type of work that requires qualifications and certain skills is the repair or replacement of hidden rotary window sash handles. Such handles were massively used in the wooden windows of Soviet apartments. Their restoration is impossible, it is difficult to replace them with analogues, so you should consult a specialist.

Advice ! If you are not sure that you will cope with all restoration problems, contact a company that provides such services and order a repair of one window, without painting. Your direct participation in all operations will give a practical idea of the progress of the restoration of wooden windows.
This practice will give you the opportunity to estimate how much specific sealing materials will be required for restoration. specific window and avoid unnecessary costs.
The order and sequence of the restoration
Before carrying out repairs and insulation, a little preparation should be carried out:
- remove the window sashes that come off, unscrew and unscrew the screws connecting the window frames;
- clean the entire surface of the wooden window frame from old paint and varnish;
- remove dust and flakes of the removed coating, wash and dry the wooden window thoroughly.
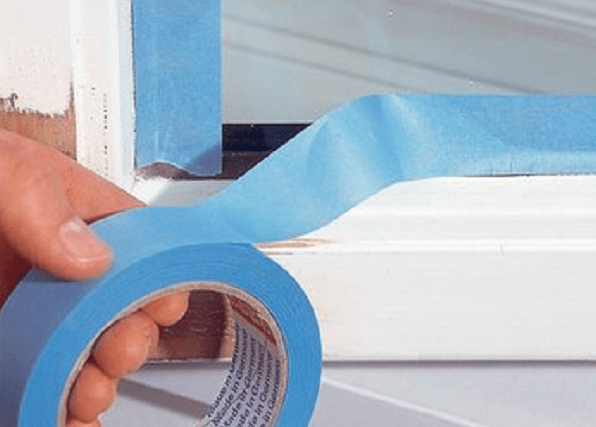
Before removing the old paint, stick construction tape around the perimeter of the window glass surface. This will protect the glass from possible scratches from the tool and protect it from dripping primer or paint during subsequent operations.
Step two - preparation for restoration
First of all, we give an assessment of the performance of old window canopies. Usually the old Soviet hinges serve in windows for an incredibly long time, although they lose appearance. Under constant load for two to three decades, the fastening of the canopies can become loose, lose some of the screws, or even move relative to its original position.
If you manage to unscrew the screw that secures the canopy to the wooden frame without effort, it must be replaced and restored. The hole into which the screw was wrapped is drilled with a drill with a diameter of 8-10 mm to a depth of 2 cm, after applying a layer of glue, it is pressed with a round wooden plug of a suitable diameter. After the glue has dried, the installation of the canopy on the frame is carried out in the same way as installing a new product.
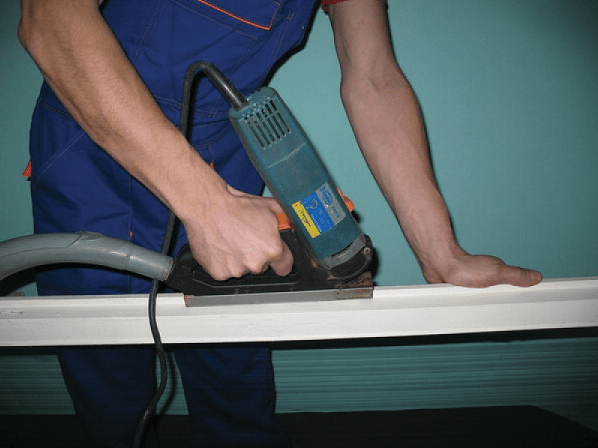
Next, we carefully study the geometry of the window, with obvious signs warpage wooden structure"Propeller" should lay the frame on a flat flat surface and mark the areas to be cut off the protruding sections using the "Bulgarian".
Advice ! The above operation of window restoration is one of the most time-consuming, requiring accuracy in work. When trimming wooden block the window sash has to be put on and tried on several times. In order not to remove the excess, be patient and cut the frame wood as thinly as possible.
Step three - installing the seal
After restoring the hinges and restoring the geometry of the sashes and the frame of the wooden window, we proceed to cutting a groove for the EURO-STRIP proprietary sealant. The complexity of making a groove is that cutting tool- end mill, 4 mm in diameter, should be inclined at an angle of 45 ° to the end surface of the window.

Make a long straight cut hand tool not easy even for an experienced carpenter. Therefore, if the milling cutter is not equipped with a special device for performing such work, the master lays a wedge-shaped wooden beam. Using the beveled surface of the bar as a support, maintaining the angle of the tool is quite simple.
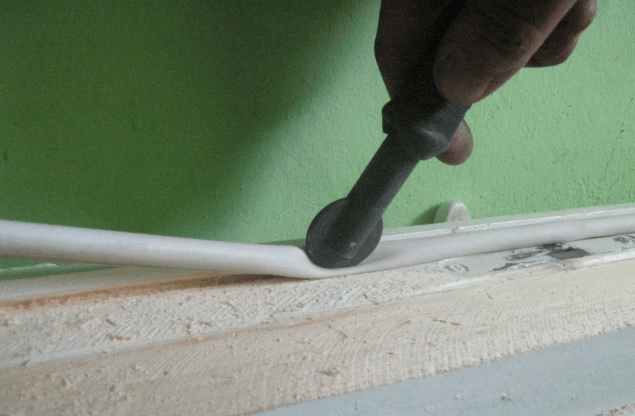
After making the groove, measure its length using a conventional 3mm nylon cord laid in the groove. Cut the seal according to the measured length and glue the ends together. Thus, you have a ring of tubular seal, which can be easily, with the help of a roller, can be laid in the groove before the final assembly of the wooden window.
In addition to using a tubular sealant for wooden window sashes, it is very effective to lay an additional layer of sealant or sheet rubber between the window frames. Like the previous procedure, the installation of the interframe material is carried out after the painting of the frames is completed.

If the window design allows, you can use a colorless sealant used by motorists to seal various gaskets in cars. Before completion of the restoration, assembly and final make-up of the external and internal parts window frame, a layer of silicone sealant 4-5 mm wide and 4 mm high is squeezed out onto the surface of the frames. Parts of the frame are assembled into a window block, but the fixing screws around the perimeter of the frame are not fully tightened for a couple of turns. After the silicone has partially hardened, after 4-5 hours, the screws are tightened to the stop.
Step four - restoration and painting of the wooden base of the window
In the restoration of old wooden windows, it is worth paying attention Special attention on the quality of the wood frames and the proper selection of paintwork for it. The most resistant and durable wood was oak or larch, then conifers, poplar or birch resist the sun and moisture the worst.
Before painting or varnishing the window frame, you must:
- Thoroughly clean the surface to be painted with an emery cloth, using a clean rag slightly moistened with acetone, remove dust;
- At least twice apply a layer of primer with thorough drying of each layer;
- Pick up quality paint or a varnish that is chemically compatible with the previously applied primer.
Pentaphthal-based paints or varnishes are commonly used. The best option an epoxy-based lacquer composition is considered to be very expensive, but of the highest quality and durability. Similar varnishes are used for painting cars.

When applying the first layer of paint or varnish on a clean wooden surface of the frame, use the base paint, diluted with a solvent by 10-15% by volume. The mixture is very fluid and easily spreads over the surface treated with soil. The second layer should be done with paint of normal consistency, preferably even with an increased content of varnish. For the outer part of the window frame, after applying the second layer of paint, it is possible to additionally provide a coating with a protective colorless varnish for outdoor use.
Completing the restoration of a wooden window
Before assembling a painted wooden window, remove the tape and apply a transparent sealant with inside window frame. This procedure will strengthen the wooden glazing bead that fixes the glass in the window frame and eliminates the gaps.
Do-it-yourself repair and restoration of wooden windows is an occupation for the patient. But it allows, firstly, to save money, and secondly, to get windows that look great and keep heat well. Indeed, along with the coloring, you can lay a heater, which guarantees the absence of drafts. Windows will be produced according to the so-called "Swedish technology".
Meticulously inspect the window sashes and frame, open and close several times, see if there are gaps and how big they are. Assess the condition of the wood: are there any rotten areas, if any, what are their sizes.
The first stage is the dismantling and assessment of the condition of the windows
The first step is to establish whether it is possible to restore the affected areas or the rotten fragment requires a complete replacement. If replacement is inevitable, there are only two options: if you know how to work with wood, you cut out the required part yourself, if not, you order from a carpenter. Any person with “straight” hands can eliminate all other window defects with their own hands.
Tools and materials
Since we are repairing old windows, we will need to remove the old paint: restoration without this is almost impossible. For this you will need:
- a building hair dryer or a thick plastic bag, rags and 0.5 liters of pure kerosene;
- spatulas, a wide knife (shoe).
In the future, you will need to repair damage, align the frame and sashes, etc. The set of tools here is more extensive, but even if you buy them, it will not take very much money, and you can make them even smaller if you rent them.

- hacksaw, jigsaw, hacksaw blades;
- planer, chisels, selector (if any - excellent);
- drill and drills of different diameters;
- dense wood for wedges and dowels;
- drying oil for impregnation or ready-made primers;
- putty on wood;
- rubber sealing cord;
- new fittings: hinges, latches;
- large, preferably a carpenter's square, building level, slope;
- glazing beads and silicone sealant.
For impregnation, you may need either factory compounds and a brush, a metal vessel, drying oil, an electric stove or a heat gun.

And last step restorations will be stained. The stage is very important - the appearance and service life until the next repair depends on the quality of the work.
- set of brushes;
- window paint or stain and varnish if you want to preserve the natural look of wood.
The procedure for the restoration of wooden windows
It all starts with demolition. The sashes are removed first, then the frame itself. Is it possible not to shoot window frame? It is possible only in one case, if it is in perfect condition: there is no damage to the wood, all angles are exactly at 90 o and no defects. But the work will be more difficult. In all other cases, the dismantling is complete.
The glass is carefully removed from the sashes, the old putty is cleaned off, all the carnations are given. Fittings are removed from all parts: they must be replaced. Now the outer tides are carefully removed: the nails with which they were fastened are probably almost crumbling.

Removing the paint
You can use a building hair dryer by setting the temperature to 200-250 o C. It’s better not to set more: wood loses heat during high-temperature processing most their properties. For the same reason, it is undesirable to use a blowtorch: even without charring, you will break the structure of the wood and it will collapse faster.
Remove the paint from the window, warming up the surface on small area. Bubbles quickly appear on the surface, and they need to be pryed with a wide knife, scraper or spatula. It is better to find an old spatula, with a blade already rounded: a new one often “cuts” into wood, then it will take a long time to grind. In general, it is more convenient to work with a wide knife used by shoemakers.

The second method is chemical softening. There are modern compositions for softening paint, but how they affect the structure of wood is a question. You can use the old, proven method: treat with kerosene. You will need a large bag of thick plastic film (necessarily whole, without a single hole), old cotton rags (they should not shed) and kerosene. It is undesirable to use other solvents - they again affect the structure of wood fibers.
Wrap the frame with strips of fabric, put it in a bag (its height should be enough for the neck to tie). Pour out the kerosene and tie the bag tightly. After a day, you can remove the paint. But do not take everything out at once - while one part is being processed, the paint on others will harden. They took out one part, tied the bag, removed the paint. Moved on to the next one.

When removing paint in small depressions and cracks, the paint can not be removed: it will be less necessary to putty and level. But this is only if you paint the window. If you plan to varnish, you will have to do everything scrupulously. But for the first experience, it is better to process under the paint: easier and faster.
Aligning the frame
For leveling, you will need a fairly large absolutely flat surface. This can be a table (but the surface must be flat), a workbench, a sheet of plywood laid on stools, etc.
First, align the frame. We lay and expose the corners. They must be exactly 90 o . We examine the contour: the strips should be even. At this stage, we remove the places affected by rot or change the completely rotten parts of the frame to freshly made ones. (How to process a rotten area is written a little lower).

We check the slats in vertical and horizontal planes, we remove the excess with a planer. We work with chisels in the corners. The result should be perfectly straight, even surfaces. Once again we check the corners, measure and align the diagonals, fasten the frame at the corners with nails. Then we take the skin grinder(tape) and process until smooth.
Restoring sashes
We disassemble the connections of the valves. They are assembled on dowels - small wooden studs. round size. For windows that have served for more than a decade, they must be replaced. It’s easier not to knock them out (you can do it that way), but to drill with a drill of a smaller diameter. Then remove the residue and clean the hole for installing a new retainer.
If necessary, the sashes can be completely disassembled into planks. Clean the joints, align the planks, cutting off everything superfluous with a planer, working out where the corners are needed. In general, put everything in order.

The next step is the assembly of the sashes. Fold, processed boards, measure diagonals and angles. Now the tricky operation: you need to remove the strips, coat the grooves and joints with glue and install them back. In this case, it is necessary to ensure that the sash does not warp. After setting the bar in place until the glue has set, set the corners and diagonals.
After assembly, for greater reliability, we will install new dowels. Let's make them first. We take a core drill with an internal diameter of 5-7 mm. We drill cylinders from a block of dense wood across the fibers (namely across). This will be pins. The diameter of the stud should be slightly larger than the drilled hole on the frame (approximately 0.5 mm). So it will “sit down” tightly and will hold the structure well.
Do not use planed chopsticks instead of dowels: the window will have to be repaired again in a couple of years. Cut across the fibers, they will keep their shape for at least 10 years.
Wedges are cut from a piece of oak or mountain ash. Their width is 5-7 mm: depending on the diameter of the prepared pins, and the thickness is 1.5-2 mm. They are then driven along the fibers, wedging the hairpin and achieving excellent fixation.
If, as a result of sorting the sashes, the hole has become uneven, level it with a needle file, you can use a drill. But try not to make it wider. Lubricate the seat with wood glue (it should be good quality), drive in pins. By glue, they fit well. Then make a groove along the fibers with a screwdriver, into which insert the planed wedge, and drive it in. Cut off the excess sharp knife so that everything is even.

So we change all connections, constantly controlling the geometry of the valves. After everything is assembled, the sashes should be quite stiff, but don't shake them too much: the glue hasn't dried yet.
After all operations, the sashes can be different heights. We level them so that they are the same both inside and out. Now we take the frame and put the sash in it. They are definitely smaller than necessary. To make them fit tightly, we glue strips of plywood of suitable thickness and width onto the frame with liquid nails.
All parts (and the frame) are laid on flat surface, a load is placed on them. It can be laid on a flat floor, with several boards on top, and a solid load on them: about 100 kg. Leave to dry and level for two or three days.
After the glue dries, we bring the frames to normal, where necessary, by grinding and making notches. We mark the places for fastening the fittings, we make recesses for it.
Installing the seal
How to lay a seal in windows using Swedish technology, the forms of these seals are described in detail in the video.
Impregnation
There are different ready-made impregnations. How to use them is described in the instructions. There is nothing complicated in the process: under certain conditions, you need to apply the composition and wait until it dries. Treatments can be several, one or different compositions.
But there are masters who are sure that the polymers that make up the impregnations worsen thermal insulation properties wood. They work only and exclusively with drying oil. Moreover, there are two processing methods: cold and hot.
With the cold method, heated drying oil is applied with a brush to the frame and sashes of the window. Leave until completely absorbed and dry, when the surface becomes non-sticky to the touch. The treatment is repeated four times. This treatment guarantees the excellent condition of wood and paintwork for 5 years. After that you have to repaint.
 Impregnation with drying oil is a great way to preserve wood
 During hot processing, drying oil is heated in a vessel to high temperatures. This occupation is a fire hazard - drying oil can flare up. Therefore, we first prepare a piece of tarpaulin, felt, etc., with which it will be possible to cover the vessel. It is better to heat up on a heat gun or hot air from an electric stove (not on a tile, but above It is sometimes necessary to quickly remove the heat source to avoid fire. Because the fire is not suitable.

After some time, the drying oil begins to bubble: air and moisture come out. There is one important point: when the bubbles are already going, it happens that the smell of drying oil increases dramatically. You need to quickly remove the heat source. If you hesitate, the vapors will flare up, a felt mat will come in handy. If you make it on time, it will pass without incident. After a few minutes, heating can be continued. When there are no bubbles, you can soak the details.
The item is immersed in heated drying oil for 3-5 minutes. At the same time, it is convenient to work with a crochet: they can hold it and pull it out conveniently. After taking it out, carefully place it in a clean place to dry. Don't touch the details with your hands. Even in mittens: hot drying oil will instantly soak them and burn your hands. The burn will be severe: the temperature is about 130 o C.
Masters say that after such processing, wood, even on the street, can stand for decades. With good paint, its renewal will be required no earlier than in 10-15 years. Like this.
Puttying and sanding
Now the frames are rigid and are not afraid of anything. Now we putty and sand them. For significant damage, we use coarse putty with sawdust. For finishing thinner and softer. If you paint the window White color, take white putties. They won't show through the paint.
The technique is simple: fill cracks and crevices with putty, then remove the excess. More often metal spatulas of small width are used. But in some places it is more convenient to work with rubber: they are designed for grouting when laying tiles, but it is also convenient to work with putty.

After the composition dries, take a skin (grinder) with a medium grain and clean off, if any, the excess. At the same time, go through the entire frame, bringing everything back to normal, smoothing out the bumps. Then sandpaper with fine grain, everything is leveled to the ideal (as far as possible) condition.
Coloring
Choose the type of paint yourself, based on your preferences. The only thing you can advise is to take glossy or semi-gloss. They keep their color for a long time. This is especially true for white paints. Surfaces painted with matt white paint quickly turn gray: they have a porous structure, which gives a “matte” finish. These pores are clogged with microscopic dust particles, which give a grayish tint. Therefore, for perfectly white windows, take gloss or semi-gloss.
The first layer is a primer. This is one part paint diluted with two parts of a suitable solvent. After the primer dries, you can apply the main paint. There will be several layers, so everything will be painted over.

Do not take a lot of paint on the brush: there will be streaks that are not easy to deal with. Dip, squeeze, rub well. You need to move from top to bottom, without changing direction. Only in this way the layer will be even. Apply the first layer, moving the brush from left to right, the second - from top to bottom, and the third layer - from right to left.
Each subsequent layer is applied only after the previous one has completely dried. If after the first application of paint there are streaks and bumps, after the paint dries, take the skin and clean them. Just don't grind down to wood. The second layer is done more carefully, but even here you can still sand a little. The third should be without flaws. After the paint has dried, your self-restored window can be installed in place.
Glazing
Installing glass is not the most difficult, but responsible. Prepare a transparent moisture-resistant and frost-resistant sealant. Lubricate the seat with it, insert the glass. On the other hand, they are pressed with glazing beads. They are also sanded, impregnated and dyed. Then they coat the perimeter of the glass with sealant, press the glazing beads and fix them with small carnations.
Replacing rotted sections of a wooden frame
If the site is rotten, you can help the grief in two ways:
- cover with a special reinforced putty, recreating the required shape;
- remove the damaged area by inserting a patch in its place.
 A reliable way to eliminate rot is to cut out the damaged area
 The second option would be more correct in terms of durability: here it is possible to remove the entire infected area, ensuring that the rot will not spread further. The technique is simple. Cut out the affected area, capturing some healthy wood. Cut out a piece of exactly the same shape. Lubricate the joints with carpentry glue, insert a patch, align it, if necessary, fix it, leave it until the glue dries completely.
After it is necessary to putty the seam, sand and paint. All. The window frame (or sash) has been restored.
But it is not always possible (or willing) to cut out a damaged piece of wood. Then you can use epoxy putty with reinforcing fiber. After drying, it is stiff enough to hold its shape.
First of all, we separate everything that can be removed. All the rubbish and filth. Blowing off the dust where we can, we reach healthy tree. If you plan to use the restored frame for a long time, it is necessary to treat it with antiseptic impregnations: to prevent, as far as possible, the spread of rot.

After that, the composition is applied to the damaged part with a spatula. Putties of this type have a rather thick consistency; any configuration can be molded. Give a shape close to the desired, but a little larger: after drying, it will be possible to sand and level the level. It takes noticeably a day to dry, but the exact time depends on the composition, temperature and humidity of the air. After sanding and leveling, it remains only to paint the window. Then you won't see anything at all.
Results
You do not need any super-abilities to repair and restore wooden windows with your own hands. Not the most complex tools, accuracy, patience and a fairly decent amount of time are needed.
If you bought a cottage old house with wooden windows that look unattractive, don't rush to throw them away and buy new ones. You can restore old frames with your own hands and with the help of our advice and modern finishing materials turn the frog into a princess. Restoration of wooden windows is a laborious process. But it is much cheaper than installing new windows. We will tell you how to restore a wooden window with your own hands.
Do-it-yourself restoration of wooden windows. Dismantling
The first step is dismantling. Often, in old private houses, window frames are simply inserted into the opening, and they can be removed with a pry bar. The main thing is to apply force evenly, moving the mount along the entire height of the window and on both sides so that the window does not warp.

If you need to unscrew the hinges covered with paint, you can remove the paint from the screws by tapping the screwdriver with a hammer. After that, unscrewing them will be much easier.

Advice! The old putty will come off easier if you heat it up with a hair dryer.

How to repair an old window
After all the glasses are removed, you can start cleaning and restoring wooden surfaces. To remove paint, you can use building hair dryer.

Or a special aggressive paint remover. It is applied to the surface, and it destroys the paint. But when working with it, you need to be careful - it is dangerous for the skin. Be sure to use gloves.

Now that the paint has been removed, the extent of damage to the window frame can be fully assessed. Further actions depends on which picture you open.

If there are rotten areas on the tree, then the rotten wood must be removed. Further according to the circumstances: if the potholes are small, and they can be puttied, then proceed to puttying. Sometimes puttying can be carried out in several stages - it depends on the degree of damage.

For medium-sized damage that putty cannot cope with, you can prepare an aggregate from sawdust and PVA glue.

Fill in damaged areas with this mixture.

After the sawdust glue has dried, putty any small dents that remain.

If the rotted area is too large for putty and aggregate, then you will have to fill it with cut-to-size blocks. They should be put on glue and - if possible - additionally nailed or screwed with self-tapping screws.

After the glue dries, the area should be puttied with ordinary wood putty.

The next step is cleaning. The frame must be carefully sanded.

Pay special attention to puttied areas.

Restoration of wooden windows. Finishing
Before proceeding with finishing, the frame surface must be degreased with white spirit or a similar solvent. Alcohol won't do it!


The frames are now ready for painting. If you are lucky and your windows are not damaged, then you can use transparent paints.

The tree is very beautiful material, and wooden windows painted with transparent paint look incredibly attractive. But even if you have to paint your windows with regular opaque wood paint to hide putty and repair marks, plastic windows still can't compare to them.
 After painting, the frame is ready for glazing and return to its place, where it will serve for many more years. Restoring wooden windows requires a lot of time and effort, but don't let that scare you. All the efforts expended will return a hundredfold, because such windows are much more environmentally friendly and attractive than modern plastic ones. In addition, restoration will be much cheaper than buying and installing new windows.
Even the highest quality synthetic material cannot replace natural wood. It is safe and attractive in appearance. Wooden windows in many apartments have been standing for many years and their owners are in no hurry to replace them with PVC frames and double-glazed windows. Why? Because wooden windows do not interfere with air exchange, thanks to this, a comfortable microclimate is maintained in the room, which not everyone is ready to give up in favor of airtight plastic. In addition, the replacement of windows involves large-scale repair work, which includes the installation of new frames and window sills, the improvement of external and internal slopes, and these are large financial costs.
Donate to save time and money new life old windows. Wood is excellent for repair. You can restore both appearance and functionality with your own hands.
Unfortunately, repairs are not always possible. If the window is completely unusable, then replacing it is the only solution to the problem.
In what cases will the window have to be dismantled and thrown away:
- The frame is literally falling apart. Most often this happens in the lower part of the window, where condensate accumulates;
- The geometry of the window is severely disturbed. If it cannot be fixed without dismantling the box, then it is better to replace the frames;
- The window is too fragile. Thin bindings between panes may not withstand mechanical influences. Considering that layers of paint will need to be peeled off the frame, which means applying force, you should not waste time on restoration, but immediately dispose of the window.
You can replace the window not only with the popular plastic one, but also with a wooden one. Such products cost a little more and functionally practically do not differ from PVC windows, as they are equipped with modern fittings and double-glazed windows.
What can be repaired:
- The appearance of the frames;
- Broken glass;
- cracks;
- Small distortions;
- Local rotten areas;
- Sagging sashes.
To carry out repairs, you will need a set of tools and materials: chisels, planer, spatula, drill, level, sealant, sealant, drying oil, putty and paintwork.
Restoration is best done in the summer when the weather is warm and dry. You need to start by inspecting and identifying defects. In order not to miss anything, the frames can be removed from the box, check the integrity and reliability of the connections, as well as compliance with the level of the sides of the box.
What to do if it blows from the window
The most common problem faced by the owners of wooden windows is blowing, as a result of ice freezing in winter. 
The following defects may be the cause:
- Drying of wood and the formation of cracks between the frame and the box;
- Depressurization of seams and joints between glass and frame elements.
Previously, ordinary cotton wool was used to seal cracks, but today you can purchase high-quality and easy-to-install seals made of foam rubber and rubber. They have a self-adhesive base covered with protective film or paper. 
To close the gaps with seals, it is necessary to remove the frames from the boxes and glue the fittings along the entire contour. If the gap is large, then the strip of material must also be glued onto the frame. Opening sashes are glued in the same way. 
The gaps formed between the glass and the frame can be sealed with silicone sealant. To avoid glass rattling, it must be planted on aquarium glue.
How to repair a sash that does not close well
Over time, the opening parts of the window sag under their own weight or swell, saturated with moisture. Because of this, the sashes can be difficult to enter the frame or stop closing altogether. There can be two ways out of the situation:
- Cut off the top layers of wood;
- Tighten or move the loops.
The first option is suitable if there are no gaps, and the sash fits snugly against the frame around the entire perimeter. You can visually detect an area that interferes with functionality, in this place the paint will be erased on the frame. You need to cut the wood from the sash, in thin layers, in the process, check how easily it enters the opening.
The second option is used if a gap has formed. To correct a large sag, the hinges must be dismantled and installed a few millimeters higher. It is also possible that the fastening of the hinges has simply weakened, in which case you can tighten or replace the screws. If the gap is small, then you can try to wind a thin wire on the hinge rods and hang the sash.
Other reasons can disrupt the functionality of the sash, for example, frame distortion or multiple layers of paint.
What to do if a distortion has formed
This problem is one of the most serious and requires capital restoration. As a result of distortions, window functions are violated, gaps are formed and the appearance deteriorates.
The skew can be seen visually. If it is not visible externally, you can use the level. Even a small difference can affect the quality of the window - a gap of 2-3 mm will become a source of cold air and cause ice to freeze.
 The solution to the problem should be cardinal - the frames need to be dismantled and the correct geometry returned to them. A simple and reliable way is to fix metal amplifiers on the corners. To do this, it is necessary to make landing recesses in the frame so that the corner, after installation, does not protrude beyond the frame. The same angles can be mounted on sashes and vents. To achieve the correct geometry, the frame without glass must be laid on an even shield and the diagonals aligned.
If the dowels or “chops” (wooden nails at the junction of the frame parts) are loose, they can be filled with glue, before that you also need to adjust the diagonals to equal values.
Sometimes the dowels dry out and are freely removed from the groove, in this situation it is better to make new ones, of a larger diameter, and lubricate them before installation liquid nails. To make "chopics" you will need a core drill and a piece of solid wood.
Dowels must be cut strictly across the fibers. And hammer into the holes with a mallet. After installation, drive wedges into the "chops" on both sides.
Correcting the frame geometry is not enough, it is possible that the box also squinted. It is possible to change its position without dismantling, but only if the difference does not exceed 2 cm. To do this, it is necessary to determine the lowest point in the lower plane of the box and the highest one in the upper one. Focusing on them, cut off the "extra" level. The same should be done with the sides of the box. To control the shape of the opening, you need to measure the diagonals, as well as the height and width at several points.
Inevitably, the frame will become smaller than the opening. To adjust the dimensions, along the perimeter you need to install wooden slats of appropriate thickness.
How to eliminate rotten areas
Moisture is the first enemy of wood. If the windows "cry" rotting is inevitable. It is important to detect the defect in time so that it can be eliminated without replacing the window.
To work, you will need to dismantle the frame or sash with a damaged area, remove the glass and lay the product on a flat shield. A damaged piece of wood must be hewn or cut off, and planted in its place. new part. It must be carefully sized and fixed with liquid nails or wood glue. Level the surface, cover with putty, sand and paint. If everything is done carefully, then there will be no trace of the defect.
Minor damage can be repaired with putty. To do this, it must be abundantly applied to the damaged area until the lost volume is restored. The composition must be kept until completely dry and give it the correct shape. 
How to restore an attractive appearance
Old wooden windows, as a rule, are covered with more than one layer of paint, which has begun to peel off and has smudges. Of course, you can not spend a lot of time, clean up what falls off and apply another layer, but in order for the window to look like new, the old coating must be removed completely.
Removing paint
Before starting work, the frames must be removed from the box, the glass removed and all metal elements mechanisms.
There are three methods for cleaning old paint:
- Mechanical;
- Thermal;
- Chemical.
The first one is the most complex and time-consuming, but does not require special tools and materials. Manually, the paint can be removed with a spatula, sandpaper or a scraper. The method is not always effective, it is appropriate if the frames have a thick layer of paint that can be easily removed. Work will go faster grinder.
Thermal cleaning requires a building hair dryer. It must be directed to the frame section, heated for several minutes and immediately removed with a spatula. The warm coating can be easily removed, with virtually no residue. Areas where the paint is held tightly can be cleaned with sandpaper. 
In chemical cleaning, a special liquid is used to remove the paint, you can also use what is at hand, for example, kerosene. 
For this method, the frames must be wrapped with rags, moistened with plenty of solvent and packed in a plastic bag. Withstand a couple of days, after which you can clean the surface with a spatula from softened paint. The wood after such processing will not be perfectly clean, it will be necessary to remove the remnants of the coating with a grinder or sandpaper. 
Training
The next step is puttying. This type of processing is necessary for leveling small defects: cracks and irregularities. Before this procedure, it is recommended to remove burrs, chop off protruding parts and clean the surface of dust. The composition must be applied as thinly as possible. Then dry well and sand. 
Before painting, wood must be protected from damage. Drying oil or an antiseptic can act as such a coating. The frames should be impregnated with them in several layers.
The "old-fashioned" way of dipping wood into hot drying oil is dangerous to life and health.
You can start applying the paint after drying. protective coating. You can check the readiness of drying oil by touching the frame, if the hand does not stick, then the surface can be painted.
Coloring
Applying fresh paint is the most important step. Much depends on the choice of material. Best for windows Oil paint. The samples presented on store shelves are made of synthetic components, their service life is short.
To keep windows looking good for 10 years, you need natural paint. It can be prepared from a thick mineral pigment-based paint mixed with linseed or walnut oil.
It is more convenient to apply the coating with a thin brush. It is better to remove the glasses so as not to accidentally stain them. You can install the frames in place when the second coat of paint dries. It can also cover the drainage, window sill and internal slope.
How to restore wooden window frames, including installing seals, removing the old coating, puttying and painting, is clearly shown in the video:
How to care for wooden windows
At proper care, a window restored with your own hands will live for another year and will delight you with functionality and aesthetics. 
In order not to bring the source of natural light in the apartment to a deplorable state, you need to watch the windows, namely:

Do not rush to get rid of old wooden frames. If their basic properties and integrity are preserved, minor flaws can be eliminated and visual appeal restored. Wherein family budget will be well saved.
Many owners of houses and apartments strive to make their housing as environmentally friendly as possible. For the same reason, they do not seek to replace wooden windows with plastic ones, but prefer to restore them, i.e. repair old wooden windows.
Advantages of wooden windows:
- naturalness of wood;
- wood is hygroscopic, i.e. does not interfere with air exchange in the house;
- low thermal conductivity allows you to save heat;
- long service life of wood with proper care;
- aesthetic appearance. Wooden windows can fit into various interiors.
All this speaks in favor of the restoration of wooden windows.
When do windows need updating or repair?
Firstly, when it starts to blow from the window opening;
Secondly, when the appearance of the window is lost due to deformation of the frames, the appearance of a fungus, damage to wood or one of the nodes (window fittings).
How to repair a wooden window with your own hands?
To begin with, we will deal with the definition: window repair or restoration is similar work that does not have fundamental difference, consist in clearing, putty, painting, sealing and. Painting of windows repair work does not apply, more to restoration, since it does not affect the functional qualities of a wooden window. Only the appearance changes.
Depending on the degree of deterioration of windows (frames, glass and fittings), the approach to restoration work will differ.
The technology of repairing wooden windows is quite simple, but it requires scrupulous execution of each stage of work.
Cosmetic repairs of wooden windows
Elimination of local damage. For example, damage to a part of a window frame by a fungus.
- identification of the area of damage. To do this, you can conduct a small test: with an awl, you need to push through dilapidated or suspicious sections of the frame, if the tip easily falls through, then the wood is damaged;
- cutting off the unsuitable layer;
- dry the cleaned area. To do this, you can use a building hair dryer or a fan heater (be careful with glass, direct the air flow directly onto the wood);
- application of wood hardener and preservative;
- putty application. Layer thickness - according to the instructions. If you need to apply several layers, you need to wait until the first one dries well;
- window coloring.
More details - in the photo.

Overhaul of a wooden window - complete restoration
Tool and materials:
- paint remover. Referring to the reviews of the masters, we note that many try to remove the paint without it, but this only damages the wood more;
- grinder and sandpaper. For leveling the surface;
- shoe knife for removing old paint
- putty knife. Reconstruction of wooden windows involves the obligatory puttying of the surface of the frame and sashes;
- brushes for paint and varnish;
- chisels;
- fittings, glass (if replacement is expected);
- drying oil, varnish and/or paint;
- putty;
- primer;
- sealant.
The cost of repairing wooden windows depends on the price of consumables, tools and, of course, on the condition of the frames. On the other hand, do-it-yourself window restoration does not require special skills. However, it should be noted that this work cannot be done in one day.
A few words about preparation. Work is best done on a warm, sunny day. The main condition is dryness, because. high humidity will adversely affect the result (wood changes geometry, dries poorly, etc.).
 Removing window sashes from awnings. If the glass is planted on putty, we remove it with a chisel, if it is on glazing beads (glass rail), then carefully dismantle them. Then take out the glass.
We remove all accessories (it is better to replace with a new one). You also need to remove the wooden sills on the windows (the wooden planks located on the bottom of the frame outside the window are also called the “teardrop”). They are attached to nails, which are probably already rotted. In general, all screws, nails, metal corners etc.
We put the “bare” frame on a flat surface and measure it - all diagonals must be the same length, otherwise, a skew in some place will lead to the formation of cracks, which is unacceptable. We fasten the frame tightly to the surface (it can be a board shield).
Dowels for windows can be knocked out with a hammer (they are cone-shaped, therefore, you need to knock them out from the thin side), provided that they are located evenly (symmetrically to the corner) and lend themselves. But, under pressure, a dilapidated frame can deform, therefore, it is better to drill out. If the dowel dangles, you can fix it before drilling - a couple of drops of superglue into the gap and after 5 minutes the drill will go like solid wood.
On the next step, when the window is disassembled, proceed to cleaning the paint.
How to remove paint from wooden windows
There are several ways to clean windows from paint.
Removing paint with a blow dryer
 You need to work carefully, ideally first remove the glass, or direct the flow of hot air so as to avoid direct contact with the glass. Due to the high temperature, the glass may burst (crack and fall out).
Put on a hair dryer temperature regime 250 degrees.
The task is not to remove the paint quickly, but qualitatively. At higher temperatures, the wood will char and, as a result of the burn, will lose its properties.
 In the process of warming up, the paint will begin to rise in bubbles that need to be cleaned off with the right tool.
It is better to do this with a shoe knife (a palette knife is also suitable - a trowel knife for mixing paints on a palette in painting). The fact is that the spatula will slide off the paint, or crash into a tree, leaving burrs.
Removing paint with chemicals
You can remove old paint from the window frame with special solutions (washes, liquids). They also use a "cunning method" - kerosene and a plastic bag. It is kerosene, because solvents and solvent destroy the wood structure.
Execution technology
- The wooden frame must be wrapped with cloth (rags) and this entire structure placed in a plastic bag.
- Moisten the fabric abundantly with kerosene, then tie the bag and leave for a day or two. During this time, the paint should soften and be easily removed (the above tool is used for cleaning).
Tip: take the planks out of the bag gradually, i.e. one was pulled out - cleaned, etc., if you remove everything at the same time - the kerosene will evaporate (dry), therefore, the paint layer will return to its original state (dry, harden) and stop separating.
Of course, such a large package for a whole window frame may not be found, therefore, you will have to disassemble the frame into elements. Or, as an option for processing the frame assembly, you can moisten the cloth and wrap it tightly plastic wrap, additionally tying the layers with a rope in order to seal the treated surface as much as possible.
Tip: keep in mind that removing paint from windows in this way is accompanied by a pungent odor, plus, the technique is fire hazardous, therefore, it must be performed on the street or on the balcony.
 The inner slope of the window and the window sill also need to be cleaned.
 After removing the paint, the frame will look something like in the photo. This is clearly not suitable look for cleaning work.
 Residues of paint are removed with sandpaper or a grinder.
Elimination of deformation of a wooden window
Sometimes old wooden windows are deformed, which can manifest itself in the form of distortions and distortions of the frame. For example, one or more window sashes led. This will be especially noticeable when installing the stack, when it fits into the selected groove, and the glass weighs in the corners or vice versa, the corners lie down, and there is a gap in the middle.
If the window is removed and disassembled, it can be put under the press, which is made of wooden shields and weighting agent.
If on installed window, then you can insert an emphasis (a bar, a bar of a suitable size) at the place of the bend (curvature), and applying an effort to close the window, fixing it with latches or come up with a fastening with self-tapping screws (for example, fasten the bar diagonally to the frame). All these manipulations are performed without glass.
We leave it in this state for 2-3 days, after which we increase the thickness of the spacer, and thus bring it to the desired position.
The method is controversial, but sometimes it helps. There may be cracks that can be repaired. We take a regular syringe and use it to inject PVA glue into the crack. Because the glue is liquid, it will flow out, the place needs to be pecked with adhesive tape. After drying, repeat the procedure, and then clean everything, putty and paint.
Restoration of wooden windows - restoration of rotten sections of the frame
If a fragment of the frame is rotten, it can be replaced or restored. If replacement is not provided, then restoration remains. To do this, you need epoxy putty for wood (the composition may include fiberglass, which will significantly increase the rigidity of the structure).
The damaged area is cleaned of paint and dust is removed. Next, putty is applied.

We apply the mixed putty to the damaged area, the mixture should fill all the cracks and cracks well. We recreate the missing section in such a way that it is slightly larger than the desired plane, i.e. there should be volume for subsequent grinding. Drying (hardening) of putty lasts a day (with room temperature). Then, using a grinder or sandpaper fixed on a bar, we grind the surfaces until they are completely leveled.

It should be understood that such a restoration allows you to restore the appearance, but does not guarantee sufficient density, especially in places of active use (places of tight abutment of the window sash). But if the window is deaf or rarely used, then it is a completely self-sufficient way to get out of the situation without completely replacing the window or frame elements.
- check the frame for damage;
- marking the damage zone with dots;
- sawing out the zone;
- replacement preparation;
- replacement. The prepared part of the frame is installed in the right place, fixed with glue and clamped with clamps. After 24 hours, the clamps are removed;
- grinding the junction of the old frame and replacement. This will avoid a difference in height;
- primer treatment;
- staining. The material was prepared for the site www.site
More details - in the photo.

 After cleaning the frame of paint, you need to putty it.
Putty for windows is sold as a finished product, at the same time, you can cook it yourself. To do this, knead 3 parts of sawdust in one part of liquid nails.
The technology is simple, but the solution dries quickly, therefore, we interfere quickly and in small portions.
Kneaded - puttied, etc.
Homemade putty is based on glue, and therefore, it quickly hardens.
We grind the dried and dense surface with a machine or sandpaper (sandpaper) of fine grain.
Drying oil impregnation
Drying oil treatment of wood is a good " grandfather method", time-tested. But, it should be borne in mind that the modern drying oil is different from the drying oil of the times of the USSR. Now it is difficult to find natural drying oil, as a rule, they sell something derivative, such as Oksol. The point is that the real one is made from natural ingredients (linseed, hemp oil), and not from synthetic derivatives. There are many on the market good impregnations, which displaced drying oil and its production from vegetable oils is simply unprofitable. As an option, for aesthetes, you can make drying oil with your own hands.
Covering window frames with drying oil is done with a brush, the first layer as an impregnation, the second or third final. Between the layers you need to withstand the time period (preferably until completely dry, and this process is not fast). If the surface does not stick, then you can work on.
Impregnation with hot drying oil
The method of processing with hot drying oil is also used. Here it should be understood that drying oil is a combustible material and ignites easily upon contact with an open fire.
How to heat drying oil?
Drying oil can be heated in a water bath and the second method is more dangerous - heating to a boiling state. To do this, make a flask from iron pipe, one end of which is welded. Drying oil is poured into it and heated with an electric stove or a building hair dryer to a boil (during the heating process, ignition is possible, extinguish by throwing burlap). After that, the bars of the window frame are lowered into the hot drying oil for 5 minutes, they are taken out with a hook, because. high temperature and laid to dry. According to reviews, impregnation on hot drying oil creates a coating for centuries (the effect of wooden railway sleepers).
Again, this is very important(!), warming drying oil is a dangerous undertaking.
To proliferate windows or treat with an antiseptic, everyone decides for himself, each of them has pros and cons.
Coating with stain and varnish
 If the condition of the window frames after removing the paint is good and there is a desire to preserve the naturalness of the wood, then you can treat the surface with stain.
With the help of stain, you can change the shade of the tree, for example, tinted pine can look like bog oak as a result.
Before treating the window frame with a stain, it is better to check the consistency of the solution on a separate board (preferably of the same type of wood and shade), i.e. choose the tone of the wood.
Staining wooden windows not only enhances their aesthetic qualities, but also makes the wood more resistant to UV rays, and also prevents rotting and fungal growth.
In addition, the stain penetrates deep into the structure of the wood, so if you subsequently have to sand somewhere, this will not disturb the shade and texture of the frame.
Finishing with stain is completed with varnishing. Dry window frames are covered with transparent varnish (it is better to use acrylic lacquer for wood, glossy or matt).
After complete drying, window fittings (canopies, handles, latches) are installed and glass is inserted.
Installing glass in a window
Proper glazing of wooden windows provides for hermetic installation of glasses, because. It is in the micro-slit between the glass and the frame that it will blow. Glasses are planted on silicone glue ( aquarium sealant). Squeeze out a thin layer of aquarium glue along the groove under the glass of the window frame and insert the glass, which we fix with glazing beads. We wipe the glue that has come out with a sponge dipped in vinegar. Do not rub the nail heads, a thin layer of sealant will additionally protect them from rust. We leave the windows to dry, it will take at least a day for the glue to harden.
Sometimes the restoration of wooden windows is accompanied by the replacement of glass if there are defects (cracks, haze, abrasions, traces of welding or grinders). After all, glass also has its resource. When ordering glass, you need to accurately measure the opening, but order 2-3 mm. less, because the glass expands under the influence of temperature, and the resulting gap will not allow it to burst.
Glass is fixed in the frame using glazing beads and small nails. At the same time, glazing beads must be prepared in advance (impregnation with drying oil, painting or staining). You can even drill holes in the glazing bead with a thin drill. Then, when clogging, the bead will not crack and the glass will not crack.
Below is a photo gallery - a master class on installing glass on putty, without a glazing bead. For example, the glass broke, it needs to be replaced, but there is no rail for fixing the glass at hand, or there is simply no need for it. Putty for glass is bought ready-made or made independently (knead chalk on drying oil).

When choosing how to process wooden windows, take a closer look at the quality of work.
If the condition of the surface suits you (i.e. no deep damage, uniform color), give preference to varnish. At the same time, in order to even out or change the tone of the wood, you can process the frame with stain. It will also hide minor imperfections.
If there are many areas with putty, then it should be covered with paint.
For coloring use oil or acrylic paint. The first lasts longer, but dries for a long time, the second vice versa.
First you need to dilute the paint, too thick will poorly impregnate the tree and streaks may appear. It is better to apply several layers of more liquid paint.
The first layer should impregnate the wood. Only after it dries well, you can apply a second layer, i.e.
You need to start painting from the inner surface - from the glass.
After painting, remove the adhesive tape (while the paint is still wet). If there are stained marks on the glass, they are removed with a blade.

How to remove tape marks
If the windows were pasted over masking tape, but with packing tape, then traces will remain that are very difficult to erase. AT this case it means pasting with adhesive tape not only glasses, but also the frames themselves (both wooden and plastic).
The first thing that comes to mind: gasoline, diesel fuel, alcohol, cologne, etc. But, these products should not be used if you do not want to damage the paintwork. Is simple and environmentally friendly safe way remove traces of adhesive tape - adhesive residues on window frames are removed vegetable oil(sunflower), and then washed off with a washing solution.
If the old window hinges (canopies) are worn out, they should be replaced. The hinge replacement technology is shown below. First you need to correctly determine the place of attachment. To do this, the window frame must be inserted into the window opening and fixed with wedges. When the gap is the same around the entire perimeter, we mark the places for installation. Using a chisel, we select a groove for planting the loop and fasten it with self-tapping screws.

Sealing and insulation of windows
Rubber seal for wooden windows, fixed around the perimeter of the frame, will reduce heat loss.
You can repair wooden windows by. Its essence is that in the sash you need to choose a groove. A special euro-strip silicone tubular seal is installed in it. He is not afraid of low and high temperatures and has a twenty-year warranty.

The final touch in the restoration of windows will be the installation of window fittings (handles and latches). Only after that the window is installed in place.
How to update wooden windows - video
Conclusion
As a result, we note that correctly executed instructions at each stage for the repair of wooden windows and a periodic analysis of their condition are a guarantee that the windows will serve you for more than a dozen years.