Content:
Sooner or later everyone spendsdo-it-yourself repairs in an apartment or house. Therefore, the question: “How to start the repair?” is very important and should be taken seriously.
We are starting repairs. We plan and think about the future work
Photo 1 - Do-it-yourself apartment renovation stages
Before proceeding with the independent repair of the apartment, you must first draw up a plan of all the premises, indicating the location of furniture and equipment. In this way, it will be possible to determine where sockets, ceiling lights, etc. will be located. This must be done in order to properly design the wiring of pipes and wires. The convenience of using the premises in the future will depend on how competently it will be performed.
If you do not like the existing layout of the apartment, then the repair should begin with the demolition of the walls or with their construction.
No less important is the style of the future premises, which can be the same for all rooms or have cardinal differences. If it is difficult to decide on this issue, then you can resort to the services of a designer who will take into account your preferences and features of the apartment.
Having thought it over and weighed all the points, you can begin to calculate the amount of materials needed and purchase them. It is better to divide repair work into stages, which will give the process a certain planning.
Important!
It is not advisable to start repairs from a passage room or corridor, because work in other rooms may adversely affect their appearance.
Performing basic renovation work
Repairs begin with the so-called dirty work:
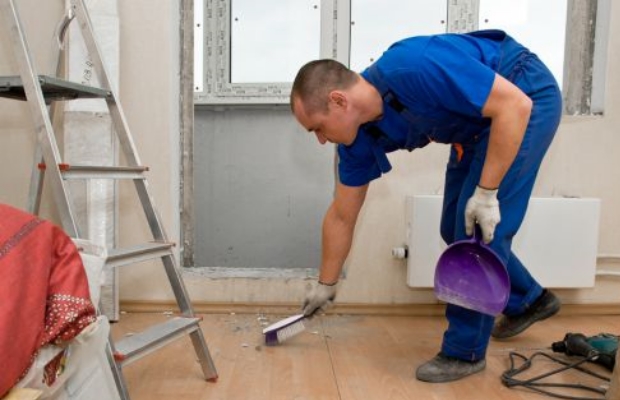
Stage one. Dismantling of old coatings

Photo 2 - The first stage of repair - remove old wallpaper from the walls
It is necessary to remove old wallpaper, whitewash, tiles and other finishing materials. If the floor has not become completely unusable, then it should not be touched yet. In the event that replacement is not provided, it should be carefully covered with plastic wrap, and securely fasten its edges with masking tape. To protect the floor from mechanical damage, it is better to use cardboard, it is much more reliable than paper.
To prevent dust from settling on doors and windows, it is better to leave the dismantling of old doors for later. You just need to withdraw cash.
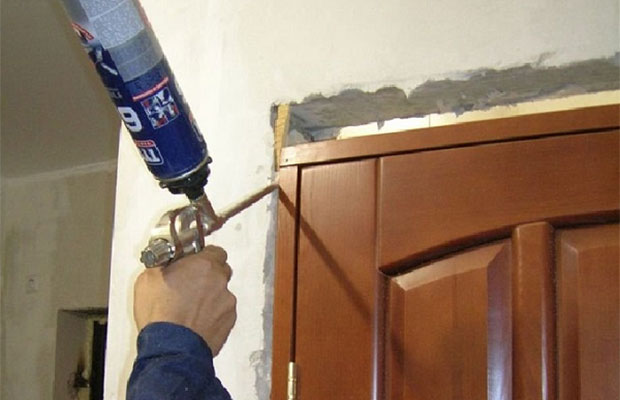
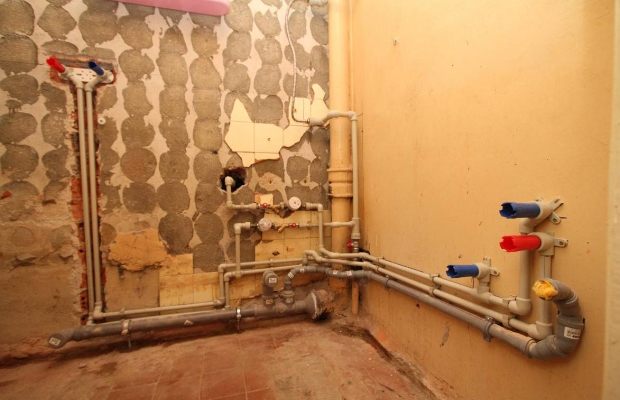
Second phase. Electrical and plumbing

Photo 3 - The second stage of repair - strobe walls for wiring and pipes
This work is the dirtiest, but at the same time responsible. It will be very difficult to redo such work later, and sometimes impossible without a new overhaul.
Important!
Saving on plumbing, as well as electrics, is not reasonable. Wires and pipes hidden in the wall cannot be repaired.
Wall chasing should be carried out according to the scheme, which will need to be saved, so that later you do not accidentally drive a nail in a dangerous place.
It remains to lay the wires of the desired section and pipes, it is better to use propylene and carefully seal the strobes.
The third stage of repair. Preparatory installation

photo 4 - The third stage of apartment renovation - we dismantle old windows and doors
It is labor intensive, because right now it is necessary to dismantle the old windows and install new ones.
Important!
To protect new windows from dust and accidental splashes, they can be protected by covering them with film. There is another way - to use paper pleated curtains, which looks more aesthetically pleasing and is inexpensive.
 Next, you need to perform a rough finish, that is, prepare the floor and ceiling for finishing. Such works include:
- Grouting seams and cracks;
- Puttying.
Important!
The material for rough work is selected depending on the type of finishing. Experts do not recommend saving on these materials.
The fourth stage of repair in the apartment. Padding

Photo 5 - The fourth stage of apartment renovation - priming of all surfaces
Applying a primer makes it possible to wall or ceiling is much stronger. The composition of the primer includes elements that have the ability to penetrate deep into the treated surface and connect small particles. Now you need to wait for complete drying and you can start painting the ceiling.
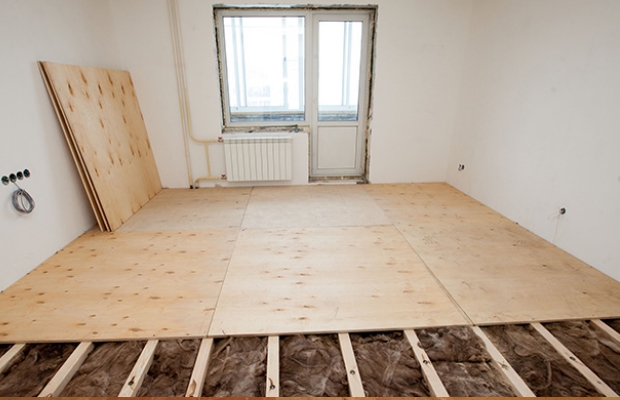
Stage five. floor leveling

Photo 6 - Do-it-yourself apartment renovation. floor leveling step
If the old floor remains, then you can skip this step. Otherwise, you need to pour the base from a modern self-leveling mortar, or carry out work on the screed. Only after complete drying can you move on to other work.
Stage six. wall decoration

Photo 7 - The sixth stage of the repair - wall decoration in the apartment
Depending on your preferences and financial capabilities, material for wall decoration is purchased. You can paste wallpaper, the choice of which is extensive not only in color, but also in material, texture, size. For example . Many options include painting, as well as decorative plaster. There are more exotic types of finishes, it all depends on your desire and the overall style of the room.
Important!
Folk wisdom says leftovers are sweet. This means that you can buy remnants of wallpaper, the price of which will be lower, and create an original combination.
The seventh stage of apartment renovation. Flooring

It's time to start laying the floor covering. For this purpose, you can use: linoleum, carpet, piece parquet or a more modern version - parquet board and other materials. If it is decided to lay floor tiles, then they begin to install them only after completion of all work with the ceiling.
The final stage of do-it-yourself repair

Photo 7 - The last stage of the repair - installation of interior doors
Thresholds, skirting boards, etc. At the same time, cabinets are assembled, furniture is arranged, and decorative elements are added.
Now you need to carry out a thorough cleaning in all rooms and you can enjoy the result.
Repair in the apartment raises a lot of questions, especially for those who first decided to do such a responsible business, relying on their own strength. Our recommendations will help to plan the work correctly, so as not to correct the mistakes made later.
Preparing for renovation - planning and design selection
Correctly chosen sequence of repairs in the apartment will help to make it in a short time, without unnecessary worries. Initially, you should decide what kind of repair is to be done. Perhaps it will be cosmetic: it will be limited to changing wallpaper, painting and other individual operations. If a major overhaul is needed, planning is indispensable. After all, he may touch windows, doors, affect walls, floors and ceilings. Maybe you want to do the redevelopment of the premises, remove the walls.
Careful consideration is required for the layout and design of the premises. For each room, consider what material will be needed for walls, ceilings, floors. Perhaps you will change windows or want to rearrange furniture. It is impossible to keep everything in your head, so you need to make a plan. We measure all the rooms and make drawings on separate sheets. You will need six of them for each room: one for the floor and ceilings, four for each wall separately. On the plan, indicate the location of windows, doors, sockets, switches, lamps.
Write down on each sheet what materials will be used. For example, the floor in the kitchen: linoleum with insulation - 12 m 2, brown. Ceiling: 12 m 2 , water-based paint, white. The first wall: 6.1 m 2, align - satengips starting, finishing, primer. Painting: water emulsion, peach color, colorex, primer. Replace the door with a new one, leave the trim. It is advisable to indicate how much of which material will be needed, based on consumption rates, it would be nice to indicate the price. If you do not undertake any work, you will involve a specialist, indicate this in the plan. This is only an indicative planning, you can fix whatever you see fit. A start has been made - the work has been planned.
Continuation of preparation - furniture moves, unnecessary elements are dismantled
An ideal option if it is possible to completely free the apartment from furniture and interior elements for repairs. But, most likely, it will have to be moved to one of the rooms so that it does not interfere with work. We stack compactly, pack with stretch film. Renovation begins with other rooms. When at least one room is ready, the furniture is transferred there, arranging as the rooms are ready.
The next step is the dismantling of the elements to be replaced. If the repair is cosmetic, remove the layer of old linoleum, remove the wallpaper. During a major overhaul, you may have to remove interior doors, remove partitions, change door installation locations, create special niches in the walls, remove plumbing, etc. If you are not going to change the floor, but only update it, do not forget to cover it with a film so as not to damage it.
Time to dismantle old windows if you are going to install new ones. After installing the windows, do not remove the protective film from them. Let it remain for the duration of the repair and protect the glass from scratches, dirt, dust, inevitable during repairs. If redevelopment is planned, there is a desire to start from scratch, we demolish non-bearing partitions.
Water, heating, electricity - we repair, install a new one
Having finished dismantling, in stages. We start with communication systems. The overhaul time is the most suitable for replacing electrical wiring, heating radiators, pipes, installing exhaust hoods, and air conditioning. Communications should be planned in advance, especially wiring. If you are going to build new partitions, the work should be done before wiring, pipes, so that you do not have to break and redo it later. In a frame house, wiring, pipes are best hidden in the walls. On the walls of another material, strobes are made, where the wiring is hidden.

Residents of panel houses should keep in mind that walls in such houses can only be ditched in a vertical direction. We breed wiring under the ceiling or in the place where the walls and floor are joined. We hide the wires under or behind the plinth. Do not forget to run cables for the Internet, television, intercom at the same time as the wiring. We do not immediately install switches, sockets, lamps, we only prepare places for them. Installation of devices is carried out after the completion of all work.
We are engaged in plumbing: we install pipes for supplying water to the washing machine and output to the sewer. We also make connections to faucets, bathrooms, showers, dishwashers, toilets. Already now it is important to know the dimensions of the bathroom and shower cabin, the places where water and sewerage are connected. It's good when they are already bought, but you can also find out the technical specifications in the store where you are going to buy the equipment.
Finishing work - scope for a flight of fancy
We carry out finishing, starting from the top - from the ceilings to the walls and floors. With this sequence, damage to the repaired parts when working with others is excluded. Stretch ceilings are an exception: they are made last. If you want to make a floor, start by leveling the screed. We use an economical method - a cement-sand mixture. If possible, use self-leveling floors. They are more expensive, but the result is worth it. If you are going to install a floor heating system - it's time.
Let's start leveling the walls. The duration of work, the amount of material depends on the condition of the surfaces. You may need several layers, or you can get by with one. The walls are leveled, mainly with their own hands. The use of machine alignment in an ordinary apartment is not practical. Manual alignment is performed in two ways: visual and by beacons. We align the walls that are being prepared for painting with beacons, which ensures the best quality.

Having finished plastering, we proceed to the final work - puttying. Putty should be carefully to close up all the bumps, places of wiring communications. Finally preparing the surface for finishing. The choice of a primer is important - a high-quality one will avoid problems when puttying, painting, pasting. If you are going to install decorative elements like stucco, do it now.
Then we move on to the wall tiles. It is important to plan which tile to use on which wall. If possible, we make an installation diagram on a computer or draw on paper. So we will find out exactly how many tiles will be needed, how many will have to be cut, in order to reasonably plan the purchase of a stock. A variety of colors, patterns, finishing materials allows you to make the apartment unique. In addition to ceramic tiles, decorative mosaics, bamboo tiles, 3D elements and much more are used at this stage.
Approaching the finish line - the last important touches
We install plumbing - all the connections are made earlier - and proceed to laying the flooring or decorating the walls. Most builders prefer this order: first start laying the final floor: laminate, parquet, linoleum. Next, we are installing interior doors. We select the door in advance in order to prepare, if necessary, doorways of the desired height and width. We install the boxes, hang the door leaf. We close the clean floor with a film and deal with the walls. Options at your discretion: painting, wallpaper.
It is not necessary to fasten the platbands immediately, it is better to do this after we paint the walls or wallpaper them.
We complete the process by installing fixtures, switches, sockets, fixing skirting boards.
Summing up - sequence of actions
So, summing up all the tips, we will outline the sequence of repair work in the apartment:
- 1. We are considering what kind of repair is needed: cosmetic or major, we choose the design. We draw drawings, specify materials.
- 2. We take out, take out furniture and everything that will interfere with the repair, dismantle unnecessary elements on the floor, walls.
- 3. We are engaged in dusty work: we remove old windows, install new ones, tear down partitions and install new ones. We bring communications - electrical wiring, pipes for connecting household appliances and plumbing.
- 4. Finishing work: we plaster the walls, we make a draft floor. Puttying, priming, laying tiles. We do the finishing floor, decorate the walls.
- 5. We install plumbing and appliances, hang the door. We fasten skirting boards, platbands.
We start the repair from the most remote room, so that garbage and dirt are not applied to the repaired premises. The corridor is being refurbished. Garbage, building materials are carried through it and there is a big risk that the walls, floor, ceiling will be accidentally damaged. We close the renovated room, we hang the door with construction film. In this way, we will prevent the ingress of dust, debris, building materials from the premises in which repairs are ongoing.
Where should you start repairs in an apartment or a separate room in order to do everything in the optimal time, not overpay and get exactly the result you are counting on? the site put everything on the shelves so that your repair turns from a state into a process.
We have prepared a list of questions that you should ask yourself and the construction team before starting a renovation. The answers will help you finish the work faster and spend less money and nerves.
Capital
When more global changes are required, major repairs begin. It includes redevelopment of space, demolition and construction of new partitions, replacement of pipes, electrical wiring and heat supply elements. Such repairs are an order of magnitude more expensive than cosmetic ones and last longer - but after it you get a completely updated home.
Repair with a contractor or do it yourself?
Any type of repair can be done independently or with the help of specialists. The first option is less expensive, but does not guarantee a 100% result. If it is closer to you, check out our useful instructions and master classes - they will help you do the work no worse than an experienced master.
Repairing with a contractor seems like a more reliable choice, but there are pitfalls here too. How to choose a good specialist? How to draw up a building contract? Exhaustive answers to these questions are collected below.
How to calculate the cost
and make a budget?
The most burning side of the future repair is financial. First of all, you need to decide how much the selected work will cost and what is enough money for; on what and how you can save, and what is better not to skimp.
Another important aspect is the preparation of a repair estimate, on the basis of which its approximate cost is estimated. There are other questions regarding the budget: for example, is it worth spending money on repair insurance?
Our advice will help you deal with all the financial subtleties. And with the help of simple and understandable calculators, in just a couple of clicks you will calculate the approximate cost of repairing an apartment or a separate room and the cost of building materials.
In addition to the previous article in this column, we will allow ourselves, dear readers, to tell you one short story that happened last summer with one gentleman, and show you a certain table, which the performer called an estimate.
Why it is so significant, you will soon understand.
Starting repairs, the diligent owner first of all picks up a calculator. However, he will receive close to real amounts of expenses only if he takes into account various factors and nuances, including non-obvious ones.
Apartment renovation calculator
Specify the main parameters of the apartment, select the type and cost of work and materials, and find out how much it will cost to repair your apartment.
Outcome 0 ₽
Design projects you might like
How to compose
repair plan?
In order for the repair not to stretch indefinitely, it is necessary to plan it correctly. To do this, it is necessary to take into account the procedure and terms of repair work, familiarize yourself with the legal framework, find out what documents will be needed for the transformations and how to draw them up. And that's not all. It is important to understand whether it is worth contacting a designer for help and how to think over the redevelopment so as not to drown in a series of approvals.
Knowing all these details, you will save time, money and nerves, but, most importantly, you will be able to be in your new apartment as soon as possible.
Do you want to be surrounded by a modern interior, but you cannot formulate how it should look like? Do you like something in the apartments of your friends, something attracted you in magazines, it’s hard to decide on something ... Is it much easier to say what you don’t want categorically? Only a professional will help you understand your preferences and make the best decision.
On the forums of potential new settlers, battles over finishing from the developer have not subsided for many years. Is it worth spending extra money on ready-made standard repairs, or is it still cheaper to buy an apartment and do the finishing yourself?
What can and can not be done when redevelopment? What types of work are not included? In what cases can a balcony or loggia be attached to a room? We answer the main questions about the global change of the apartment.
Repair in the apartment is now an expensive pleasure. Some save up for it for years, while others give away their last savings and fall into a debt hole. Regardless of the financial situation, everyone tries to save money, but in practice, not everyone succeeds in doing this. We will analyze what materials you can save on, and which ones are better not to, and learn how to expose hired repairmen who are trying to cash in on the ignorance of the owners.
Different types of repairs - how much to pay the master and how to save money?
The final estimate will depend on the type, size of the room and the complexity of the repair. There are three types of repairs: cosmetic, major and renovation. The cosmetic option is the most economical. This repair usually includes painting, wallpapering, sanding the floor. Such work is easy to do with your own hands, saving on calling a specialist. If some specialized tool is missing, it is not worth purchasing it for one-time purposes. Rent it. Make a preliminary estimate for repairs in order to adjust it in advance and find cheaper options. When deciding to hire a private specialist, redecorating an apartment will cost you, on average, 1,500 rubles per 1 m 2, and through a construction company - 2–2.5 times more expensive.
It is much more difficult to make major repairs on your own, since many of the works require special skills and abilities. Stages of such repairs: floor screed, wall leveling, demolition and installation of partitions, dismantling of old coatings and finishes, complete replacement of water pipes, plumbing and electrical wiring, replacement of windows, doors, garbage disposal. The price for calling a master during a major overhaul increases to 6,000–15,000 rubles per 1 m 2. And that's not counting the cost of consumables.
Here are four tips to help you save money on major repairs:
- 1. Remove old wallpaper, tiles, dismantle the flooring, clean and take out the garbage yourself. Such work does not require special skills and tools, and the savings are significant - 5000-8000 per 1 m 2.
- 2. Do not rush to spend money on finishing an expensive ceiling. Just level and paint it with inexpensive chalk paint. When money appears, sheathe the ceiling with drywall or make a stretch ceiling.
- 3. Do not remove plaster completely. Remove it only in those places where it exfoliates. However, take into account the peculiarity of the finish. If you plan to stick photo wallpaper, the surface must be perfectly flat. It may be necessary to completely replace the plaster, in which case it will not be possible to save money.
- 4. In order not to waste time on paperwork and extra money for garbage disposal, collect the waste in bags and send it to the basement, shed or leave it on the stairwell in a specially designated place, it is provided. Throw away one bag every day in the general trash can, there is nothing illegal about it.
Renovation practically does not differ from overhaul. The cost increases due to the purchase of expensive and natural materials from well-known manufacturers. The price of materials is automatically reflected in the cost of the master's work, which starts from 25,000 rubles per 1 m 2. .
How to check the honesty of the estimate - common tricks
If you decide to involve an experienced team of repairmen in the repair, be prepared that you may be deceived. To test this for sure, pay attention to a few important features. The information will be useful for both beginners and experienced homeowners who decide to start a renovation.

To display the exact cost of repair work, the foreman measures the parameters of your room with his tape measure. It seems that everything is fine and there can be no catch. In this case, we recommend that you give your own tape measure for measurements. Often, cunning repairmen cut the tape measure, for example, by 50 cm, and fasten it to another part of the tape, stepping back 20–30 cm or more. From a real size, for example, 2 m, your room increases to 2.3 m and, accordingly, the price increases, because the cost of work is calculated based on 1 m 2.
Upon receipt of the estimate, carefully study all positions. Often, repairmen duplicate the cost of services under the guise of other work. For example, leveling walls - preparing walls for wallpaper. Read each item carefully so as not to overpay.
Pay attention to the price for 1 m 2. Compare it with other construction companies and individuals beforehand. Prices below average should alert you. Usually, in the process of work, the repairmen who initially offered you a low price raise it and ask you to pay extra for additional services. The owner gets into a dead end, as the work is already in progress, and the estimate is automatically increased by 2-3 times.
Saving materials and increasing the cost of work is another trick used by dishonest repairmen. For example, you can put a 1 cm layer of plaster for the price of 3-4 cm, shorten the planned route for laying electrical cables or plumbing pipes, and take the rest of the material for yourself. In fact, you overpay for material that does not "work" for you. To avoid such mistakes when performing a turnkey repair, ask the repairmen to photograph the completed work process in detail in stages and send it to you by mail.
If you decide to put a warm floor, remember that it is not placed around the entire perimeter of the room. An unscrupulous foreman will offer you to put a warm floor under the furniture, where it is absolutely not needed, which will also increase the cost of the project.
Complete wiring replacement is another service that almost every foreman will offer you without making sure that you really need it. You can make good money on old wiring made of copper and aluminum cores.
And the last piece of advice: buy materials yourself, do not trust this business to the repair team. As a rule, they buy building materials in the market, where the storage conditions for many goods do not meet the standards. In addition, there repairmen can ask for a blank check with a seal, enter a list of goods themselves and their cost with an extra charge.
In which season repairs will be cheaper - promotions and special offers
It is better to start repairs in the off-season - in early or mid-autumn. This period is suitable for both external and internal repairs. It is still warm outside, and prices for building materials are gradually decreasing by the winter season. Savings on summer goods reach 15-20% without loss of quality. Therefore, if you were planning to spend 250,000 rubles to renovate a room, know that in the fall and winter you can save about 30,000 rubles, which can be spent on renovating the hallway.
Promotions and special offers are a special type of service where you can save. Pay attention to non-liquids. They have a limited shelf life and do not last until the next season. Hardware stores do a good discount on such goods. If you are going to make repairs right now, look at putty, plaster, glue, sealant at a bargain price, below the market average.
Budget plumbing replacement options
Replacing plumbing affects a significant part of the repair budget. If it is in good condition, without chips, cracks, and only the surface with an old coating makes you think about its dismantling, we advise you to clean and restore the plumbing. We replace expensive detergents with a mixture of baking soda and vinegar, which destroys stubborn plaque well. Budget option for transformation -. You can cover the bath yourself with enamel, liquid acrylic or order an acrylic liner to fit the dimensions of your plumbing. Restoration will reduce the cost of buying a new bathtub by about 4 times and, depending on the option chosen, will extend the life of the old bathtub from 5 to 20 years.
If you still decide to change plumbing, consider buying a budget option from the so-called landfill entrepreneurs. Often, upon arrival at a new house, the owners change faience and cast-iron plumbing, which is in good condition, and throw it into a landfill. Resourceful businessmen have come up with an easy way to quickly and easily make money on this. They pick up plumbing in good condition from the landfill, wash and put it in order. They do not expose their contacts directly, working on the principle of word of mouth. In the auxiliary warehouse of such entrepreneurs, you can pick up the right plumbing and save a third or even half of the factory cost.
Economical wall cladding and flooring in dry and damp rooms
To save money when cladding walls, we advise you to buy not edged (planed) lumber, but slabs (wood sawing waste). The croaker is sold raw and does not correspond to the quality of the usual materials. It is easy to fix this if you purchase it in advance in March-April and keep it in a dry room until autumn. In addition, slab sheathing saves money on leveling walls. In 80% of cases, it completely hides all the irregularities. Not only to save money, but also to make wall decoration practical, the option of wall cladding with croaker to the waist and pasting the walls to the ceiling with non-woven wallpaper will help. The lower part is resistant to wear and dirt, and the upper one completes the overall picture.
The most budget option for laying the floor in dry rooms is marmoleum. This material requires leveling the floor in only 10% of cases. However, for rooms with high humidity (bathrooms) marmoleum is not suitable, you will have to lay classic tiles. An alternative to marmoleum is laminate. This option is also inexpensive, looks beautiful and is suitable for laying under a plank floor. True, the floor will have to be leveled.
For wall decoration in the bathroom, choose laminated hardboard. Such material is less familiar than tile, but cheaper. The ceiling is better sheathed with plastic panels. Don't skimp on waterproofing. The money spent on it will pay off and extend the life of even the cheapest finishing materials. Instead of gypsum plaster, use a cement-plaster mixture to level the walls. It is not inferior in quality and is cheaper. When deciding to tile walls and floors, buy a solid color finish. Such a tile does not need to be often adjusted and compared with the pattern, less material is used, which automatically affects the purchase price.
What is better not to save on, so as not to pay twice later?
When carrying out major and European-style repairs, it is impossible to do without replacing the wiring. At this event, it is better not to save money and entrust the work to a professional. It is especially important to pay attention to Soviet wiring due to the high power of modern devices, which sometimes the old cable cannot withstand. During the replacement, you will have to use a wall chaser to lay new wiring with high quality. Workers charge for this service from 100 rubles per 1 m 2.
A complete replacement of wiring in a two-room apartment, on average, will cost 40,000 rubles. A private specialist may take less, but he does not give a guarantee for installation, so if a malfunction occurs, you will have to pay the master again for the work. To save money, we advise you to contact an electrician from the DEZ. Such a specialist performs the work slowly as the workload, however, the quality and guarantee of service is a definite plus for choosing this particular master. But sockets and switches can be installed independently.

Another job that you need to involve a specialist and not save: replacing plumbing pipes. Choose your supplies according to your budget. Attracting a plumber will cost, on average, 15,000–20,000 rubles. If you do not have experience in connecting plumbing, we also recommend that you seek help from a specialist.
Before starting repairs in the apartment, it is necessary to carry out preparatory work. The main thing is to carefully plan each step. To get started, find out on the site the current prices for apartment renovation in order to correctly plan the budget. This will avoid unnecessary costs in time and finances in the future. Now you can move on to the work plan. The entire scope of work is conditionally divided into several stages, which must be performed strictly alternately. Let us consider in detail the stages of repair work and the rules for their implementation.
We are planning a renovation
The first thing to do before a major overhaul of an apartment or house is drawing up a detailed plan of your home. This scheme should indicate where the furniture, interior, household appliances will be placed. This will help you decide where to start repairs in the apartment, where to place sockets, switches, chandeliers.

Thanks to the plan, you will be able to lay pipes and wires without complications and the first time. After all, the comfort of the room directly depends on the rationality of the placement of these elements.


If the plans include not only cosmetic work, but a turnkey apartment renovation with redevelopment, then initially it is worth starting demolition or building walls. Next, you need to decide on the style of the future housing - will you stick to one style when decorating the entire room, or will you combine the future interior with several styles.

People who do not have enough experience in this matter are advised to seek the advice of a professional designer. The specialist will be able to develop the best option for interior design, taking into account the features of the layout and personal wishes of the client.

After completing the layout, proceed to the financial issue - calculate what materials and how much you will need. It is better to buy them in specialized stores.

Give preference to well-known and proven brands, the quality of the assortment of which corresponds to their price. Savings on materials can result in additional financial costs in the future.

Rough work
It is necessary to start transforming the premises from the implementation of rough work. These include the dismantling of the old coating. In order for the new interior to look attractive and last for many years, the tiles, wallpaper or whitewash must be removed.

If you do not plan to change the floor covering, it must be protected from possible damage during construction work. To do this, use a dense plastic film, the edges of which must be firmly fixed with masking tape. In the case of planned large-scale work, it is more convenient to protect the floor from mechanical damage with cardboard sheets, which are much stronger than the film.

It is not recommended to replace windows and interior doors at the first stage of repair. After all, when dismantling and puttying, a significant layer of dirt will settle on them, which will be difficult to get rid of. Only cash withdrawals are required.

Electrical and plumbing
At the second stage, it is necessary to do the dirtiest, but at the same time the most important part of the work. It's about electrical and plumbing. These types of work should be taken extremely responsibly, because in order to correct mistakes, you will have to re-make a major overhaul in the apartment. For this reason, it is not recommended to save on the quality of wires and pipes. After all, it will be possible to repair them afterwards only by destroying the wall.

Initially, a storming scheme is drawn up for each individual wall. It is recommended that these diagrams be retained even after repair, in order to avoid erroneous damage to pipes or electrical wiring with nails. Lay the wires with the required cross section, as well as pipes, into the prepared strobe, carefully seal the strobes.


window replacement
It's time to change the old windows. But if you are renovating an apartment in a new building, you won’t have to do this part of the work. Indeed, high-quality metal-plastic windows have already been installed in modern houses.


In any case, window frames and glass should be protected from paint with a film or pleated paper curtains. These curtains are quite high quality and their price is not high.

After finishing work with windows, you can begin to prepare the floor and ceiling. You need to do the following:

- align the walls;
- wipe seams and cracks;
- putty.


The building materials used for the rough phase of the repair do not have to match the base materials. But they must be of good quality.

Surface priming
Next, proceed to apply the primer to the walls and ceilings. Thanks to this coating, the strength of these surfaces is increased. A high-quality primer, has in its composition substances that seep into the surface, connecting its small particles. Be sure to wait until the primer is completely dry. Only after that you can start painting the ceilings.


The next step is to level the floor. For this, a screed and a fill are made. But it will be much easier and faster to use modern specialized solutions that level themselves. After all, apartment renovation in 2018 should be done using new technologies.

During the drying of the floor, all work is stopped. Violating this rule, you will damage its surface and the work will have to be redone.

Wall finishing materials
Those materials with which the walls will be finished, you choose solely at your own aesthetic and financial discretion. The most popular way of finishing is wallpaper. The range of this material is quite rich in terms of color, size, texture and material. Often they also turn to painting or decorative wall plastering.

For fans of more daring decisions, there are other options. The only limitation of your imagination is that the materials must be in harmony with the overall interior.


If you want to save money, you can decorate the walls of the room with the remains of several types of materials. This solution will emphasize your originality, and significantly reduce the cost of repairs.

Floor decoration
When the walls are already decorated, proceed to laying the floor. You can make a coating from linoleum, laminate, carpet, piece parquet, or parquet board.


A popular solution in a modern interior is the use of floor tiles. But you can start laying it only at the end of the design of the ceiling.

The final touches of the renovation
This stage is the final one. Now you can start installing door frames, thresholds, baseboards and more. Assemble and install furniture, appliances, decorating interior items. After that, it remains to do the cleaning and admire the new home.


Photos of the main stages of repair in the apartment


