A comfortable bathhouse on your site is a dream that you can always make a reality on your own. One of key points its construction is to solve the problem of waste water disposal.
How do-it-yourself sewerage for a bath is equipped and what points to consider when designing and installing the system, we will consider in more detail.
The installation of a well-designed wastewater disposal system is prompted not only by aesthetic standards, but by current requirements aimed at maintaining environmental safety.
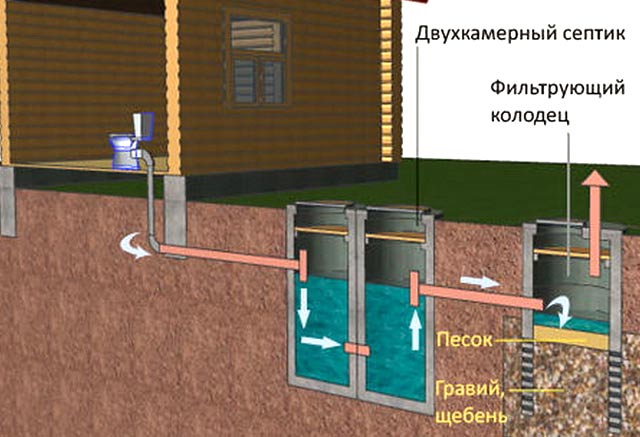
According to the norms 30-02-97, the collection and processing of effluents from the bath and shower must be carried out with the help of treatment and filtering facilities, which provide for sand and gravel filling
Design solutions autonomous sewers, erected during the arrangement of the bath, there can be many.
By type of action, independent systems are divided into two types:
- Non-pressure system- involves movement Wastewater on it by itself. This effect is achieved due to the correct angle of inclination of the pipeline.
- pressure system- provides for the forced transportation of wastewater with the use of pumping equipment.
A sewer system for a bath building is being built, regardless of whether or not a water supply is connected to it. In any case, the very nature of the site implies an abundant use of water, which must be disposed of.
When arranging a gravity system, it is determined by the diameter of the pipes.
Photo guide for installing a sewer station
If a deep treatment plant is selected for the treatment of wastewater before disposal, in addition to connecting to the sewer system, an electrical wiring device will also be required.
Otherwise, the stages of work on the arrangement of all types of autonomous treatment facilities sewer systems produced in the same manner.
Image gallery
But it can only be installed on soils characterized by high level moisture permeability. These include sandy, fine-clastic and coarse-clastic soils.

Having decided on the place of arrangement drainage pit, mark the site and choose the path for laying a sewer line to it
erection treatment plant perform in the following order:
- In the marked area, a pit is dug, the depth of which is 1-1.5 meters higher than the soil freezing mark.
- The bottom of the pit is laid out with a 10-centimeter layer of clay.
- Expanded clay or gravel-sand filling is laid on top, forming a layer 40-50 cm high. It will perform the function of drainage.
- To prevent shedding of the earthen walls of the pit, they are lined with bricks, laying out rows in a checkerboard pattern, or with ready-made concrete rings.
Walls if desired drainage well can be laid out with tires. To do this, dig a pit, the diameter of which allows you to accommodate 4-5 used tires laid out on top of each other.
Construction of a bath own site can be made from different materials and by various technologies, however, a sewerage device in a bath is necessary for any method of construction. Understanding how to make a sewer in a bath with your own hands will greatly contribute to both financial savings and comfortable further use of it.
Existing options for the construction of sewerage in the bath

 Designing a water drain in a bath
 Proper technical construction and drainage, performed in compliance with the basic rules, will ensure long-term use of the bath without the need for frequent maintenance of internal communication systems.
Starting on your own site, and considering suitable projects you need to immediately work out how to properly make the sewer in the bath. This is primarily due to the fact that the laying of the wastewater disposal system, with any method of its organization, is carried out at the stage. 
Sewerage in the bath can be organized in two ways:
- Pressure type with the installation of pumping equipment for special purposes, providing the selection of sewage. This method good to use when device bath rooms below ground level, such as in a basement.
- Non-pressure flow, in which wastewater is discharged due to the slope of the laid pipelines and is the most generally applicable.
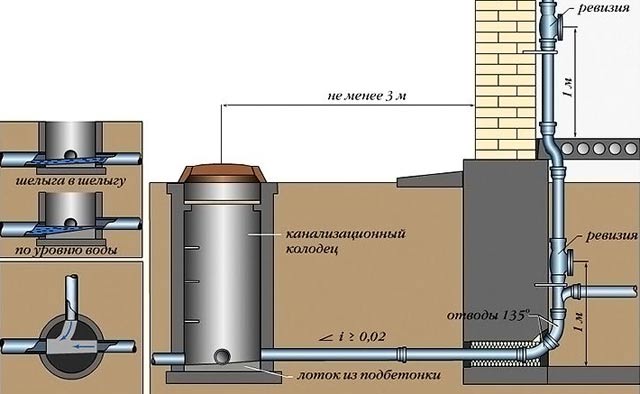
 Scheme of the design of a free-flow drain in the bath
 When designing a bath sewer communication, it is necessary to take into account the arrangement of the following components:
- or a place of accumulation and processing of wastewater;
- pipeline both external and internal;
- drain devices in the washing rooms (ladders, gutters);
- odor removal system (ventilation outlet, siphons).
Criteria for choosing a sewer system
When designing a sewer system in a bath, it is necessary to take into account several main points on which the choice of its most optimal device depends.
 Bath outlet options
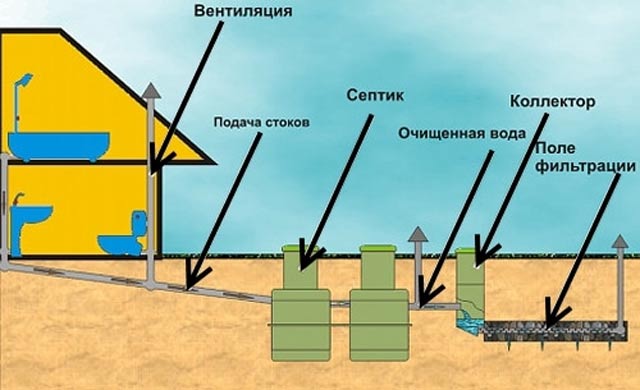
Construction of a sewage storage tank
The collection and processing of wastewater is one of the main activities of the entire range of works on the construction of a bath sewer in the absence of nearby centralized sewer systems. In this case, it is necessary to equip a container in which effluents will be collected on their own. This can be done in several ways depending on technical features construction and availability of financial opportunities.
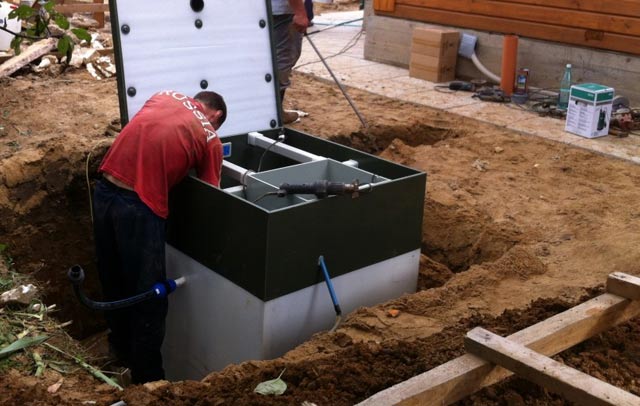 The process of installing a septic tank for a bath
 Schematic diagrams of the device of wells can be the following:
Depending on choice circuit diagram it is necessary to select the material for manufacturing. The following options are possible:
- plastic containers, for example, eurocubes or other containers of the appropriate volume and composition;
- prefabricated concrete rings;
- pouring a concrete box directly on the ground;
- , laid in a checkerboard pattern with drainage gaps.
 An example of finishing a drainage well with brick
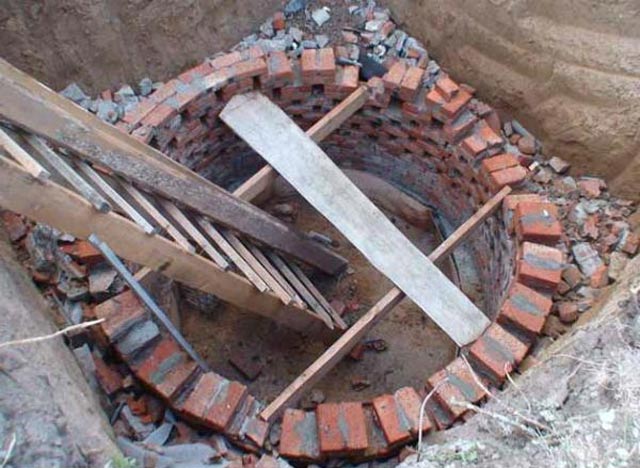

After the material and the scheme of the device are selected, it is necessary to select optimal location for construction and provide proper training pits for deepening or container devices.
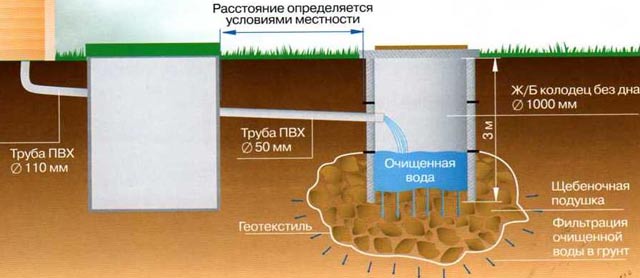
 Design and design of a drainage well

In this case, the following rules must be observed.

After doing earthworks to prepare the pit, its bottom and edges must be smeared clay composition to avoid shedding of the edges, as well as to perform backfilling sand cushion and drainage layer if necessary.
 Drawing and names of the elements of the drainage well
In this case, it is necessary to take into account:

When arranging drainage tanks, it is also necessary to provide for the presence, which will contribute to the efficient processing of waste and exclude an unpleasant odor.
Features of laying sewer pipes
The most relevant material for organizing wastewater disposal today is plastic pipes, which, due to their properties, have replaced pipes made of cast iron, metal and asbestos concrete. They have a long service life, wear-resistant, easy to work with during installation, and also have a low cost.
To connect pipes, appropriate docking modules or fittings are provided, which have a variety of configurations to perform complex joints and piping.
 An example of laying sewer pipes in a bath

Pipe laying external sewerage carried out in prepared trenches, prepared taking into account the following features:

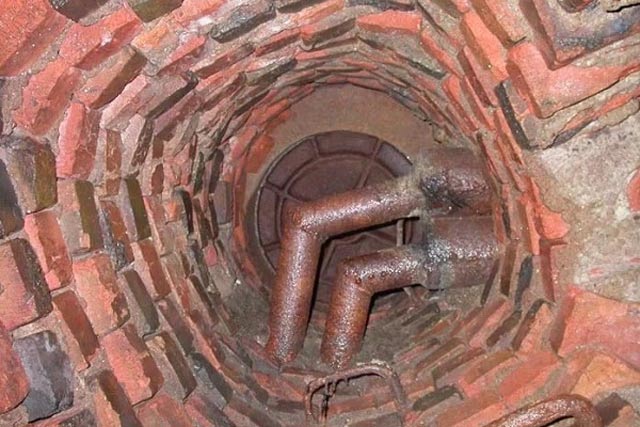
 An example of a manhole device

Docking of the pipeline to sewer well tie-in methods with sealing of the joint are carried out.
The pipeline is connected to the bath itself through by installing the pipe in the technological holes and sealing the connection point. cement mortar. The video shows the process of laying sewer pipes.
Arrangement of internal sewer outlets
Laying pipes for sewerage equipment interior spaces depends on the planned way of arranging the floor, functional purpose rooms and the number of drain points.
In small baths, water is supposed to be drained directly from washing room . Other options involve the removal of waste from several points, including a toilet and additional places water supply, e.g. shower, washbasin.
 Device example sewer outlets in the bath
All this must be taken into account when planning a bath, to ensure the necessary technological conclusions.
The material for covering the floor is also of no small importance for how the drain in the bath will be organized.

 Examples of design and installation of ladders in the bath

Work on laying internal pipelines is carried out in the following sequence.

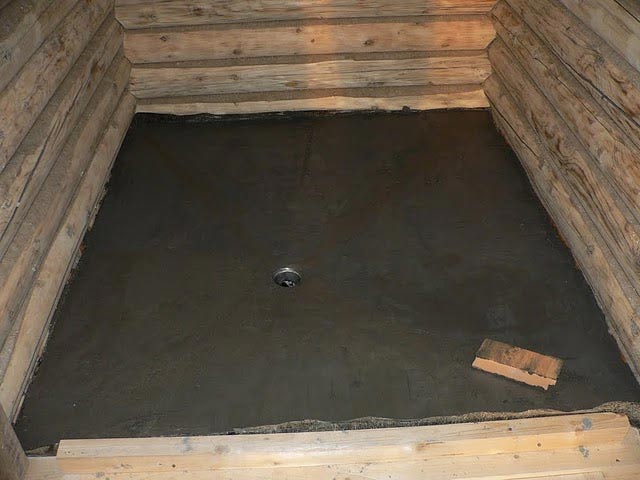
After completing all the steps for laying out the pipes, they are poured with concrete mortar, taking into account the following points:
- the height of concrete above the pipes must be at least 10 cm;
- slope must be provided concrete base according to the planned type of flooring.
The final stage of the sewage device inside the bath is laying the floor covering.
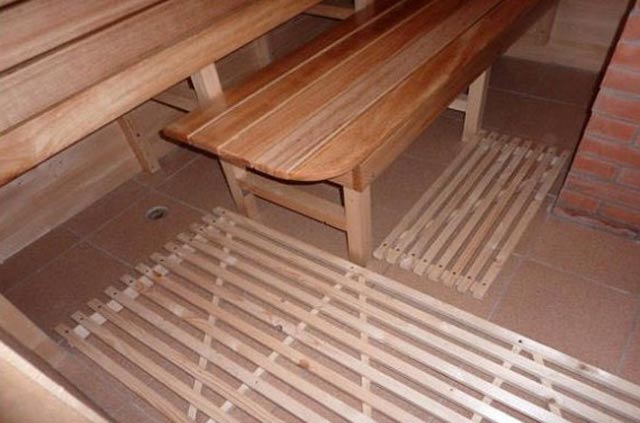
 The process of laying the floor in the bath

It's hard to imagine Vacation home no bath or sauna. Relax, take a steam bath from the heart, relieve fatigue or use the bathhouse as a temporary home during the construction of the main house - there are many options for use. It is not surprising that interest in the topic is growing among FORUMHOUSE users from year to year.
Our portal has already told in detail where to place it on the site, how to finish the steam room. We continue the topic. From our material you will learn:
- What kind engineering Communication necessary.
- How to install a simple and budget plumbing.
- What are the nuances to consider when installing electricians.
The nuances of installation and selection of utilities in the bath
Without properly constructed communications - water supply (option - we carry water from a well, we do not consider it), electricity, ventilation, sewage and sanitation, normal use of the bath is impossible. At the same time, due to the peculiarities of the operating mode of a bath or sauna, and this is high humidity and temperature, engineering networks are presented with special requirements for safety and durability.

In addition, even at the design stage, it is necessary to decide whether the bath will be a separate structure, or we will limit ourselves to building a simple sauna inside the house.
Practice shows that most often a bath is built in the form of a separate washing and bath complex. There are both options for relatively simple baths / saunas, as well as complex and expensive facilities (with a SPA area and a swimming pool) used for recreation and entertainment.

Regardless of the option for using the bath, we remember the main rule: first a project is made (based on the preferences of the owner and the expected mode of operation of the “wet” room).
Now we count required volume water consumption, as well as determine required amount water points. This is a shower or shower stall, a sink with a mixer, a connection point washing machine, toilet inlet, storage tank, etc.


If an electric heater is supposed to be a heat source, we calculate whether it will withstand electrical network additional load. Do not forget about the water heater for preparing hot water, and this is also an additional load on the power grid.

We think in advance how to supply electricity (underground or air) and water to the bathhouse. Is the flow rate of the well sufficient, how to dispose of wastewater, will the septic tank cope with the mass discharge of water, or is it necessary to design the separation of wastewater, etc.
Only after collecting all the necessary data and estimating the approximate number of people who will use the bath, you can proceed to the design engineering networks and the direct construction of the bath.
Such an approach - careful planning, will avoid costly rework in the future, when the bath / sauna has already been built. For example, it turns out that electrical wiring and the machines do not pull the connected electrical equipment, there are not enough points for, and the pump power is not enough to quickly fill the font or pool with water.

There are many features, for each of them you can write a separate article. For those wishing to find answers to the above questions, we recommend reading the articles: and observe all boundaries from the treatment plant to other objects on the site, and.

Move on. Take, for example, the usual "budget" bath - a wooden structure made of timber or logs. It is necessary to mount a water supply system and conduct an electrician in it. It is required to understand: what basic moments pay attention to equip high-quality engineering communications.
Installation of plumbing in the bath
The first thing to think about when designing a water pipe in a bath is its mode of operation - year-round or seasonal. If the bath is not planned to be used in winter, or it is supposed to be launched only on weekends, it is necessary to ensure that water is drained from pipes and plumbing (for example, a toilet bowl). If this is not done, then negative temperatures the water will freeze and may burst the pipes.

Our users solve this problem in different ways.

Kolek2575 Member of FORUMHOUSE
I plan to put a stove with a water heat exchanger on the pipe in the bathhouse. Frosts at us reach - 30 °C. Haven't decided what to do with the water yet. Leave it, break it. Drain every time?
According to experienced participants, there can be two options: either drain the water, or prevent the bath from freezing. For example, on the advice dokainfo, We use a self-regulating heating cable.

After the completion of the bath procedures, the water is drained from the heating tank and the shower cabin. In order for the water to drain freely into the well, we put a check valve on the submersible pump.
By installing such a system, we provide necessary slopes pipes so that water flows freely by gravity.
But the heating cable is an additional complexity during installation. Power outages are also possible. If a pumping station is used to create pressure in the water supply system, then the accumulator becomes a bottleneck. From it, with infrequent visits to the bathhouse in winter, you will also have to drain the water or completely dismantle the station and store it in a warm room.
Interesting are the ways of bath water supply, which are used by users of our portal in winter period time.

Sanap FORUMHOUSE User
In the summer I use a pumping station to provide bath water + mounted electric water heater. As soon as the temperature drops below zero, I drain all the water from the water supply, and in winter I use imported water to operate the bath. For 2-3 people, 50-70 liters is enough to wash. For contrasting procedures, we wipe ourselves with snow.
Also interesting is the user experience with the nickname 8k84r. The water supply of the bath is done like this - the water from the well sways submersible pump. Above the steam room, in a heated room, a hydraulic accumulator is mounted, as well as an electric storage boiler for hot water in summer. A plus open system with a tank, with recharge from a hydraulic accumulator.
When leaving, all taps open and the water drains into the sewer. Turn off the pump, air the pump line. It all takes about 5 minutes. Arriving, we flood the bathhouse, close the taps and turn on the power to the pump.
For clarity, we offer a diagram of the water supply system of the bath from Putnik2008.

Note: used for heating water copper pipe, bent into a spiral, which was laid on the stones of an electric heater.

As storage tank a 30 liter canister is used.


Putnik2008 FORUMHOUSE User

Also, for a simple bath plumbing scheme, you can mount a capacity of 200 liters in the “attic”, which will provide sufficient water pressure when the tap is opened, or to wash in the shower. After completing the bath procedures, we leave the tap open for 15 minutes, while the water drains back into the well by gravity, but such a Spartan system, of course, is not suitable for everyone.
The bottleneck of the gravity system, with irregular use of the bath in winter, may be the depth of freezing, which depends on the region. To prevent freezing of the pipeline, it is laid below the freezing depth, a heating cable is used or insulated.

About how to make a simple and effective winter plumbing that will not freeze when sub-zero temperatures and which does not require a heating cable, is described in the article
Features of the installation of electrical wiring in the bath
A complete bath water supply system is impossible without a reliable power supply to the pump, which provides required pressure water in the plumbing. In addition, lighting electrical devices used in the bath, water heaters, etc., must also be connected to the mains.

Moreover, unlike an ordinary house, a bath / sauna is a place with high humidity and temperatures, which means that special requirements are imposed on the electrical network to guarantee its safe operation.

T0lyanych FORUMHOUSE User
A bathhouse is a humid room, so the wiring in the bathhouse is carried out in accordance with the requirements of the Electrical Installation Code for saunas, bathrooms and showers.
Hence: in the steam room and in the washing room there should not be any electrical appliances such as a washing machine, sockets, junction boxes and switches. This equipment is located in the rest room, and a separate wire goes to each light bulb (in a splash-proof housing) in the steam room and washing room. If an electric heater is used for heating, then for its connection we use a solid cable coming from the switchboard located in the rest room or dressing room.


According to the EIC, paragraph 7.1.40. In saunas for zones 3 and 4 according to GOST R 50571.12-96 "Electrical installations of buildings. Part 7. Requirements for special electrical installations. Section 703. In rooms containing sauna heaters", electrical wiring with allowable temperature insulation 170 °C.
We choose special ceiling lamps / lamps - sealed, designed for operation in a humid room. The seal between the base and the cover must be made of heat-resistant silicone, and not rubber, which is exposed to high temperature may crumble.


Degree of protection of the lamp IP54. In the rest room, a switchboard is installed, all switches, sockets and pumping stations. In addition to impact prevention electric shock, this will help to avoid premature failure of the equipment due to corrosion caused by moisture in the washing room.

T0lyanych
Do not forget about the device of a separate grounding near the bath, even if the main grounding is installed in the house.
This is the basics of installing electricians in the bath. Let's move on to practice. As experience shows, the largest number questions are raised by the choice of an electric cable for a bath, the method of its wiring, as well as safe options electric lighting of the washing room and steam room.

The electrical wiring in the bath has a number of features. And this is mainly due to the high temperature and humidity in this room, which negatively affect the condition of the wires, as well as the specifics of flammable wood material, from which the walls of the steam room are composed. Correctly laying the cable to the bath and mounting the wiring inside is vital.
Ideal option it will be if it is possible to conduct electricity to the bathhouse from the central switchboard through a specially allocated power supply line. You can lay a power cable, bring it directly to the bath in 2 ways: “earth”, when the wire is laid underground, and “air”, when it is carried through the air. Methods should be provided for by the projects of the baths themselves.
"Earth" method of laying
This is the most reliable way but it doesn't always fit. Pre-on personal plot all agricultural work should be completed and the fact that the wire will not have to be led through the neighbor's territory should be confirmed. The so-called "armored cable" of the VBbShv brand with 4 copper conductors, the cross section of which is 10 sq. mm, is laid underground. This cable is quite expensive, it costs about 200 rubles per meter. But it's extremely reliable and durable thanks to the steel braid that runs between its plastic shells. Accordingly, moles, mice and other rodents will not be able to gnaw through it. The cable is not afraid of earth shrinkage.
It is not recommended to use metal pipes for laying the cable, as they are collectors of condensate, which reduces the life of the wire. They are allowed to be used only in places where the cable goes along a pole or along a wall. In this case, a pipe is used in height not< 1,8 метров.
Laying the cable underground: leading to the bath in the "earth" way
The sequence of steps for installing the cable underground is as follows:
1. A trench is digging with a depth of not< 0,7 метров, на дно которой засыпают песок слоем примерно 10 см. Сверху провода засыпаются таким же слоем песка.
2. The cable is entered into the building through a steel sleeve. It is necessary to protect the wire during movement and complete shrinkage of the wooden wall. Electrical wiring in the bath should be carried out especially carefully and carefully.
3. The cable is released from its "armor" immediately before entering the shield. Only after that the cable cores are connected to the machine, making grounding and lightning protection.
Important! When installing an underground cable, eliminate the possibility of dangerous tension, its mechanical damage in case of soil displacement: create a margin by placing the cable in the trench in waves.
Air cable laying
If you choose a more economical way, deciding to run the cable through the air, then consider the following points:
1. If the distance to the bath is more than 25 meters, it is necessary to place a support between the gaps. Air laying of the wire is carried out using the so-called stretch, or on porcelain insulators.
2. The cable must be located at a certain, regulated height. Above the carriageway, it cannot be placed below 6 m above ground level, above walking paths- 3.5 m (not lower). The wire is attached to the bath at a height of 2.75 m above the ground.

Bringing the power cable to the bath "air" way
3. SIP is usually used - a self-supporting insulated cable. His guarantee period service is 25 years. SIP cables (SIP-4, SIP-3, SIP-2A) have a special weather-resistant polyethylene coating and special load-bearing elements that are resistant to overloads. Its cross section must be< 16 кв. мм с пропускной способностью — до 63 ампер. Если подключение однофазное, то мощность будет равна 14 кВт, а если трехфазное – 42 кВт. Главный недостаток СИП состоит в их проблематичном вводе в автомат защиты из-за низкой пластичности, они трудно изгибаются.
4. SIP is introduced into the bathhouse (but not into the steam room itself, since aluminum wires cannot be placed there) through a metal sleeve. And completely different wires are introduced into the steam room - NYM, NG or VVG. The VVGng-LS cable with a section of 3x1.5 has proven itself well (it is used to connect lighting), VVGng-LS with a section of 3x2.5 (used to connect sockets). VVG insulation does not support combustion, the level of smoke in the event of smoldering is very low. For the transition, sealed copper-aluminum connectors should be used, SIP should be attached to anchor clamps, the so-called tensioners.
Installation of electrical wiring in the bath: the main stages
In the process of installing electrical wiring directly in the bath room, the following stages are distinguished:
1. Installing the shield;
2. Wiring from the shield;
3. Connecting fixtures;
4. Connecting sockets;
5. Connecting the electric furnace.
Electrical installation rules
From the switchboard, the energy system of the bath will be powered. It is important to choose the optimal place for its installation, observing the following requirements:
1. Access to the shield must be free;
2. The place should be well ventilated;
3. The shield must not be placed in the steam room and other fire hazardous premises;
4. Good room lighting with a shield.

Electrical panel in the bath (located in the rest room)
Usually the shield is installed in the rest room. It consists of a device protective shutdown, input, as well as outgoing automata. His top part should be 1.4 m - 1.8 m above the floor, no less.
If the electrical wiring in a wooden bath is single-phase, at least 3 cores must be present in the supply cable. In accordance with the new GOST, the color of the phase conductor must be gray color, but wires from old stocks with a white or brown phase conductor may come across. This core is placed on the upper terminal of the introductory machine. From the lower terminal, the phase conductor is partially moved with the help of jumpers to the upper terminals of the outgoing automata, or it is bred through distribution bars to the automata. Zero core (blue or of blue color) is placed on the zero block, the protective conductor (yellow-green) - on the protective block, or on the welded bolt of the shield. The phase conductors of the cables leading to the load are connected to the lower contacts of the machines. The outgoing and input cables are laid very carefully in the shield, then they are removed from the shield through the corrugated pipe. RCDs and circuit breakers must be installed taking into account the level of load on the cable.
We calculate the load on the cable, select the required section
It is necessary to know the load in order to correctly select the cable section. There are special tables for selecting the cross-section of wires, where its dependence on the estimated power of the devices is calculated. Electrical appliances usually have their power consumption indicated, so you should pay attention to this Special attention.
1. If the bath is supposed to be placed only lighting, the total power will be approximately 1-2 kW.
2. If you do not use an electric furnace, the total power will be in the region of 5-6 kW.
It is advisable to take into account a 20% power reserve. For example, if the total power in the bath is 5 kW, then it is better to calculate the wiring by the value of 6 kW. With such a power, a VVGng-LS cable with a section of 3x4, that is, 4 sq. mm, is suitable. It is advisable to choose cables for lighting with a cross section of 1.5 square meters. mm (3x1.5), for sockets - with a cross section of 2.5 sq. mm (3x2.5).

Choosing an input machine
To do this, you need to know the total power. Then we calculate the current by dividing the total load by the voltage. For example, 6000 / 220 will turn out 27 A. But the machine should be chosen with a margin - approximately 32 A. The choice of outgoing machines by groups is carried out on the basis of the same principle. It is advisable to sign each machine on the shield, indicating which group of electrical appliances it is responsible for.
Also next to the shield should be a wiring diagram for the bath. Remember to connect residual current devices that cut off power supplies if they come into contact with water. This will help save lives in the event of an emergency. RCD with cutoff current will protect against fire. Make sure that the wires in the clamps of the terminal blocks are well fixed in order to avoid heating the area due to a loose clamp.
Electrical cable wiring from the shield
Initially, a wiring diagram in the bath should be drawn. When drawing up a diagram and in the further practical implementation of the wiring plan, the following should be taken into account:

1. It is recommended to make the wiring of cables extending from the shield in one piece.
2. If there are wooden walls in the bath, then the wiring can be open, conducted over wooden walls. It is forbidden to place wires in PVC pipes.
3. If the walls are brick - the electrical wiring for the bath will be hidden, hidden behind a layer of plaster.
4. All cables should be installed in a strictly vertical and horizontal position. There should be no kinks and twists, as indicated in the latest edition of the PUE instructions. It is allowed to lay wires from junction boxes only at a right angle.
5. Try to place the wires in the least visible places. They should not be laid opposite doors, closer than 50 cm from metal pipes and batteries.
6. Switches, sockets, as well as mounting boxes, must not be used in rooms with high temperatures and humidity. Over time, moisture will accumulate in them, and a short circuit will inevitably follow. This applies, first of all, to the couple. Therefore, they must be placed in dressing rooms or rest rooms.
7. Connect wire cores by welding or soldering.
8. Use protective protective zeroing.
10. It is forbidden to place wires in metal sheaths and pipes.

Installation and connection of fixtures
The protection class of luminaires for a bath should not be< IP-44 и мощностью не >75 W. Plafonds should be used only glass, and the body should be metal, connected to the protective conductor of the wire. The plastic housing may be deformed. You should not place fixtures on the ceiling, but only on the walls, since the temperature is usually the highest under the ceiling. In the steam room, usually low-voltage voltage (12V) is used. For this purpose, step-down transformers are useful, which are placed outside the steam room. It is also forbidden to install fluorescent lamps in the steam room.
Connecting sockets
Sockets can only be installed on the walls in the dressing room or rest room at a height of 90 cm. Their protection class should not exceed< IP-44. Желательно использовать розетки с крышками.
Norms for connecting an electric furnace
To connect an electric furnace, you will need wires that can withstand high temperatures (up to about 170 g) and high power consumption, which is 4 kW on average). For these purposes, wiring in a cable channel with single wires of the PRKA, PMTK, PRKS or RKGM brands is suitable. A copper cable with a cross section of 3 * 2.5 mm is capable of withstanding approximately 5 kW of load. It is acceptable to stretch wires of the PMTK type to the junction box, which is located outside the zone of high temperature and humidity, and run a regular cable (VVG 3x2.5) from the box to the shield.
Video: electrician in the bath and in the sauna
During installation electrical wires remember, that correct wiring in the bath is the key to your comfortable and safe rest in this room. Before installation, carefully study the PUE (Electrical Installation Rules) in the latest edition - the desktop "Bible" of the electrician. Try to approach the issue as responsibly as possible by mounting the wiring with your own hands, or contact the experts.
Long gone are the days when the inhabitants of cities and towns were satisfied with the only achievement of progress - electricity. Today's residents of country estates strive to have heating, plumbing, sewerage, forced ventilation, etc. All these engineering communications are available, but their installation should begin already at the design stage of the building.
In the project for the construction of the foundation, checkpoints are taken into account water pipes from the central network or house well and sewer pipe to the location of the septic tank. In the foundation under construction, channels are made for all these communications, so that later, at the time of installation, do not punch holes in the foundation for them.
During the construction of walls and the installation of partitions, holes, channels, and other necessary work for future intra-house pipelines and communications. Such foresight will eliminate the need for any restructuring, violation of the integrity of structures, waste of extra money and effort.
In houses, communications are laid secretly under decorative trim or open, after all finishing works and each of these technologies has its advantages and disadvantages. Covert conduct of communications does not spoil the interior, but limits access to them, when conducting repair work, and the open one is convenient for maintenance and repair, but the interior does not decorate. Engineers and craftsmen of our StroyProjectBani company are well aware of the specifics of laying and connecting communications in buildings of any purpose and perform work with high quality.
Installation of house electrical networks

Internal installation of electrical networks is carried out according to the schemes in strict accordance with the norms of the PUE. Switchboards and meters are installed as close as possible to the power cable entry point, and all wiring starts from automatic machines and protective devices collected in the switchboard.
Hidden wiring it is laid in sleeves behind a decorative finish, with wires leading to switches, sockets and lamps, and is separated from junction boxes, to which free access is provided.
The safest electrical wiring is laid outside, along the surface of walls and ceilings. For aesthetics, the wire is retracted into the cable channels, which are available in a wide variety of shades and textures, to match the decorative finishing materials.
For the power supply of the bathhouses, the wiring is laid in metal hoses, bred in sealed junction boxes, switches and lamps closed to moisture penetration are used, it is especially important to approach the selection of electrical equipment in the steam room, washing room and shower room.
When installing electrical wiring and electrical equipment, it is necessary to fulfill all the requirements of the PUE, be sure to arrange grounding and remember that electricity is not only a blessing, but also a source of increased fire hazard and electric shock.
Water supply of wooden houses and baths

When thinking about conducting a water supply system, already at the stage of building a house, it is necessary to develop a scheme of water consumption points and supplying water pipes to them. By finished scheme, holes are left in the walls for passing pipes, and laying can only begin with complete shrinkage of the walls or log house.
In the case of connection to a centralized water supply system, the pipe is laid below the freezing point and is led into the basement of the house or the space under the floor, and from there it is bred to the points of water consumption.
From the well or well, the pipe is also laid 20-30 cm below the freezing point and is brought into the room where it is installed pump equipment and water filtration equipment, after which the water supply is bred around the house. If the well is equipped with a caisson, pumping equipment and filters are installed in it, and a supply pipe is brought into the house.
Sewerage in wooden houses and baths

Sewer installation technology in wooden houses and baths is no different from similar work in other buildings. During the construction of the foundation, it is necessary to provide a hole for removing the sewer pipe from the underground space. To connection points sewerage and drain pipes are brought under the floor with access to plumbing through the floor.
In baths, sewer pipes are laid to water drain points and plumbing fixtures before the device wooden floors or concreting the base under the tile.
From plumbing fixtures second floor, sewer and drain pipes are laid in the basement through ceiling and then along the walls of the first, before them finishing so that in the process of wall cladding, pipes can be hidden behind decorative boxes.
All pipes in the basement or under the floor are connected with the help of special fittings to a common pipe, which is led through the foundation of a house or bath at a depth below the freezing point, with a slight forward slope and laid to a septic tank installed in the ground.
Heating in wooden houses and baths
Heating of a country, separately built house is almost always carried out from a boiler installed in a special room. The boiler in wooden buildings is a high fire hazard, so it must be mounted in compliance with all fire regulations:
1. The boiler is installed on a concrete foundation, at a distance of one meter from the walls, the walls are covered with asbestos sheets or other non-combustible materials.
2. Exhaust and supply ventilation must be arranged in the boiler room.
3. To remove smoke, double-circuit pipes are installed - a sandwich with a layer of non-combustible basalt wool inside.
4. When passing through ceilings and walls, pipes are separated from combustible materials by special protective fittings.
Pipes, radiators and water heated floors are mounted strictly according to the schemes and are bred from the collector, which evenly distributes heat to all heating points.
Ventilation in wooden houses and baths

Unlike brick and concrete buildings, walls wooden houses"breathe" creating their own special microclimate. Mounting forced ventilation definitely needed in the boiler room, in the kitchen, in bathrooms and bathrooms, and in the bath, hoods are placed in the steam room and washing room. For other rooms, simple ventilation is sufficient. Good ventilation helps remove unpleasant odors and smoke, freshen the air, reduce indoor humidity, which improves the quality of life and leads to the preservation of wooden structures.
Today at country houses come and other communication engineering systems, the issue of installation of which can be resolved with the specialists of the StroyProjectBani company.