A bathroom is a room where an elevated temperature is required. Firstly, it feels more comfortable, and secondly, warm air will quickly carry away excess moisture after taking a shower or bath. Heating in the bathroom is done infrequently - not accepted. A more common way is to install a heated towel rail, which we will talk about later. In order for everything to work without problems, you need to choose the right connection scheme, and even implement it correctly. And you will have to figure everything out on your own. After all, even if you do not do everything with your own hands, you will have to follow the plumbers. This is the only way to be sure that you will be left with a normally working dryer.
What designs are
Towel warmers come in different shapes. When choosing them, people are often guided solely by aesthetics, which is not entirely justified. These devices work normally with good water circulation, but not all models provide such circulation. With some you have to be smart for a long time, looking for the right connection scheme, otherwise they simply refuse to work.
So, all heated towel rails can be divided into four groups:

It often happens that after installing a heated towel rail, it simply does not work. If the error is serious, the riser to which it is connected also stops working. Therefore, it is necessary to know and follow the connection rules.
Where to connect and where to hang
You can connect a water heated towel rail to both the hot water riser and the heating. If both of these options are available, DHW is usually selected. There are three reasons for this: less hassle with permission to connect, you can connect at any time of the year (agree with the management company to turn off the riser and that's it) and, most importantly, such a heated towel rail is heated all year round.
If there is no hot water in the house, you will have to connect to the heating riser. This requires permission from the Criminal Code and a project. You buy a heated towel rail (preferably of a simple design), go to the housing office with his passport (copy), write an application. If permission is given, order the project (you will also need a copy of the passport with connecting dimensions). Then, according to the project, you do it yourself or hire performers (plumbers from the Housing Office, as an option). Call the representatives of the Housing Office for acceptance.

To ensure that the “towel” is always warm and without problems, all supplies are straight, without arcs and pockets
When determining the installation location of a heated towel rail, questions may still arise about at what height it should be hung. If there is a choice, it is most convenient to position it so that it is at head level and below. This is if you put a U-shaped or a snake. If we are talking about "ladders" of great height, the upper bar is placed not at the level of the glow of the hand of the raised hand (about 190-200 cm).
When choosing a place to install a heated towel rail, one must also take into account the distance from the riser. In principle, the closer to the riser, the better - more chances that it will work. But, it can be attributed to a meter or so, only if the following conditions are met:
- low hydraulic resistance of the heated towel rail (simple shape and section 1″ or 3/4″),
- sufficient pressure (2 atm or more)
- drainage with pipes of normal diameter (one step less than the riser).
In this case, be sure to follow other connection rules. Then there will be chances that such a “remote” device will work normally.
How to make bends and how to change the riser
If the riser is metal and you are not going to change it, then installing a heated towel rail is possible with steel or. If you change the riser (the best option) and install polypropylene, there is no choice - PPR pipes also go to bends. Take polypropylene for hot water, better - reinforced with fiberglass.
Why is metal-plastic not suitable? Because he has fittings with a strong narrowing of the lumen. This is very bad for circulation. As a result, even 100% efficient circuits do not provide normal heating.

A little about why to change the riser. It makes sense to do this in old houses when repairing a bathroom or a bathroom (depending on where your riser is located). First, the pipes are usually already old and worn out. Even a branch can be problematic to weld to them, so the metal has worn out. Secondly, modern renovation involves hidden laying of communications and you will also want to. Hide the old pipe, and after a few years to destroy everything again ... not the best solution.
A little about how to change. You need to negotiate with neighbors from below and above, as well as with the Housing Office (DEZ, UK). With neighbors that you will cut off their riser and install a new one on the thread. Why have them? Because leaving the old pipe in the ceiling is dangerous: it will collapse and flow. Will flood you or neighbors from below. Therefore, it is better to pass through the ceilings with a new pipe.

With this connection, the dryer is part of the riser and there can be no taps
Having agreed or not with the neighbors (they may have already closed the riser), go to the housing office and agree on the date of replacement and the time for which the riser will be turned off. “Local” locksmiths, you yourself (if you are qualified as a welder) or people hired by you can work. After the tie-in, the water is turned on, you check the performance of the heated towel rail and the system as a whole. If in 30 minutes it does not begin to cool, then it is set correctly. This completes the replacement or installation of the heated towel rail.
With or without bypass
Let's start with what a bypass is. This is a jumper between the input and output of the device, which ensures the circulation of water when the device fails or is turned off.

The jumper between the input and output of the heated towel rail is the bypass
If there is a bypass in the circuit, shut-off ball valves can be installed at the inlet and outlet of the device. This is convenient - you can turn it off if necessary (during repair or replacement) and not block the entire riser.
If there is no such jumper, no taps can be installed. In this case, the heated towel rail is part of the riser, by closing the taps you completely shut off the riser.

The bypass can be straight (as in the first photo in the chapter) or offset (in the photo below). An offset jumper is placed at the top coolant supply for better performance (circulation improves). With a bottom feed, the offset only interferes. If you do not know where the water is coming from, it is better to do a direct bypass.

More bypasses (straight or offset) are made narrower. Tapering, as well as offset, improves circulation, but only in the case of top feed. The narrowing is made with a pipe, which is one step smaller than the main one (if the riser is an inch, a bottleneck is made 3/4 ″). Can't be less. The size of the insert is at least 10 cm.
Once again: the offset and/or narrowed bypass only works with the top water supply. At the bottom, it interferes with circulation. If you are not sure, make the bypass straight and not narrowed.
Categorically it is impossible to put taps on the bypass. Each faucet is a loss of pressure, which means that it impairs the circulation of the entire riser, the water flows not so hot anymore. All neighbors above or below (depending on the direction of supply) noticeably worsen the pressure. Sometimes it also falls at the owner of the bypass with a tap. In addition, this is an absolutely unnecessary detail that only brings harm, and there is no noticeable improvement in circulation in the heated towel rail. Well, and besides, this is a violation of SNiP 31-01-2003 (clause 10.6) - interference in general house communications, for which a fine (considerable) can be issued.
How to arrange taps (connection methods)
With lateral and diagonal connections, the outlets should be at the same level as the heated towel rail inlets or slightly above/below. What definitely won't work is installing a heated towel rail if the outlets are spaced less than the distance between the inlets. The photo below is an example of a non-working diagonal connection with closely spaced taps. Black indicates the variant of its correction (upper feed).

When connecting, the taps must be placed strictly horizontally or slightly at an angle. A little at an angle - this is from 2 cm per meter (2%) or a little more. The direction of the slope depends on the connection scheme and on which end this branch will be connected to. To make it a little clearer, consider several typical schemes for connecting heated towel rails.
Universal bottom connection of the heated towel rail "ladder"
This circuit works regardless of the direction of hot water supply. Connection type - bottom, both outlets must be located lower than the bottom edge of the dryer. At the top feed, the option is acceptable when the edge is between the taps, but the work may no longer be so efficient (it may heat up worse).

In this scheme, shut-off valves can be installed. For its normal operation, you need:
- Mayevsky cranes (air vents) installed on the upper outlets for descent of air accumulating in the upper part. They will need to be periodically opened and air bled (as it starts to warm up worse). There is an option - to put automatic air vents. They are also compact. This will make it easier to operate.
- Bypass straight with narrowing. The size of the narrowing is a pipe one step smaller in diameter.
- Branches are made by a pipe with a smaller diameter than the main riser.
If you have this option in height, do it. The scheme works in any conditions, with towel warmers of the "ladder" type of any kind.
Possible bottom connection option for top feed
When pouring hot water from above, you can make the top outlet higher than the lower edge of the dryer. With a shifted bypass and its narrowing, it should heat up normally. This method is not the best, but it works.

The presence of air vents and air bleeding after the system is stopped are mandatory.
Universal side connection
You can bring pipes on the side to a heated towel rail of any of the standard shapes - U-shaped, snake and ladder. The connection itself does not depend on the form. As standard, there is a direct open bypass. Branches are either strictly horizontal or with a slight slope. There is a slope in the figure: the end of the upper branch is tilted slightly downward (2 cm by 1 meter), the lower one is pulled up a little. The diameter of the outlets is not less than the diameter of the heated towel rail.

Such a connection scheme is good because it is not necessary to install air vents on the “ladder” (put plugs), since the air simply goes into the riser.
With the top supply on the bypass, it is possible to make a narrower and / or move the jumper towards the heated towel rail. This will improve circulation, the dryer will heat up better. But once again: such a scheme will only work with the top water supply.

With this scheme, it is also possible to make bends at a slight slope or strictly horizontally.
Possible side connection option (not the best)
A side connection scheme is acceptable with the location of the upper outlet below the upper edge of the heated towel rail. But with such a connection, Mayevsky taps are needed, through which air will have to be bled after the hot water supply is turned off for repair / maintenance. It may also be necessary to periodically remove air in the process.

Diagonal connection
There is no special meaning in the diagonal connection of most heated towel rails: their efficiency is no different from the side ones (in any case, there is no significant improvement), and the consumption of pipes is greater, the strobes are also required longer, and this is laborious. Although the scheme is working.
The diagonal works fine if the water supply comes from above. Then the upper outlet is connected to the far edge of the "ladder", and the lower one - to the near one.

In this case, you can also make a narrowed and offset bypass, but even without this, everything should work with a bang. At the bottom supply, bypass without narrowing, exactly along the riser, connection
Towel rails of complex shape: how to connect
In the case of connecting heated towel rails of complex shape, in addition to conventional means, it is also necessary to take into account the structural features of each specific model. They must be considered from the point of view of hydrodynamics - where water will flow better, water will be supplied there. For example, the popular model "Elegy" by Sunerzha. This is not a ladder and not a zig-zag.

The installation of the Sunerzhi Elegia heated towel rail was chosen as a side one, since any other would disrupt the circulation. There are no options at all.
Another model with a bottom connection and a complex design has three installation options. Provided that water is supplied from above, the second one will work best, the first one will work a little worse, the third one will be the most inefficient.

When feeding from below, options 1 and 3 remain, but only without narrowing the bypasses - it will interfere, not help. The second option is excluded completely.
How not to do
All the above schemes work stably. As you can see, all the bends go straight, without bends in the form of an arc or rings. This is not accidental - air accumulates in all the irregularities, which interferes, and sometimes completely blocks the circulation.

In the photo, the installation of the heated towel rail is incorrect. Made at least two mistakes:
- the taps are made narrower than the center distance of the heated towel rail;
- they are made of a metal-plastic pipe with loops.
Such a connection simply cannot work. Metal-plastic pipes are an excellent material, but not for connecting heated towel rails. Their fittings have a very strong narrowing of the lumen, which has a bad effect on circulation. Plus, air accumulates in the loops, and the flow through the upper loop, even when supplied from above, will not go - too much hydraulic resistance to water must be overcome.
Unstable Circuits
The next two schemes may work, but not always. In the lower part of the heated towel rail, water stagnates and, with some difference in height, cannot rise. No one can say exactly when it will work, and when not. Depends on the pressure in the riser, on the diameter of the pipes and the design of the dryer itself.

With such a connection, even a working connection may suddenly (usually after a stop) stop working. It's simple: the pressure has changed, the pipes are clogged, the water does not “push through” from below, the heated towel rail does not heat.
Another option for an unstable circuit is with a loop on top. Again, it will work under certain conditions. But sooner or later, the highest point will become airy and block the circulation. Trouble can be helped if an automatic air vent is installed at the highest point, but if the pressure drops, it will not save.

Completely wrong
The photos below are examples of what not to do. Schemes without a tap on the bypass are inoperative. What it threatens is known. In addition, after several years of operation, they will generally cease to function. Most likely this will happen after the next shutdown - the system will become clogged with dirt. This is because the entire flow of hot water is launched through the heated towel rail. After repair, the water carries a huge amount of dirt, which safely settles in the bends (in the lowest areas in the first place). In a few years, everything is clogged completely. For good, everything needs to be redone and connected correctly, but only flushing can help grief.

It is necessary to rinse both the heated towel rail and the supplies to it. To do this, we remove the dryer and wash it in the bathroom, and wash the outlets in turn by connecting a hose to the vacated outlets, the second end of which is connected to the sewer. By manipulating the taps, pass the flow of hot water through one outlet, then through the other. After washing, everything is installed in place. It may be possible to start the system after that.
Mounting process
The very connection of the heated towel rail to the ready-made outlets is standard for plumbing - suitable fittings, linen and packaging paste or fum tape. For fastening to the wall, there are brackets or special clamps-holders into which the pipe is pressed. The process is shown in detail in the video.
In this step-by-step master class, we will learn how to install a ladder towel rail with a bottom connection. We will carry out the installation and wiring of pipes to the riser, we will fix the plumbing in accordance with regulatory standards.
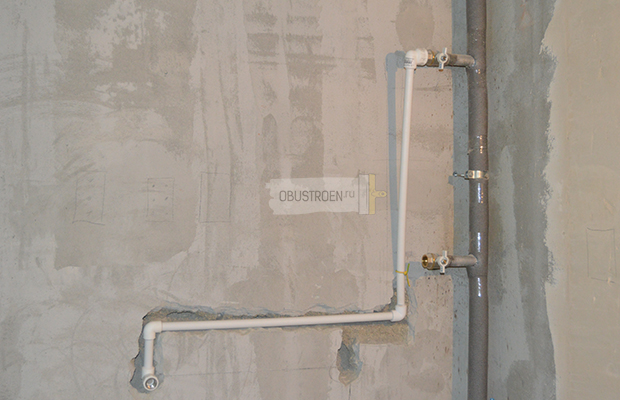
Step 1: Marking and chasing the wall
In the bathroom, one of two types of heated towel rail is purchased: electric or water. The first option is easier to install, but it requires more energy. Therefore, most often install a water heated towel rail. It is connected to a common heating system or hot water riser.
Connecting a heated towel rail to heating is impractical. The duration of the heating season is 6 months, it will be impossible to keep the pipes hot all year round, unlike connecting to a hot water riser. This option is also possible difficulties. You will need to get permission to turn off the water in the entire house. During the heating season, this will be problematic, there is a high probability of an emergency. Therefore, we recommend connecting the heated towel rail to the DHW riser.
Replacing the old Soviet-style heated towel rail in the bathroom is done with the help of a grinder, a coil is cut out along with a riser.
After dismantling and shutting off the water, we make markings. We mark with a pencil the places of the lower connection and the location of the pipes for divorce. When installing this plumbing, we adhere to SNiP. According to the regulations, the installation height of the heated towel rail should be at a distance of 1.2 m from the floor level and located at least 0.6 m from the sink, bathtub and other plumbing equipment.
The heated towel rail can be installed above the washing machine, providing unhindered access to appliances. A ladder-type dryer, as in our case, is mounted at such a height that a person of average height can freely reach the last crossbar. When marking, also keep in mind that the heated towel rail should not be located at a distance of more than 2 m from the riser, otherwise the installation will provoke large heat losses.

Further we hollow out in the lined part of the wall of the cavity under the pipes. To make a strobe, you can use a special strobe cutter or an ordinary grinder with a drill. Wear a protective mask and goggles while shredding. If you are leaving pipes in plain sight, skip this step. We install ball valves at the ends of the riser for the outlet of plastic pipes, thanks to them you can shut off / resume the water supply at any time.

Step 2: Wiring and piping to the heated towel rail
The general scheme for connecting a heated towel rail is the same for all types of device. From one end, water is supplied, and from the other, water is withdrawn from the system. Let's get to the split. We solder polypropylene pipes from ball valves to the water supply to the dryer. We prepare additional tools and materials that will be needed during work - a soldering iron and scissors for polypropylene pipes, connecting fittings (corners and American couplings). For the distribution of the heating system, we use plastic pipes with fiberglass d = 20 mm. Screw on the plugs.
Temporarily fasten the heated towel rail into place without final fixation and winding, set it exactly horizontally and vertically, fasten the plumbing to the dowel-screws. American couplings should protrude from the wall by the thickness of the tile with which it will be faced.

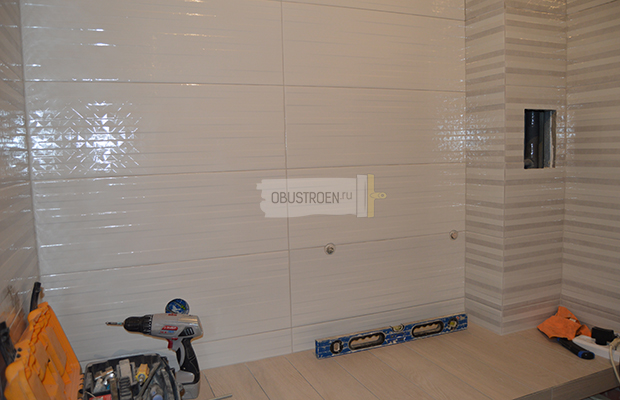
Step 3: Punching and cladding
After installing the heated towel rail according to the level, we moisten the wall from dust and seal the strobe with putty.

Outside, we leave the outer part of the threaded polypropylene fitting, putty the rest.

As soon as the putty hardens, remove the heated towel rail. We will finally mount it when we tile the walls.

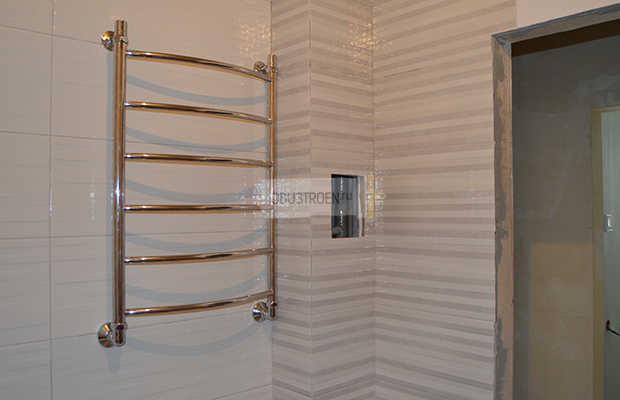
Step 4: Installing Cams and Fasteners
The tile is laid, now comes the final installation of the heated towel rail. From the side of the riser, we cut a window in the tile for the inspection door. Through it we make sure that the taps are closed, we unscrew the plugs.
Included with the heated towel rail are eccentrics with narrow and wide threads, ½ and ¾ inches with offset. We screw the eccentric manually into the thread coming out of the wall, inserting it with a narrow part, after winding the sealing thread. We install it evenly, without distortions, we do not reach it slightly so that we can adjust the position of the heated towel rail. Tighten the connection with a wrench.

Do not forget about the installation of gaskets, we put reflectors on top, which will hide the junction of the pipe with plumbing. We wind the heated towel rail by hand, set it according to the level, turning the eccentrics.

We fasten the device and make marks where the top attachment of the heated towel rail to the wall will be located. The last time we remove the heated towel rail, we drill holes for the dowel-screws in the marked places using a special drill on the tile to avoid cracking the tile.
To fix the plastic, we will use Point 96 liquid nails. This is a crystal-clear fixative that, after application, creates an invisible seam, suitable for almost all surfaces. Another feature is the primary fight. No additional bolts or fasteners are required.

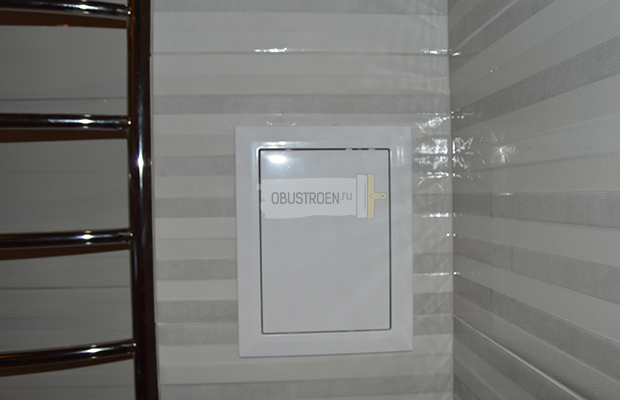
The hatch is installed, if necessary, it can be easily opened for inspection and shutting off the taps.
If your heated towel rail is already more than fifteen years old, then surely its appearance causes sheer despondency. Well, after getting acquainted with its more modern counterparts, a great desire immediately arises to install this snake-like chrome miracle in your own bathroom.
In order to make this wish come true, there are two options:
- Invite professionals to replace the heated towel rail.
- Install the heated towel rail yourself.
Whichever option you choose, read this material to the end. If employees will carry out the replacement procedure, you can easily control all their activities. If you install the coil yourself, you will receive high-quality instructions on the topic “Installing a heated towel rail” and easily carry out such a procedure.
The towel warmer replacement strategy is as follows:
- The stand is disconnected from the water.
- Eliminate the old product.
- Install a special jumper.
- Ball valves are installed at all junctions with the device.
- Then you can turn on the riser and perform all further work.
It is worth noting that you will have to pay your management company to turn off the riser.

Main varieties
Depending on the principle of operation, there are such types of dryers:
- Working on hot water. They can be connected to a hot water or heating system. Such dryers will be useful in that they can significantly reduce your utility bills.
- Powered by electricity. Such instances are completely independent of the supply of water and heating. Durable enough (since there is no corrosion). Easily installed in any convenient place. But the main thing is that there is a power source nearby.
- Combined. It is a combination of the previous types. During the heating season, hot water circulates through the device, and the rest of the time, a heating element can be turned on to heat the water.
The appearance of modern water devices is quite diverse. Consider their types.

The first type: M, U, Ф figurative - the most common forms.
The second type: "snakes", "ladders" and other varieties of the original design of devices. To include them in the existing system, the location of the installation nozzles is also of great importance:
- Lateral - as a rule, it is used for heated towel rails of the first type.
- Top or bottom - more common among coils of the second type.
The choice of the optimal option is always determined by the type of connection scheme, the availability of the necessary free space in the bathroom, as well as the location of the piping system.

Norms and rules of installation
All requirements for connecting the dryer to the hot water supply system can be found in SNiP 2-04-01-85.
Installing a heated towel rail in accordance with all the rules consists in connecting the outputs and inputs of the radiator circuit with the fittings of the heating riser, or the water main through plastic pipes.
Pipes, couplings, bends are assembled into one piece by means of a special soldering iron.
To connect the purchased heated towel rail, you can also use copper and metal-plastic pipes, but here you need to take into account a number of features. In modern half-inch pipes made of metal-plastic, the cross-sectional diameter is smaller than in plastic ones. In addition, they do not withstand strong pressure drops well. Copper pipes, despite their durability, will cost a very large amount, and their welding requires special skills and special precautions.

If you want the heated towel rail to perform its functions normally, it is necessary to ensure a slight slope of the supply pipe in the direction of the hot water flow. For the entire length of the eyeliner, its length is from 5 to 10 mm. The water flow must pass from the top point of the heated towel rail circuit to the bottom. For this purpose, the upper radiator bell is simply connected to the hot water riser.
Be sure to make a gap between the surface of the walls and the pipes of the circuit. It is 35 mm for pipes with a cross section of less than 23 mm, and 50 mm for pipes with a cross section of more than 23 mm. All distances are easily adjusted with a pin, which is screwed into the bracket, however, there are also completely fixed mounts where this distance cannot be changed. The structure that supports the strapping should not be fixed too rigidly in order to compensate for all the thermal expansion of the pipes and at the same time not to load the wall sections that carry them.
Required Materials
Before installation, it is important to check the complete set of the device, familiarize yourself with the design, the connection diagram of the new dryer, and also study the instructions. It is best to prepare the necessary materials and tools in advance.
- directly purchased heated towel rail;
- brackets;
- PVC pipes of the required diameter (26 and 32 mm);
- screwdriver;
- impeller;
- fasteners;
- knife for cutting PVC pipes;
- building level and hammer;
- two wrenches;
- two or three ball valves;
- tow or some other sealant;
- two union solder nuts;
- soldering iron for PVC pipes;
- PVC elbows;
- one PVC elbow with internal thread;
- two tees (in case you install a jumper);
- one sleeve with internal thread.

Dismantling the old towel warmer
First of all, contact the organization serving your water supply and heating networks so that they turn off the hot water supply at the time of your dismantling work. And only after that start removing the old dryer.
In addition, when removing the old coil, it is necessary to pay attention to the wear of the riser to which it was attached. If its condition already leaves much to be desired, then it makes sense to replace it partially or completely. It will also be useful to ask the opinions of neighbors from above, below. Suddenly they will support the idea to change the riser completely. Even when you replace only at home, it is necessary to do this in such a way that the ancient pipes do not remain in the ceilings, and the junctions with the new sections are accessible and visible. Having outlined the required segments, cut off part of the riser with a grinder along with a dryer.

On the cut ends of the pipes, it is still necessary to cut the thread. For this, a special threading machine is useful. In specialized markets, they sell and rent this tool. From the ends of the cut pipe, chamfer with an impeller, install the lerk of the required caliber in the tool socket and, having fixed it well at the end of the pipe, simply cut the thread.
Currently, copper, steel and polypropylene pipes are most commonly used for plumbing. The latter are distinguished by their low price, ease of installation, and resistance to corrosion.
In addition, the process of soldering propylene pipes together is simple and easy to learn. For independent work, you will need the following tools:
- soldering iron for pipes;
- a set of different nozzles of the required caliber;
- wire cutters or pipe cutter;
- beveler;
- shaver (for removing aluminum from pipes).
It is better to buy a soldering iron in a specialized store. So you will be sure of the quality. Included with the soldering iron are always nozzles of various sizes, as well as a stand for secure fixation.

Proper welding can be done with an exceptionally high-quality device, so saving on it is not recommended.
How to weld pipes step by step
First, draw up a diagram for yourself with the obligatory consideration of the size of the plots, the location of the bends, tees and taps. It will be very convenient to be guided by it to save materials and assembly accuracy. In addition, the scheme will reduce the number of adhesions on weight.
Use a pipe cutter or nippers to cut sections to the required length, and then chamfer the ends with a beveler. According to the standard, the chamfer has a length of 2-3 mm and a slope of 15 degrees. Do not forget to clean all the cut edges of the pipes from crumbs, burrs for more reliable welding.
For a reliable connection of the couplings with the ends of the pipes, it is necessary to heat the soldering iron to 260 degrees, and then place all the elements in the sockets of the nozzles. The coupling is put on the pin on one side. The pipe is inserted into the sleeve from the other side. The total heating time is determined by the diameter of the element, as well as the thickness of its walls. Time is normalized by international standards. It can be found in special tables. You can also find out the readiness for soldering on your own. It is necessary to scroll the element on the heating surface: with the necessary heating, the coupling or pipe will turn very smoothly and be easily removed from the nozzle.

The process of soldering plastic pipes
The heated pipe with the coupling should be connected immediately after removal from the soldering iron. At the same time, try to set them exactly relative to each other. Press as far as it will go, but do not press hard. You have about 5 seconds after connection to adjust the position of the mating elements. Then they are already firmly grasped.
Installation of taps and bypass
The bypass jumper is not a mandatory component, but it can help in case of need for repair work on the installed dryer. Replacing sealing gaskets at the points where the dryer is connected to the riser will necessarily require shutting off the water supply in it. This means filing a special application with the FSW, as well as additional cash costs. By including shut-off valves and a jumper in the connection diagram in advance, you can easily cut off the coil circuit from the main line in order to save money or in case of repair.
When installing a jumper, you can use steel, copper, or so-called polypropylene pipes.

Working with metal involves laborious welding, so it would be much more rational to make a bypass from modern plastic pipes.
To cut off, regulate the flow in the required areas, we need three ball valves. By installing one on the jumper, and two more on the supply, water return fittings, you can shut off the hot water supply to the coil and cut it off from the riser. By adjusting the position of the valve on the jumper, it is possible to increase or decrease the water supply in the circuit, and thus adjust the overall heating temperature.
Installation of a new heated towel rail
How to install a heated towel rail: stages
Installation and connection works are carried out in several stages:
- Cutting off the water supply.
- Removing the old coil. If it is threaded to the riser, it must be unscrewed with adjustable wrenches. If the dryer is welded to the riser, we simply cut it off along with the pipe using a turbine.
- Installation of ball valves, lintels.
- Screwing the Mayevsky tap into the bypass for comfortable deaeration of the system.
- Marking on the wall with a pencil places for future fastenings. Exhibition of horizontal marks using a level indicator.
- Drilling holes according to special marks and driving dowels into them.

How to install a new heated towel rail yourself
Having set the heated towel rail so that the holes match, we fasten it with a regular screwdriver. At the same time, do not forget to maintain the required distance from the wall to the pipes. We adjust it if there is a bracket with a stud.
- For a reliable connection with the supply fittings, as well as the return of water, we use fittings. They are angled or straight. It is important to seal the threads with tow or other winding. You can use fum for a more reliable sealing of tapered threads. When installing the device, set a slight slope of the liner (from 5 to 10 mm). Tighten all union nuts, placing a cloth under the wrench in advance so that there are no scratches. Insert special sealing gaskets into the end face of the nut. It is necessary to tighten smoothly and without much effort, if there are difficulties when turning the key - unwind the connection, set the connected elements evenly. Having screwed the nut to the end, squeeze it a little, but do not overdo it so as not to strip the thread.
- After completing the assembly, you can supply water to the heated towel rail. Open the water supply slowly. Slightly open the valve on the jumper in order to release air from the pipes. When water starts to drip, you can close it. Inspect well, smooth all threaded connections and welds with your hand to detect leaks.

How to connect an electric heated towel rail
An electric heated towel rail is a household heating device that does not require a special tie-in to the water supply. The installation of such equipment is much simpler, but it is imperative to ensure complete isolation of electricity, since current leakage in the bathroom can pose a great threat to human life. Grounding should be made, as well as connected for reliable protection against any voltage surges.
As a rule, the socket is placed outside the bathroom, but a device without a thermostat may well be connected to a socket in the bathroom. If necessary, it can be unplugged at any time in order to reduce electricity consumption. The socket must be with a cover for insulation and a special waterproof housing, and all the wires are hidden in a strobe.
Installing the socket on a wall that faces the street is prohibited, as this may cause short circuits due to the formation of condensate.
After reading this material, installing a heated towel rail will definitely not be scary for you!
The device for drying hygiene items and removing excess moisture in the bathroom is simple both in device and in installation. In order to perform its installation, fundamental knowledge in the field of engineering communications construction is not required.
However, you should clearly know how to connect a heated towel rail. After all, the result of your own efforts or the work of hired plumbers should please for many years, do you agree?
In the article presented by us, all options for mounting the substation and possible complications during its connection are analyzed in detail. Verified and systematized information will be a reliable help to home craftsmen who want to do the work themselves, or who want to control the actions of workers.
We have detailed the specifics of connecting an important household appliance in the bathrooms of the old and new layouts. The problems of the owners of private houses were not ignored. The information we offer is verified in practice, supported by visual materials and video instructions.
Connection heated towel rail in a country house
The conditions of a private house are more favorable for installing a dryer. With an autonomous supply system, there is cleaner water. You can buy imported PS, which is afraid of sediment accumulation.
Typically, in such a house, a sufficiently large room is allocated for a bath, which expands the boundaries of the choice of the unit in size and shape. And connection work does not require permission from neighbors.
Regardless of where you are going to connect the heated towel rail - to the heating system or to the hot water supply at home, you cannot do without inserting the device into the pipes
The connection scheme itself is similar to that used in an apartment building. It must be remembered that the device should be connected exclusively in the direction of the water flow. With a liner length of up to 50 cm, place the pipes horizontally, with a longer one, make a slope along the entire length.
Keep the distance between the wall and the water pipe. With a pipeline diameter of 4-5 cm, choose a distance from 5 to 5.5 cm. When the diameter value is less than 2.3 cm, this gap is reduced to 3.5 cm.
Considering the temperature deformations to which hot pipes are subject, it is impossible to fix the PS on the supports by welding, the fastening must be free.
Typical mistakes of independent masters
When the lower outlet is above the extreme point of the SS with a side or bottom connection, a dead zone is formed between the bottom of the device and the connection point of the lower outlet.
This is a consequence of the fact that the cooled liquid, having dropped down, cannot get back into the riser due to the pressure on it of a column of hot water with a lower specific gravity. While the allowable height difference between the lower outlet and the bottom heated towel rail is not exceeded, the device works, and after that the circulation in it stops.
The circulation will also stop if there is an elbow formed by the upper pipe. Only a tie-in can make such a scheme work in order to periodically bleed the accumulated air. Sometimes a loop is made in the upper pipe, laying it behind the ceiling lining, and the lower pipe is immured into the floor.
Air will accumulate at the top, and the chilled water in the unit will be blocked in the lower loop located in the floor. The movement of the coolant will completely stop.
A heated towel rail in the bathroom is an extremely handy device. Thanks to him, the comfort of using this room increases significantly. There is always the opportunity to dry wet towels, put on a warm bathrobe after a shower, and for young mothers, drying children's things after express washings, which sometimes happen several times a day, is a very important point. And in the bathroom itself, from the heated towel rail located on the wall, it is much warmer, since it also plays the role of a kind.
Those old heated towel rails, which were previously installed everywhere in city apartments, no longer satisfy many from an aesthetic point of view. Therefore, when planning a repair in a bathroom or in a combined bathroom, the owners also plan to install a new device, in the old place, or with a transfer to a more convenient, from their point of view, position. But for all the seeming simplicity of such an operation, installing a heated towel rail in the bathroom still obeys a number of important rules. If they are not taken into account, then either the device will not function as we would like, or, even worse, the normal operation of the entire hot water supply or heating system will be disrupted.
The main focus of this publication will be to give the owners of the apartment an idea of which heated towel rail connection schemes are considered acceptable and effective. It should be assumed that if a home master takes on such a thing, he should no longer be taught the basic techniques of plumbing installation. Well, if a third-party specialist is nevertheless invited, there will be an opportunity to control his work, since a considerable number of frank hacks work in this environment.
General ideas about the operation of a heated towel rail
There are several types of such devices. The vast majority of them are designed to work when connected to a pipeline through which heated liquid circulates. In our time, a lot of electric models have appeared on sale, which only need a connection to the mains. This is, so to speak, a “separate” category of heated towel rails, the installation of which does not require compliance with special requirements - it is only important to follow the rules of electrical safety. By and large, the installation of such a device is not much different from connecting, say, a lamp or a heating convector.
The most “problematic” were and still are heated towel rails of the water principle of operation - it is with their installation that the greatest number of questions arise. Devices of this type will be mainly devoted to further presentation.

We will immediately make a reservation that you can purchase a combined type model that will work thanks to the circulation of hot water, but can, if necessary, switch to electric heating. However, the connection of such heated towel rails to pipe circuits is subject to general rules, so we will not put them in a separate category.
How to understand the variety of heated towel rails?
The proposed range of such devices is extremely wide, which can even confuse the choice. A special publication of our portal - will help in this matter.
So, for the normal operation of the heated towel rail, a flow of heated liquid through it is necessary. In multi-storey buildings, where hot water supply was organized on the principle of constant water circulation, this device, as a rule, was just an ordinary loop of a hot riser pipe, most often on the descending part of the “ring”, that is, with a flow directed from top to bottom. This was the meaning that consumers receive hot water of the required temperature, regardless of the floor of their residence, and already when the flow returned, additional heat was taken from the heated towel rails.

Pay attention - the pipe forming the loop (one, in U-type towel warmers, or two - M-type) has the same diameter as on the riser itself, or even more. This is a requirement to ensure normal, without interference and excessive hydraulic resistance, circulation in the local DHW circuit.
It is clear that nowadays such heated towel rails very often do not satisfy the owners in terms of their appearance. A decision is made to replace them with more modern ones, most suitable in terms of their aesthetic qualities to the interior created in the bathroom. And this is where the miracles begin. The incompetent intervention of home craftsmen or even "unfortunate plumbers" (of which, unfortunately, there are quite a few), leads to the fact that, at best, the heated towel rail does not work at all or warms up unevenly (this is especially true for devices such as "ladder"). And at worst, the functioning of the hot water supply system in the entire entrance riser is disrupted, which entails administrative measures and, of course, aggravation of relations with all neighbors.
The fact is that ill-conceived decisions, most often based on the desire to hide the supply pipes or purchase a device of the original form, without taking into account the features of its connection, lead to a violation of the hydraulic balance in the system. Therefore, further in the article, options for connecting heated towel rails will be proposed, from which you can choose the most suitable one. In addition, attention will be paid to controversial schemes, obviously non-working, and even completely prohibited for implementation.
One more caveat before moving on to consideration of schemes. In the future, we will talk more about installing a heated towel rail in the hot water supply system. The fact is that in private houses or apartments where autonomous heating is organized, these devices are often an integral part of the heating system. On the one hand, it seems to be convenient, but on the other hand, in the summer, when heating the house is not needed, the device becomes “incapacitated”.

Another option is to connect the heated towel rail to an autonomous hot water supply system equipped with an automated circulation scheme.
Schemes in both variants of autonomous systems can be very diverse, complex, but subject to somewhat different rules. Therefore, this question will also be “bracketed”, as it already belongs to another section, more related to heating systems.
Prices for heated towel rails
Towel dryers
Which towel warmer connection scheme to choose?
The simplest schemes for tie-in heated towel rails
So, earlier heated towel rails were most often an integral part of the hot water circulation riser. With such a connection scheme, absolutely nothing can interfere with their work - since the diameter of the "coil" is not less than the diameter of the riser pipe, the hydraulic resistance, even by lengthening the line, practically does not increase. While hot water circulates in the system, the device itself will also be heated.

Pay attention to the red arrows shown. The direction of the flow does not affect the performance of the heated towel rail with such a connection. The simplicity and reliability of such a connection encourages apartment owners not to refuse it when changing a heated towel rail. It is enough to choose a modern model with the appropriate center distance and pipe diameter in order to prevent narrowing of the riser.

Installation also does not look too complicated. It is necessary to agree with the public utilities on the temporary disconnection of the riser and the discharge of water from it. Then the old heated towel rail is dismantled (or cut off). In its place, a new one is installed, according to the technology most suitable for specific conditions. This can be welding of threaded pipes with further “packing” of the device, using, if possible, preserved threaded sections, etc. Often they also resort to updating the riser itself - for example, they change it to without reducing the inner diameter of the pipe. Then the installation will be even easier - the appropriate fittings are welded in to go to the thread, and a heated towel rail is already mounted to them.
The riser itself is often hidden behind a decorative box that “masks” the entire piping in the bathroom or bathroom. But in principle, with any connection scheme, this should not affect its configuration.

No matter how the installation is carried out, two mistakes should not be made:
- Often, when installing metal-plastic pipes, an involuntary narrowing of the passage occurs, which is associated with structural features of press fittings. This may affect the overall performance of the entire riser, since hydraulic resistance sharply increases in local areas.

The second amateurish mistake is the installation of locking devices in front of the heated towel rail. No words - the presence of taps allows you to independently turn off the device when it is not needed, and if necessary - to carry out dismantling or any repair work. Cranes are usually installed, but not as shown in the illustration below.

Shutting off any faucet practically paralyzes the operation of the entire riser. The circulation stops, the water supply from the mixers may continue, but the immobilized volume will quickly cool down, and in order to get hot water at the outlet, a considerable amount of chilled water will have to be drained. In addition, when the tap is closed, airing of the riser is not excluded. In a word, no locking devices on the riser (and in this case, a heated towel rail is its integral part) are not allowed.
Considering that the taps in front of the heated towel rail are still very useful, the scheme shown above is increasingly being abandoned, organizing a system in which there is a bypass. This is a jumper connecting those going from the riser to the heated towel rail. The options here may vary. So, the riser itself can also act as a bypass, to which pipes for connecting a heated towel rail are welded - in modern new buildings, such wiring is most often planned, which gives the owners the maximum number of connection options.
If the old piping is being redone, like the one shown above, then the bypass can be welded or threaded on the horizontal sections extending from the riser to the device. In any of their cases, it is quite possible to install taps after the bypass - this will not affect the general circulation in the riser system.

Installing a bypass solves a lot of problems at once. Firstly, hot water is supplied at approximately the same temperature to all apartments located in the riser, regardless of the floor. The owner of the apartment is free to turn off his heated towel rail at any time or even remove it altogether by closing the shut-off ball valves. Moreover, he may well install a thermostatic regulator on the heated towel rail, which is able to maintain the temperature in the "coil" at a certain level, by analogy with heating radiators.
There is a common opinion that the bypass must be either offset or narrowed (one diameter less than the inlet). Indeed, this approach should somewhat improve the circulation of water through the heated towel rail. But practice shows that there is no particular difference with devices that are simple in configuration - water circulates perfectly even with a direct, not narrowed bypass, since, in addition to the forced circulation flow, gravitational flow also interferes with the matter, due to the difference in density of the liquid heated and somewhat cooled down in the heated towel rails. By the way, a narrowed bypass can even play a negative role under some circumstances. In the future, several schemes will be considered with a different location of the bypass or branch pipes cut into the DHW riser.
But what is completely unacceptable is to install shutoff valves on any bypass. No excuses, they say, this tap improves circulation through the dryer, and will always open if the taps to the device itself are closed - should not be taken into account. According to the existing rules, the owner of an apartment in a high-rise building, in principle, should not be able to independently block the riser. The fact that he can vouch for his prudence does not at all exclude accidents, due to which the circulation of hot water for the entire entrance can be blocked.

By the way, such a connection scheme “walks” very widely across the Internet (even with attached photos of the work performed), where unscrupulous authors of articles give it out as one of the possible options. It is worth being very biased towards such a publication!
In the conditions of a private house, where the heating and hot water supply system is completely autonomous, the owner can install any shutoff valves he wants where he sees fit. However, even in this case, the need for such a faucet on the bypass looks very doubtful - everything can be solved by properly balancing the system and installing thermostatic devices.
The range of heated towel rails is not limited to the simplest models with side connection. Many people choose towel warmers with a bottom, diagonal or even a universal arrangement of nozzles for mounting to supply pipes. It is with such devices that the most confusion arises, the maximum number of errors are allowed when, after installation and connection, it turns out that the heated towel rail either barely heats up, or is even tightly “locked”. Therefore, further consideration will be devoted to various mounting options for more complex schemes.
Read how to do it with full instructions and photos in our new article.
Recommended and impermissible connection schemes for heated towel rails
Lateral or diagonal connection
In the first place, we put a scheme that is highly versatile and therefore used extremely often. In principle, it largely repeats the simplest options, which have already been described above.

The scheme works equally well with a towel warmer of the "ladder" type of universal connection, with water supply in the rack from above or below. It does not require any offset or narrowing of the bypass. There is no dependence on the pressure of water in the riser and the speed of its movement. Removal from the riser, in principle, is also not regulated. Subject to all connection rules, there is no need to resort to bleeding air if there was a temporary shutdown of the water supply.
In order for such a scheme to demonstrate all its advantages, it is necessary to adhere to the following rules:
- The lower point of the tie-in to the riser must be lower than the lower connection pipe for the heated towel rail. Accordingly, the upper inset is higher than the upper connection point. At the same time, a slope of approximately 20-30 mm per linear meter of eyeliner is observed. True, this condition becomes even optional if the heated towel rail is located at a distance of no more than 2 meters from the riser, and pipes with a diameter of 32 mm and above are used for the connection. In such conditions, it is quite possible to confine yourself to a horizontal eyeliner.
- No bends are allowed on the supply lines, as they become potential "air collectors" that prevent the normal circulation of water.
- No narrowing or offset of the bypass is required. Moreover, when water is supplied from below, the narrowed bypass becomes only an obstacle, which can completely block the internal circulation through the coolant. When supplying water from above, you can narrow the bypass, based on one step of diameter less than the riser, although with such a scheme it will not matter much, and the feasibility is doubtful, since the universality of the system simply disappears.
- The diameter of the supply pipes must be at least DN20: 25 for polypropylene with high-quality internal reinforcement or ¾ inch for VGP steel pipes. When installing ball valves - the size is also at least ¾ inch.
- The practice-proven allowable distance from the riser when using PPR pipes is up to 4.5 meters.
- It is desirable to place pipes in a layer of thermal insulation, and when they are hidden (that is, located in a slot cut in the wall), this becomes a prerequisite for normal operation.
Find out some of the available ways in our new article.
By the way, despite popular belief, the diagonal connection in this case does not have any special advantages. Apparently, they think so by association with heating radiators, where, in fact, with a diagonal tie-in with an upper coolant supply, the total heat transfer of the battery increases by 5 ÷ 7%.
Such a scheme allows some modification, for example, when there is a need to arrange the supply pipes a little differently.

In principle, even according to the scheme of this option, it can be seen that no conditions have been changed - the only difference is in the tie-in points into the riser and in the presence of vertical sections at the inlet and outlet of the heated towel rail. This does not affect the efficiency of the device and its performance in any direction of water supply.

The illustration shows another version of the side connection. It happens that the installation conditions do not allow to spread the tie-in pipes into the riser to the height of the heated towel rail. This means that we can apply this option, however, with such a tie-in, it is already impossible to do without installing an air vent on the device itself - due to the resulting step, after a temporary shutdown of water, an air lock is formed in the heated towel rail, which will have to be released manually.
Now - several valid schemes with a narrowed or offset bypass. As already mentioned, there is no particular need for such measures, but still many plumbers adhere strictly to their points of view and try to do the sidebar in this way. Another option is that an offset or narrowed bypass was already installed on the previously standing heated towel rail, and there is no desire to completely redo the riser design.
So, the same two schemes, with lateral and diagonal connections, but only on the riser between the outlets to the heated towel rail, a narrowing was made - by one diameter step.

It would seem that such an approach is obvious. But then again - apparently, the associativity of thinking is triggered, caused by the requirements for such an installation of heating radiators in a single-pipe system. But a heated towel rail is still not quite a radiator, and such alterations are not needed here. Moreover, such a scheme will work only with the upper water supply. If the supply is carried out from below, or even in the case when the direction of flow on the riser is unknown to the owner of the apartment, it is better to refuse this approach.
And in the rest - the top feed scheme is quite efficient and effective, not particularly limited by the distance from the riser to the heated towel rail. The basic requirements in it are the same as with a direct, not narrowed bypass.

Now - a variant with an offset bypass. Displacement is also often used when wiring radiators, it is also used by craftsmen when installing heated towel rails. This approach is especially justified when trying to keep the old riser bends, to which the most primitive loop, which was described at the beginning of the section, was attached. In order not to change the entire riser, you can simply embed the bypass.
But at the same time, it must be borne in mind that the flow direction must also be from top to bottom. Otherwise, situations are quite likely when the device will remain cold.
Another point is important - with a displaced bypass, you should not use a narrowed pipe for its installation. This can significantly reduce the efficiency of the heated towel rail, unbalance the normal circulation of water. In general, it is always advised to strive to ensure that the bypass in front of the heated towel rail is equal in diameter to the riser.
Otherwise, all the requirements and tolerances for the installation of such a circuit are similar to the side connection with a direct bypass.
Bottom connection of heated towel rail
This method of mounting a heated towel rail is popular because it allows you to covertly lay the supply pipes without resorting to large-scale chiselling - some of the lines can simply be hidden by accessories standing along the walls. In addition, a number of models are designed specifically for this type of installation. I must say that the heated towel rails with a bottom connection look very impressive, although in terms of efficiency they still lose to appliances with a side or diagonal connection.

The connection of such heated towel rails, despite its apparent simplicity, is also subject to certain rules. Let's look at a few acceptable schemes.

This scheme works regardless of the direction of water flow. A prerequisite is the presence on one of the vertical collectors of the "ladder" of the Mayevsky crane - any shutdown of the water always leads to airing the device. Usually, drain taps are included with the heated towel rail and are covered with a decorative cap so as not to be out of harmony with the general background. If the hot water supply in the house is stable, you will often not have to resort to air release.
What basic requirements should such a scheme meet?
- The lower outlet from the riser in any case should always be located below the heated towel rail.
- The upper outlet, in the case when a narrowed or offset bypass is used, should also be located below the heated towel rail - only in this case will versatility be achieved, that is, the device will function in any direction of water flow. With an even unbiased bypass, this requirement is optional, but it is better if, on any horizontal section, the supply pipe still has a slight upward slope, from the riser to the heated towel rail, at least from 5 to 30 mm per linear meter of length. A strictly horizontal arrangement of the liner from the upper outlet is allowed only at small distances from the riser or when using pipes with a diameter of more than 32 mm.
- Naturally, "humps" where air can accumulate should be completely excluded along the entire length of the pipes.
- With a lower connection, the pipes are most often hidden in the thickness of the wall, so you will have to put them in a thermal insulation shell anyway.
Variants of the scheme shown above can be as follows:

The need to place the supply pipes from the riser to the heated towel rail at a minimum distance from the floor makes it necessary to lengthen the vertical sections before connecting to the device. But it doesn't really change anything. Both outlets are located below the heated towel rail, which is optimal for all such schemes. The direction of the flow is any, it does not affect the efficiency in any way.

If such a situation arises, then it is necessary to follow the rule so that on the upper branch, in the horizontal section, the rule of a slight upward rise is still observed (shown by the blue arrow), even if only by 5 ÷ 20 mm per meter. In this case, the universality of the circuit will remain, that is, its independence from the direction of water flow in the rack.

This scheme meets the same requirements as the one above. The only requirement is that the diameter of the bypass must not be less than the diameter of the riser.
And what to do if you plan to connect the bottom connection of a heated towel rail, and the old tie-in with a displaced bypass remains on the riser, and I would not want to redo it all. At the same time, the upper outlet is located high enough, and if you follow the rule that it should be below the connection point, you will have to lift the device to the ceiling itself. There is also a solution to this, but only if two important conditions are met.

- Firstly, such a scheme will be guaranteed to work stably only with the upper water supply. When feeding from below, it is very likely that the internal circuit will “lock” and the appliance will remain cold.
- Secondly, the upper outlet of the riser in any case should be located below the upper edge of the heated towel rail, otherwise the device will not be able to work in principle.
If at least one of these conditions is not met, then there is nothing to think about - you will have to deal with altering the riser on a straight line, with a smooth and not narrowed bypass. Then there will be a full opportunity to choose the optimal connection scheme.
Obviously NOT working, erroneous wiring diagrams
For the sake of the external design of the bathroom or in pursuit of maximum savings in effort and money (for example, when using old sections of wiring or channels punched for other needs in the walls), inexperienced craftsmen sometimes make mistakes. These omissions lead to the fact that, with a visual, seemingly correct tie-in, the heated towel rail remains cold, despite the correct operation of the hot water supply.
We give as examples the most common incorrect connection schemes.

Probably, everything is clear without words - wanting to bring the pipe from above (usually for the purpose of some kind of disguise, for example, over a false ceiling, because it is difficult to think of other reasons), the “master” created a “hump” in the area of the liner from the top outlet. The result is a loop in which air will definitely begin to accumulate. Moreover, this will happen even with a relatively stable operation of the hot water supply system - small air bubbles in hot water are present almost constantly. Sooner or later, a situation will arise when an air lock simply blocks the circulation through the heated towel rail, and the device will remain cold.
In theory, all this is solved by installing the Mayevsky crane loop on the upper section of the resulting loop. But then, in general, what's the point of starting all this, if there is a desire to perform hidden eyeliner?

In this example, the key condition is not met - the location of the lower outlet below the bottom point of the heated towel rail. It turns out that the mechanisms of forced and natural (gravitational) circulation of water come into "antagonism".
The water that has cooled down in the heated towel rail tends to sink down and involuntarily finds itself in a kind of “trap” formed by the loop created between the lower tie-in point in the riser and the lower edge of the device. It is difficult for her to freely enter the riser, and hot water does not allow her to overthrow.
Perhaps, at first, the heated towel rail will seem to be efficient, however, a rather significant gradation in temperature will be felt - the bottom is clearly colder. At a certain “critical mass” will reach, when it will be much easier for water to flow through the riser, bypassing the device. The circulation will stop, the heated towel rail will simply turn into a “decoration” of the bathroom.

Here, in general, everything is wrong - the lower eyeliner, and both cut-in points are located above the lower edge of the heated towel rail. There is no incentive for water to flow through the small circuit at all, and in addition, two “trap bags” are formed at once for the cooled water, which are described above.

The “master” decided to hide the upper eyeliner from the ceiling, and put the lower one into the screed. The result is a "scheme" that will not work immediately for two reasons. Air will accumulate from above, and from below - again, a “bag” has formed, making it difficult for normal circulation. The result is the same - very soon the heated towel rail will “stand up” tightly.
Finally, consider the side connection scheme, already mentioned above, but which can be considered conditionally working, only with the top water supply. Again, we are talking about the "hobby" by some plumbers with narrowed or offset bypasses.

What is the matter here, after all, it would seem that all the requirements are met? And the snag is precisely in the narrowed or displaced bypass.
Due to the fact that a displacement or narrowing is made, at the lower point the fluid pressure at the inlet is higher than at the upper one. This means that a working pump that circulates in the riser will tend to “pump” water into the heated towel rail from below. But the gravitational flow of cooled water necessarily goes towards it. It turns out that they meet at the bottom point and begin to mutually inhibit each other.
And here it is - "how lucky." If the circulation pump is powerful enough, then it will, of course, push through the gravitational oncoming flow. True, at the same time, areas of uneven heating may well appear in the heated towel rail itself, since the forced flow will most likely choose the path of least resistance, while pushing the cooled water “to the periphery”.
But even in this case, it is impossible to exclude a pronounced direct dependence of the performance of the heated towel rail on the pressure in the riser. It is worth the pressure of hot water to drop to a certain mark - and the circulation through the device will completely stop. Moreover, this pressure drop does not necessarily have to be associated with any emergency situations. Simply, for example, in the evening, the total water intake in a multi-storey building rises - and this may already be enough for the heated towel rail to become a little warm, or even completely cold.
Attempts to understand the effectiveness of a heated towel rail in such a situation using a diagonal connection will only aggravate the situation, and the likelihood of normal operation will become even less. Forced flow will have to overcome a much greater hydraulic resistance, passing the device diagonally, while the gravitational back pressure remains at the same level. So instead of improving, you can get a completely inoperable heated towel rail.
The conclusion is obvious - a narrowed or offset bypass with a side connection of the device will be justified only when hot water is supplied from above, so that the forced and gravitational flows go in the same direction, reinforcing each other.
So, the most popular correct schemes for installing a heated towel rail in the bathroom were considered, and an analysis of possible errors was carried out. The author will consider his mission fully accomplished if the home master has a clear idea of which installation option to choose in order to guarantee an efficient working device.
As for the installation work itself, it is very difficult to give any ready-made recipes here. A lot depends on the type of heated towel rail, and on the type of pipes chosen, and on the desire to hide them or leave them in sight, the skills of the master to apply one or another technology for their connection.
Therefore, we will limit ourselves to the fact that, as an example, we will post several videos that demonstrate the installation process of heated towel rails of various models.
A few illustrative examples of the installation of heated towel rails of various models
Video: Installing an M-shaped heated towel rail directly on the riser outlets
Video: Mounting an M-shaped heated towel rail on "water outlets"
Video: installation of a vertical heated towel rail - "ladders" with a bottom connection