The presence of a tiled apron in the kitchen is not a sign of the hostess's whims. An apron is a part of the wall located between wall cabinets and the surface of tables and other items. kitchen set. This is very effective remedy, protecting walls from drops of fat and splashes of water, from various pollution and impact household chemicals. Such an apron in the kitchen frees the hostess from many unnecessary chores for cleaning the room. Classic option is the apron of tiles, although it can be created from glass, metal, plastic, and other materials.

Tile is a versatile material. He is not afraid of moisture, dirt, high temperature. This is the optimal finishing material. It is reliable, durable, environmentally friendly. Properly selected color tiles can transform the room and decorate it for 10-15 years. How to lay out an apron in the kitchen, which tile to choose for its construction?
Material selection
Choosing the right tile is already a significant part of the whole thing.

Tiles are divided into classes. Class B tiles are ideal for wall cladding in the kitchen. It is highly resistant to various pollution, to water and chemicals. The tile has a set of color shades. She is produced different sizes. You can buy material of different price categories. It depends on the manufacturers, on the color, on the quality of the coating of the front of the tile, on its thickness, and on a number of other reasons. From what and how to put an apron in the kitchen?
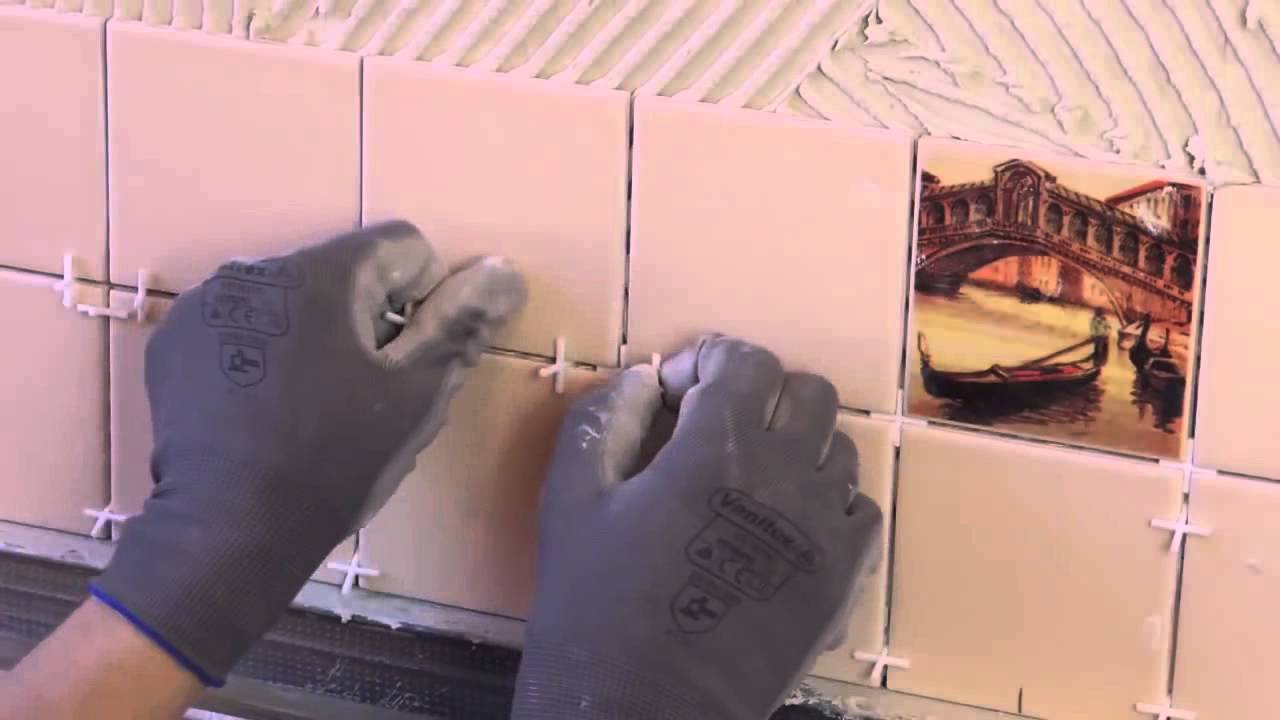
The apron is laid out from a single-color tile with inserts of a different color and pattern. Often an apron is laid out of mosaics or tiles, from which certain paintings are laid out. Such stylish design is not very expensive. And if you do everything yourself, you can save additional amounts. A tile with dimensions of 27x40, 20x20 is more expensive than 15x15 cm. A mosaic is a compromise price option.
To keep the apron clean, tiles or mosaics should be regularly wiped with a damp sponge or soft cloth, washed every month using any cleaning agent. Even the most heavy pollution easily removed from the surface. There are practically no disadvantages of this type of finish, except for some nuances when laying tiles.

For facing, you can choose a tile smooth and textured, with a matte and glossy surface, with and without a pattern. You can decorate the wall under the tree and under the tiles. The tile apron in the kitchen looks original, decorated as a brick. It is able to decorate the wall and complement the set in the kitchen. If there is little light in the kitchen, the tiles are chosen in light shades. The room visually increases in size and becomes lighter. If the kitchen is decorated with some attributes of national color, a tiled panel with a reproduction of views of the country, region, city can become the material for the apron.
Finishing design is not limited by any conditions. This element of the kitchen can occupy the entire wall or only part of it, have the shape of an ellipse and a rectangle, a rhombus or a triangle. It depends only on the desire and aesthetic taste of the landlord. It is easier to determine the dimensions of the apron when the kitchen furniture is installed and the hood and stove, dishwasher and washing machine, tables and cabinets. Then the width of the apron should be such that its edges are covered by 2-3 cm with furniture. In the absence of furniture, it is better to lay out an apron with a width of 5-10 cm more.
Back to index
Materials and tools
For work you need to prepare:

- tile;
- tile adhesive, you can Ceresit CM11. The approximate consumption of glue is 25 kg (1 bag) per 4 m² of laid tiles;
- water-resistant grout. The color is chosen according to the design of the kitchen.
- primer for base treatment;
- spacer crosses to maintain equal gaps between tiles;
- spatula with a smooth edge;
- notched trowel for applying and leveling the adhesive layer;
- rubber spatula for grouting;
- electric drill with a mixer nozzle for stirring the glue;
- roulette;
- building level;
- sponge for cleaning the surface of the tile;
- roller glass cutter, grinder with a disk for cutting ceramics, a special tile cutter;
- chisel, hammer, perforator with a spatula nozzle for removing old decorative coating.
Back to index
Preparing the wall for facing
Before laying a tile backsplash in the kitchen, you need to prepare the base. You need to remove the old coating from the wall. To remove wallpaper, you can do this:

- Type in a bucket of heated water and dissolve in it a little washing powder containing surface-active components.
- With a spatula or knife, cuts are made on the wallpaper in a chaotic manner.
- A wall with wallpaper is wetted with a roller.
- After soaking, the wallpaper usually peels off easily. It remains to scrape them with a spatula. If several layers of wallpaper are pasted on the wall, the procedure is repeated. For disposal, it is a good idea to prepare garbage bags in advance. The rest of the wallpaper is completely washed off with water.
- If the wall is wooden, it is treated with special impregnation or drying oil.
- If a electric wires for hoods and for other needs they pass at the location of the future apron, you need to prepare a strobe for them. A hole of about 1 cm is made along the marked line with a puncher or grinder. All dust and pieces of brick and plaster are carefully removed, the strobe and the surface next to it are treated with a primer. A wire is laid in the strobe and fixed in it with a plaster solution.
- The wall, if necessary, is leveled with plaster, putty, drywall. plaster mixture diluted in a bucket, the finished solution is thrown onto the wall with a small spatula, leveled with a spatula 30-40 cm long. You don't have to be perfect flat surface. The main thing is to achieve its verticality.
- Paint can be removed from the wall with building hair dryer and spatula. A section of the wall is heated with a hair dryer until the effect of boiling paint and bubbles appears, which are removed with a spatula, a scraper. You can use various formulations to wash off the paint. But some masters do not advise removing the old paint layer if it is strong enough. It is enough to remove traces of peeling, prime the surface and apply notches that can be made with a grinder. All notches are also primed.
- Do not ignore the part of the wall that is hidden behind the furniture. Over time, dust and food residues accumulate there. As a result, unpleasant living creatures like cockroaches, mice and rats can appear. The tiled apron itself will protrude significantly over bottom walls. This part can be easily leveled with a drywall sheet, glued to a height of about 85 cm from the floor level. This is where the tiling will begin. The top of the drywall is marked by level and cut off. It will also serve as a stop instead of an auxiliary guide rail.
Preparatory work takes a lot of time in old houses. In relatively new buildings, wall preparation may only consist of removing the old decorative coating, lightly leveling the surface and applying a primer coat.
Back to index
How to lay out an apron?

The standard width of the protective strip in the kitchen is usually 0.6-0.8 m. The apron falls another 10-15 cm under the countertop. The width under the hood is calculated separately. The size of the resulting tongue depends on the height of the hood. The tile is fixed with a special adhesive. Tile joints should be 2-3 mm wide. After drying, they are rubbed with a white or colored grout.
The larger the tile, the easier and faster it is to lay. But an apron lined with small tiles looks more advantageous. Optimal size- 10x10 cm.
Facing is performed in the following order:

- The wall is cleared of old finishing materials.
- With an old ax, chisel or chisel with a hammer, about 200 notches are applied to each square m of the surface for a stronger adhesion of the tile to the base.
- Before laying the tiles, the wall is treated with a penetrating primer, allowed to soak and dry.
- Wall marking in progress. Depending on sizes kitchen furniture marks are made indicating the top and bottom of the future apron. The distance between the top and bottom should include whole tiles and go beyond the edge of the furniture from below. With the help of the level, parallel horizontal lines are drawn.
- A strictly vertical line can be drawn in the center of the wall.
- A temporary guide rail or metal profile is attached along the bottom line.
- The working adhesive mass is being prepared. Water is poured into a clean basin or bucket, mixed. The dry mixture is poured in a thin stream. The proportions are indicated in the instructions on the package. manually, and better than a drill with a mixer nozzle, the solution is mixed until a homogeneous composition without lumps is obtained. The glue is left to swell for 10-15 minutes and mixed again.
- The adhesive composition with a small spatula is superimposed on a wide notched trowel and applied to the wall and leveled with teeth.
- A thin layer of adhesive is applied to the back of the tile. The tile is installed on the guide rail and pressed against the wall flush with the central vertical mark. It needs to be leveled with a level. The next tile is installed next to it. A distance cross is placed between them.
- After gluing every 8-10 pieces of tiles, the surface is carefully wiped with a damp sponge from traces of glue.
In a similar way, the entire area of \u200b\u200bthe apron is laid out with periodic control of the verticality and horizontality of the tiles. The surface must be cleaned of glue, later it will be more difficult to do this. After a day, you can remove the crosses from the seams and start grouting them.
And the gas stove must be closed practical screen resistant to moisture and high temperatures. The appearance of this area is also not in last place, it is the wall above the working area that is often used to place the accents of the kitchen interior. If you plan to install the apron yourself, then the complexity and duration of installation play a big role. To do right choice, you need to choose the option with optimal ratio all these qualities.
The surface of the wall above the countertop is the most loaded area of the kitchen. Here are located Appliances, work area and gas stove. Not every type of finish is able to adequately withstand all types of impacts associated with the operation of the kitchen for its intended purpose. Therefore, a number of requirements are imposed on the kitchen apron:
- Resistant to high temperatures. Since the heating of the screen surface is uneven, the material should not expand significantly. Flammability and low temperature melting is also not best qualities for an apron;
- Moisture resistance. The impact of liquids on the surface can manifest itself in different ways: direct contact, splashes, steam. Therefore, the apron must be chosen from materials that do not absorb water;
- Ease of cleaning. The surface of the screen in the kitchen is exposed to various types of pollution: dust, grease, food particles. It is important that the material does not change its appearance, even after prolonged contact with dirt;
- Mechanical strength. Since the surface of the apron will have to be cleaned frequently, and sometimes intensively, the coating must be resistant to abrasive substances and hard brushes. Micro-scratches and areas of worn paint will definitely not decorate the kitchen;
- Safety. Ecological cleanliness and lack harmful fumes- one of the most important qualities of a kitchen apron, because it can come into contact with food.
There are many materials on the market that fully or partially meet these requirements. Nevertheless - this hard choice, which requires taking into account all the features of the installation, the advantages and disadvantages of different types of aprons.
Types of materials for an apron
It is better to decide on the choice of material for the protective screen in the kitchen before installing the headset, as some types of finishes are mounted on a free wall.
Aprons made of solid or large fragments can also be fixed after placing the furniture, if they do not require "wet" types of work.
Before installing any apron, it is necessary to prepare the surface of the wall, check its integrity and reliability. It will not be superfluous to treat with primers with an antiseptic to protect against moisture and its inevitable companions - fungus and mold. It is important to pre-wire the wiring and make outlets for sockets.
When the wall plane is prepared, you can measure the area for the apron and proceed to select the most suitable materials. To do this, you can compare their advantages and disadvantages, and also evaluate possible difficulties during installation.
Tile
The classic version of the apron lining is tiles of various shapes, sizes and designs. She is practical and accessible. Combinations different shades and tile designs allow you to create unique and beautiful protective screens for kitchen. 
Material Features
Tiled tiles are a win-win option for decorating an apron. It will always be in fashion and will provide a comfortable and safe operation kitchens. The popularity of tiles is due to a number of advantages that distinguish them from other types of materials:
- Resistant to mechanical influences. Minor blows will not harm her, and the glaze with which the front surface is covered endures intensive cleaning;
- Does not absorb moisture. No wonder it is used for laying in the wettest places at home in the bathroom and toilet. In the kitchen, it will perform the function of protecting the wall from splashes and steam flawlessly;
- Easily tolerates uneven heating. The expansion is compensated by the presence of a small distance between separate elements finishes. But it is important to choose a good adhesive base and grout;
- Durable. The service life of a tile apron provided quality styling and glue - at least 15 - 20 years;
- Safe. The material is environmentally friendly and non-flammable.
Among the shortcomings of the tile, the most significant is the seams, which are difficult to clean from dirt, and prolonged exposure to moisture can provoke the appearance of mold and fungus. But if you do not be stingy and choose a quality grout, these inconveniences can be avoided.
Installation of a tile apron
In order for the tile to adhere well to the wall surface, it is necessary to provide all conditions for high-quality adhesion. Check the plaster for voids and weaknesses. Prime and notch if the base is covered with a layer of paint that cannot be removed.
For laying tiles with your own hands, you will need special tools and materials:
- Glue;
- notched spatula;
- Crosses for seams;
- Grout;
- Tile cutter.
Installation can be done different ways. The simplest - horizontal or vertical, it is best to choose for self-laying if there are no professional skills. More complex types will require the hands of a specialist: herringbone, offset, diagonally. 
Laying must be done before the installation of the kitchen set. And since the first row of tiles will not start from the floor, but from the middle of the wall, it is necessary to temporarily install a guide rail.
Ideally, if the size of the tile is matched exactly to the size of the apron, then it does not have to be cut. But if there are outlets on the plane of the wall, you will need to work with a tile cutter. A guide to using this tool is provided in the video.
By changing the thickness adhesive composition small irregularities of the wall can be corrected, but not more than 10 mm. A layer exceeding this value is not allowed for wall cladding. The tile may "float" or fall off due to uneven drying of the adhesive.
It is imperative to insert crosses into the space between the individual fragments, and do not remove them until the composition seizes. Grouting is done only after complete drying.
Mosaic
The mosaic apron will become bright accent throughout the kitchen. The variety of laying options and element materials can ensure harmony with the design and individuality. But working with this type of finish requires patience, skills and the selection of high-quality glue and grouting compound. 
Material Features
Mosaic has all the advantages of tile, it is not afraid of moisture and dirt, resistant to temperature and mechanical damage, while it has a number of features:
- It is easier to lay around ledges and rosettes;
- To work with the mosaic, white glue is required;
- Differs in a wider choice of materials for the production of elements: ceramics, glass, stone, metal, mirror.
The disadvantage of a mosaic, the same as that of a tile, is the seams, which in this case a lot more. Only epoxy grout is suitable for sealing them.
Mosaic installation
Elements can be placed in a variety of ways. Designers use the game with color and shades, creating real works of art that will definitely be unique.
Types of mosaic laying:

For installation, you will need the same set of tools as for tiles. Glue is applied to the wall and to the mosaic panel. The fragment is installed on the apron and pressed a little. If the tile has a protective paper layer, it must be moistened a few minutes after fixing the fragments to the wall and carefully removed.
After 48 hours after installing all the elements, you can start grouting. Raster is applied with a rubber spatula and evenly distributed over the surface. After 20 minutes, you can remove excess grout with a soft cloth.
Glass
Aprons for the kitchen are made from tempered glass. It is stronger than usual and can withstand high temperatures. On such a screen, you can place any image, drawing or imitating texture. 
Material Features
The glass apron is practical and safe option. Contaminants are easily removed from its surface. Tempered glass or triplex (two glasses glued with a film) are resistant to mechanical stress. If, nevertheless, the screen breaks, then in the first case it breaks up into small fragments with non-sharp edges, in the second - the fragments are held on the film.
For mounting the apron, a glass panel is made according to the exact dimensions of the site, so it remains only to fix it. Seams are most often absent.
The image can be applied in different ways, they differ in cost, complexity and practicality.
- Wallpapering clear glass- inexpensive and fast, but if moisture gets under the glass, the image will be damaged;
- Printing on vinyl film - more reliable option, the film is not afraid of moisture, but over time it can peel off the glass;
- UV printing on glass is a durable and high-quality image that is resistant to any kind of external influence;
- UV printing inside triplex is the most reliable and expensive option, the image is protected on both sides.
There are practically no drawbacks to this type of apron. It's beautiful and functional solution. On production in glass can do desired holes under kitchen utensils and sockets. Stop in the choice of this material can only be its high cost. The life of the product depends on the quality of the printed image. Clear frosted glass or printing inside the triplex can serve for an unlimited time.
Installation of a glass apron
Installation of an apron made of glass is carried out after the installation of a kitchen set. Therefore, when measuring the length and width of the section, greater accuracy is required. Fixing can be done in different ways:
- Through holes (the most reliable mounting option, it is used by professionals, but when fixing with bolts, it is important to be extremely careful not to break the panel; decorative caps can be purchased to mask the fasteners);
- Canopies (do not require drilling of the glass surface, suitable for small aprons);
- Liquid nails (the easiest do-it-yourself installation method, but the wall surface must be perfectly flat).
It is better to seal the joint of the apron with the wall with sealantso that moisture does not get into it. All openings in the panel must be made at the manufacturing stage. You cannot drill the screen yourself.
MDF (medium density fibreboard)
A compromise design option for a kitchen apron is MDF. Plates are affordable and attractive in appearance. But their use is limited, therefore, before choosing this material, it is worth comparing its advantages and disadvantages. 
Material Features
MDF is widely used in home decoration and furniture assembly. It is also suitable for the kitchen. It does not require installation perfect alignment wall surface.
The possibilities of the material are unlimited: it can have any shade and texture, imitate other types of finishes, such as stone and tile, any image can be applied to the surface using photo printing technique.
Installation is simple and fast. The service life of the material is only a few years, but given the low cost, such an apron can be changed frequently, which will not only get rid of the damaged screen, but also update the familiar kitchen.
Aprons made of MDF are not suitable for a kitchen that is heavily exploited. This option is appropriate for busy people who rarely cook and keep the room perfectly clean..
The material has some disadvantages:
- Does not withstand high temperatures;
- Frequent direct contact with water leads to deformation and flaking protective coating;
- Abrasives and solvents are not suitable for cleaning MDF;
- The screen surface is less durable than glass and tiles.
Despite the presence of all these disadvantages, the material is often used for kitchen aprons. It looks beautiful and expensive, while the cost of MDF is much lower than other types of finishes.
MDF installation
Perhaps there is nothing easier than installing an MDF apron. Its dimensions can be adjusted on the spot, but the cuts will need to be trimmed. It is easy to cut holes for sockets with a jigsaw and drill a plate to accommodate hooks.
Installation consists in fixing the panel with self-tapping screws or liquid nails to the plane of the wall. If the main surface is uneven, you can pre-place the slats on it and create an ideal plane with them.
PVC panels
Most a budget option design of a kitchen apron - pvc paneling. They are offered on the market in in large numbers, have a wide choice color design and design. 
Material Features
Panels have many benefits. If we compare them with a material from the same price category - MDF, then the plastic has excellent moisture resistance, but also, like a particle board, it does not tolerate high temperatures and cleaning with abrasives.
In addition to deformation when heated, plastic is highly flammable and releases toxic substances when melted, so over gas stove he has no place. He's good for working area, where it is often cooked, since contact with water and dirt does not affect its appearance. The service life is also short - a maximum of 5 - 7 years with proper care.
Panel mounting
For installation you will need: guide elements (crate), self-tapping screws, a screwdriver, a clerical knife. The panels are fastened together according to the tenon-groove system, while forming absolutely tight joints.
The panels can be mounted on any wall with irregularities and defects, the main thing is that there is where to screw the screws for the guides.
The crate is set according to the level. Above and below - guide elements, then vertical crossbars with a step of no more than 60 cm.
The panels are fixed with self-tapping screws to the crate, each subsequent one closes the place of fixation of the previous one and the caps of the fasteners. Therefore, outwardly, the apron looks quite presentable. You can cut plastic with a clerical knife or a hacksaw with a fine tooth. All holes must be prepared before installation. The edges of the finished apron in height and width, if they are visible, must be drawn up decorative elements, they are sold in the same department as the panels themselves.
Stone
natural and fake diamond- one of the best materials for a kitchen apron in terms of practicality. He possesses all necessary qualities. Durable and looks expensive and prestigious. 
Material Features
Such an apron requires the appropriate design of the kitchen. An expensive countertop and exquisite facades will make him a worthy company. Used to make screens different types stone. Most often - granite, less often - marble, basalt, slate, quartz. It is best if the surface is polished, it is easier to remove dirt from it.
Artificial stone is much cheaper than natural, while it has the same properties. But it is devoid of pores, therefore it does not absorb moisture and is better cleaned of dirt. It is lighter and can be made thinner. The durability of these materials is unmatched by any other.
Installation of a stone apron
Stone products are most often made to order according to individual sizes. Installation must be done after the installation of furniture.
If the stone looks like a tile, then it can be laid with your own hands, in the same way as the ceramic one. It is better to entrust the installation of a solid panel to professionals, since the material is expensive, and when self installation, without having the skills to work, you can damage the product.
The installation of an apron made of solid panels - stone, MDF, PVC and glass is carried out after the installation of a kitchen set, so there will be no problems with taking measurements and the height of the screen. It is more difficult to determine the location of the apron, which is installed before the headset is installed; here it is important to take into account both the height of the lower cabinets and flooring and layout of furniture. How to do it right is shown in the video.
When choosing an apron for the kitchen, it is still more important not its appearance, but price category and practicality. And the problem of aesthetics has long been solved by manufacturers - all types of materials are presented in various color solutions and design options.
Tile is the most popular and stylish material for use in the kitchen. This is the most practical solution for finishing the area above the sink, countertop and stove, as such a cladding perfectly protects the walls from dirt, splashes of various liquids, water and grease, and is also resistant to heat. And, in addition, it is possible to lay out an apron in the kitchen with your own hands, without outside help.
Before direct laying tiles should choose the right material:- View. You can buy any tile, but it is better to forego the catchy material of bright colors, and give preference to soft pastel colors.
- The size. Of special importance this criterion does not have, you can purchase the tile that you like best. But it is more convenient and faster to lay larger tiles. Most practical material- the one whose edge side is 10 cm. But if you are interested in the aesthetic component, for example, you want to lay out a pattern from a tile, then its size should be smaller.
- Tile surface. Since the main function of the tile in the kitchen is to protect the walls from dirt and grease, it is worth choosing a smooth tile for the backsplash. After all, this is easier to wash. But the relief surface delivers more trouble.
- Stock. When purchasing material, do not forget to take a spare tile in case it is damaged during cutting. You should also take into account the presence of marriage in the form of chips and possible improper installation. Therefore, it is customary to take 10% more material.
- It is better to take high-quality tile adhesive, for example, Ceresit CM11. Despite the fact that it costs more than its counterparts, the tile will hold really firmly.
- Grout mixture take only waterproof. Its color scheme should be in harmony with the picture of the entire kitchen. But the fugue is selected differently for the tile: these substances can both harmonize with each other and contrast.
- Primer composition. The use of a primer is not a prerequisite, but is recommended to ensure better adhesion of the adhesive to the wall.
- Distance crosses, which are required to separate the tiles during installation.
To work, you will need such a set of tools: glue graters, spatulas that have smooth and jagged edges, rubber spatulas for grouting, an electric drill, which is needed when mixing the adhesive composition, measuring devices, sponges, a tile cutter.
At the first stage of work, it is necessary to qualitatively prepare the surface of the walls for laying tiles and apply markings:- If the walls have old cladding, it must be removed. A puncher is used to dismantle ceramic tiles, a metal spatula is needed to remove wallpaper. Then the surface is cleaned with a metal brush.
- After that, you need to use a chisel or an ax to put shallow notches on the walls. For 1 square meter - about 200 pieces. This has a positive effect on the ability of the adhesive to fix the tiles on the wall.
- The next procedure is surface treatment with a penetrating primer. It is recommended to apply a primer approximately 2 hours before you start laying out the apron in the kitchen.
- In this case, the future location of the furniture and its dimensions should be taken into account.
- Mark the borders of the apron on the surface, top and bottom.
- The height of the apron should be chosen based on the whole number of tiles, so as not to fool around with trimming it.
- The tiling should be slightly lower than the edge of the countertop will subsequently be.
- For ease of installation of tiles along the bottom edge, install a wooden plank or guide. The first row of tiles will be based on the structure. This will help ensure that the rows are perfectly horizontal.
- In addition, you can place the surface additional lines to make it easier to adjust the location of the tiles.
- First, it is worth making a reservation that the laying is carried out in the direction from the bottom up. You need to start work from an open corner.
- Take a grater that has teeth on it and use it to pick up the adhesive solution to cover the wall section.
- Apply the adhesive to the tile using the same trowel and making grooves. And it can be attached to the surface. Its lower edge should rest on the guide profile.
First, the tile is leveled by hand, and then a measuring tool should be used for this. - Lay down next element. Remember that between it and the previous tile you need to put a remote cross.
- After fastening 8-10 pieces, it is worth wiping the surface to remove glue residue.
- Continue to act in this way until the entire planned surface is completely lined, not forgetting to control the horizontal level and the amount of adhesive on the wall.
- After completing the laying of the apron, you should remove the crosses. Also remember to clean the seams and wipe the entire surface.


After a couple of hours, be sure to wash the apron in the kitchen, first wiping the surface with a hard sponge to remove traces of adhesive and fugue, and then cleaning it with a soft rag. Dry flannel is used to give the tile a shine. That, in fact, is all!
What could be better for a hostess than a beautiful and modern kitchen in the house? Yes, practically nothing! Now many companies offer a huge range of materials that are used to create an apron.
It could be:
- Picture;
- photo of the city at night (see also the article about photo aprons for the kitchen);
- appetizing food;
- conventional tile composition;
- tree different size and design.
But that's just in the pictures. It takes a little effort and patience to get it right.
Let's start with the basic requirements
Before work, you should always have an accurate list the right materials, to once again do not run to the building materials store for some item not included in the shopping list.
What do you need if you lay an apron with tiles?
- Ceramic tiles;
- Glue for tiles;
- Grout (selected according to taste);
- Construction level (after all, the plans are to put an even apron, and not undulating landscapes);
- Saw with tungsten thread;
- Rubber spatulas;
- Small notched trowel;
- Sponge;
- Sharp high-quality tile cutter;

Training
How to fix a kitchen apron? Now step by step and answer this question!
Here, all attention is riveted to the base of the entire structure - the wall. So, instructions, pay attention!
Walls need to be fixed
Laying the kitchen apron follows the preparation of the walls.
Advice! If the tiles are small or medium in size (as in our case), then it is best to level the walls immediately. If this is not done, it will be more difficult to achieve a smooth wall surface already in the process itself.

Wall marking
At this stage, you should be very careful and apply the level. The evenness of the laid tiles depends on this procedure.

The easiest thing is markup if you do all the work yourself.
Advice! If this cannot be avoided in any way, then there is an option to “play around” with the seams: increase or decrease their width. But it should be remembered that this solution is not suitable for every tile.
Leveling bars

Planks can be both wooden and metal, as in the photo
The first row of tiles will lie on this bar to make it perfectly even and accurate. You can also draw vertical lines, which will serve as an excellent guide to avoid deviation to the sides.
Glue preparation
Glue should be chosen after consultation with a specialist. It is advisable to spend a little more money, but purchase a better quality and time-tested glue.
If the wall still could not be leveled, and the surface remained rough, then the amount of adhesive mass will be spent more.
After all, how to glue a kitchen apron without glue ?!

Laying an apron in the kitchen largely depends on the quality of the glue
How to apply tile adhesive

This is where a notched trowel is used. Its convenience is that it leaves behind an even layer with grooves.
In this case, the amount of adhesive under the tile becomes smaller and when the ceramic element is pressed along the edges, much less residual mass comes out than with a continuous layer. This is an important step, since gluing an apron in the kitchen is not very easy.
Advice! The mass should not be laid in a continuous layer, but separately under each tile. This will prevent the layer from drying out, where on this moment tile is missing.
Start laying tiles

Initial installation of a kitchen apron
- There is a way when they start laying tiles from the center of the markup, but it will be effective for large sizes of ceramics.
- In our case, it is better to choose the most inconspicuous corner and start attaching the kitchen apron.
- To more accurately observe the distance between the tiles, it is worth using special plastic crosses.
- Their sizes are varied and their choice depends on your desire. They can be laid sideways or one at a time in one area where four tiles meet (there is a problem here, because then it will be difficult to get it out).

Help crosses - here's how to properly lay out the apron in the kitchen
Next in line - the styling itself

How to lay out an apron in the kitchen - here's a great example for you!
Now we need a sequence of how to put an apron in the kitchen:
- In the corners, peculiar "pockets" are formed, the wall in which often has a deviation. In this case, it is better to layer glue with a level to level the surface;
 How to put it correctly if there is a socket mount in the apron area
- In this case, you will be lucky if the sockets fall exactly on the joints of the tiles and you need to make ordinary rectangular cuts. If not, it is best to use a tungsten filament threaded through an ordinary metal saw, which can accurately make a neat one-piece cut to fit the socket;
- It is already worth starting to grout the seams. We use grout of any color with a spatula and a regular sponge.

Advice! It is worth removing the grout that has fallen on the tile within a few minutes. Otherwise, it will harden and you will have to try hard to erase it without damaging the tile.
At the end of the article, your attention to the video, here you will find visual information that will help you understand the intricacies of this process in more detail.
We love the work done

How to lay out an apron in the kitchen? No more questions!
When repairs are started in the kitchen, the owners want to make it as practical and original as possible. These properties can be given to the room by a tile apron, which will protect the wall during cooking and will look very aesthetically pleasing, attracting the attention of guests.
The main material for the apron is ceramics. It has an indispensable quality: resistance to high temperatures, grease, moisture, household chemicals. Putting it on your own is quite possible if you use the appropriate recommendations. But professionals will do it faster and better.

Before proceeding with this part of the repair, you need to carefully measure everything and think over the design of the future apron for the tile kitchen in accordance with general design premises.
Watch an interesting video. The masters laid the apron in 10 minutes. Fast and clear 🙂
A little about the sizes
Tiles in the kitchen come in different sizes, for an apron it is better to take a large one - 20 * 30.
There are several nuances in determining the area of the ceramic coating.
- the height of the lower edge relative to the floor level is calculated simply: the mark is placed 5 cm below the level of the countertop;
- the top edge is 60–70 cm higher, depending on the height of the top row of furniture;
- in the place of installation of the hood, lay out the apron to the place of its contact with the wall;
- the length of the coating is better along the entire length of the countertop;
- the amount of material directly depends on the method of laying.
Standard - the most economical, for self-laying it is more advantageous. Diagonal - the most expensive due to cutting corners.
The larger the size of the tile, the faster it will be laid, because the area is reduced quickly, and there are fewer joints.
How to choose a tile?

AT construction stores The range of classic ceramics for an apron for the kitchen is very diverse. You can use the following tips:
- evaluate composition: the best option will become a plate with additional protection from chemistry marked "AA", porous and glazed;
- ask the price: ceramics cost differently, you can’t take too expensive for an apron in the kitchen, the quality is unlikely to deteriorate;
- pick up ceramic tiles a few tones lighter or darker than the color of the wallpaper or furniture, but in the same range (if you really want something unusual, you can lay out the apron with ceramics of a different color, but choose the appropriate curtains, blinds or interior items (panels, clocks, vases, dishes) ;
- emphasize on classic colors: white, beige (you can pick up vinyl stickers for them, the apron will always be new, original); such tile fit for any kitchen, the apron looks elegant;
- ask if there are ceramic tiles in the kitchen with ready decor to lay out the apron. Designers offer a lot interesting options: mosaic, plot and landscape panels, always popular clinker (imitating brickwork), ceramics with photo printing. After looking at the catalog, you can find an unexpected solution for a tile backsplash in your kitchen.
Purchase tiles in such quantity that there is enough "with a margin" in case of a breakdown.
What is needed for styling?
Having decided on the tiles, you must definitely look into other departments: at home you may not have the whole set necessary materials and tools. It is worth making sure and purchasing special glue, primer, waterproof grout and decor (if the tile is colored).
From the tools you will need:
- various spatulas (rubber, notched);
- trowel or spatula to apply glue;
- building levels (long, short) and a pencil;
- roulette.

When installing an apron, you can not do without a grinder or tile cutter, drywall fixtures, drills, remote crosses and dowels. A sponge and buckets for water and glue will come in handy.

The tile for the kitchen is selected, the apron is calculated and thought out, the materials and tools are in place. You can get to work.
How to prepare a wall?
High-quality preparation of the base will guarantee the durability of the kitchen apron. First of all, you need to properly remove the old base.

- Wallpaper. Make cuts on paper and moisten with soapy water. When the wallpaper gets wet and peels off, it is easy to remove it with a spatula. Rinse off the residue with water and let the wall dry. wooden wall it is better to process with drying oil.
- Dye. Many masters do not recommend removing paint if it lies well. "Problem" places can be cleaned and primed.
- Cables for sockets and devices. If they pass under the apron, they must be laid in strobes, recesses for which must be made in the wall. Irregularities are primed, the wire is covered with plaster.
- Cleaned surface. If it is uneven, you can use plaster, putty or drywall. After the solutions have dried, the surface is primed.
Notches are made on the leveled wall so that the glue sets better.
There might be fungus on the kitchen wall! It must be treated with a special solution!
A significant step is the marking. The bottom edge of the apron will rest on a thin wall attached to the wall. wooden block or metal profile (temporary measure). The accuracy of their location should be measured with a building level. Vertical lines that need to be drawn strictly perpendicular to the rail will help control the accuracy of the masonry.

Cooking adhesive solution carried out in accordance with the instructions.
Do not dissolve too much glue! It quickly seizes and loses its properties!
How are tiles laid out?
If the installer is a beginner, it is better to lay out the tiles for the backsplash in the basic way, that is, in rows, starting from the bottom.
Glue can be applied in two ways: on the tile itself and on the wall. Experts disagree on which one is better. The main thing is that the ceramics “sit down” well and the glue under it is distributed evenly.
And yet it is more practical and more convenient to apply the adhesive on the wall, so you can put 2-3 tiles at the same time. In this case, it is possible to apply a very thin layer of glue on them too.
You can start laying from the edge of the apron and from the middle - as it is more convenient. The first tile is the most important, and when installing it, you cannot do without a level or corner that can be temporarily installed. When laying out several pieces at the same time, the entire added fragment is checked by the level.

- apply glue to the wall with a thin spatula under an area of 2 or 3 tiles, make grooves with jagged;
- attach the tile to the wall by pressing, which should be uniform. Excess glue is deposited by tapping on the tile area. The accuracy of the installation is checked by the level.
Crosses in horizontal and vertical joints are installed to maintain the same distance between the tiles.
If there are irregularities on the wall, it is permissible to put a thicker layer of glue in this place. First, the first row is mounted. On it - all the "responsibility" for the subsequent rows. It will be better if you give it enough time to dry (during the day).
Lay out each subsequent row only after the previous one has dried!
In the places where the wires exit and the sockets are installed on the ceramics, it is necessary to make marks correctly, according to which holes will subsequently be cut. After installing 10-12 tiles, be sure to wipe the row with a rag or sponge to prevent the glue from hardening on the surface.

What and how to cut the tiles?
There is a need to cut ceramics. This can be done with a grinder or roller glass cutter. If you need to cut a lot, it is better to use a tile cutter. All actions are performed on the front side of the tile.
- Bulgarian. There will be fine dust, so a gauze bandage or respirator will not interfere. With the help of a grinder, an incision is made on the tile, after which it breaks well. Minus - uneven edges that will have to be processed with sandpaper or a file.
- Roller glass cutter. Preliminarily hold the tiles in water for 40 minutes. Draw a line along the marked line with pressure. Put the tile on the edge of the table strictly along this line. Break the tile with a sharp movement. When laying, the factory edge is attached from the side of the glued tile.
- Tile cutter. Act according to instructions.
