Except traditional use garage space for car storage with related vehicle consumables and spare parts, very often city dwellers use the basement for arranging a vegetable store and a place to save a supply of canned salads and fruits. A vegetable pit is being built in the garage with their own hands according to the same laws and rules as the foundation itself, but taking into account the specifics of storing the crop, creating the required temperature and humidity in the first place.
Requirements for arranging a vegetable pit in the garage
Equipping a reliable and convenient vegetable pit under the garage is not as easy as it might seem. Despite the many suggestions different kind craftsmen and experts, it is quite difficult to choose the best microclimate for specific vegetables, you have to check various modes ventilation, control humidity, prevent open water in the basement of the garage.
To prevent spoilage and rotting of fruits, the storage process in vegetable pit should be manageable and well balanced.
There are several ways to make a vegetable pit in the garage:
- Use the basement of the garage;
- In the inspection hole of the garage, cut a niche and a recess in the ground of the appropriate shape and size;
- Build a vegetable pit directly in the garage floor.
Advice! Before deciding how to make a vegetable pit, it is necessary to consider the issues of thermal insulation and organization of ventilation in the garage and in the vegetable store. These are the two most effective ways conservation required level moisture content in vegetables.
Vegetable pit design
A vegetable pit differs from a vegetable store only in the size of the room, the basic requirements for storing the crop are practically the same:
- The volume of the pit should correspond to the mass of the stored products. No more than 100 liters of vegetable products can be laid per 1 m 3 of space, but in reality, the larger the volume, the easier it is to store the crop;
- For a room with a volume of 1-3 m 3, storage of vegetables is ensured by natural ventilation, therefore it is important to perform proper zoning and placement of vegetable products in a pit so that stagnant zones with condensate do not form on the walls;
- The floor inside the room is recommended to be made in the form of a ladder or several segments of different heights. At sharp increase water level in this way, you can avoid getting the vegetable crates wet.
Advice! Experts recommend that the floor in the vegetable pit of the garage be made in the form of one or two channels 10-15 cm deep and wide, with side terraces the size of vegetable boxes. The direction of the channels must coincide with the lines of air flow from the supply opening to the exhaust ventilation pipe.
Thus, the main mass of heavy air will move through the channel, heat up, dry out excess moisture and, mixing with warm food breathing vegetables, be removed through the hood. Otherwise, at least three stagnant zones will form in the vegetable pit of the garage, where moisture, condensate and decay products will accumulate.
In any, even the smallest storage, zoning should be carried out according to the degree of susceptibility to low temperatures, that is, between the ventilation inlet and the diagonally located exhaust pipe, boxes with vegetables should be arranged approximately in the following sequence: carrots - cabbage - apples - potatoes.
If your garage has a deep vegetable pit, during the period of intense snowmelt or heavy rains walls can get wet in it, ground and condensing water collects at the bottom of the tank. In this case, a trap well and a drainage pump will be required.
Arrangement of a vegetable pit
When building a storage facility of any size, several basic conditions will need to be met. A niche for a vegetable pit must be dug in the place most remote from the inlet ventilation. For normal drainage, the bottom of the pit will need to be covered with a layer of rubble, compacted with the maximum available degree of compaction. The next layer of sand and waterproofing film is laid. After leveling, the floor will need to be poured with a layer of concrete.

Important! The walls in the vegetable pit of the garage must be laid out with red brickwork. ceramic brick. This is a prerequisite for successful storage of vegetables.
This solution allows you to achieve stable humidity in the vegetable pit. As the amount of water vapor increases, for example, with a decrease in the temperature of the outside air to +3°C, the water begins to intensively condense and be absorbed by the porous brick walls. With a further decrease in temperature, the air becomes less humid, so part of the capillary water in the walls is released, and the air humidity in the vegetable pit is restored.
First important condition successful storage of food in the vegetable pit is effective ventilation with a valve system that allows you to accurately control the amount of incoming air. In addition to the level of humidity, it will be necessary to regulate the second important indicator - the content of carbon dioxide in the air. Excessively strong ventilation in the garage removes condensation well, but causes the crop in the vegetable pit to intensively lose moisture and dry out. In addition, the inept use of garage ventilation valves can lead to freezing and damage to vegetable crops that are sensitive to low temperatures.

Upon completion of work in the garage, it remains to fill the bottom in the pit with a thin layer of sand, lay the boards with a gap of 20-30 mm. On that wood flooring it is necessary to install boxes, you can even lay out heads of cabbage. It is strictly forbidden to spread vegetables on the ground or sand. At the end of the storage season in the vegetable pit of the garage, disinfection must be done, sand must be removed from the bottom, and concrete surface treat with lime or mortar blue vitriol. There should be a gap of 2-3 cm between the wooden walls of the boxes with vegetables and the bottom or walls of the vegetable pit, which ensures normal air flow around.
Water removal and effective thermal insulation of the vegetable pit
The closer the structure is to the entrance gate of the garage, the faster the interior space in the pit cools in autumn and dries faster in autumn. summer period. But, the closer the pit is to the walls of the garage, the higher the risk of flooding with rain or groundwater.
Water in the vegetable storage garage will accumulate if the vegetable pit is not deep enough. For example, if the GWL in the garage area is less than 1 m, several additional measures will need to be taken, problem solving how to dry the room. Firstly, during the construction process, the soil bottom in the pit must be made with a slope towards the installation of a drainage pipe. After laying the first layer of crushed stone, two drainage pipes in the form of the letter T or L are mounted on the floor, after which geotextiles are laid, an additional layer of crushed stone is poured, followed by sand, waterproofing and concrete screed. The outlet of the drainage pipe is connected to a prefabricated water well. The well in the vegetable pit of the garage must be located 40-50 cm below the floor level. Periodically, water has to be removed by a drainage pump.

If everything is done correctly, then at any level of groundwater under the garage, the vegetable pit will be cold and waterless. Use in construction brick walls, good drainage and controlled ventilation will make the vegetable store much more efficient than a simple concrete box embedded in the ground under the foundation of the garage.
Simultaneously with solving the problem of how to dry the room, it will be necessary to solve the issue of thermal insulation and a sealed entrance hatch - a door. If this is not done, the warm, acidic fumes that break through into the garage will “eat up” your car in a few months.

How to heat a vegetable pit in the garage
In the period from late spring until the moment a new crop of vegetables is laid for storage, it is necessary to thoroughly dry the storage room under the garage. Usually, the question of how to dry the room is addressed after removing the remains of vegetables and carrying out disinfection work. Wet brick walls lose water very badly, naturally dry for a long time. Therefore, when choosing a method of how to dry the storage under the garage, they prefer forced way drainage.
You can effectively dry the room under the garage using forced ventilation. To do this, it is enough to install an exhaust electric ventilation device or use a conventional floor fan. For a day of work, such a device easily dries a room of 1-2m 3. If it is not possible to use electrical appliances in the vegetable pit under the garage, you can install a burning kerosene lamp or a candle. It is clear that in this case the entrance to the pipe will need to be finished with a layer of thermal insulation.
An important component of the device in the vegetable pit of the garage is removable thermal insulation. Most often, in order to prevent freezing of the room in especially severe frosts, the walls in the pit are trimmed with shields with sheets of expanded polystyrene. The entrance hatch or door is equipped with insulation.

Often, such measures to ensure the temperature regime in the vegetable pit of the garage are not enough, so the storage has to be heated with homemade devices. For example, effective tool is to use a few old car bulbs installed in metal box. The light emitted by the lamps does not penetrate outside, but metal surface dissipates heat well.
Conclusion
When choosing the conditions for storing crops in a vegetable pit, each garage owner is guided by his experience and knowledge of the characteristics of the soil. It is impossible to give an accurate and efficient scheme that can work with any garage device. In practice, one has to look for optimal dimensions and storage locations in the garage, test different modes ventilation work and ways to insulate a vegetable pit, so it can be used more efficiently in the second or third year after construction.
The vegetable pit has long been considered one of the most practical ways crop storage. Such a cellar can be built in a summer cottage, in a garage or even in the basement of a residential building!
The point is that it does not require additional resources(no electricity or e.g. fuel required). The freshness of grown vegetables is achieved naturally due to the appropriate conditions. Let's look at the main types of vegetable pits, the construction process and alternatives.
Vegetable pit, the construction of which is completed
The process of building a vegetable pit
Building a vegetable pit is quite a difficult task, so we recommend that you think over all the details and analyze all the options several times. You may need to hire specially trained people! Below is a list of the main work that is necessary for the construction of a vegetable pit.
Step 1. Preparatory work
If you have special knowledge and skills, and you want to build a vegetable pit yourself, then start the process with preparatory work. The most difficult part is choosing a place, because it must meet all the requirements, otherwise the vegetable pit will not work.
- First, the soil must be suitable. To study this issue, you will need the help of specialists. With the help of instruments, a detailed assessment of the soil will be made (its features are revealed), they will also establish the level at which groundwater is located, because they may not allow building a vegetable pit. Don't ignore this stage because all your efforts will be in vain if the pit is flooded. Waterproofing, of course, will give an effect, but over time, water will still find a way to get into your storage.
- Second, check the schema engineering communications. If you are building a vegetable pit in the city, then you need to check for the presence of a pipeline, gas pipeline, or even electrical cables under the place where you planned to work.
- Third, consult with a specialist about your project. This consultation will not cost big money, but it will help you avoid ridiculous mistakes.
Step 2. Digging a pit
You must strictly follow the project, which must be drawn up in advance, the only way to achieve the result. Constant edits and changes in any parameters can only lead to terrible results. If for some reason you cannot do this work yourself, then hire a special team that will do the job in a few hours.

The process of digging a pit
Step 3. Arrangement of the floor
When the pit required sizes will be dug out, you can proceed to create the floor. The best option would be to create a layer of crushed stone and sand, which is subsequently filled with bitumen. You also need waterproofing and thermal insulation, because sudden changes in temperature will cause vegetables to rot, and constant moisture will give exactly the same effect!
Unfortunately, not everyone has the opportunity to create such a floor. by the most budget option is the floor of the boards, but do not forget about heat and waterproofing!
Step 4. Arrangement of walls and ceiling
Now let's move on to the more difficult part, you need to equip the walls and ceiling. We recommend using brick for this, concrete is a better option, but for this you will have to use special formwork. Brick will greatly facilitate the work.
Step 5. Organization of ventilation
So we come to the difficult part, because for the safety of vegetables it is necessary to create a special microclimate, which is achieved by properly organized ventilation. Most likely, you will need the help of specialists to resolve this issue. If this is not possible, then simply lower two pipes into the vegetable pit, which will help to carry out at least some kind of air circulation. Cover the ends of the pipes with special nets to protect against pests.
Step 6. Installing shelving and finishing work
Since most vegetable pits have small size, it is necessary to use the whole place wisely. Install shelving around the edges, and leave room for a manhole in the center. Your task is to organize everything so that acceptable conditions for storing vegetables are maintained.

Vegetable pit, the construction of which is completed.
Alternative option - plastic cellar
As you could understand, the construction of a vegetable pit is a problematic process, you need to calculate a lot, carry out complex work. Fortunately, technology does not stand still, you can purchase a special one that does not need additional works, it only needs to be placed in the ground. Here are the main advantages of a plastic cellar:
- lower requirements. Yes, before installing a plastic cellar, you also need to check the soil for any communications. Rest preparatory work not required. Of course, there are soils that are definitely not suitable for storing vegetables, but the land requirements are greatly reduced!
- Turnkey vegetable store. When buying a plastic cellar for storing vegetables, you can be sure that it is ready for use. It only needs to be placed underground! All racks and manhole are included!
- Price. Yes, a plastic cellar, of course, cannot be called cheap, but the total amount that is needed to create a vegetable pit ( Construction Materials, payment for services of workers and other expenses), still more!

Plastic cellar.

High-tech plastic cellar.
About vegetable pits in a century modern technologies can be forgotten, since they were replaced by latest equipment. You can buy a high-quality plastic cellar that will fulfill all your requirements.
Each locality builds different storage for vegetables. Basically, these are underground structures that allow you to maintain an almost constant temperature and humidity throughout the entire storage period without any additional technical means. I will present my design potato storage pits and vegetables, built in the late 90s.
Conceived potato pit in the standard version, mainly for storing potatoes for one family.
This determines the basic size of the pit, since a family of 4-5 people needs a supply of potatoes of 50-60 buckets plus 10-15 buckets for seeds. As a rule, two compartments for potatoes are organized inside such a pit for food, as well as separate places for seed potatoes. More separate place for 8-10 buckets, I allocate carrots for storage, beets can be covered with potatoes, they do not interfere with each other. Radishes and turnips must be stored separately, they are more prone to rotting and can spoil the product with which they lie. On the top of the pit on side supports made of fifty-fifty boards, shelves are laid in two rows - blanks in glass jars are stored there.
Based on the above considerations (well, we looked at what and like the rest of the people) the size of 210 by 190 centimeters was chosen. vertical walls It was decided to build the pits (or the main frame) from silicate bricks with a wall thickness of half a brick. Previously, such a log house in our area was always made of roundwood, and he stood in the ground for up to thirty years, or even more. The brick, of course, does not rot at all, and the thickness of the wall in half a brick, as practice shows, is quite enough. When laying walls after 3-4 rows, it is good to lay steel wire in the seam, it gives additional strength. The height of the pit is usually made slightly higher than a person's height, on average, from 180 to 200 cm. For laying the walls, 600 pieces of silicate brick (one pallet) and 3 bags of cement for the ceiling were bought.
The ceiling in the old days was also made of wood, or round timber, or timber. It is more convenient to lay the beam, fewer cracks are obtained. The pit breathes through the wood, less dampness. wooden ceiling costs from 7 to 10 years, then it must be changed. It's busy and difficult.
Therefore, I decided to fill the ceiling with concrete, and use a 50mm board as a substrate for reinforced concrete.
Usually the construction of a potato pit is carried out as follows:
On a selected high dry empty place, a pit is dug about three meters deep with dimensions at the bottom of the pit for a log house. The slope of the walls of the pit is done based on the soil. If it’s clay, you can make vertical walls, if it’s sand, then you need to set it down, otherwise they will collapse. A dry and high place is chosen so that there is no groundwater for the entire depth of the pit, and riding water does not flow in the spring.
Then a log house is laid (wooden or brick - Fig. 1), it is allowed to stand, and it can be covered with earth from the outside. Additional moisture insulation is not required. The log house is laid directly on the ground; cement floors and screeds are usually not made. Need for cement floor occurs if shrews pass under the wall, but this is very rare. By the way, for many years I have been putting potatoes in a hole right on the ground, he does not suffer from this at all, but he must be separated from the brick walls with boards, otherwise he will sweat and may rot.
Further, a hatch is built in the pit and the ceiling is laid. For the device of the hatch, a floor beam is required (Fig. 2.). The beam must be strong and not rot. Usually, either a reinforced concrete attachment for supports, or a piece of rail, or something similar is suitable.  The hatch is also made in the form wooden frame or again brick. The height of the hatch depends on the thickness of the backfill above the ceiling of the pit. Standard Thickness backfill 60-100cm if special thermal insulation materials, the thickness can be reduced.
After filling the pit with soil, a utility shed is usually built on top of it. In such a shed, shovels, buckets, bags, almost all the equipment for processing the site are usually stored, and in the fall the potatoes are scattered to dry.
AT harsh winters the walls in the pit should not freeze more than 2 bricks from the ceiling, otherwise the temperature will drop below zero degrees, and the potatoes may freeze. Since the cold air inside the pit comes from the ceiling, and geothermal heat comes from below, covering the potatoes with straw or moss on top can prevent freezing. Again, if the ceiling does not freeze, there is more moisture in the pit that can drip from the ceiling.
To make a brick hatch in the corner of the pit, I needed two beams - one transverse and one short longitudinal. Directly on them we lay out about half the height of the manhole on the solution so that the ceiling can be poured. The ceiling was covered with boards. It is advisable to impregnate the boards with an antiseptic. On top of the boards put transverse steel corners from old greenhouse so that the ends go to brickwork, and on top of them are nets from old unnecessary beds. It turned out steel reinforcement, which was then filled with a solution about 20 cm thick, it turned out reliably and firmly.
The boards on the ceiling have rotted a little in ten years - they are not impregnated with me, but still quite strong. In the long term, the reinforced concrete ceiling slab should gradually settle through rotten boards directly onto the brick walls, but so far nothing has been observed.
Opposite the hatch in the opposite street, I inserted a vertical asbestos-cement pipe with a diameter of 200 mm for ventilation, for one season I even dried the pit with a window fan in hot weather, quite effectively. But I liked to dry the pit in the usual old-fashioned way, kindling a fire in the basin. The pit dries and disinfects at the same time.  After the ceiling has hardened, you can report the hatch to the right sizes. Having estimated a little that it would be more convenient to go down into the pit if there was another step along the height of the hatch, I laid it out directly from brick, while the upper hatch turned out not to be square, but rectangular, about 80 cm by 100 cm in size (lower hatch 80 cm by 80 cm). As long-term practice has shown, this is a wise decision. Walking up and down with the presence of such a step is much more convenient and safer (Fig. 3). The ladder is assembled from the same board with a thickness of 50mm, with the expectation that it would be convenient to go down and up.
I had to build a hole in the yard with existing buildings, so it was decided to make it right inside the utility shed. To do this, one wall of the shed had to be dismantled, and the pit had to be dug manually, throwing the soil in one direction, separating it with a wooden shield. Then extra soil (I have White sand) was used as a large sandbox for little son, later became the basis of a multi-tiered flower bed like a slide.  On the ceiling slab I put a thin substrate of glass wool and covered everything with sand. To close the hatch, two wooden shield, the top level with the floor in the barn, is actually part of it. For the winter, two mattresses are placed between the shields; in severe frosts, you can put a couple of bags of sawdust between them. Since the barn is equipped with electricity, there is no problem with the light in the pit.
To control the temperature inside, an ordinary room thermometer is suspended. Since I go to the pit for vegetables all year round, even in the most severe frosts, then there is a need for a little heating after going for potatoes. To do this, I simply throw the carrying lamp on the sandy floor, close it with an iron bucket and turn it on for a couple of hours after closing the pit. This is quite enough to normalize the temperature.  For the first couple of years, to control the temperature regime for storing vegetables, I built a remote electronic heat stabilizer with a thermometer, the sensor and heater of which were in the pit, and the electronic unit was at home. You could always see what the temperature was. The minimum was set at which the heating was turned on. The system is interesting and useful, but practice has shown that with a normal pit design, the temperature is stable on its own. Currently, if you wish, you can buy an electronic thermometer with a sensor on a wire in any store, and put it anywhere.
The operation of the pit is as follows:
Before filling vegetables in late August - early September, the pit is cleaned, dried, and disinfected. All boards for compartments are dried in the sun. In autumn, while harvesting vegetables and loading them into the pit, it stands open with a safety net in the hatch so that the mice do not jump off. The first time after harvesting, vegetables emit a lot of moisture, it should disappear. Potatoes after digging are usually put in a barn for a couple of weeks to dry out, then they are sorted and lowered into a pit. The temperature inside the pit slowly starts to drop as the nights get colder. At the first frost, when the temperature in the pit drops to 4-5 degrees, it can be closed. The first time you need to control more often temperature regime, because due to internal heat when closing, there may be a run-out of temperature, which leads to the germination of vegetables, especially carrots. After the temperature stabilizes at about 3-4 degrees, the hatch can be closed and the ventilation too. When closing the ventilation, it is necessary to clog it both at the bottom and at the top of the pipe, if this is not done, there may be intense condensate or frost.  Banks with blanks are placed on the shelves. It is good to close them from above with a sheet of waterproof material such as foam, so the covers rust less.
I hang fresh cabbage for storage within 15 heads by the stalk on rope loops to a wire stretched under the ceiling of the pit. In this position, they are fresh until spring. I specially choose such heads of cabbage immediately in the garden, carefully pull them out with roots from the ground, chop the root from the ground with a log, cut off large extra leaves and hang them in a hole. When backfilling, I liked to shift the carrots with green dried moss, but it lies well in the pit and in the sand and just like that.
I fall asleep potatoes in notches right on the ground, but I separate them from brick walls with boards. Backfill height - up to 80cm. Actually, I dry the potatoes after digging in the sun for a couple of hours and immediately put them in the pit. It is clean, dry on sandy soil and almost does not rot. For the winter, I don’t close the potatoes in the pit, almost no drips from the ceiling, and the temperature in winter is about zero, the potatoes do not germinate in the pit until July.  In the spring I don’t open the hole, I keep it low temperature all summer, while we use vegetables, until drying.
When visiting the pit during the period when it is permanently closed, it is necessary to follow the appropriate safety rules, especially during the first visits if the pit has been closed for the winter. Carbon dioxide can accumulate in the pit. Therefore, before the first visit, it is necessary to ventilate the pit, for this, open the hatch and ventilation pipe and leave for a couple of hours. If you put a window fan on the pipe, you can ventilate in minutes. If gas accumulation is suspected, a visit to the pit must be made by two, and one person must remain at the top.
With regular visits and with a good staircase for entry and exit, you can go into the pit alone. Interestingly, in some potato pits, gases appear constantly (in the spring), and in some they do not happen at all. It depends on the design and on the depth and, possibly, on the type of soil. In my pit, for many years of operation, no accumulation of gases was noticed, for example, a slight smell of carbon dioxide.
To connect plumbing fixtures to the water supply network, a flexible water supply is used. It is in demand when connecting faucets, showers, toilets and other points of water intake, and greatly simplifies the installation process. Flexible piping is also used during installation gas equipment. It differs from similar devices for water in manufacturing technology and special requirements security.
Characteristics and types
Flexible plumbing connection is a hose different lengths Made from non-toxic synthetic rubber. Due to the elasticity and softness of the material, it easily takes the desired position and allows installation in hard-to-reach places. To protect the flexible hose, the upper reinforcing layer is designed in the form of a braid, which is made of the following materials:
- aluminum. Such models withstand no more than +80 ° C and retain functionality for 3 years. At high humidity aluminum braid is prone to rust.
- Of stainless steel. Thanks to this reinforcing layer, the service life of the flexible water supply is at least 10 years, and the maximum temperature of the transported medium is +95 °C.
- Nylon. Such a braid is used for the manufacture of reinforced models that can withstand temperatures up to +110 ° C and are designed for intensive use for 15 years.
Nut-nut and nut-nipple pairs are used as fasteners, which are made of brass or stainless steel. Attachments with different indicators allowable temperature vary in braid color. Blue are used to connect to a pipeline with cold water, and red - with hot.
When choosing a water supply, you need to pay attention to its elasticity, reliability of fasteners and purpose. It is also mandatory to have a certificate that excludes the release of toxic components by rubber during operation.
Features of gas connections
When connected gas stoves, speakers and other types of equipment also use flexible piping. Unlike models for water, they are yellow and are not tested for environmental safety. For fixing, end steel or aluminum fittings are used. There are the following types of devices for connecting gas appliances:
- PVC hoses reinforced with polyester thread;
- synthetic rubber with stainless steel braid;
- bellows, made in the form of a corrugated stainless steel tube.

Holding "Santekhkomplekt" offers engineering equipment, fittings, plumbing and fixtures for its connection to communications. The range is represented by products and materials of well-known foreign and domestic manufacturers. Discounts apply for bulk purchases, and product quality is confirmed by standard certificates. For information support and assistance, a personal manager is assigned to each client. The ability to arrange delivery within Moscow and to other regions of the Russian Federation allows you to quickly receive the purchased goods without any hassle.
Drainage is a hydro-reclamation measure to remove excess groundwater.
If water does not leave the territory of the site for a long time, soil gleying occurs, if shrubs and trees quickly disappear (wet), it is urgent to take measures and drain the site.

Reasons for waterlogging the soil
There are several reasons for waterlogged soils:
- clay heavy soil structure with poor water permeability;
- an aquiclude in the form of gray-green and red-brown clays is located close to the surface;
- high occurrence of groundwater;
- technogenic factors (construction of roads, pipelines, various facilities) that impede natural drainage;
- violation of the water balance by the construction of irrigation systems;
- the landscape area is located in a lowland, a beam, a hollow. In this case, precipitation and water inflow from higher places play an important role.
What causes excess moisture in the soil
You can see the results of this phenomenon yourself - trees and shrubs are dying. Why is this happening?
- the oxygen content in the soil decreases and the content of carbon dioxide increases, which leads to a violation of the processes of air exchange, water regime and nutrition in the soil;
- oxygen starvation of the root-forming layer occurs, which leads to the death of plant roots;
- the intake of macro and microelements by plants (nitrogen, phosphorus, potassium, etc.) is disrupted, because excess water washes out mobile forms of elements from the soil, and they become inaccessible for assimilation;
- there is an intensive breakdown of proteins and, accordingly, the processes of decay are activated.
Plants can tell at what level groundwater occurs
Take a close look at the flora in your area. The species inhabiting it will tell you at what depth the groundwater layers are located:
- top water - in this place it is best to dig a reservoir;
- at a depth of up to 0.5 m - grow marigold, horsetail, varieties of sedge - blister, holly, fox, Langsdorf reed grass;
- at a depth of 0.5 m to 1 m - meadowsweet, canary grass,;
- from 1 m to 1.5 m - favorable conditions for meadow fescue, bluegrass, mouse pea, rank;
- from 1.5 m - wheatgrass, clover, wormwood, plantain.
What is important to know when planning site drainage
Each group of plants has its own moisture needs:
- at a depth of groundwater from 0.5 to 1 m can grow on high beds vegetables and flowers of the same year;
- the depth of the water reservoir up to 1.5 m is well tolerated vegetable crops, cereals, annuals and perennials (flowers), decorative and fruit bushes, trees on a dwarf rootstock;
- if groundwater at a depth of more than 2 m, you can grow fruit trees;
- optimal groundwater depth for Agriculture- from 3.5 m.
Do you need site drainage?
Record your observations at least for a while. You yourself will be able to understand how much drainage is needed.
Maybe it makes sense to simply redirect melt and sediment water along a bypass channel, and not let it flow through your site?
Perhaps it is necessary to design and equip a storm drain and improve the composition of the soil, and will this be enough?
Or is it worth it drainage system only for fruit and ornamental trees?
The exact answer will be given to you by a specialist, whom we strongly recommend calling. But after reading this article, you will gain some awareness in this matter.
Upon completion of the technological and production tasks associated with the arrangement sewer system in apartment building, production building, as well as in private households, it is required to test the system involved using the forced spill method. This task used to detect possible defects or incorrect installation of the entire involved sewer part and the act of testing systems internal sewerage and drains will be material evidence of work on the acceptance of the facility.

Visual inspection should be accompanied by entering into the act of testing internal sewerage and drain systems according to SNIP, which is currently represented by the current regulation of the appendix of the D series, which corresponds to SP 73.13330.2012 "Internal sanitary systems of the building", recently a new one has been applied updated working version according to SNiP 3.05.01-85.
The vegetable pit is intended for storage of vegetables and fruit. It is not difficult to build it with your own hands. Important criteria for crop conservation are dryness and good air exchange. Creating conditions for a good microclimate, it is necessary to be wary of sudden changes in temperature. Ventilation in the vegetable pit will help to avoid unpleasant odors and stale air, as well as mold fungi.
Natural ventilation in the vegetable pit
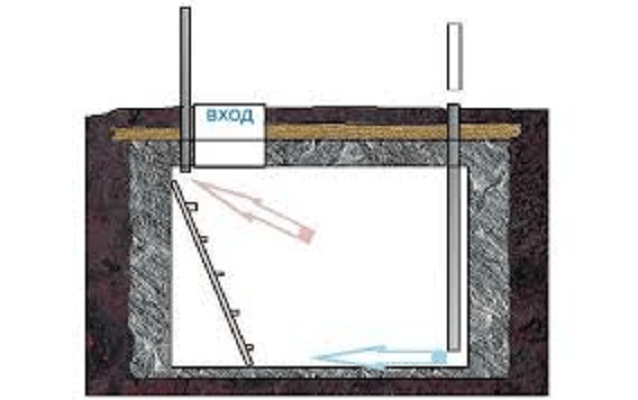
A vegetable pit can be built in a garage or on the street. If it is located in the garage, then it will certainly be divided by a partition with viewing hole. However, wherever it is built, it is necessary to think over the ventilation system. An important point is the material from which it was equipped. It could be:
- wood;
- concrete plates;
- brick.
quality natural ventilation vegetable pits largely depends on the insulation of the room.
Important! Metal should not be used as a material for decorating a vegetable pit. AT winter period it will be difficult to achieve the desired temperature indoors. So, in any case, corrosion processes will occur.
by the most simple option if the pit is located on the street, there may be an installation of two air ducts of the same cross-sectional diameter. They should be equipped in opposite corners. The ventilation duct for air supply is mounted at a distance of 0.2 m from the floor. This duct will pass through the ceiling. Outside, the pipe should rise above the ground by at least 0.2 m. The exhaust pipe is mounted under the ceiling in the ceiling. It is brought out as high as possible from the ceiling surface.
Important! The choice of a particular ventilation system is influenced by the area of \u200b\u200bthe vegetable pit.
Due to the inflow and outflow of air through the ventilation ducts, natural air circulation will be carried out. It is based on the pressure difference between inside and outside the room. If there are severe frosts on the street in winter, then the ventilation is blocked with the help of dampers.
The only negative natural air exchange, is the dependence on weather conditions. In the warm season, the air can stagnate due to the lack of normal draft. Another important point is the protection of ventilation pipes from pests and precipitation. In the first option, you can use a grid, in the second, a special umbrella made of metal or plastic.
Forced ventilation of the vegetable pit

If the vegetable pit is located in the garage, it is worth giving preference to forced air exchange. The arrangement of such ventilation involves the installation of not only air ducts, but also fans.
Important! The disadvantage of forced ventilation is its dependence on electricity.
Device Algorithm
- An air duct is installed near the ceiling of the pit to remove air. The end of this pipe should be 0.5 m above the roof level of the garage.
- At the very bottom of the vegetable pit, at a distance of 10 cm from the floor, a supply veterinary duct is installed. It extends 0.25 cm outside, connects to the elbow at a 90° angle and exits through the wall at the bottom of the building to the street.
- With forced ventilation, this circuit is enhanced by fans. Performance mechanical devices should correspond to the volume of the ventilated room.
- good option, there may be a combination of natural and forced systems air exchange. To do this, an exhaust fan is mounted in the ventilation duct designed to remove air. It creates an air vortex, forcibly expelling air currents from the vegetable pit. Therefore, while providing an influx of fresh air from the supply ventilation duct.
Important! Forced ventilation does not depend on the season, it provides the necessary air circulation all year round. A good option is to automate the ventilation system, for this you need to purchase a controller. Fans will turn on and off according to the set parameters.
Technical features of ventilation ducts

When designing ventilation, it is necessary to decide from what material the ventilation pipe is to be installed. It can be:
- metal pipes;
- PVC pipes;
- asbestos pipes.
The options for metal ventilation ducts are varied. It can be stainless steel, galvanized steel, aluminum.
Stainless steel channels
Pipes from stainless steel well transfer temperature drops, are not exposed to corrosion, strong, fire-resistant. Therefore, by mounting such an air duct, you can secure ventilation system from the growth of fungi and mold in it.
Galvanized pipes
Air ducts made of galvanized steel withstand temperatures up to +85 C°, resistant to moderate air humidity - up to 60%. Relatively light in weight, so no additional effort is required when installing the ventilation duct. They are often installed in dry rooms with ventilation equipment.
aluminum pipes
They are semi-rigid and flexible. They are made from aluminum foil, the thickness of which is 0.08-012 mm. They can be easily bent. Heat-resistant, withstand + 135 C ° flexible, and rigid air ducts can withstand temperatures up to + 300 C °. Semi-rigid air ducts according to all characteristics can be installed outdoors.
Asbestos ducts
Asbestos-cement pipe can reach 5 m in length. Section diameter in the range from 100 to 500 mm. They are classified into pressure and non-pressure. Pipes can withstand temperatures of + 300 C°. They absorb condensation. Such air ducts are not subject to corrosion, but they are very fragile. There is a version that asbestos is harmful to health (directive 1999/77/EC on the prohibition of the use of asbestos).
PVC pipes
PVC ventilation ducts are often used for arranging ventilation in residential and utility rooms. Pipes withstand temperatures - 30 C ° to +70 C °. The smooth inner surface of the inner part creates a low dynamic resistance during the passage of air currents. Pipes are resistant to moisture. The range of cross-sectional diameters and lengths of air ducts is very wide.
Condensation: causes and effects

Condensation in a vegetable pit is a danger to humans
How to make ventilation in a vegetable pit so that condensation does not occur in the room during demi-season periods. Indeed, due to its formation, not only air ducts can collapse, but also the wet walls of the vegetable pit can collapse. To protect yourself, you need to insulate the ventilation pipe. Ideally all the way. If this is not possible, thermal insulation is carried out only in the area from ceiling and up to the umbrella equipped at the end of the duct. At proper insulation, the life of the ventilation duct will increase, plus condensate will also be removed.
Do not forget about the insulation of the walls of the vegetable pit, because this factor also prevents the formation of condensate. This can be done with polyurethane foam. It helps to achieve complete sealing of the pit. It is a foamy consistency. It freezes upon contact with the surface. Does not form seams and joints, retains its properties up to 50 years.
Proper ventilation contributes to the preservation of vegetables in the autumn-spring period. In order for air exchange to be carried out as expected, you need to know that its multiplicity in the garage and other outbuildings must comply with the norms of SNiP and be equal to 180 m3 / per 1 hour.
n - the frequency of air exchange of this room
V is the volume of the vegetable pit, expressed in m3.
L is the air flow.
After all the work done, it is worth testing the ventilation system - check the draft with a piece of paper.