Dismantle the split system, consisting of an external and indoor unit, more difficult than a monobloc air conditioner. The main nuance lies in the closed refrigerant circulation circuit, which must be depressurized when removed.
Is it advisable to do this work on your own or is it better to entrust it to professionals? What is the technology for dismantling the air conditioner? The answers to these questions are described in the article.
Dismantling the split system: the pros and cons of self-removing the air conditioner
As a rule, the main reason for removing the air conditioner is moving or replacing an obsolete device with a new one. When changing your place of residence or office, you do not want to leave the split system purchased for your own money to the new owners. In this case, you can invite a team of specialists to dismantle the air conditioner or try to do this work yourself.

Professional installers will dismantle air conditioners (split systems) in 15 minutes, but you will have to pay for such speed and a guarantee that the device will not fail. The pricing policy depends on the power of the equipment: the removal of an apartment air conditioner will cost 2500-4000 rubles, a large office split system - up to 10000 rubles. The cost of dismantling the built-in suspended ceiling or cassette "conder" increases by 5-15%.
In principle, a person who is familiar with the technical topic and shared device air conditioner, it will be, more or less, clear how to unscrew the fittings, pump out the refrigerant, disconnect communications, remove the split system blocks and pack the elements in boxes. However, not all so simple. There are some risks to be aware of:

Important! No one can give a 100% guarantee for the safety of the uninterrupted operation of the air conditioner after its dismantling. The risk of dismantling / installing a split system in an unusable condition is quite high.
If the above arguments are not enough and the desire to remove the device on your own has not disappeared, then you need to familiarize yourself with the device of the air conditioner and understand the technology of its dismantling.
Air conditioner device
50% of the success of its removal depends on understanding the operation of the split system. A modern split system consists of outdoor and indoor units, each of which contains a set of relevant equipment and performs its function.
The outdoor unit includes the following components:
- heat exchanger - condenser;
- a fan that drives air through the heat exchanger;
- a compressor that pressurizes;
- dryer, connecting copper tubes and expansion valve;
- electrical elements (powered from the mains) and automation equipment.
The indoor unit of the air conditioner contains:
- heat exchanger - evaporator with fan;
- shutters directing the air flow;
- filter elements;
- container for collecting condensate.

The blocks are interconnected by two lines for the coolant. In a large pipe, the coolant moves in the form of a gas, and in a pipe with a smaller diameter - in a liquid state.
The general principle of operation of air conditioners: The compressor works with freon vapor. When turned on, the refrigerant vapors heat up and enter the outdoor unit where heat is transferred to the radiator. Then the refrigerant returns to the indoor unit, absorbs heat from the house, heats up and transfers heat to the radiator. Thus, there is a cyclical work.
Important! greatest danger undergoes deformation during dismantling Vacuum pump compressor. Even minor damage to the pump reduces the performance of the split system - dust, scratches, foreign objects and dirt can cause the performance of the air conditioner to decrease.
Do-it-yourself dismantling of a split system: a sequence of actions
Required Tools
When servicing the split system and dismantling it, it is important to follow the basic safety rules: work with an assistant and use safety equipment.

To remove the apartment air conditioner, you need to stock up on the following tools:
- open-end wrenches;
- wrenches;
- socket wrenches with ratchet;
- screwdriver PH2;
- side cutters;
- construction knife;
- a set of hexagons;
- screwdriver;
- pipe cutter;
- manometric manifold.
Refrigerant removal
Before removing the air conditioner, it is necessary to “overtake” the refrigerant:
- Turn on the air conditioner in cooling mode, set the lowest temperature mode on the remote control.
- Find two valves on the outdoor unit of the split system different sizes and unscrew the plugs with a wrench.
- After starting the compressor with a hexagon, close the smaller valve. Connect the gauge manifold directly to the larger valve.
- Monitor the pressure drop on the pressure gauge. As soon as the arrow drops below zero, tighten the large valve.

After completing these steps, turn off the air conditioner - now all the refrigerant is discharged to the outdoor unit. The next step is to disconnect the wire from outdoor unit.
Disconnecting communications
Sequencing:
- Unscrew the tube smaller. As a rule, this process does not cause any difficulties.
- Unscrew the large tube carefully, applying little effort so as not to strip the thread.
- After turning off the freon pipeline, close the valves with plugs - this will protect the external unit of the air conditioner from moisture and debris getting inside. In the absence of special plugs, you can use ordinary electrical tape.
- Disconnect electrical communications.

Removing the outdoor and indoor unit of the air conditioner
Unscrew the outdoor unit of the split system from the horizontal brackets. Usually the outer part of the air conditioner is screwed with four bolts M8, M6 or M10. After the bolts are loosened, remove the outer casing and set aside. Outside, on the facade of the building, only a freon drain should remain, which has not yet been removed.
The next step is to dismantle the indoor unit of the split system. To an inexperienced specialist, the removal process from the side will seem simple: disconnect from the wall and unfasten the tubes. In fact, in order to correctly dismantle this part of the air conditioner, you must follow the recommended procedure:

The old freon line remained on the facade of the building. For further installation of the split system, you will need nuts from the freon pipe - they must be unscrewed from the pipe.
Important! During the transportation inner part the air conditioner can be located in any position, and the outdoor unit - only as it is installed on the brackets, that is, only upside down and down with legs.
Features of dismantling air conditioners of various types
Above was the procedure for dismantling the wall-mounted split system with your own hands - in fact, domestic air conditioner. The situation is more complicated with the removal of the channel split system - the device is very heavy, and its dismantling requires disconnecting the air ducts from the blocks.
The work order is as follows:
- Remove supply and exhaust adapters with grille.
- Disconnect the air ducts from the indoor unit - unscrew the screws or remove the clamps (depending on the model of the air conditioner).
- Inject freon into the outdoor unit.
- Continue the removal according to the described scheme for dismantling the wall-mounted device.

The column split system is removed in the same sequence as the wall split system according to the scheme:
- Freon pressure control and pumping.
- Disconnecting connecting lines and removing the outdoor unit.
- Disconnecting the communications of the indoor unit and dismantling it.
The indoor column unit does not have a mounting plate or fastening studs (like a console, cassette), so the dismantling process is somewhat simplified.
The removal of the cassette split system occurs according to the channel scheme. The dismantling of the indoor module begins with loosening the fastening nuts and sequentially disconnecting the communications. The difference from the channel split system is that the cassette split system does not have air ducts.
The internal fastening of the console (floor-ceiling) occurs with the help of studs - this point must be taken into account when disconnecting the unit from the wall or ceiling. Otherwise, the dismantling process is similar to the removal of a wall-mounted air conditioner.
Important! It is impossible to dismantle the split system in rainy or snowy weather. Moisture trapped inside will damage the compressor.

- When disconnecting wires, tubes, it is advisable to mark their ends and additionally draw a connection diagram. If reassembly is not performed immediately after dismantling, then there is a risk of forgetting the order of their fastening.
- Violation of the dismantling rules can lead to pumping out freon. The cost of pumping refrigerant and repairing a split system can be more expensive than calling a specialist for a qualified removal of an air conditioner.
- Transportation of the split system must be carried out with extreme caution. The most susceptible and vulnerable part of the system is the vacuum pump. It will be expensive to repair or replace.
- Dismantling the indoor unit is best done by three people. Two hold, one unscrews communications, etc.
- When removing the indoor unit, it is most difficult to get to the latches. Often you have to remove the cover of the evaporator. For lack of special tools, some get out of the situation using a Phillips screwdriver and pliers.
Split system dismantling: video
Sooner or later, any user of a household air conditioner is faced with an unpleasant problem - after turning on the split system, a cool breeze bursts out of the blow hole, filled with the sweet smell of stagnant mold.
This says only one thing - it's time to carry out maintenance on your split, or rather, wash it thoroughly.
Here you can do it in two ways - call the master and part with a certain amount of money, or rely on own forces and disassemble the air conditioner yourself.
This manual for disassembling the indoor unit of the split system (using the example Toshiba RAS-07EKH) will also help those who are faced with the problem of a breakdown of the air conditioner and are eager to fix it on their own.
And the last thing - the disassembly algorithm is typical, and is suitable for most modern split systems.
What you need
Yes, in general, a little. Several plus and minus screwdrivers of different diameters and (for some models) a set of hex sprockets.

If you have stocked up with such a simple arsenal, it's time to start!
And in order to finally dispel the last doubts, I clarify - in the process of all the operations described below, the indoor unit of the split system is not removed from the wall, copper track does not disconnect, freon does not merge.
Let's start cleaning the air conditioner!
Disassembly process
First things first, de-energize the air conditioner and remove the protective filters of the indoor unit. This process is detailed in the manual for any split.
Now you need to remove the front panel. We unscrew the two screws under the protective plugs,

and pull the frame towards you (two latches hold it on top).
The inside of the lid is covered in dust and mold, it belongs in the sink.

Now remove the airflow direction blade. To do this, you need to apply a little force and remove it from the grooves.

We get such a picture.


Now disconnect all electrical wiring, remembering to write down the location of the wires.

If you are too lazy to write, and your knowledge of radio engineering is worthy of respect, when reassembling, you can use the electrical circuit located on inside front cover.

Be sure to disconnect the ground wires before removing the card from the slot.

Now we press the mounting brackets,

and take out the housing of the electronic unit together with the transformer.

Depress the three support latches and carefully dismantle the drain together with the outlet hose.

Look at those awful brown spots.

The blow hole of the indoor unit, as well as the fan blades, are also covered with a disgusting coating that exudes a stench.

But let's continue
Loosen the motor support bolt

very carefully lift the radiator and remove the motor support,

after which we take out the blade together with the engine from the cell.

The radiator is carefully laid back so that it does not fall.

It is not easy to remove the thermal lock of the motor pulley mounting bolt.

In order not to burn the energy-transmitting rubber element, gently heat the head of the bolt with a thin soldering iron, periodically trying to unscrew it. I got it on the third try.
When the blade is separated from the motor, all dirty elements should go to the sink.

A bottle of Feri, a long-bristled brush and a powerful jet from the shower hose will help you get rid of annoying mold.
Assembly is carried out in reverse order.
Conclusion
As you can see, the design of the indoor unit of a household split system is quite simple, if not primitive.
Therefore, if your hands grow from the right place, and the purse does not break from the abundance of excessive freaks, it is quite possible to service your favorite air conditioner on your own ...
Regular maintenance of the air conditioner requires disassembly of its indoor and outdoor unit. This is necessary when replacing parts of the split system and its complete cleaning. It is worth understanding the features of the process and the consequences of improper disassembly.
How to remove the indoor unit
To remove the indoor unit of any type of air conditioner, you need to snap off the bottom clips. For most devices, they are located below and are indicated by arrows or serifs. Clip types:
- The hook for the wall plate is made from above. In these cases, the clips are pressed upwards.
- Bottom plate hook. In such devices, there are additional holes at the bottom. Fasteners are pulled down from the block.
- clips under decorative cover. First, remove the cover, and then squeeze the fasteners.
The removed indoor air conditioner module is easier to disassemble.
Dismantling the indoor unit of the air conditioner
You can disassemble the indoor unit of the split system after disconnecting the device from the network. Then open the housing cover and take out the filters. The next step is to remove the case:
- Any air conditioner has self-tapping screws at the bottom, which are easy to find under the plugs. They need to be unscrewed.
- Under the cover behind which the filters are located, there may also be self-tapping screws or latches. After unscrewing them, you can slightly open the lower housing element.
- The next task is to release the latches located at the top of the case. They are quite rigid, to detach them you need to find out the features of the fastening. Most often, they can be unlocked by pulling the bottom of the case towards you and up.
- It remains to disconnect all the wires, if any.
- Unscrew and release left side radiator from the body of the device.
- Unscrew the fastening on the right in the shaft itself by a few turns. This screw is often heavily tightened, so it is important to be careful not to damage the head of the fastener and break the blades.
- Remove the shaft from the bottom of the housing, taking care of the safety of the parts. Since the fan is often installed quite tightly, to remove it, you need great experience. The screw can be held with a screwdriver while pushing the shaft.
- Remove the control unit from the housing. This will require disconnecting all wires and sensors. Then the latches are disconnected and the screws securing the control unit are unscrewed.
- Loosen all motor fasteners. Detach the shroud from the shaft.
- Carefully study how the shaft is disconnected from the motor. Carefully bend the copper tubes that go to the radiator.
Having slightly opened the blinds, it is easy to remove the case by pulling it towards you.
The next step is to remove drainage tank. Some models are made monolithic, so they will not be able to separate the tray from the body. It is important to understand the features of its installation in order to correctly install it in place during assembly.
It is recommended to prepare a container for condensate from the tray. To disassemble the container, it is enough to unscrew one screw, and then disconnect the clips at the bottom. From the tray it is necessary to disconnect the blinds motor. After removing the container, the “tail” of the drainage hose is separated.

Air conditioner indoor unit fan (impeller)
The next task is to remove the fan (shaft). This procedure is the most responsible and complex. A simple shaft removal option is applicable when it is removed to the left without affecting the control unit and engine:
When mounting the shaft into the device housing, the screw must be exactly in starting position. Otherwise, the fan will touch the walls.
There is also a more complicated option for removing the fan. If the shaft is pulled out with right side, you will have to remove the electric motor and control unit.
Sequencing:
Disassembly of the external module
Dismantling mobile or window air conditioner does not take much time - just remove the device from the window or remove the air duct. When disassembling a full-fledged split system, it is required to save all the refrigerant.
 The connecting tubes through which freon is transported have different diameter. The thin channel serves to transport liquid refrigerant. A large tube is designed for pumping gaseous freon. When disassembling the air conditioner, it is necessary to “drive” the refrigerant into the outdoor module. Then you can turn off the main channels. To pump the refrigerant, it is necessary, when the device is running, to screw the pipe with liquid freon, which leaves the outdoor unit into the room. The device pumps the gaseous substance into the outdoor unit in 1 minute. After that, turn off the device immediately.
The disassembly of the outdoor unit of the air conditioner is carried out by two people. In this way, unnecessary risks can be eliminated and the time of work can be reduced.
After disconnecting the device from the mains, disconnect the cables by marking the terminals.
The copper channels through which the refrigerant is transported can be straightened by yourself with care. Together with them, the room is removed electrical cable. It is screwed to the end of the tube. Then you need to unscrew the nuts that hold the outdoor module. Remove the block together. Lastly, the brackets are removed from the wall.
The removed outdoor unit requires vertical storage and transportation. To avoid possible damage, it is placed in a box with foam.
Removing the compressor
In some cases, only the dismantling of the outdoor unit is required, for example, when it is necessary to adjust the operation of the compressor. In this case, the indoor unit remains in place. The main task is to correctly remove the compressor:
- dismantle the cover of the outdoor unit;
- disconnect the discharge and suction pipes;
- disconnect electrical wires;
- unscrew the fasteners of the fan and condenser;
- remove the capacitor from the case;
- dismantle the compressor mounts and the part itself.
By following this sequence of actions, you can reduce the risk of damage to the pipelines and gain access to other elements located in the housing.
Consequences of incorrect dismantling
 If dismantled incorrectly, it is easy to damage the air conditioner. Possible adverse effects.
Knowledge of how to remove the air conditioner from the wall with your own hands may be needed in several cases:
- if you plan to move;
- if it is necessary to carry out repair and restoration work;
- if you plan to replace the air conditioner with a new one and there is no desire to pay for the dismantling of the old one.
To begin with, when changing the location, it is worth dealing with completely disconnecting the air conditioner from the wall, that is, both units. AT this case it is important not only to carry out high-quality dismantling, but also to follow the rules for transporting split system modules.
How to remove the outdoor unit from the wall
First of all, they provide for necessary tools. For self-withdrawal air conditioner will need:
- adjustable or gas key;
- hexagons;
- open-end and socket wrenches;
- indicator screwdriver;
- pipe cutter;
- manometer or manometric station.
Nippers and similar tools should not be used instead of a pipe cutter, as they spoil the quality of the copper pipeline.

First, the external module is dismantled - the compressor and condenser unit or KKB.
Step 1. With an adjustable or wrench on the end side of the KKB, open the valve plugs.
Step 2 Close the liquid valve of the outdoor unit. Use a hex key.
Step 3 In order for all the freon to pass into the external module, the air conditioner is started in cooling mode for 30-40 seconds. As soon as the compressor began to work only for suction, a manometric station is connected to the valve from the gas pipeline and they wait for the indicators to reset. Close the freon return valve immediately.
Step 4 The system is completely de-energized. Before proceeding to next step removing the air conditioner from the wall, check the absence of current with an indicator screwdriver by inserting it into the phase terminal.
Step 5 Now the freon line is cut with a pipe cutter, since it is a non-removable structural element. The remaining ends must be insulated from moisture and debris. You can use electrical tape for this.
Cut off the connecting tubes at a distance of 15-20 cm from the fittings. If the dismantling of the capacitor module is carried out for the purpose of carrying out repair and restoration work, then it is not necessary to cut the copper tubes.
Step 6. Carefully disconnect the drain piping and interconnect wires. ends electrical wires and it is also desirable to wrap the drainage tube with protective material.
Step 7. Now proceed to dismantle the device itself. How to remove the outdoor unit of the air conditioner from the brackets? To disconnect it from nuts and bolts, use an open-end or socket wrench. Since the KKB usually has considerable weight, it is advisable to take a second person to help.
Step 8. Brackets are removed from the surface of the building or balcony by unscrewing stop valves end head.
After the air conditioner has already been removed from the wall, proceed to its packaging. To do this, you will need a multilayer cardboard box, foam plastic and soft packaging film on a roll.
It is possible to transport KKB only in a vertical position in order to avoid water hammer during subsequent work. Before mounting the unit in a new place, you should let it stand for 2-3 hours.
If transportation is planned for winter time, you need to dismantle the air conditioner from the wall so that all the freon does not leak out. To do this, be sure to use a manometric station. But most experts advise to drain the refrigerant and then completely recharge the circuit.
How to remove the air conditioning compressor

The most serious malfunction of a split system can be a compressor failure. It occurs when:
- poor-quality installation - lack of evacuation, violation of the rules for laying a freon pipeline;
- using a split system in an unacceptable temperature range;
- factory marriage.
In this case, you will also have to independently remove the KKB of the air conditioner and disassemble it. Some climate control systems do without complete dismantling, but it is problematic for a non-specialist to do this, since in this option access to many elements is severely limited.
The outdoor module has been dismantled, how can I remove the air conditioning compressor now? In fact, there is nothing supernatural here:
- The protective cover is removed from the body of the outdoor unit;
- Disconnect the lines going to the discharge and suction, as well as electric wires suitable for fan and compressor;
- Unscrew the fasteners with an open-end or socket wrench and remove the compressor from the vibration dampers.
It is worth considering that before removing the air conditioning compressor, it is necessary to check the degree of oil deterioration. If it has bad smell and changes color when tested for oxidation, then a replacement + flushing of the KKB will be required. With normal properties and a negative reaction of the oil oxidation test, a simple replacement will be sufficient.
How to remove the indoor unit from the mounting plate

Everything is clear with how to remove the air conditioning compressor and the outdoor unit itself from the wall with your own hands. It remains to figure out how to dismantle the internal module. This process also goes through several stages:
- Remove the protective cover from the case;
- Unscrew fasteners;
- Disconnect all connecting communications: freon line, electrical interconnect cables, drainage pipeline. Turn off the power first.
- The block is removed from the plate by opening the latches of the fasteners;
- Unscrew the mounting plate and dismantle the plastic wire with the remaining copper tubes.
When removing the indoor unit from the wall, be very careful not to damage the fixing latches holding the unit to the mounting plate.
Be sure to caulk the ends of the copper freon tubes in the same way as for the outdoor unit.
Pack the room unit in a tight cardboard box, overlaying it with foam and wrapping it with soft bubble wrap. The evaporative block can be transported in any position unlike KKB.
If replacement or cleaning of any element of the indoor unit of the air conditioner is required, then it may also be necessary to remove it from the wall or partially disassemble it into components. It looks like this:
- Remove the front panel and wash its reverse side with a stream of water and detergent or soap;
- Remove the airflow guide plates by carefully pulling them out of the grooves. Some models have special latches for this;
- Unscrew the screws, gently pull the lower protective part towards you and slightly raise its top, then remove it from the latches;
- Turn off the power wire and drainage;
- Disconnect the interconnect wires from the corresponding terminals, having previously recorded their location;
- Remove the tray with the hose. For some models, it may be stationary, then it is lowered a little;
- Now remove the tangential fan by lifting up the evaporative heat exchanger.

All elements are washed with water and detergent. You can use a steam generator for a more thorough cleaning. When the parts are dry, they are fixed in reverse order into place.
If it is required to dismantle the control board, then first remove the protective cover from the electronic unit, disconnect all wires (sensor connectors of the display panel, air damper actuator). After that, the board is unscrewed from the fasteners with a screwdriver or simply disconnected from the latches.
When the indoor unit is not dismantled, but disassembled, there is no need to cut off the freon line.
Monoblock systems are dismantled in almost the same way. The only difference is a slightly different fundamental circuit diagram and nozzles with working fluid.
When self-dismantling is undesirable
Do not remove the air conditioner with your own hands in the following cases:
- in the presence of a split system of column, channel or cassette type;
- if the user does not have necessary tools, materials and instructions for the device;
- with a person's lack of self-confidence.
In these situations, it is better to contact professional installers.
Before proceeding to independent action, you can watch a video on how to remove the air conditioner yourself:
Partial or complete dismantling air conditioner is produced according to various reasons- repair in the apartment, moving, installation in another room and so on. The standard approach is to call the employees of a specialized company for the correct removal of the split system by paying for this service. A more economical option is to dismantle the air conditioner with your own hands, having understood the intricacies of the procedure. This is not to say that it is simple, but with the right approach it is quite feasible.
About the methods and difficulties of dismantling with your own hands
As a rule, owners of private houses and apartments install 2 types of air conditioners - monoblock (mobile) and split systems. There are no special problems with the first ones, since in such models all the main elements are enclosed in a single housing, and to move the unit, it is enough to simply disconnect the air duct.
In addition to monoblocks and "splits", there are other types of climate control systems - cassette, channel and column. But usually such equipment is installed in offices, shopping malls and other premises large area, in private dwellings it is used quite rarely.
The split system consists of two sections located inside and outside the dwelling. They are interconnected by two highways, along which in various states of aggregation circulating refrigerant - freon. Through a copper tube of small diameter, it flows in the form of a liquid from the external block to the internal one. In a large diameter line, the gaseous refrigerant moves in the opposite direction. This gives rise to a number of difficulties that await an ignorant user when trying to dismantle himself:
- Complete or partial loss of freon as a result of unskilled disconnection of main pipelines.
- Ingress of air containing moisture into the tubes and heat exchangers. If the split system is installed incorrectly in another place, incompressible moisture will enter the compressor and may damage it.
- Clogging of copper pipes when pulling them out of the wall and during transportation. Moisture or sand in the freon circuit is a quick "death" of the compressor.
- When disconnecting the lines from the nozzles of the inner section, it is possible to accidentally roll up the threaded drives soldered to them.
- Disconnecting power wires without markings on the terminals where they were connected leads to confusion during the reassembly process.
- Too short trim of the drain pipe leading to the street condensate.
- Loss during transportation of screws and other small parts not fixed after dismantling.
Most of these cases lead to expensive repair of your air conditioner in a specialized workshop, so before removing the split system, you must carefully study the instructions below.
There are three ways to dismantle the indoor and outdoor unit:
- simple disassembly with the release of refrigerant into the atmosphere;
- with the preservation of freon in the system according to the "by eye" method;
- using special equipment that allows you to completely save the refrigerant in the circuit.
The last method gives the best result, although all three are used in certain circumstances. So that you do not have any problems with the installation of the removed air conditioner and its further exploitation, it is recommended to act according to the third option, having previously familiarized yourself with the method of preserving freon.
Preparatory activities
First of all, you need to prepare such a set of tools and fixtures:
- Phillips and flat head screwdrivers;
- a set of open-end wrenches;
- stationery knife;
- hex keys 5…10 mm in size;
- manometric manifold or pressure gauge with tube and threaded connection, designed for a maximum pressure of 10-15 bar;
- masking tape and marker;
- insulating tape or ordinary tape.
A pressure manifold will definitely be needed when you plan to install a split system in another room, so it’s better to rent it, and it will be too expensive to buy.
Also, for convenient and safe work, a stepladder is needed to safely get to the indoor module installed under the ceiling. External section located on the wall apartment building, it is better to retract through the window, after tying it with a rope. Here, the services of an assistant will be useful.
An important stage of preparation is to ensure the preservation of the refrigerant with the least loss. For this, the principle of operation of the air conditioner is used, thanks to which all freon can be collected in one place - the contour of the outdoor unit. Having prepared the tools, follow the instructions:
- Covering the infrared element on the remote control with your hand remote control, switch the split system to "Turbo" mode and set the minimum temperature. Remove your hand from the element and point the remote at the air conditioner. In this way, you start the compressor immediately at full capacity.
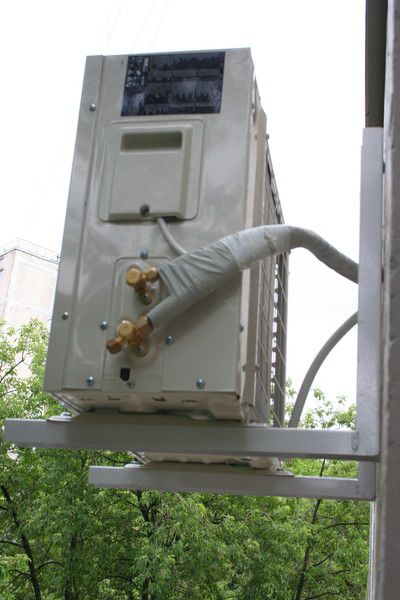
- Connect the hose from the pressure gauge to the service port located on the side of the outdoor unit, after which it will immediately show the pressure in the system. In some models, these pipes are hidden under the cover, it must be removed.
- Unscrew 2 nuts - plugs located at the ends of the fittings. Under them will be found valves, adjustable with a hex wrench. Choose the right hex size.
- Turn off the liquid line valve (this is a thinner tube) and watch the pressure gauge. At this time, the compressor draws in gaseous freon through the second tube.
- When the arrow of the device drops to zero and begins to go into the vacuum zone, close the second valve and quickly turn off the air conditioner with the remote control. That's all, the refrigerant is in full in the circuit of the external module.
In split systems filled with different brands freon (sometimes R22 and R410), the diameter of the thread of the service fitting, where the pressure gauge is connected, is different. For R410, a special adapter is needed, which should be prepared in advance.
Preservation of the refrigerant by the method "by eye" is carried out without a manometric manifold. After closing the liquid valve, wait about 40-50 seconds, then close gas cock and disable household appliance. The disadvantage is clear: you will not know how much freon managed to get into the outdoor unit, and it is unacceptable to keep a running compressor with a blocked line for a long time. The result will appear the next time you install the "split" and run it.
Instructions for removing the external module of the split system
The outdoor unit of the air conditioner has to be dismantled when moving or moving it to a new location. To repair the apartment, it is not necessary to remove the outer section, but you still have to disconnect the freon lines, cable and drainage. The work is carried out in the following order:
- Unscrew the hose of the pressure gauge used when pumping the refrigerant, and replace the end nuts - plugs.
- Using an open-end wrench, unscrew the cap nuts pressing the copper tubes to the fittings, bend them to the side. Using adhesive tape or electrical tape, protect all open holes in the lines and pipes of the outdoor unit so that debris and dust do not get inside during operation.
- To disconnect the electrical cable, disconnect the device from the mains and remove the cover covering the terminals (located above the freon valves). Before unscrewing the wires, stick a strip of masking tape over the terminals and sign with a color marker to fix the connection order. Disconnect the wires and remove the cable.
- Tie the disconnected lines to the bracket of the outdoor unit so that the copper pipes do not hang or bend, otherwise they will have to be changed.
- Unscrew the 4 nuts securing the outdoor unit to the bracket, tie it with a rope and remove the unit together with an assistant.
Professional refrigerators often practice a slightly different approach: they do not unscrew the union nuts and do not remove the freon pipes from the fittings of the outdoor unit, but bite them off. Then it is not necessary to wrap the ends of the pipelines with adhesive tape in order to protect them from moisture and debris, because they are flattened by wire cutters. During subsequent installation, the flattened ends are cut off and flared for connection with a union nut.
After disconnecting the cable cores from the terminals, tighten the terminal screws and tighten them, as they may fall out and be lost during transportation.
It is better to remove the bracket itself later, when you untie the freon circuit pipelines from it. If the lines go out of the wall no more than a meter, then they do not need to be tied. Carefully align the tubes to make it easier to pull them in from the inside. The bracket is most often attached to 4 anchor bolts, unscrewed with a conventional open-end wrench.
Proper disconnection of lines from the outer section - photo gallery
The lines are disconnected after unscrewing the union nuts Screw the plugs that close the port valves into place Unscrew the cover to disconnect the wires Marking the location of the wires, disconnect the cable After disconnecting the cable, the screws on the block must be tightened According to the rules copper pipelines must be bitten off Bitten tubes must be plugged
How to remove the outdoor module while preserving freon - video
How to dismantle the indoor unit of the air conditioner yourself
To remove the indoor module from the wall, it is necessary to disconnect all communications from it - cable, tubes for freon and condensate. The place of twisting of pipelines is, as a rule, in the niche of the body, arranged in the lower part. Depending on the split system model, there are 2 ways to get to this niche:
- Unlock 3-4 plastic latches that secure lower part block to the mounting plate. Deviate the bottom of the case from the wall and insert any rod between them, remove the communications harness from the niche.
- If there are no latches on your split model, then you need to remove the front plastic panel, having previously dismantled the blinds and additional covers (when available).
When you get to the harness, make a longitudinal cut on it with a clerical knife, which will allow you to move the insulation away and grab the nuts with the keys. Don't cut too long or you'll have to change later. thermal insulation material. Follow the next steps in this order:
- Unscrew the joints of the highways with two open-end wrenches. Important point: the squeegee soldered to the short tube of the block itself cannot be rotated, it must be held in place with a wrench by unscrewing the union nut.
- Wrap the ends of the pipelines with electrical tape or tape in order to protect against dirt.
- Locate the junction of the drain pipe with the outlet pipe and disconnect it. Do not cut the corrugation anywhere, so that later it would be more convenient to dock it back.
- Remove the electrical compartment cover (located on the right side of the case or under the front panel), make marks with a marker and adhesive tape, then unscrew the screws and disconnect the cable cores. Retighten the screws and screw on the cover.
- When all communications are disabled, grasp the case on both sides and remove it from the mounting plate, lifting it up a little. Pass the block to the helper.
- Remove the mounting plate by unscrewing all the dowels.
Considering that condensation may remain in the tray of the indoor unit, it is advisable to protect the wall before dismantling polyethylene film. If you are renting an air conditioner for apartment renovation, then such a precaution is unnecessary.
After removing the inner section from the wall, put all the unscrewed parts on it, tighten the screws and put on the mounting plate. Place the protruding pipes in a niche, fixing masking tape. Use the same material to secure the opening front panel so that it does not dangle during transportation.
The last step is the dismantling of communications laid along the wall or inside it. There are no difficulties here, the main thing is not to bend the copper tubes under a small radius. From such treatment at the bend, the flow area decreases, and it is quite difficult to align the tube with an oval profile. From outer wall pull out the harness carefully so as not to damage the insulation. If the hole was sealed mounting foam, then it must be cut in parts. At the end, roll the tourniquet into a ring and fasten it with tape.
How to dismantle the indoor module - photo gallery
To disconnect the electrical wiring, remove the cover of the electrical compartment Before disconnecting the wires, write down the order of their connection. Cut the bundle passing in the niche with a knife and get to the junction of the tubes. drainage tubes Disconnect the cable running in the same bundle The indoor unit can be easily removed with two hands Final stage- removing the mounting plate Having tilted the housing, it must be fixed in this position
How indoor units of different designs are removed - video
Dismantling in winter
If the outdoor temperature has dropped to -5°C or more, it is recommended to refrain from dismantling for the following reasons:
- it will not be possible to pump refrigerant into the external module;
- in the cold, you can not disassemble the connections, unscrew the plugs and close the service ports;
- as a result of disassembly, the seals of service valves often fail.
In a situation where, without removing the split system when negative temperature not to do without, be sure to warm up the fittings of the outdoor unit building hair dryer. Then unscrew the plugs and close both valves, thus saving some of the freon remaining in the outdoor unit circuit. Then slowly unscrew the lines from the fittings and disconnect them, releasing the second part of the refrigerant into the atmosphere. Then proceed according to the algorithm described above.
The staff of specialized firms uses manometric stations to pump out freon in winter. But if you rent such equipment, then dismantling will cost more than the wages of specialists, and the result will be questionable.
At temperatures above -5°C, work can be carried out according to standard instruction, but it is advisable to use a pressure gauge to control the transfer of refrigerant. If you start acting “by eye”, you may not guess the exposure time and still lose part of the freon. It is equally dangerous to keep the compressor in operation without cooling (and it is cooled by circulating freon), it can fail from overheating.
You have successfully dismantled home air conditioner, if you take up work in the warm season and follow the instructions given. You can not miss a single detail, act very carefully and without haste. Do not neglect the pressure gauge, as the loss of refrigerant will negate all the savings from this procedure.