Currently, almost all residential buildings are heated using gas or electric heat generating equipment. Even country and garden houses, which are used only in summer, are not an exception. Most buildings that are not used year-round are equipped with inexpensive cold-type roofs, through which the main heat losses occur while maintaining a comfortable temperature regime. In this article, we will tell you how to properly insulate the ceiling under a cold roof so that the house is always warm.
The design of the roof depends on the nature of the use of the house and the under-roof space. It is on these factors that the choice of shape, roofing material, the scheme of the truss frame and the presence or absence of a thermal insulation layer depend. . In private housing construction, 2 types of roofs are used:
Important! If the attic space is not heated, then the air in it serves as a kind of buffer zone, which acts as thermal insulation and reduces heat loss. The air rising from the heated rooms on the first floor, according to the law of convection, gradually cools and does not heat the surface of the slopes from the inside, so that frost does not form on them.
To keep warm, as well as reduce fuel consumption to maintain the optimum temperature, with the help of bulk or fibrous thermal insulation materials, the ceiling located under the cold roof is insulated. Since heated air always rises, this operation is an effective measure to reduce heat loss.
Thermal insulation methods
High-quality thermal insulation reduces heat losses and the cost of heating a house by 30%, which is a good savings on a family budget. The use of suitable insulation and the correct choice of installation method form a comfortable indoor climate.
The issue of thermal insulation of the ceiling under a cold roof is best addressed at the stage of building a house, then you can choose the most effective and convenient option. Most often, the insulation is mounted in 2 ways:

Note! Any thermal insulation works in a complex way. Therefore, if you want to solve problems with heat loss in a house with a cold roof, do not forget about the thermal insulation of the floor, door and window openings. A clear way to analyze where the heat goes is to look at the house in the thermal imager in winter. To increase the energy efficiency of the house, you need to pay attention to the zones painted in red and yellow, it is through them that heat escapes.

materials
The modern building market offers an impressive range of thermal insulation materials, but not all of them are suitable for cold roof ceiling insulation. In order for the costs to recover, it is necessary that the thermal insulation layer is resistant to moisture, has low thermal conductivity and meets safety standards for human health.
The following materials are used for insulation:

Experienced craftsmen remind you that vapor barrier and waterproofing layers play an important role in warming the floor located under a cold roof. To protect the insulation from getting wet as a result of interaction with heated air saturated with water vapor, a vapor barrier membrane is first laid. And from the side of the roof, it is protected from leaks with a waterproofing film.
Video instruction
High-quality insulation of the ceiling in a house with a cold roof reduces heat costs, reduces heating costs and increases living comfort. Thermal insulation is carried out in different ways, using materials of various composition and form of release. How to choose the best option?
We will talk about which methods are most effective in installing a system that prevents heat leakage through the ceiling. We will tell you what to look for when choosing a heater. In the article we have proposed, you will find valuable recommendations for improving the thermal insulation characteristics of the house.
A cold roof is a budgetary and practical option for organizing the roof of a house for seasonal living. This design significantly saves construction costs, but does not contribute to heat conservation.
It is desirable to solve the issue of thermal insulation of the ceiling zone at the stage of building a house. However, insulation is often resorted to in the operated premises.
The warm air of the heated room rises and, in contact with the cold ceiling, quickly cools. Losses of thermal energy through an uninsulated roof and ceiling reach 25-40%
Thermal insulation of the ceiling solves a number of problems:
- Reduces the intensity of cooling of heated air, contributing to savings in home heating costs.
- Increases sound insulation in a room by dampening the rumble of wind or heavy rain.
- In summer, the insulating material helps to keep the room cool without letting in warm air from outside.
Insulation of the ceiling increases the comfort of a private house and optimizes the microclimate of the room. Subject to the installation technology, thermal insulation eliminates the appearance of condensate on structural elements.
Methods of thermal insulation of the floor
Thinking about how to properly under a cold roof, first of all, you need to decide on the method of thermal insulation.
There are two fundamentally different approaches:
- insulation from the attic;
- installation of thermal insulation material from inside the room.
The first method is more preferable for a number of reasons. So, the installation technology itself is greatly simplified - there is no need to build a suspended frame or fix the insulation with glue to the ceiling.

External insulation eliminates costly repairs inside the room, and also does not reduce the height of the ceilings. The latter is especially true if the distance to the ceiling in the premises does not exceed 2.5 m.
Also, with this approach, the risks of condensation are minimized. What can not be said about the thermal insulation from the inside of the room.
If you choose the wrong insulation and do not exclude the contact of warm air with a cold plate, then water vapor from the room will accumulate - this is fraught with the appearance of dampness, fungus and the gradual destruction of the ceiling.
However, in some situations, the internal insulation of the ceiling is a necessary measure, for example:
- lack of access to the attic;
- reconstruction of an old building with a ready-made attic floor;
- thermal insulation of the garage located in the basement.
If internal insulation is necessary, installation technology should be followed to prevent condensation inside the building. It is important to comply with two requirements: block the flow of water vapor and use insulation of sufficient thickness.
Overview of the best ceiling insulation
The choice of installation method also determines the list of possible options for heat insulators. When insulating from the attic, the range of materials is much larger - from natural compositions to technological modern solutions. Installation from inside the room imposes a number of restrictions.
Regardless of the placement method, it must have low thermal conductivity. The coefficient determines the ability of the insulator to transfer energy from heated elements to cold ones. The lower the thermal conductivity, the better the material retains heat.

An important selection parameter is moisture resistance. The ability of the material to maintain physical characteristics in a humid environment is especially important when insulating from the side of the attic, when the roofing is worn out enough
Additional requirements include:
- durability;
- environmental friendliness and safety for humans;
- low flammability - it is better to use non-combustible insulators, compositions with minimal smoke formation;
- resistance to rodents - relevant for materials placed in the attic.
It is important to take into account the vapor permeability of the insulation. But there are nuances here. When insulating a concrete slab from the attic side, a vapor permeable material must be used. For installation from inside the room, on the contrary, it is a vapor-tight insulation.
View # 1 - mineral wool insulation
The popular heat insulator holds its leading position due to its affordability, ease of installation and good thermal efficiency.
For installation under a cold roof, mineral wool with a synthetic binder, basalt insulation and glass wool are used. The last option provides the maximum thermal efficiency. The thermal conductivity of glass wool is 0.044 W / (m ° C).
However, it should be used with caution - the particles cause irritation of the skin and mucous membranes. Glass wool is unacceptable for indoor use. Basalt insulation is deprived of these shortcomings. Additional advantages of the material: fire safety and plasticity.
General disadvantages of mineral wool materials:
- water absorption;
- low strength;
- tendency to shrink;
- the content of unsafe components - abrasive particles or formaldehyde resins.
To place the layers of mineral wool, it will be necessary to install wooden logs, it is desirable to waterproof the insulation itself from above.
Type #2 - loose cellulose insulator
Bulk material made from paper waste and pulp. To protect against decay and fire, synthetic components are added to ecowool.

The material is used for external insulation - in the attic. Ecowool is sprayed dry over the floor or applied mixed with glue. Requires special equipment to work
The characteristics of cellulose insulation and the technology of its application endowed the modern method of thermal insulation with a number of advantages:
- good thermal efficiency - a thermal conductivity index of about 0.038 W / (m ° C);
- the material fills all the voids and crevices, forming a solid canvas - no cold bridges are formed;
- due to its light weight, it is possible to lay ecowool of any thickness;
- durability of service and preservation of original properties;
- environmental friendliness - ecowool does not emit toxic fumes;
- low flammability and self-extinguishing ability;
- vapor permeability.
Despite the mass of dignity, ecowool has not gained much popularity. The main reasons for low demand: high cost, impossibility of installation by hand.
In addition, ecowool is prone to shrinkage and wrinkling - it is advisable to equip a rigid support from above for moving around the attic.
View # 3 - plate polymer types
This group of heaters includes: foam and (EPS). Their thermal efficiency exceeds indicators of mineral wool heaters. The leader is XPS, the thermal conductivity coefficient is 0.038 W/m°C.

Expanded polystyrene is superior to polystyrene in terms of strength, rigidity and fire safety. However, in the event of a fire, XPS boards also emit toxic fumes.
Styrofoam is cheaper than polystyrene foam. Among the general advantages are:
- water resistance;
- low biological activity;
- wide choice of geometric dimensions and thicknesses.
Both materials are vapor-tight, so they are used to insulate concrete and brick surfaces.
The material is suitable for . Penofol is placed with the foil side inside the room - the canvas not only retains heat, but also partially reflects it back.
As an independent material, foamed polyethylene is advisable to use in areas with a mild climate. In regions with severe winters, a combination of penofol and penoplex shows a good effect.
View # 4 - bulk heat insulator
Light porous material in the form of rounded granules. Contains burnt clay. The natural origin of the insulation explains its environmental friendliness.
Additional benefits of expanded clay:
- fire resistance;
- providing a good degree of sound insulation;
- durability;
- chemical inertness;
- not of interest to rodents;
- the heater does not give dust.
The thermal efficiency of expanded clay depends on the density of the embankment, the size of the granules.
To ensure the preservation of heat, it will be necessary to use an embankment with a thickness of 20 cm or more, in cold regions the layer is increased to 40-50 cm. This leads to an increase in the cost of the warming procedure and significantly increases the load on the ceiling.
View #5 - liquid polyurethane
Polyurethane foam is applied to the surface under pressure, a special technique is used for spraying. Polyurethane foam is an excellent solution for attic floors with complex terrain and thermal insulation of hard-to-reach places.
The main advantages of foam ceiling insulation:
- formation of a seamless hermetic coating;
- high adhesion with materials - polyurethane foam fills all cracks and voids;
- low water absorption;
- excellent thermal efficiency due to the porous structure of the hardened foam - thermal conductivity of about 0.027 W / m ° C;
- preservation of qualities in wet conditions;
- the possibility of multilayer spraying - relevant for cold regions;
- providing acoustic insulation;
- durability of the coating - service life of about 25 years;
- speed of processing;
- resistance to microorganisms;
- lightness of the material - does not exert pressure on the overlap.
Polyurethane foam is difficult to ignite, the insulation does not spread combustion.

Spray insulation is considered one of the best solutions for attic floor treatment. The limited use of polyurethane foam is explained by the high cost of the method
The total cost includes the price of the insulation itself and the cost of attracting craftsmen with equipment. Foam spraying should not be carried out if the air temperature in the attic is below +10 °C.
View #6 - natural materials
The main advantages of folk methods: affordable cost and environmental friendliness. The technique of using and the effectiveness of such natural materials as sawdust and algae is different.
Features of insulation with sawdust
Loose woodworking waste is often mixed with chips and distributed over the ceiling from the attic side.
Warming methods:
- Dry backfill. Wooden logs are mounted on the floor, the cells are filled with sawdust. The material shrinks over time and requires periodic updating.
- wet method. Combine sawdust, cement and water in a ratio of 10:2:1.5, respectively. Such a thermal layer is more durable.
Weaknesses of sawdust: flammability, fear of rodents and water absorption.
Characteristics and varieties of algae
In coastal areas, algae are widely used, the second name for insulation is damask. The material is natural, good thermal insulation characteristics. Rodents do not start in algae, and the insulation itself is not afraid of moisture and does not rot.
There are three types of stone:
- by weight- bales or loose rolls collected from dried pressed seaweed;
- mats in nets- canvases 10 cm thick, tied with synthetic thread for ease of installation;
- dense plates- up to 85% of algae are present in the composition, the rest is a binding component, for example, silicone.
In terms of thermal efficiency, kamka is significantly inferior to many heaters, the heat capacity coefficient is 0.087 W / (m ° C).
Calculation of the thickness of the thermal insulation layer
The efficiency of thermal insulation depends on the accuracy of determining the thickness of the insulation, which is part of it. In addition, the indicator allows you to calculate the loads imposed on the ceiling structure. When calculating, the values of the allowable weight and the required thermal protection are compared.
The thickness of the insulation is determined by the formula
q = R*k,
- q– thickness of heat-insulating material, m;
- R– thermal resistance, m 2 °С/W;
- k- coefficient of thermal conductivity of the insulation, W / (m ° C).
The R value is determined from tabular data - the indicator is calculated for each region, taking into account the climate.

For example, the normalized thermal resistance of floors for Nizhny Novgorod is 4.26 m2°C/W. If you use penoplex to insulate the ceiling, you will need a layer of thermal insulation 12 cm thick
To calculate, it is enough to multiply the indicators 4.26 and 0.038. The last value is the thermal conductivity coefficient of extruded polystyrene foam. The weighting of the ceiling is calculated based on the volume of insulation and its density. The first indicator is determined by the product of the area and the thickness of the thermal insulation, the second - the tabular value.
The minimum load on the ceiling is provided by polyurethane foam and ecowool, their density is in the range of 25-60 kg / cu. m. One of the heaviest heaters is expanded clay - 180-330 kg / cu. m.
Features of mounting different materials
The tactics of action depends on the chosen material and its location - from inside the room or from the side of the attic.
Mineral wool installation
Installation of insulation is carried out on the attic floor.
When constructing a heat-insulating cake, it is important to withstand two conditions:
- to ensure the protection of mineral wool from water vapor coming from inside a warm room;
- arrange ventilation of the outer surface to weather moisture from the insulation.
Mineral wool slabs are laid between the beams or planks of the prepared crate. Surface mounting possible.

Before starting work, it is necessary to check the boards for rot, treat the wooden elements with an antiseptic. Make sure the roof is not leaking
The surface is cleaned of debris, if necessary, a wooden frame is constructed.
Further actions:
- Install vapor barrier membrane.
- Roll out rolls or place mats between beams.
- Mount the wooden base, maintaining the ventilation gap between the insulation and the hard floor.
The last step can be skipped. However, it will not be possible to walk in the attic or store things there, since mineral wool cannot be pressed.
Sheathing from the inside with polystyrene foam
This option of thermal insulation is suitable for a concrete ceiling. Expanded polystyrene plates are fixed to the surface with glue and fixed with "fungi".
Before installing the insulation, the ceiling is treated with an antifungal compound and a primer.
The procedure for fixing expanded polystyrene plates:
- Apply glue to the insulation, attach and press to the ceiling.
- Cover the entire area with slabs, leaving no gaps between the elements.
- Drill holes for fasteners with a puncher.
- Kill mushrooms.
- Joints and gaps between the plates should be foamed.
- Cut off the remaining foam, fix the reinforcing mesh with adhesive.
- Surface primed and plastered.
After the layer has dried, clean the ceiling and apply a finishing decorative coating.
Filling the attic with expanded clay
The minimum layer of bulk insulation is 20 cm. To regulate the height of the backfill, it is necessary to prepare a beacon - make the desired mark on the piece of reinforcement by securing a piece of electrical tape.

If a wooden base is insulated with expanded clay, then the ceiling must first be covered with waterproofing with a call to the walls. Suitable plastic film
There is no need to lay a hydro-barrier on a concrete base.
Sequence of work:
- Pour expanded clay and evenly distribute the granules.
- Check the thickness of the insulating layer. Its height should be 3-4 cm below the level of the flooring. If this norm is neglected, then when walking in the attic, the sound of rubbing the granules will be heard.
- Lay a layer of vapor barrier membrane, glue the joints of the sheets with adhesive tape.
- Install a rigid base. Suitable boards, fiberboard or OSB panels.
A floor over expanded clay makes it easier to move around the attic and increases the effectiveness of the heat-insulating cake.
Application of sprayed insulation
It will not work to do the work on your own, since spraying will require expensive equipment - a high-pressure apparatus. In addition, skills in working with equipment are required to evenly distribute polyurethane foam.
It is better to entrust the work to a specialized company and conclude an agreement with them for the provision of services. At the appointed time, a brigade arrives, stretches a hose with a gun into the house
- Mount wooden logs on the floor of the attic. They will be needed for the subsequent fastening of the flooring.
- Fill the device with components in the required proportions.
- Set the gun to the minimum foam delivery force.
- Apply polyurethane foam between the joists in an even layer.
- Wait for the composition to dry. If the thickness of one layer is not enough, then the treatment must be repeated.
- Level the hardened coating, cutting off the excess to the level of the lag.
- Mount a rigid base on the boards.
To insulate a small ceiling with your own hands, you can use a disposable foam spray kit.

The kit includes everything you need: cylinders with components for the preparation of foam insulation, a spray gun, hoses, personal protective equipment
Assembly and preparation takes a couple of minutes, no power supplies are needed - the device works autonomously.
Conclusions and useful video on the topic
Mineral wool floor insulation technology:
Thermal insulation of the ceiling of a private house with sawdust:
Insulation of the ceiling with a cold roof is one of the conditions for comfortable and economical operation of the house. When arranging a heat-insulating layer, it is important to choose the right material. The method of installation is important, as well as the mandatory formation of a reliable cut-off of condensate.
Those who consider the insulation of the ceiling with a cold roof optional, it is worth remembering the condensate and significant heat loss in the winter. Drops of condensate that form on the ceiling and sloping surfaces during temperature changes fall by the collar and head - very unpleasant sensations at any time of the year.
Warm air rises according to the law of convection - for further circulation. When it receives significant cooling from a cold ceiling, space heating can be considered ineffective.

That is why any method of insulating the roof, ceiling and attic spaces is considered the most effective measure for saving heat.

How to insulate ceilings and attics of private houses?
When building private houses, everyone wants to save money. But no one will dispute that cheap building materials are not effective or have a limited service life. It is better to master the laying technology, where it is available, in order to save on do-it-yourself insulation installation.

Attention: The more technologically each stage of construction is carried out from high-quality materials, the longer the house will last without requiring major repairs. This is the essence of saving for the future.

Any building supermarket will offer a complete list of heaters that are used during the construction of the roof or after the completion of rough work.

They are produced in different forms:
- roll materials;
- porous briquettes;
- sheet heaters;
- sprayed two-component mixtures;
- bulk materials;
- fibrous insulation;
- foil wrap.


The choice of insulation for the ceiling of a particular building depends on the type of surface and the temperature regime in the interior.

In this case, we are talking mainly about external insulation - the floors of the attic or attic (on the other side of the ceiling of living rooms in residential buildings). For example, materials are used that are not suitable for energy saving methods in a bath where the level of humidity is high, and vice versa.

In some cases, special equipment has to be used. You can’t do without it when spraying with polyurethane foam.

But this method is indispensable when it comes to the processing of inclined and negative surfaces, a metal frame and a combination of materials of various textures used in the installation of complex-shaped roofs.

It is much easier to insulate the lags with sawdust or expanded clay (of any fraction). They belong to bulk materials that do not need complex installation.

In addition to leveling, nothing needs to be done with them, then the substrate and cladding are laid, if it is a residential attic. For an empty attic, you can leave bulk materials without any fastening.

Tip: In some areas, bulk insulation is free. In seaside places, this is dry seaweed that the storm throws onto the coast. There is a lot of sawdust, shavings and crushed bark in the area of the sawmill and woodworking enterprises.

Internal insulation of the attic along the beams and rafters - the laying of mineral wool with large briquettes, but the floors (the reverse side of the ceilings) must be insulated.

The specifics of a cold roof and its insulation
Based on modern technology, any roof is erected like a multilayer sandwich or sandwich, hence the borrowed name. It is assumed hydro and vapor barrier, thermal insulation and multi-layer roofing.


It is necessary to treat building materials with fungicides (from fungi), antiseptics and chemicals so that mice do not start in the attic. Rodents easily climb stairs and any sloping or porous surface.


A cold roof is a dubious economy, but it is appropriate in different cases:
- for country houses that are not used in the winter;
- for auxiliary buildings;
- with high-quality insulation of the ceiling in the house (outside and from the attic);
- when the foundation stands on unstable soils, it cannot be heavily loaded in the form of several floors and an insulated roof of an intricate configuration;
- if the attic or attic is not used for living rooms, and the house is warm enough, built using energy-saving technology, as well as in the form of a log house (made of natural wood).

In these cases, it is imperative to insulate the ceiling in the house under a cold roof.

Along the way, all communications, chimneys and heating pipes passing through the attic are insulated with rolled, foil and sprayed materials.

The advantages of such insulation:
- Comfortable microclimate all year round.
- Minimum temperature difference.
- Additional sound insulation from the roof (rain, hail, gusty wind).
- Prevention of condensation.
- Energy saving.


If possible, the overlap between the last floor and non-residential cold-type attic space should be made on both sides.

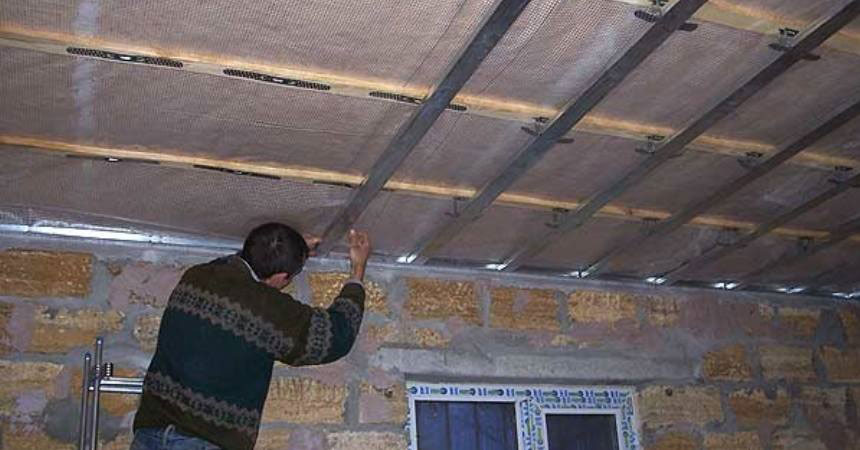
You can use stretch and suspended ceilings, multi-layer structures made of plasterboard, behind which it is easy to hide wires and communications. A good example is in the photo of the ceiling insulation.

Tip: If possible, use non-combustible or non-flammable materials to minimize the chance of a fire.

Common heaters
Keep in mind that high-quality insulation can only be complex - windows and doors, external and internal surfaces.

Sprayed polyurethane foam
To work with your own hands, you need to rent a special installation for mixing a two-component composition, which is fed through a sprayer with nozzles in the form of "snow flakes".


They adhere well to any surface, even those not treated with expensive primers. The advantage is that the tube can be fed into all hard-to-reach places in the attics.


Expanded clay
Bulk material in the form of small clay-based pebbles, which is scattered over the entire horizontal surface of the attic.

Cellulose ecowool
Reminiscent of flakes, which are also poured over the surface without any fixation.

Foamed sheets and rolls
A popular material, since foam insulation is one of the most affordable means. It can be placed in specially prepared cells or sewn layer by layer over the entire surface.

Mineral or stone wool
A practical non-combustible fibrous-porous material in which mice and insects do not start. Produced in layers, briquettes and rolls.

Today, insulation with mineral or basalt wool remains the most in demand, due to the properties of the material and convenient packaging.


wood waste
available heater. Although wood is a combustible material, it will not ignite without oxygen and preheating. But for a guarantee, additional treatment with a fire-fighting mixture is recommended.

The disadvantage is that wood pests can be introduced, which can damage the wooden roofing.

As natural heaters in each locality there are agricultural wastes or plant wastes suitable for these purposes. These are cake and husk, hay and straw, chopped reeds and corn, fallen leaves and needles.

They can be mixed, applied separately, if there is no other alternative, fall asleep on top of expanded clay. A layer of 5-7 cm is enough for the heat retention to be noticeable.

To reduce the likelihood of ignition, plant waste is best mixed with clay or sprinkled with sand on top. Plant mixtures are susceptible to decay, so over time you will have to change the old layer for a new insulation.

The wires to be laid require additional insulation, so they are usually enclosed in hollow corrugated tubes made of non-combustible polymers. Keep in mind that each heat-insulating material has its own laying method and service life.

Photo of ceiling insulation


Large heat losses in the room and cold air blowing from the ceiling are the result of improper or poor-quality thermal insulation. Heat loss through the ceiling can reach 20%, since the heated air rises, and if there is no obstacle on its way that can keep it inside the room, it will be “blown out”, like your budget. Measures for the insulation of the ceiling must be carried out at the stage of building a house. But if for some reason this did not happen, or the old thermal insulation has become unusable, you will have to do it all over again. What are the ways to insulate the ceiling, how best to implement them in one case or another, what materials to use - these are the main questions that the owners have. At the same time, it is important to do everything right so that the insulation does not dampen, condensation does not accumulate on the surface, mold or fungus does not appear. And for this it is necessary to understand the very essence of the work performed and the processes occurring in the insulation.
Why and how to insulate the ceiling
What is meant by ceiling insulation? If it blows from above, from the side of the ceiling, we say “it is necessary to insulate the ceiling”, but what actions are meant by this? In fact, there are several technologies, and which one is suitable in each case depends on the starting conditions.
In a private house, the ceiling is always insulated from the side of the upper room.: whether it is an attic, next floor or attic. Laying heat-insulating material on top of the ceiling or in the voids of the ceiling ensures the retention of heat inside the room. At the same time, the height of the room to be insulated does not decrease, additional ceiling finishing is not required, and there is no need to install thermal insulation directly above the head, because it is not so easy to fix it, and particles will penetrate into the living room. But the most important thing is that the processes occurring in the ceiling and the heat-insulating material provide warmth and dryness of the room and materials, condensation does not form and the insulation does not get wet.
What is the principle of attic insulation? It's no secret that the best insulation is air. All modern thermal insulation materials are essentially air enclosed in one way or another in a form. But how can you use air for insulation, so as not to pay for it? Our ancestors acted very wisely when they built houses with a gable roof and an exceptionally cold attic, in which there were two windows in the gables. Our climate allows us to play this situation to our advantage. The gable roof retains snow well, which is also a heater. The snow-covered roof retains heat so well that even if it is -25 ° C outside, the temperature inside the attic is about 0 ° C. The air trapped in the attic room is an ideal insulator, the characteristics of which can be changed depending on the season or the weather by opening and closing the windows in the gables and ventilating the room. The floor of the attic has always been insulated with loose natural materials, which, together with air, made it possible to maintain the temperature inside the heated room at +20 - +25 °С. The advantage of floor insulation in the attic is that the material does not dampen, it can be dried by ventilating the room.
Extremely important! In order for the attic to act as a heat insulator, it is impossible to insulate the roof slope from the inside. This will lead to the fact that the snow on the roof will melt, and icicles will form on the overhangs. In addition, the construction of an uninsulated roof is always open for inspection and repair.
Important! An attic insulated from all sides with heating is no longer an attic. This is an attic, more suitable for the climate of the warm countries of Western Europe. The design and operation of the attic has its own rules.
In an apartment building, things are a little different. It is not possible to insulate the ceiling or floor of the upper floor. And the problem of a blown ceiling most often occurs among residents of the last floor. What to do? The only option is to insulate the ceiling from the inside of the room, although this is not recommended, there is no other choice.
When insulating the ceiling, it is important to remember this rule: each subsequent layer in the direction from the room should have a greater vapor transmission capacity.
Below we consider separately the methods of warming the attic from the outside and from the inside.
Insulation of the ceiling from the outside (from the side of the upper room)
Insulation of the ceiling from the side of the upper room involves laying heat-insulating material on top of the ceiling or in its voids, if any. As already mentioned above, this is done in private houses and cottages. The type of material for insulation and the very technology of its laying depend on whether the floor is wooden or concrete. For overlapping on beams, which is a wooden floor on logs, light backfill materials or roll-type materials are suitable. But for the insulation of a concrete slab - dense mats or slabs, as well as heavy backfill materials.

One of the most ancient and time-tested ways to insulate the ceiling is to insulate the attic with sawdust. In some regions, you can buy sawdust for next to nothing or even get it for free if there is woodworking nearby. Quite often at the enterprise they themselves do not know what to do with sawdust, therefore - stop by and take it at least every year. It is better to fall asleep sawdust on top of wooden floors.
The only drawback of this method is that the sawdust burns. Therefore, several different ways of insulation with sawdust have appeared.
Method 1. Grease all the cracks in the wooden floor of the attic with clay, a little liquid. Sprinkle sand on top. If suddenly the clay cracks somewhere, sand will immediately fall into the gap, and integrity will be preserved. To protect sawdust from mice, cover with a layer of slaked lime interspersed with carbide. Next comes the main layer - sawdust. For different regions, the thickness of this layer may be different, but the minimum is 150 - 200 mm, 250 - 300 mm is considered optimal. Since sawdust is a combustible material, a thin layer of spent slag is sprinkled on top of it, especially around hot communications - a chimney, for example. Nothing is laid on top. You can only lay out the boards for the convenience of walking in the attic.
Method 2. The floor surface must be protected from moisture. This can be done in two ways: the first is to lay a waterproofing film on the wooden floor that can pass steam from the side of the room, the second - just like in the first method, coat the entire floor with clay. Then you need to mix sawdust with cement. To do this, take 10 parts of sawdust, about 1 - 2 parts of cement and 1.5 parts of water. First sawdust is mixed with cement, then water is added. The sawdust should be slightly wet for the cement to stick to it. The resulting mixture can be poured on top of the attic floor or poured between the floor beams on the subfloor. A layer of 200 mm will be enough. It is necessary to start doing all these works in the spring, so that the sawdust with cement has time to dry well over the summer (they dry for a long time).
Important! It is easy to check if the sawdust is dry or not: just walk on it. Dried sawdust will not break, but will slightly crunch.

Method 3. Similar to the second way. Only clay is used instead of cement.
Method 4. Similar to the first way. Slag can not be sprinkled on top. Sawdust can be smeared on top with clay, but not very liquid, so that it does not spill deep inside.
Considering that expanded clay is a rather heavy material, it is not recommended to insulate wooden floors with it. There is too great a risk that the wooden flooring may fail. The ceiling is insulated with expanded clay with concrete ceilings.
First of all, the surface of the concrete floor must be covered with a vapor barrier film. It should be laid with an overlap, the joints should be glued with adhesive tape. An overlap is made on the walls, approximately 40 - 50 cm. The wooden rafters and the chimney must also be pasted over with a vapor barrier film.

Next, crumpled clay is laid on the film. And already from above - expanded clay. For better thermal insulation, a mixture of coarse and fine fractions of expanded clay is taken. Then the small one will fill the voids, and the backfill will turn out to be more homogeneous. For a cold climate, the expanded clay layer should be 50 cm. Recommended in some sources, 15 - 20 cm will not save the situation. It is precisely because of the fact that expanded clay must be covered with such a large layer for high-quality thermal insulation, it is rarely used.
A light cement-sand screed with a layer of 50 mm is installed on top of the expanded clay. The solution should be thick enough not to spill deep into the backfill. Thus, in the attic, a sufficiently strong floor will be obtained, and it can be used for storing something or as a boiler room. A big plus is also the complete fire safety and environmental friendliness of this method.
Clay is an ancient building material, the scope of which is diverse and multifaceted. Clay itself is not used in insulation, since for effective thermal insulation its layer must be simply colossal - 50 - 80 cm. A wooden ceiling cannot withstand such a weight, and such a backfill thickness is simply impractical, it is better to choose modern material.
Therefore, to insulate the ceiling, clay is used in a mixture with sawdust.

First, the floor is covered with a vapor barrier film that does not allow water to pass through. Next, you can prepare a clay-sawdust solution. Water is poured into a large barrel, into which 4-5 buckets of clay are added. Then the clay is kneaded in water so that the water acquires a dirty color and the clay almost dissolves. Next, part of the resulting mixture is poured into the concrete mixer and covered with sawdust. While stirring, the amount of water is added. As a result, the solution should be neither liquid nor thick.

An excellent option for insulating the ceiling in the attic of a wooden house is reed mats. Modern reed mats, tied with twine or wire, are simply laid on top of the ceilings apart. It is better if there are 2 layers, the second of them will overlap the joints of the mats of the first layer, removing the "cold bridges". The disadvantage of this method is the fire hazard.

For those who want to insulate the ceiling with natural materials, seaweed is suitable. In coastal regions, this material can be bought for pennies, and if you wish, you can order delivery to another region. The advantage of seaweed ladders is that mice do not start in them, they are hypoallergenic and even medicinal, as they are saturated with iodine and sea salt, the vapors of which are useful, and also do not support combustion and do not smoke. In algae, insects and microorganisms do not start.
Seaweed is not afraid of moisture, so there is no need to vapor barrier the floor. Ladders are laid directly on the ceiling or floor with a layer of 200 mm. From above, you can equip the floor or lay boards for ease of movement.

Ecowool or cellulose wadding is a modern material that is positioned as natural. To reduce flammability, it is treated with flame retardants or boric acid. Ecowool absorbs moisture in itself, so it is not necessary to lay a vapor barrier film.
Ecowool is laid immediately on wooden or concrete floors. This requires a special blowing unit, due to which all the cracks are blown out, the insulation layer turns out to be monolithic and saturated with the air enclosed inside. For most regions of the Russian Federation, a layer of ecowool of 250 mm is sufficient, but in colder regions it is better to make 400 - 500 mm.
Ecowool ceiling insulation technology sometimes includes water spraying. It is needed in order to accelerate the process of lignin formation. Then, after 1 - 3 weeks, a crust appears on top of the ecowool. Due to the fact that this material tends to cake, it is always necessary to take a margin of 5 - 15%.
Penoplex is a member of the extruded polystyrene foam family. This material has greater strength than polystyrene, which means that it can be used to insulate concrete floors before pouring a concrete floor from above. A good option for insulating the ceilings of the first or second floor of a low-rise private house.
It is not recommended to insulate the ceiling with Penoplex if the floors are wooden. The fact is that XPS is a material that is absolutely not “breathable”. As a result, moisture will accumulate in wooden structures, this will lead to the appearance of mold and fungus.
Before laying Penoplex on a concrete floor, the latter must be checked for irregularities. First, the surface is leveled, only then can the vapor barrier material be laid.

Then the Penoplex plates are laid out. Definitely on the run. They are attached to the surface with special dowels with a mushroom cap. The joints between the plates are filled with mounting foam. After the foam dries, a cement-sand screed with a layer of 50 mm is poured on top. It will serve as a solid floor of the attic or second floor.
Insulation of the ceiling with mineral wool (Ursoy)
The most popular modern material for ceiling insulation is mineral wool. One of the manufacturers of thermal insulation materials based on minerals or fiberglass is the Ursa company, in the assortment of which there are both roll positions and rigid slabs.
Mineral wool Ursa in rolls is good for warming wooden floors, it is convenient to lay it between the beams. But rigid mineral wool slabs are used for thermal insulation of concrete floors, although it is also possible for wooden ones.
Ursa insulation of the ceiling is carried out in this way:
For wooden floors. A vapor barrier material is laid between the floor beams. Its laying is mandatory, as mineral wool is afraid of moisture. The film is spread with an overlap, and the joints are glued with adhesive tape, an overlap of 15 - 25 cm is made on the walls. Next, Ursa mineral wool rolls with a thickness of 100 to 250 mm are laid between the beams, depending on the calculations of heat loss. The material must enter the space with force. To do this, it must be cut with a small margin of 2 cm more than the distance between the beams. Then there are two ways: the first - you can leave the mineral wool open, but then you can’t walk on the floor, the second - you can make a wooden floor from above, leaving a gap between the mineral wool and the floor boards of 3 mm. The advantage of mineral wool is its fire safety.

For concrete floors. The surface of the concrete is leveled, then covered with a vapor barrier film. Mineral wool slabs are laid on top, always apart. Next, a wooden floor or flooring made of boards, plywood, etc. is equipped. It is not recommended to perform a screed over mineral wool, since concrete has low vapor permeability, which means that the main rule of thermal insulation will not be observed.
Ceiling insulation with foam (polyurethane foam)
Polyurethane foam is a modern material that is advertised everywhere as the most ideal insulation for ceilings and attics. The advantages of this material are incombustibility, good adhesion, neutrality to microorganisms and insects, waterproofing and soundproofing properties, resistance to temperature fluctuations, and the absence of cold bridges. The disadvantage is complete vapor tightness, this has a bad effect on the microclimate of the room.

Insulation of the ceiling with polyurethane foam is carried out only by an organization specializing in this. The material is sprayed under high pressure so that it is blown into all the cracks and envelops the protruding elements - columns, etc. The layer is usually 10 - 12 cm.
Insulation of the ceiling from the inside
An extremely undesirable measure is the insulation of the ceiling from the inside of the room. In addition to reducing the overall height of the room, there is an extremely high risk of insulating material or its fumes getting inside the room, as well as the likelihood of mold and fungus appearing in the insulation. But if there is no other way out, you will have to at least take into account a number of restrictions: do not use mineral wool and form a ventilation gap between the insulation and the ceiling finish.
Ceiling insulation with extruded polystyrene foam (Penoplex)

EPPS is a good option for insulating a concrete ceiling. First, a crate is nailed, on which drywall will be attached in the future. The height of the lathing beam should be 2 - 3 mm more than the thickness of the insulation. The step between the rails should be equal to the width of the Penoplex minus 1 - 2 mm. Further, a heater is shoved between the crate, it should go in with effort. For greater reliability, it must be fixed with dowels to the ceiling. Then drywall is attached to the crate and a suspended ceiling is obtained. Instead of drywall, you can mount a stretch ceiling.
Penofol is a foamed polyethylene, one side of which is foil-coated. Its thermal insulation properties are not that great, but if the heat loss is not too large, it may be sufficient.

It is necessary to fill the crate on the ceiling, to which Penofol is fixed, with the foil side inside the room. It can be nailed to the crate. On both sides of this material, it is necessary to make a ventilation gap, so another crate is stuffed on top of it, to which drywall is attached. A stretch ceiling option is also available.
The second way to insulate the ceiling with Penofol is to use it in conjunction with Penoplex.

In addition to the Penoplex insulation method described above, Penofol is stuffed onto the crate, and only then drywall.
Ceiling insulation with heat-insulating plaster mixtures

For some unknown reason, the option of insulating the ceiling with special heat-insulating plaster mixtures is not popular. But in vain. This is an excellent material for insulating a concrete ceiling. Plasters are absolutely eco-friendly, decorative, do not suffer from moisture and steam, do not burn and are not afraid of fungus or mold. Among the materials of the UMKA company there are positions that can be used indoors.

Insulation of the ceiling with white agglomerate of cork tree bark is an environmentally friendly natural method of insulation. It is convenient to use the cork when installing an Armstrong false ceiling, fixing it to the crate. The use of a vapor barrier is optional, as the cork is not afraid of moisture.
The methods of ceiling insulation described above are the most common, but the general list does not end there. There are many other natural and synthetic materials that can be used to insulate the attic of a private house. When choosing one or another method and material, be sure to consider the general concept of your home. For example, to insulate the ceiling of an environmentally friendly wooden house with Penoplex or Penofol is at least stupid. To keep the wood dry and allow it to “breathe”, it is necessary to choose natural vapor-permeable materials, such as algae, reeds, sawdust or ecowool. And for a house made of concrete, foam concrete or brick, EPS and polyurethane foam will come in handy.
In order to insulate the ceiling yourself, you do not need university-level knowledge. It is enough to understand the layout of the floor device, to know the types of heat insulators used and how to install them.
How to choose the right material for ceiling insulation
Insulation of the ceiling will significantly reduce the cost of heating residential premises. The main heat leakage occurs through the upper and lower floors of the house, so you need to pay attention to both of them. It should be understood that the insulation of the attic floor requires a more careful approach than the interfloor. The fact is that the first will always be colder, since there is a roof next to it.

When choosing thermal insulation materials, the following characteristics should be taken into account:
- thermal conductivity (the lower it is, the better the insulation will be);
- water absorption coefficient (an important indicator that allows you to choose the least hygroscopic material);
- density and weight;
- flammability class (optimal G1);
- environmental friendliness.
In a private house, the floor can be either concrete or wood. In the first case, bulk materials, polystyrene, sprayed heat insulators, and dense mineral wool boards are used. To insulate a wooden floor, you can use any available materials with a low thermal conductivity. It is easier and easier to work with such ceilings. Methods of installation of the same materials for concrete and wood floors may be different.
GOST R 52952-2008. Heat-insulating materials and products. Download file.
In order to quickly determine the type of insulation, we recommend that you familiarize yourself with the table.
Table. Characteristics of the most popular thermal insulation materials.
| Material | Thermal conductivity coefficient (W/m*°C) | Flammability class | Density (kg/m3) |
| Styrofoam | 0,035-0,039 | G2 | 15-25 |
| Styrofoam | 0,025 | G2 | 35-50 |
| Mineral wool boards | 0,035 | NG (non-flammable) | 250 |
| Mineral wool | 0,041 | NG | 125 |
| Slag | - | NG | 1000 |
| Expanded clay | 1,148 | NG | 500 |
| Perlite | 0,041 | NG | 40 |
| Vermiculite | 0,05 | NG | 100 |
| Wood fiber boards | 0,09 | G2 | 250 |
| Sawdust | 0,090-0,180 | G2 | 25 |
Video - How and how to insulate the ceiling of a private house
Ways to insulate the ceiling, their pros and cons
There are two ways to insulate the ceiling in a private house:
- internal;
- external.
Each of them has its own advantages and disadvantages. If possible, both can be used for best results.
Mineral wool prices
mineral wool
internal
Insulation of the ceiling from the inside of the room will require the installation of a suspended frame made of metal profiles or wooden bars. This method is disadvantageous in that it significantly reduces the space of the room. Another disadvantage is that you will have to work at a height, holding tools and materials on weight. This will require significant labor costs.

Internal insulation requires a high-quality vapor barrier, since steam always rises and must certainly leave the room. Otherwise, the overlap will inevitably become damp, mold or fungus will appear on it. Therefore, when choosing thermal insulation materials, it is important to take into account the coefficient of their vapor permeability.
Outdoor
External insulation of the ceiling is easier to perform, since in this case the construction of an expensive and bulky suspension frame is not required. You can use any bulk materials with low thermal conductivity: sawdust, expanded clay, slag, foam chips, ecowool. This method is often used when insulating attic floors, if they do not plan to exploit the space under the roof.
In the event that an attic-type room is equipped, the external insulation of the ceiling will simultaneously be a floor device. Therefore, to complete this task, it will be necessary to mount the frame and its subsequent sheathing with suitable durable materials: boards, OSB boards, moisture-resistant plywood.

The technology of internal insulation of a concrete ceiling in a private house
Concrete flooring is easiest to insulate from the side of the attic. The fact is that for the device of the frame inside the dwelling, it will be necessary to perform a complex of very labor-intensive work, including drilling numerous holes.
But if there is no other way out, you should prepare all the necessary tools:
- drill or perforator;
- drill;
- screwdriver;
- building bubble level;
- twine and marker for marking.
From the materials you will need:
- metal profile for work with drywall (can be replaced with wooden blocks with a section of 40/40 mm);
- hangers for fixing the metal profile (narrow perforated metal strips);
- connecting elements - "crabs" used in the installation of frames for suspended ceilings;
- insulation (sheet foam, roll materials, mineral wool boards);
- panels for sheathing the frame (moisture-resistant plywood, OSB, drywall);
- vapor barrier membrane (film).
screwdriver prices
screwdriver

Stages of installation of a suspended frame and insulation
Step 1. Applying markup. In order to perform this task correctly, you need to understand what the frame scheme is. It consists of longitudinal and transverse racks interconnected by crabs and fixed to the ceiling with suspensions.

In order to make it easier for yourself to insulate the concrete floor, you need to choose such a distance between the longitudinal posts so that insulation sheets can be laid in the openings between them without additional cutting. But it should be noted that it should not exceed 80 cm, since in this case the structure will turn out to be unstable.
Marking is applied to all four walls adjacent to the ceiling. The easiest way is to stretch the cord from corner to corner, checking the correct direction with a bubble level. After that, markup is applied directly to the ceiling itself.

Step 2 Installation of guides. For mounting the frame, two types of metal profiles are used: PN 28/27 and PP 60/27. The first is the guide. It is fixed in accordance with the marking lines along the walls.
Step 3 Hanger installation. In order for the frame to be firmly attached to the ceiling, the suspensions are installed at a distance of 80-90 cm from each other. The required number of holes are drilled on the ceiling in the right places.
Step 4 Installation of longitudinal and transverse racks of the frame. Install the metal profile PP 60/27 so that the location of each rack corresponds to the markings.

Step 5 Heat insulator installation. To support the material laid between the racks of the frame, the legs of the suspensions are used, bending them in the right direction.

Step 6 Laying a vapor barrier membrane. At this stage of work, it is important not to violate the integrity of the film with sharp objects. You need to pull it carefully, fixing it on the metal racks of the frame using double-sided tape.
Step 7 Frame sheathing. When performing this work, it is important to install the sheathing sheets so that the gaps between them are minimal. Solid sheets must be fixed perpendicular to the long guide profiles. Docking of sheets should be carried out in the middle of the profile. For high-quality fastening, work is best done by two people. The sheets are fastened with self-tapping screws, and the latter are recessed into the sheathing material by 2-3 mm. The step between the screws should be 25-30 cm (3-4 cm from each corner of the sheets).
Chips should not form on the edges of the sheets when screwing in the screws. If damage does occur, the self-tapping screw must be removed, and a new one screwed in 3-4 cm.
False ceiling prices
suspended ceiling
Important point! A ventilation gap of at least 1 cm must remain between the insulation and the sheathing. Otherwise, moisture will accumulate under the film.
The technology of external insulation of the ceiling in a private house
External insulation of the upper floor can be single-layer or multi-layer. Regardless of the chosen option for landscaping the attic, it is recommended to use materials with low weight. This applies to both wooden and concrete ceilings.
If you plan to use bulk material, you must correctly calculate the thickness of the layer. For sawdust, 20-30 cm is enough, for expanded clay 10-15 cm. In order to make it convenient to move around the attic, a frame is mounted on top of which a floorboard, OSB boards or moisture-resistant plywood are laid.

For the device of the frame with external insulation of the ceiling, it is recommended to use wooden bars or boards. The first ones are suitable if the layer is not very thick.
Stages of work on the installation of a frame for external insulation of the ceiling
Step 1. Based on the dimensions of the insulation sheets, determine the distance between the racks of the frame (battens).
Step 2 Draw up a scheme for laying longitudinal and transverse crossbars.
Step 3 Boards are installed on the ends.
Step 4 Fasten the boards to the floor with metal corners and self-tapping screws.

The choice of material for external insulation
There are several possible options, let's get acquainted with the features of the installation of each of them.
Styrofoam
In the openings between the racks of the frame, you can lay:
- mineral wool in rolls and mats;
- foam sheets;
- bulk thermal insulation.
The choice depends on the financial capabilities of the owner of the house and his preferences. The least troublesome floor insulation using foam. If this particular material is chosen, the frame must be built so that the sheet can be laid without pre-cutting. In the case of polystyrene, this is not an easy task. Manufacturers offer canvases 50 cm and 1 m wide. You can use any.
The most preferred brand for attic floor insulation is C25. This is a denser foam compared to C15, therefore it has less thermal conductivity. Styrofoam grade C35 and polyurethane foam are expensive materials, but the most beneficial for regions with a harsh climate, as they provide the highest quality insulation.

Mineral wool
Manufacturers offer a wide range of fibrous thermal insulation materials. The most popular: Izover, Rockwool, Ursa, Parok. These materials have a lot of advantages, but have only one drawback: hygroscopicity. If the roof is not waterproof enough, mineral wool cannot be used to insulate the attic. Over time, it will inevitably absorb moisture and lose most of its thermal insulation properties.

Sawdust
The cheapest and easiest way to insulate the ceiling from the outside is to use sawdust. When choosing this material, it should be taken into account that it is also very hygroscopic. To prevent wood decay, sawdust is mixed with lime. Lime fluff is sold in building supply stores, which is ideal for this purpose.
Styrofoam prices
Styrofoam
Another way to insulate with sawdust is to prepare a mixture consisting of the following ingredients:
- sawdust;
- cement;
- water.
Optimal proportions: 10:1:1. The mass is mixed manually in a suitable volume container or in a concrete mixer. The finished composition fills the space between the racks of the crate and gives time to dry.

Expanded clay
Expanded clay is the most convenient bulk insulation. When using it, there is one nuance, the knowledge of which will allow you to get better insulation. When backfilling expanded clay, you need to ensure that granules of different diameters are present. This will eliminate large voids.

The name of this material should not be misleading: it has nothing to do with high environmental friendliness. Ecowool is made from recycled materials: newspapers, cardboard, bags. All components are mixed with borax and boric acid. These additives are needed to ensure a low combustibility coefficient of the material and prevent its decay.
The advantage of ecowool is that it has low thermal conductivity and excellent vapor permeability. We can say about this material that it "breathes", so mold or fungus never forms under it.
Ecowool is extremely easy to install and apply. All work on insulation can be done by hand, without the involvement of assistants.
There are three ways to lay ecowool:
- dry;
- wet;
- adhesive.
In the first case, ecowool is laid in the openings of the crate and compacted. For insulation using the last two methods (wet and adhesive), a special machine will be required, consisting of a hopper, sprayer and compressor. A mixture based on water or PVA glue is prepared in the bunker, after which the ecowool is fed under pressure into the hose from which the spraying is performed.
Ecowool prices

Ceiling insulation with polyurethane foam
The modern method of ceiling insulation is spraying with polyurethane foam (PPU). This lightweight foam is quickly applied to any surface. At the same time, it does not need to be fixed to a wall or ceiling, as it adheres firmly to them.

PPU has the following advantages:
- has low flammability;
- non-toxic;
- resistant to chemicals;
- differs in low hygroscopicity;
- durable.
During spraying, a continuous layer without gaps is formed. This eliminates the formation of cold bridges, which makes the insulation better. Polyurethane foam has excellent vapor permeability, so the ceiling does not need additional vapor barrier. This allows you to save on the cost of insulating the ceiling.
Before applying PPU, it is important to make sure that the condition of the surfaces meets the requirements for them. The humidity level of a concrete ceiling should not exceed 4%, wood - 12%.
Before starting work, all surfaces not intended for insulation are covered with paper, polyethylene or thick cloth. Polyurethane foam is applied in layers, constantly controlling the thickness of the spray. Before applying the next layer, make sure that the previous one is completely dry and hardened. The application density of PPU is 30-50 kg per 1 m3. This method of ceiling insulation in a private house is the most expensive, but at the same time the most convenient.
Video - Insulation of the ceiling with polyurethane foam