If desired, the tracks can be made with your own hands, and such an unusual material as corks from plastic bottles is suitable for this. Turn on your imagination and, using the tips, create a unique and practical art object in your country house. And you need quite a bit for this: diligence, free time and our advice.
When it comes to waste material, many believe that it is much easier to work with it with construction material. This is not entirely true. If you want the garden path to become not only a practical element of landscape design, but also its calling card, you need to follow some rules. They primarily concern the choice of material and its preparation.
Choosing plastic bottles and caps (corks)
They say that plastic decomposes after 100 years. It's wonderful! Indeed, in this case, it is ideal for garden paths (for the garden). The palette of plastic covers is quite extensive.
To create beauty, you can use:
- caps from plastic bottles of different sizes;
- lids from tetrapacks, eggplants, and cans;
- metal bottle caps;
- wine corks.
The main requirement for plastic lids is high density. After all, the tracks have a serious load. And it will be a pity for the spent effort if the coating does not last long.
For the track you will need a lot of this material. You can do the calculation yourself:
- measure the diameter of the cork, in 1-2 liter bottles it is 3 cm;
- 33.5 corks are placed in 1 meter;
- 1122.5 plugs will be needed for 1m 2;
- multiply this figure by the area of your track, and you will get the total number of caps.
One family cannot handle such a number of drinks, even if you collect all the caps from bottles and cans, including water, beer, yoghurts and even medicines. Connect everyone you can to the project:
- announce your decision to create an extraordinary element of garden design to friends, acquaintances and neighbors;
- give a call to collect caps on social networks;
- try to negotiate the supply of material with the employees of the nearest cafe.

How to do it yourself in the country
Corks can be laid in different ways:
- face up (resulting in a flat surface);
- ribs up (this track can be used instead of a massager);
- inside up (the coating is textured).
The latter option is only suitable for small areas under a canopy. Otherwise, during precipitation, water and dirt will accumulate in the recesses of the plugs. And such an uneven surface is hard to care for.
He will acquaint you with varieties of crafts from tin cans.
Mosaic laying scheme
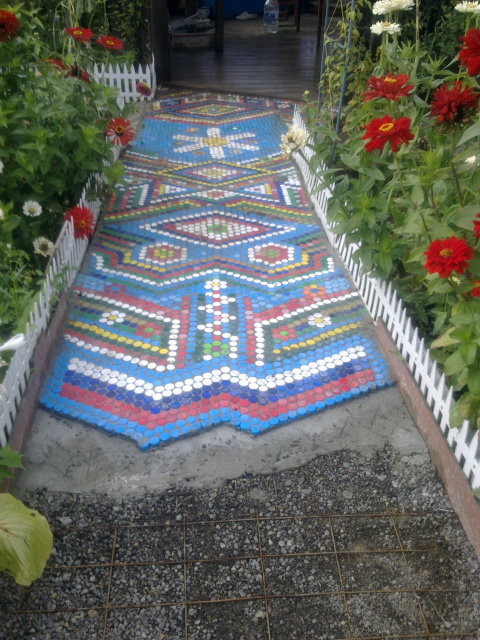
This is the most creative part of the job. Before you start paving directly, you need to decide exactly how your path should look. You can lay out the covers in even rows, regardless of color. As a result, you will get a multi-colored scattering of colored highlights in your garden. Such a path attracts the eye and looks impressive.
But if you want something more extraordinary, choose a pattern for your track yourself. Cross stitch patterns will help you with this. Tracks with colored geometric patterns look good. If you are confident in your abilities, you can choose drawings more difficult. Some summer residents create real plot panels under their feet in their garden. It is in the country that such decorations are popular. 
Tools and materials
Despite the cheapness of the material, the approach to creating paths from traffic jams must be serious. Sometimes it is advised to simply level the ground before laying the cork mosaic and start creating by sticking the caps directly into the ground or a layer of sand.
This carpet will not last long. Not only will the covers not hold out for a long time and will begin to fly out one after another, but also the grass will hasten to sprout between them. It is better to spend more time, but do everything soundly.
You will need:
- covers of different colors;
- cement;
- sand;
- construction adhesive or ceramic tiles;
- wooden blocks and boards for formwork.

For the construction of the track you need:
- determine the area of \u200b\u200bthe track and make markings;
- remove the sod and topsoil;
- dig a trench 10 cm deep;
- drive supports along the edge of the recess;
- make a wooden formwork, and the nails must be hammered from the inside of the structure;
- install spacers for reliability (the optimal distance between them is 1 m);
- fill up a layer of rubble, gravel, broken bricks;
- prepare a solution of cement and sand (4: 1) and add one part of the glue to it, the mass should be of medium consistency;
- pour a small amount of solution onto the prepared site;
- quickly lay the covers, according to the chosen scheme, slightly press them into the cement;
- the solution should almost completely cover the lids;
- after the cement has hardened, go over the top layer with a stiff brush in order to remove excess cement.
The mortar hardens quickly, especially in hot weather, and laying mosaics is time consuming. Do not fill the entire track with cement. Work in sectors. Break your drawing into parts or conditional squares and fill in small areas.
Advantages of garden paths
- The coating performs an aesthetic function not to the detriment of the practical one.
- The material does not require material investments.
- Plastic handles temperature fluctuations well.
- Such paths do not lose their aesthetic appearance for a long time.
- Paths made of unusual mosaics are easy to repair: any cover can always be replaced.

Disadvantages and methods of dealing with them
But such tracks are not ideal, they have serious drawbacks. But knowing in advance what difficulties can arise with them, you can easily avoid them.
- The plastic paths from the lids become very slippery after rain. Such coatings should not be arranged on the central paths. Their place is in the garden and near recreation areas.
- The icy path becomes dangerous. If you need to walk on it in winter, it is better to combine plastic cover mosaics with cement, ceramic or wood designs.
Other options
Coatings from combinations of plastic covers with broken ceramic tiles look good. The small size of the elements allows you to lay out bizarre and extraordinary patterns. The result is a distinctive path of bright elements. Such a garden patchwork will decorate the garden and place accents on the site.
Drawings can also be varied with metal covers. And adherents of eco-design will like paths made of wine corks. Cork wood is a noble material with unique properties. 
Health track from different covers
Homemade massage paths in the garden have become quite popular. They are loved by children and adults. After all, walking barefoot on a textured surface is not only pleasant, but also useful. For such paths, you will need a cement base on which different materials are laid.
Lids from juices, glass jars, corks, buttons, sticks are suitable. All this stuff is sorted by color and size. Then a sketch is developed. Here you can play not only with color and texture, but also with the way of laying. Covers laid on the end will create a convex surface, and glued with a notch down will give a smoother plane.
From bottles
This material can serve as a wonderful material not only for manufacturing, but also for arranging exclusive paths in the garden. For this, whole bottles or their parts are used.
How to make from plastic bottles
Empty bottles do not withstand serious loads. Therefore, before building a path, they need to be filled with sand, fine gravel or dry soil. If you want to make a color path, then put colored paper, foil or pour a little dye inside the bottle, and only then fill in the sand. When the material is ready, start laying it. 
In this case, you can not do without a cement cushion. Only the hole for it needs to be dug deeper - by 1.5 bayonet spades.
- Gravel is poured at the bottom, formwork is being built.
- The bottles are laid sideways in a trench and poured with cement mortar.
- Seal the masonry. To do this, put a board on the track and walk along it.
- After drying, the formwork is removed.
- Decorate the edges. Any mosaic is suitable for this.
You can make interesting paths from the bottom of the bottle. To do this, prepare a trench about 15 cm deep.
- Cut off the bottom of the bottles (leave 1/5 of the height).
- Make formwork and concrete pad.
- Put the bottom into the wet solution.
From the remains of bottles, you can build interesting garden sculptures or greenhouses for seedlings.

Greenhouse for seedlings from a plastic bottle.
How to lay paving slabs is described.
How to make glass bottles
The technology is largely similar to the previous one. Only glass bottles do not have to be filled with sand, although the sand will give them extra strength. It is better to take bottles of champagne or wine, but beer ones are also suitable.
They are usually installed upside down. For such a path, a fairly deep trench is needed. Therefore, lane bottles are often cut and only the bottom is used. The laying technology is the same as that of plastic.
The backlit track looks great. To do this, you need to mount small bulbs under the bottles. It is better to take LEDs - they are durable and economical. Bottles are also suitable for building walls, fences and borders.
Video
On the video: do-it-yourself traffic jam paths.
Ordinary caps are a cheap and practical material. They are well suited for paving paths of varying degrees of sinuosity. Surfaces decorated in this way look cozy and colorful. And so that they do not stand out from the general style of the site, complement the garden with bright mosaic sculptures and panels in the same color scheme.
There is always little time left for restoring beauty in a summer cottage - all the forces take a garden with a garden. But recently, many people spare no time and effort to make their site beautiful and unique. Take plastic bottles, for example. With each trip to the country, summer residents carry drinks in such bottles with them, and a lot of this container accumulates over the whole summer. Of course, you can collect them in bags, take them away and just burn them. But it's bad for the environment. We offer another option and now we will tell you how a path is made from corks of plastic bottles. By the way, the bottles themselves can not be thrown away, but many useful things can be made from them.
 Advantages
 - cheapness. There are a lot of plastic bottles everywhere, you can ask neighbors and acquaintances for corks from them, or simply remove them from those bottles that are ownerless in the bushes;
- quite simple to manufacture;
- look elegant, beautiful and fun;
- long service life.
 1. First of all, select the type of future track. Think about what ornament you will lay out. Then prepare a place for the path. If necessary, dig a trench for one and a half spade bayonet under the garbage.
2. It is best to use cement mortar in proportions of one part cement and four parts sand. Some people, before laying the cork mosaic, level the ground, moisten it a little with water, and begin laying out the cork carpet. But for a long time it will not last, after a while the plugs will begin to fall out one after another. Therefore, use cement mortar.
3. Make a base from small gravel and tamp it down. Then put about five centimeters of the solution, place a metal mesh on it with a cell of 3-4. Then comes another layer of mortar about five centimeters. A strongly liquid solution is not needed, otherwise everything will float.
4. Start pressing the lid into the solution. Press them onto the fresh mortar until it sets. They can be laid out in the form of a selected pattern or simply in random order. It will be easier to work if you do not pave the entire path at once, but do it in parts, in sections of fifty centimeters. It is better to take multi-colored caps, the pattern of them will look very beautiful.
5. The covers pressed into the solution must be leveled with a sheet of plywood, on which lightly tap with a rubber mallet. To prevent the covers from being squeezed back, put the same plywood and press it on top with bricks around the perimeter and put one in the center. Then the load distribution will be uniform. The process, of course, is long, but it turns out indescribable beauty!
 1. Make paths from caps and bottoms of plastic bottles. You can involve children in this, let them cut off the bottoms of the bottles with scissors, and then help you make the path itself.
2. Prepare a place for the path and install the box formwork there. On a well-packed earth, pour a layer of sand into the formwork. Level and water.
3. Now start pressing the lids and bottoms into the wet sand. You can lay out a flower meadow from the bottoms, and lay out any pattern or picture according to the cross-stitch pattern with lids. Take your time and such original paths will bring beauty to your site and joy to all family members.

Rustic hand-made
Let me get into the patrimony of our expert in the field of beauty - - and speculate about the features of rustic design. Recently, I was visiting relatives in the village of Yarkovo, Tyumen Region, and was shocked by the creative creations of a local resident, Uncle Misha: a former prosecutor, now retired, creates pictures from plastic bottle caps.
Why not hand-made?
Any rubbish can be put to good use. they sew bags from old newspapers and dresses from tax returns, so why not make a picture out of corks?
With a rural artist, they are everywhere: on the doors of the bathhouse, barn, toilet, on the inside of the fence and gates.
He would decorate the house and the street gate, but his wife is categorically against it.
Having learned about the pensioner's hobby, they bring him more and more corks, throw them under the fence, send them by mail, on holidays he receives parcels with corks from relatives from Moscow.
It is clear that the pensioner's drawings are unlikely to appear in museums around the world. To create masterpieces, practice is required, even more corks and nails, it is advisable to come up with a concept in advance.
But the idea of using traffic jams for peaceful purposes seems promising to me: waste disposal plus the realization of creative potential. I would not mind if a similar pattern appeared on my country house. And you?
Photo: Galya Wood
http://f5.ru/galyavud/post/77883
Cork panel
http://stranamasterov.ru/node/134240
![]()
http://stranamasterov.ru/node/195172
Rugs.
http://stranamasterov.ru/node/147044 ![]()

Not education, but talent makes an artist real. Nikolai Petryakov, a resident of Bratsk, creates paintings from plastic corks. 
Cork mosaic is a troublesome business. Only the preparation of material for unusual paintings takes several hours, master Nikolai Petryakov shares. First remove all unnecessary, first rinse, then match by color. It's like embroidery. Only instead of canvas - the wall of the bath, and instead of threads - colored plastic corks. 
I draw 30 mm squares. Where the black ones are, I mark the dots. Where brown - I put crosses. First you prepare the plugs, then you fill them in, - says Nikolai Petryakov, a resident of Bratsk. 
This summer the summer resident has a creative anniversary. Five years since he mastered the cork art. During this time, not only neighbors learned about the unusual hobby of Nikolai Petryakov. People from other cities come to take pictures with pictures from traffic jams. Everyone is sure: the author of the works is a professional artist. But Nikolai Pavlovich has no special education. And recently, he calculated how many traffic jams he collected over 5 years of creativity. It turned out almost 40 thousand pieces.
Sometimes bottles with expired mineral water were thrown away at the landfill, so my family and I collected a whole bucket, - says Nikolai Petryakov, a resident of Bratsk 

The creative potential is there, but the material is not enough. Because of this, work on the painting, which he is currently finishing, is delayed. Black, green and brown corks are in short supply. But despite everything, the summer resident has grandiose plans - after all, there is one more free wall of the house.
http://ideidetsploshad.info/publ/stati_o_dploshhadkakh/plastikovye_butylki/nikolaj_petrjakov_sozdaet_kartiny_iz_plastikovykh_probok_bratsk_irkutskaja_oblast/25-1-0-475
Path of caps from plastic bottles.


I am glad that humanity is gradually learning to reuse waste.
If earlier these were only modest attempts, now people will think several times before sending them to the garbage container.
You can reuse not only transparent, but also the cover. About them today and will be discussed. More specifically, how can apply multi-colored caps in daily life, how to make of them:
- garden paths;
- fence;
- furniture;
- massage Mat;
- other crafts for home and garden.
Recycling plastic caps- a relatively young direction, which is only gaining momentum. In large shopping centers you can see special containers for collecting multi-colored plastic.
It is clear that a resident of a small town is unlikely to take a bag with lids to the capital to throw them in a specially designated place. But sending them to a landfill is also not worth it - you can give them second life.
 Colored, white, large and small - almost all bottle caps are suitable for creating country crafts.
The main thing is to let your imagination run wild.
Can connect to collection their covers relatives and friends.
This material can be used in a variety of ways, and for this it needs quite a lot.
Coasters for glasses and hot dishes, children's toys and rattles, country rugs and seats, lampshades for lamps and curtains, garden furniture - and this is only a small fraction of what can be made from plastic bottle caps. Next we Let's take a look at some tutorials which can be your source of inspiration.
Garden paths and paths
The garden path on the plot will become brighter and more fun if you lay it out with colorful corks. Why buy crushed stone and gravel when you can use the waste for free? Also, this way you can save the environment from pollution.
To get started, you need mark the territory, install the sides and fill the base with solid material so that the plugs do not fall into the ground. Now only remains lay out track - you can do it in a chaotic manner, or you can gradient or pattern, as in the photo below, the result is an unusual solution for landscape design.
Looks good garden path from the covers in the form of a rainbow also a great option for brook imitations.
let's consider step by step process creating a garden path:
- First of all, it is necessary decide on the size path and location. At this stage, you just need to outline the boundaries of the garden path.
- In the future, it should remove the top layer of soil and dig a trench at least 10 cm deep.
- Now follows set up the formwork wooden products and fill the trench with fine sand or gravel.
- Prepare concrete solution in order to fill the future track.
- Flood the path follows in small portions with the addition of glue.

Now you can lay out colorful plugs. In order for the path to have a finished look, it is necessary to install a curb. Plastic covers can be laid out on top of green spaces.
We talked about how to make a garden path out of tires.
Instructions for creating a rug
Here we will talk about a massage mat that will be useful for all family members. One evening is enough for you to create an unusual decoration for your home, which will also be good for your health. A little patience and care - and an unusual massager is ready.
It can be use for foot massage at the end of the working day, as a massage therapist for a tired back, as well as for rehabilitation after operations.
You can make it in any form, or you can think over the shape, size and even the design of the product in advance.
Here's what you'll need:
- a large number of plastic covers;
- awl for making holes;
- strong line.
 First of all, it is necessary make holes in lids On the sides- it is best to do this according to the principle of the cross.
Now imagine what your rug will look like.
Lay out a pattern on the floor and fix it in any way (draw or photograph).
Laid out plug the plugs with a snake on the fishing line according to the drawing, row by row.
The result should be a long "snake". Then select the covers of the first row and put them on the fishing line in others - located opposite.
So, having collected the first row, proceed to the collection of the second and then a third. It remains only to tighten the ends and securely fasten them. You can use the above diagram, or you can try to draw up an original drawing yourself.
How to make a fence?
It should be said right away that for the covers of this material you need not just a lot, but a lot. It is almost impossible to collect such a quantity on your own, given that parts must be the same size.
It is also worth deciding on the color in advance - you can collect caps of the same shade, or you can cover them with the desired color.
And there is also lots of options:
- cover the fence with only one color;
- make in the manner of colored pencils;
- lay out an unusual pattern and a whole picture on the fence with plastic covers, as in the photo.

As soon as there are enough covers, it is necessary to sort and drill holes in each of them with a thickness corresponding to the size of the fishing line. The same holes are made in the frame of the fence.
Once you have decided on a pattern or ornament, you need to weave the fence section. For these purposes, suitable wire from. And for fence frames, you can use steel strips, corners and pipes.
Now you should arrange the covers in accordance with the pattern on plywood or cardboard, after which transfer the image to the frame fence. Further, only string lids and fix them.
In any case, such a fence will definitely not go unnoticed. fasten caps should with wire or string. Nails are not the best option, as they will not allow you to fit the covers to each other.
Other garden and home decorations
In a private house or a gazebo on a personal plot, you can do unusual curtains from multi-colored corks. They will perfectly emphasize the interior in Provence style, as well as create a cheerful mood.
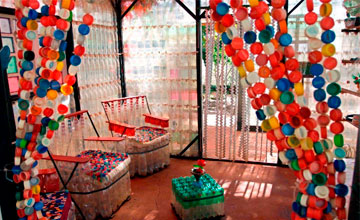 These curtains are very easy to make. The main thing is to choose the right palette in accordance with your interior.
Or how about new light, comfortable, compact and mobile garden furniture? Craftsmen make from covers original and creative chairs, as well as unusually decorate tables.
Also, don't rush to throw away corks if you have small children. This is excellent entertainment for kids that develops fine motor skills, and also forms color perception.
Invite your little one to sort the corks by color - you will be surprised how much this activity will captivate the child.
You can also assemble a frame from wooden slats in the shape of a flower or a funny animal and fill it with colored corks from PET bottles - you will get an unusual decoration for your backyard, which will certainly attract the attention of everyone around you.
If you prefer bright colors and unusual design solutions, pay attention to the fact that lids turn out unusual and original lampshades.
Making such an element with your own hands is quite simple. The main thing is to design a frame and choose covers of the desired shade.
Practicality, convenience and functionality are the main criteria that the design of a country house must meet. Surely, somewhere in your shed an old kitchen sofa is gathering dust, which is a pity to throw away, and it is difficult to make something worthwhile out of it. Try making plastic caps fun rug that brings old furniture back to life.
Also from bright plastic covers you can make unusual pots or . It is enough just to glue the base with colored corks.
Related videos
The video shows a lot of ideas brought to life on creating a variety of beautiful and useful crafts from plastic covers for a house, a summer residence, a personal plot:
Conclusion
To all that has been said, it remains only to add that the lids are not waste and not. It is a versatile material that can be reuse, creating unusual and useful things while protecting nature from pollution. These colorful caps can be used to create baby toys and rattles, garden furniture and interior decoration.
After reading this article, you have learned how to use PET bottle caps for garden and summer cottages, making a variety of DIY crafts and decorations out of them.
In contact with
One of the indicators of the well-being of any cottage is the presence of paths. They connect garden buildings, lead to a recreation area, separate beds.
To make such a path, you will need plastic bottle caps, cement, sand, boards and tile adhesive.
Country paths, in addition to their direct purpose, ease of movement in any weather, play a very important decorative role.
Such paths become the main element of the surrounding landscape.
Absolutely any material is chosen for their manufacture, but in order for the path in the country house to become truly unique and original, it can be made from the most ordinary traffic jams. This is an easy and very interesting task, which even a child will be able to cope with. But before you make country paths from traffic jams yourself, you need to draw rough sketches on paper. The house, the fence, the flower garden, the rest of the decor - everything should be in harmony with each other. The dacha should become a single entity. Next, you need to decide whether the paths will be monochrome or not, whether to make a pattern or ornament on them, whether they need a small fence. If it is decided to make an image or lay out an inscription, then this must first be depicted on paper, calculating how many traffic jams will be in each row. You also need to collect a sufficient amount of material used and only then get to work.
Construction of paths from traffic jams in the country
Before you start laying the plugs, you need to level the area and fill it with liquid from weeds, and after laying, tamp it down with a mallet.
Required tools:
- Shovel.
- Cord.
- Roulette.
- A hammer.
- Watering can.
Step by step work:
- Wash the corks well and dry.
- Make markup. To do this, you need to decide on the place of the track, drive pegs around the perimeter and pull the cord along them. If the path in the country house is with a bend, then on the turns the stakes are driven in at a small distance from each other so as not to disturb the smoothness of the line. Measure the width of the tracks with a tape measure. If the path is intended simply for walking, then its minimum width is 50 cm, if a wheelbarrow will pass along it or it will be used for other household needs, then it will be 80 cm.
- Sod is removed along the marked area, stones and plant roots are removed. Dig a small trench with a shovel and tamp the soil.
- If the path has a fence, then it can also be made using plastic bottles. Their necks down should be placed next to each other at the edges. A decorative fence can be made from any other improvised materials.
- Pour rubble into the trench. Smooth it out.
- Pour sand on top, tamp and lightly pour water.
- Covers bottoms up to be pressed into the sand. As the sand dries, it must be moistened.
Thus, you can lay out the usual straight path in the country house, enclose a flower bed, make a labyrinth, or simply lay out a small area on which flowers in pots will then stand.
If it is necessary to make a more durable coating, then it is better to lay the corks on a concrete solution. The technology is the same, but the sand is replaced by cement. You need to make such a path quickly, and it is better to spread the cement in small portions. When mixing the solution, special dyes can be added to it, then bright colors will be visible between the covers, and not a dull gray color. In addition to plastic corks, metal ones can also be used. They are also well suited for laying and decorating a summer cottage.
