Sooner or later, any user of a household air conditioner is faced with an unpleasant problem - after turning on the split system, a cool breeze bursts out of the blow hole, filled with the sweet smell of stagnant mold.
This says only one thing - it's time to carry out maintenance on your split, or rather, wash it thoroughly.
Here you can act in two ways - call the master and part with a certain amount of money, or rely on your own strength and disassemble the air conditioner yourself.
This disassembly guide indoor unit split systems (for example Toshiba RAS-07EKH) will also help those who are faced with the problem of a breakdown of the air conditioner and are eager to fix it on their own.
And the last thing - the disassembly algorithm is typical, and is suitable for most modern split systems.
What you need
Yes, in general, a little. Several plus and minus screwdrivers different diameter and (for some models) a set of hex sprockets.

If you have stocked up with such a simple arsenal, it's time to start!
And in order to finally dispel the last doubts, I clarify - in the process of all the operations described below, the indoor unit of the split system is not removed from the wall, copper track does not disconnect, freon does not merge.
Let's start cleaning the air conditioner!
Disassembly process
First things first, de-energize the air conditioner and remove the protective filters of the indoor unit. This process is detailed in the manual for any split.
Now I need to take it off front panel. We unscrew the two screws under the protective plugs,

and pull the frame towards you (two latches hold it on top).
The inside of the lid is covered in dust and mold, it belongs in the sink.

Now remove the airflow direction blade. To do this, you need to apply a little force and remove it from the grooves.

We get such a picture.


Now disconnect all electrical wiring, remembering to write down the location of the wires.

If you are too lazy to write, and your knowledge of radio engineering is worthy of respect, when reassembling, you can use the electrical circuit located on inside front cover.

Be sure to disconnect the ground wires before removing the card from the slot.

Now we press the mounting brackets,

and take out the housing of the electronic unit together with the transformer.

Depress the three support latches and carefully dismantle the drain together with the outlet hose.

Look at those awful brown spots.

The blow hole of the indoor unit, as well as the fan blades, are also covered with a disgusting coating that exudes a stench.

But let's continue
Loosen the motor support bolt

very carefully lift the radiator and remove the motor support,

after which we take out the blade together with the engine from the cell.

The radiator is carefully laid back so that it does not fall.

It is not easy to remove the thermal lock of the motor pulley mounting bolt.

In order not to burn the energy-transmitting rubber element, gently heat the head of the bolt with a thin soldering iron, periodically trying to unscrew it. I got it on the third try.
When the blade is separated from the motor, all dirty elements should go to the sink.

A bottle of Feri, a long-bristled brush and a powerful jet from the shower hose will help you get rid of annoying mold.
Assembly is carried out in reverse order.
Conclusion
As you can see, the design of the indoor unit domestic split systems quite simple, if not primitive.
Therefore, if your hands grow from the right place, and the purse does not break from the abundance of excessive freaks, it is quite possible to service your favorite air conditioner on your own ...
Knowledge of how to remove the air conditioner from the wall with your own hands may be needed in several cases:
- if you plan to move;
- if it is necessary to carry out repair and restoration work;
- if you plan to replace the air conditioner with a new one and there is no desire to pay for the dismantling of the old one.
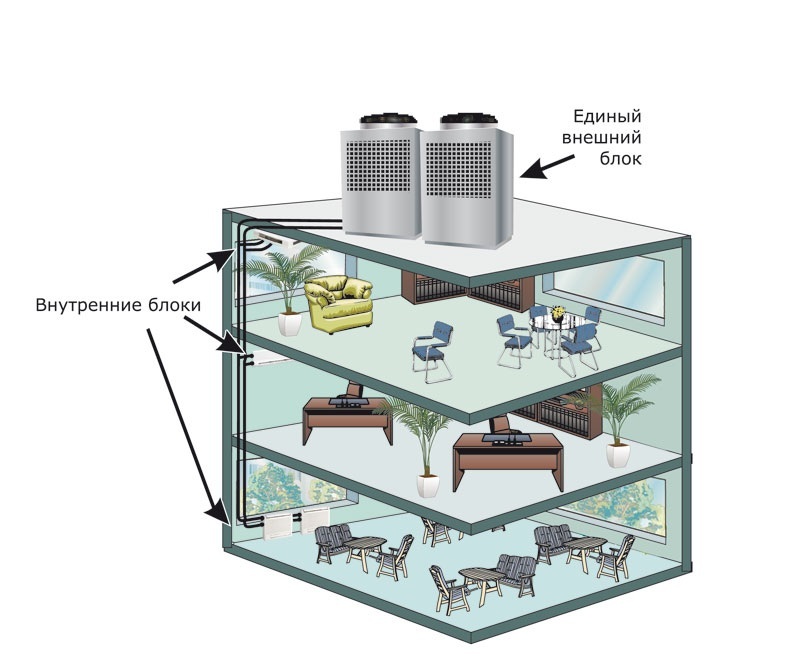
To begin with, when changing the location, it is worth dealing with completely disconnecting the air conditioner from the wall, that is, both units. AT this case it is important not only to carry out high-quality dismantling, but also to follow the rules for transporting split system modules.
How to remove the outdoor unit from the wall
First of all, they provide for necessary tools. For self-withdrawal air conditioner will need:
- adjustable or gas key;
- hexagons;
- open-end and socket wrenches;
- indicator screwdriver;
- pipe cutter;
- manometer or manometric station.
Nippers and similar tools should not be used instead of a pipe cutter, as they spoil the quality of the copper pipeline.

First, the external module is dismantled - the compressor and condenser unit or KKB.
Step 1. With an adjustable or wrench on the end side of the KKB, open the valve plugs.
Step 2 Close the liquid valve outdoor unit. Use a hex key.
Step 3 In order for all the freon to pass into the external module, the air conditioner is started in cooling mode for 30-40 seconds. As soon as the compressor began to work only for suction, a manometric station is connected to the valve from the gas pipeline and they wait for the indicators to reset. Close the freon return valve immediately.
Step 4 The system is completely de-energized. Before proceeding to next step removing the air conditioner from the wall, check the absence of current with an indicator screwdriver by inserting it into the phase terminal.
Step 5 Now the freon line is cut with a pipe cutter, since it is a non-removable structural element. The remaining ends must be insulated from moisture and debris. You can use electrical tape for this.
Cut off the connecting tubes at a distance of 15-20 cm from the fittings. If the dismantling of the capacitor module is carried out for the purpose of carrying out repair and restoration work, then cut copper tubes no need.
Step 6. Carefully disconnect the drain piping and interconnect wires. It is also desirable to wrap the ends of the electrical wires and the drainage tube with protective material.
Step 7. Now proceed to dismantle the device itself. How to remove the outdoor unit of the air conditioner from the brackets? To disconnect it from nuts and bolts, use an open-end or socket wrench. Since the KKB usually has considerable weight, it is advisable to take a second person to help.
Step 8. Brackets are removed from the surface of the building or balcony by unscrewing stop valves end head.
After the air conditioner has already been removed from the wall, proceed to its packaging. To do this, you will need a multilayer cardboard box, foam plastic and soft packaging film on a roll.
It is possible to transport KKB only in a vertical position in order to avoid water hammer during subsequent work. Before mounting the unit in a new place, you should let it stand for 2-3 hours.
If transportation is planned for winter time, you need to dismantle the air conditioner from the wall so that all the freon does not leak out. To do this, be sure to use a manometric station. But most experts advise to drain the refrigerant and then completely recharge the circuit.
How to remove the air conditioning compressor

The most serious malfunction of a split system can be a compressor failure. It occurs when:
- poor-quality installation - lack of evacuation, violation of the rules for laying a freon pipeline;
- using a split system in an unacceptable temperature range;
- factory marriage.
In this case, you will also have to independently remove the KKB of the air conditioner and disassemble it. Some air conditioners do without complete dismantling, but it is problematic for a non-specialist to do this, since in this option access to many elements is severely limited.
The outdoor module has been dismantled, how can I remove the air conditioning compressor now? In fact, there is nothing supernatural here:
- The protective cover is removed from the body of the outdoor unit;
- Disconnect the lines going to the discharge and suction, as well as the electrical wires suitable for the fan and compressor;
- Unscrew the fasteners with an open-end or socket wrench and remove the compressor from the vibration dampers.
It is worth considering that before removing the air conditioning compressor, it is necessary to check the degree of oil deterioration. If it has bad smell and changes color when tested for oxidation, then a replacement + flushing of the KKB will be required. With normal properties and a negative reaction of the oil oxidation test, a simple replacement will be sufficient.
How to remove the indoor unit from the mounting plate

With how to remove the air conditioning compressor and himself outdoor unit with your own hands from the wall, everything is clear. It remains to figure out how to dismantle the internal module. This process also goes through several stages:
- Remove the protective cover from the case;
- Unscrew fasteners;
- Disconnect all connecting communications: freon line, electrical interconnect cables, drainage pipeline. Turn off the power first.
- The block is removed from the plate by opening the latches of the fasteners;
- Unscrew the mounting plate and dismantle the plastic wire with the remaining copper tubes.
When removing the indoor unit from the wall, be very careful not to damage the fixing latches holding the unit to the mounting plate.
Be sure to caulk the ends of the copper freon tubes in the same way as for the outdoor unit.
Pack the room unit in a tight cardboard box, overlaying it with foam and wrapping it with soft bubble wrap. The evaporative block can be transported in any position unlike KKB.
If replacement or cleaning of any element of the indoor unit of the air conditioner is required, then it may also be necessary to remove it from the wall or partially disassemble it into components. It looks like this:
- Remove the front panel and wash its reverse side with a stream of water and detergent or soap;
- Remove the airflow guide plates by carefully pulling them out of the grooves. Some models have special latches for this;
- Unscrew the screws, gently pull the lower protective part towards you and slightly raise its top, then remove it from the latches;
- Turn off the power wire and drainage;
- Disconnect the interconnect wires from the corresponding terminals, having previously recorded their location;
- Remove the hose tray. For some models, it may be stationary, then it is lowered a little;
- Now remove the tangential fan by lifting up the evaporative heat exchanger.

All elements are washed with water and detergent. You can use a steam generator for a more thorough cleaning. When the parts are dry, they are fixed in reverse order into place.
If it is required to dismantle the control board, then first remove the protective cover from the electronic unit, disconnect all wires (sensor connectors of the display panel, air damper actuator). After that, the board is unscrewed from the fasteners with a screwdriver or simply disconnected from the latches.
When the indoor unit is not dismantled, but disassembled, there is no need to cut off the freon line.
Monoblock systems are dismantled in almost the same way. The only difference is a slightly different fundamental circuit diagram and nozzles with working fluid.
When self-dismantling is undesirable
Do not remove the air conditioner with your own hands in the following cases:
- in the presence of a split system of column, channel or cassette type;
- if the user does not have the necessary tools, materials and instructions for the device;
- with a person's lack of self-confidence.
In these situations, it is better to contact professional installers.
Before proceeding to independent action, you can watch a video on how to remove the air conditioner yourself:
It is as responsible to dismantle household climate equipment as it is to install it. Especially if its further use is planned, for example, when moving to another place of residence. Consider the basic rules of how to dismantle the air conditioner yourself without losing its effective performance.
Set of tools
Dismantling, as well as installation of the air conditioner, is strongly recommended to be trusted by professional installers. This largely guarantees a high-quality installation procedure, without the appearance of unpleasant consequences in both cases. But if there is no money for an expensive service, with certain skills, disassembly can be done independently.
The main point when dismantling a split system is careful, consistent observance of the basic rules that will preserve the functioning of the equipment. In many ways, special tools will be useful here that will help to disassemble with the least effort, with better quality. These include:
- pipe cutter
- side cutter
- construction knife
- Phillips screwdriver
- integral screwdriver
- hex socket wrenches
- wrenches
- adjustable wrenches
- drill, screwdriver
A set of these tools is required because not many standard mounting tools will come in handy. Using the latter, it is likely to cause irreparable damage to the system, after which it will have to be changed.
How to properly dismantle the air conditioner? Safety regulations
There are certain rules, conditions that must be observed in order to protect health, equipment from breakdowns, malfunctions. Let's list them:
- the cooling circuit must not be depressurized. It operates at a pressure of 15 A. With a sharp leak, there is a high probability of being hit by a very low temperature gas jet;
- you can get frostbite from a jet of cold freon when it leaks;
- it should be avoided when disassembling the ingress of dust, moisture into the circuit, which have a destructive effect on the system;
- when transporting an outdoor unit containing freon, an explosion may occur;
- during transportation, it is necessary to carefully handle the remaining pipe sections, as their damage will lead to the replacement of the entire unit;
- it is forbidden to unscrew union nuts from fittings;
- Care must be taken when handling the latches of the indoor unit so as not to break them.
Freon transportation
When dismantling the outdoor module, the primary task is to "pack" the freon. It is necessary to carry out this procedure with high quality, so as not to waste time and money on refueling the air conditioner. attention should be paid to the accuracy, accuracy of the transfer of refrigerant.

It is possible to reproduce with the help of a manometric manifold, or without it. This device will be able to show when a vacuum is reached in the cooling circuit. It is in this case that the second valve should be closed to “pack” the freon inside the condenser.
- connect the gauge manifold to the nipple on the fitting instead of the branch pipe with the liquid of the cooling circuit (it is thinner compared to the second one, through which gas freon passes);
- if the device is absent, it is necessary to start from the next point;
- put the split system on cooling mode, determining the most low temperature, which the equipment is capable of according to its technical specifications(should be found in the user manual). So the unit works for at least 10 minutes;
- close the valve of the liquid pipe (thinner. It is closed with a hex key under the protective cap);
- on the gauge manifold, watch the pointer until it reaches the vacuum level. If there is no pressure gauge, it is necessary to note 1 minute on the clock;
- after the time has elapsed / the desired indicator is reached on the device, close the gas pipe valve with a hex wrench;
- turn off the air conditioner;
- put back the protective caps.
The difficult task of moving the refrigerant can become more difficult in the cold season, when the air conditioner cannot be turned on. The compressor oil thickens, its smooth operation is impossible. If the equipment is equipped with a "winter kit" that allows the equipment to work for cooling even when sub-zero temperature, the problem is easily solved by launching heating devices located in the compressor crankcase, drainage. After 10 minutes of warming up, you can start the climate system for cooling and pump freon, following the recommendations described above.

If there is no winter heating system, you can use a manometric station to collect the refrigerant. It is connected in the same way as the collector. Freon is distilled there for transportation.
Removing the outdoor unit. Is it possible to do it yourself?
After "packing" the coolant, you can proceed to remove the outdoor module from the mounts. How to dismantle the air conditioner with your own hands:
- disconnect the outdoor unit from the mains;
- if further use of the pipes is planned, they are unscrewed. Open fittings must be reliably protected from dust and moisture. In case when reuse not foreseen copper pipes are cut off, 15-20 cm of each branch from the fasteners remain. The ends are minted with a vice from moisture, debris;
- when it is known that the air conditioner will not be used for a long time, it is recommended to fill the remaining pipes with nitrogen, thereby displacing the air, and clog it. This will prevent the oxidative reaction of the metal with atmospheric oxygen;
- remove the thermal insulation from the freon circuit;
- disconnect the outdoor unit from the electrical cable by removing the pre-marked terminals;
- dismantle the nuts holding the module on the brackets, remove the module. It is recommended to do it together with an assistant, because the block is heavy, there is a high probability of dropping it;
- put in a special box with foam or other filler to avoid mechanical damage housings, pipe bends;
- transport, store only in an upright position.

How to dismantle the indoor unit of a split system?
The indoor unit of the air conditioner is removed from the mounts only after dismantling the outdoor unit. Care must also be taken here, especially with the evaporator clamps of the equipment itself. If these elements are damaged, the subsequently re-installed unit will vibrate during operation, which will cause it to break.
How to dismantle the air conditioner yourself:
- remove the front panel so that you can get to the latches;
- disconnect the pipeline of the cooling circuit;
- turn off the power supply;
- remove the evaporator (carefully unfasten the latches closed by the lid)
- press the clamps of the indoor unit, remove it from the guides;
- dismantle the plate on which the indoor unit was attached;
- remove the cooling circuit pipeline from the wall gates;
- remove the drain pipe;
- dismantle the decorative box.

Consequences of incorrect dismantling
Here are some backfire inaccurate dismantling of the split system:
- depressurization of the cooling circuit, as a result - freon leakage. When installing equipment again, you will have to pay for refueling the system with coolant;
- mechanical damage to the body of the outdoor unit, outdoor module, any parts, freon pipes, especially if they lead to depressurization of the circuit;
- clogging of the cooling circuit with dust, debris, moisture ingress. Dust will invariably affect the operation of the compressor, it will soon have to be replaced due to a malfunction. Moisture is dangerous because it will oxidize the inner surface of the copper freon path, the metal will begin to corrode, which will completely disable the system;
- fall of the outdoor unit from a height. It doesn't matter how high it was fixed - a fall will result in its complete replacement anyway.
How to properly dismantle the split system will tell the video
When changing residence, they often carry an air conditioner with them, after all, the equipment is expensive. To do this without loss, it is strongly recommended to contact professional installers who will do everything correctly, efficiently. If the disassembly of the air conditioner is planned on its own, it is necessary to strictly follow the rules for dismantling, while doing everything as accurately, clearly, and smoothly as possible.
Friends! More interesting stuff:
 Air conditioning
Nowadays, many owners of houses and apartments equip their homes with climate control equipment that is able to maintain a comfortable microclimate in the premises. One of the most popular appliances for this purpose is the air conditioner. Modern models can have not only one function - air cooling, but also be "all-season", multifunctional, that is, at any time of the year, maintain a normal temperature set by the user in the rooms.
However, the microclimate will actually be comfortable, and the use of air conditioning will not harm the owners if certain important conditions. In particular, such devices require some care, so they are usually serviced by professional craftsmen. To do this, often contracts are concluded with the company that conducted, for further service maintenance . They also resort to one-time calls for masters - there are a lot of ads of such content in the advertising press.
But such a service is not cheap, so many device owners are interested in the possibility of self-care for them. One of important points in the maintenance of climate technology is the maintenance of all its components, especially filter blocks, clean. Therefore, the question arises of how possible it is to clean the air conditioner with your own hands? Yes, it's doable! And if you understand at least a little about the design of the device and know how such a process is carried out, then, indeed, you can put it in order on your own.
Why is it necessary to clean the air conditioner?
Is it really necessary to regularly clean the air conditioning equipment? Maybe it's just another "money scam" on the part of manufacturers and service companies? No, everything is much more serious!
Devices that cool or heat the air drive it through the filtering devices installed in them, since it is unrealistic to completely get rid of dust in the premises. Accordingly, quite soon in the filters is collected a large number of dirt and dust.

Therefore, if you do not carry out periodic cleaning of the air conditioner, then the following problems will certainly arise:
- There will be a clear drop in the functionality of the device, that is, a significant decrease in efficiency due to the difficulty of passing air through the filters.
- If the air conditioner is not cleaned or is not done regularly, the heat exchanger with the freon inside it will start to overheat, which will increase the load on the compressor, and as a result, the device will quickly wear out.

- Increased humidity and dust deposits inside and outside the filters contribute to the active reproduction of dust mites and various bacteria. Among pathogenic microorganisms, the most dangerous is legionella, which causes a serious lung disease - legionellosis (it is also called "Pittsburgh pneumonia"). Together with the flow of air passing through contaminated filters, spores of fungi and mold can spread throughout the premises, which can easily provoke allergic reactions, lead to asthmatic attacks and dermatitis.
- Unpleasant smell in the room is probably the smallest trouble of all, which entails the pollution of the air conditioner.
It should be noted that air conditioners that are installed in multi-storey buildings on the uppermost floors are less susceptible to rapid clogging, since many times less dust is concentrated at high altitudes than in the lower layers of air. But this does not mean that they will not have to be cleaned - there may simply be less mud deposits.
Much more often it will be necessary to clean and disinfect devices installed in houses located near highways, in industrial areas of the city and in areas under construction, since the air is most polluted there.
Another negative phenomenon for climate technology is poplar and other plant fluff, which is capable of literally clogging air conditioner filters in a short time. Therefore, if the area where the house is located is planted with poplars or other trees (shrubs) with a similar form of flowering, then climatic devices must be monitored with particular care.

The air conditioner, as a rule, itself begins to “declare” that it needs preventive maintenance if it was not cleaned on time. So, such manifestations can be:
- Constant or temporary noise or crackling when the device is turned on.
- Unpleasant smell of dampness or preli.
- A clear decrease in the cooling capacity of the air conditioner.
- The device began to consume too much electricity with the same or even reduced output - this can be seen by taking readings from the meter.
- The indoor unit began to leak while the air conditioner was running.
Prices for popular air conditioners
If at least one of the above signs appears, then this indicates that the device needs urgent preventive maintenance, otherwise the air conditioner may soon fail.
It is best to prevent such a situation, since it can result in the replacement of individual parts or structural blocks that have failed due to the banal carelessness of the owners, which leads to significant costs.

- Be sure to clean the filters of the device in the spring, before intensive work in the summer.
- Prevention should also be carried out in the fall, before the cold period, when the air conditioner is switched to the room heating mode.
- Unscheduled prevention - urgently, in any case, if the signs mentioned above appear.
Thanks to timely preventive maintenance, the air conditioner will work out the entire resource put into it without any problems, which is usually 8 ÷ 12 years and even more.
Cleaning the indoor unit of the split system
The design of the indoor unit of the air conditioner
To figure out where to start preventive work, and what exactly should be subjected to the most thorough cleaning, you need to at least get a little familiar with the design of the device. Most often in recent times split-systems are used, and first of all, the indoor unit of the air conditioner most accessible to the user affects the microclimate in the room. Let's start with him.

So, the indoor unit consists of the following components and parts:
1 - Front panel of the device - This is a plastic case with a grille. Through it, the air from the room enters the device for cooling (or heating), naturally, with the transferred dust. The panel can be easily removed - if necessary, carry out maintenance work. For this, a system of locks (latches) is provided.

2 - Coarse filter- This is a fine-mesh polymer mesh, which is designed for collection of large dust particles from the air, fluff, villi of animal hair and other similar suspensions. Such a filter requires cleaning, or at least control, at least twice a month. In innovative models, some manufacturers provide for automatic cleaning of this filter. The coarse pre-filter is located immediately behind the front panel of the instrument.
3 - Fine filter. Usually, not one, but several filters are installed in a cascade, which can clean the air from various contaminants. Each of them has its own structural features:
- carbon filter, containing Activated carbon, and intended to be removed unpleasant odors and neutralization of harmful substances. This type of filter is not cleaned, but replaced completely, on average every 4-5 months.
- Zeolite filter made from porous mineral - zeolite. This version of the filter is able to absorb chemical compounds from the air, which include heavy metals, so it is more efficient than carbon. In addition, unlike carbon, the zeolite filter can be washed with water and can regular maintenance be used for up to five years.
- Electrostatic the filter cleans the air from fine dust by creating an electrostatic field. Dust particles, passing through it, become electrified and settle on oppositely charged plates. The service life of this filter is unlimited, and it is cleaned as it gets dirty.
- Plasma filter works on the same principle as electrostatic. In it, under the influence of an electric voltage, a low-temperature plasma is formed that can destroy harmful substances and small dust particles, while giving them a negative charge, due to which they settle on a positively charged plate. The plasma filter is also designed to remove odors and smoke. The service life of this filter is unlimited, and it is cleaned as it gets dirty.
- UV filter necessarily includes an LED of a certain spectrum of luminescence, which is capable of disinfecting the air of the room, destroying viruses and bacteria. UV light can also prevent the growth and spread of mold and mildew inside the air conditioner. This option can be used alone or in combination with a photocatalytic filter.
- photocatalytic filter is a porous substance titanium dioxide coated. This filter adsorbs on its surface all the pollutants of the air masses passing through it, including toxic substances, unpleasant odors, fungal spores, etc. Getting under the influence of ultraviolet, which is included in the complex photocatalytic filter, all toxic substances decompose into water and carbon dioxide. This type of filter does an excellent job with both inorganic and organic air pollutants. The service life of this filter is limited only by the "life" of the UV lamp.
- Antibacterial filter. Designed to neutralize various pathogenic microflora - microbes and viruses. It contains such natural active ingredients as:
- catechin - an antiseptic found in apples and green tea;
Wasabi is a plant with antibacterial properties.
Prices for filters for air conditioners
air conditioner filter
- Antioxidant filter It is made on the basis of flavonoids, which contribute to the conversion of free radicals into inactive chemical compounds.
4 - Fan to circulate air through the air conditioner. As a rule, the fan can have three to four speeds of rotation.
5 - Evaporator. This, in essence, is a radiator in which freon evaporates, due to which the air passing through it cools.
6 – Horizontal blinds , regulating the direction of air flow vertically. They are controlled remotely, from a remote control, through an electric drive installed in the air conditioner housing.
7 - Display panel located on the surface of the indoor unit of the air conditioner. On it, using LEDs or a digital display, the operating modes of the device are shown, including the set temperature.
8 - Vertical blinds regulate air flow in horizontal directions. They can be moved manually or remotely, depending on the equipment of the device.
In addition to the above structural elements, it necessarily contains others that are not shown in the figure:
9 - Condensate tray. This part is placed under the evaporator, and it serves to collect water, which is then discharged through a drain hose from the air conditioner to the outside.
10 - Control electronic board. A central microprocessor is installed on it, with the help of which the device is controlled. The board is usually located to the right of the indoor unit of the air conditioner. Usually, a terminal group is also located near it - for connecting the air conditioner to the mains and for electrical switching of the indoor unit with the external one.
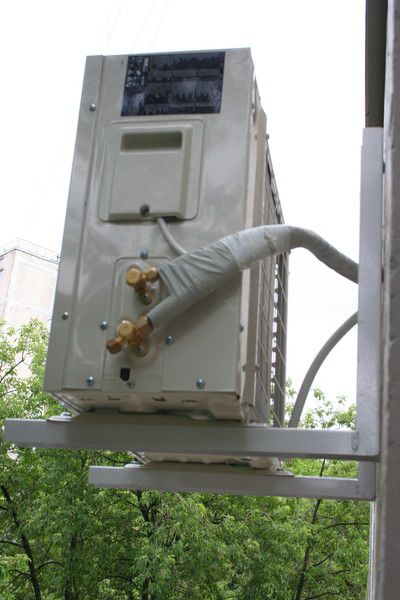
11 - Fittings located on the bottom rear of the indoor unit. Copper pipes connected to them serve to connect the outdoor and indoor units - this creates a closed circuit for the circulation of the refrigerant.
Several preparatory operations
Due to the fact that the split system air conditioner consists of two blocks, outdoor and indoor, their cleaning also differs somewhat, which is important to consider when starting its prevention. On the outer block, attention will be focused below, but for now we continue to consider the inner one.

- Before proceeding with preventive maintenance, it is necessary to protect the hands and respiratory tract, since one should not forget that the air conditioner housing contains a hotbed of viruses and dangerous bacteria that got there along with dust from the air. They can easily enter the body, which threatens with serious diseases, even for a person with excellent immunity.
- Next, the air conditioner must be disconnected from the mains. It would seem that this is an understandable action for everyone, but sometimes they forget about it, and remember it only at the moment when the first electric shock occurs. Well, if it is light, only in the form of tingling ....
- Then, it is recommended to cover the floor area under the air conditioner plastic wrap, which after cleaning the device is best to simply throw it away. It is especially important to protect the floor surface if the air conditioner long time worked without maintenance, and a large amount of dirt accumulated in it.
Procedure for general cleaning of the indoor unit
Sometimes it is necessary to clean only the filters of the instrument, as they are the first to get dirty. I must say that washing them yourself is not difficult at all. Therefore, it is recommended to carry out this procedure almost weekly, making it a rule to perform these simple steps before cleaning an apartment or house. Naturally, such frequent preventive maintenance is necessary if the device is used constantly.
If the climate equipment is put in order regularly, the house is kept clean, and thanks to this, the dust does not have time to clog all the pores of the fine filters and the coarse cleaning cells, then it is enough to dry clean with a vacuum cleaner.

If the filters of the air conditioner are heavily clogged, then they will have to be additionally washed with special detergents, and then with water.

Detergents are purchased in specialized stores for climate equipment or in service centers for her service.

| Illustration | Brief description of the operation to be performed |
|---|---|
 | So, the first step is to open the front cover of the air conditioner, on which the protective grille is located. This process is simple, especially since all owners need to do it quite often, checking the degree of contamination of the device. Next, the coarse filters are carefully removed. They can also be fixed in different ways. So, in some models, they can be removed without even opening or dismantling the front panel. |
 | Then the cover covering the fasteners is removed. AT various designs this panel can be fixed in different ways - in some models it is enough to simply remove it from the latches, while in others it has to be unscrewed. |
 | In this model, the plastic case of the indoor unit is fixed with screws located at the bottom of the structure. They are closed with protective plates, which must first be opened. For convenience, you can use a regular screwdriver - it picks up the closing screws of the cover, and then unscrews the fasteners themselves. Work must be done carefully, as plastic parts- quite brittle. Having unscrewed the fasteners, it is also necessary to dismantle the display panel connected to the electrical part of the air conditioner from the housing. This element, together with the wires, must be temporarily placed to the electrical unit. |
 | After unscrewing the screws, the plastic case of the air conditioner is removed. AT different models it is also fastened in different ways, therefore, having unscrewed the screws on one side, you should not pull the case. It must be gently pulled towards you, and if it is not removed, then you will have to look for places where it is additionally fixed. Next, the fine filters should be removed from the air conditioner. |
 | The next step is to make sure that the electrical unit of the device is protected from splashes of disinfectants and detergents, as well as water jets. Ordinary hospital shoe covers are perfect for this purpose - thanks to the elastic band located on them, they will fit snugly against the device, and the protection will not fall during operation. |
 | Now it's time preparatory work for cleaning. A large, strong plastic bag can be used for this purpose, but this "device" cannot guarantee reliable protection surfaces of the room from getting detergents on them together with dirt from the air conditioner. In specialized stores or on online trading platforms, you can purchase a kit specifically designed to protect the floor and walls during the cleaning of climate equipment. Such a set is more convenient, since it provides almost all the necessary elements both for its fastening and for draining dirty water into a bucket. |
 | The service package includes a large specially shaped plastic bag with a funnel in the lower central part, on which a plastic spout is attached for easy fixing of the outlet hose. In addition, it contains a polyethylene apron installed between the wall and bottom air conditioner, stationery-like holders, with the help of which stiffening ribs inserted into the edges of the bag are fixed, and a tape for hanging it under the air conditioner. Unfortunately, the kit does not include elements that act as stiffeners, as well as a hose for draining dirty water. Therefore, you will have to take care of these details yourself. To do this, you will need thin plastic or metal tubes, or even ordinary wooden glazing beads, which are used to fasten window panes. The length of these rigid inserts should be: 600 mm - 2 pcs. and 1200 mm - 2 pcs. The section of the hose should correspond in cross-section to the diameter of the spout fixed on the plastic bag - so that it fits snugly against the drain spout. |
 | In the bag along its edges, channels are provided in which stiffeners must be installed and fixed with stationery holders. A belt is fixed on one side of the package, with which the package will be hung on the air conditioner. When ready for use, this fixture looks something like the one shown in the illustration. |
 | Next, an apron is taken - this is an ordinary polyethylene sheet, which is slipped under the body of the device and with the help masking tape fixed on the wall. It will protect the wall from getting dirty lumps of wet dust. Then, a package with stiffeners is hung under the air conditioner, the belt is put on top of the device body. After that, a hose is put on a plastic spout, the second end of which is lowered into an ordinary plastic bucket standing on the floor. |
 | Further, if thick dust layers are found after opening the indoor unit of the air conditioner, they can be removed with a soft brush or collected with a vacuum cleaner. After such a superficial removal of accumulated deposits, it will be easier to flush structural parts from more deeply ingrained dirt. |
 | After removing the external dust, you can proceed to the preparation of a washing disinfectant solution. It is made from products specially designed for cleaning the air conditioner. The solution is mixed in accordance with the proportions indicated on the packaging of detergents. To apply the solution, you will need a spray gun, in which the jet can be adjusted according to the spray diameter. |
 | The next step is to apply the finished solution to all elements of the indoor unit. Especially carefully it is necessary to spray the fan and radiator of the device. A huge amount of dust collects on the impeller blades of the fan roller, which eats into the surface of the material from which it is made. Therefore, it is simply impossible to clean this part of the air conditioner from dirt without special tools. The radiator is equipped with numerous heat exchange plates, between which dust also accumulates, and it is quite difficult to remove it with plain water, so you can’t do without special equipment either. The disinfectant cleaning solution should cover all the details of the structure, since if unwashed areas remain, they will later become a favorable place for fixing new layers of dirt. |
 | Detergents are usually applied in two stages. Liquid detergent disinfectant (in this case, Alfadez) is sprayed first, followed by Winns 30202 detergent, which is sold in cans and gives a rich foam that helps to better soften and peel off the dirt. After the detergents are applied to the surfaces of the indoor unit, they must be left for some time, approximately 20-25 minutes, so that the solutions corrode the outer and inner dirty layers. When the foam has settled, a control check can be made to see how easy the dirt will be removed. |
 | After the foam settles, you can start flushing the split system with water supplied under high pressure with a thin stream. With self-washing, you can use the same spray gun, but this will take a lot of time and a large amount of water. |
 | When flushing the system, the dirt on the bottom of the air conditioner body will drain into a plastic bag suspended under it, and from there into a bucket. It is important to ensure that the container is not overfilled, as dirty water and disinfectants can seriously damage the flooring. |
 | Flushing the indoor unit of the split system starts from its rear. Then the radiator is thoroughly washed, after which it needs to be cleaned again inner part, as dirt from the heat exchanger grill may be on the surface of the fan blades. |
 | At a time when the indoor unit will soak under the influence of detergents, you can clean the parts of the plastic case removed from the structure. They are also sprayed with disinfectants and detergents. If necessary, the dirt on them can be rubbed with a soft brush, and then these structural elements are washed under running water. |
 | In addition to the rigid parts of the body, it is necessary to rinse the coarse air filters. First, they also need to be sprayed with detergents. Then they are left for a while - until the dirt is separated from them, and then washed under running water. |
 | The filter is washed, but not wiped - the water should drain from it spontaneously, and it should dry naturally. When washing the filter, do not use ordinary detergents, as they can negatively affect not only the filter itself, but also the indoor unit of the air conditioner. In addition, one should not forget that the molecules of solutions household chemicals subsequently enter the air of residential premises. |
 | It is more difficult with fine filters, since among them there are options that cannot be washed, and dry cleaning will not bring results, and therefore they will have to be replaced with new ones. So, I would like to remind you that replaceable filters include coal, antibacterial, antioxidant, and also vitamin. Washable filters include electrostatic, photocatalytic, plasma and zeolite filters. New replacement filters are usually sold at air conditioner service centers or at service centers of manufacturing companies. |
 | When all the insides of the unit and all the parts removed from it dry well, you can remove the hanging bag and shoe covers from the electric unit and assemble the air conditioner in reverse order. The fine filters (new or washed) are returned to their place, then the washed housing is fixed, the indicator panel is fixed to it, and the coarse filters are installed last. |
 | Now that the cleaning work of the air conditioner has been completed, you can turn it on, check its operation and proceed to normal operation, until the next maintenance. |
Cleaning the drainage system of the air conditioner
One of the common problems that air conditioner owners face is water leaking onto the floor or walls from the indoor unit. Most often, leaks occur for the following reasons:
- Due to contamination of the drainage system of the appliance, when condensate cannot pass through the clogged pipe, and therefore begins to drain from the indoor unit into the room. In this case drainage system needs to be cleared. Drainage clogging occurs due to the fact that the air conditioning units were not cleaned in time - the dust turned into dirt and clogged the tube.
- If the amount of freon (refrigerant) in the system is reduced, then the temperature of the evaporator also becomes lower, therefore frost forms on it and water does not pass into the pan, and also flows down to the floors of the room.
- If the air conditioner does not have a pressure regulator, then when the temperature drops outside, the pressure drops and in the system, as a result which also reduces the temperature in the evaporator. However, it should be noted that pressure regulators are usually installed in all modern models of air conditioners.
- Freezing drainage tube– this occurs when the air conditioner is used in winter period for room cooling.
- Another cause of stagnant phenomena in the drainage is wasps or other flying insects, which quite often clog the edge of the pipe located on the street.
If the drain pipe is clogged, then before proceeding with its cleaning, it is imperative to flush the drain pan, as well as other elements of the air conditioning system. Work on cleaning the drainage is carried out with the device turned off from the network and is carried out in the following order:
- The first step is to remove the coarse filters.
- Next, the lower narrow panel is dismantled, hiding the body mounts to the air conditioner.
- Then the drainage pan is removed - in each design this operation is carried out differently, but it is not difficult, and it is quite possible to figure it out on the spot. It is necessary to remove this structural element in order to clean it of dirt, and also in order to get to the hole into which water flows from the pan and to which the drainage tube is connected.

- The next step is to disconnect the drain tube from the air conditioner and connect the hose of the compressor (hand pump), steam generator or vacuum cleaner with a blowing function to it.

- Another cleaning option would be mechanical way. To do this, take a long, enough hard, but at the same time flexible wire (something like television cable), which is inserted into the drain pipe that is disconnected or directly through the hole in the tray. It is pushed through the entire drainage system. Thus, it should appear from the pipe facing the street, through which the condensate escapes.
- However, these are not all the steps necessary in this process, since it must be taken into account that the cork was removed from the tube, but the dirt in it still remained in the stacks. When the air conditioner is running, new dust will easily stick to these residues of dirt, and the plug will be restored. Therefore, the tube must be thoroughly rinsed. This can be done using a pump or a homemade device consisting of plastic bottle and a piece of silicone hose put on her neck.

- To flush the drainage tube, it is recommended to use chlorhexidine, which is an excellent antiseptic and is sold in a pharmacy. For flushing, approximately 400 ml of liquid will be required.

- If flushing will be carried out through the drain hole, that is, without removing the tube from it, then the flushing liquid can be poured through it. The bottle with chlorhexidine has a spout, which allows you to perform this procedure without the use of improvised means. After 15 ÷ 20 minutes, the system must additionally be purged with a vacuum cleaner or pump. After cleaning the system, it is recommended to check it immediately. To do this, one and a half liters of ordinary water is poured into it again using one of the methods described above, which should freely pour out through a pipe on the street.
In the event that the air conditioner is equipped with a drainage pump, that is, condensate is not discharged to the street, leakage may occur for the following reasons:
- Failure of the pump - it may not work in full power or burn out altogether. In any case, the device must be checked, and for this it will have to be removed.
- If the float chamber is clogged and the float is fixed in one position, the pump will stop discharging water.
- The float or proximity sensor does not work.
- Air tube is kinked.
- Not enough good contact pump power terminals.
To find the cause of problems in models with a drainage pump, you will have to invite a specialist in the repair of climate equipment. It is not recommended to meddle in this system yourself.
Automatic air conditioner cleaning system
Some modern models of air conditioners are equipped with an automatic cleaning system. The principle of operation is quite simple - with a certain frequency, the device switches to idle operation, and the air passing through the filters dries all the details of the structure.

In addition to the usual automatic cleaning, ionic air purification is installed in some models. Thanks to the latter, dust particles are ionized, so they easily fall into the dust collector. In another version of the devices, water ionized dust is used to protect against the occurrence of unpleasant odors - this is a system of full ionization and filtration.
In addition, such air conditioners are usually equipped with touch sensors that can control the composition of the air. If necessary, they give a command to the automatic cleaning system to turn on.
These features extend the life of your air conditioner and make it easier to maintain. However, do not think that you will not have to clean the device manually or call a wizard for this purpose, since automatic system will not be able to remove and wash its filters, and this is necessary to do, one way or another.
Find out and also read the criteria for evaluating devices in a special article on our portal.
Cleaning the outdoor unit of the split system
The design of the external unit of the air conditioner
Now, having figured out how to clean the indoor unit of the split system, you need to consider how the preventive work of its external part is carried out.
Unlike the indoor unit, the outdoor unit is washed once a year, but it is still necessary to do this, as it is clogged not only with dust, but also with leaves, poplar fluff, small twigs and other debris. From this it becomes clear that it is absolutely impossible not to clean this part of the air conditioner. The most difficult thing is to carry out preventive measures if the device is installed on the upper floors of multi-storey buildings, in this case, specialists cannot be dispensed with.

The design of the external block consists of the following blocks and parts:
1 – Fan, occupies most case of the outdoor unit of the air conditioner. Its functions are to blow the heat exchanger-condenser.
2 – Capacitor located along the inner walls of the case, near the fan. It is a set of copper tubes, inside which freon is pumped, which is cooled by a working fan.
3 – Compressor ensures the circulation of freon in the general closed circuit conditioner. This device is of two types - piston and spiral. The piston version of the compressor is more affordable, but less reliable, unlike a piston device. This factor is especially important, given the conditions of low winter temperatures.
4 - Control board, but it is only in inverter-type air conditioners. In other climatic devices, all electronics are located in the inner case, since the outer natural factors may adversely affect electronic components.
5 - Four-way valve it is installed only in models of reversible type air conditioners, that is, capable of not only cooling, but also working for space heating. This control unit is necessary to change the direction of freon movement when switching the device to heating mode. After that, in fact, the outdoor and indoor units change their functions - the outer one starts to work for cooling, and the inner one - for heating the air pumped through it.
6 - Fittings there are both on the indoor and on the outdoor unit, since it is to them that copper pipes are connected, connecting for the air conditioner department into one common refrigerant circulation system.
7 - Filter for cleaning the refrigerant is installed in front of the compressor and protects it from the ingress of small particles and copper chips, which often remain in the circuit during the installation of the air conditioner.
8 - Protective cover, covering the terminals of electrical cables and fittings. However, in some models, this cover is provided only for electrical connections while the valves remain open.
Cleaning the outdoor unit of the air conditioner
Cleaning the external unit of the air conditioner can be done by hand only if it is installed in a private house, and you can safely work from a stepladder, or on the balcony of a high-rise building. Independent work at a height without special equipment, an insurance system and experience is strictly prohibited!
Prices for LG air conditioners
air conditioner lg
The cleaning process is carried out in stages, in the following order:
- The first step is to turn off the device completely.
- Next, the front panel of the outdoor unit is dismantled. Having removed it, the owner will surely immediately see the whole volume upcoming work.
- First, all large debris found in the case is removed - it is he who slows down the operation of the air conditioner. Large debris is usually removed by hand, and no tools are required for this process.
- The next step is to remove the dust layers from hard-to-reach places corps. For this purpose, brushes of different widths and a hand-held vacuum cleaner are used.

- The fan blades can also be vacuum cleaned and, if necessary, wiped with a damp cloth. Wet cleaning must be done carefully so that water does not get on the electrical contacts. If it is necessary to use a large amount of water to wash the fan, then the electrical box should be covered with plastic wrap.
- The capacitor has smooth smooth surfaces, so it will not be difficult to clean it - this can be done with an ordinary damp cloth or sponge.
- Before reinstalling the front panel, it should also be thoroughly rinsed and dried.
- Do not touch the electrical unit of the device. Its repair and prevention should be carried out by specialists.
- Turning on the air conditioner can be done only after it has completely dried.
Learn how to make and also check out some simple models with step by step instructions, in a special article on our portal.
At the end of the topic, I would like to give a few useful tips, which will help not to make mistakes during the operation and cleaning of climatic devices.
Prices for Haier air conditioners
Air Conditioner Haier
- When purchasing an air conditioner, it is recommended to conclude an agreement for service maintenance device. During the warranty period, it can be carried out free of charge.
- Timely preventive maintenance will extend the period of trouble-free operation of the air conditioner and save you from many problems.
- It is recommended to entrust the first cleaning and disinfection of the air conditioner to specialists from service department. At the same time, it is worthwhile to carefully monitor how they carry out preventive measures, in order to then use their experience when performing independent work.
- If the air conditioner began to malfunction, then you should not think that the malfunctions will go away by themselves. It is necessary to disconnect it from the mains and call the wizard for diagnostics and possible repairs.
- If you decide to clean it yourself, then you need to use special detergents and disinfectants. In addition, to clean the radiator of the indoor unit, it is convenient to use comb brushes, which are designed specifically for this purpose.

- Cleaning the air conditioner will be better if you use a steam cleaner for it. A jet of hot steam not only removes dirt, but also carries out preventive disinfection of structural parts.
- Assembly and inclusion in the network can only be done after complete drying of all parts of the air conditioner.
- Do not start the air conditioner when detergents are applied to its internal surfaces and the fan. It is extremely dangerous to do this, as water can get into the electrical unit of the device, which will cause a short circuit in the network. In addition, the dirt accumulated on the fan blades will scatter throughout the room, hitting the surfaces of the walls, ceiling, floor, furniture and other interior items.
- In order for the device to serve for a long time, it is necessary to follow all the rules for its operation specified by the manufacturer in the instructions.
So, from all of the above, it becomes clear that it is quite possible to carry out work on cleaning climate equipment on your own, if you know the design of the device and the procedure for carrying out this process. If the owner can carry out the preventive maintenance of the air conditioner on his own once and understand all the nuances, he will no longer have to call the master for this purpose, since the specialist will only be needed to solve more serious problems.
And, probably, the interested reader will benefit from a video story in which an amateur craftsman shows how he cleans his air conditioner on his own.
how to open the air conditioner to get to the fan, the bottom 2 screws found what needs to be done to open
Vadim Unscrew two or three screws under the horizontal blinds.
Then gently move the bottom of the body. Try to let the blinds pass through the slot. There are three hooks on the top, they will unhook themselves. After removing the housing, carefully remove the thermal resistor from the slot.
Then, on the left side, unscrew one screw holding the drain pan, gently slide it off the hooks and let it hang on the drain hose.
Access to the fan will be free.
Be careful when assembling. Don't break the hooks.
Nikita with all the dope with a swing on the floor
Victoria Download the instructions for it - there is a disassembly in pictures. At least on my HITACHI so.
Yuri He is taken out of the case. very tight.
Tags: How to remove the cover of the indoor unit of the Samsung air conditioner
Dismantling, cleaning the indoor unit of the Panasonic P.S. split system Don't forget to grease the impeller bearing in...
24 Nov 2013 - 29 min. - Added by the user Split-infoDisassembly of the indoor unit of the split system. ... Dismantling the indoor and outdoor unit of the air conditioner. - Duration: 8:39. Cool Van 89.139...


Service of the internal block of the conditioner...
Hi all! At the request of my friends and accomplices in general, I want to write a post about the maintenance of air conditioners, because this is already relevant on this moment(I hope the moderators will react with understanding)! The fact is that consumers are often misled by offering them air conditioning service ANNUALLY!!! This is not necessary, because everything depends on the degree of contamination of the room where the air conditioner is located!How to understand that cleaning is already inevitable? Let's look at the process of cleaning the indoor unit, perhaps you yourself are able to perform this operation:
So we have a regular internal block:

Below, in order not to mess up the repair, we glue the film onto ordinary masking tape:

Open the lid, remove the mesh filters and rinse them under running water (you can do this at any frequency, but at least once every 2 months!)

Now filming in full upper part body, complete with cover...

We unfasten the bath (through it the condensate enters the street) ...

and then enjoy the terrible spectacle! Here we can already understand what we breathe including a clogged air conditioner ...

So we got to the main point that I wanted to tell you about! WITHOUT DISASSEMBLY OF THE AIR CONDITIONER, you can see the degree of its contamination and independently draw a conclusion ... but should it be cleaned?
Pay attention ... The fan impeller, which we need to clean!!!

We remove the impeller (if possible), wash it with a jet of water and a brush, and clean the radiator with a steam generator ... Voilà:

Then proceed to the assembly of the indoor unit, in reverse order! But those same mesh filters ...

We fasten the lid, put the nets ...

Close the lid of the indoor unit...

We turn on 22-25 degrees on the remote control (do not turn on the minimum ... never in the heat, not a single condo will give you 16-17 degrees !!! You will stupidly kill it!) and enjoy the coolness!

... I will talk about the outdoor unit later! I inform you that I have been engaged in air conditioning and ventilation since 2000 and I am ready to help with advice, and indeed business in this area!!! So ask! I will answer later, in the evening I will answer everyone, because now there is a lot of work .. I am running away) Have a good day everyone!
How to remove the air conditioner from the wall with your own hands
disassembled indoor unit. With how to remove the air conditioning compressor and the outdoor unit itself with your own hands ... Remove the protective cover from the housing; ...