Plastic bottles, which are currently collected in every home a lot, are difficult to expose recycling. After all, they not only occupy significant volumes, but also very, or rather almost do not decompose in nature. But why throw away something that is a wonderful and durable material if it can be usefully used to equip your summer cottage?
How to use? Below we will consider all the most popular methods.
Buildings made from plastic bottles
 If you are just starting to use bottles to decorate your summer cottage, then start by building a gazebo. For her you need many bottles, and if you do not have assistants, then the entire construction process may take 3-4 days, but the result will certainly please you.
So, before you start building, you should prepare well all the necessary "ingredients" of the future gazebo. You will need:
- several hundred plastic bottles;
- cement mixture;
- dye;
- sand or earth.
The work will begin with the most tedious task, but alas, the inevitable: it will be necessary to fill the bottles with sand or earth.
After that, a recess is dug for the foundation of the gazebo and construction begins.
The cement mixture is diluted to the desired consistency, and some of the sand bottles are placed on the bottom of the recess, after which the foundation is poured. While it will cool and harden, you can finally decide on the height of the future gazebo and add sand to the remaining bottles.
On the already finished foundation, the construction of the gazebo begins. To do this, in the corners are made load-bearing columns from bottles as follows:
the corner is covered with a connecting cement mixture and a circle is laid out from the bottles on it. Then the connecting mixture is laid again, and in such a way as not only to cover the bottles, but also to fill the voids formed between them. The process is repeated until the required column height is obtained.
If you planned to make just an open covered gazebo, then next you will need to put a roof frame on top of the columns and cover it.
How to make a roof from plastic bottles, we describe below.
But if you want a gazebo that looks like a secluded house, then in this case, be patient and continue to lay out walls and carved openings from the same plastic bottles. As you have probably noticed, plastic bottle construction technology little different from the technique of building with bricks or blocks. Therefore, all masonry methods and gazebo designs can be taken from other building resources.
We will give you one more hint: in the gazebo you can also make a table and benches from the same bottles, which will create a pleasant atmosphere of intimacy and peace in it.
A gazebo constructed in this way will delight you and yours for many years. And you start building a garage.
Yes, yes, we are not joking. In the same way, you can build an entire garage for your car. Moreover, you can equip a special viewing hole in it, if you have a desire to go a little deeper into mother earth and dig.
Building a garage out of plastic bottles
 Starting to build a garage is also worth start from the foundation. And if you still decide to make an inspection car hole, then you have a lot of digging work to do.
First, you should dig a recess for the entire foundation of the future garage, then carefully calculating the dimensions of your car and your personal needs, you need to start digging a hole. Traditionally, the depth of such a pit is 150-160 cm, depending on the height of the driver, and the width is 80-100 cm.
Remember, you will have to dig a much wider hole, as it will have to be processed and fixed with a cement-bottle mixture in the future.
After carrying out "digging" work, it is necessary to strengthen the inspection hole, for this, first we put bottles on its bottom and fill it with cement mixture, leveling it. After drying, proceed to strengthening the walls of the pit: we put the bottles in rows, bottom to the ground, layering with cement mortar.
When the pit is fully equipped, in the same way as in the gazebo, we fill in the foundation of the future garage.
After it hardens, we build a garage, adhering to the classical building technology.
But how can you save money with plastic bottles and roofing materials?
Oddly enough, very, very simple. Today, craftsmen in practice have tested and use as many as 2 types of materials for roofing from plastic bottles: tiles and slate.
How to make shingles from plastic bottles
To make shingles from plastic bottles, you just need to take a bottle, slightly heat it in the sun and press it. The result: a translucent, durable plastic tile sheet.
Make a plastic slate a little harder, since you have to cut and glue a lot. First, the bottom and neck of the bottles are cut off, then the remaining part is cut in a straight line in one place. After that, the sheet is unbent and glued to another of the same sheet exactly along the seam with PVC glue. The result: plastic corrugated slate, which can be used both for the roof of the gazebo, and for the roof of the garage and carport.
As you have probably already noticed, the technique of building from plastic bottles is not difficult. And this means that you can build absolutely anything from them. For example, finally making that lovely new fence for your backyard. After all, everything you need is already at hand: bottles, sand, cement, water and your desire. In building your new fence, you can use either the column technique or the solid wall technique.
Using bottles, you can easily create complex shapes such as arches, ovals and rounded corners.
Add a little imagination, perseverance and work to your desire, and in less than a month your dacha will become a magic castle that you will make from (just don't tell anyone!) Bottles.
How to make a flower bed out of plastic bottles
Even more beauty can be added to the summer cottage using bottles in the design of flower beds and gardens.
So just digging a flower bed and inserting bottles upside down into the moat, you not only prevent shedding of soil in the flower garden, but also give it a special decorative look.
Making interesting accessories
 No less popular today are crafts in the form of flowers from painted plastic bottles, which, like fabulous inhabitants, settle in the gardens and front gardens of summer residents. Try to make a cute smiling daisy or daisy too. After all, all you need is to take a knife or scissors and cut the bottle into petals, then painting them with paint.
From the same bottles you can cut practical and so useful in cold winters bird feeders. You can show your imagination here in carving windows and doors through which the birds can get to the food you have carefully left.
Made from bottles have also become especially popular. garden lamps. Usually they are one bottle with a cut bottom. But some craftsmen make whole chandelier balls by gluing cut bottle bottoms together into large spheres. If you have the time and desire, try to do something similar, we assure you the result will not only surprise you, but will also delight you every time you walk around the site.
By the way, during such a walk it would be nice to walk along a comfortable garden path, which can also be built from bottles. To do this, you will again need bottles filled with sand and a cement mixture.
 You can transform your cottage very much using plastic crafts - it's very interesting!
First, outline the boundaries of the path and dig bottles along its perimeter on both sides, they will create a special side that will be the basis of your path. Then, as when pouring the foundations of the gazebo and garage, lay the bottles and fill them with a cement mixture. If you want to get a perfectly flat track, then level the surface of the mixture and wait 1-2 days until it completely hardens.
If you want to create the illusion of a stone path, then you can use less mixture, lightly covering the bottles with it and then not leveling the surface of the path.
This is not all that you can do with plastic bottles in your area and, no doubt, you will do much better. After all, in addition to making your summer cottage more beautiful, at the same time, you are contributing to the protection of the planet's ecology, not littering it and using recyclable materials.
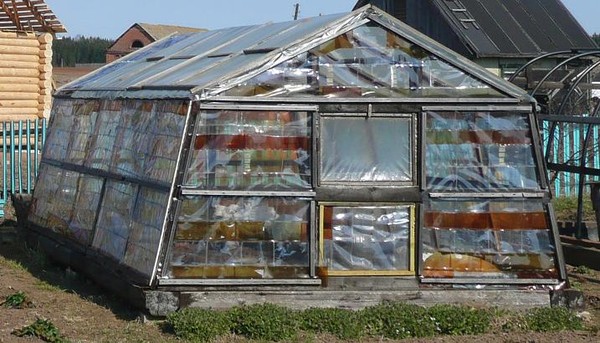
How much can be done using ordinary materials at hand, which we simply throw away. For example, take plastic bottles. On the net you can find a lot of products made from plastic bottles. It is a versatile material: cheap, readily available, easy to process and safe. You may be surprised, but you can make not only small crafts or garden accessories from it, but also large-scale structures. One of them is a greenhouse. Don't believe? In this article we will tell you what it is, a do-it-yourself plastic bottle greenhouse.
You can repeat everything, thanks to the detailed instructions. Therefore, from now on, you can stock up on plastic containers, and not throw them away, and connect your friends with your neighbors, you will need quite a lot of raw materials.
Benefits of plastic bottles
Why are we talking about plastic bottles? After all, you can build a greenhouse from wood or metal sheathed with a film. But, it's all about the advantages that are inherent in the material. Let's look at them so that you can be convinced of the feasibility of building a plastic greenhouse:

There is only one snag that can scare you. We are talking about the number of these same bottles. Depending on the size of the greenhouse, it will take from 600 to 2000 pcs. plastic containers. The preparation is thorough, but realistic. All you need is time and friendly neighbors. Otherwise, it will take time, a little effort and desire. With a set of all this, you can make a greenhouse.
How to make a greenhouse
Our greenhouse will be lined with plastic bottles. The frame itself is made of durable materials to hold the walls and roof. Before you get started, you need to stock up on these bottles themselves. In general, for an average greenhouse, you will need about 1000 pcs of a plastic bottle. Each of them should be prepared. How? Let's find out.

Pre-treatment of bottles for lining
First, sort the bottles by size and color. Ideally, use a smooth transparent bottle, light or brown. Their volume is 2-3 liters. There should be no labels on the container, remove them. And in order to remove the remnants of glue on the plastic, it is required to soak the products in a soapy solution. Then the bottles will be clean and suitable for work.
Advice! This work is meticulous and rather long, if we are talking about processing 1000 bottles at once. We recommend that you do this gradually, as you collect these same bottles. It is better to set aside 5-10 minutes a day to wash a few new bottles than to clean the entire container at once for several days.

The next step is to construct the plastic walls. In this article, we will consider two options for creating a greenhouse:
- from a continuous sheet of plastic;
- from whole plastic bottles.
You can choose the option that you like the most. So, let's start by creating a canvas for the greenhouse.
Plastic linen greenhouse
It all starts with cutting bottles. Your task is to cut out the bottom and neck of the bottle, since we will not need them, and cut the resulting cylinder along one side. So you get a semblance of a rectangle from a plastic bottle. This is only a small part of the whole structure, like a brick in a masonry.

Advice! The remaining bottom and neck can be used at your discretion. Don't write them off to throw them away. They may be needed to create decor or crafts.
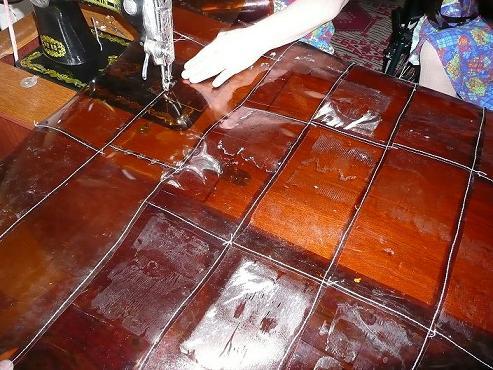
Since the blanks will be twisted, they can be put under some kind of stretch. During the time you process the rest of the bottles, each part will level out. The next step is to stitch the resulting plates. This is done with an overlap, using a sewing machine. Narrow strips of plastic are created. Overlappings must be created in one direction. To make the connection strong, we recommend using a nylon thread of medium thickness.
Note! Some connect the finished parts with a construction stapler or fishing line. However, this method is a little more expensive. Yes, and fishing line can easily damage plastic.
The resulting strips should have a length identical to the height of the greenhouse, plus a margin of 20 cm in order to hem. The resulting narrow strips must be sewn into one continuous blank or canvas. It is similar to film, only denser and cheaper. The width of the canvas can be identical to the gap between the supports (frame) or large enough to completely wrap the greenhouse around the entire perimeter. You decide.
To create a roof, you can use slate made from the same bottles. It should also be prepared in advance. Your task is to divide the resulting cylinder (without a bottom and neck) into two parts. Further, these parts are fastened to each other, creating a wave. You can see this process of creating slate from bottles in the photo.

Creation of the frame and its sheathing
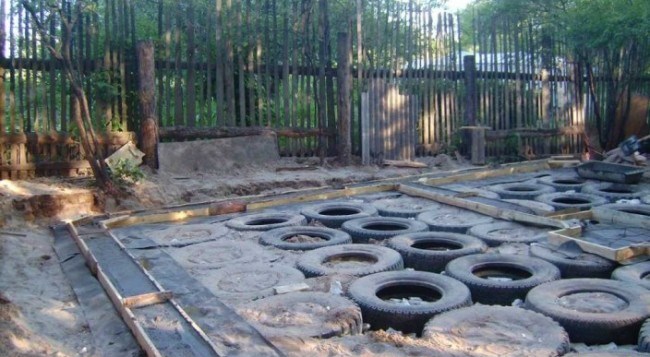
The creation of the frame begins with the foundation. But, since the bottles are lightweight, like the wooden elements of the frame, the foundation may be shallow. A shallow strip foundation is enough. And you can fill the perimeter of the structure with old tires. They dig in half and are forgotten by gravel.
Even when building a foundation, you can dig holes for support pillars. Their depth is 50-60 cm with a greenhouse height of up to 2 m. After that, the supporting pillars are strengthened with strapping, additional lintels and wind ties. Fixation is carried out with simple nails or, better, self-tapping screws. At the same stage, the frame for the front door and windows is mounted. Be sure to saturate the tree with drying oil to protect it from decay. Alternatively, you can use this design, laid on strong bars.

That's all, now you can do the sheathing of the frame. It's better if someone helps you. Fixing plastic sheets to the tree is carried out with self-tapping screws for thin strips. Make sure that the skin is well stretched, just do not overdo it, in order to avoid deformation of the seams. Finally, glue the joints with construction tape, making the plastic bottle greenhouse airtight. Bend the top allowance (those 20 cm) around the beam and fix it from the inside. The bottom is fixed to the foundation.
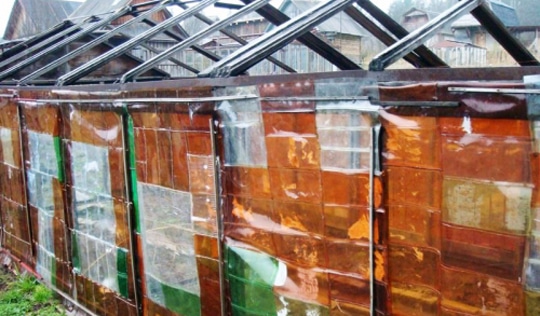
It remains only to put the roof. Use a pre-created slate. In the photo below you can see another version of a solid canvas greenhouse. As you can see, its appearance is very worthy.
Greenhouses of plastic bottles master class
We considered one option for creating a greenhouse from plastic containers. It is more complex and costly in terms of time and effort. There is an easier option. In this case, the bottles do not need to be cut. Here are detailed instructions for creating:
The roof can also be assembled according to the same principle. And in order to perform waterproofing, a film is laid under the bottles. Inside the cracks are caulked to protect plants from the wind.
Conclusion
Now you know how to make a greenhouse with your own hands without extra construction costs. As you can see, the task is easy. Even children can handle this challenge. You just need to allocate time, make an effort and collect the right amount of plastic containers. And then it's up to the little things.
We offer you several options for a roof made of used PVC containers: Plastic tiles. For the manufacture of this simple roofing, it is necessary to compress plastic bottles.

If this process is carried out without light heating of the plastic, then the containers will simply crack, so the easiest way is to put the raw material in the sun and then flatten the containers. Installation of PVC modules is carried out with conventional self-tapping screws to the frame with laying the material in several layers. From such tiles, you can easily form a cone-shaped roof for a gazebo or bath.

Plastic slate. It is easy enough to make something like a slate roof covering from the cylindrical part of a plastic bottle. To do this, it is necessary to cut off the bottom and neck from the container, cut the middle part of the container lengthwise and in half, connect the resulting PVC elements with glue, forming a wavy surface

In order to make plastic tiles, you need to cut off the bottom and neck of plastic bottles, and cut the resulting plastic ring in half.

To straighten pieces of plastic, it is necessary to immerse it briefly in hot water - but in no case in boiling water. After that, you need to place the "tile" under oppression for a day or two.

Finished parts of home-made roofing material are laid, starting from the edges of the roof and upward, overlapping. They are fastened to a wooden crate using self-tapping screws, and it is imperative to use rubber gaskets to prevent damage to the "tile".

The last, top layer of homemade roofing material is laid as follows:
· if the roof is sloping, then the last layer of tiles is attached so that the upper parts go onto the wall, protecting the junction of the wall and the roof;

If the roof is two or more pitched, then it is necessary to close the joint of the slopes with a number of parts, fixing them at both ends of different planes of the roof of the gazebo.
Now they talk a lot about environmental protection, about waste disposal, but only a few are really concerned about these problems. Many people simply do not pay attention to the efforts of the "green" to remake the world, because at the moment it does not concern them personally.

However, not everyone knows that some of the waste that we successfully dump in tons of landfills could well be useful to us.
One of these wonderful materials is an ordinary plastic bottle. Craftsmen have invented hundreds of ways to use bottles, but one of the most interesting is the roof of plastic bottles. Thus, you can significantly save on the purchase of building materials. In short, a great roof, practically lying under your feet.

Consider several ways to make a roof from plastic bottles. It is desirable to select bottles of the same size, but this is not a prerequisite.
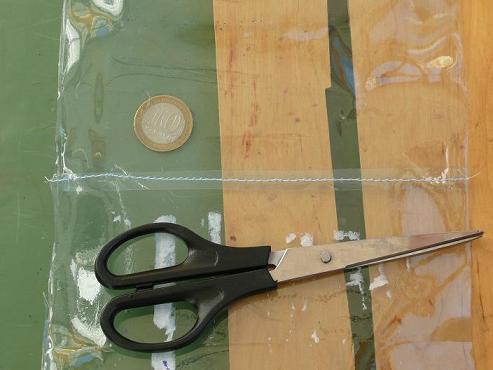
To begin with, we take a knife, and cut off the bottom and neck of the bottle - it turns out a tube. It is also cut in such a way that a sheet of approximately 25x30 in size would be obtained. We can proceed in two ways.

1. We straighten this sheet, either under hot water, or by stroking a not very hot iron through the paper. You can also stack the sheets and put them under the press, under the carpet. After the sheets are straightened, they must be fastened together, for example, with dichloroethane-based glue. It perfectly melts plastic and therefore connects these parts together.

You can also simply fuse them with a hot iron through thick paper. When you get several sheets of the right size, they need to be attached with a stapler to a pre-prepared wooden frame. This will be the roof. You can take bottles of different colors and connect the pieces like a mosaic.
2. After the plastic tube has been cut, the sheet is still twisted, it must be folded in half, as if unwinding back and the place of the fold should be well marked. As a result of this action, we will get a detail that will resemble two slides.

We take the second sheet and bend it in the same way. Then we must put the second sheet on top of the first sheet in such a way that we get three slides, when we add the third sheet, we get four and so on. Fasten the parts along the edge to each other with a stapler.
If you look closely, you get shingles from plastic bottles. When one strip is ready, proceed to the manufacture of the second, which is then attached above the first overlap.

Start fixing the finished strips on the roof from the bottom up, that is, starting from the edge of the roof to the ridge. It can also be made from bottles, which are also prepared and fixed at the top.
It may sound paradoxical, but the plastic for the roof is literally lying around under our feet. And these are ordinary used plastic bottles. It turns out that they make a wonderful plastic roof. Thus, we solve two problems at once: we save our money and we solve the problem of recycling plastic bottles.

· You will need plastic bottles of approximately the same size. They need to cut off the neck and bottom so that a tube is obtained.
· Then you need to cut it along.
Thus, we have a piece of rectangular plastic, approximately 30x25 cm in size.

There are several ways to make a roof from used plastic bottles:
First you need to straighten the resulting piece of twisted plastic. To do this, you can use hot water, a press or a not very hot iron (ironing through a sheet of paper).
After straightening the sheets, glue them together with dichloroethylene or a hot iron.

· So we prepare several large sheets of fused plastic, which are then fixed to the roof with a stapler on a pre-prepared wooden frame.
· If you take pieces of multi-colored plastic, you can get a mosaic roof.
In the second case, the roof of plastic bottles is made without straightening the sheets. They just need to be bent in half in the opposite direction of twisting. Something like two hills twisted upwards is formed. We prepare the sheets in this way and fasten them with a stapler on one twisted side, making an overlap.

It is worth noting the advantages that distinguish plastic bottles:
1. Low cost. It is possible to purchase empty plastic bottles from manufacturers, but an even cheaper option would be to use already used containers. Such materials can be asked to be left for you, for example, in a cafe or with friends. This will help reduce the cost of building materials.
2. Durability. Plastic bottles are able to withstand heavy loads and mechanical shocks.

3. Possibility of multiple use.
4. Easy to use during construction work.
5. Durability. It is worth noting that, unlike other building materials, plastic bottles are characterized by a longer service life - about three hundred years. This is many times higher than the characteristics of existing analogues.

Instructions for building a roof from plastic bottles
There are several options for creating a roof structure using plastic bottles. It is only worth noting that it is better for work if all the material is of the same size.
Material preparation
1. Using a knife, it is necessary to cut off the bottom and necks from the bottles in order to get an element that looks like a tube.

2. The resulting part should be cut. You need to do this so that you end up with sheets that have a size of about 25x30 centimeters.
Method one
1. The resulting sheets must be straightened. This can be done using hot water, or you can put all the sheets in a pile, placing them under a press or under a carpet. Another option would be to use an iron.
It is necessary to use a not very hot iron, and it is better to iron plastic sheets through paper.

2. When all the sheets are straightened, you can proceed to the process of fastening them together. To do this, you can use glue, which is based on dichloroethane. Such a fastener will allow you to create a high-quality connection, and working with it is quite simple. The glue will melt the plastic pieces, allowing them to be held together.
3. The connection of the prepared elements can also be provided with a hot iron, melting the blanks through thick paper.
4. After you have prepared several sheets that have the desired size, proceed to their fastening with a stapler. Do this on a wooden frame, which must be prepared in advance.

5. This wooden frame will be the basis of the roof. To create such a design, you can use plastic bottles that have different shades. Putting together a colored mosaic of pieces will make the roof more interesting.
Method two
1. This option involves the use of plastic tubes cut in half. The product does not need to be straightened. You will need twisted elements that need to be folded in half. In this case, if the semicircle is unwound back, we get an even designation of the bend.
2. After the work done, you should get an element that looks like two slides.

4. After adding the third sheet in the same way, you should get one more slide, that is, four. Thus, the entire roof structure is filled.
5. The fastening of the elements is carried out along the edge. The work is carried out with a stapler.
6. This method of making a roof from plastic bottles resembles a tile coating in appearance.
7. Installation is carried out in strips. After installing one, proceed to another. The second strip must be attached to the first overlap, placing it a little higher.
8. Finished strips of plastic construction are fixed on the roof, starting from the bottom and moving up - from the edge of the eaves to the ridge.

9. At the same time, the roof ridge of plastic bottles is made in the same way, preparing the elements and fixing them at the top.
10. Laying the top layer of plastic products is carried out in different ways, in contrast to the slope of the roof:
With a sloping roof, the last layer of home-made tiles is fastened in such a way that the upper parts go onto the wall, protecting the junction of the wall and roof;
· in case the roof has two or more slopes, then it will be necessary to close the joints of the slopes with the help of an additional row of parts, fixing them at both ends of the different planes of the gazebo roof.
· Roofing is best done with a slope to ensure water runoff from the plastic cover.
· When straightening the elements under hot water, it is necessary to immerse the product in liquid for three to five minutes, and then put it under the press for one or two days.
· Installation work is carried out using a construction stapler. But a better way would be to use an awl and a nylon or cordon thread. This fastening option will provide a longer roof life, adding additional resistance to wind loads.
It is convenient to lay the plastic coating on plywood sheets, fixing the structure with self-tapping screws.
· To prevent the formation of leaks in plastic roofing material, it is necessary to use rubber gaskets.
With the beginning of the summer season, another avalanche of empty bottles of polyethylene containers - PET rolls. Like Colorado beetles, these bottles penetrate all corners of the country: cities and villages, streets and squares, parks and beaches, porches and basements, etc. I once saw an almost thriller story on TV - dozens of hectares of the river bordering Slovakia are covered with a decent layer of PET bottles. The picture is not for the faint of heart.
The authorities, environmentalists and a huge number of other specialists are constantly looking for an opportunity to solve this problem, or you can even say "catastrophe". I decided to join them too. If something is lying underfoot, then no one needs it anymore. Therefore, if you make something useful out of PET bottles, they will very soon disappear from under your feet. I make transparent slate for the roof from plastic bottles. From the traditional industrial method, which is very complex, energy-intensive and expensive, mine is simple and affordable.
In empty bottles, I cut out the cylindrical part. I cut the resulting cylinders vertically into 2-3 (or even more, depending on the volume of bottles) plates.
The plates are fastened together in longitudinal intermediate rows, i.e. connected along the length.
I connect the intermediate rows with each other in the transverse direction, so that a depression follows the performance, etc.
As a result, sheets are formed like slate, but they have significant advantages:
- Firstly, plastic bottle slate is much lighter than any other covering material.
- They have high ductility and flexibility, which is convenient for installation.
- Slate from plastic bottles is transparent, therefore it is great for covering greenhouses.
- And most importantly - cheapness.
I connect the plates with silicone or glue, but it is possible to connect the plates using heat treatment, although this is a rather laborious process. The most reliable connection method is combined - adhesive + mechanical. Anyone who is not lazy can make such sheets, right in the kitchen, watching TV.
Scope of sheets
For those who have at least a piece of land, these are greenhouses, fruit dryers, fences, shelters for haylofts, fuel, auxiliary buildings, etc. - as far as imagination and fantasy suffice. And for amateur winegrowers, a broad prospect opens up to make fuller use of the opportunities to grow a vine under a screen according to the method of Kharkovchanin L.S. Shugin. Those who do not have land can make them for sale, change the products of the peasants, etc. For the poor and low-income, such fishing can be a good source of income, and perhaps for someone it will be a good business.
Thus, PET bottles can easily turn from enemies into human friends. And what our country will be like tomorrow, a big landfill or a beautiful greenhouse-oasis, depends on each of us.