Remember your childhood: almost every child dreamed of their own separate housing - toy house. Many of us tried to make such a corner for ourselves and, naturally, even though simple designs were obtained, they made our childhood much happier.
The one who possessed own house from a box, cardboard, lots of branches or pillows, could rightfully be considered the “coolest” child on the street.
Now, when we have already matured and have our own children, I want to build a better structure with our own hands, which will bring joy to our children.
Children's house made of wood
You can build a house for a child with your own hands from any material suitable for this. However, the most common idea for a do-it-yourself children's house is precisely wooden version, which we will talk about.
This choice is due to the fact that wood is the most environmentally friendly and long-term material. Also, of course, wood has a more effective look, which adds atmosphere to children's games. Such a house will not make your child happy, but will also positively affect his health.
Naturally, it is very important to build Orphanage ik with your hands in this way so that it is the most secure and cannot bring any harm your heir.
When the time comes that your child has grown up and no longer needs his own play area in the form of a tree house, you will not have to wonder why he is needed now. Such a structure can be very effectively used as country barn that blends in perfectly with the exterior of your home.
The procedure for building a wooden house with your own hands
First of all, you need to decide how your house will look like. To do this, you can already draw up the first schematic drawing, which will determine the type of building that you need.
So, first of all, before construction, it is necessary to determine the following characteristics of the future structure:
Children's house ideas
Below is a list of ideas for building a wooden children's house. If you don't want to spend time creating your own house, creating drawings, ideas, and so on, you can use one of these options.
house-tent
This idea involves the construction of a children's house in style primitive people . That is, the style of Indians, Robinsons or nomads will be used here.
If you choose to build a house according to this idea, in addition to wood, you will need a lot of fabric, branches, and shrubs.
Hobbit house
Many of us are familiar with John Ronald Reuel Tolkien's novel of the same name, The Hobbit and The Lord of the Rings. It was after the appearance of the film adaptation of these books that many people got acquainted with the forest dwellers, who are also commonly called Hobbits.
It is the house of one of these forest dwellers that this idea proposes to build. Moreover, after the construction of such a building, you can really completely plunge into the fairy-tale world of Tolkien.
house-ship
This option is best suited for young rogue pirates and distant sailors. This the idea involves the construction of any kind of ship with my own hands. To better understand what such a wooden children's house will look like, you can see a lot of photos.
Development of a plan for a children's house made of wood
Before compiling detailed plan construction, as well as a drawing, it is necessary to take into account the mandatory features of such a structure:
Drawing of a children's house
 With regards to the drawing of a children's house in the country, you there is a choice of two options: either sketch a diagram yourself, or use a ready-made option.
If you are well versed in drawing up drawings, and you are not too lazy to engage in this craft, then feel free to choose the first option. If you want to use a ready-made drawing that a specialist worked on, then this is very simple, since you can find a lot of similar options on the Internet.
It is worth remembering that the drawing for the construction of a children's house in the country is being done in order to correctly calculate all materials to be used during construction. This will help not only save materials, but also correctly calculate their dimensions and produce a blank.
Do-it-yourself tools and materials for building
Here is a list of all the tools you may need when building a small wooden house for your child:

Also, of course, you will need materials, without which it is impossible to create a cozy house for a child in the country. Materials you may need:
- Beam for the frame. We recommend choosing a beam with a cross section of about 50 x 50.
- Lumber for house cladding.
- Plywood with a thickness of more than 8 mm. OSB can be used. The second option is cheaper, but, as a result, less durable. It all depends on your capabilities and desires.
- Roofing material for the roof.
- Brick.
- Glass for windows. It is worth remembering here that given material is quite unsafe, so it is best to completely eliminate the presence of glass in the cottage in the country. However, if you are confident in your child, glass can also be used.
Construction process
Now that you have completely figured out all the details, created the drawings, found the material, spent everything necessary calculations, you can go to the country.
The entire construction process can be divided into several stages, each of which is very important:
- Foundation erection.
- House floor construction.
- Walls and frame.
- Roof.
Foundation
Of course, it is worth remembering that you are building an ordinary children's house in the country, and not a serious house for permanent residence. Therefore, the construction of the foundation for the children's house can be approached a little easier without flooding it.
In order for the cottage in the country for your child to last as long as possible, it is best to dig the soil of the order of 10 cm and lay it with bricks. You can, of course, also take advantage of the special terrace board , but, this option will be extremely costly.
If you are looking for an idea that will be the most budget and simple, use bricks.
Floor, walls and frame
It is better to approach the construction of the floor with all seriousness. There are 2 options here:
- The use of lags and floorboards.
- Using plywood or OSB.
At the corners of the foundation, it is necessary to dig holes in which the beams will be installed. This will be the support for the wall. Do not forget that before you place a beam in the ground, you need to competently approach the process of processing it.
For more solid construction you can use a metal corner. After placing all the corners of the beam into the ground, you can sew up the frame with boards or plywood, of your choice.
There are also options for houses that cannot be built without supports.
Roof
 The beginning of the roof construction process must be carried out separately from the children's house in the country. The first step is to make the fronts. Here it is recommended to use the same beam, which was used during the construction of the frame.
It is necessary to install two triangles along the edges of the house, after which boards, OSB or plywood are sewn. If necessary, more than two triangles can be installed. It depends on the size of the house.
Don't forget about roofing material, which is superimposed on top of everything. Some professionals use thatched roofs.
In general, you can choose any option, but remember that the roof should never be used as a playground for your child. If the safety of the heir is important to you, approach this issue with all seriousness.
So, as you may have noticed, building a wooden house for children in the country with your own hands is a very simple craft that any self-respecting father can afford.
Using the universal construction principle given in this article, you can build any simple building for a child. The main thing is your imagination.
Holidays in the country or personal plot- a great way to spend family time. However, children often get completely bored away from the city and have absolutely nothing to do. In this case, a play complex comes to the rescue, which can be made inside a children's play house. Such a kind of shelter, for example, made of wood, will fill children's games with new emotions and variety, and the creation of such a product can become another family game.
If you have already thought about how to make a house with your own hands, but were afraid complex schemes and drawings - do not lose heart. The construction of such a building right approach, will be able to cheer not only the children, but also their parents. It is important to acquire diligence, patience and good mood. Then any work, especially such a creative one, will be a joy.
Getting Started: House Requirements
Enthusiasm is not enough to turn a child's life into a fairy tale and build a real, not fictional kingdom for him. It is important to carefully structure the work and understand the design features. Whatever house for children with your own hands you wish to make, it must meet a number of requirements:
- The materials used must be completely safe (they must not be toxic).
- The house must have a safe design.
Everything should be safe in a do-it-yourself children's playhouse, including: paint coatings, impregnation for lumber, finishing and construction materials. And also in the house there should not be rough surfaces and sharp corners. You do not want to treat the injuries of your beloved child later, do you?
Before starting work, it is useful to look at the Internet with examples finished projects. Pay attention to drawings and diagrams, features of appearance. On the Internet, you can find ready-made wooden design projects, or you can design your own children's playhouse and create it together with your child. This approach will help to have fun not only for you, but also to allow the child to express himself creatively.
The dimensions of the children's house for giving with their own hands can be any. It all depends on the area of the site, the availability of materials and your desire. It can be a house, a hut, a castle, a lair. Any fantasy can be realized if you approach the work correctly. Don't be afraid of difficulties.
To build a house, you may need:

The finished product can be diversified with accessories, turning an ordinary building into fabulous city or even a country.
Features of choosing a place
When choosing a place for a house, remember that this is primarily a playground. Therefore, it should be located as far as possible from parking spaces, ponds, barbecue areas. And also pay Special attention for the presence of wells and septic tanks nearby - in no case should they be nearby!
The children's area can always be combined with a garden and then decorated:
- Garden gnomes.
- Children's labyrinths or green labyrinths.
- Characters from your favorite cartoons.
- Hammock.
- Seesaw.
- Sports stairs, horizontal bars, slides.
- Backlit.
In addition to all of the above, the chosen place should be clearly visible from all sides of the garden and from the windows of a residential building. Before deciding on a place, inspect the area you like from all sides.
 Wood- the most popular material for creating children's playhouses. It not only inspires confidence, but also looks very impressive. In addition, even a beginner can master the construction of a wooden children's house.
When choosing a material for a future home for a child, pay attention to the properties of the selected wood. For example, conifers have a beneficial effect on health, therefore, in addition to entertainment, in such a house your child will receive the prevention of many diseases. This is due great content volatile substances in the needles, which activate the protective functions of the body.
The construction of such wooden house will be able to decorate the cottage and also successfully fit into the interior country house or villas.
Before starting work, you need to decide with the exact size of the house. Decide whether additional elements such as slides, terraces, stairs will be present and take this into account when drawing up the drawing.
When drawing up a drawing, consider not only doors and windows, but also interior decoration, external decorative elements(if they are planned). When choosing sizes, remember that children grow quickly and interior decoration, as well as the size of the children's house, should take this into account.
What you should pay special attention to:
- Roof.
- Height of doorways.
- Wall surface.
- Stationarity, mobility and compactness of a playhouse for a child.
- The height of the windows from the floor level and their number.
If you plan to build a children's house for a child preschool age- for window placement enough 700 mm from the floor level. Older children in such a house will be able to look out the window squatting down, and the younger ones standing up. Considering that the illumination of the room will depend on the windows in the house, there should be at least two or three of them.
When choosing the size of the doors, consider the height of the child. Doorway it is necessary to make the height of the child not less than 400 mm. And the wall covering, in order to avoid injuries and abrasions, must be absolutely smooth and even. For the same reason, the roof must be made gable, and not even. Then the child will not be tempted to climb on it.
We build an orphanage: the necessary materials
Make sure that the purchased product is good quality see all certificates. Make sure that there are no toxic substances in the composition of the purchased materials.
To build a wooden children's house with your own hands, you will need:

The easiest option for building a wooden house with your own hands - wooden frame lined with a block house. What is a block house? This is a planed board made of logs. Products available for sale standard sizes and in a wide range.
The main advantage of using a block house – strength, that makes him ideal material for the construction of a children's play house in the country or in a personal plot. In addition, such a product will look equally impressive on the territory of the garden and the playground.
In addition to the above advantages, the block house material is environmentally friendly, and its prices are very low, for building materials of such quality. And collect wooden house ik with your own hands, you can arm yourself with a screwdriver, tape measure, hacksaw and level. Subsequently, such a children's house can be sheathed with vinyl, which will significantly improve its appearance.
The Basics: Building the Foundation
Any construction starts with building the foundation. To do this, before starting work, mark the installation site, according to the drawing, on the territory of the playground. Getting Started:
- With four pegs (40 cm in height) and twine, we place the future location of the house.
- In the corners of the marked area, we dig holes 100 cm deep. They will be needed for the support bars. we make the same holes at the locations of the pillars, for installing windows and doors. Always refer to the drawing to avoid unpleasant surprises.
- Before installation, all installed wooden beams must be carefully treated with impregnation from decay.
- We fill the finished pits with crushed stone to a height of 150 mm. Then a beam is installed on it.
- The installed supports are poured with cement. At this stage, the construction must be interrupted until it dries completely. cement base. This will take approximately a week.
Floor and wall construction
 A few days later, when the poured cement grabs a little, on wooden poles it is necessary to nail the four most durable beams. They are located at the level of the future floor of the gaming house. So we get a frame, with support bases in the corners and locations of windows and doors. Horizontally fixed beams complete the frame structure.
Let's start building walls and floors:
- In accordance with the drawings, the resulting frame base is sheathed with a block house. In order not to waste precious time adjusting the dimensions, purchase products in the store that match the dimensions of your drawing.
- After sheathing the structure, the places of windows and doors are cut out according to preliminary markings. Pay special attention to decorating openings: they should not have cracks and sharp corners - this can be dangerous for the child.
- To build the floor on the nailed base beams, we nail additional boards. You need to install them at the same distance from each other. As a result, you should get a strong and durable semblance of a lattice.
- Now, on the finished base, you need to lay out two layers of plywood. Make sure that the top plywood overlaps the seams of the bottom ones. This arrangement of plywood makes the floor as safe as possible.
roof construction
Roof gables should be made from the same material that was used to build the entire house. They should be triangular shape, and by no means flat.
To create pediments you will need:

The construction of the roof is almost completed, it remains to decide on its outer coating(if you haven't already). There are many photos on the internet. various options roof sheathing. It can be tiles, straw, ondulin, boards or polycarbonate. It all depends on your capabilities and desires.
Finishing work
The construction of a wooden house for a child with his own hands is almost completed. Left decide on the design of your creation. It can be decorated with a shallow pond with your child's favorite cartoon characters. Or you can show your imagination yourself by decorating a wooden house in the style of Russians folk tales. Fortunately, on the Internet you can find many photos with options for such decors.
However, whichever finish you choose, remember that correct handling wood is the key to the longevity of the gaming house. In addition, without appropriate processing, a wooden house will quickly lose its attractiveness.
In maintaining the longevity of a wooden house with your own hands, you will be helped by:
- Impregnations and varnishes that create an invisible film that repels dirt. Besides, protective film does not allow the wood to darken.
- Fire retardants will reduce the combustibility of wood.
 Use a roller to apply wood care products and follow the manufacturer's instructions.
As you can see, making a children's house for a summer residence with your own hands is not such a difficult mission. Just be patient and inspired. Create with your family and for your family And most importantly, don't be afraid to experiment. Consider the tastes of the child and try to choose a calm color scheme for the design of the playground. After all, soft, pastel colors have a beneficial effect on the psyche of the child, harmonizing it and activating creative processes.
Remember that the main requirement of a children's building is safety. Therefore, the absence of sharp corners and traumatic places should be your priority in creating a fairy tale for your baby. It should be not just fabulous, but also the most safe place for leisure activities.
children's house do it yourself


Many summer residents, when planning and, are going to build at least a small children's house with their own hands, so that the little owners have something to do and where to play in the summer. That is why we decided to write an article where we describe in detail the process of creating this small building on the site.
In our case, the height of the ridge of the building will be 90 centimeters, and overall dimensions limited to the following indicators - 160x160x140 centimeters. To build a children's house, you will need the following tools and materials:
- Screws with nails;
- 4 foundation blocks;
- Dye;
- 4 floorboards;
- Edged board;
- Lining;
- 6 beam holders;
- Mounting corners;
- 11 bars for creating a floor and 5 for a blood;
- Carved platbands;
- Furniture shield.
Work order
- Floor frame assembly. The first step is the foundation of the future structure, followed by reinforcement with metal corners and diagonal alignment.


- Plot Definition. You should choose level ground. If there is none, then you will first have to level the area for construction. On the site, using the frame, it is necessary to designate four corner points, which will become the markup for placing the foundation blocks.
- Give stability to the base. Before laying out the frame of the house, it should be on the surface sand cushion place four foundation blocks in a depth of no more than one bayonet of a shovel. After that, a waterproofing material is laid between the frame and the base.

- Floor execution. In the next step, the frame is completely sheathed with boards, thus obtaining a flat surface.

- Underside processing. After the floor is assembled, it is necessary to process outer surface boards, that is, the one that will subsequently be adjacent to the ground. Then you can begin to build walls, insert doors and windows.
Important point! For the construction of a children's house with your own hands, you should select only jointed materials. Thus, children will not be injured and get splinters while playing in a small building. For the same purpose, it makes sense to chamfer the corners.
- rafters. First of all, preliminary markings are drawn on the working surface. After that, with the help of temporary nails, bait is performed. The next step is to fix the rafter, and also seal all the joints with corners. At the end, the nails are removed.
- Rafter fastening. To install exactly on a plumb line, 3 rafters should be placed on the frame, resting them with an inclined support. The walls of the future children's house will be attached to the frame with metal holders.

- wall cladding. A self-assembled frame can be sheathed different materials, however, lining is most often used for this.

- Roof assembly. Starting from the ridge, the roof of the house is sheathed with carved boards on both sides. On top of it, you can lay ondulin, which is quite simply cut to size with a grinder.


- External decoration. Having finished with the construction of the children's house, you should not stop there - decorate the appearance of the new building for the child, making the structure more elegant and beautiful. To do this, you can embellish the corners of the building with figured corners, and doors, windows and ends with carved platbands.

- Interior. Do not overlook and, placing inside, for example, a small bench or table.
Thus, you will get an almost ready-made children's house. As you can see, doing all the work with your own hands is not difficult at all. In the end, it remains just to paint the walls of the new building.
Children's house on poles
You can easily build a playhouse for a child on your own on suburban area, right in front of the house. One of the most common options is a do-it-yourself building on poles.
Instructions for work
Of course, the new construction on the site will not be very heavy, and therefore there is no need to build a foundation for it. However, some foundation is still required even for a children's structure. In our case, it is best to use wooden beam 100 by 100 millimeters. You can fasten the beam together with steel corners.
The next step is to place the supports that will hold the top floor of the children's house. For this purpose, it is worth using boards with a thickness and width of 30 and 80 millimeters, respectively. Jumpers are useful for fastening, which will simultaneously hold the boards of the 2nd floor.

Along with this, wooden supports are installed, they will play the role supporting structures for stairs. Wooden roof is installed.
Expert advice! So that the ceiling of the future structure can hold heavy load, it is recommended to place the boards with the edges down.
It is best if the supports of the building will be placed not just anywhere, but on paving slabs.

To prevent children from getting hurt during the game, it is worth installing balusters with railings on the stairs.


In the upper part of the support must be fixed to each other. Jumpers should be used to fasten the wall frame.
Walls can be sheathed with ordinary boards, for the roof it is recommended to use plywood.
For greater safety and to avoid injuries to children, before building a children's house, it is worth sanding all the timber with your own hands. In addition, it is better if you inspect all boards in advance for chips, cracks and breaks in order to minimize the risk of splinters during the operation of the building.
For the roof, you can use almost any modern soft.


In addition to the main entrance, it would not be superfluous to provide in the design of the house for children a "black" and simply an emergency exit. For this purpose, it is possible to perform in the floor of the structure small hole where the rope will be stretched. Undoubtedly, the guys will appreciate this decision!

Near the end are held Finishing work for which various decorative elements and multi-colored coloring materials are used.

Finally, between the pillars, under the first floor, you can create a sandbox.
Master class on creating a house with your own hands
First option
Required to work the following materials:
- Wood corners.
- Cutting board.
- Sheet piling to create a floor.
- Nails.
- Mounting brackets made of metal.
- Bar for the frame with a section of 45 by 45 centimeters.
- Biotex.
- "Block house".
Before you start creating a children's house with your own hands, you need to draw up a drawing future design. In our case, the building will contain a single room with a doorway and a window and a small veranda.

As you know, any construction work begins with grounds, which will simultaneously play the role of sex. Three logs are connected together with tongue-and-groove boards by fastening a tenon-groove and nails.

After that, a frame of a new building is made from a bar. Do not forget that for fastening the bars it is worth using metal corners.


So that during the process of fixing the "Block House" the material is not damaged and does not spoil its appearance, it is necessary to use scraps and a hammer.
Wall cladding should be based on the location of the doorway and windows.


Corners from the side of the street are covered with wooden corners.
Used for the roof edged boards that are fixed on each side with nails. The flooring is recommended to be made of bituminous tiles.

After you completely build a children's house with your own hands, it is necessary to treat the walls, floor and roof of the structure with "biotex". This composition will not only give the surfaces the desired color, but will continue to protect the structure of the building from negative impact rain and sun.

Like last time, shelves, a table and benches are made inside the room.
Thus, with our own hands, without the help of specialists and additional costs, we will get a beautiful and reliable children's house, which your children will certainly appreciate.
Second option
In the second case, the following components and materials will be required to build a house:
- Thin boards.
- Ruberoid.
- Six wooden planks 2.4 by 1.8 meters.
- Screw set.
- Bars of various sections.
- Stain.
It is recommended to lay the foundation, if possible, using crushed stone. Alternatively, you can simply level the ground under the new structure. Next, the bars with a section size of 10 by 10 centimeters must be cut into equal parts, and then placed in increments of 1.4-1.5 meters between the racks.

Support bars should be placed under the posts in the soil, so we will exclude the process of floor decay in the future. We place bars 5 by 10 cm in cross section between the rack and the panel, which will become the floor in the future. Fixation of the beams is achieved by screws. The existing voids between the lags should be covered with earth.
The next step is to cut wooden panels into equal parts, and then decompose them into strictly horizontal position. Fastening is achieved by a beam.

In order for the flooring to be as smooth as possible in the end, panels should be laid with little margin, then saw off the excess parts.
The next step is to create the sidebars. IN this case Initially, marking should be done, leaving at least a 6-centimeter margin on each side in width. As for the height of the wall for the children's house, 1.5-meter panels can be made as an example.

In the process of assembling walls with your own hands, one should not forget about door and window openings, which are also created based on pre-made markings. In our case, the dimensions of the door will be 0.6 by 1.2 meters.


Internal and external panels are varnished. After the flooring is well fixed, walls are attached to it with screws. A board with a section size of 10 by 5 centimeters is placed with a small protrusion over the edge on the side.
As soon as new wall will be placed in place, its installation must be checked with a level. Only after making sure that the location is correct, you can move on to the next wall!
The next step is to build a roof, which at the end is covered with a layer of roofing material. To cover the gaps that may accidentally form between the panels, a wide ridge should be used.

For greater beauty, you can create shutters on the windows or assemble a small porch in front of the house with your own hands.

On this, the children's building will be ready.
Aboveground building with stairs and slide
An interesting option can serve as a children's house, built on a summer cottage on a hill. In this case, the following materials and products may be required:
- Dye.
- Ladder.
- chipboard.
- Sand with cement for the base.
- Slide.
- Wooden blocks for piles.
- Screws and nails.
This version of the structure will be erected for the most part thanks to the tenon-groove connection, which will allow, if necessary, to disassemble the building, for example, for the winter.
The frame of the house is assembled in the same way as shown in the photo below.


If you are going to perform shutters on window opening, then you should buy hinged loops in the store in advance.

The railing under the porch is assembled. For this purpose, small holes are made in the bars with a certain step, with a depth of no more than half the bar.


Reiki should be tried on together with drilled notches. After making sure that the slats fit well, they should be removed for a while and secured with nails for greater ease of painting work.
Most important point during the construction of any structure, the foundation is laid. The children's house is no exception! In our case, under the piles of the building, it is necessary to dig 4 holes, the depth of which will be approximately one meter. Next, the supports are poured cement mixture, after which it remains to wait for the final drying.

It is important to emphasize that the deeper the piles are placed in the soil, the more reliable the finished house structure will be, reducing to nothing the risk of collapse and mobility of the children's building.
It is difficult to convey the joy of a family leaving on a warm summer day to relax in the country.
Feasible work in the garden and flower garden, pleasant stay in a shady deck chair and fragrant home-made shish kebab - this is the ideal active rest for adults.
Unfortunately, children do not fit into this scheme well, since the favorite activities of fathers and mothers are usually interesting to them for no more than 15 minutes, after which the kids do not know what to do with themselves.
To solve this problem, to the mutual satisfaction of all family members, a children's house for a summer residence will help- a compact and beautiful structure that kids dream of.

Today, the creation of such structures are engaged in best designers, and in reality they are embodied by manufacturers of sports and gaming complexes.

Let's try to understand the proposed market abundance of options in order to select the most interesting of them.


Obviously, a house for children should not be limited to four walls and a roof, but should become the center play area. Therefore, when buying it, special attention should be paid to designs with the widest possible “functionality”.

The imagination of the child is limitless and the developers are trying to take this into account by equipping children's houses with door bells and lamps, equipping them with verandas, toy furniture and kitchen appliances. Very often, such a house is combined with a slide and a ladder. So it turns out a full-fledged playground in the country.

Children know how to appreciate care, so they will be delighted even with a simple wooden "hut" with one window and two benches. Everything else will be quickly added to it by children's imagination.
Plastic is a hygienic, lightweight and safety material that pleases the eye with inexhaustible wealth. colors. Today it is actively used to create playgrounds. A house made of such material will surely appeal to the little guests of your dacha.

In addition to the usual door, a special hole is sometimes made in it for those who like to crawl on their knees. A small counter in the window is all that is needed for complete happiness for girls who love to play “shop” or treat friends to shortbread “cakes”.

Considering ready-made options, take note of the most successful elements and solutions. They can be used when creating your own project.
Original designs of children's playhouses
The popularity of Tolkien's fantasy novels gave birth to a new direction in the design of children's houses, turning them into cozy dwellings hobbits. Here is an example of one of the many fabulous options.

This is not a factory design, but a do-it-yourself building using a fair amount of imagination. Not only children, but even their parents will not refuse to play in such a house. The interior of such a building should correspond to the maximum with the atmosphere of the dwelling of the fabulous inhabitants of Middle-earth.

Anyone who is familiar with organic architecture will not hesitate for a long time when choosing the best option children's house. A simple mesh frame, a little work for its landscaping and your country masterpiece will be the envy of all family neighbors.

The beauty of natural wood and its popularity in our open spaces made it possible to order a children's house made of logs. Such a cozy hut - perfect place for games and reading fairy tales.

Affordable price and solidity of a wooden structure are weighty arguments for buying.
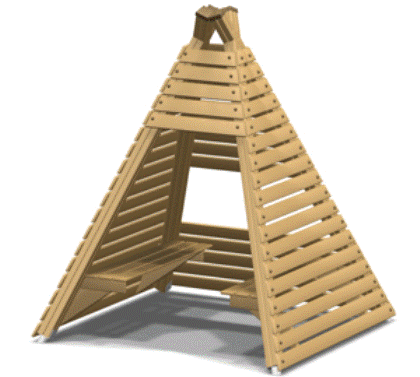
Give the kids a little "sovereign republic" where no one will disturb them to play and play sports. Its capital can be a two-level wooden children's complex, on the lower tier of which there is a table and benches, and at the top there is a comfortable room for games.

You can climb there not only by the usual stairs, but also by a special inclined flooring, which trains dexterity and develops coordination of movements. A side support with a horizontal beam on which a swing is suspended is a good addition to a country entertainment complex.
How to build a children's house yourself?
There is no shortage of offers for playgrounds on the market today. For every taste and budget, you can find dozens of original options.
Nevertheless, making a children's house on your own is much more interesting and useful for a child than buying a finished structure. If your son is old enough, you can discuss the blueprint for the future play area with him and decide on a mutually acceptable solution. Such a construction will turn for him into exciting game from which he can draw a lot of useful things for his future adult life.

If the children have not yet grown up to understand the basics of construction, they still need to discuss the drawing of the future house with them and get approval for their plan.
Most simple option self construction house is a wooden frame sheathed with clapboard or block house. It is assembled easily and quickly using a screwdriver, hacksaw, tape measure and level.
It is not necessary to put such a structure directly on the ground. It is better to assemble the flooring on wooden frame mounted on concrete poles. This will protect the wood from moisture and decay.

The layout of the house should include not only a playroom, but also small open veranda where children can play. The size of the building in terms of it is desirable to make at least 2.5x1.5 meters.
It is easy to build a playhouse for children when its base is a frame made of timber. Having installed all the racks, crossbars and calibrated their position with a level, it remains only to fix the wall cladding evenly and tightly. To do this, you can use OSB board, wooden or PVC lining.

The play area should not look like a dog house, so use translucent roofing cellular polycarbonate and make at least two windows in the walls, decorating them with a carved frame. It is best to paint such a structure using bright rich colors, as well as stencils with drawings of cartoon characters.
You can build a wooden house in the form of a two-level hut. To do this, an inclined frame made of bars with a section of 50x80 mm is mounted on a wooden frame, which is then sheathed with an OSB board.

Its height is 2.5 meters, so one slab can block two floors at once. On the first one there will be a game room, and on the second one there will be an improvised couch.
The stairs on the other side of the hut can be supplemented with a slide along which children can slide down to the ground. It is easy to build it from a pair of planed boards, upholstered in smooth plastic and provided with sloping side walls.
The house built in the form of a boat with a steering wheel, masts and rope ladders looks great. Its design is more complicated than the construction of a conventional straight frame, but all the efforts in construction fully justify the original appearance and joy of the child.
Children's houses designed for children aged 1 to 5 and older, when the child already knows how to crawl or walk confidently. There are such types: with a slide, folding, inflatable, with a pipe. Most types can be installed in the summer both in the apartment and in the country. All tents are made of plastic, some have fabric. When choosing, pay attention to the game elements and the size of the house.
- With a slide - a children's playhouse can be equipped with a slide, installed on the street and in the house.
- Folding - balls are also attached to such models. Quickly assembled by one person in a couple of movements. Suitable for an apartment.
- Inflatable - their advantage is simple storage and quick assembly, the pump is supplied.
- With a pipe - a house for children, which comes complete with a climbing tunnel.
Size s: each playhouse can be installed indoors. Medium models have dimensions of 100x100x135; complex models with several rooms in length up to 2 meters.
Material and quality: children's playhouses are made of plastic, the shapes are rounded, there is nothing to cut yourself on. Some models are made of fabric (breathable material) or have such inserts. There is no specific smell.
Type and purpose: game developing houses designed for passive and active recreation in the country and at home.
Assembly: all models have simple and robust design Everything in the houses is stable. One person can assemble the tent on their own, following the enclosed instructions. Folding models allow you to assemble in a couple of simple movements.
Design: bright models are presented, with thematic appearance for kids, boys and girls. Castle-inspired tents and cabins, gardener's dwellings, as well as models with combined structures are available.
game elements: all play houses, some with plastic balls, tunnels, slides, most have windows, pots and musical items.
Price: you can buy a simple tent in the range from 700 to 1,500 rubles, or a multifunctional house for 1,600-30,999 rubles.