A simple and functional do-it-yourself scratching post is made quickly and easily. If there is time and desire, then you can make a beautiful scratching post with a couch or with a house on top, which will look no worse than bought in a store. If there is neither one nor the other, then you can buy a scratching post for cats in a store or on the market. But in this case, you will have to spend a considerable amount of money, because even very simple cat accessories made from the most common materials are not cheap.
A simple and functional do-it-yourself scratching post is made quickly and easily
So it's worth looking at the prices of ready-made accessories and figuring out how to make a scratching post for a cat with your own hands. It is necessary to pay attention to the materials suitable for their manufacture and safe for cat health. And after that, carefully weigh everything and decide whether it is worth spending money or not.
After all, scratches for cats very quickly lose the attractive appearance that they have in the store. And aesthetics matter only for the owners. But the appearance of the object on which he sharpens his claws is completely indifferent to the cat.

If there is time and desire, then you can make a beautiful scratching post with a couch or with a house on top, which will look no worse than bought in a store
It is also necessary to take into account the fact that the cat may not even come up to the purchased claw sharpener, despite all the exhortations of the owners. In some cases, he may even begin to bury a beautiful contraption bought for him with love. This is due to the fact that the animal does not like the smell of some synthetic materials and dyes used in the manufacture of the accessory. In such cases, it is not safe to force an animal to use an object that he did not like in such a harsh way as lubricating the surface of valerian tincture. After some time using an unsuccessful accessory, the cat may become lethargic, begin to lose hair and appetite. And this will certainly affect his health.
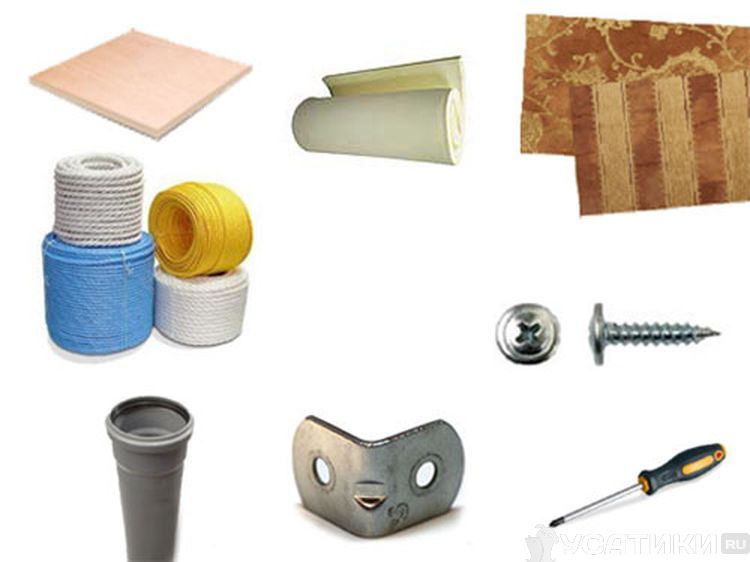
Materials suitable for the manufacture of scratching posts
Cats are much more sensitive to smells than humans, and therefore natural materials that do not have strong fragrances are best suited for making cat accessories. These are wood, natural fabrics, burlap, cotton wool, twine, hemp, cardboard. Synthetic fabrics and twine for a scratching post cannot be used also for the reason that a cat scratching too strong fibers can damage or tear out a claw. And it hurts a lot. This may not happen, but it's not worth putting your own pet's health at risk. Materials dyed with synthetic dyes should not be used in the manufacture of accessories for cats. They can not only cause allergies in animals, but also contribute to the development of serious digestive diseases and the occurrence of tumors.

The simplest claws - easy and fast
In the house where the cat appeared, the scratching post for her becomes almost a matter of prime necessity for the owners, if they do not want to later admire the damaged things. Because in her absence, the cat will sharpen its claws on anything, most often on furniture. And if you get used to something, then it will be quite problematic to wean it off.
If a cat appeared in the house unexpectedly, or there is no time to create a stationary sharpener for claws, then the simplest ways to make them are suitable for this case. A piece of softwood log with peeled bark 70-100 cm long can act as the simplest scratching post. A wooden scratching post is very strong, durable and does not require cleaning. You can cut the log in half along the fibers and attach it to the wall.

Do-it-yourself cat scratching post from packing cardboard is made instantly. To do this, it is enough to tightly roll up the packaging cardboard with a roll and tightly tie it in several places with twine. The height of the roll should be approximately equal to the length of the cat with outstretched paws, and the width of the bundle should be slightly less than the thickness of the cat. With a high degree of probability, the cat will show interest in the process and begin to scratch the cardboard without waiting for the end of production. As a result, the furniture in the house will be safe and sound.
If the cat did not show interest in the process, then after the end of production, you need to play with him with this roll. This should be done when the cat wants to play, and not eat or sleep. In no case should you wake up a sleeping cat and try to play with him with such a roll. This is often provoked by children who are eager to offer their pet a new game. Therefore, children need to be explained in advance that a sleepy animal can be frightened by such a large object, and after that it will bypass the cardboard roll.
If it didn’t work out, then you need to slightly moisten the tip of your finger with tincture of valerian and touch it to the roll, or rub the cardboard a little with catnip. From an old carpet or carpet with a fabric backing, you can make an excellent scratching machine in a matter of minutes. To do this, you need to roll the carpet with the wrong side out and tie it with twine in several places. Cats love such a claw brush regardless of its size and get used to it instantly - it is enough to show it once. It serves for a long time and is suitable even for large active cats.

A wonderful do-it-yourself scratching post for a cat is easily made from an ordinary bag made of natural material. In the bag you need to put an old unnecessary thing made of natural fabric, twisted into a tube, or a strip of cardboard 7-10 cm wide. And then roll the bag tightly. Secure the edge of the bundle with twine, threading its pieces into burlap and tying them in a knot. The distances between the threads of the burlap are large, and it will not be difficult to thread the twine into them. For convenience, you can use a crochet hook, if you have one.
A voluminous roll of burlap, inside of which there is a folded thing, can be styled like a candy by tying it with twine at a short distance from the edges. You can also stylize it as a sausage by pulling it with a rope through equal distances along the entire length in the same way as sausages are tied up. On a flat claw brush, you can draw a fish or a cat's face with a marker or felt-tip pens, and it will look much more interesting. And a small kitten will be able to use such scratching posts made of burlap for a long time.

It is necessary to pay attention to the materials suitable for their manufacture and safe for cat health.
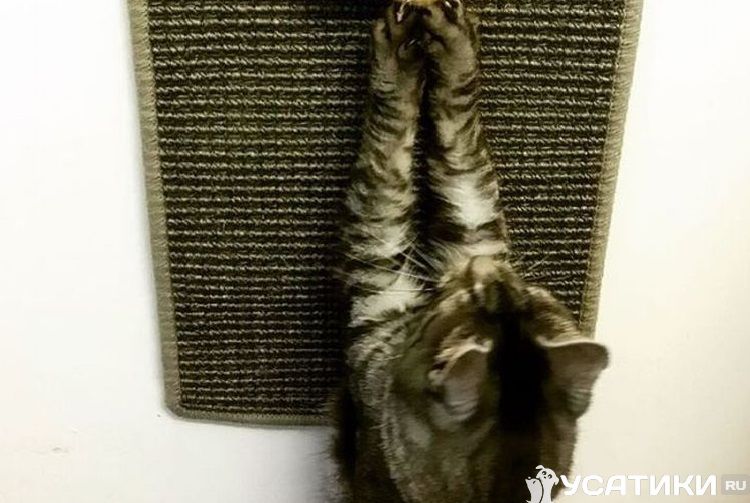
Wall scratching posts
Wall-mounted scratching posts are the best option for an apartment and a small house. They will not roll around anywhere. They are permanently fixed to the wall and do not take up space in the house, unlike the floor ones. They don't need to be brushed. Such products cannot be turned over, creating a rumble at the most inopportune moment, so they are ideal for large active animals.
You do not need to spend a lot of money on materials for their manufacture. Almost all the necessary materials are often found in every home. They have one more indisputable advantage over other models of claws. With a wall scratching post, you can close a wall or corner scratched by a cat. For the manufacture of both flat and corner claws for cats with your own hands, the manufacturing scheme is quite simple - a piece of plywood with a soft fabric layer is attached to the wall with slats around the perimeter.

The size of the piece of plywood you need depends on the size of the cat. The length of the plywood should be 5-10 cm longer than the length of the cat with outstretched paws so that it cannot scratch the wall above the scratching post. The width of plywood for a flat wall-mounted claw should be about 40 cm, so that the cat, spreading its paws, does not scratch the walls next to it. To make a corner scratching post with your own hands, you will need 2 pieces of plywood at least 25 cm wide. If the kitten is still small, then you need to focus on the size of an adult cat of its breed.
As a soft layer, a piece of old carpet with the wrong side out is perfect. If possible, then you need to put the carpet in 2 layers. Then the nail clipper will be softer and more durable. A fine soft layer will come from a piece of quilt covered with several layers of burlap or heavy velveteen. In the absence of a carpet or a wadded blanket, a cover made of natural fabric, folded in several layers, is perfect.
A piece of carpet or blanket needs to be cut to the size of the plywood and fixed around the perimeter with glue or a stapler. Burlap or velveteen should be cut with a margin of 7-10 cm along the edges. On the fabric laid out face down, put the plywood in a soft layer inside, bend the edges of the fabric and fix it around the perimeter with glue or a stapler, pulling it tightly.
Then prepare 4 slats equal to the sides of the plywood rectangle, screw screws into them at a distance of 4-6 cm from each other so that the edge of the fasteners does not protrude from the slats. Such a small distance between the screws is necessary for the durability of the claw point. The screws must be long enough. When choosing their length, you need to take into account the thickness of the rail itself, plywood with a soft layer and the depth to which the screws must enter the wall for a strong fastening of the claw clip. Now you need to fix the prepared plywood with a soft layer of slats to the wall, tightening the screws to the end. There should be no distance between the floor and the scratching post, because the cat will sharpen its claws on its hind legs in its lower part.

How to make a scratching post for a cat with your own hands (video)
Floor scratching posts
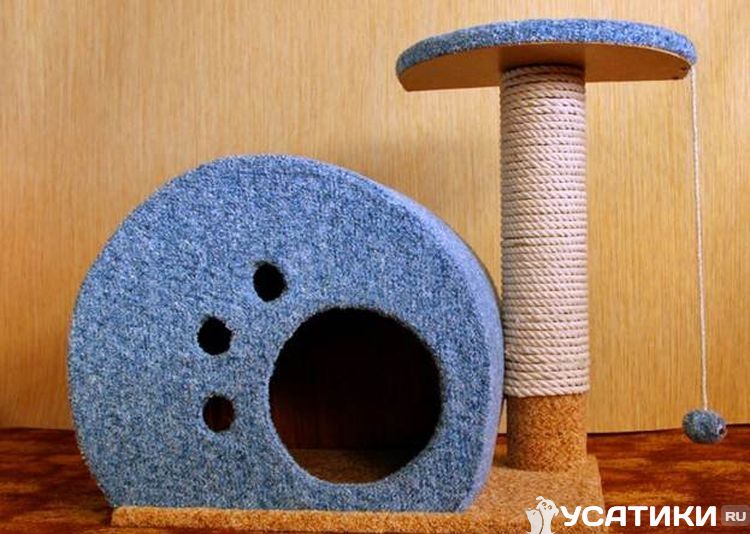
Floor scratching posts are different - flat, posts, combined with a bench or a house. They take up a lot of space in the house, but in some cases are irreplaceable. Flat and heavy floor ones will help out when the material of the walls does not allow wall-mounted ones to be attached to them. And you don’t want to constantly stumble over light rags for cats made of cardboard or fabric that the cat drags around the apartment. The floor claw machine, located under the table, will not interfere with anyone. The columns will be very good for an active and young cat if he has nowhere to climb in the apartment, and there is no way to go outside. Complex complexes with houses and beds will be especially useful where there are several cats, and kittens are often born. All animals will have a place to frolic, and they will not constantly get underfoot, scratch and spoil furniture.

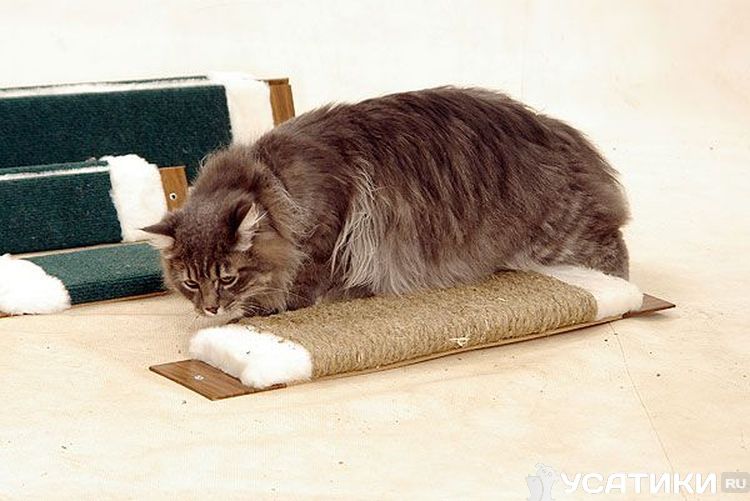
Flat floor scratching posts
Making a flat floor scratching post for cats is very simple. To do this, you need to take a piece of a wooden board, chipboard or plywood 40-50 cm wide and 70-100 cm long as a basis. A part from an old cabinet is perfect for this. The base can be wrapped on both sides with carpeting with a fabric backing, wrong side out. An old wool rug is perfect for this.

The edges of the carpet must be sewn with strong threads or fastened together with twine using a crochet hook. Such a sharpener for claws and a comb at the same time is wonderfully suitable for a calm, phlegmatic pet. And when 1 side becomes pretty torn, it will be possible to turn it over. The disadvantage of such a comb-couch is that it must be regularly cleaned of wool.
Scratching posts - posts
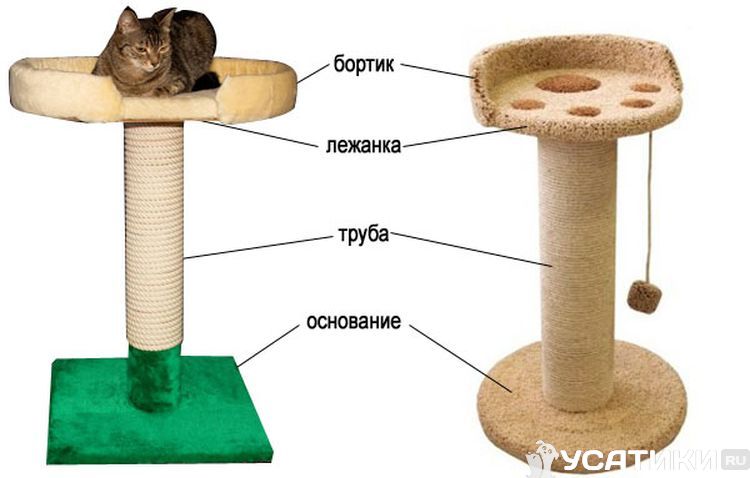
Scratching posts can be made with or without a base. Long columns without a base are fastened with metal corners and screws to the floor and ceiling. They can be made from tree trunks 7-10 cm thick with peeled bark or from a plastic pipe with a diameter of 5 cm, tightly wrapped with twine or a thin rope in 1 or several layers. Before winding, the pipe must be coated with glue, and the twine must be compacted when winding by tapping it with a hammer. But you will need a lot of twine and rope, so a long pipe simulator for an active pet will cost a decent amount of money. Making a wooden one is much more profitable.

The column on the base must be made at least 1 m high. As a base, a heavy board or multi-layer plywood 40-50 cm wide and 50-70 cm long is needed. For the column, you will need a piece of pipe made of dense plastic. The pipe must be attached to the central part of the base using metal corners and screws. Cut a piece of carpeting 10 cm wide and 10 cm longer than the base. In the center of it, cut a round hole equal to the diameter of the pipe.
Put the cover on the base with the wrong side up. The protruding edges of the coating must be wrapped on the inside of the base and secured with a well-bonding adhesive or stapler. The pipe must be smeared with glue and tightly wrapped with twine or rope. You can insert a soft toy into the hole in the pipe.
With a bed or with a house
After studying the manufacture of posts on the base and flat floor scratching posts with your own hands, the step-by-step instructions for creating complexes with beds and houses do not look complicated. If there is a desire to make a cat complex with several columns, beds and houses, then you should first make a drawing of the future structure. If there are several cats in the house, then when drawing up the drawing, you need to plan the complex so that each animal has its own house or bed. They must be done at the same height, because the animal located below will experience discomfort and may begin to spoil the furniture. It is advisable to place the columns in the complex for several animals at a distance of at least 60 cm so that the cats do not interfere with each other.
After drawing up the drawing and calculating the amount of necessary materials, you can proceed to the manufacture of the complex step by step:
- Prepare the base for the product. If the building is with one rack, then the stand is made as for a column with a base. If the complex is planned with several racks, then the base is cut out.
- Attach pipe sections to the base using metal corners.
- Make a cover pattern for the base with holes for pipes. Put the cover on the stand and fasten it.
- Wrap the pipes with twine or rope.
- Make beds according to the principle of a flat floor scratching post of such dimensions that it is convenient for animals to sit on them, and attach them to the pipes using furniture corners.
- Attach a house to one of the beds. It must be removable so that it can be washed. It is convenient to fasten it with a zipper, sewing one part of it to the base along the perimeter of the house, and the other to the bed.

It is desirable to attach the completed complex to the floor in the corners so that during active games the cats do not turn it over.
Attention, only TODAY!
Cats love to scratch things, especially furniture. To prevent their damage, you need to provide your pet with the opportunity to sharpen its claws in a specially designated place. Consider a simple guide to making a scratching post with your own hands (step by step photo instruction). With its help, you will completely get rid of the problems associated with damage to upholstered furniture and decor items, which are often caused by cats with their claws.
Many cat owners unreasonably believe that their pet will never use a scratching post. The main reason why the animal does not want to use homemade scratching posts for its intended purpose is their incorrect design. This suggests that when choosing a scratching post, as well as when making it, it is necessary to proceed not only from your own desires and tastes, but to take into account the inclinations of the animal.
Requirements for a scratching post
Basic requirements for a scratching post:- Height. Any cat wants to fully stretch their muscles when using a vertical scratching post. Note that in nature, cats sharpen their claws primarily using wood. The height of the structure should be slightly more than the length of the animal. Otherwise, the design will be too low. The pet will refuse to sharpen its claws and will continue to do it where it likes it.
- Strength and stability. A tree in nature will never sway at the trunk. Therefore, if the scratching post for a cat staggers, then the animal will never use it. This is due to the fact that an unstable scratching post is not able to fulfill all the needs of the animal. Alternatively, a homemade scratching post can be placed on one side of the sofa, securing it in this way.
- Good material. Cats like to scratch material that leaves marks (scratches), while the claws should penetrate the material without much effort. Sisal fabric is best. It meets all the above characteristics. This material is superior in quality to any other material, including carpet material. Using sisal cloth, you can make the perfect scratching post. But first, we suggest considering the technology for creating a scratching post from a carpet.
Do-it-yourself scratching post from carpet
Our cat started scratching the books. This behavior manifested itself after we removed a special small tree for the cat. That is why we decided to make a scratching post, thus creating a special place where the pet can sharpen its claws without any harm. In the end, the scratching post cost us less than 300 rubles. Of course, one could buy a similar scratching post in a zoological store, but still my husband and I decided to build it ourselves.- Quantity: 1 piece.
Necessary materials:
- a wooden pole with a height that is slightly more than the length of your pet;
- decorative cover for the top of the claw point;
- 1 circle cut out of plywood;
- the rest of the carpet measuring (approximately) 45 x 40 cm;
- 3 screws;
- screwdriver;
- construction stapler;

Stages of work:

DIY scratching post made of sisal fiber
Cats, in addition to carpets, are very fond of sharpening their claws on sisal fiber. Consider the technology of equipping a scratching post using an old sesal scratching post.- Approximate time to create a scratching post with your own hands: 1 hour.
- Quantity: 1 piece.
Necessary materials:
- the base for the scratching post (see Option # 1);
- sisal coil;
- scissors;
- glue gun.

Sisal scratching post can be done alone, but it is more convenient to work together. One person can apply the glue and the other can attach the sisal.
Stages of work:
 You can use such a scratching post for a cat in about 1-2 days, after the glue has completely dried. Please note that at first the smell of glue may come from the scratching post.
 Conclusion:
In order to teach a cat to use a scratching post with pleasure, it should be in a conspicuous place. It is best to place it in the place where the cat is often. If you place a scratching post in a place where the cat practically does not visit, then it will not attract the attention of the animal.The base of the scratching post should be made of solid wood material. At the same time, it is necessary that the devices on which the cat will sharpen its claws and mark, so that the territory has an attractive appearance. Thus, the scratching post will fit perfectly into the interior of the room.
The entire set of the necessary material can be purchased at almost any pet store. The choice of material for the claw point must be given due attention. Only in this case you will be able to make not only a cat-friendly scratching post, but you will also be able to create a good piece of room decor. With a little effort, you will make a scratching post at home, which you can show off to your friends.
We told why it is so important for a cat to have its own place in the house, how to choose a house that your pet will appreciate, and described in detail how to make a bed for her. In this article, we will continue the topic of creating furniture for our pets with our own hands and tell you how to make a couch with a scratching post at home.
Materials for the manufacture of scratching posts with a bed
- two rectangles made of chipboard or other hard wood material (dimensions are selected individually)
- two rectangles of fiberboard (the dimensions are the same as those of the rectangles of chipboard)
- hard material pipe (diameter 80-110 mm)
- rope (cotton, sisal, jute)
- foam rubber
- metal strip (width about 7 cm, length depends on the size of the couch)
- self-tapping screws
- metal corners
- faux fur or upholstery fabric

Tools for making a scratching post with a bed
- jigsaw
- screwdriver
- drill
- hot glue gun
- furniture stapler
- scissors
- metal cutting scissors
- roulette
- stationery knife
- sandpaper
- pencil, marker

How to make a scratching post with a cat bed
Training
First you need to determine what size the design will be for your cat. To determine the size of the bed, estimate how much space the cat occupies, curled up in a ball, and when it lies stretched out. Based on these measurements, select a rectangle of suitable size from which the oval bed will be cut. For the base, select a rectangle of the same size. If the base is smaller, the design may be unstable, and the top will look too massive.
To determine the height of the structure, extend the cat along the wall. The top point, to which the cat reaches with its paws from the floor, will determine the height of the scratching post. The height can be slightly increased, as cats like to stretch out when sharpening their claws. It is not necessary to wrap the bottom of the pipe with a rope; the cat will not use it anyway. We will cover the bottom of the pipe with the same fabric as the base.

Cut out the main details of the structure
Having determined the dimensions of the base and the bed, we cut out the rectangles of the desired size. If you only have a hand saw, then to get an even cut, draw a line along which you will cut, and attach a guide to it - another board with a smooth edge. If you work at home, keep a vacuum cleaner handy to immediately remove the sawdust and not spread it around the apartment.

Before cutting the oval out of the chipboard, mark the center on both sides of the rectangle. This should be done in order to accurately determine the place to which we must screw the pipe in the future. (In the photo, we marked the center with a marker for clarity, in reality, it is enough to draw small dashes with a pencil.)

To cut an oval, you must first draw this oval. How to do this, we told in the article.
It is convenient to first draw an oval on a piece of paper, then cut it out and circle it on a chipboard.

You also need to cut a rectangle and an oval from fiberboard. We will glue them on the bottom to cover the edges of the fabric. Before cutting the oval out of the fiberboard, mark the center of the rectangle. If there are rough edges on the edges of the fiberboard, clean them with sandpaper.
Additionally, we cut out another oval from the foam according to the template. This will be a soft lining for the couch.
Now we cut out the side for the couch. It is also convenient to first cut it out of paper, and only then from metal, circling the paper blank.


It remains to saw off a piece of pipe of the desired length and strengthen it with wooden blocks. You can take any pipe of a suitable diameter, for example, plastic used for laying sewers. We took a pipe made of thick cardboard left over from a roll of linoleum. The wider the pipe, the more stable the structure will be, but the more rope will be required for winding.

Insert wooden blocks into both ends of the pipe and fix them with self-tapping screws. We will fasten the base and the stove bench to these bars. You can simply screw the pipe with corners, but with bars the structure will be much more stable.

Construction assembly
Now you can start assembling the structure. We try on the pipe in the center of the rectangular base, you can circle it with a pencil for clarity. We remove the pipe and mark two points where we will screw the base to the bar. At the marked points, we drill holes a few millimeters deep. These recesses are needed so that the screws do not protrude beyond the plane of the base. Select a drill according to the diameter of the screw head.

We put the pipe on the floor, install the base on it, check whether it is exactly in the center, and fasten it with self-tapping screws in the places where the recesses were drilled.

Check if the pipe is well fixed. For stability, you can screw the pipe to the base with metal corners. It is convenient to use corners for fixing drywall.

We cover the base with faux fur. We put the base on the fabric and measure the desired rectangle, taking into account processing allowances of 4-5 cm on each side.

We cut off this rectangle, turn it over with the fur down, put the pipe in the center and circle it. Cut out the outlined circle.

We also measure on the fabric and cut out a small piece that will cover the bottom of the pipe. You can wrap the entire pipe with a rope, but, as we already wrote, the cat will still not use the lower 10-15 cm scratching posts, and a small piece of fabric will cost much less than several meters of rope needed to wrap this part of the pipe.

Glue a piece of fabric to the bottom of the pipe. It is best to use a hot glue gun and the appropriate glue. Strong-smelling glue like "Moment" can scare away a cat.

We put a piece of fabric with a round neckline on the pipe and glue it to the base. We glue the place of the round neckline well so that the cat does not tear off the fabric.

We turn the structure over and glue the edges of the fabric left for the allowance to the base.

For reliability, we attach the fabric with a furniture stapler. We attach the fabric only from below with a stapler so that the staples are not visible. If the staples do not go all the way in, carefully hammer them with a hammer.

We put an oval piece of fiberboard on the pipe, so that its center coincides with the center of the pipe, draw a circle, and then cut it out. If there are rough edges on the edges of the fiberboard, we clean them with sandpaper. We put the oval on the pipe through the cut round hole.

We fasten the oval top in the same way as we screwed the base: we make two recesses in the center, install it evenly and fasten it to the bar inserted into the pipe.

We glue the foam. We glue the oval-couch with faux fur. For strength, we similarly attach the fabric with a furniture stapler (only from below).

We attach a rope with a furniture stapler, on which a toy for a cat will hang. The staples must go through the rope, otherwise the cat will eventually pull the rope out from under the staples.

We glue the metal strip with foam rubber, which will serve as the side of the stove bench.

We cut off the excess so that the foam rubber coincides with the rounded sides.

We glue the side with fur. We glue the fur only on the side that will be inside.

We fasten the side to the oval bed. First of all, we fasten the center of the side and check whether the edges are equally located relative to the middle. If all is well, fasten the side around the perimeter.

We stretch and smooth the fur on the side, glue it and attach it with a stapler to the bottom of the couch.

Glue fiberboard to the bottom of the bed to hide the glued fabric and staples.

We turn the structure over and glue a rectangular piece of chipboard to the bottom to hide the edges of the fabric and staples. If this is not done, the fabric may crumble and peel off when moving the structure along the floor.

We wrap the scratching post
When choosing a rope for a scratching post, it is important to consider the following points:
- the rope must be wear-resistant;
- the rope should not have a strong smell (the smell can scare away the cat);
- it is better if the rope is made of natural fiber;
- rope aesthetics.
Cotton rope looks best, but it is also the most expensive. Sisal rope is also a good option. This rope is cheaper, but more "shaggy" and has a yellow or gray tint. Jute rope is even cheaper, but it is the darkest and does not look as aesthetically pleasing.
We tightly wrap the rope around the pipe. To keep the rope, glue 2-3 extreme turns to the pipe.

It remains to attach the toy to the end of the rope hanging from the couch. As a toy, you can use a fur ball, a toy mouse, a monkey fist knot. We attached a "fur eyeball". How to make it and other toys, we will tell in the article “Toys for cats. We do it ourselves."

Everything is ready.
Our cats immediately took a liking to their new furniture. However, it may happen that the cat will take time to get used to the innovation. It's important to be patient. Recommendations on how to help a cat get used to a new place can be found in the article.
In situations where a pet begins to spoil furniture and wallpaper by scratching them, a scratching post made according to a master class will be the best assistant. If you understand this well, then the task will turn out to be quite simple, especially considering how much use you will get from it.
Since this habit is inherent in the nature of the animal, you cannot scold the pet for its antics. With a homemade scratching post, the cat will be able to calmly sharpen its claws, and the owner will forget about the problems with the scratched sofa.
You can choose the right scratching post for any apartment, based on its size and design concept. Our master class suggests making one of the following cat scratching post options:
- a claw point in the shape of a cone, wrapped with a regular rope, which is glued to the base

- a rectangular product covered with natural fabric so that it is convenient for a cat to sharpen its claws on it

- compact scratching posts with fleecy fabric placed on the wall
- houses that combine both a place for a cat to sleep and vertical columns for turning claws
- scratching post, resembling an ordinary board, which is tightly wrapped with a rope
- angled design, which is placed at an angle for the convenience of the pet

Any option can be adapted to your apartment and made it convenient for the cat, and if necessary, the structure can be installed exactly in those places where the pet likes to sharpen its claws.
Our master class on creating a scratching post is very simple. If you do not have the opportunity to purchase any materials for its manufacture, there are suitable things in the house in order to construct a scratching post according to the scheme. It can be:
- any remnants of coverings (fabric, carpet, etc.) that will be comfortable for the cat;
- small but stable plastic pipes;
- remnants of furniture that has already outlived its usefulness.
It is important to take into account the fact that for manufacturing it is necessary to select materials from which debris will not remain as a result of turning the claws. You can take a ready-made form as a basis or use cardboard, but it is better to wrap it with a cloth or rope on top.
Step by step making a cardboard scratching post
One of the simplest and most affordable materials for scratching posts is cardboard, because it can be found in almost every home. Such a product will serve your pet for quite a long time, so its manufacture will be not only easy, but also practical. To work, you will need to take:
- pencil;
- ruler;
- ordinary cardboard;
- stationery sharp knife;
- fabric or rope for decoration.
You do not need to have any specific skills to make such a scratching post according to our scheme. Follow the steps below and build it yourself, without much complexity and expense:
- Drill a hole in the center of the board.
- Attach the cardboard to a wooden dowel, in which a hole is also drilled, right in the middle.
- Screw the screw to the base, holding it with a screwdriver, and screw the dowel onto it.
- Then for several levels of scratching posts, you need to prepare templates and cut them out.
- Use these templates to get the pieces you need out of cardboard and cut them out with a sharp knife.
- Assemble all the cut pieces on the dowel.
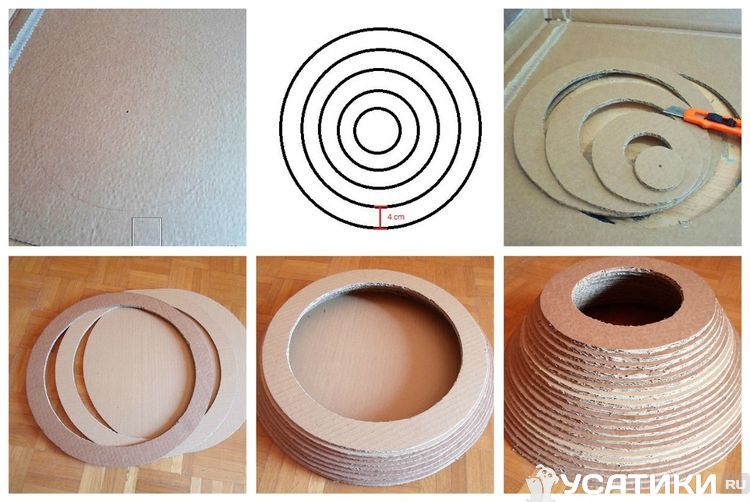
It is enough to spend a little time, and a scratching post for a cat from improvised means is ready for use.
Scratching post with a bed for your beloved pet
This design will require some sewing skills, and more complex materials are needed to make a scratching post, namely:
- bar dry;
- plywood (thickness about 1 cm);
- rope;
- the cloth;
- self-tapping screws;
- plastic;
- foam rubber;
- sharp knife or scissors;
- necessary construction tools.
Having picked up the necessary materials and decided on the size of the future scratching post, you can begin to perform a step-by-step master class, presented below:
- Based on the results of measuring the desired characteristics, a stable board is selected, which will be the base of the product.
- Cut out 2 rectangles according to the given sizes.
- Determine their center by drawing diagonal lines.
- Make an oval paper template before cutting it out of wood or chipboard, attach it to the base and trace around the shape.
- Having obtained the base of the desired shape, clean the edges with sandpaper.
- Cut out another such oval from plywood, only its thickness should be less.
- Make a side for the future couch using metal, and cut out another oval from the foam rubber for the couch itself.
- For a scratching post, take a plastic pipe or wooden beam of the desired length and diameter and attach it with self-tapping screws.
- Assemble all the parts received as follows: fix the pipe with self-tapping screws on the base of the scratching post, decorate the pipe with a cloth or rope using special glue, so that it is convenient for the cat to sharpen its claws on it, and there is no debris left on the floor, and install the bed itself on top, in the same way with which the pipe was fixed to the base.


This version of the scratching post will be more versatile, since the cat will also have a place to rest. The design can be placed anywhere, because it is quite compact.
Twine scratching post: step by step description
In order for the scratching post made according to our master class to turn out to be of high quality, the scheme and dimensions of the product must be correctly selected. Natural twine is the best fit for a standard scratching post in the form of a vertically mounted tube wrapped in cloth or rope. You can do it like this:
- Take a stable and strong base.
- Make a pole of the desired size, which can be a regular pipe or a wooden beam.
- Next, you should connect and fix the post based on the claw point.
- Tightly wrap the finished form with a rope, the coils of which should fit snugly against each other, and fix them with resistant glue.

To make such a scratching post look more interesting, you can install a couch on top or attach some toys to interest the cat.
Making a flat or angled cat scratching post
The flat cat scratching post shown above is made from the same materials as the previous ones, except that it does not need to be attached to a post.
- You can take any board or beam, as long as it is flat.
- Then you should wrap the base with the material that you find in the house.
- Using a stapler, you need to fix the material on the base of the claw point.

This design is attached to the wall or to the floor. Its main convenience lies in the fact that it can be installed exactly in the place where the cat sharpened its claws before the scratching post appeared in the house.
As for corner structures, the process of its creation involves the use of the above steps, with the exception that it must be made in two planes. Attach it to two surfaces, the floor and the wall, and firmly fix it with self-tapping screws, and such a scratching post will serve your pet for a long time.

Tips for making scratching posts at home
If you have never had to deal with master classes before, then perhaps the process of making a scratching post will seem complicated and time-consuming to you, but it is much easier and faster than you think. Follow the step-by-step recommendations, and everything will work out, and small tips will help you avoid mistakes:
- in designs with a house, place it on a pole, since the cat can take this room as a toilet and relieve himself in the wrong place;
- if you have several cats in your house, and you decide to design a scratching post with several beds, then think it over so that the resting places are at the same level from the floor, otherwise disagreements may arise between the cats;

- the height of the claw point or the entire structure should not be higher than 1 meter;
- If you want to arouse your pet's interest in the scratching post with toys attached to the structure, make sure that your cat will be interested in this so as not to waste time.
If you take into account all the parameters of the room and the factors that affect the convenience for the cat to use the scratching post, you can create an excellent design according to our scheme and spend time usefully, saving your own money on buying a product.
Many do not get a cat for fear of torn or upholstery. Even the most affectionate representative of this family will arrange "scratches" in or chairs. This happens on an instinctive level, after all, the blood of a wild beast flows in them. In nature, they sharpen their claws on tree bark, grass or earth. The best solution is a do-it-yourself scratching post for cats, which can be easily made at home. Today, the advice of the Homius editors will help create ideal, and most importantly, harmless conditions for sharpening claws for your pet.
It is impossible to wean a cat from the instinct to sharpen its claws, it is in their genes. Pet owners need to know why this is happening:
- The claws are constantly growing, they are overgrown with a layer of rough skin, causing discomfort to the animal during outdoor games. Therefore, the cat tries to get rid of this cover on a comfortable surface.
- While the cat sharpens its claws, it gets great pleasure.
- The pet marks its territory. Between the pads of the fingers are glands that secrete a secretion with a subtle odor that only animals can smell. Thus, they mark personal possessions.
It is interesting! In pet stores, you can buy special multi-colored anti-scratches that look like manicures. But not all cats will like this innovation, and the cost of a DIY scratching post will be less.

Claw classification
The most common type of scratching post is a vertical post wrapped with twine. In addition, accessories can be classified according to the following criteria.
| Classification | Description |
| By shape | Floor, hanging, corner in the form of a ring or column. |
| By type of construction | In the form of a house, multi-tiered, complemented by shelves or bridges, a town with toys. |
| According to the material of manufacture | A scratching post can be made, wood with twine, fabric is also suitable. |
| By size | Miniature, medium, large and monolithic. |

cat scratching post
How to quickly and easily make a simple scratching post for a cat with your own hands
There are a lot of options for making scratching posts, you can supplement them with interesting toys, or bridges. Consider the simple examples of the principle of creating the most common structures.
Do-it-yourself claw-bed made of cardboard
To make the most budgetary and simple scratching pad, you will need the following materials and tools:
- cardboard or corrugated board;
- stationery knife;
- piece of fabric;
- thick paper;
- adhesive tape.
Then perform the following steps:
- Disassemble the boxes, draw strips more than 10 centimeters wide on the surface.
- Cut strips.
- Then you need to twist one strip and glue. This will be the middle or core of the scratching post.
- Then wind all other strips in the same way around the core, periodically fixing the layers with glue or adhesive tape. Particular attention should be paid to the last layer.
- Wrap with cloth and secure.
- Put the design on thick paper, circle the perimeter, cut it out and fix the base on the scratching post.

You can watch the master class in more detail in the video below:
scratching post couch
How to make a cat scratching post out of wood
Another budget option is a wooden scratching post. A small log or stump picked up in the forest is suitable as a base. Previously, the workpiece should be cleaned with a brush with a hard bristle and dried in a darkened room.
- Wrap the workpiece with twine completely or individual fragments.
- Fix the workpiece on a wide base, for this use the corners, and a drill.
- Tie some interesting little toys to the top of the scratching post.
Ready-made sharpeners in stores are wrapped with a special tourniquet, and not every seller will answer the name of the rope for scratching posts. If you wish, you can look for a sisal thread, but any tourniquet or twine will completely replace it.

scratching post
How to make do-it-yourself floor scratching posts for cats with a photo of finished designs
A more complex option is floor structures. You can not complicate life and adapt an old small coffee table for this. But we will tell you how to make a scratching post for a cat with your own hands in the form of a column, a house and a whole town with photo examples of manufacturing processes and finished works.
Mobile Option: Outdoor Flat Cat Claw Sharpener
A flat scratching post is one of the simplest devices. To do this, you need a small sheet of board or plywood. On both sides, wrap it with carpet inside out or with a bundle. The edges can be sewn with thick threads or secured with a stapler. This design can be used by a pet and as a lounger.

Step-by-step instructions for making do-it-yourself scratching posts in the form of a column with a photo of the process
For the manufacture of a floor claw-post, we offer you to watch a detailed master class. After familiarizing yourself with this process, you can make any of the most complex designs with your own hands.
| Illustration | Action Description |
 | Before you make a scratching post for a cat yourself, you need to cut the base from the sheet. It is important that the corners are not sharp. |
 | Glue the rope to the base, starting from the end. After the side edge, proceed to fixing the rope on the base. |
 | For the column, take a tube from a stretch film with a height of no more than 40 cm. For the base, you need to take a piece of wood and make it the same size as the tube. |
 | Insert a piece of wood into the base of the tube and fix with three self-tapping screws. |
 | Next, you need to mark the place of attachment of the tube on the back of the base, screw in 3 screws and fix the post. |
 | From the bottom up, fix the rope on the post with a glue gun. |
 | Glue the joint of the base and the column with a tourniquet, increasing the turn horizontally. |
 | So that the cat does not subsequently unwind the end of the rope, you need to unwind it a little, cut off one part and glue it to the base. |
 | Glue three small ropes to the top of the column, at the ends of which tie knots. |
| | Make a decorative cap on the column. |
The kitten will like to play with an interesting novelty, and in more detail the master class can be viewed on the video
All the nuances of making a do-it-yourself house for a cat with a scratching post
After we have described in detail how to make simple designs, you can complicate the task a little and make it with a scratching post, as well as supplement it with beds. First you need to make a sketch and draw a diagram of the future design. Next, the manufacturing process is as follows:
- Cut holes in the base to install the posts.
- Make a pattern out of fabric, cut holes for the posts and secure it to the base with a stapler.
- You can take as columns. They should be fixed to the base with metal corners and self-tapping screws.
- Wrap the twine around the posts.
- Make the upper beds according to the principle of flat claws. Attach to the posts with furniture corners.
- Fix soft houses for cats on beds.
It is important! It is desirable to fix a large structure to the wall surface so that cats do not turn it over during games.

scratching post with house
Schemes and sizes of complexes for cats with scratching posts and beds for making with your own hands
You can draw up a scheme for a future claw-drawer yourself or use the proposed ready-made examples from the Internet.


scratching post couch
Features of making wall-mounted scratching posts: photos of finished examples
For a small room, a great option is to fix the scratching post on the wall surface, especially since it is much easier to make it than the floor. And two more advantages: they do not leave cat hair on them, and they cannot be turned over at the most inopportune moment. Therefore, it is ideal for active pets. For work, you will need a sheet of plywood and a harness, which can be pre-painted for decoration.
DIY wall scratching post for cats
The wall scratching post should match the size of the animal. It is optimal to choose a length 10 centimeters longer than the length of the cat in an elongated form. These settings will help keep the wall from scratches. The recommended surface width is 40 cm.
To make a simple wall-mounted claw machine, you will need two sheets of plywood, each should be at least 25 cm wide, but you need to focus on the size and breed of the pet. For a soft layer, you can use a piece of an old carpet or carpet, while fixing them inside out, and a tourniquet or several layers of natural fabric will do. The procedure is as follows:
- Cut the canvas according to the pattern with a margin of about 10 cm, secure with a stapler on the back of the plywood. As an option - wrap the sheet with a tourniquet.
- Fasten around the perimeter with rails using screws.
- Attach the structure to the wall.

wall scratching post
Favorite attraction - scratching post on the corner of the wall
To make a corner scratching post, you need to prepare three boards or sheets of plywood with a width of at least 15-20 cm, first fix the carpet inside out or twine on them. Set the prepared products at the corner, for example, to a height exceeding the length of the cat in an elongated form of about 10 cm. If desired, you can make a design for the entire height of the box, the pet will be able to climb on it during games.

corner scratching post
Road scratching post for a cat: a DIY master class
If a cat is your constant travel companion, be sure to make a travel scratching post. It will not take up much space, and a pet on the road will be happy with his favorite thing. For manufacturing, you will need a small sheet of plywood or board in the form of a rectangle, wood glue, twine, a piece of rope or a strip of leather and a drill. Manufacturing instructions:
- Drill a hole in the board or plywood for the cord.
- Wrap the structure with a rope, periodically putting it on glue, carefully fix the ends.
- In order for the accessory to be hung, for example, on, you need to fix the rope in the holes made earlier.

How to deal with a cat
Sometimes it is not enough to put a scratching post, the cat simply may not understand what to do with it. To accustom your pet to a new accessory, use the following proven tips.