The ceiling plinth performs not only a decorative function, visually separating the walls from the ceiling, but can also hide the joints of various finishing materials ceiling and walls. Not every interior design involves the use of a ceiling plinth, but most often general form the premises seem unfinished without it. In fixing this element - fillets - there is nothing complicated, almost all types of skirting boards are attached with glue. But the question is how to cut ceiling plinth in the corners of the premises, can confuse many. After all, even in simple room there are internal corners where the planks of the ceiling plinth need to be joined precisely and beautifully. And in a more complex configuration of the room, you will also have to dock the skirting boards, making the outer corner. In this article, we will look at various options how to cut a ceiling plinth with and without improvised tools.
First you need to deal with the question of how to cut the ceiling plinth, the answer to it depends on the material from which the fillet is made. On this moment sold ceiling plinths made of polyvinyl chloride (PVC), expanded polystyrene (styrofoam), polyurethane and wood.
PVC ceiling moldings are the cheapest. Dents and creases are easily formed on them, which cannot be eliminated, so the product has to be thrown away. Also, their disadvantage is electrostaticity - the ability to attract dust. You can cut them with a sharp construction knife or a hacksaw.
Styrofoam ceiling moldings are also cheap. This material is very fragile, it crumbles easily during processing, therefore it is necessary to cut polystyrene foam with a sharp knife or a hacksaw, without making too much pressure.

Ceiling moldings made of extruded polystyrene foam slightly more expensive than polystyrene foam, denser than them and more difficult to cut. However, they crumble less, so they are easier and more comfortable to work with. They are cut with a construction knife and a hacksaw for metal.
Polyurethane ceiling moldings are currently the most expensive. They are durable, elastic and moisture resistant, easily cut with a construction knife and do not crumble. The disadvantage of polyurethane baseboards is their dependence on temperature changes. For example, over gas stove the polyurethane baseboard will acquire residual deformations and begin to crackle slightly. If you try to process or cut such a plinth, it may bend or deform in another way.
Wooden ceiling moldings are dense, heavy products that can only be cut with a hacksaw, preferably with fine, frequent teeth. You can also use metal sheet.

Before moving on to listing ways to properly cut a ceiling plinth, I would like to note that it is possible not to cut a plinth with particular accuracy. Available for sale special corner pieces into which the edges of the plinth are inserted. IN this case it is enough to cut the skirting board at an angle of 90 °, and the corner element will hide all the flaws. But this way it is not always used, since the dimensions of the corner elements are somewhat larger than the baseboards themselves, so the corners in the room will stand out against the general background. Sometimes it can look sloppy. However, if the design of the room allows the use of corner elements for ceiling plinths, it makes sense to use them. The following instructions will be useful to those who still decide to accurately cut the skirting board to a given angle.

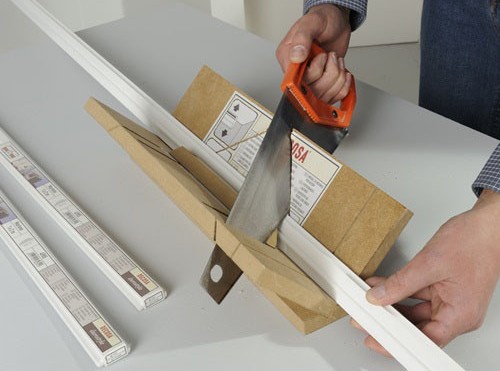
The miter box is a simple carpentry tool that allows you to cut the workpiece at the required angle. Most often it is a tray made of plastic, wood or metal with vertical slots for cutting at an angle of 90 ° and 45 °. There are also more complex structures miter box - for cutting at angles of 90, 60 and 45 degrees. For more professional works miter box is used with swivel mechanism where the hacksaw can be fixed at any angle to the workpiece.

How to cut a ceiling plinth with a miter box - inner corner:
- We apply the plinth to the ceiling, measure the required length.
- Then we install the plinth bar into the miter box so that the position coincides with the position of the plinth on the ceiling.
- The plinth strip should be pressed against the far wall of the miter box.
- Hold the plinth with your left hand.
- We choose such a position of the hacksaw when the angle is 45 degrees and at the same time the handle of the hacksaw is as close as possible to the left hand.
- We cut the workpiece without making excessive pressure on the saw.
- The next step is trimming the plinth striker. We also install it to the far wall of the miter box.
- Pressing and holding right hand.
- We choose a position for the hacksaw when the angle is 45 degrees and the hacksaw handle approaches the right hand.
- Cut off the plinth.

Next, we join the trimmed skirting boards and check the cutting accuracy. For a more accurate orientation, they also say that in order to perform inner corner you need to start cutting from the front of the plinth. Wooden plinths after trimming, most likely, will still have to be adjusted with a file.
How to cut a ceiling plinth with a miter box - outer corner:
- In order not to make a mistake with the dimensions, it is better to start by marking the inner corner, and then cut out the outer corner. Otherwise, a situation is possible when the straps may not be long enough.
- It is necessary to attach the bar to the ceiling and outline the dimensions.
- We install the ceiling plinth bar and press it against the nearest wall.
- Hold with your left hand and select the position for the hacksaw at an angle of 45 degrees, when the handle approaches the left hand.
- We cut off the workpiece.
- We set the reciprocal bar to the nearest wall, hold it with the right hand.
- We set the hacksaw at an angle of 45 degrees, when the handle approaches the right hand.
- Cut off the workpiece and join the corner.
Trimming the workpiece with a miter box is only suitable if the angle between the walls is even - 90 degrees. If the accuracy leaves much to be desired, you will have to use other methods.
How to cut the corner of a ceiling plinth using ceiling markings
Marking the skirting board on the ceiling also allows you to cut the corner evenly and accurately. The only drawback of this method is that it is difficult and inconvenient to keep the plinth plank suspended during the cutting process. For the rest, it is possible to outline the angle for cutting in this way even more accurately than in other ways. When applying the skirting board to the installation site, all wall flaws and deviations in the size of the corner are immediately taken into account.
Trimming the corner of the ceiling plinth:
- First of all, two blanks must be cut at an angle of 90 degrees.

- Then we first apply one plank, resting its end against a perpendicular wall. We draw a line on the ceiling, outlining the contour of the plinth.

- We remove this bar and apply the reciprocal bar, also resting its end against the wall. Let's draw a line.

- The point of intersection of the marked lines will be the mark at which the plinth must be cut.
- Again, we apply each bar in turn and mark the cut point on them.
- We draw a line from this point to the other edge of the plinth.

We cut off the skirting boards along the marked lines, join them and apply them to the installation site. Please note that using this method it is more convenient to cut internal corners.

Something resembling a miter box can be made by applying the necessary cutting angles to paper, cardboard or wood. It is necessary to draw two parallel lines, determine the center, and then set aside the necessary angles using a protractor. The advantage of this method is that you can postpone any angle, including more than 90 degrees. Of course, before cutting the corners of the ceiling plinth, you must first check the angle between the walls with a corner and measure with a protractor.
The technique for cutting off a ceiling plinth using a painted miter box is exactly the same as using the miter box itself. We press the plinth bar to one of the parallel lines, then set the hacksaw at the desired angle, which is already outlined, and cut it off.
Improvised tray-miter box do-it-yourself
Making a miter box with your own hands is also not difficult.
Method 1. You will need three wooden planks or boards that need to be hammered into a U-shaped box. Then, the necessary angles are marked on the walls of the box, and a cut is made with a hacksaw. The result should be a wooden miter box in which grooves are cut.

Method 2. A combination of an impromptu miter box and a template with outlined lines. For the convenience of cutting, it is necessary to build something in which it will be convenient to hold the ceiling plinth bar, since it is difficult to keep it on weight. It is enough to put together a corner from two wooden planks or boards. On paper, you need to draw lines with angles for cutting at 45 degrees or at any other. Then we apply the plinth blank to the corner, press it with our hand, as described in the technology for using the miter box, move the paper with the template under the edge where we are going to cut, and cut it off. In the process of cutting, we focus on the line drawn on paper.
Method 3. As an impromptu miter box, you can use anything, everything - that we form an angle. For example, a table pushed up against a wall.

Important! Pay attention to the measurement rule for trimming the ceiling plinth. To mark the inside corner, you need to measure the length directly from the corner itself. To outline the outer corner, it is necessary to be guided that the plinth will protrude deep into the room at a distance equal to its width.
It is not necessary to fix the strips of the ceiling plinths before you cut the reciprocal strip and tried on their location. Only after the two reciprocal strips have perfectly converged in the corner, you can begin to mount them to the ceiling. Minor flaws can be modified with a file or nail file in the case of wooden and polyurethane skirting boards. To fit the foam products, you will have to wield a sharp knife.
If suddenly, even after adjusting the skirting boards, a small gap remains between them, do not despair, it can be repaired with putty. Trimming the ceiling plinth yourself is not difficult. But in order not to spoil a lot of products, it is better to pre-train on small blanks.
Ceiling plinth - an original decorative element, it decorates the premises and gives it sophistication. hides all errors corner connection ceiling with walls, and hides such a nuisance as cracks in the corners.
Installation of a ceiling cornice, at first glance, seems like a simple task. It seems, nothing complicated, cut at an angle 45 degrees, glued and you're done. But already at the first stage of work, it becomes clear that cutting the ceiling cornice correctly is not such an easy task, as it turned out.
Many, for the first time faced with the installation of decorative cornices, spoiled more than one ceiling plank. To prevent this from happening to you, you should study the question of how to cut off the corner of the ceiling plinth correctly. Let's take a look at a few ways you can quickly make the right cut.
Methods for cutting baguette corners
The problem with cutting the corner joint of decorative cornices is not that it is difficult to cut correctly at a 90 or 45 degree angle, but that in general the corners of the room are crooked, and do not have 90°. Therefore, you have to contrive to close the cracks with putty, liquid nails, silicone or cut by hand.
Use of decorative corners
The easiest, but also the most expensive way to cut a ceiling cornice is to use decorative inserts. This is an expensive method because you have to buy additional elements.
But this option has some advantages:
- saving time;
- ease of installation.
Decorative inserts for their purpose are divided into:
- Decorative connections for internal corners;
- Decorative connections for external corners;
- Docking decorative inserts.

Understanding how to cut off the corner of the baseboard for this method is not difficult. In this case, the ceiling cornice is cut strictly at an angle. 90°. And, as you can see from the photo below, it is glued right next to the previously glued corner.

Cutting the corner of the ceiling plinth with a miter box
The main tool for cutting ceiling cornices at an angle is a miter box. Its design is simple, it is a kind of tray made of wood, metal or plastic with special grooves that guide the hacksaw blade at a certain angle.
With a standard tool, you can cut the product at angles 45, 60, 90 degrees. When cutting ceiling fillets, trimming is mainly used in 45 and 90 degrees.

We start with the inner corners. To understand how to cut the corner of the ceiling plinth correctly, first, attach it to the inner corner of the room and visually determine the cut line. Please note that the bottom, the edge that is attached to the wall, always remains longer.
Next, we put the cornice in our carpentry fixture so that the edge that will be attached to the ceiling is at the bottom. We set its end at the angle we need, in this case 45 °, fix it, and cut off the unnecessary part with smooth movements.
In this way, we will get the correct cut of the ceiling cornice for the inner corner.

Note! If you stand facing the corner, you can divide it into the right hand and the left. So, the right inner corner is cut off from left to right, the left, on the contrary, from right to left.
Advice! Do not allow excessive pressure or sudden movements when cutting. This may damage the cut edge.
To cut the outer, you should carry out the same steps, only the direction of the cut will be different. When cutting, it should be noted that, unlike the inner corner, the edge that is glued to the ceiling should remain longer in the outer corner. So for right side right-to-left mode, and left-to-right mode.
Note! The gap from the incorrect trimming of the ceiling cornices on the inner corner can be easily repaired, and repaired so that such a defect will not be visible. With an outer corner, such oversights cannot be made, since such a defect is practically impossible to correct. If outer corner does not have 90°, then, first of all, cut the baguettes in the miter box, and then fit them directly on the spot with a drywall knife.
How to make the right cut without a miter box
So, we figured out how to cut a corner on a ceiling plinth using a miter box. But what to do if there was no such tool at hand, and you are reluctant to purchase it in order to glue a baguette in one room? There is an exit…
Consider how to properly cut the corner of the baseboard without using a guide tool.
To do this, we apply a ceiling fillet in the corner and draw a mark on the ceiling along the fillet line with a pencil. This must be done on both sides, left and right. As a result, on the ceiling we will have the intersection of two lines.

We transfer the intersection point to the fillets. After that we put them on flat surface, as well as in the miter box, and cut off the unnecessary part. When cutting off the fillet, consider the rules that are used when cutting ceiling dumbbells in a carpentry fixture.

In the same way, you can cut out the outer. You just need to draw lines on the wall. So we figured out how to cut a corner on a baseboard without using a miter box.
Note! In order to properly cut the ceiling fillet without using a miter box, it is very important not to make a mistake with the markup, and cut off the unnecessary part of the product strictly vertically. If you do not adhere to these rules, then when docking ceiling baguettes there may be a large gap in the corner. Advice! Use this method only when cutting corners on foam and polyurethane ceiling moldings. When using it on wooden or plastic baguettes there is a high probability of spoiling the product.
Tools you will need to trim the baseboard
When cutting the cornice, one should take into account what material the cornice for the ceiling is made of. If the plinth is plastic, then you can’t do without a hacksaw for metal. Wooden plinth is cut with a small saw on wood. Well, if you need to glue a foam or polyurethane baguette for the ceiling, then a simple sharp knife is enough, a drywall or clerical knife is ideal for this.
In addition to cutting tools, you may also need such a tool:
- miter box;
- pencil;
- roulette.
Note! Use only correct tools. The cutting tool must be sharp, with frequent and fine teeth. This will not only allow you to achieve a perfectly even and smooth cut, but also protect against possible damage to the product.
How to make a miter box yourself
Undoubtedly, this is a carpentry fixture, the most important tool if the question arises of how to properly cut the corner of the baseboard. And, of course, when cutting ceiling plinths from solid material, you cannot do without it.
But what to do when you need it, but it's not there? There is an exit. Make it with your own hands.
Advice! If your plans include a large amount of work from the installation of ceiling plinths, do not be lazy and make this simple and indispensable tool yourself. Unfortunately, in construction stores mostly plastic tools are sold, but that's not even the point, it's just that their quality leaves much to be desired. From my own experience I know that when cutting even foam plastic baguettes, such a tool cannot withstand more than one object. You can, of course, buy a professional device, but the price is not small either.

First of all, we determine the dimensions of the future tool. The length can be selected based on the building materials, and height and width, based on the dimensions of the products that will be cut on the tool.
If the plinth has a size of 10 cm, then, accordingly, the width with a height should be at least 10 cm. We, however, can recommend the following dimensions:
- length - not less than 500 mm. This size of length allows you to set and fix the product with high quality.
- width and height would be better to take 200 by 200 mm. With such dimensions, it will be possible to cut the largest ceiling plinths.
After we have decided on the dimensions, consider using the example of 500x200x200 mm, we have to prepare the main elements of the future miter box:
- The basis - wide board which serves as a lining. The length and width of the miter box depend on the base, so it should be made with the planned length and width, in our example it is 500x200 mm. The recommended thickness is 25 mm. The base must be strictly rectangular shapes. The quality of the cut corner directly depends on this.
- guide boards - their task is to guide the hacksaw blade according to the chosen angle. They need to be harvested the same length as the base, the thickness is not so important here, 15 mm is quite enough, but calculate the width taking into account the thickness of the base, in our case 25 + 200 = 225 mm. Thus, we get the working area of the miter box 500x200x200 mm. Guide boards should also be rectangular.
So, we have prepared the material, let's start creating our tool, instructions:
- using screws, we fasten the guide boards to the ends of the base.
- using a protractor, we mark the corners; 45 and 90 degrees are enough to work with ceiling moldings.
- using a square, draw lines from the marked points along the walls of the guide boards;
- we cut along the marked lines.
In this way, from improvised material, you can make a high-quality carpentry fixture with your own hands.

The result of our actions - no difficulties
Conclusion
If you manage this and cut the ceiling moldings under right angle, then spend installation work by installing the skirting board for you will not challenging task. Good luck with your repair!
A ceiling plinth is a product that looks no different from its counterpart for floor coverings. It is also called a fillet. This detail serves to mask the joints of the wall and ceiling. It is installed at the very end. finishing works, since the element does not carry any functional load, but only plays decorative role. The installation process of the product is quite simple, but many are faced with the dilemma of how to make the corner of the ceiling plinth. Depending on the selected materials and tools that are available, the corners of the fillet are cut in different ways.
Modern construction market offers the following product options:
- Polyurethane. They are considered the highest quality and most reliable. In addition, they are moisture resistant and elastic. Among the shortcomings, it is worth noting the high cost and exposure to temperature extremes. Because of this feature, the corners of the ceiling plinth are made of this material may crack if installed from below kitchen stove. It is also important to remember that with inaccurate trimming, slight deformations are possible, which in the end can lead to significant curvature.
- Polystyrene. Practically no different from the previous material, but they have a lower level of strength, so they break easily due to mechanical influences. Also, polystyrene products cost a little less.
- Polyvinyl chloride (PVC). This is the most cheap option material. Low cost has left an imprint on quality: products are difficult to work with, they are prone to dents. To make an external or internal corner of a PVC ceiling plinth, you need to have a lot of experience and special tools. But the manufacturers of these products do not stand still, and today for these purposes you can purchase special fittings - corners for ceiling plinths, thanks to which installation plastic parts even a novice home master can do it.
- Wooden. These plinths look impressive. Unlike all other products, wooden materials are installed on self-tapping screws or nails, and not on glue.

The options above are available in various sizes, have a relief coating or be completely smooth. Usually the color of products is white, but if you wish, you can find or order any other.
Creating fillet corners
To connect two planks, you can use decorative corners for ceiling moldings. But in the absence of such, the material will have to be processed. Next, we will talk about how to properly cut a corner on a ceiling plinth.
How to use the treatment chair
A miter box is one of the simplest carpentry tools, with which pruning is done. various products at different angles. Usually it is a plastic, metal or wooden tray with several slots in the walls. IN simple version there are slots for 45 and 90 degree angles only. In more complex ones, there are more angles, and professional tool equipped with a swivel mechanism that allows you to direct the cutting element at any angle. The principle of operation is simple: before cutting off the corner of the plinth, the workpiece is fixed in the tray, and then processed with a cutting tool (knife, saw, and so on), lowering it into the slots.
 Trimming the ceiling plinth with a miter box
 How to properly cut a ceiling plinth for an inner corner on a miter box:
- The first step is to attach the baseboard to the surface and mark the required length with a pencil.
- Then install the item in the tray so that its current position coincides with the position on the surface.
- Using the clamping mechanism, the plinth is fixed on the far wall of the tool container.
- The product is taken with the left hand. After that, it is necessary to choose the correct position of the cutting element (angle of 45 degrees). In this case, the handle of the tool should be as close as possible to the left hand.
- Applying light pressure on the part, trimming begins. It is important not to press the product too hard, otherwise you can deform it.
- The same manipulations, only in mirror image, must be carried out with the second plinth.
Then the trimmed strips must be checked for correct processing. To do this, it is enough to connect the ceiling plinth by simply attaching the planks to the surface. If a wooden product is used, then it will most likely have to be further processed with a file.
On a note! First of all, it is necessary to arrange the internal corners on the ceiling plinths, only after that proceed to the external ones. Otherwise, the length of the purchased strips may not be enough.

How to properly cut the ceiling plinth for the outer corner:
- Before cutting the corners, you need to attach the fillet to the edge of the wall so that the product extends slightly beyond the surface, and make a mark.
- Then do the same operations as in the previous instructions.
- At the end, make a fitting and, if necessary, additionally process the edges with a clerical knife or file.
Important! To cut the corners of the skirting boards with a miter box, you need a perfectly even angle of the surfaces of 90 degrees. If there are any irregularities on the walls, due to which deviations of more than 2 degrees will be present, other tools will have to be used.
Processing fillets using markup
Most often the result final alignment are straight corners. But in some cases, the deviations are so large that even after fitting and filing the fillets with a file, gaps remain. And then the question of how to properly cut the ceiling plinth with a miter box will be meaningless, since in this situation it is better to cut the planks with a preliminary fitting on the spot. To carry out this procedure, you will need the following:
- A thin hard pencil or marker (such a tool leaves clear lines, so you don’t have to peer).
- A small fragment of a fillet.
- Ruler or tape measure.
- Special construction or clerical knife for processing polystyrene, polyurethane or PVC baguettes.
- Saw or hacksaw for processing wooden skirting boards.
Before cutting off the ceiling plinth, it is necessary to lean the plank against the corner and draw a line along the outer edge of the product on the ceiling surface. Then attach the same fillet fragment to the opposite wall and draw the same line.
As a result, on ceiling surface an intersection will be obtained, in which it will be necessary to dock the cut products. The resulting mark is alternately transferred to the parts that will be joined.

Then you need to take a ruler and connect the edge of the fillet with the markup. After that, the product is placed on the table and cut along the line.
This method is quite simple, but it comes with some risks. As a result inner part skirting boards can interfere with the connection of parts on the surface. To prevent this from happening, you can do this: before cutting the ceiling plinth in the corners, it must be placed on the table in the same position in which it will be glued to the wall. Then cut the outer corner or inner corner at a 45 degree angle. Similarly, the next bar should be processed. In this way, lengthy processing after fitting can be avoided.
Next, you need to adjust the joint, but already at the installation site of the fillet. That is, before gluing the ceiling plinth in the corners, it is necessary to check the internal joint without applying adhesive or fasteners. Then carry out the same manipulations for the slats of the outer corner. After preliminary fitting and bringing the corners to an ideal state, you can glue the products.
Now the question is how to join the ceiling plinths on uneven corners, should not occur.
Trimming with a square
Now let's look at how to cut a ceiling plinth using standard set tools. For this you will need:
- ruler or tape measure;
- square;
- construction, stationery knife or hacksaw.
How can I cut off the corner of the ceiling plinth if the surfaces are perfectly flat:
- A ruler is applied to the fillet at an angle of 45 degrees. Using a knife, an unnecessary fragment is cut off with one movement of the hand.
- In the presence of wooden product, the plinth is first marked with a pencil, after which it is sawn off with a saw or a hacksaw.
If the wall surfaces are uneven, then the first step is to measure the degree of the angle, and then divide it into two. Let's say the angle is 80 degrees, which means that each product needs to be cut at an angle of 40 degrees.
 If adjacent walls do not form a right angle, then in order to cut the baseboard, you will have to do some calculations.
 Decoration with decorative corners
The easiest way to join ceiling plinths in the corners is to use special products. They are sold in hardware stores and are immediately ready for use. Fillets are simply glued to the surface, and the junction is closed with a decorative element. In this case, the question of how to properly cut the plinth does not make sense. Even if the joint turned out to be uneven, this defect will be hidden by a decorative corner.
How to replace the miter box with improvised means
How to make the corners of the ceiling plinth using improvised means? There are several ways:
- First way. It is necessary to prepare three wooden planks the same thickness and width. By means of nails or self-tapping screws to connect them in U-shaped design. Mark the 45 and 90 degree angles (you will need a square or a protractor for this), and then make cuts with a hacksaw. The result is a homemade miter box. How to cut ceiling moldings with this tool, indicated above.

- The second way. In this case, before cutting the ceiling plinth, you should build simple design to hold the fillet. To do this, you need to take two boards and put together a corner from them. Then take paper and draw lines on it that go under different angles. Now let's look at how to cut corners using the resulting tool:
- fillet is laid on a wooden corner;
- in the marked place - a template with drawn lines is applied to the product and trimmed.

- The third way. This method is the easiest, but it requires some experience and a steady hand. In this case, you can use any design that has a right angle, for example, a table.
On a note! Before cutting a corner, measurements should be taken at the fixation point. To mark the inner corner, they begin to measure from the junction of the walls. Before cutting out the outer corner, it is necessary to mark, taking into account the fact that the product will go beyond the surface boundaries by its thickness.
The process of making a miter box at home demonstrates the video:
Installation of skirting boards
This operation will be successful if you follow a few recommendations:
- Installation of ceiling fillets begins precisely with the design of the corners. After completing this operation, you can proceed with the installation of the remaining parts.
- During fixation of products, it is necessary to press their edges so that there are no gaps left. In this case, excess glue should be removed immediately so that it does not have time to dry.
- If a PVC skirting board was purchased, then to fix it, you can use the finishing putty, which may have remained after the finishing work.
- Before gluing the skirting boards to the ceiling, it is necessary to treat the surfaces with a special primer or simply with water. Then the fillets are installed in their places and wait until the surface under them dries out. At the end, the seams and cracks are sealed with sealant or other material with a similar composition. It is better to use sealants containing acrylic.

Installing ceiling plinths is a fairly simple procedure that even a novice master can handle. The main thing is to follow the above recommendations and regularly check the correct installation with a level, even if the fillets look perfectly even to the eye. It is also important to remember that given element carries an exclusively decorative load, so even the smallest oversights are unacceptable.
At first glance, the installation of this decorative element does not present any difficulties, but in reality and with self-assembly beginners may have some difficulties. One of the main ones is cutting skirting boards to decorate the corners of the room. With improper trimming, the plinth will not only not decorate the room, but can completely ruin it. appearance.
How to avoid additional difficulties, cut the corner correctly and with the least loss and beautifully install this necessary element interior?
What do you need to know to prepare for work?
The most common options for ceiling plinth are products made of foam, extruded polystyrene foam and wood. Depending on the material, preparations are made for installation and cutting corners, as well as the selection of cutting equipment.
For example, foam products are cut with an ordinary clerical knife. For cuts of denser polystyrene foam, a well-sharpened construction knife or a hacksaw is used. Despite the density, this material crumbles very easily, and therefore, when working with it, you should not press hard on the tool.
As for the most durable wooden skirting boards, they are cut with a hacksaw with frequent fine teeth.

Also, when cutting plinth material, you will need a miter box - a tool that helps cut the bar at a given angle.

The main assistant here is the miter box. It should also be borne in mind that corners can be internal and external. The first are the usual corners of any rectangular rooms. The latter are formed in niches and with other original designs.
So, to form an internal corner, it is necessary to install a plinth bar in the miter box and press it against its far wall. In this case, the workpiece must be held with the left hand. The hacksaw is set so that the cut angle is 45 degrees, and the saw handle is directed towards the left hand.

To trim the second (opposite) part of the corner, all actions will be similar, only the workpiece will need to be held with the right hand and the hacksaw handle will be directed towards it. Small inaccuracies are eliminated with a file.
In the case of preparation by fillet for external corners, the algorithm of actions remains almost unchanged. The only difference is that the bar is pressed not to the far wall of the miter box, but to the nearest one.

It is important to remember that this option for fitting corners is only applicable when the room angle is 90 degrees. If the room angle is not straight, then its radius is divided by two, and thus is determined required slope cut.

The miter box can be purchased or made independently. And independent production this necessary tool does not require large expenses and a lot of time. By connecting three boards with a width of 10 to 15 cm, a box is formed, on which, after careful measurements, appropriate markings are applied. To do this, two perpendicular lines are drawn on the sides of the sides.
Then a distance equal to the width of the workpiece (box) retreats from them and two more marks are applied. All marks should eventually form a square. In the marked places, cuts are made diagonally, which are then expanded with sandpaper.

Another method of forming the corner of the fillet is with the help of ceiling markings. In this case, the angle will exactly match the wall joints. This is a plus. The downside is the inconvenience of holding the material to the canopy when cutting.
To properly cut the bar, first take one of the skirting boards and apply it tightly to the intended installation site. A small straight line is drawn along it on the ceiling surface. Then they take another bar and press it on the other side of the corner. And draw a line again.

After that, again taking the first bar and leaning it the way it will look in ready-made, mark on it a place corresponding to the point of intersection of two lines on the ceiling. The resulting mark is connected by a line to the opposite edge of the plinth. It turns out a cut line.
For the second part of the corner fillet, the procedure is repeated. As a result, two strips are obtained, forming the required angle.
Ceiling plinths are very often used for decorating rooms. They give the ceiling a complete look, allow you to convey one or another style in the interior. In addition, they serve to mask the joints between the walls and the ceiling, where the pairing of two various materials. Although not always such elements are present in the premises, however, they make the interior more complete. In the material below, we will describe in detail how to cut the corner of the ceiling plinth, since in such places the docking individual elements often presents a problem for inexperienced builders.
If the room has simple form, then you will need to cut only the inner corners. But in rooms of a more complex configuration, with columns, partitions and niches, there will also be external corners. To decorative elements looked beautiful, trimming must be done correctly and accurately, otherwise the appearance of the ceiling will be spoiled.
To cut the ceiling plinth in the corners as best as possible, you can use high-quality and sharp tools, or other means. The type of tool that will be used to cut the skirting boards depends on the type of material they are made of. So, ceiling plinths are made of PVC, polystyrene, polyurethane and wood.
The cheapest option is PVC skirting boards. They are soft, so it is easy to leave dents and creases on them, which cannot be fixed in any way. In addition, this material has the ability to attract dust. For cutting such skirting boards, a hacksaw or sharp knife.
Another fairly cheap type of material is polystyrene foam skirting boards. They crumble easily, so only a sharp knife or hacksaw should be used to trim the corners of the ceiling plinth. Movements should be soft, without pressure.
Cutting a skirting board for decorating a ceiling
Another type of ceiling plinth is made of extruded polystyrene foam. They are much denser than regular foam products (therefore they do not crumble), they cost a little more, but they are also somewhat more difficult to cut. For work, you can use the same knife or hacksaw for metal.
The most expensive skirting boards are made of polyurethane. These are elastic, strong and moisture resistant products that are very easy to cut with a construction knife. True, they can not be used in all rooms, since polyurethane is sensitive to high temperatures- it deforms, starts to crack or cracks.

To work with wooden skirting boards only a hacksaw with fine teeth is suitable, you can use a tool for metal.
However, many novice craftsmen are interested not so much in what, but in how to properly cut the ceiling plinth in the corners. This process requires careful calculations and accuracy from the performer. In some cases, if the interior of the room allows, you can not think about how to cut a corner on the ceiling plinth, but use ready-made corner elements. They can be purchased at hardware stores. In this case, the plinth is simply cut straight and inserted into the corner element. All irregularities and flaws will be hidden.
Using a miter box to cut skirting boards
In carpentry, a special device made of wood, metal or plastic is often used - a miter box. It has special slots that allow you to carry out even cut under 90º, 45º, and in more complex devices - also under 60º. There are also professional miter boxes equipped with a swivel mechanism. In them cutting tool can be installed and fixed at any angle to the workpiece. Before you make a ceiling plinth in the corners, you need to understand the details.

To cut the inner corner of the ceiling plinth with a miter box, you must:
- First, the plinth blank must be attached to the ceiling surface and mark the length.
- Now the piece of plinth is placed in the miter box in the position it should be placed on the ceiling.
- The plinth is pressed tightly against the back wall of the miter box.
- Hold the workpiece with one hand so that it does not move during cutting.
- The hacksaw is set at an angle of 45º to the workpiece.
- Cut the plinth, controlling the degree of pressure of the hacksaw, so as not to damage the product.
- Then they proceed to cutting the reciprocal piece of the plinth. It is also applied to the far wall of the miter box.
- The workpiece is pressed and held by hand so that it does not move.
- The hacksaw is set at an angle of 45º to the workpiece so that the direction of the cut is opposite to the first element of the plinth.
- Cut off the corner of the plinth.
After trimming the ceiling plinths in the corners, they proceed to joining the resulting elements. If the cutting was done accurately, they will fit snugly together.

Consider how to cut the outer corner of the ceiling plinth using a miter box:
- It is best to start marking and measuring the ceiling plinth from the inner corner, and only after it is completed, start cutting outer corner. Otherwise, the plank may be short, it will not be enough to fill the entire length of the ceiling.
- The plinth is applied to the ceiling and its length is marked.
- Then the workpiece is placed in the miter box and pressed against the front wall.
- The hacksaw is placed at an angle of 45º and, holding the workpiece with your hand, saw off the corner.
- Similarly, it is necessary to cut off the opposite part of the outer corner.
- The workpiece is pressed against the front of the miter box.
- The hacksaw is placed at an angle of 45º to the plinth and the workpiece is sawn off.

Upon completion of the work, the pieces of the plinth are joined together, checking whether everything is done correctly and evenly.
Marking on the ceiling to make a corner on the plinth
Exist different ways how to make a corner on a ceiling plinth. Some are easier to do, others are more difficult. One of these methods is to mark the plinth on the ceiling. True, it is not very convenient to cut the plinth on weight, but exactly this method not inferior to all others. Before cutting the plinth onto the ceiling, it is applied to the surface, while all the flaws and irregularities of the walls, as well as the size of the angles, are immediately taken into account.

Let us consider in detail how to correctly make corners on ceiling plinths using this technique:
- First, two mating skirting strips must be cut at an angle of 90º;
- One of the blanks is pressed against the wall, and its end rests against the opposite wall. Then the contour of the workpiece is drawn on the ceiling.
- On next step take the second bar and in the same way press it with its end against the wall. Draw a line.
- At the intersection of the lines obtained, a point is placed at which further trimming of the skirting boards will be carried out.
- Then each of the strips is alternately applied again to the ceiling and the cut point is transferred to the workpieces.
- From this point, a diagonal cut line is drawn into the corner of the plinth.
It should be noted that this method is more often used for internal corners.
Applying a miter box template
To cut the plinth in the corner to the ceiling as evenly as possible, instead of the usual miter box, you can use paper, cardboard or wooden pattern. Two parallel lines are applied to it, then the center point is found and any necessary angle is laid off from it with the help of a protractor. Before cutting the corner of the ceiling plinth without a miter box, it is worth double-checking the size of the internal or external angles between the walls of the room using the same protractor.

The principle of cutting corners using a template is similar to using a standard miter box. In this case, the workpiece must be pressed against a parallel line and, setting the hacksaw at the desired angle, saw off the workpiece.
How to make a miter box yourself
Often the only way to cut the corner of the ceiling plinth evenly is to use special tools so that the tool does not move to the side during the cutting process. In this case, you can make a miter box yourself.
Option 1. A box in the shape of the letter P is made from three boards. The desired corners are marked on the walls of the box and cuts are cut in the appropriate places. The result is a complete fit.
Option 2. Sometimes it is quite difficult to make the corners on the skirting boards on the ceiling as even as possible, especially if you have to keep the workpiece on weight. In that case, you can use makeshift device. Take two boards and knock them down in the shape of a corner. Then, on a sheet of paper or cardboard, lines are drawn with the desired angles, a template is applied to the corner. Then they press the plinth, put the template under the cutting place and saw off the corner along the lines.

Option 3. If you are still in doubt about how to cut the corner of the baseboard correctly, almost anyone can help with this. household item, the shape of which allows you to form an angle. It can be a chair or a table, just placed close to the wall.
To understand how to properly cut a ceiling plinth, you should also familiarize yourself with the rule for measuring blanks. So, to make an internal corner, they begin to measure the length directly from the beginning of the corner. But to determine the outer corner, it should be borne in mind that it will protrude into the space of the room by the width of the product.
There is no need to rush and fix the workpieces before the mating skirting boards in the corner have been completed. In order not to redo the work, you must first make sure that the joined surfaces fit snugly against each other and to the ceiling. Minor imperfections can be corrected with a file, a thin nail file or a knife, depending on the material of the product.
If cutting off the skirting boards in the corners did not work out perfectly, small cracks can simply be puttied. In general, the process of trimming skirting boards in the corners is not at all complicated. However, for practice, you can take a few small pieces of plinth and practice on them.