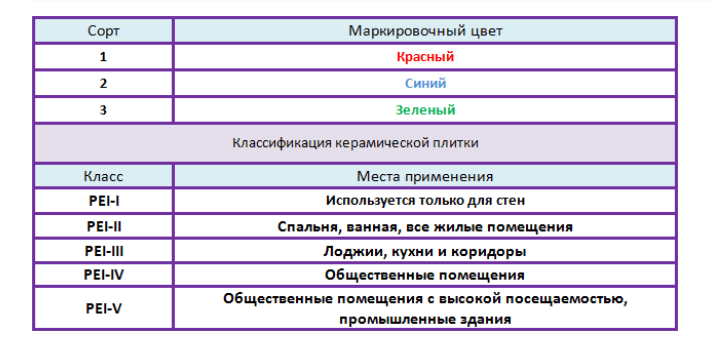
Among the great variety flooring materials, ceramic tiles occupy a special place. This material has been tested for years and gives no reason to doubt its advantages, especially in rooms with special operating conditions and microclimate. Today’s material will talk about the advantages of tiles, how to choose floor tiles, as well as about alternative types of tile materials.
There are many options for floor tiles, differing in the material used. But ceramic tiles take the lead for many reasons.
The main thing is that it has no restrictions on use in premises of any purpose and differs in completely different ways:
- Considering the surface to be covered, tiles can be wall or floor. The first is thinner, the second is more durable and wear-resistant.
- Taking into account the operating conditions, ceramics are subject to different requirements– it can be used indoors and outdoors. Outdoor ceramic tiles must have a low level of water absorption, be resistant to cracking and be frost-resistant.
- Based on their composition, tiles are divided into ceramic and porcelain stoneware.

Methods for making ceramics
There are two ways to produce tiles: pressing and extrusion. In the first case, durable, aesthetically attractive products are obtained. In the second case, the tiles are extruded through an extruder under high pressure.
To produce glazed tiles, the double firing method (bicottura) is used. Using the pressing method, a tile of the required shape is formed from a clay mixture, then it is fired and glazed, and then fired again. This type of tile is not very durable, and therefore is more often used for interior work.
Technical qualities of floor ceramics
When choosing ceramics, they look at the grade of the product; the higher it is, the higher the quality of the tile.
Grade I tiles are characterized by uniformity, caliber, strength and correspond to other qualities declared by the manufacturer. Low-grade tiles have some defects - the presence of uneven corners or surface planes, a not very clear pattern. Grade II is assigned to products that have defects on only one side in the form of uneven color, sagging and unevenness on the edges. If there are flaws on both sides, the tile is assigned grade III.

Despite this, even third-grade tiles meet operational requirements that allow them to be used for cladding walls and floors of unheated rooms. A fairly low level of water absorption is ensured by the porous and dense structure of the products and their frost resistance.
Advantages and disadvantages of using ceramic tiles
The advantages of ceramics include the following:
- High strength.
- Environmental cleanliness.
- Hygiene.
- Hypoallergenic.
- Moisture resistance.
- Wide selection of colors and shapes.
- Bacteriological resistance.
- Fire resistance.
- Dielectricity.
- High coefficient of thermal conductivity, which is important for “warm” floors.
- Wear resistance.
- Color fastness against exposure to UV rays.
- Durability.
- Variety of shapes and sizes.

Among the disadvantages, first of all, fragility and low soundproofing properties coverings. It is also worth noting that the surface is cold to the touch and difficult to dismantle. In addition, if you have no experience in laying tiles, then it is better to entrust this matter to professionals who know how to solve all sorts of small nuances that pop up during the work. The calculation formula looks like this: cost of work = ½ cost of material.

Characteristics of tile floor
Regardless of the material used, the flooring must meet a certain set of performance requirements. As for ceramic tiles, a floor made from it must have the following qualities:
- Wear resistance. The tiles are selected depending on the upcoming loads on the floor covering - the wear resistance class of the floor covering must correspond to the level of traffic in the room.
- In rooms where temperatures are expected to drop in winter (unheated rooms), great attention is paid to frost resistance of the coating.
- Hypoallergenic. The material should not highlight harmful substances and provoke the occurrence of allergic reactions.
- Fire resistance. The material must not support or spread flames.
- Moisture resistance. This criterion is especially important when laying floors in the bathroom, hallway and kitchen. The material should not absorb moisture and serve as a medium for the development of harmful microorganisms.
- Chemical and mechanical resistance.
- Anti-slip surface.
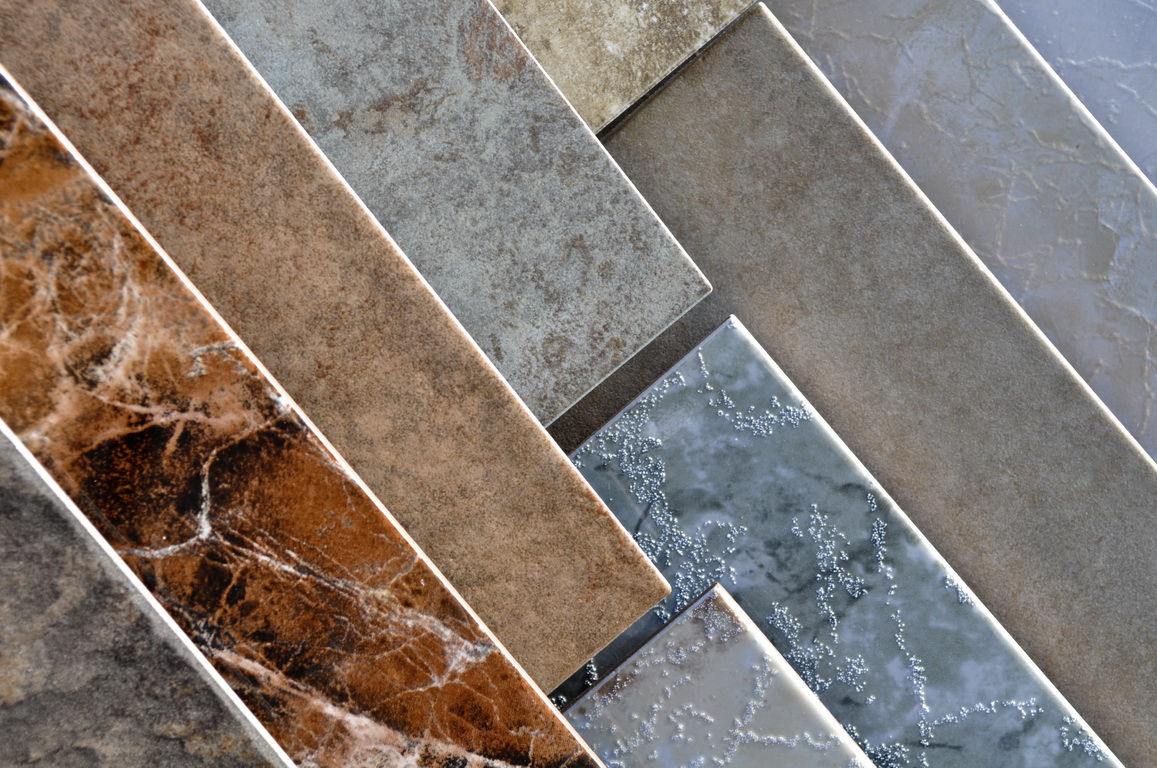
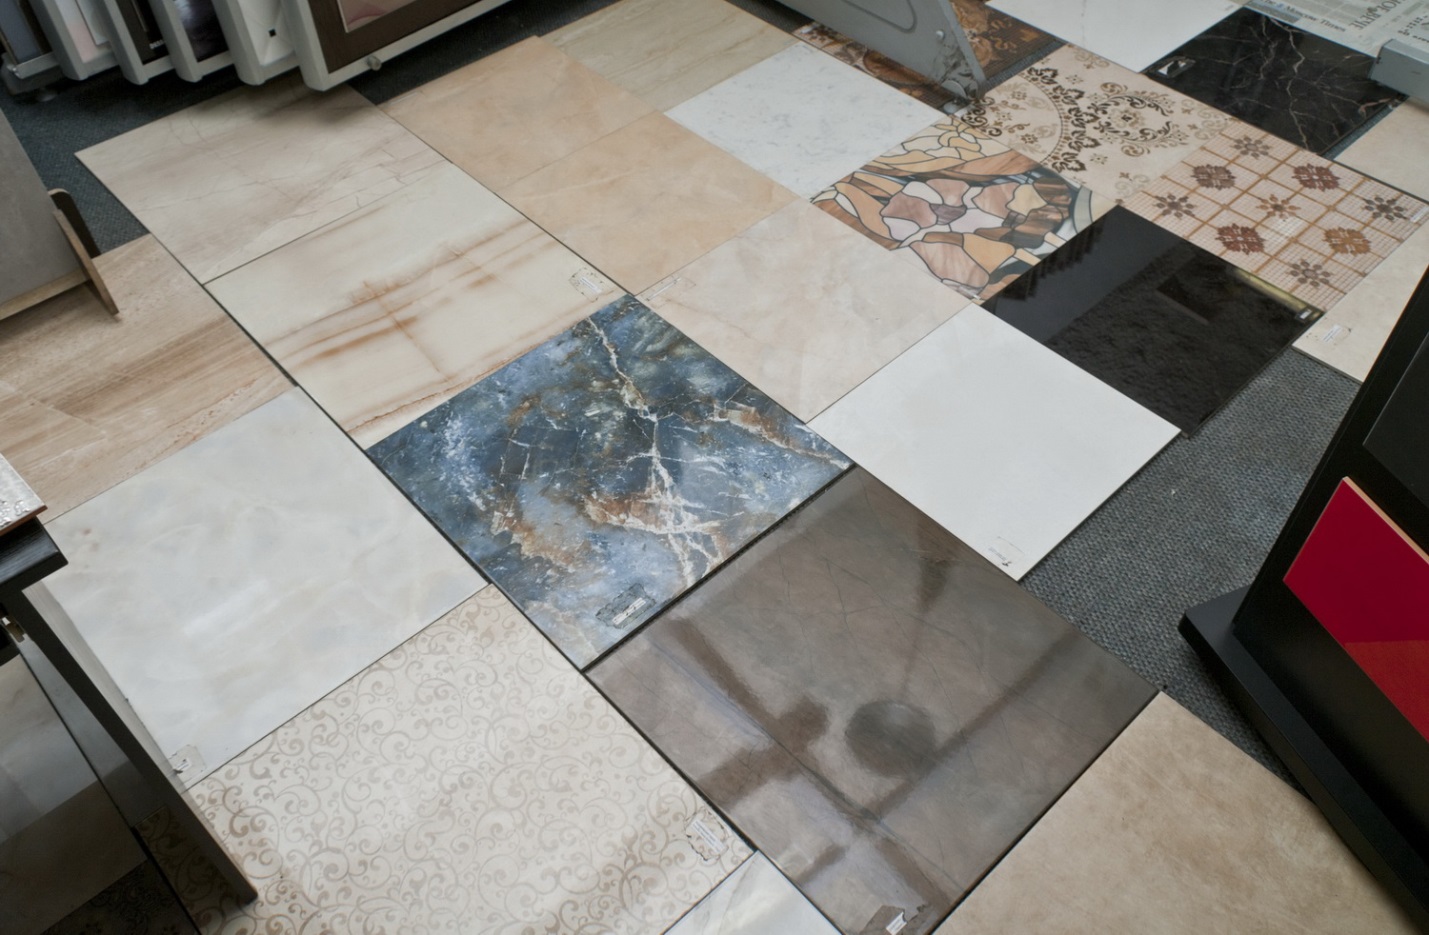
Types of ceramics
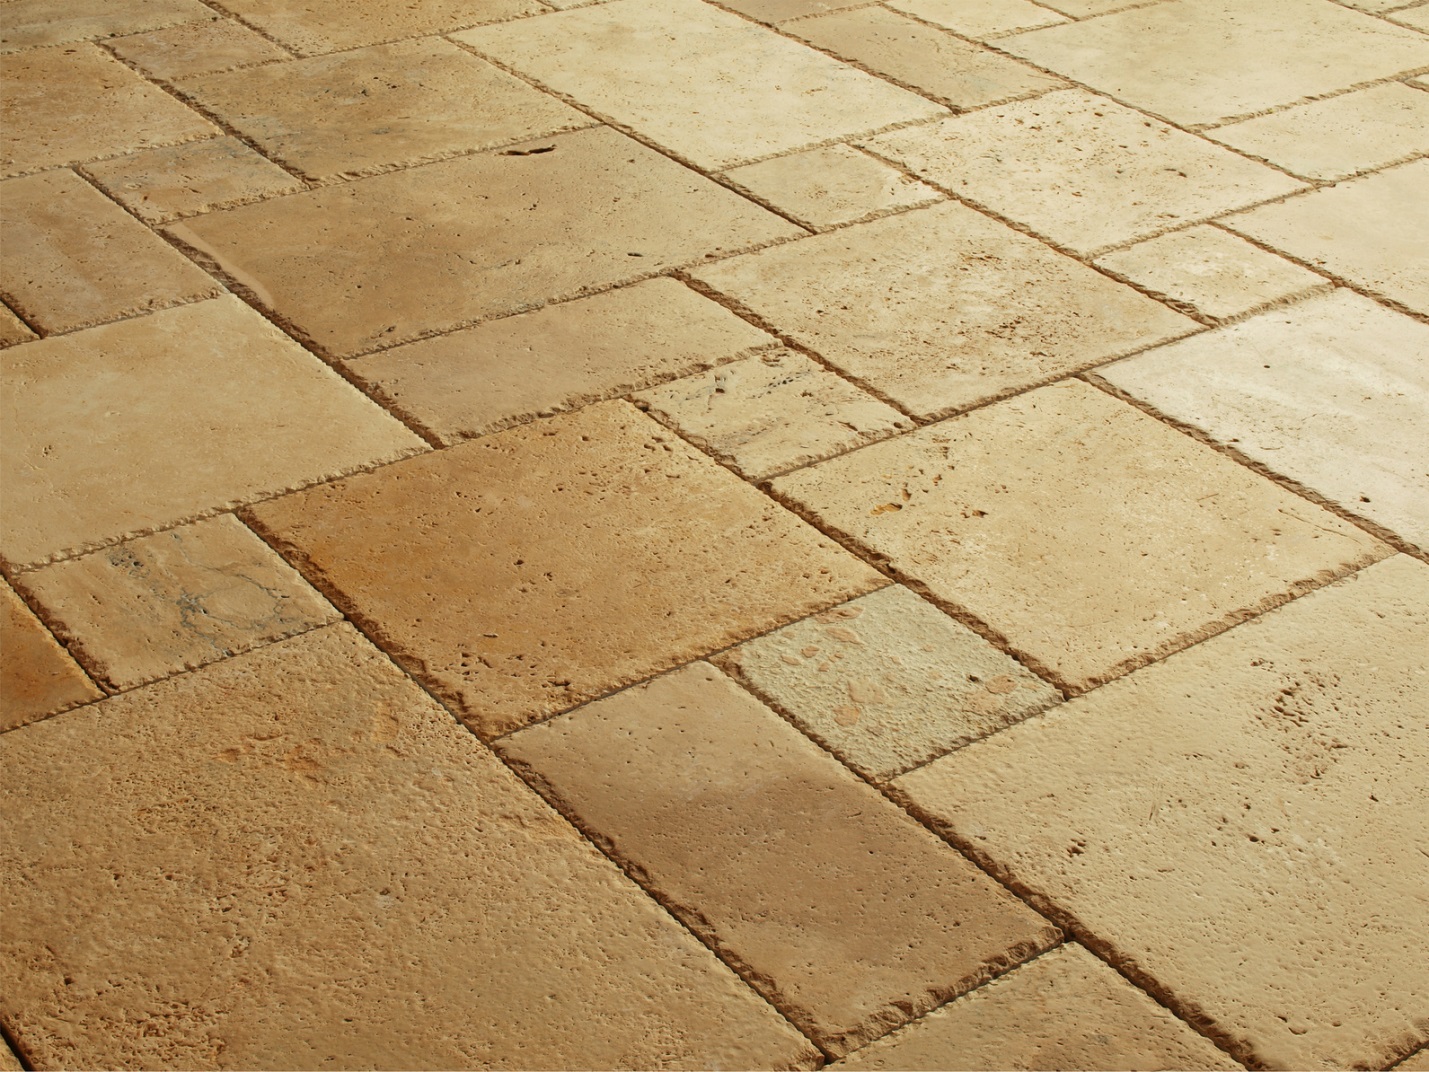
The surface structure of floor ceramics can be matte with a slight relief imitating, for example, the surface natural stone or smooth glossy. The rough, porous surface of matte floor products is pleasant to the touch and safe, as it provides an anti-slip effect and safety. Glossy products are more often used on walls - the glazed coating protects the image and makes them shiny. With the help of glossy tiles you can visually make the room more voluminous.

Tiles with a smooth surface are among the simplest options; they are functional and practical - they are easy to install and keep clean. The smooth surface can retain heat well.

Mosaic is less common, but still found on the floor in the bathroom or other “wet” rooms. When using such tiles on the floor, you can create a unique original pattern, but you should carefully consider the grouting material, which is much more numerous than when laying large-format floor tiles.

What to look for when choosing ceramic tiles
When choosing tiles, first of all, they take into account the purpose of the room in which they will be laid, the conditions and intensity of loads on the coating - the specifics of the bathroom and hallway are significantly different from the living room or dining room. The material differs in several respects.

By structure
As previously noted, in rooms with high humidity, preference should be given to floor tiles with a matte, rough face layer. Glossy surface the floor, especially when water gets on it, becomes dangerous. Therefore, matte tiles are chosen in the bathroom and kitchen.

To size
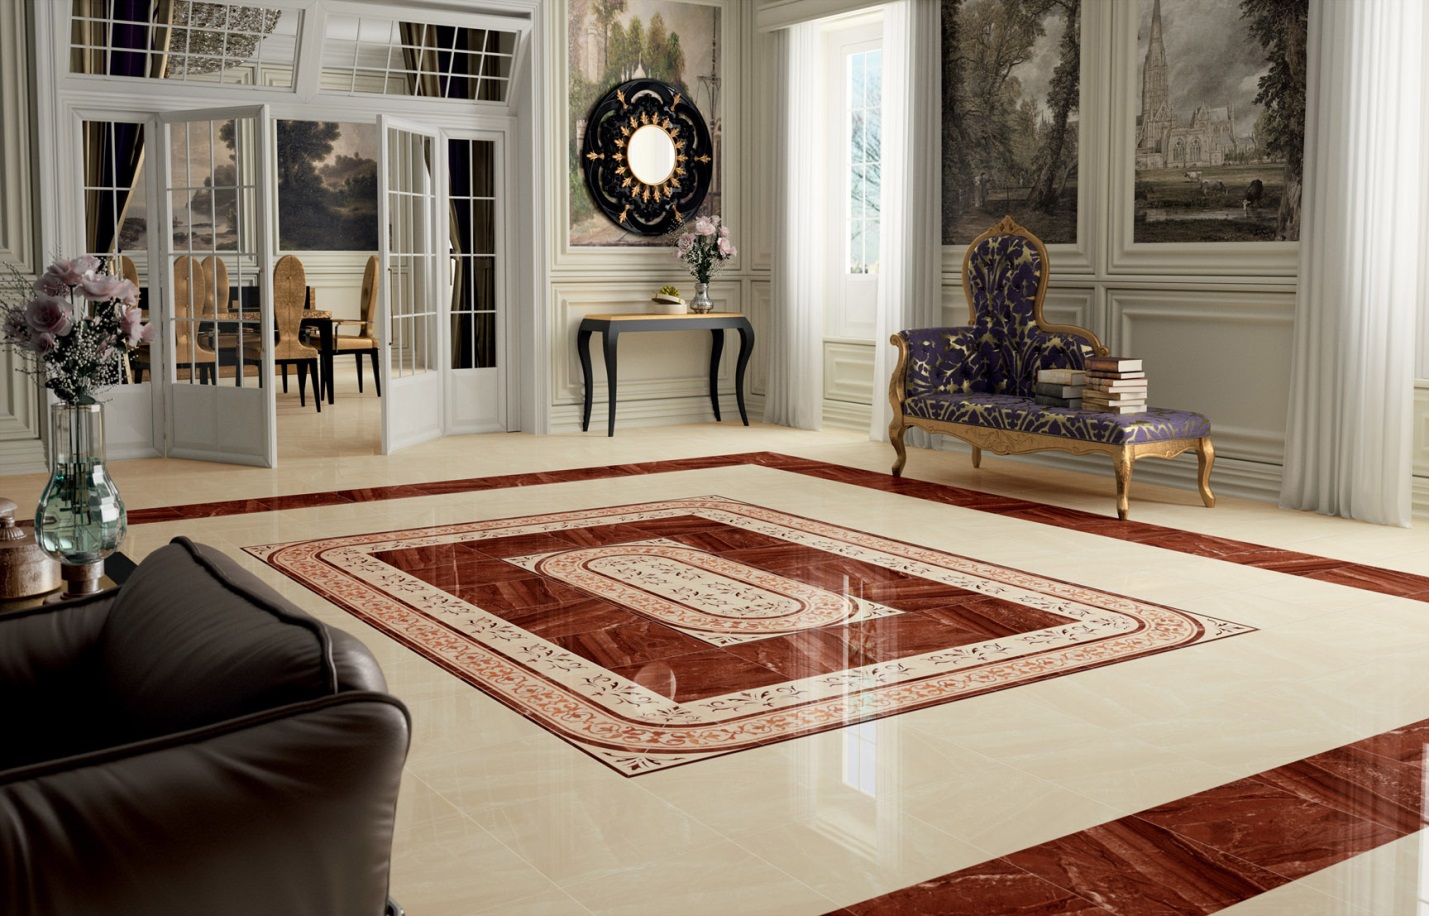
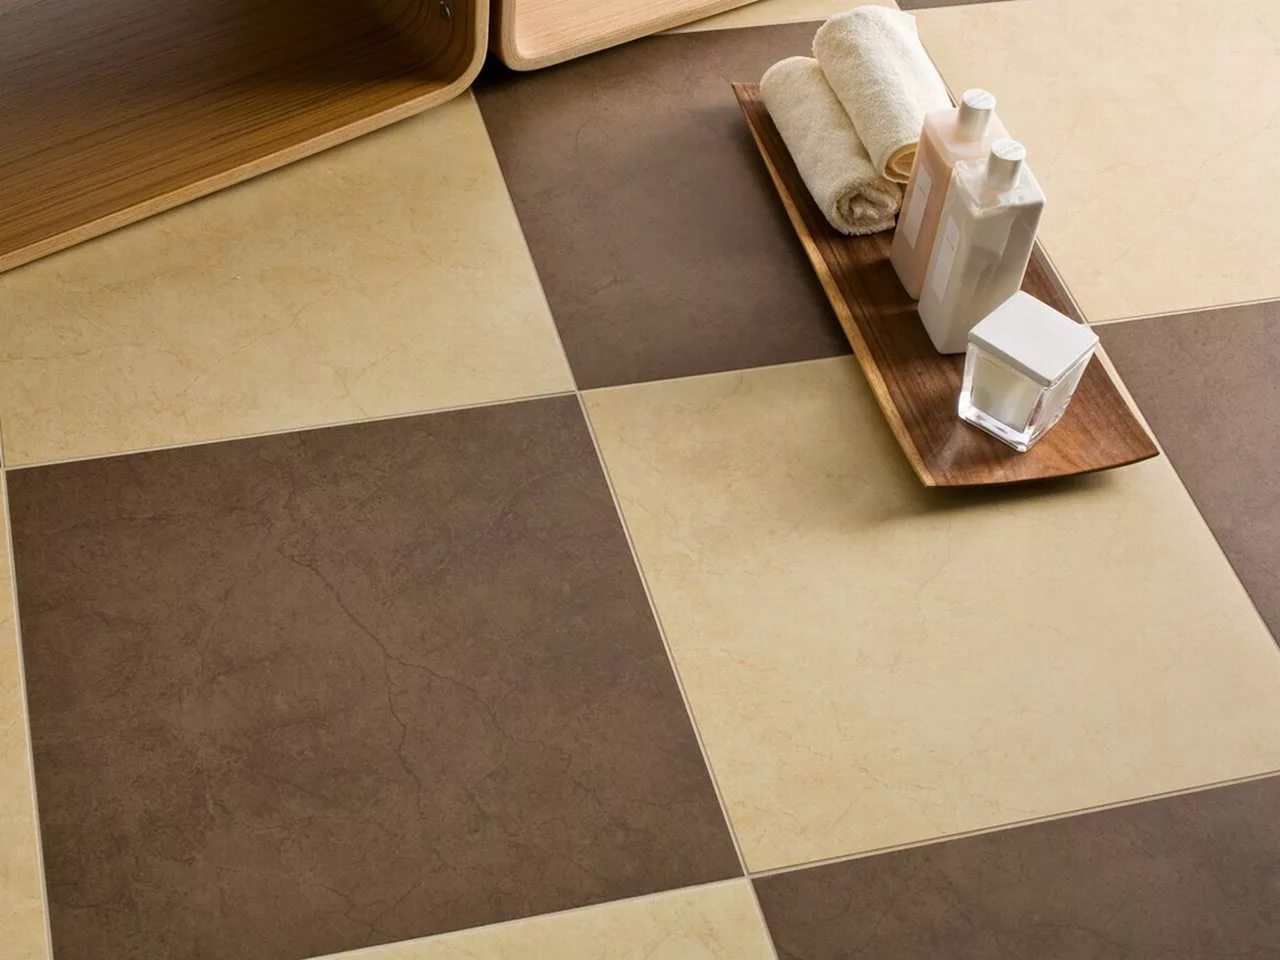
This important parameter, which affects the visual perception of the floor area and the room as a whole. Large tiles in a small room will make it visually even smaller, and small tiles or mosaics, on the contrary, will make it more spacious. Large format tiles are recommended to be installed in rooms whose area exceeds 7 m². A mosaic on the floor would be quite appropriate in a bathroom.
The fugue, matched to the tone of the cladding, creates the impression of a monolithic coating
By color
Being one of the planes that influences the overall perception of the interior, the floor requires careful selection of its color scheme. Taking into account the fact that the flooring is durable, it is advisable to make it in neutral colors, which will be appropriate in many interior solutions. The color of the floor should fit organically into the space and harmoniously combine with other decorations or create a contrasting combination. So, with the help of a white or light tiled floor you can visually make a small hallway lighter and larger.
Base for ceramics
The surface of the tile, its front layer determines appearance finishing, and the correctly selected and prepared base is responsible for its quality, strength and durability.
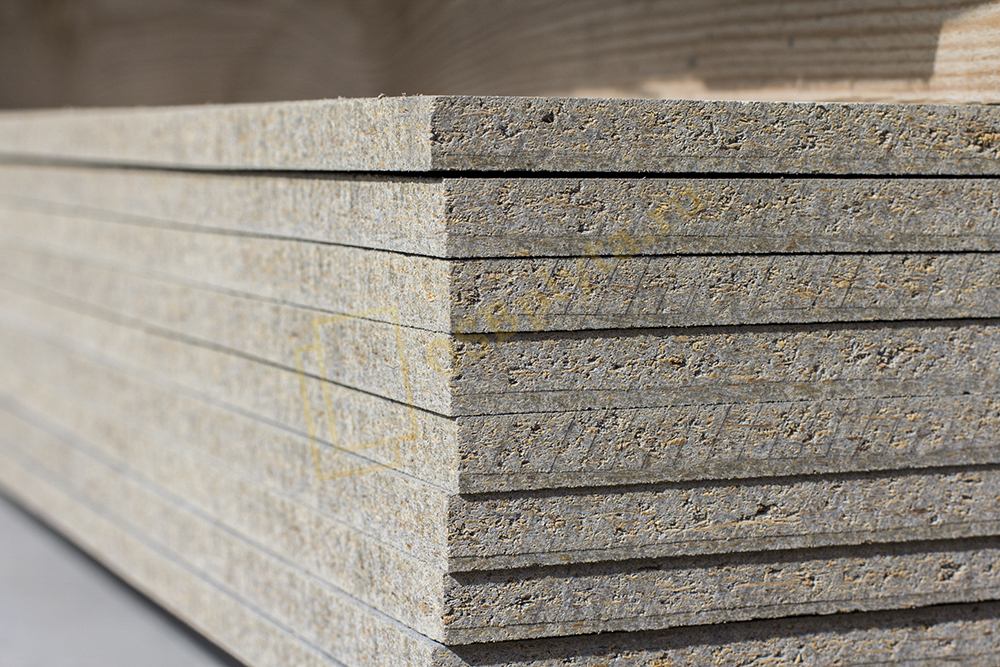
Laying on a cement board (CSB)
Cement board has high strength and, despite its higher cost than plywood or other sheet materials, is an ideal base for laying tiles. This is a universal material that allows you to form a base for tiles on any surface - on walls, on the floor, on the kitchen counter, in rooms with normal and high humidity.
Important! Cement board requires additional protection from moisture.
There are two types of cement boards. Products based on sand and cement have a fiberglass-reinforced front layer that creates a rigid and solid foundation. The length of such slabs is 90–300 cm, a width of 80–120 cm and a thickness of 6–15 mm.
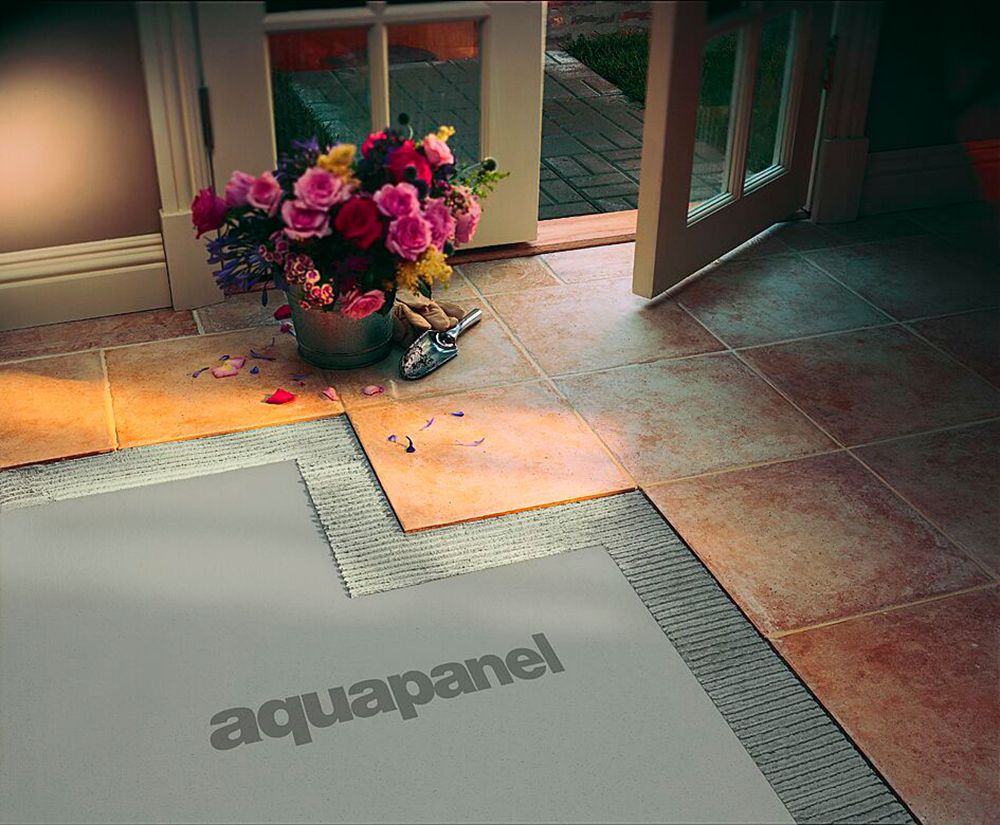
Cement-mineral boards Aquapanel
Sand, cement and mineral fiber-based slabs are available in thicknesses starting from 6 mm. In this case, the fibers reinforce and strengthen the entire slab, and not just the top layer, since they are evenly distributed throughout its mass. Such slabs are characterized by high density.
Laying on fiberglass gypsum board
Gypsum sheets with the addition of fiberglass, which are made specifically as a base for tiles, differ from plasterboard sheets. They are not as hard and durable as cement boards, so they are used in light-duty applications. The internal filler with water-repellent impregnation is located inside the moisture-resistant coating, which allows them to be used even in close proximity to water. Glass fiber is used as a reinforcing substance.
Important! Despite the increased moisture resistance, when attaching the slabs, additional sealing of the joints is required using silicone sealant.
This material is easy to transport, cut and install.
Plywood as a base for laying ceramic tiles can be used in conditions normal humidity. It is not recommended for use in conditions of sudden temperature changes and in rooms with high humidity. It is also necessary to perform high-quality waterproofing using a waterproof membrane. Among all varieties, it is recommended to choose moisture-resistant plywood, which is used for outdoor use. When choosing a material, carefully check the integrity of the slabs, the absence of voids, and the presence of resin on the surface, which reduces the quality of adhesion. The permissible thickness of plywood must be at least 15 mm.
Laying on a concrete slab
There are no problems when laying ceramics on a concrete base. The only requirement relates to the quality of the surface of the slab, which must be flat. For 3 meters of length, a difference of no more than 3 mm is allowed. Since any concrete surface is prone to dust formation, before laying the tiles it is dust-free and treated with a primer, which creates a thin film that ensures excellent adhesion to the adhesive. More often, deep penetration soil Concrete Contact is used for this purpose. For better grip concrete surface treated with a metal brush.

Laying on a cement screed
A common method of laying tiles is by tile, which in turn can be poured onto any base. The standard requirements are surface evenness. To do this, they use the method of pouring the solution along beacons and markings on the wall, which are applied using a laser level. To ensure strength, the screed is reinforced metal mesh. The advantage of such a base is that communications and the coolant of the heated floor can pass through the screed.
The use of a screed is relevant in the following cases:
- When installing tiled flooring in rooms with high traffic (in trading floors, public spaces any purpose).
- For restoration work for leveling the floor in a new building.
- With a pronounced deviation from the vertical of the walls of the apartment.
- When covering elements of a room of irregular shape.
Installation on old ceramic coating
Laying floor tiles on a base previously covered with tiles is allowed if the old cladding is firmly in place. Otherwise, the floor will need to be completely cleaned of the old finish, and then the base will need to be leveled. The disadvantage of laying over existing tiles is the increase in the thickness of the coating. To ensure high-quality adhesion of the old tile to the adhesive solution, its front layer is treated with sandpaper.

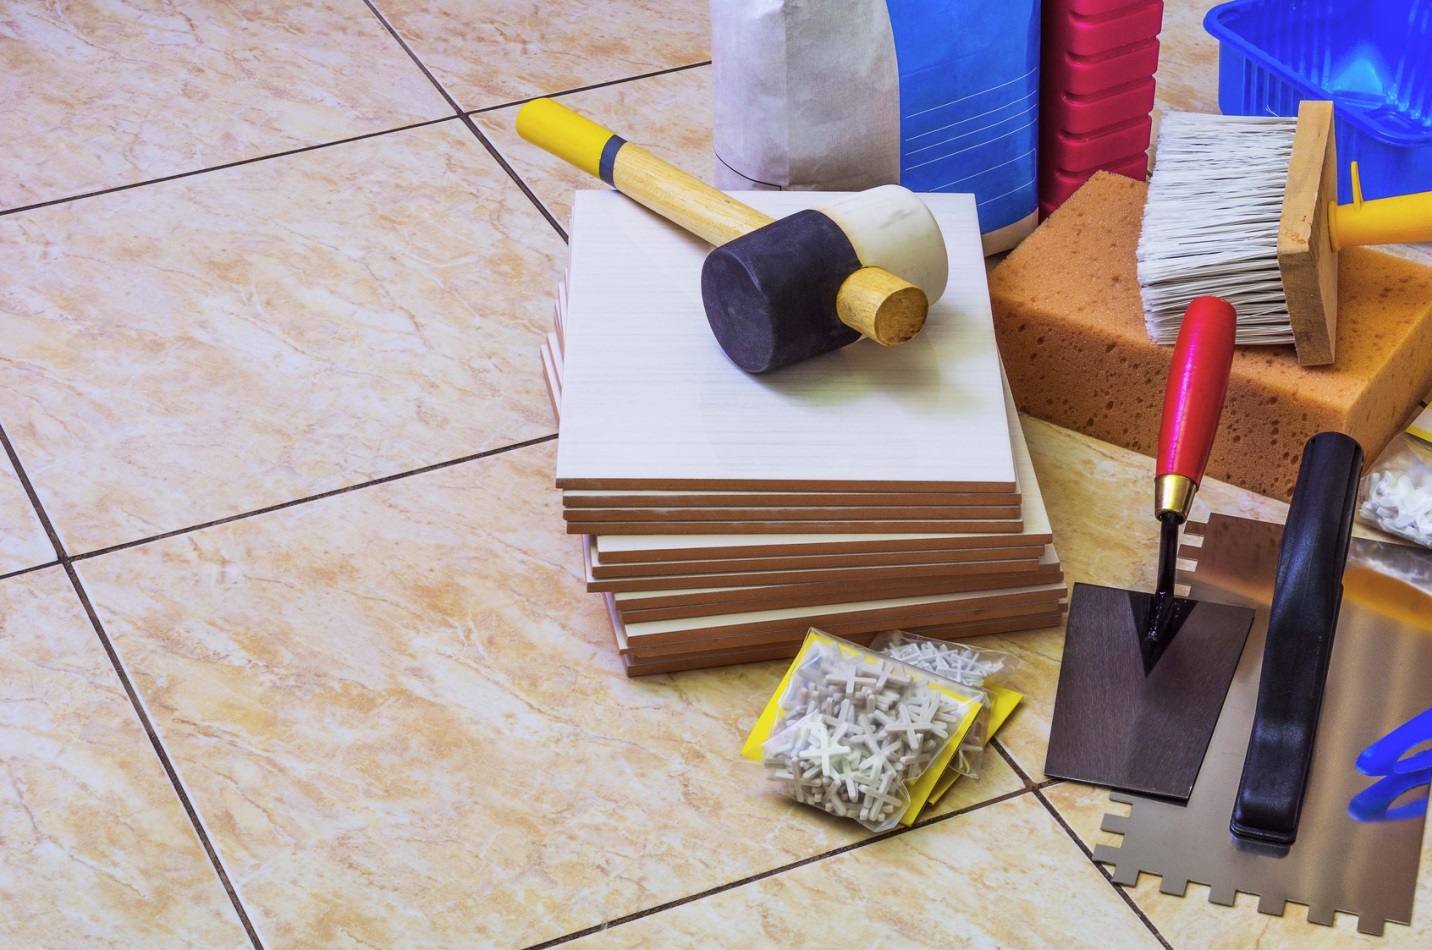
Materials and tools
To lay tiles on the floor you will need a standard set of materials and tools:
- The tile itself. It is worth purchasing it with a reserve in case of defects during pruning. The tiles must be from the same batch, since often products from different batches differ in shade. You should immediately evaluate the tiles for defects and unevenness and sort them - better elements will be laid in a visible place, products with defects will be useful for trimming.
- Tile cutting is done using a tile cutter.
- Tile adhesive and mixing container. When laying tiles, you should take into account the pot life of the adhesive and your pace of work, and prepare the required amount of adhesive accordingly.
- To apply the glue you will need a notched trowel and trowel.
- To form tile joints, purchase plastic crosses of the required size.
- To apply markings you will need laser level, construction square, tape measure and pencil.
- When laying tiles, use a level to control the horizontalness of the surface. It is advisable to have several levels of different sizes to control the position of both one tile and the entire floor space horizontally and diagonally.
- The tiles are fixed manually and using a hammer with a rubber butt.
- Grouting composition. Fugu is selected taking into account operating conditions. Epoxy grout is more expensive, but it is more resistant to all kinds of influences. It is also important to decide on the color of the fugue - it can be matched to the tone or contrast with the tiles.
- To work with grout, you will need a small rubber spatula to press the compound to the depth of the seam, a bucket for clean water, felt grater and sponge.
Preparatory work for installing tiles
Preparatory work depends on the type and condition of the base. If this is a floor in a new building, then it is necessary to assess its evenness, repair cracks, level it with a screed if necessary, prime it and perform waterproofing using the coating method.
In habitable premises, the existing floor covering is dismantled down to the rough screed, and it is repaired and leveled.

If the tiles will be laid with a pattern, then it is necessary to draw it on paper in advance, apply the appropriate markings on the floor, lay out the tiles in the required order and trim the necessary parts so as not to be distracted by all this during the work.

When laid on a wooden base, it is checked for strength and integrity. If the boards are strong, do not move and are rigidly fixed, forming a durable monolithic flooring, then wooden base pour a self-leveling mixture with mesh reinforcement.
As noted earlier, non-glossy tiles with wear resistance class III or II are chosen for the floor, depending on the room in which they will be laid. It is worth remembering that the larger the tile format, the higher its cost and the price of glue, which should have higher ductility. Optimal size floor tiles are 40 x 40 cm.

You should decide in advance on the layout of the tiles. The diagonal layout has its own nuances, especially if there is a damper seam in the central opening of the room. In this place you will need to make a cut on the tile, which will be noticeable even with high-quality grouting.

Diagonal layout requires more tiles and creates more waste. In this case, it is better to choose the standard method of arranging the slabs, and start laying from the doorway.
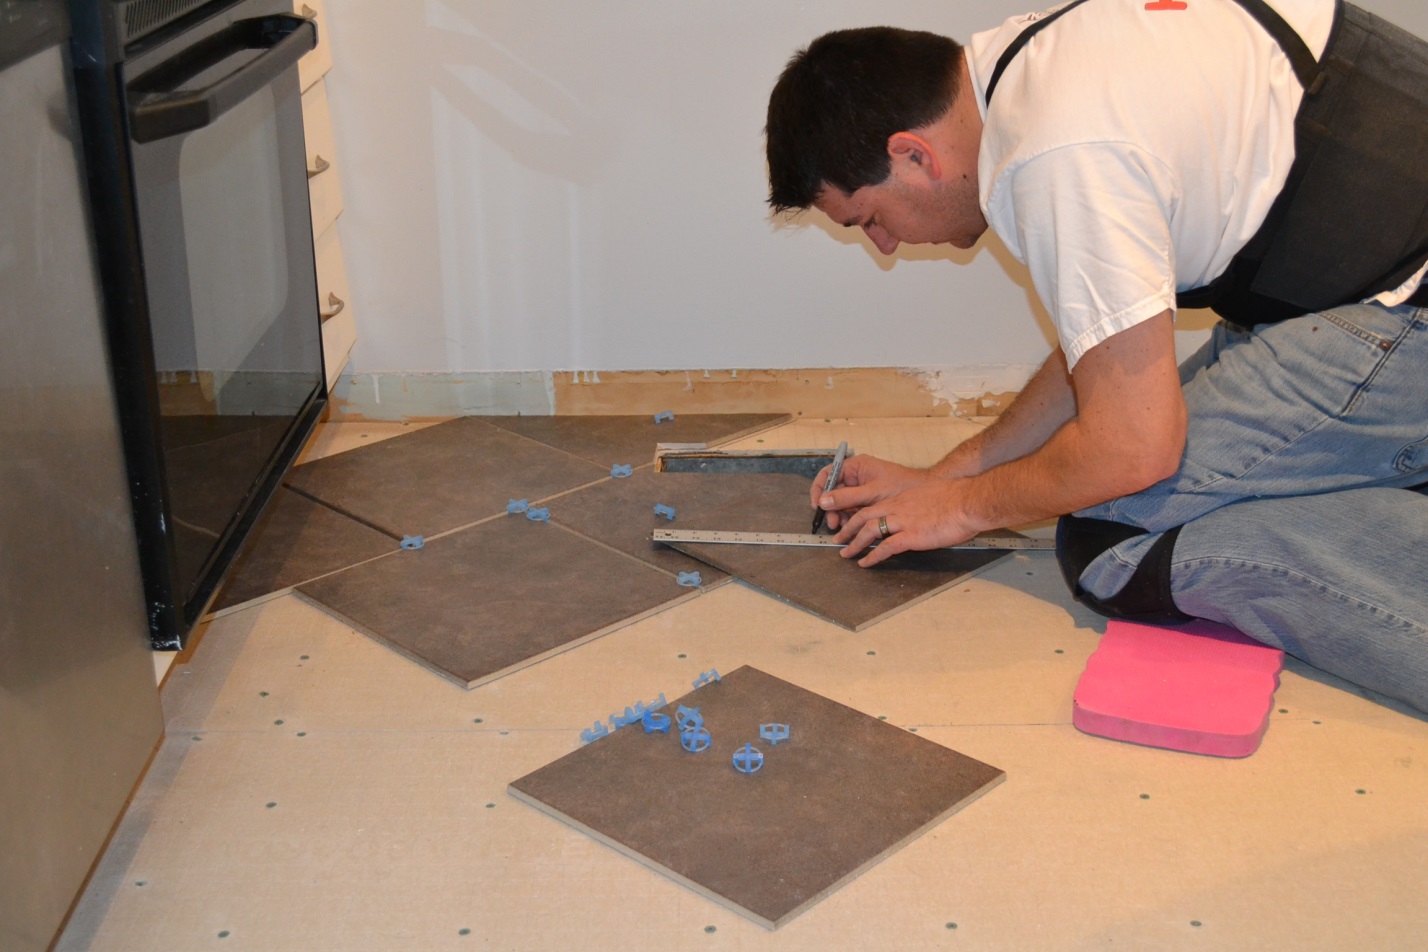
The tiles are laid using SVP wedges, but if the screed is level, then you can use regular spacer crosses, controlling the placement of the tiles according to the level.
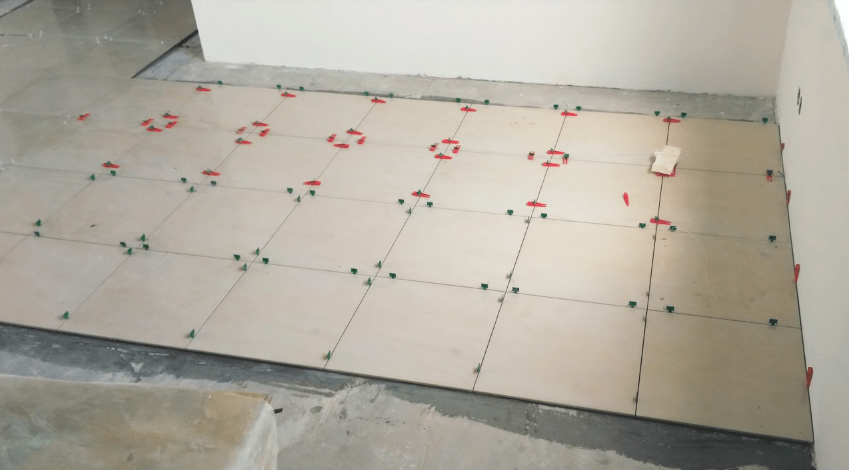
Forming seams using SVP wedges
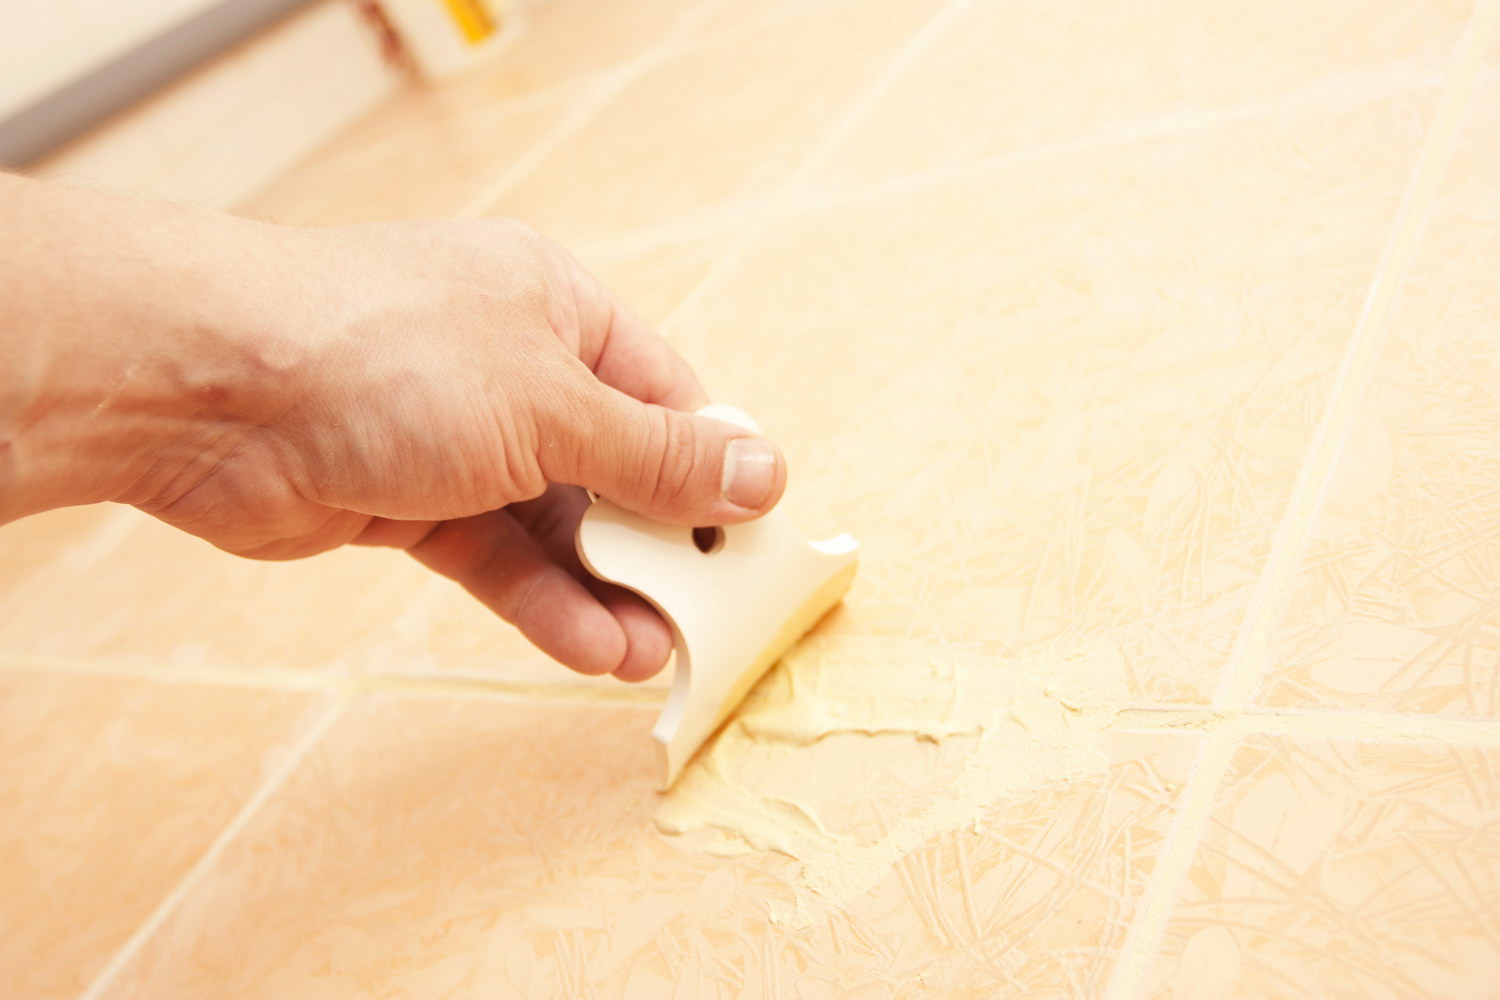
If there are microcracks on the surface of the screed, it is recommended to use elastic adhesive, for example, Ceresit CM 117. When laying tiles, as work progresses, it is necessary to remove excess adhesive from the seams between adjacent tiles. This will allow for high-quality grouting of joints in the future. When working with grout, it is necessary to take into account that the work will have to be done at a fast pace. In the absence of experience, it is better not to dilute a lot of the composition at once, since it has a short viability period. Using a small rubber spatula, the grout must be pressed to the full depth of the seam. And then immediately treat the seams with a damp sponge. It is also recommended to remove grout residues from the tile surface immediately - if it dries, you will need to use a special product to remove it.
Let's look at how to grout the tiles on the floor, and what composition is needed for this.
Important! When you choose a grout that matches the color of the tile, you can disguise uneven seams.
Ceramic tile price
The cost of ceramic tiles depends on many indicators - variety, technical indicators, abrasion class, size, country of origin.
Table 1. Cost of ceramic tiles
| Image | Name | Size, cm | Cost, rubles (as of June 2018) |
|---|---|---|---|
 | Ceramica Classic Libra | 38.5x38.5 | 830 |
 | Azori Eclipse Indigo | 33.3x33.3 | 700 |
 | Kerama Marazzi Sycamore | 30.2 x 30.2 | 675 |
 | Uralkeramika Brown PG4BR404 55x55 | 55 x 55 | 840 |
 | Jade-Ceramics Tuscany brown | 38.5x 38.5 | 670 |
Care
Ceramic tiles are easy to maintain, but there are some nuances:
- When choosing a detergent, you need to study the recommendations for its use - whether it is suitable for ceramics. It is better to avoid powdered formulations and detergents containing acids and fats.
- For daily care, it is recommended to use detergents that do not contain soap or warm water with the addition of glass cleaner.
- It is not recommended to use porous sponges, which can retain abrasive particles that scratch the front layer of the tile.
- Surface cleaning is carried out in two stages - dry and wet. First, remove dirt from the floor using a soft brush, broom or vacuum cleaner, paying special attention to the tile joints, and then wipe the floor with a damp cloth. The detergent is washed off clean water and wipe the tiles dry.
- If grouting was done cement mortar, then annually the seams are treated with water-repellent impregnation.
Floor tiles are an unpretentious coating and, as they say, easy to care for. Let's take a closer look at how to clean tiles on the floor and how to deal with stained joints?

Alternative types of tiles
Floor tiles are not only ceramic. Modern manufacturers offer a wide range of coatings of natural and synthetic composition, each of which has its own pros and cons.
PVC tiles
PVC tiles are among the most budget option creating flooring. The structure of such tiles is the same as linoleum, produced in the form of slabs of a certain size. For ease of fixation, such tiles may have an adhesive base. The high level of wear resistance of the coating is ensured by its multilayer structure.

Laying such material can be done on any base, even on plywood or old linoleum. The positive qualities of this material include the following:
- Laying can be done on any base.
- The material is moisture resistant.
- Low cost.
- PVC tiles are not characterized by shrinkage.
Disadvantages include a short service life compared to ceramics. Instability to high temperatures and chemicals. PVC tiles, depending on the class, can be used not only in residential premises (class 21 - 23), but also in public (class 31 - 33) and industrial (class 41 - 43) premises.
Vinyl tiles
One of the multilayer flooring materials - vinyl tiles, belongs to the category synthetic coatings with high aesthetic properties, characterized by moisture and wear resistance. The presence of vinyl in the tiles guarantees the reliability and excellent performance properties of the floor covering.
One of the cheaper varieties is quartz vinyl tiles, which contain sand. This is a multi-layer product consisting of a protective polyurethane coating on a decorative layer, a vinyl base and a lower polymer or fabric layer. This coating is moisture resistant, has excellent shock absorption, and is resistant to chemicals. The tile has a non-slip face layer, and due to its high heat transfer, it is suitable for finishing a heated floor.

Metal floor tiles
Manufacturers offer a huge range of flooring materials, including metal ones. The polymer film on the surface of such tiles protects it from the harmful effects of moisture. High strength and resistance to various impacts make this coating in demand in industrial and commercial facilities with high traffic, as well as in warehouses. In addition, you can find decorative tiles for sale. home use. Such tiles are characterized by: heat resistance, wear resistance, fire resistance. She is not afraid of mechanical influences.

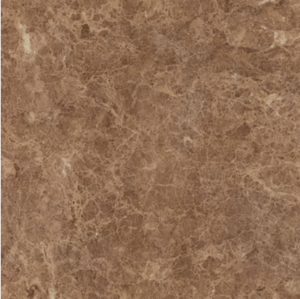
Stone tiles
These tiles are made from artificial or real marble or granite. Each of these materials is characterized by high wear resistance and aesthetic appearance.
From positive qualities of this gender the following can be noted:
- Long service life (up to 25 years).
- The tiles are frost-resistant.
- Fireproof.
- Aesthetically attractive.
Regardless of the type of tile, the operating conditions are taken into account - in damp rooms it is recommended to abandon products with high hygroscopicity.
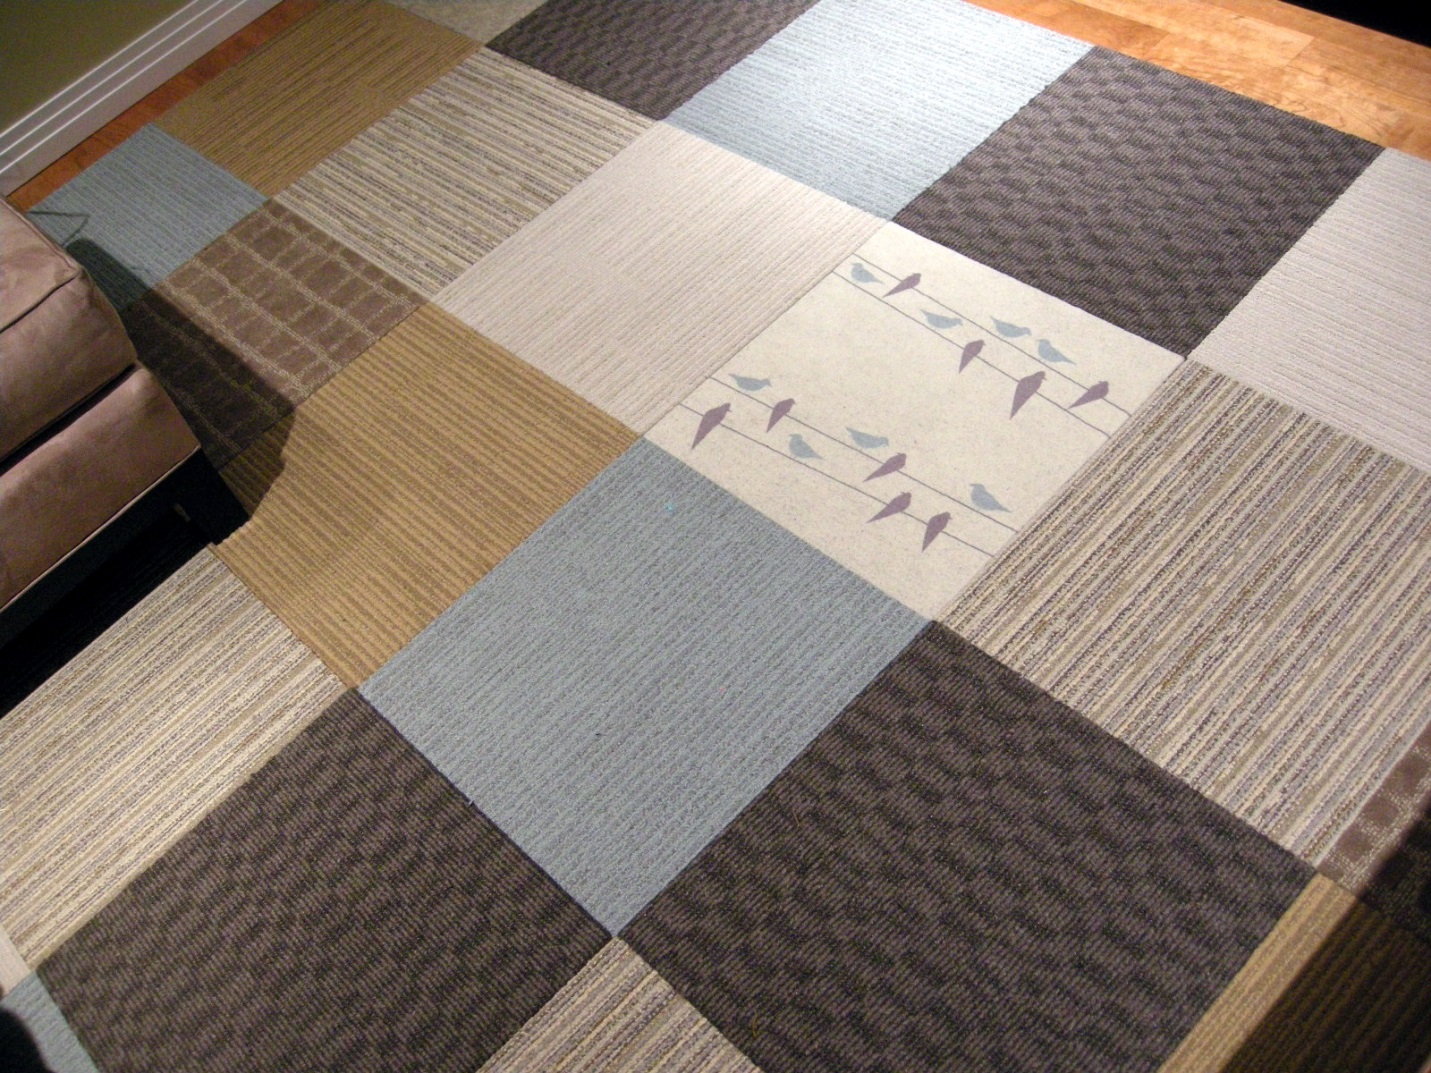
Carpet tiles
New on construction market– modular carpet tiles measuring 50 x 50 cm. The structure of this material is not similar to carpet, as it is a multilayer product with several reinforced layers.

Due to the presence of a solid substrate and the tight connection of the elements to each other, the rigidity of the individual slabs is ensured and eliminates their deformation during operation. The base of such tiles is made from bitumen, polyvinyl chloride, fiberglass or rubber.

Fiberglass ensures that the geometric parameters of the tile remain unchanged when room temperatures change. The material of the front layer is nylon. The aesthetics and performance properties of tiles depend on the quality of the fibers and pile.
If you have chosen tile flooring for your kitchen, then your decision is very successful. The main thing is that it is not difficult to install. A little more complicated than linoleum, but laying tiles on the floor is much easier than on the walls.
In addition, a tiled floor in the kitchen is a good option in the sense that the durability of the tiles definitely has no competition among other kitchen flooring.
Moreover, it is a good option if the tiles are matte. In this case, the surface of such a floor will not be slippery, even if you spill liquid on it.
Matte tiles on the kitchen floor will feel warmer to the touch. But the gloss on the tiles is also not a problem. True, it slips when wet, but try not to get it wet when you are cooking in the kitchen.
Advantages and disadvantages of tiled floors
Flaw This option is coldness. This problem is solved by underfloor heating systems and slippers. And rigidity will be a disadvantage in the sense that a housewife who walks kilometers around the kitchen may have sore feet.

But dignity its undeniable. It doesn’t burn, doesn’t deform, doesn’t fade, is easy to clean, doesn’t conduct electricity, and all that. This type of flooring is also extremely decorative. There are so many options that it will be impossible to look through everything. Using tiles you can decorate the interior in any style.
How to work with ceramic tiles if you decide to make the kitchen floor this way? First, calculate the required amount of material. If you have a designer drawing, it will look more difficult, but managers at retail outlets will be happy to help you. The floor for laying tiles must be well leveled. True, this is not always possible, but let’s pay attention to how to behave in this situation. The tiles under the feet are laid by applying glue to the floor surface. It's much faster than applying it to every tile. It is necessary to spread glue along the wall onto the floor for the entire length of the room across the width of the tiles, and run a notched trowel over this mixture. Such a spatula, thanks to its teeth, will level the glue so that top part The grooves on the glue will be in the same plane. Now you can glue a whole row of tiles.
All this is done quite quickly. I smeared it, peeled it off, stuck it on. So fast that some do not have time to follow the drawing made by the designer. After such omissions, entire rows of tiles have to be removed.
Well, what if the floor surface has slight unevenness, in the form of depressions and bulges? If it was not possible to level the floor in advance, then you can adapt as follows. We apply glue to the floor and to each tile. The layer thickness increases. If there is a depression on the plane, then you can simply carefully place the tile in this place without pressing it. If there is a protrusion, then you won’t have to apply glue to the tile at all. Only on the floor.
In general, by playing with the thickness, you can even lay it on an uneven floor. Of course there is more fuss. After the bulk has been laid, you can make trims along the walls, but not on the same day. So that it was already possible to step on the finished floor. While the glue is fresh, this will not be possible.

In addition to regular tiles, you can use porcelain tiles for the kitchen floor. This is a material that is even more durable than tile. On a ten-point hardness scale, the rating of porcelain stoneware is 8-9 points. It practically does not absorb moisture. It comes in both matte and glossy, just like tiles. The first option will also be safer.
If you have already decided to make a tiled floor in the kitchen, then go for it! Having arranged such a coating yourself, you will be extremely surprised at how simple it is. And at the same time, you will also experience satisfaction from your work.
Ceramic tiles are one of the most popular materials for decorating floors in hallways, kitchens and, of course, bathrooms and toilets. When deciding which tile to choose for the floor, you need to study the wide range and main characteristics of each type of tile flooring.
Features of ceramic tiles

How are ceramic tiles made? The principle is simple: crushed kaolin, mica, quartz, sand and various mineral oxides are baked under pressure or a press.
The tiles produced in this way have a whole range of useful qualities:
- has a high degree of wear resistance and abrasion resistance;
- has a long service life - up to 20 years;
- durable;
- Some types of tile coverings have additional properties, such as frost resistance, resistance to high temperatures and chemicals.
On a note! Ceramic tiles are easy to install, look beautiful, and are low maintenance, which is why this type of flooring is used in many areas, from residential to industrial.
Distinctive properties of floor tiles

When determining which tile to choose for the floor, you should take into account the following indicators:
- thickness - for floor slabs it is increased and is at least 0.9-1.2 cm in order to adequately withstand dynamic loads (for example, the fall of a heavy object);
- dimensions - they are also increased to simplify the installation process and reduce the weight load;
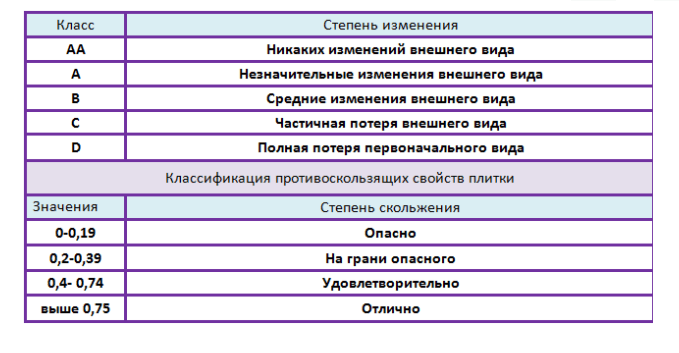
- wear resistance must have the highest index of REI 4 or REI 5;
- if increased moisture resistance is required, the moisture resistance indicator should not exceed 3%;
- — anti-chemical protection of the tiles is marked with indicators A and B, which allows you to clean the floor using various household chemicals;
- the presence of additional anti-slip treatment in the marking is indicated either by coefficients R10-11, or by a drawn boot with numbers from 1 to 4 (the lower the number, the more slippery the tile).
Clinker or porcelain tiles are used for the floor. These are especially durable types of tile coverings created using special technologies.
Different rooms - different tiles
The functional purpose of the premises in a house or apartment determines which tiles to choose for the floor. For a kitchen or bathroom, you need to select tile floors of different performance characteristics, sizes and colors.

When choosing a tile style, you must proceed from the area of the room: with a large footage, you can lay large-sized tiles, while with a small one, such tiles will be cut off: the amount of waste is large, and therefore unprofitable. Ideally, the size of the tiles is proportional to the dimensions of the room - then there will be little waste.

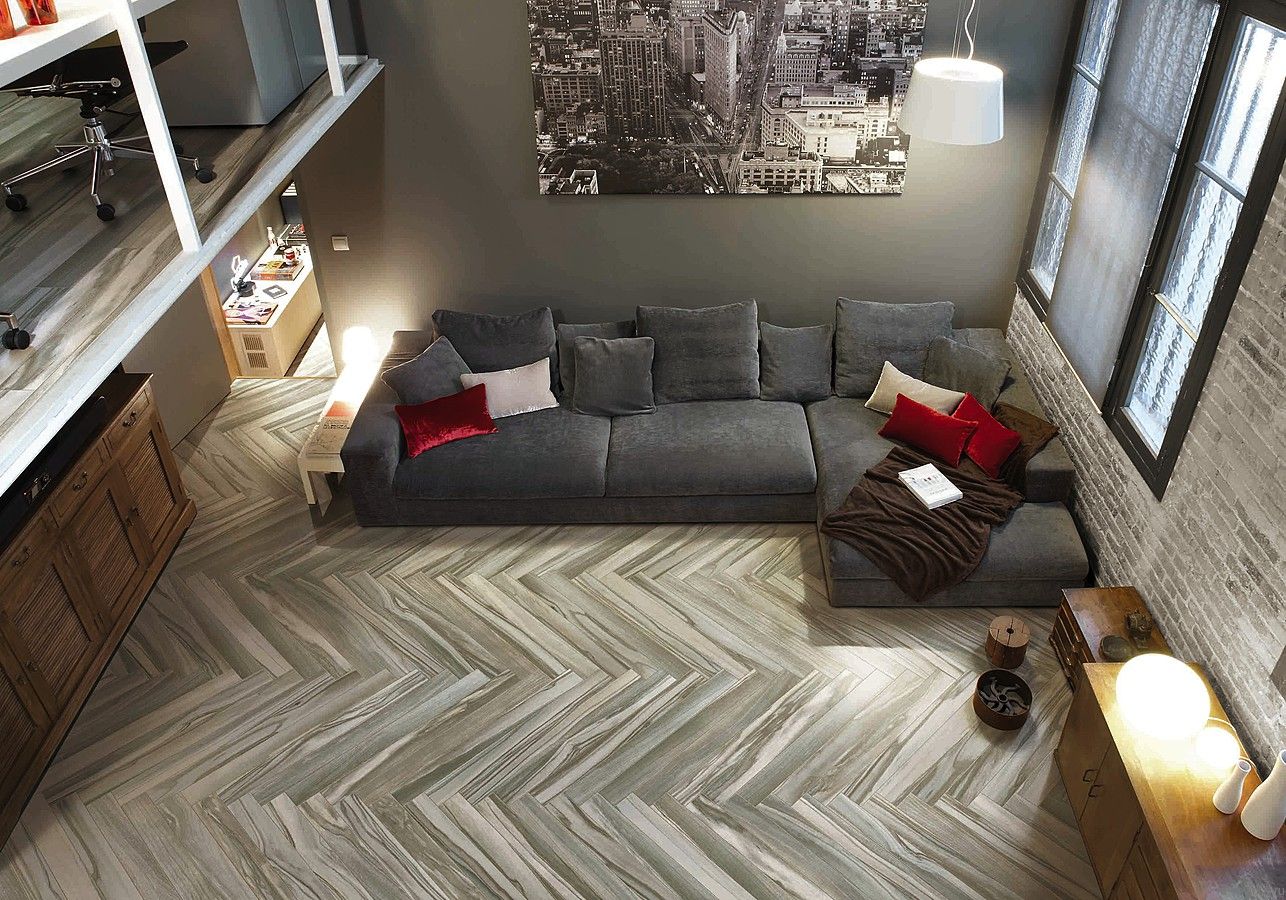
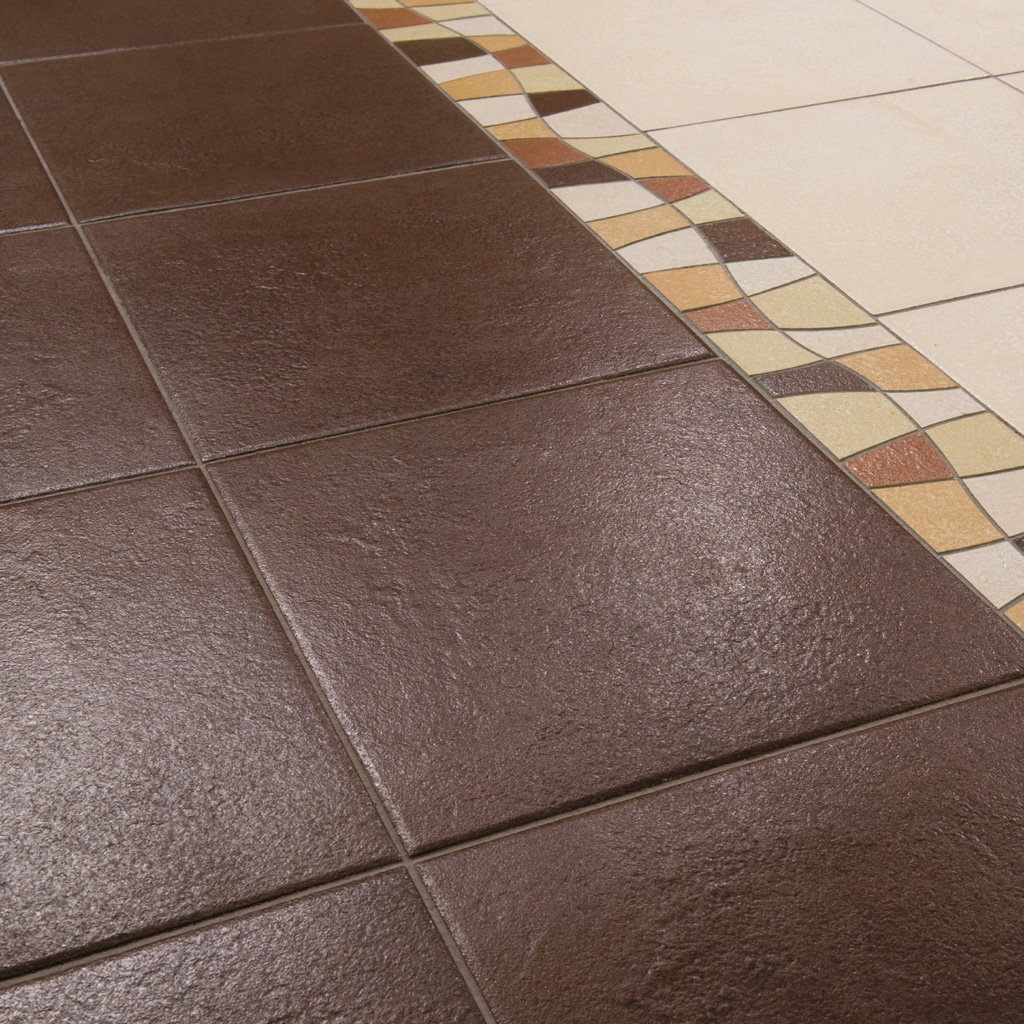
In addition, the aesthetics of the floor pattern is important: large patterns look beautiful only on large tiles, but small tiles can be combined in patchwork style. Ceramic tiles with hexagonal shapes or with original inserts provided by the design look interesting. You can lay tiles not only in a geometric order, but also in a wave-like, diagonal, herringbone pattern, creating a visual delimitation of space.
The design of the room determines style decision floor covering, its color. Monochrome walls can be diluted with a splash of color on the floor using bright tiles.
Manufacturers offer tiles that imitate wooden floors, marble, and leather.
Hallway
The first thing you see in the house is the hallway area. Whatever the hallway: narrow or spacious, small or huge, the flooring should be not only beautiful, but also functional. Due to its ease of maintenance, tile flooring is the leading choice for flooring in hallways.

Which tile to choose for the floor in the hallway? It must meet a number of requirements:
- Safety is extremely important, so to avoid injury, it is important to use non-slip tiles. Such tiles are matte, rough to the touch or covered with thin grooves. Before purchasing, you need to study the marking - there must be an anti-slip sign R 10 or R
- For the hallway you need ceramic tiles with wear resistance class 4, they are suitable for rooms with high level cross-country ability.
- The tiles should not be very porous, because this affects moisture resistance and hardness.
On a note! Tiles are most often chosen for hallways dark colors: chocolate, coffee, gray so that the dirt is less noticeable.
Tiles that imitate parquet look beautiful.
Kitchen

To choose which tiles to put on the floor in the kitchen, you need to remember that the kitchen is a place where there is fire, water, people often walk there, chairs move, sometimes dishes fall...
Thus, in the kitchen, tiles should have the following characteristics:
- wear resistance class 4;
- increased hardness;
- anti-slip coefficient 4.
When determining which tile to choose for the kitchen floor, you can use ready-made designer selections of ceramics so that the floor looks harmonious with the entire room and furniture. In the kitchen, marble or natural stone tiles are often used.
Bathrooms

When deciding which tile to choose for the bathroom floor, you must proceed from the fact that the bathroom is a room with a high moisture content. Therefore, the floor must have increased moisture resistance.
In addition, the larger the size of the slabs used, the fewer joints between tiles are required, into which moisture enters, which over time corrodes the grout. Therefore, if the size of the bathroom allows, it is better to choose large floor tiles.
Designer ceramic series are usually chosen for bathrooms. They include floor and wall coverings, narrow and wide borders, skirting boards, corners, individual decorative elements, colored grout.
Traditional colors of tiles in bathrooms: blue, turquoise, green, light green, beige, coral.
Bath
When arranging a bath great importance has the correct gender. Ceramic tiles have increased heat transfer, heat up quickly, and are easy to install on a heated floor of any design; it is indispensable in a relaxation area, washing room and steam room.

Which tile to choose for the floor in the bathhouse?
The tile must have the following characteristics:
- matte rough surface;
- water absorption coefficient 3-10%;
- abrasion resistance PEI2-PEI4;
- increased frost resistance.
Warm floors and ceramic tiles
What kind of warm floor to choose for tiles in residential premises to make walking on the floor comfortable at any time of the year? There are 2 types of underfloor heating:
- water system;
- electric (cable or film floors).

Which is better to choose a warm floor for tiles is determined by the purpose of the room. In the bathroom, water floor heating is more often used, while in the kitchen or hall, electric floor heating can be used.
A water floor is economically beneficial when used on an area of at least 30-40 sq.m. and runs on an autonomous boiler. IN apartment buildings With central heating The installation of water floor heating systems is prohibited by law, this is due to the peculiarities of the water supply and the need to make a large concrete screed during installation, which makes the inter-apartment floors heavier.
Attention! When installing an electric floor, it is necessary to provide good water insulation, as well as connect the power to the entire network through an RCD.
Film electric floor is a special film consisting of carbon strips. Such floors, due to the fact that the heating elements are laminated, provide a high degree of fire safety and water resistance. They can be used in bathrooms and other rooms with high humidity or temperature changes. However, they are beneficial over large areas.
An electric floor operating on the basis of a laid self-regulating cable as heating element, completely safe. In addition, tiles can be laid on such a system without fear that over time the seams will begin to crack and crumble.
Now we can conclude which electric heated floor to choose for tiles is more profitable and reliable.
Features of laying tiles on a “warm floor” system
Having decided which heated floor to choose for the tiles, you need to correctly lay all layers of the heated floor, because In case of technological violations, the finishing coating will be the first to suffer: the seams will begin to crumble, the tiles will become brittle and brittle.

Sequence of laying heated floors:
- Leveling the base, differences of more than 1 cm per 1 sq.m are unacceptable.
- Waterproofing.
- Thermal insulation.
- A heating element.
- Screed or adhesive solution.
- Tile.
It doesn’t matter which tile to choose for a warm floor, the main thing is to choose the right tile adhesive.
The adhesive for tiles placed on a “warm floor” system must be heat-resistant thanks to special additives.
A beautiful heated floor will help make your home cozy and beautiful regardless of the time of year!
Ceramic tiles have long been used for flooring. It is durable, wear-resistant, practical and beautiful material. Certainly, exclusive finishing Only professionals can do it. But it’s quite possible to make the floor in the toilet, bathroom or kitchen with your own hands. Be persistent and everything will work out. Even if you break several tiles, the savings will still be many times greater.
What are the characteristics of ceramic products?
- composition of raw materials: from red, white, colored clay;
- manufacturing method: pressed, extruded;
- firing: single, double;
- material structure: porous, dense;
- type of coating: glazed, unglazed.
For deviations up to 10 cm, first apply a leveling cement-sand mixture, and after drying, apply a self-leveling one.
The wrong choice of mixture will cause the surface to crack or be poorly leveled, which will lead to additional costs and wasted time to correct the work.
If you plan to lay tiles over an old tile base, no leveling mixtures will be needed.
Finally, ceramics can be laid on a wooden floor, having previously strengthened it. For preliminary cladding, cement-fiber boards will be required.
Step 3. Purchasing everything you need
So, the layout design has been chosen, the method of preparing the base has been outlined. What materials you will need:
Basic:
- ceramics;
- glue;
- grouting joints (in the vocabulary of builders - fugue);
- impregnation;
- plastic dividing crosses.
Auxiliary (base preparation):
- self-leveling mixture (or cement-fiber boards);
- primer primer;
- roll or coating waterproofing;
- quartz sand;
- degreasers.
What tools will you need:
- glue container;
- electric drill with mixer attachment;
- Master OK;
- spatulas: toothed metal for applying glue and narrow rubber for grouting;
- manual roller or electric tile cutter, as an option - tile cutter, glass cutter;
- tungsten string with diamond coating;
- a hacksaw blade for metal or a jigsaw for cutting out (for attaching the string);
- a ring bit for drilling holes, or a ballerina drill;
- roulette;
- marking cord;
- pencil;
- square;
- short (up to 300 mm) building level;
- metal rule or level 1.5 m long;
- rubber mallet.
- protective glasses.
Step 4: Preparing the floor
In order for the coating to adhere securely to the base and not fall off or crunch underfoot, the base should not be loose or flexible (unsteady). After the revision, determine whether something needs to be done with the base, and if so, then what exactly. Based on the results of the audit (step 2), a decision is made on how to strengthen the foundation.
Concrete base:
 Loose, flaking areas are scraped off manually (with a chisel) or with a hammer drill with a flat attachment. Clean the surface from dust, dirt and grease deposits using chemicals. Level the base using a solution based on one or another leveling mixture.
Apply a layer of liquid primer. Glue the roll or coating waterproofing. Sprinkle a thin layer of quartz sand on top (for better adhesion adhesive composition to the base). 
In order to lay the new coating on old tile, sand the base using a rotary or surface grinder (round metal brush, abrasive wheel, abrasive belt).
On a wooden floor:
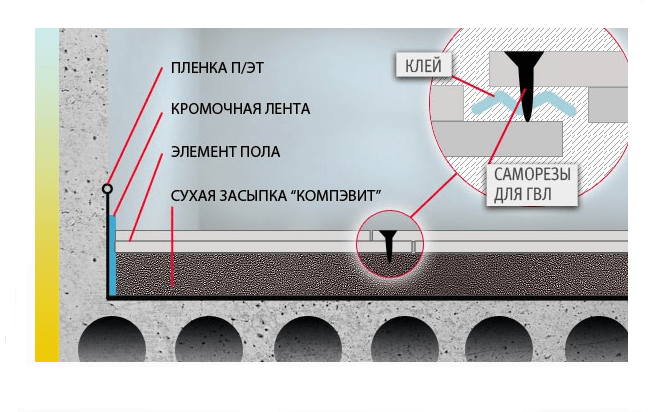
 The base is covered with gypsum fiber sheets (GVL) 20 mm thick (for dry rooms) or cement particle boards (CSP) 10 - 15 mm thick (in rooms with high humidity). The joints should not be located between the boards; for GVL they are filled special glue, for CBPB - elastic polyurethane mastic.
Step 5. Marking
The outline of a room is rarely perfectly rectangular. With a monochromatic floor finish, this is not noticeable. Perpendicular tile joints emphasize the unevenness of the walls. How to reduce this illusion? Procedure:

If the walls are fairly straight (the difference in diagonals is no more than 1 cm), draw one of the marking lines parallel to the long side of the room.
Step 6. Preparing the glue
Dry mixture for tile adhesive is sold in 25 kg bags. To seal it, take an open container with a volume of 5 - 10 liters (empty plastic cans for paint, putty and other materials are suitable). The main thing is that the inside is dry, clean and free of grease.
Pour a certain amount of water into the container, then add the appropriate amount of dry mixture (the ratio is indicated on the packaging).

Make the first batch small until you feel how much of the solution you can use during its viability.
 Take an electric drill with a mixer attachment and mix the contents until the solution has the consistency of sour cream and there are no unmixed lumps left in it.
To prevent the solution from separating, do not set the mixer speed too high.
Let the mixture sit for 10 - 15 minutes and stir again. The glue is ready to use.
Step 7. Styling
You can watch how to lay floor tiles in this video:
We dance from the stove. The first tile is laid according to the markings (step 5) according to the selected layout option. If work starts from the center of the room, choose a quarter of the marking opposite to the entrance, so as not to walk on the newly laid tiles.
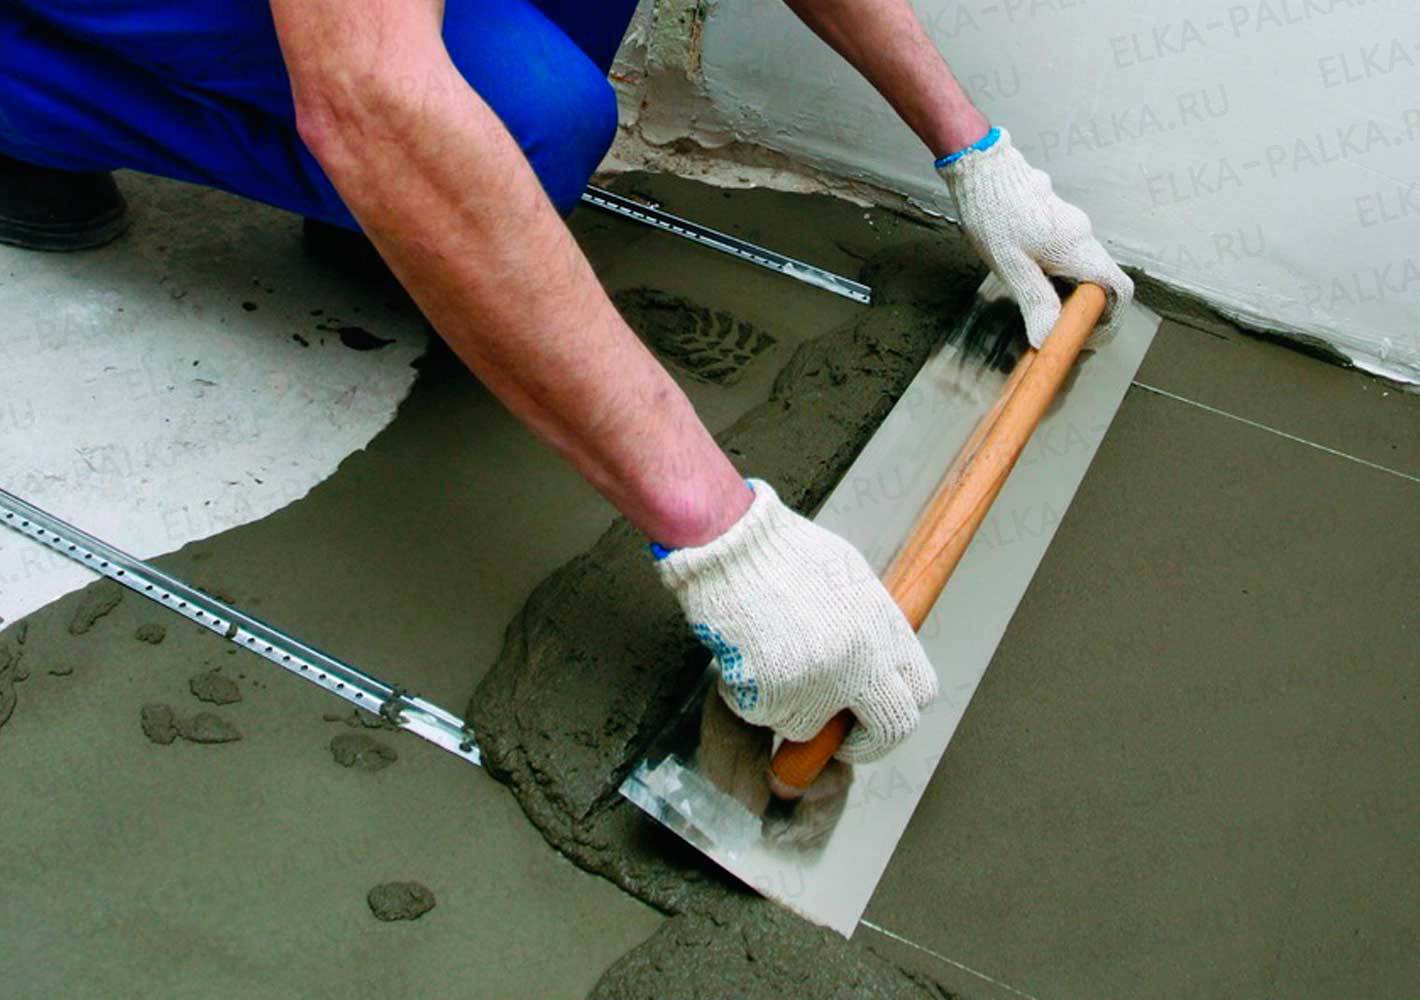
Using a trowel, spread the amount of mortar on the floor for 2 to 3 tiles. Using a notched trowel with a cut width of 6 to 8 mm, smooth out the glue. Place the first tile in the corner of the marking, lightly press it from above with your hands or a level, checking its horizontalness with a short level. If necessary, adjust the horizon by recessing one edge of the tile using a rubber mallet or placing an additional portion of glue under it.
 Install the next tile close to the first, place dividing crosses in the corners, some prefer to place them upright on the sides of the tile. Check horizontality and relative position with a long level. After the coated surface has been laid out, the next portion of the solution is placed and smoothed.
They put a few more pieces in place. After a while it will become clear: how many tiles you manage to put on one portion of the solution, after which the work will go faster. When the time comes to lay additional elements (not whole), they are cut to the required size. To pass various pipes make curly cuts. Laying is carried out starting from the far corners of the room and ending at the front door.
Step 8. Grouting the joints
The grout mixture is diluted to a thick paste, after which it is applied into the cracks between the tiles, trying to fill them to their full depth. Only then can you be sure that after some time cavities will not appear on the seams where moisture will penetrate.
The joints are filled with paste at help hard rubber spatula, making cross movements with it  along the seam from left to right and vice versa, while holding it at an angle of 45° to the floor. Excess fugue is removed with the same rubber spatula, leading it along the seam perpendicular to the coating.
After about 20 minutes, the floor is finally wiped with a damp sponge, which is periodically rinsed to remove adhered grout particles. After complete hardening, the surface of the fugue is covered with sealant or impregnation for seams to protect it from moisture.
Subtleties of styling
We invite you to watch a video on laying tiles:
Some tips from the experience of tilers:
- For laying on the floor, it is better to choose ceramics with a matte surface;
- If possible, choose tiles without chamfers (roundings) at the ends. They visually increase the thickness of the seam, that is, if the seam is chosen to be 3 mm, then it will look like 5 - 6 mm;
- When choosing a notched trowel, it is assumed that the thicker the ceramic product, the wider the cutouts should be;
- For more durable adhesion, sometimes the back side of the tile is coated: apply a layer of glue with a notched trowel, and remove it with a flat one (coating “to peel off”);
- This method is also more reliable for gluing large-format products;
- To remove incorrectly laid tiles (especially if they are not located on the edge), special suction cups are used;
- The crosses are taken out without waiting for the glue to set completely;
- Before grouting ceramic products with a rough surface, in order to avoid contamination, they are first coated with a protective liquid;
- Tile seams should be slightly recessed relative to the tiles. To do this, after grouting, the seams are ironed with the end of a metal tube, the diameter of which is slightly larger than the width of the seam;
- Choose the correct time after which the coating can be wiped from the fugue. If you start too early, the grout will spread across the tile; if you wait too long, the grout will harden and you will have to scrape it off, with the risk of scratching the surface.
So, the technology of finishing a floor with ceramics does not present any particular difficulties. The main thing is to follow all the tips and recommendations for tile work. More confidence in your abilities, and your new floor will delight you for many years.
Tile materials for interior work are presented on the construction market in a huge range. Each type of demanded raw material has its own characteristics and performance characteristics. The variety of textures, sizes, and manufacturing technologies allows you to use many ways to lay tiles on the floor. Some manufacturers mass-produce whole fragments of companions, which makes it possible to decorate surfaces with an identical pattern. To successfully update the interior and carry out high-quality tile installation, you need to understand the types of materials and follow certain rules during repair work.
Types of floor tiles
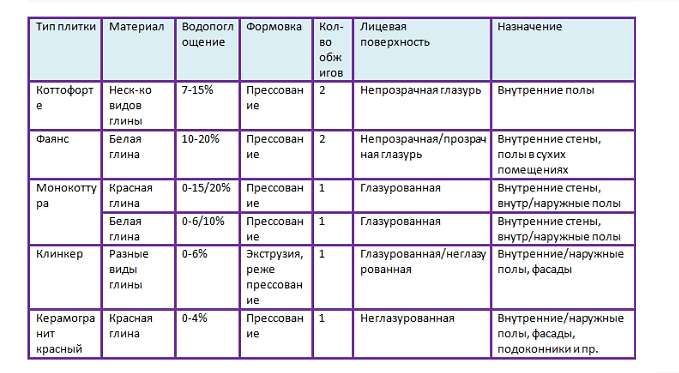
All material offered by manufacturers can be divided into two types. These are extruded and pressed options. Separation according to the manufacturing principle is necessary for selection suitable material for installation in certain conditions. Floor tiles can also have a glazed finish or remain natural.
You can make any room comfortable and unique using the following types of tile products:
- Simple ceramic tiles. Due to the colored glass coating, the elements receive additional hardness. Available unglazed and with an additional layer of enamel. It has many shades and excellent water resistance.
- Porous. Produced by single firing. Due to the high degree of moisture absorption, it is used only indoors.
- Porcelain tiles. A product with a homogeneous structure based on kaolin and quartz. The outer coating has a glass luster and durable structure. High impact strength and resistance to intense loads allow it to be used for installation in industrial enterprises.
- Metlakhskaya. Unglazed elements are produced by pressing after one firing. Material with high operational properties used for street and home masonry. The incredible durability of the design is explained by the painting technology - each brick is soaked through with paint.
- Cotto. Dense, effective material, up to 3 cm thick. Enameling is not provided, so the tiles require constant maintenance. To reduce porosity, after installation it is treated with hydrophobic compounds and mastic.
- Clinker room. They are made from several types of clay, binders and dyes. The durable product easily contacts chemical irritants, any natural factors. Universal finish has a uniform texture, unlimited service life.
- Monoccotura. They are often used for decorative finishing and laying out certain patterns, despite the low degree of moisture absorption and dense structure. Monoccotura elements are subject to shrinkage and may differ in size in different batches.
Methods of laying tiles on the floor - technology and features
Laying floor tiles is one of the most popular and rational decisions when carrying out repairs. Thanks to the variety of types, sizes, patterns, you can update the floors in any room, on the veranda, in the garage. The material can be laid in different ways. But it is worth considering that working with each type of product has its own nuances. Difficulties may arise in adjusting the elements, their pattern, preparing the base, and the adhesive composition. It is better for novice craftsmen to do the styling according to a simple, standard pattern.
Traditional way
The most common type of laying products on the floor involves their parallel arrangement relative to the base. The elements are tightly packed in even rows. You can create a perfectly even pattern from square or rectangular tiles.
To give the masonry an original look, use tiles different colors. When carrying out work, it is necessary to lay out long or short parts as evenly as possible, since even the slightest defects will be evident. Traditional way suitable for seamless ceramics, it is used when laying out coatings in the bathroom, toilet, and kitchen.
With an offset or in a running start
The installation method looks like brickwork. It is often used when decorating indoor floors. Plain rectangular elements laid out with a slight offset will look especially good. This is a great way to disguise floor defects and avoid overall monotony.
Interspersed tile laying will create a historical atmosphere in the house. By experimenting when preparing a diagram with dimensions, you can achieve a special pattern that suits a specific room design. Floor tiles are laid only in horizontal rows. Each middle of the elements from the next strip should lie on the junction of the square from the previous row.
To achieve real aesthetic pleasure from the result, offset laying must be done with strict adherence to the thickness of the seams. In the corridor or on the terrace, diagonal masonry will look original. In this case, the tiles are distributed on the surface at an angle of 45 degrees relative to the wall.
Before you start laying tiles, you must determine the floor level. To do this, lay lighthouse slabs in the corners and make a screed. If necessary, level the tiles using a rubber hammer.
Herringbone laying
Rectangular elements of various lengths are suitable for work. The method is quite complicated to implement, but the end result will surprise you with its originality. Herringbone tiles can be laid in two ways. The first will outwardly resemble parquet; for the second, mosaic inserts or cut pieces of elements of a different color will be additionally used.
The herringbone laying technique involves joining the narrow side of the material to the wide side of another tile to form 90 degree angles. By choosing the right pattern, you can make a durable tiled floor that imitates the pattern of laminate or parquet. This method is used to decorate irregularly shaped rooms, since the pattern creates an optical illusion and smoothes out the difference in the size of the room.
The laying pattern can be single - each new tile touches the adjacent one, double - two rectangular tiles in a row, triple - reminiscent of weaving, each row consists of 3 fragments. Arranging the parts diagonally on the floor not only creates a stunning pattern, but also minimizes waste during work.
Modular installation
The simple way is the best option for training in working with floor tiles. A design made from several modules of different sizes looks interesting and original. It will look great in small rooms.
First of all, the installation scheme, module size and pattern are selected. When creating a drawing, it is important to take into account the thickness of the seams, otherwise the entire work will be ruined. To simplify the task, you can immediately purchase a set of tiles with ready-made card to a certain square.
The basic principle of the modular laying method is a repeatedly repeating heterogeneous pattern. The elements must belong to the same series, but be of different sizes. More often, products are chosen with the same texture, but it is possible to use tiles of different colors. Products marked “modulare” are suitable for modular display.
The "labyrinth" method
The laying method is an artistic one, creating a complex pattern on a ceramic floor. The intricate weave formed gives the appearance of a square center being enveloped by several oblong bricks. To enhance the effect, the tiles in the middle should be different in color. Provided that the shades are correctly selected to match the color scheme of the interior, the surface design will look more than good.
To correctly determine the material, it is necessary to lay out one tile pattern in point of sale, and calculate on the spot required amount elements. To choose a combination of flooring shades, you need to take into account certain rules when choosing a material. In darkened rooms without windows, a dark center and a light edge will look better. A pattern formed in this way in the hallway will visually highlight areas of the floor.
Masonry "deck"
For installation, elongated rectangular tiles with a pattern imitating the texture of deck boards are used. Thanks to the variety of ceramic products that closely resemble wood materials, any parquet layout can be used. This particular method involves straight laying with a slight offset.
When installing tiles, the shear length along the entire plane must be maintained the same. Such tiles will look as natural as possible. Layout technology differs from the offset method in the distance of the offset itself. The element from the next row goes to the side not half the previous one, but only a few centimeters, leaving most module.
To make the floor visually look like wood, you need to choose rectangular tiles with a structured pattern of natural material. The absence of a glazed surface will make the resemblance as accurate as possible.
Laying using the "carpet" method
A patterned tile carpet is enough the hard way layouts, despite the existence of simple patterns and ornaments. To ensure that the result of the work does not disappoint, it is necessary to carefully select all the elements, their color, size, and quantity. Laying using the “carpet” technique involves a large number of pruning.
To create a tile pattern, use at least three colors. First a sketch is created. If all dimensions coincide in area with the room, transfer it to transparent pattern paper and mark the prepared surface. Then the tiled cladding is assembled directly on the floor from many simple and shaped parts.
It is better to implement such projects in large areas. Any room will be suitable. But a tiled carpet will look better if it is not cluttered with furniture, rugs, flowers, or various floor decor.
Laying method "kaleidoscope"
A great way to create a medieval atmosphere or hide an unsightly slope in a room. The “kaleidoscope” pattern involves elements of the same size, but different in color. If the plane is large, it is better to choose shades from one spectrum; at most you can grab the neighboring ones. The main thing is that the contrast is soft. It is necessary that the proportional quantitative ratio of all tiles be the same. To do this, the total number of participating modules is divided by the number of colors.
For small and medium-sized tiles, another layout option using the kaleidoscope technique is used. You will need to purchase a ready-made tile panel and lay it on the floor. Then the elements from the outermost 3 rows on all sides are swapped and rotated 180 degrees. The blurring effect will be more noticeable in a small room.
Features of laying tiles on different surfaces
Before you start tiling the floor, you need to study the basic rules and possible combinations of tiles with different surfaces. To lay out ceramics even using the simplest technique, you must have necessary tool, considerable theoretical knowledge, skill in working with adhesive mixtures. It is also necessary to provide for all possible negative reactions of the tile and surface upon contact, and options for eliminating errors.
Laying rules and preparation on a concrete base
A concrete surface is an excellent base for tiles. It has a durable, rough structure with high adhesion. But concrete floors can be different, so before starting work you should determine their type. The quality of installation will depend on this. Foam concrete, expanded clay concrete, and polystyrene concrete are taken as the concrete base. Each type of material has its own properties and characteristics. IN to a greater extent the final result is influenced by the strength of the base.
Floor tiles should only be laid on a clean and level concrete base. If the subfloor has bulges and depressions, laying a cement-sand screed will be required. Working with a defective surface will significantly increase glue consumption. To improve the adhesion of materials, the finished base must be treated with primer. Also, using special solutions, you can protect concrete from mold damage.
Before laying tiles on a concrete base, it is necessary to apply waterproofing, especially if the room will be exposed to moisture. It can be a roll of self-adhesive film or bitumen mastic. The process of laying tiles takes place using special plastic crosses for the seams. The finished adhesive is applied to the concrete and to the lining itself with a notched trowel, the materials are joined and lightly pressed down.
Rules for laying and preparing a wooden base
The only explanation for laying tiles on natural wood is ease of maintenance. Due to the significant difference in the service life of the connecting materials, such a floor can crack within 5 years. If the installation option is unavoidable, you must carefully select the facing material. These should be elements with a minimum amount of chemical additives.
Preparing the base of the boards involves leveling it. Leaky wooden elements needs to be replaced. It is very important to treat the surface so that the subfloor is not mobile and susceptible to temperature changes. A special flooring must be installed over the moving wooden base using the dry leveling method. Installation of waterproofing and reinforcement is also required.
Tiles can only be laid on a flat and solid base. If the back of the tile has grooves or other grooved patterns, such as boar tiles, the adhesive strips from the notched trowel should be perpendicular. You can start grouting the joints 3 days after installation.
Selection of adhesive mixture
Compositions for gluing floor tiles can be purchased dry or already finished form. Bulk mixtures require subsequent dilution with water right before laying the material. They are sold in bags and packages. You need to prepare glue at home according to the instructions, strictly observing the proportions. The advantage of using dry mass is the ability to dilute only the required amount of substance for installation, and an affordable price.
Ready-made mixtures are produced in plastic buckets or canisters. They are ready for application and begin to harden upon contact with air. Due to their high cost, they are purchased only if the area needs to be tiled. small area, for repair work of already finished coating. With certain skills, any adhesive mixture can be replaced with cement-sand mortar.
How to calculate the required quantity
Any construction or renovation work begin with the choice of design, selection of material and calculation of its quantity. A large assortment of tiles, their colors, and textures makes it difficult to solve such a problem, especially if the floor has non-standard geometry. When making calculations, it is important to know the future size and design of the elements.
You can determine the required number of tiles for one room in the following ways:
- By room area. Suitable for single-color, one-dimensional elements. First, determine the area of the room and add 10% to the resulting value to create a supply of material. The final figure is divided by the area of one tile. This method of online calculation is available on many websites of ceramic manufacturers and in special programs.
- When laying diagonally. This installation technique increases the consumption of tiles, so 15% is added to the area of the room.
- By the number of rows. Determine the width, length of the room and the parameters of one tiled part. Then the length of the room is divided by the length of the tile, and the width is dealt with accordingly. The resulting figure is rounded to big side, add stock.
- Piece counting method. They are used when laying floors with expensive coatings and elements of complex panels, since the method gives a minimal error in calculations. Determine the parameters of the room, one tile instance. Then the number of rows and tiles in each is calculated.
How to cut tiles correctly
When laying tiles on the floor, it is often necessary to trim them. To get the elements non-standard shape, make curly cuts, reduce the material, resort to dividing it into parts in various ways. When working with electrical appliances, you must wear a protective apron and gloves. At home, you can cut floor tiles with the following tools:
- Manual tile cutter. Makes straight cuts;
- Electric. Creates holes with straight lines quickly and accurately;
- Jigsaw. Cuts dense tiles into complex trajectories;
- Bulgarian. Creates straight cuts and rectangular holes;
- Manual glass cutter. Copes with thin, porous elements;
- Drill. Special drills and attachments simplify the work of even cutting and making shaped products.
Selecting a mixture for grouting
The cladding will acquire a finished aesthetic appearance if its seams are properly sealed. The final stage of finishing the floor will help hide the resulting defects and protect the cracks from the penetration of dust and moisture. When carrying out grouting work, it is necessary to strictly follow the technology. The choice of material will depend on the size of the gaps.
If the seams between the elements are wide, more than 5 mm, it is better to choose a resin-based mastic for grouting. Small space at the joints it is necessary to seal with moisture-resistant compounds on cement based. Places in contact with the wall must be treated with silicone sealant.
Grouting joints performs not only practical, but also decorative functions. The material of the desired shade can be purchased ready-made or made with your own hands. Pure white grout is used if it is necessary to hide unevenness during installation and other defects. With ideal installation, the design of the seams in contrasting colors will look beautiful.
Technology and stages of laying tiles on the floor yourself
The work of laying tiles on the floor takes a long time; the process is divided into several stages. In order to achieve best result, you must act carefully, strictly following the rules and technologies. Installation of tile materials can be carried out indoors only with permissible temperature. The optimal mark is + 20 degrees.
Required materials and tools
Installing tiles will not be difficult even for a beginner if you work with high-quality materials. First of all, they calculate the number of elements and buy the cladding. For the kitchen or living rooms you can take tiles with minimal moisture resistance for the bathroom, swimming pool, open terrace an option with improved characteristics is needed. You will also need the following tools for installation:
- Level;
- Notched trowel, trowel;
- Wire cutters;
- Suitable tile cutter;
- Special crosses for tiles;
- Rule;
- Bulgarian;
- Rubber spatula;
- Tile hammer;
- Roulette;
- Nylon sponge.
Base preparation and marking
Laying of floor tiles is carried out on an exceptionally level base. First, the old floor is removed and construction garbage and dust. Then they check the serviceability of communications. If there are old concrete baseboards, you should get rid of them.
Before starting work, you must make sure that the surface meets all the specified requirements. If unevenness is found, they can be leveled with a screed. On next stage treat with a primer. You can choose any penetrating composition suitable for the type of base.
Experts recommend starting laying tiles from the center, and not from the walls, as this can minimize the likelihood of errors. To mark the floor, it is better to use a laser level. With its help, you can draw fairly accurate lines without moving the device.
The axis line is drawn first, then the central points of the two walls are determined - from front door and the opposite. Connect them with a straight line. Then a perpendicular line is drawn through the center. Now you can make support transfers to the remaining sectors of the floor. Before installing the elements with glue, a test laying is done.
Preparation of the adhesive composition
Correctly selected and diluted composition is a guarantee of high-quality installation, eliminating displacement. First of all, good adhesion depends on proper kneading. An insufficiently mixed, thick mixture is difficult to distribute over the surface, it will take more time to finish, and the glue will dry unevenly.
To mix dry mixture at home, you will need two buckets - one empty, the other with water, dry tile adhesive, and a construction mixer. Pour 2 liters of water into an empty container, add the amount of dry glue corresponding to the instructions, lower the mixer into the mixture and mix at the lowest speed. You can achieve the required consistency by adding liquid or powder mixture. For the solution to become homogeneous and plastic, it needs to stand for 10-15 minutes.
Laying process and working with crosses
When the surface is prepared and the adhesive solution has settled, you can begin laying the tiles on the floor. The glue is applied to the base and smoothed well with a notched trowel. The size of the grater for making grooves is selected in accordance with the parameters of the tile. If installation is carried out according to markings, it is better to apply a lot of glue at once so as not to cover the drawn lines. In the same way, a paste-like composition is applied to the tile elements. But straightening with a notched trowel should be perpendicular to the pattern on the base. This will allow no air voids to be left during docking.
In order for the tile to hold better when applied to the base, it is pressed and simultaneously moved in different directions. If necessary, ceramic parts can be tapped with a rubber hammer. It is necessary to continuously monitor the level of coverage, especially when adding new elements.
During tiling work, plastic crosses are placed in each tile floor. They are clamped between the dies to maintain an identical distance between them. They will remain there until the glue dries completely.
Grouting joints - technique for applying the mixture
To give the new tiled surface a finished appearance and protect the concrete base from the influence of external factors, the joints are grouted. To do this, use special mixtures intended for finishing tiled surfaces.
The voids between the elements can be filled with white, gray or multi-colored material. Powdered mixtures are diluted with water, and a bright pigment is added if necessary. Then the mixture is well kneaded and applied with a small rubber spatula, trying to completely fill the entire gap. The excess mass must be removed immediately before it dries out. If grouting is carried out over a large area, it is better to use a special trowel to distribute the thick mass.
Final cleaning of tiles before use
After all installation and grouting work, the floor tiles can be prepared for use. The mixture for finishing joints must be removed no later than 30 minutes after its application, otherwise it will harden and you will have to use a spatula or aggressive chemicals to remove it.
After the grout has hardened, a final wash can be applied. If the mixture was liquid, you need to wait for it to dry completely. You can remove dust and small splashes of the solution with a damp sponge or a simple dry cloth. Thoroughly mopping a newly laid floor is not recommended. You can move the elements and increase the drying time of the glue.
When choosing a material, you must carefully study the characteristics of each type of tile. They must meet the needs of the owners. It is necessary to take into account the degree of strength, thickness, and the need for a glazed coating.
The texture of floor tiles should be moderate. Slight ribbing will prevent slipping. If the patterns and grooves protrude too much, this may make cleaning difficult. The gloss will highlight even the slightest dirt.
It is better to dilute the adhesive composition for installing tiles in small portions. If unforeseen circumstances arise and the installation process slows down, it will not be able to dry. Only cold water is used for mixing. Hot liquid will deteriorate the quality of the adhesive solution.
The material can only be laid on a flat, clean floor, door frames and the baseboard needs to be removed. It's easier to work along guide lines. The resulting gap between the outer row of tiles and the wall can be hidden with a plinth or you will have to glue a ceramic strip.
Conclusion
Manufacturers of ceramic tiles recommend starting installation work with development detailed plan. First of all, you need to choose a design and a suitable caliber of products. It is necessary to take into account the geometric features of the room, the level of lighting, and the degree of mechanical load. Thanks to the huge assortment, variety of types, formats, installation can be carried out using any scheme you like.