The roof of the garage is single-pitched, self-assembled - a great option for private construction. It is cheaper to manufacture than a gable or flat. The design can be assembled together, without experience and skills, in just two days. Maintenance of such a frame is much easier and it is designed for longer term services. Let's look at some of the design nuances and a step-by-step description of how to build a shed roof for a garage.
Despite the outward simplicity of a shed roof for a garage, there are several types of construction. In some cases, such a roof goes as a continuation from a residential building. But most often the garage is a separate building.
Sometimes they make a single roof for several objects at once: a bathhouse, a garage, summer kitchen. The basis for the installation of truss beams can be walls of different heights or a special box installed on a plane of the same level.
The main feature that distinguishes a shed from others is that the rafters have supports on both sides. The load-bearing elements are laid on the Mauerlat or frame, they are simply layered. Therefore, in the technical literature they are called "layered".
Determining the slope angle
When designing a shed garage roof, it is important to observe the slope of the slope so that rainwater could flow freely to the ground. Therefore, they make supporting walls at different levels. How steep the slope will be is influenced by several factors:
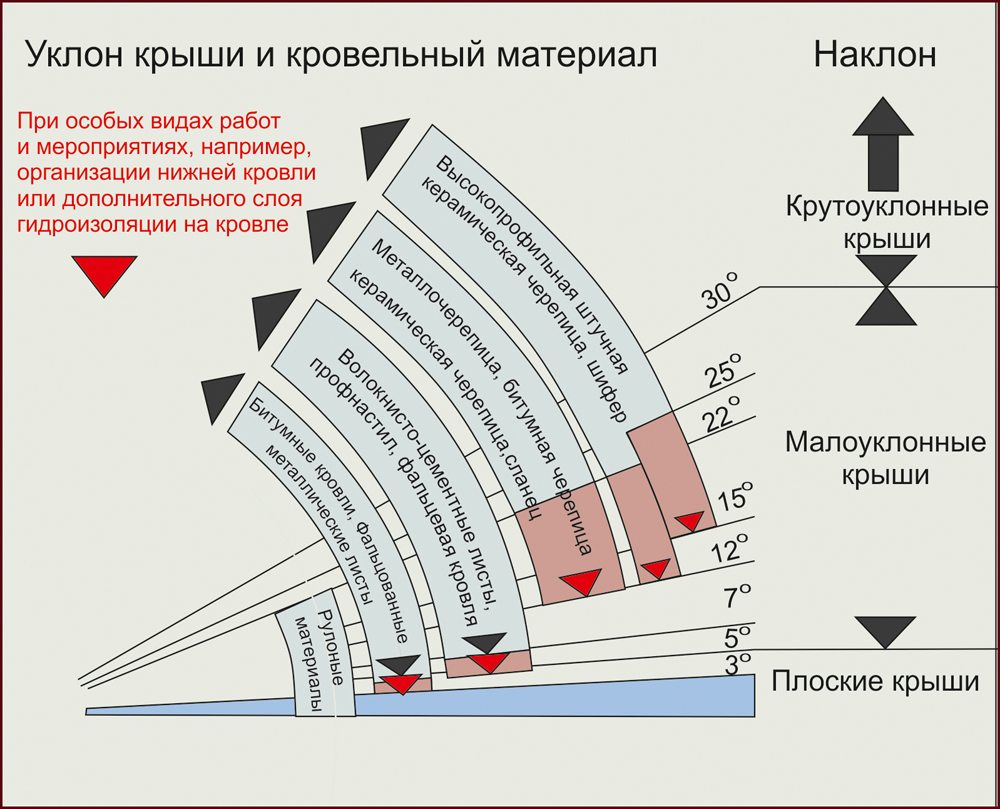
- climate zone. In areas with little rainfall and strong winds, it is enough to make a slope of 5-7 °. And where, on the contrary, weak winds and a lot of snow fall, they make a slope of 20-25 °. Moreover, if you confuse the slopes, then in the first case the roof can be demolished, in the second - there will be an overrun of resources.
- Type of roofing. Using rolled roofing materials, for example, 3-layer bitumen-polymer rolls, the slope of the slope is up to 8 °. By increasing the slope to 10°, the number of layers can be reduced to two. Using wave slate or sheet steel, the angle is made in the region of 15-20 °. More modern materials, such as corrugated board and metal tiles, are laid on a roof inclined by 25 °.
- Architectural design of the site. To maintain a uniform look for all buildings, it is recommended to keep the roof angle approximately the same.
The photo below shows well that the slope of the roof can be made on the walls of the same level. To do this, complete the construction of a special supporting frame.
Rafter length

The dimensions of the rafter leg are not limited by the distance between the supporting walls. For those building a garage, it is important to know the following requirements:
- On a metal frame garage, the overhang should be 100-200 mm.
- If this is a log house, then - 500-600 mm.
- But for the classic brick structures the beam should protrude by 300-400 mm.
At times, the architectural plan may call for an increased overhang. Usually it is done to protect the path or entrance from rain. In this case, additional supports with a foundation will be needed.
Calculation of the truss frame

For beginners in design, it is easiest to use construction calculators and special programs on the Internet. It is enough to enter the basic data of a garage with a shed roof and the drawing will be ready automatically. True, for this you still need to calculate some indicators:
- what is the expected weight of a roofing cake on an area of 1 m²;
- if the slope of the ramp is less than 25 °, they arrange a continuous crate, you need to calculate its weight;
- for a heated garage, the weight of the insulation is important;
- reference data on the mass of snow cover.
You can find information about the thickness and mass of snow cover in winter in a library or on the Internet. Another option is to contact the weather service in your area.
The level of complexity of the truss system

Building a roof on a garage with your own hands, strength lean-to structure should be sufficient. The following factors influence the need to use additional reinforcing nodes:
- The simplest frame for garages with a span of up to 4.5 meters. All that is required is to lay the beams parallel to the walls with the Mauerlat.
- For wider buildings, with a distance between the supporting walls of up to 6 meters, the rafters can sag. Struts help to strengthen the system, usually on one side they are attached to the high part of the wall, and on the other to the rafters.
- If the garage for several cars and the span reaches 6-14 meters, then intermediate supports will be required. At some distance from each other, several runs are laid. They can be supported on load-bearing partitions inside the garage or on columns.
The classic version of the shed roof garage for one passenger car implies dimensions of 3.5x5.2 meters. Such a project implies the first or second level of complexity of the shed roof frame, depending on the direction of the slope.
Assembling a shed roof for a garage

After all the calculations have been made and the material has been purchased, construction can begin. It is not difficult to make a roof on a garage with your own hands, especially a lean-to, for this, follow seven steps:
- Lay a layer of roofing material on the supporting walls, it acts as a waterproofing. A Mauerlat beam is laid on top of it, the minimum section of which is 100x100 mm. The greater the slope, the greater the cross section required for the timber. For fastening, use anchor bolts in increments of 1-1.5 meters. When installing, make sure that the laid element is horizontal.
- Now you need to make grooves in the Mauerlat for installing rafters. To do this, mark the attachment points with a pencil and make cuts. Watch the angle of the cut, it must correspond to the slope of the ramp. Make the groove a little wider than the thickness of the beam, then the installation will go easier. Choose the distance between the rafters in accordance with the roofing material. 1500 mm is enough for metal tiles and corrugated board, and 1000-1200 mm for ceramic tiles or slate.
- Next, install the extreme rafters so that their slope matches the design. Stretch the twine along the bottom and top edges, it will be a guide. Mount subsequent beams so that they exactly fit the design corner. For fastening to the Mauerlat, large nails are used, from 12 cm long.
- In the event that the span is too large, make struts. They will strengthen the structure and prevent the rafters from bending under snow load.
- This and the next paragraph apply to heated garages. Attach the vapor barrier film to the bottom of the rafters so that it sags a little. This will protect the material from damage if the rafters move apart under load. Next, nail the laying slats thermal insulation material. When laying the insulation, make sure that the distance between the beams and the mat is no more than 5 mm. The thickness of the insulating layer is 20 cm.
- Attach the waterproofing film to the rafters from above, using a stapler. Spread it across the direction of the slope, make an overlap between the rolls of 10-15 cm. For reliability, connect each joint with construction tape. Then, on each rafter leg, nail a counter-lattice with your own hands. She will provide good ventilation, which will save the frame from destruction.
- Now it remains to fill the crate, solid or discharged, depending on the chosen roofing material. It is enough to use bars with a section of 50x50 mm. Top mount top coat and the shed roof will be ready.
A conventional shed roof can easily withstand a load of up to 100 kg / m². If you notice that the structure has begun to sag, then you need to make additional reinforcement.
It is possible to fasten vapor and waterproofing layers not only with a construction stapler. It is allowed to use special nails with a wide hat. Keep the gap between the attachment points in the region of 15-20 cm. The bottom row of waterproofing should hang from the edge of the slope by 20 cm. It is bent under the overhang and nailed or stapled.
The people often use the edge of the waterproofing nailed with a rail. This ensures that the wind will not blow under the film.
By completing these simple steps, you will build a shed roof of the garage with your own hands. The main thing is not to deviate from the advice, otherwise, the structure may collapse on the car. If in doubt about own forces then contact the professionals.
Roofs with one slope - an option ideal for arranging garages. Sloping planes, widespread in the expanses of the fatherland, authoritatively complete solid brick buildings and small frame boxes.
The principle of construction is much simpler than the construction of a gable rival. The work is carried out much faster, and the result lasts longer, which has a very convincing effect on independent craftsmen. However, for the successful completion of the case, you should firmly know how a shed roof for a garage is built, in what way it is more reasonable to arrange it.
Shed constructions do not strike the imagination of aesthetes, but they appeal to the mind of practitioners extremely persistently. Therefore, not too beautiful, but simple and reliable roofs with a single slope are built mainly over outbuildings.
The leadership of shed roofs in the field of arranging garages is justified by an impressive list of advantages, including:
- economy. The minimum amount of materials is spent on the construction and arrangement.
- Design simplicity. shed roof formed by separately installed rafters, the edges of which rest on walls of different heights. The function of walls can be performed by pillars, columns or racks of a frame structure.
- Long-term flawless service. Elements of a well-built shed roof are freely washed by air currents. Excellent ventilation eliminates the formation of destructive condensate, prevents moisture wooden parts and its inevitable outcome is decay.
The construction of shed roofs over garage boxes in most cases is not accompanied by an attic. The configuration itself is not very convenient for organizing in attic places to store, for example, winter tires.
An exception may be the desire of the owner to make a workshop above the main room. True, in such situations it is more expedient that broken technology be used in construction or, which makes it possible to acquire an almost two-story garage at a relatively low cost.
The subtleties of designing a garage roof
There are significantly more options for the construction of shed roofs over garages than the constructive simplicity suggests. They are erected over free-standing objects and over extensions.
One slope can block not only the garage, but at the same time a bathhouse or a summer house with an adjacent wall. The basis of construction can be not only a foot with walls of different heights, but also a box, the walls of which are brought to a single level.

The main sign of a shed roof is the presence of a support under both edges of the rafter leg. The elements of the truss system are simply laid down, i.e. as if leaning on supports, in connection with this they are technically called "layered".
In fact, the rafters of a shed roof are ordinary beams laid at a slight angle to the horizon. Therefore, the steepness of the structure is not taken into account in the design and calculations.

Principles for determining the angle of inclination
Competent construction of a shed roof must comply with the slope necessary for the free flow of rainwater and the removal of precipitation during the snowmelt period. That is why the height supporting structures should differ.
Three factors influence the choice of slope angle:
- Climatic specificity of a particular region. It is irrational to erect flat shed structures with a steepness of up to 5-7º in areas with heavy winter precipitation. But they work great in areas with high wind activity and with a small amount of snow. Shed roofs with an angle of inclination of 20-25º should not be built in areas with frequent strong winds over detached garages. It is possible to build over an extension.
- Type of roofing. In the arrangement of flat roofs up to 8º, rolled roofs are used: polymer, 3- and 4-layer bitumen or bitumen-polymer materials. If the slope of the roof is 8-10º, the roof is laid in two layers. If the angle of inclination is 15-20º, use metal sheets, connected by a seam, flat and wavy slate. For roofs with a steepness of 25º, one of its variations, a metal tile, is suitable.
- Landscaping of the estate. Architectural canons command the use of roofs of the same color and type within the same territorial unit. At least for own site if it doesn't put too much pressure on the budget.
It does not matter whether the angle of inclination is chosen with reference to the specified circumstances, or vice versa. It is important that the result is a consensus that satisfies the entire spectrum of the listed conditions.
The steepness of a shed roof is an extremely important parameter for a garage, which must be determined at the design stage of the garage. It will make it clear whether it will be necessary to build the walls of the box of different heights, or whether it is possible to provide a slope by installing a cantilever-running frame on one side.

Rafter leg length
The slope area should take into account the formation of overhangs that protect building structures from direct and oblique rains. Masters who want to know how to competently make a shed roof project for a garage need to consider the type of material from which the walls are made, because:
- Overhangs over metal sheathed frame structures should be at least 10-20 cm.
- Overhangs over log cabins should be 50-60cm.
- Overhangs over brick and concrete garage boxes 30-40 cm.
Sometimes overhangs are increased in order to form a canopy from the side of the entrance or along a long wall. The canopy increased in area must be supported on pillars built on a common foundation with a garage or a separate foundation.

Upon completion of the analysis of geometric indicators, you can safely proceed to calculating the dimensions of the rafters.
Rules for calculating the truss system
To calculate the elements of the truss frame, it is easier to use one of the programs offered by the Internet. There are no fundamental differences in their calculations.
Data is tritely entered into specific tables, after which the result appears almost instantly. Because intensive pedestrian movement on the surface of a shed roof is usually not expected, then for calculations you will only need to know:
- The weight of the roof covering, distributed over 1m² of area, excluding the angle of inclination.
- The weight of a continuous crate used for arranging slopes up to 25º. The weight of the board per 1 m², plywood or OSB is taken.
- Insulation weight, if it is planned to be installed.
- The mass of snow cover, established by long-term observations in a particular area.
The weight of precipitation in the construction area can be determined from the map that we cited, or found in the collection of standards for building climatology.
The degree of complexity of the truss frame
The structural complexity of the shed roof truss system directly depends on the size of the span it covers:
- If the span does not exceed 4.5 m, the truss frame is extremely simple. In its composition there are only parallel-laid rafter legs connected to the Mauerlat bars or equivalent elements.
- If the span is more than 4.6m, but less than 6m, then the system becomes more complicated. Due to the impressive length of the rafter, there is a possibility of its sagging and torsion. To avoid deformation and increase the rigidity of the structure, the rafter legs are supported by struts.
- If the span is more than 6 m, it is divided into conditional segments, between which a purlin with vertical supports is installed. Naturally, to install a running frame, you need your own support in the form inner wall. You can lean on a concrete floor, for the installation of a roof over which calculations are almost not required.
Optimal sizes inner space a garage for one car is considered 3.5 × 5.2 m. Even if you do not take into account the thickness of the walls, it is clear that to build a roof over the box with the indicated dimensions according to the diagrams from the first or second paragraph. When the slope slopes across the long walls of the building, the rafters are laid without additional elements.
If the slope is directed along long walls, the rafters will need to be supported with struts. In any case, both options should be considered and calculated. It is advisable to draw up two drawings of a garage with a shed roof in order to choose the most suitable type on technological and economic aspects.

Construction process instructions
The best method of studying construction technologies than the analysis of real developments and examples has not yet been invented. They are also useful for those who, with their own hands, decided to make a shed roof over a garage planned for construction, and for those who need to control the construction of an object on a personal plot.

Close attention should be paid to the construction of the foundation for the garage. The foundation of the building must be impeccable and really solid. If the soils under the mass of the “iron horse” sag unevenly, the foundation will definitely crack. Barely noticeable at the initial stage, damage in a year will turn into a large gap with complete list resulting consequences: with a violation of thermal insulation, a displacement of part of the wall and a skewed roof as a result.
The uneven subsidence is especially dangerous for prefabricated and columnar foundations. A grillage arranged on top of them will not save brick and concrete walls due to low self-power. Therefore, it is quite reasonably customary to pour under capital structures monolithic slab or tape. It is required to deepen monolithic foundations below the horizon of seasonal soil freezing by at least 30 cm, to be sure of reliability by 50 cm.
In the northern regions, such a seriously buried slab will be too expensive. They prefer tapes with overlappings of concrete slabs, if a device is supposed viewing hole, or with a concrete floor on a rammed base, if the organization of the pit is not to be.

Frame garages are not too demanding on foundations. Due to the uneven subsidence of the underlying soils, they can be somewhat skewed. However, the frames of the upper and lower trim, rigidly coupled to the wall studs, will not allow the building to collapse. Moreover, it will not be difficult to correct the skew: it is enough to raise the sagging part of the structure with a jack and level the foundation by lining bricks, foam blocks, scraps of timber, etc.
The possibility of free elimination of shortcomings is the reason for the use of columnar types of foundation for frame garages, with the construction of one of which we will deal.
Construction of a detached garage with a "one-slope"
Undeniable advantages frame technology perfectly displays a sweet couple of definitions of "cheap and fast." Let us add to them the possibility of building with our own hands and laconicly send the slightest doubt into the distance. Let's get started.

Construction process frame garage step by step:
- Arrange according to column foundation the bottom trim of the frame. First of all, we create a frame from a 150 × 200 timber according to the dimensions of the garage. We lay the elements flat with the wide side, connect them in the corners with an oblique cut. We strengthen the joints with nails, bolts, metal plates. The space between the ribs of the frame is filled with a beam 150 × 150, laid on ordinary pillars of the foundation. We additionally strengthen the corners with brackets;
- We build the front wall of the garage. We install bars 150 × 150 3 m long at the corners of the strapping. We fasten them with reinforced galvanized corners and fix them with temporary braces to adjacent strapping ribs. We install bars of equivalent section and length according to the width of the opening under Garage Doors, fasten the corners. We connect the obtained racks by laying a 100 × 150 beam on top with a similar fastening - we get the front part of the upper trim.
- We collect the back wall. We install four pieces of timber 150 × 150 with a length of 2.5 - 2.7 m at equal distances. The height of the rear wall pillars is calculated during the design process and depends on the length of the garage. Corner posts are additionally fixed with temporary braces. We bind all four elements from above with a 100 × 150 bar. This is the back of the top harness.
- We lay the rafters with an edge on the strapping bars. For cutting the rafter legs, we use a board 25 × 150. We fasten them with corners or sliding supports to the strapping bars.
- Building the side walls. We apply an inch to the middle of the side wall, on which we mark the lines washed down in fact. According to the template made from an inch, we make side wall racks from a 150 × 150 bar. We install them and connect them at the top with a 100 × 150 beam attached to the side faces of the racks.
- We tie the entire frame in the middle with a board 50 × 150. For the reference point of the middle strapping, we take half the length of the column of the rear wall.
- We install permanent braces. We dismantle all previously installed auxiliary elements. We supply each segment of the frame obtained as a result of installing the middle strapping with a jib from a 25 × 150 board.
- We decorate the roof. We arrange a continuous crate by laying a 25 × 150 board on the rafters with gaps of 2-3 mm. Instead of a board, you can use plywood or OSB-3 panels. We sheathe the perimeter with a wind board, spread the waterproofing, mount the coating.
It remains to sheathe the frame of the garage with a board, wall decking or moisture-resistant plywood, used as a basis for subsequent finishing.


If you want to insulate the garage before sheathing, thermal insulation is laid between the frame elements. There is no need at all for wall and ceiling cladding from the inside of an uninsulated building. Wooden components open to free access to air dry well, thanks to which they serve for a long time.
Construction of an extension with a pitched roof
By economic indicators an extension garage is significantly ahead of a detached object. It is not only a matter of a significant reduction in building materials due to common wall with the main building. If necessary, it is more profitable and easier to bring communications to the extension.
Under the frame extension described in the example, a strip foundation was made. To fill it, they dug not a foundation pit, but a trench into which the formwork was installed. The height of the formwork was calculated so that, as a result, a small plinth of 15–20 cm rose above the ground. During the pouring period, we install embedded parts for attaching the frame to the foundation.
After demoulding inside the contour, we select the soil 30 cm below the ground surface. We ram the bottom and first we fill in 10 cm of a mixture of crushed stone with sand, then 10 cm of sand, then we ram again. We lay oiled paper or roofing material on the compacted sand, and pour 10 cm of concrete on top of this layer. We got the most suitable concrete floor for the garage.
If there is a desire to make a certain slope of about 1% towards the gate, before pouring it is necessary to install wooden planks in the longitudinal direction at the required angle. Planks are installed on the edge 60 cm from the walls. The concrete mixture is poured into the space between them and distributed by rubbing with the required slope. After removing the planks, the grooves formed by them are filled with mortar.

The sequence of work on the device garage-extension:
- Bottom strapping device. On the base we lay a strip of roofing material, roofing felt or similar waterproofing material. We lay on top of the waterproofing the details of the lower trim, pre-cut from a bar 150 × 150. We check the horizontal level, if necessary, level the position by lining the wood chips. We connect the strapping details with a cut, we supplement the joints with bolts, we reinforce the corners with brackets.
- Installation of entry posts. Before installing the strapping in the beam, we make a cut along the edge of the beam with a depth of about 7 cm. We install racks made of timber 150 × 150, their height should correspond to the project.
- The construction of the extension walls. First, we form corner supports from a 50 × 150 board. Two boards are set at an angle to each other so that the adjacent board forms the edge of the adjacent wall. We fill the space between the corner supports with ordinary racks. We install them in increments of about 60cm.
- Upper strapping device. We lay flat board 50 × 150 in two rows with dressing of joints.
- Laying ceiling beams. We install a board 50 × 150 with an edge in increments of about 60 cm on top harness. Between the beams we place trimming boards 50 × 50 to fix their position.
- Installation of rafters. We install the rafter legs next to the beams at an angle. To form the corner, we use either wall brackets pre-screwed to the supporting structure of the main building, or short support drains installed on the strapping.
- We arrange a continuous crate along the rafters, cover it with waterproofing, lay the coating.
The final stages are carried out in the traditional sequence. We sheathe the garage, arrange a jamb for the gate and hang the gate.

An overview of the options for building a shed roof with a detailed study of construction technology will help you build a reliable structure with your own hands or guarantee proper control of the work of hired builders.
Experienced car enthusiasts are well aware that a perfectly made roof for a garage is very important, since it is not only the final stage of the entire construction, but also serves as protection from various atmospheric precipitation. Roofing is a complex process, so you need to initially familiarize yourself with what kind of roofs are made on garages and choose the right roofing.
What are garage roofs?
Roofing for a garage can be varied, so you need to initially decide on its design. In many cases, it is possible to replace one type of roof with another, but this involves additional expense and worry. That is why it is better to make the right choice at the initial stage of roof construction.
Before choosing one of the types of roof frame, it is worth deciding on its load-bearing characteristics, the size and shape of the box, and then considering one of the presented roof design options.
Features of the shed roof device
Shed roofing is the simplest type of construction, which is in great demand today, since it has no analogues of a similar cost. To equip such a roof, you do not need to use special building materials, special equipment or have deep knowledge in the field of design.
Shed roof is the simplest and cheapest design for covering the garageFeatures of the construction of a shed roof is as follows:

As rafter legs, two boards connected along the wide side are often used, however the best option- is to use beams made of metal or wood with a section of 50 * 150 mm.
Shed roof consists of the following parts:
- the basis of the roof is the truss system to which all other constituent elements are attached;
- lathing is a support for roofing;
- elements that reinforce the rafter system;
- insulating materials that protect the structure from water and keep heat inside the building;
- directly coating for the roof of the garage.
The upper ends of the shed roof garage should have a mauerlat or logs, which are the support for the rafters. They are attached to the walls with wire anchors. The anchors themselves can be walled up in masonry or hammered into the wall.
Similar design can be covered with any kind of roofing material: roofing felt, corrugated board, soft tiles, etc.
How is a gable roof
A gable roof is installed over the garage, if an attic is needed. The most common gable roof gable design is isosceles triangle.
The gable roof truss system can be made in the following versions:

It is very simple to install a gable roof, since its base consists of several rafters of identical sizes. The installation of the frame rafters is done sequentially, and then they are connected at the very top of the roof.
The roof support is the walls of the building. For the correct calculation of the size of the ridge, as well as the rafters, it is necessary to know not only the angle of inclination of the roof, but also the dimensions of the building. To accurately make a visor, you need to add about half a meter to the length of the rafters.
Installation of a gable roof begins with the arrangement roof trusses, which are assembled on the ground according to a pattern. The Mauerlat is installed around the perimeter of the building, and then it is attached to the wall with anchors. Between the Mauerlat and the wall, a layer of roofing material is made.
Characteristic features of a broken roof
A broken roof is a structure with numerous broken lines. In principle, this is a type of gable roof that allows you to create attic floor additional room.
There are such types of broken roofs:

The reliability of the structure and its comfort depend on the type of roof chosen. However, broken four-pitched roofs are gaining the greatest popularity today, since they ideally combine two features: effective use extra space and the low complexity of installing the rafter system. This approach involves obtaining full-fledged residential premises with a small financial investment.
 The device of a broken four-pitched roof of the garage allows you to create full-fledged living quarters on the second floor
 To build a sloping roof, it is necessary to make a rather dimensional structure of the truss system, however, during its construction, modular installation methods can be used, so it is not necessary to use different lifting equipment. The rafter system and racks are cut at the right angle in those places where there are slope fractures. To fix the knots, it is necessary to use "kerchiefs" made of plywood with a maximum thickness of 2 cm.
This design of a four-pitched roof is perfect for small garages, where it is not possible to design a sloping roof more than complex shape. For buildings with large areas, another rafter system is installed.
Operated garage roof
The operated roof is a flat-shaped structure that has a special coating. A similar structure can be built over the entire area of the building or over some part of it.
The operated roof is conditionally divided into the following types:

The device of such a roof must comply with the standards specified in the SNiP, since the operating time of the roof depends on the correctness of the selected materials, the calculations performed, and the consideration of loads.
Typically, the roof structure has a multilayer structure, and it is done in this way:
- hard base;
- obligatory layer of vapor barrier;
- insulation;
- coupler under right angle;
- waterproofing layer;
- protective separator;
- finish coating.
An operated roof can also be equipped with the use of granite gravel (fraction 25/32 mm), which is laid on geotextiles. In order for the roof to operate normally, gravel is laid at least 50 mm thick. Geotextiles in parallel with gravel will make the coating more stable.
The undeniable advantages of a sliding roof for a garage
Today, mobile sliding roofs are of great interest, which have many advantages over traditional roofs.
According to its design, a retractable roof can be of this type:

According to their functionality, sliding roofs are divided into:
- seasonal (the structure moves only during a certain period, usually in summer);
- permanent (used throughout the year);
- temporary (used for mobile light structures).
In addition, a retractable roof can be not only capital, when the entire building or a specific part of it is covered, but also attached to the main house over various buildings. Among other things, a retractable roof can also be constructed over other free-standing buildings, such as greenhouses, greenhouses or observatories.
The main elements of the sliding roof are load-bearing aluminum profiles, which are manufactured with a variety of protective coatings in the form of:
- anodizing;
- powder paint;
- various enamels.
To give the profiles rigidity, a steel pipe with a square section is installed inside them. However, the most durable are such forms of sliding roof frames as:
- domed;
- arched;
- single-pitched with an inclination angle of at least 45 o.
For other types of roofs that have a slope angle of up to 45 o, use only reinforced coatings as well as profiles.
The highest quality and effective options Sliding roofs are considered to be plexiglass, triplex or tempered glass coverings. This type of panels can withstand hail up to 14 mm.
What types of materials are used for the roof of the garage
The roof of the garage can be built from a variety of building materials, and their cost depends on the “thickness” of your wallet, and the laying methods depend on the time you have. Therefore, it is worth thinking thoroughly about the type of roofing material for the garage.
A fairly popular and well-known material among consumers, which is affordable and easy to use. One roll is enough to cover 10 m 2 of the roof and forget about it for 15 years. The main advantage of the roofing material is that this coating is inexpensive and durable, but for its use it is necessary to make a crate, as well as a rigid frame.
 Ruberoid is one of the most inexpensive and popular materials for garage roofing.
 Waterproofing is considered to be of high quality, provided that it is made of at least four different layers, using different types roofing material.

Decking
This is a modern material that replaces slate, since the service life of corrugated board exceeds half a century. When deciding how to cover the roof of the garage, think about purchasing load-bearing wall material of the HC brand. The wavy profile of the sheet is made using cold rolling. All types of corrugated board have an identical wavy trapezoidal shape, but the size and height of the material is different for all brands.
 Decking is one of the most popular garage roofing materials because it is lightweight and lasts at least 50 years.
 The professional flooring is the resistant, fire-resistant, and also water - and sound-proof roofing material meeting state standards. Its advantage lies in the possibility reuse.

Slate
Traditional slate is often used for garage roofing, as its service life is about 40 years at a moderate cost. The material is an asbestos-cement slab, which is quite simple to install - holes are drilled into which galvanized nails are driven in with an allowance of a couple of millimeters. Further, the installation of this material is carried out identically to the installation of a corrugated roof with the only difference being that the corners of the internal spans are sawn off.
 Slate on the roof of the garage is laid in the same way as corrugated board and fastened with special slate nails
 Roof tiles
The roof of the garage can also be made of cement-sand or ceramic tiles. These types of natural coating last approximately 100 years and are characterized by UV resistance, fire resistance and the ability to withstand a variety of temperature changes. In addition, shingles are excellent at absorbing noise, do not store static electricity and have low heat conductivity.
 For laying tiles gable roof special locks are used on each product
 If a roof with a slope of about 12 degrees is being built, then a metal tile is an ideal option. The flooring is made of 0.6 mm thick galvanized steel, which is coated with a polymer composition. To give the material a shape, it is stamped. The metal tile is realized in a various palette of flowers.
 The metal tile is laid in large sheets, often corresponding in length to the dimensions of the slope
 seam roof
Metal is the lightest building material, which allows you to save money when installing the frame. Of course, when servicing a metal structure, you will have to spend a lot of money, but this material is suitable for any type of roof. For example, when planning to build a metal roof, when arranging it, you can only get by with a crate, which is made of beams.
 To create a seam roof of the garage, special tools are used that form the sheet fastening profile
 Installing a seam structure involves the use of special equipment and the involvement of professionals, since even minor “punctures” in the calculations will lead to distortions, which are much harder to eliminate than to immediately build a roof correctly.
How and how to insulate the roof of the garage
Every motorist dreams of warm garage, while making the roof insulated is quite simple.
AT modern construction the roof of the garage is insulated in combination, that is, they combine traditional insulation with a heat insulator that reflects light and does not transmit infrared radiation. However, in some cases, such costs may be unreasonably high, for example, if the building is detached. Then use classic materials such as:
- Mineral wool. She has excellent technical specifications. It is used only with hydro and vapor barrier material that protects mineral wool from water. In addition, mineral wool is quite affordable.
 Mineral wool is inserted into the cells between the rafters and fastened with wire or fishing line before the ceiling finish is laid.
 - Glass wool. This material is cheaper than other heaters, but has a low degree of fire resistance. If it is supposed to make a pitched roof, then it is better to buy a special type of glass wool, which has a high density of structure. Such material is produced in rolls with a width equal to the normal distance between the rafter legs.
 Glass wool is one of the most inexpensive and affordable materials for roof insulation.
 - Styrofoam. This is a waterproof material, which, in terms of its thermal insulation characteristics, is similar to mineral wool. Styrofoam is a flammable insulation, however, the PBS-S brand with the addition of fire retardants has the property of self-extinguishing. Due to these features of the material, it is used as a heater for the roof of the garage. In addition, it does not rot, mold and fungus do not form on it.
 Laying foam in the crate of the roof of the garage does not require special skills
 - Penoizol. It is a liquid foam, but with better performance. It is resistant to fire and water, hardens when it gets into closed space, and forms an ideal seamless coating. With all this, penoizol is cheaper than any sheet foam, and its service life is about 40 years without loss of performance.
 To insulate the roof with penoizol, it is necessary to use special equipment for spraying
You can also apply traditional options for insulating the roof of a garage, for example, use sawdust, but with modern materials they don't compare.
The garage room is an object with a high probability of fire, so it is necessary to purchase insulation with improved fire resistance characteristics.
We warm the roof of the garage from the inside
- special buttons or a furniture stapler with staples;
- film for vapor barrier;
- carpentry tools;
- self-adhesive tape;
- waterproofing;
- insulation.
Thermal insulation of the roof from the inside is carried out as follows:

Such a cake is laid not only on beam structures made of wood, but also on reinforced concrete slabs. Before installation, the beams are protected with sheet material, after which waterproofing is attached to it, then insulation and vapor barrier.
Do not let the waterproofing film come into contact with the insulation; there must be a certain distance between these materials for ventilation. Direct contact is only allowed if a superdiffusion membrane has been used.
Video: how to insulate the roof of the garage inside
We insulate the roof of the garage from the outside
Outside, the roof is insulated even at the construction stage, since it is not very convenient to open an already finished building in order to correct shortcomings. Pay attention to the presence of a vapor barrier, which must be installed from the side of the room. So you can prevent not only the re-condensation of vapors, but also avoid unpleasant smudges. How to insulate the roof of the garage from the outside:

Video: how to insulate the roof of the garage from the outside
How to repair a garage roof
Leakage is the main nuisance that the roof of the garage brings, and the reasons for this may be as follows:
- exhaustion of the strength resource during operation;
- the negative impact of the weather;
- incorrect installation of the roof;
- mechanical damage due to careless cleaning of the roof from snow cover;
- low quality finishing material;
- neglect of the installation of waterproofing;
- violation of installation standards when using roofing material.
Leaks should be repaired at the stage of mold or wet spots. Initially, it is worth checking the joints, as well as joints, then the integrity of the roof for holes, chips or other damage. In addition, it is necessary to eliminate various kinds blockages, for example, from dry leaves, which clog the corners of the roof and accumulate moisture.
The way to eliminate the leak depends solely on the amount of damage and the characteristics of the roofing material. Partial renovation can be carried out for small-piece, as well as soft roofing materials. The amount of repair work for panel and sheet material depends only on the complexity of the structure and its damage.
 With the help of roofing felt, you can quickly and inexpensively completely repair the roof of the garage and get rid of leaks.
 When preparing drawings and a garage roof project, immediately include an extra 10% in the estimate for other expenses that are difficult to foresee.
Video: how to repair a garage roof
High-quality construction of the roof of the garage - best option minimize your costs if you have the necessary knowledge in construction. The choice of material and tools has great importance when building a roof. It is enough to read the necessary information, and you will be able to do all the work yourself. We wish you success!
A garage is a room, of course, not intended for habitation, but it cannot perform all its functions if the roof is constantly leaking. Especially often, car owners encounter this phenomenon in spring period when the snow that has accumulated on the roof begins to melt. But a well-made roof will not leak and will not cause problems, and the car house will always be dry and comfortable. What is the best way to cover the roof of the garage to avoid all the trouble?
The purpose of any garage is protection from external influences of the vehicle. Rain, snow, wind can quickly spoil appearance cars, and for a motorcycle standing on the street, such impacts are simply fatal. Due to excess moisture, corrosion processes on metal products begin to take place quite quickly, destroying the metal. That is why the garage must be of high quality, not have leaks.

The roof on the garage can be single-pitched or double-pitched. These are the most common options. In the first case, it is easiest to make a roof - it is a single slope, based on the walls of a building with different heights. The angle of inclination can be different (up to 60 degrees) - usually this indicator depends on the climate in the region, the wind rose, and the selected roofing.


On a note! A roof with one slope is usually constructed if there is no need to create an attic.
Roofing material is laid on wooden rafters. The drop height is calculated by the formula H \u003d D x tan a, where D is the width of the garage. The last indicator is selected according to the Bradis table. Wood for rafters must be treated with antiseptic compounds that will protect the material from the effects of biological organisms, and it is also recommended to cover it with compounds that reduce the likelihood of fire (flame retardants). The shed roof category also includes roofing, which is often found on garages built of concrete.

A gable roof is built if the garage is planned to be equipped with an attic. Usually such a roof has the shape of a triangle. The frame is a rafter legs connected at a certain angle, having support on the walls and at the top point of their connection. The height of the roof ridge H and the length of the rafters C can be determined by the formulas H = 0.5 x H (Z:2) and C = 0.5 x N/sin (Z:2), where Z is the slope value. For an equilateral roof, the use of the Pythagorean theorem is suitable.

Less often, but still, a multi-pitched roof is also equipped. However, it is already much more difficult to execute, because rarely anyone undertakes to build it with their own hands.
Advice! To create a roof on a garage with your own hands, beginners are advised to opt for a simple pitched roof.
Table. What else needs to be considered?
| Parameter | Description |
|---|---|
| To choose the type of roof and materials for it, it is worth considering the type of foundation and its strength, strength bearing walls, overlays. After taking into account the main indicators, the roofing material is selected in accordance with them. |
| Important to consider wind load on the structure, the location of the garage, the frequency of snowfalls and rains. |
| If the garage is located in a cooperative, then it is recommended to select such roofing material so that it is in harmony with the rest of the buildings. |
| Various tools may be needed to create a roof and cover it. It is worth making a list of the ones you need and purchase or rent them before starting work. |


Material Comparison
Any roofing materials can be used for the roof of the garage roof. Of course, most owners want to save on construction by choosing the material that is suitable for both quality and cost. Consider the main types of coatings used for roofing.

Ceramic tiles
This is one of the most beautiful and popular types of roofing material. It is made of clay and therefore has such advantages as resistance to rust, sunlight, low temperatures and attack by microorganisms. The service life of the coating is long and is about 100 years. The disadvantages include the significant weight of the material, the difficulty in transportation due to fragility and the rather high cost.

Installation of such a roof is easy, but with a roof slope angle of more than 12 degrees, tiles should not be used. Also, it is not suitable for finishing a concrete garage.
Prices for different types of tiles
Roof tiles
Ondulin
This is a kind of soft version of slate, otherwise called euroslate. It has several color variations, which allows you to choose it for any style of building. The service life of the coating is 20 years ( guarantee period), the material protects the roof well from leaks, is not dangerous from an environmental point of view, is easy to install and lightweight. Another advantage is its low price. Among the shortcomings, the flammability of the coating can be noted, but by itself it will never catch fire. It also quickly fades in the sun and loses its color brightness.


Prices for various types of ondulin
One of the oldest roofing options. Represents wavy sheets made from asbestos-cement mixture. The material is durable, easy to repair, does not rust, cheap, does not burn. However, it is quite fragile, and with insufficient sealing of the roof, leaks can form.

On a note! Slate is one of the cheapest coating options, which is why it is often used to finish the roof of a budget garage.

Prices for various types of slate
Metal decking
A roofing option that replaced slate. Made from galvanized thin steel sheet, has waves or trapezoidal corrugations, due to which it acquires additional strength.

The material is easy to install, has a lot of color variations, and lasts a long time if properly installed. Due to the polymer protective coating not afraid of rust and does not fade. The main disadvantage of the material is that if the polymer layer is damaged, the sheet will quickly rust. Moreover, you can damage the coating by just walking on it in rough shoes. It costs more than ordinary slate.

An option that is quite often used for finishing pitched roofs and flat roofs. Represents roll material, consisting of thick cardboard impregnated with bitumen and covered with protective powder. It is very cheap, durable, well insulates the roof from water, easy to use. However, the material easily catches fire, breaks, and looks, to put it mildly, ugly. Can be used as a waterproofing layer in roof construction.

Polycarbonate
Yes, this material can also be used to make a garage roof or create a small carport. Polycarbonate is structured or monolithic. The latter resembles glass and is completely transparent. Suitable for creating a flat version of the roof.

The first version of polycarbonate is known as cellular or cellular. Very light, strong enough and flexible.

Roofing process
The design of the roof of the garage can consist of several stages, depending on what kind of roof is needed. For example, it can be built from scratch and for this you will have to build a truss system, lay waterproofing, and mount a coating. If you do not need to make an insulating layer, then the work will be greatly simplified. Also, the roof may already be ready (for example, concrete), but in need of additional finishing.
Important! When choosing a material, it is worth considering the angle of inclination of the roof. For roofing material, the best option is an angle of up to 5 degrees, for slate - no more than 25-35, corrugated board is laid on a roof with a slope of up to 8 degrees, and a metal tile can be used on a slope of up to 30 degrees.

All work must be performed only on condition of sunny weather. It is best to read the forecast for at least a week and choose warmer days.
Concrete roof finishing
Even if the garage already has a concrete roof, it must undergo special preparation before the new roofing material is laid. In general, the process begins precisely from this stage and ends with the laying of a new coating.
Training
Step 1. The old coating from the concrete slab, if any, will have to be removed completely. This is done with the help of improvised means - for example, shovels, chisels, etc.

Step 2 concrete surface inspected - its condition should be good before further finishing. It is tapped with a hammer - everything that exfoliates in the process must be removed.

Step 3 All small cracks are sealed with cement milk (or liquid glass), which is applied with an ordinary wide brush. Wide cracks can be repaired mounting foam, the excess of which is then cut off with a sharp knife.

Step 4 The uneven base is leveled with cement mortar. It is applied to the surface and leveled using the rule. Next, the cement layer is dried.

Step 5 The cemented surface after drying is treated with a deeply penetrating primer. It is applied by roller or sprayer in an even layer.

Step 6 When the primer dries, the surface is covered with bituminous mastic.

Roofing work on a concrete roof
Step 1. Work on laying roofing material on the roof begins with raising the rolls of material to the roof surface. Next, one of the rolls is placed in the corner of the roof and the bituminous mastic applied to the base is heated using a gas burner.

Step 2 A roll of roofing material without sprinkling with the help of a metal hook, as the mastic is heated, gently unfolds. The flame of the burner is also directed to lower part rolled material. Thus, the entire roof is closed, individual strips of material are laid overlapping each other.

Step 3 The top layer of material that already has powder on the surface is laid. To begin with, the required dimensions of the segments are measured. For ease of use, they are rolled up.

Step 4 Laying the top layer of material should be carried out on the bottom so that the seams overlap each other, that is, with an offset. Laying starts from the bottom of the roof slope.

Step 5 And again, the gas burner comes into play. The previously laid lower layer of material is heated.

Step 6 After the bottom layer is well warmed up, the heating and rolling of the roll with sprinkles begins. Rolling is also carried out using a hook.


The same metal hook is used
Step 7 The material laid in this way is sprayed with water to speed up the cooling process. Also, a layer of water will prevent the crumbs on the surface of the coating from sticking to hands and tools.

Step 8 The material is pressed against the surface of the roof with patting movements using a wooden board wrapped in cloth.

Step 9 The entire roof is closed in the same way. The individual coating strips are overlapped.

Step 10 The sides of the roof are also covered with roofing material.


Video - How to cover the roof with TechnoNIKOL material?
The process of finishing the roof of the garage with corrugated board
Quite often, corrugated board is used as a roofing during the construction of a garage. This strong and durable material will serve faithfully if laid correctly.
Training
Step 1. The roof is being prepared - if necessary, a waterproofing layer is laid. Next, the installation of supports for the material begins - bars of 50x50 mm are laid on the base, and boards of 40x15 mm are laid across them.

Step 2 The bars are aligned strictly according to the level, and the cross-beam boards are also aligned.

Step 3 Longitudinal bars are attached to the base of the roof with frame bolts.

Step 4 The transverse boards are fixed with self-tapping screws to the bars - two pieces at the edges, and one at a time in the middle of the boards.

Step 5 Along the perimeter of a kind of crate, planks are nailed. Them top part should be flush with the boards-crossbars. You can start laying corrugated board.

Installation of corrugated board
Step 1. Sheets of corrugated board rise to the roof, stacked on the crate and leveled. Individual sheets are overlapped in 2 waves. For the installation of the roof, it is better to use sheets of such a size as to immediately cover the roof slope from edge to edge.

Step 2 At the exit of the garage pipe, it is required to cut the material so that a hole for the chimney is formed. The easiest way is to cut a hole in the whole sheet, and then put the sheet on the pipe.


Step 3 Sheets of corrugated board will be screwed with self-tapping screws. For convenience, you can mark up along a string evenly stretched from one edge of the roof to the other. Marking is applied with a marker. The markings should be straight along the cross-beam boards.

Step 4 Special roofing screws with a rubber washer-gasket are screwed in. Along the perimeter of the sheets, their pitch is 40-50 cm, and along the rest of the sheet, according to the marking, they are screwed through one corrugation.

Step 5 The lateral part of the roof can be finished with roofing material, reinforced with bituminous mastic, or closed with metal shields of the desired height.

Step 6 The shields are fixed with roofing screws, and the joints between them and the roof are smeared with bituminous mastic.

Step 7 Fabric strips are glued onto the first bituminous layer, which are then coated with bitumen again.


Step 8 The joint between the pipe and the corrugated board is sealed with a waterproofing material or sealant.

Prices for corrugated board
Decking
Video - Corrugated roof on the garage
What material to use for the roof of the garage? Here the owner himself will have to decide in accordance with his wishes and budget. It is also important to take into account the features of each coating. But of the above two main materials, it is better to use corrugated board - it will be more reliable and durable for the roof than roofing material.
The roof of any type is responsible for the safety of the building, the integrity of the walls and interior decoration building. It protects the house from the scorching heat in summer, from snowfalls in winter, heavy rains in the off-season, and also performs an important function in shaping the overall exterior of the building. Unlike broken, multi-level, hip and other modifications, a shed roof is reliable, economical and least expensive. This type is often used for outbuildings, verandas and garages. Despite the simplicity, the roof is made according to calculations and building codes in compliance with the rules and technologies for laying roofing material.
Advantages and disadvantages of a pitched roof
A shed roof, like any medal, has two sides: it has its own advantages and disadvantages. The construction of a roof of this type is characterized by simplicity and low cost, since you can mount it yourself without resorting to the services of a construction team and saving a certain amount on this.
Garage with a shed roof will reliably protect the car from snow and rain
So, pay attention to the main advantages:
- the design is based on a right-angled triangle - the "lightest" geometric figure, knowing the length of its sides, you can easily calculate the angle between them (in our case, this determines the angle of inclination of the slope);
- installation of a shed roof is intuitively simple and understandable;
- it will take several days to cover a typical "one-sided" roof; with certain skills and dexterity, such a roof can be laid even over the weekend.
In addition, design problems fade into the background and give way to solidity and reliability. It is imperative to foresee in what area the garage will be built, how much precipitation will fall on the roof. Now the disadvantages:
- insufficiently strong truss system will not be able to cope with a large mass of snow without problems. That is why in regions with severe winters it is preferable to use a gable roof;
- the second drawback will be the lack of a fully functional attic space, which significantly limits the ability to use additional space for temporarily unused materials or tools;
- the actual absence of the under-roof zone significantly complicates or almost completely negates the laying of high-quality thermal insulation. It is hardly possible to insulate a roof whose slope angle is 9 o - 12 o.
Calculation of the slope of a shed roof, depending on the choice of roofing material
If preference is given to a single-pitched structure, pay attention to the selection of roofing material. The angle of inclination of the roof will depend on this, which, in turn, is necessary for the unhindered convergence of snow, rain, ice from the slope:
- for rolled, bituminous, polymer materials the slope of the ramp should not exceed 10 o. The minimum safe slope is not less than 6 o;
- for flat or corrugated slate, sheet metal with a seam connection, the maximum allowable angle of inclination is 20 °;
- if you use corrugated board, tiles, asbestos-cement and slate slabs, metal tiles as a roofing, you should not exceed the maximum allowable 25-30 o.
The angle of inclination of the slope will depend on the choice of the type of roofing material.
Shed roof design with drawings
When building a shed roof, pay attention to the design of the truss system and the selection of roofing material - the safety of operation and the ability to cope with loads depend on this. In rare cases, reinforced concrete slabs are used (provided that the angle of inclination is minimal). But mostly they use a rafter base made of wooden beams.
For the correct calculation, you need to know several parameters:
- the length and width of the bearing walls of the building;
- the angle of inclination and the desired length of the slope;
- type of material with which the roof is covered.
Based on the dimensions, it will become clear whether additional support posts are needed to reinforce the rafters. The angle of inclination will determine the need for additional construction of the pediment and its height, as well as whether it is necessary to do attic floor. According to fire safety standards, an attic with a height of less than 1.6 m is prohibited from being installed.
The roof truss system is calculated depending on the width of the slope
It is extremely important to determine the angle of inclination of the garage roof at the design stage, since the height will depend on this. opposite sides boxes and the feasibility of using a cantilever frame on one side to maintain the required slope.
Use wood only after it has dried thoroughly. Lumber for rafters should not have chips or other flaws at the joints. For long rafters, use glued beams. Boards are used only for light roofing surfaces.
Mauerlat - a reliable basis for a pitched roof
The rafter frame is a structure of planks or logs laid in parallel, resting on the base of opposite walls of different heights. Mauerlat performs a transitional function from walls to roof and is a link. If the walls of the garage are made of wood, which is unlikely in the age of new building technologies, there is no need for it. Brick (silicate and ceramic) is also a strong and durable building material in itself, so there is no need to lay Mauerlat on walls one brick thick. This will only add financial problems and unnecessary labor costs. In the case of a shed roof, the truss system can be installed directly on the strapping - this justifies itself when the slope is minimal and the coverage is not heavy. Installation of a tiled roof, asbestos-cement or slate requires the presence of a Mauerlat. It helps to evenly distribute the load of the wall around the entire perimeter of the building. You can’t do without a Mauerlat if the walls are driven out of gas silicate blocks or foam concrete. Such material is too fragile and loose - an anchor bolt or dowel is unlikely to hold in it.
How to fix the mauerlat on the walls of the garage
Mauerlat is laid on two opposite walls, on which the rafters will subsequently rest. So:
- Lay any waterproofing material on the ends of the walls. It can be roofing felt or bituminous tape.
- Lay the Mauerlat on top. To do this, use a beam measuring 50 * 150 mm or 100 * 150 mm, depending on the thickness of the walls of the building.
- Using anchor bolts or dowels, secure the tree to the base.
Such a uniform redistribution of the load is especially important for walls made of blocks, since they have less strength than, for example, brick.
In some cases, reinforcement tabs are used to fasten the truss system to the walls during forcing. With the help of steel wire, rafters are knitted to the reinforcement, traces of the strapping are hidden under the wall decoration inside the garage.
Reinforcing tabs are used to fasten rafters
Sometimes you need to install reinforced belt: special studs or trimmings of reinforced pipes are inserted into the upper masonry of the wall, on which a Mauerlat beam is mounted. In addition to additional redistribution of the load, such a belt will allow you to adjust and fix the horizontal level as much as possible.
The technology of erecting a shed roof garage
Before starting construction work, you need to carry out small trigonometric calculations. With their help, they find the difference in heights of opposite walls, calculate the angle of inclination and the area of \u200b\u200bthe future roof. Most of the calculations can be done on your own, using familiar school formulas for finding the area, length and other parameters of different figures. The amount of necessary building materials depends on the calculations and, accordingly, the budget necessary to implement the idea is calculated.
The amount of necessary building materials depends on the calculations and the budget necessary to implement the idea is calculated
Having done necessary calculations and having purchased the material, you can start building the roof of the garage.
How to make a roof from a profiled sheet with your own hands
Consider an example of the execution of a shed roof made of corrugated board. Strength, lightness and rigidity favorably distinguishes it from modern building materials. The profiled sheet is made from a sheet of galvanized steel by cold rolling. For greater rigidity, it undergoes profiling during production, due to which ribs of a wavy or trapezoidal shape can be seen on the sheets. It is available in different thicknesses and the corresponding markings. For roofing, the most suitable profiled sheet is NS44 or NS35.
A roof made of corrugated board will reliably protect your car
To mount the roof, we need:
- wooden boards of the appropriate length and timber for Mauerlat;
- roofing material (in our case, corrugated board), covering the entire roof area, taking into account overlaps;
- woodworking tools: an ax, a circular saw, a hammer, a plane, a jointer, a screwdriver;
- tools for working on metal: grinder, rubber mallet, awl;
- fastening materials: a stapler with staples, nails, self-tapping screws or roofing screws with rubber gaskets;
- measuring and marking tools: tape measure, ruler, level, pencil, chalk.
After the garage frame is brought to a sufficient multi-level height, we proceed to the construction of the roof:
- We proceed to the installation of the Mauerlat (the laying technology is described above).
- We build a truss system and lay the crate.
- We lay the first rafter on the Mauerlat, going beyond the overhang by 40-50 cm, make a notch on it for fixing and use it as a template for subsequent boards.
- With help metal corners, self-tapping screws and a screwdriver, we fasten rafter boards over the entire roof area at equal distances.
The rafters are laid on the Mauerlat at equal distances
- We make a crate from the bottom up.
We lay the crate on the rafter system
- We lay roofing material or bituminous tape for waterproofing under the overhangs (for exterior decoration of the garage, you can sheathe it with siding or the same profiled sheet).
- Using a construction stapler, we mount waterproofing film or a vapor-tight membrane, put a counter-lattice on top.
A counter-lattice is attached on top of the waterproofing
8. We lay the sheets from left to right, starting from the bottom row, with an overlap of 2 waves. If the height of the corrugation is not more than 2 cm, we fasten the self-tapping screw to the top of the rib. If it is higher than 2 cm, we fasten it to the base. Gaskets under the screws should not hang out, but they should not be pinched either - this will lead to subsequent roof leaks.
The order of laying the profiled sheet on the crate
When the roof is ready, the final necessary touch remains - the installation of a drainage system. The absence of low tides will eventually lead to wear of the foundation, damage to the basement and facade.
Low tides will protect the garage from the destruction of the foundation and basement
Video: fastening rafters for a pitched garage roof
Video: how to make a pitched roof with your own hands
If all the instructions for laying a shed roof for a garage have been followed, you will receive dry and reliable protection for your beloved car. A solid roof will protect the room from leaks and destruction. And you can do it yourself, but together with a partner it will be faster, more reliable and more fun. The more valuable such a building will be.