The fireplace has always been a symbol of warmth and comfort. The home was built in luxurious palaces, small castles, and cozy estates. A prerequisite for a fireplace is a chimney, which cannot be done in a modern standard apartment. Depending on the income of the homeowners, the fireplace was decorated with marble, stone or other fireproof materials.
But is it really possible for those who live in apartment buildings without a chimney, will you have to forget about the hearth? Not at all - a modern alternative to an antique fireplace is an artificial fireplace portal - a design that imitates a real home hearth. But here the question arises: how to decorate a decorative fireplace in an apartment? Should I use traditional materials for this or can I use my imagination and creativity?
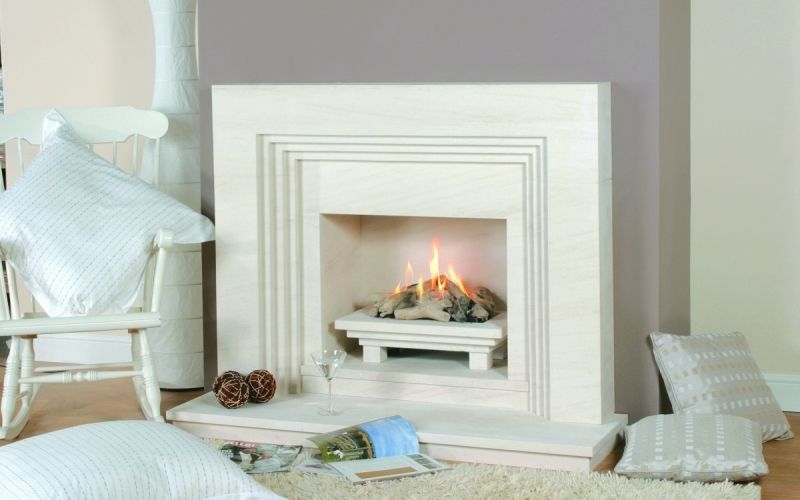
Fireplace in the interior of the apartment
Modern high-rise buildings do not include chimneys in their design to accommodate working fireplaces that would serve as a source of heat. If the goal is to heat the home and replace heating radiators, then implement this task It is quite possible with the help of an electric fireplace - a device that runs on environmentally friendly fuel. This “toy” produces a real flame without smoke and is very popular among overseas designers. An electric fireplace is often built into a specially equipped portal, creating the effect of a real hearth.
But for decorative effect More often they install a fireplace portal or a false fireplace - a structure that looks similar to a real fireplace, but without a chimney and the ability to start a fire. A niche can be decorated in different ways: put candles or vases with flowers, cover it with mirror tiles, or lay out a stack of real logs - it all depends on the designer’s imagination and budget limitations.
Types and features of false fireplaces
The design and choice of materials depends on the type of fireplace chosen. IN modern architecture distinguish authentic, conventional and symbolic fireplaces.
Reliable
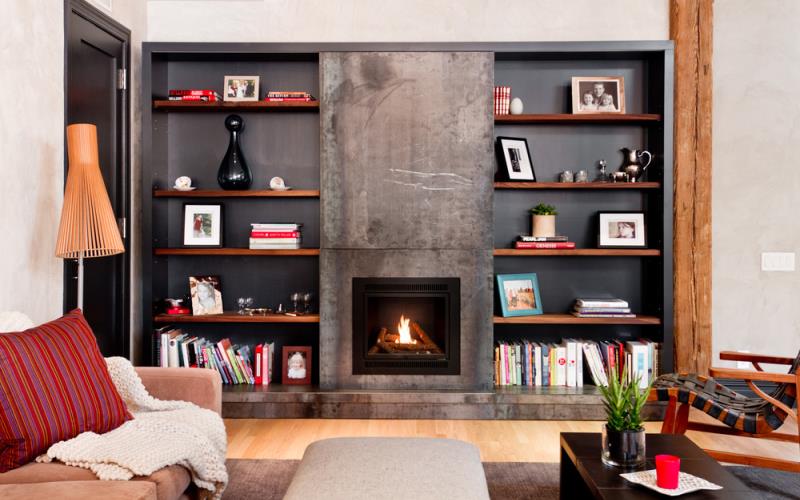
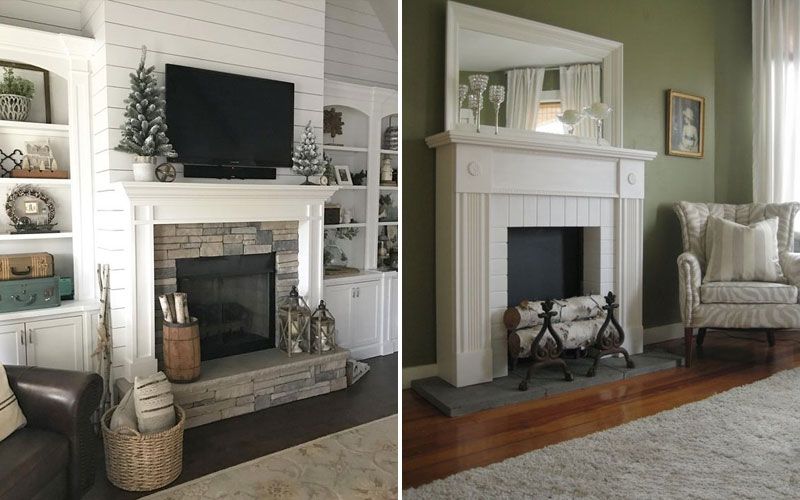
A reliable fireplace is the most similar to the real one, imitating the shape and appearance of the hearth so well that an ignorant guest will not immediately notice the difference. The difference between a reliable fireplace and a real one is the absence of a chimney. Such models of false fireplaces are often made to order, since decorative materials require special processing: metal, stone, tiles, porcelain stoneware, plaster.
An electric fireplace or burner running on environmentally friendly fuel can be installed in the niche of such an artificial fireplace.
Only a reliable false fireplace can replace a real hearth as much as possible, both in appearance and functionality. But it is also the most expensive among all types.


Conditional
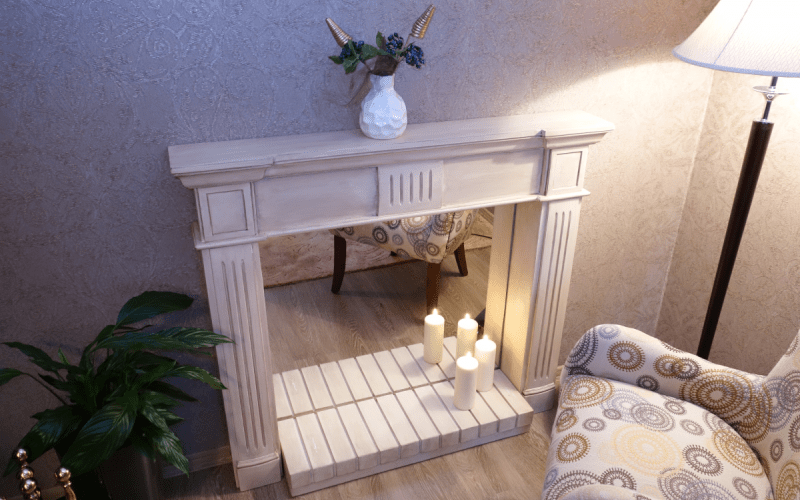
It is also possible to create an artificial hearth in an apartment using a conventional false fireplace - a small structure on the wall made of metal frame and covered with plasterboard or plywood. This option does not involve installing an electric fireplace inside, which means it does not require great depth - 20 cm will be quite sufficient. And a mirror glued to the back wall of the fireplace portal niche will create visual depth.
Another option for “deepening” a niche is to paint the wall black and install candlesticks in it, decorative candles and other little things.
From the outside, such a portal is decorated with plaster, tiles, tiles, wood, moldings and stucco so as to bring the appearance as close as possible to a real fireplace.

Symbolic
Another way to create a feeling home comfort in the apartment, without unnecessary financial and time costs - a symbolic fireplace. Simply put, the outline of a fireplace is created on the wall either with the help of a drawing, or ceiling moldings, or some other decorative elements. Of course, we are not talking about any volume in this case, decorative element creates only the necessary atmosphere, but you can do it yourself, without resorting to the services of professionals.


How to make a false fireplace yourself
Of course, the most simple solution, both from the point of view of budget and labor costs, there will be the arrangement of a symbolic or painted fireplace.
First of all, determine the place where the drawn element will be located. Measure the height and width of the decoration; it is better to immediately draw it on the wall with a pencil. Now think about the design: will it be straight or curved lines drawn with paints, or will the outlines be decorated using moldings. Its role may be:
- ceiling or floor plinth,
- wooden slats,
- plaster stucco,
- beautiful door casing.
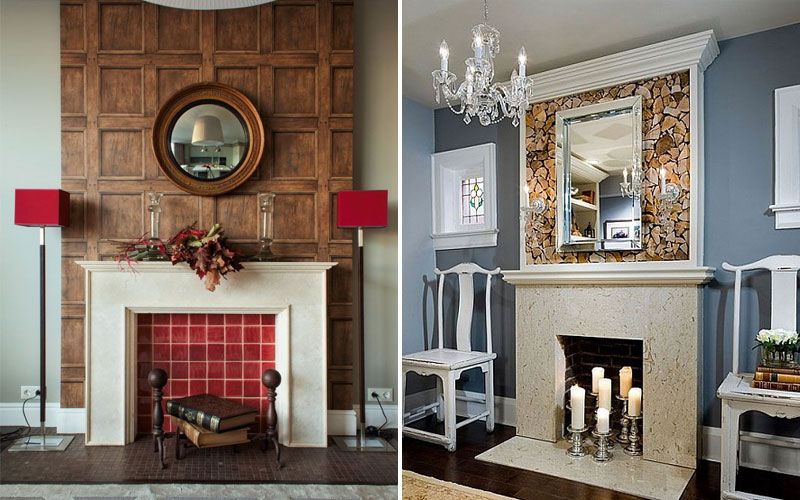
On top of the entire structure, you can hang a narrow shelf the width of the fireplace, which will serve as a stand for photographs, candlesticks or other cute trinkets.


Making a home false fireplace with your own hands is not at all difficult, as it may seem initially. The main thing is the ability to use a hacksaw or jigsaw, a screwdriver and a tape measure.
The first step is to decide what material the fireplace portal will be made of. It is easier and cheaper to make it from a metal profile and cover it with plasterboard or MDF (PVC) panels. But you can use bricks or foam blocks.
Next, a decision is made on the shape and size of the decorative stove. If you create a structure that completely imitates a real fireplace, you will have to select a significant part of the wall, since a real hearth consists of two parts: a chimney and a firebox. If you decide to decorate the space above the portal differently or allocate it for other needs, then you can only stop at installing the lower part of the fireplace.
For work you will need materials and tools:
- Drywall 12 mm thick;
- Metallic profile;
- Tape measure or ruler;
- Pencil for marking;
- The tool you plan to use to cut drywall. Usually this is a construction knife;
- Metal shears for metal profiles;
- Self-tapping screws for metal;
- Metal corner;
- Screwdriver.
To finish the fireplace portal, do not forget to purchase putty and spatulas, and perforated tape to strengthen the seams. Also, depending on the decorative finish, a primer may be needed.

Installation of the fireplace consists of several important steps.
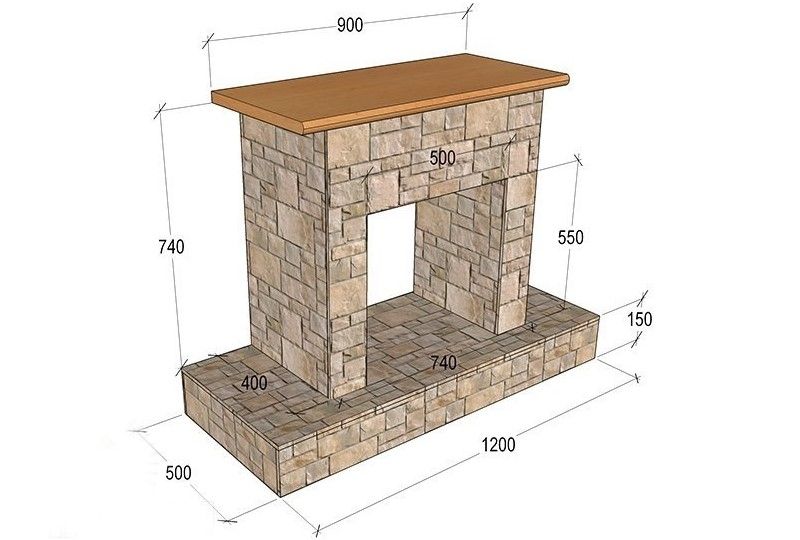
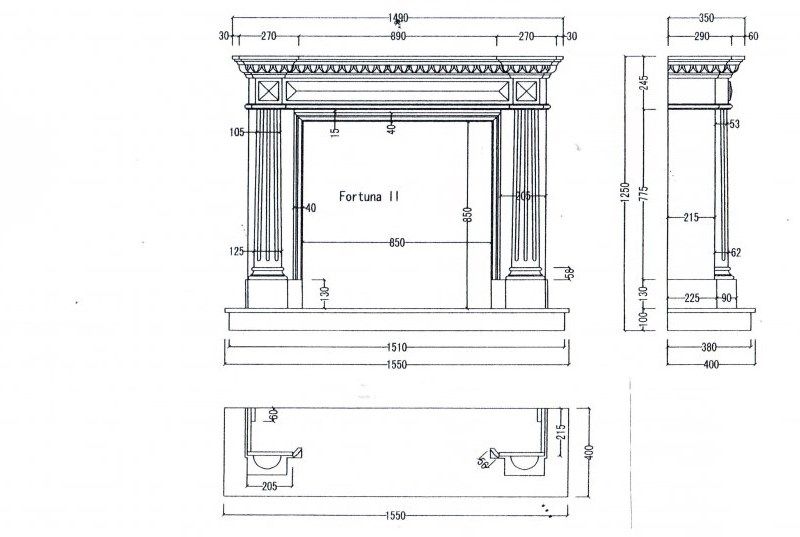
- We draw a sketch of the future product and put everything down required dimensions(they depend on the dimensions of the room in which the hearth is assembled). We calculate how many materials will be needed and which ones. We transfer all the markings to the wall to have a clear idea of the structure.
- From a metal profile, using metal scissors, we cut the frame parts and try them on the wall. We mount the frame using self-tapping screws.
- Cutting drywall from plasterboard necessary details sheathing and also fasten them to the frame with self-tapping screws. Don't forget to remove the chamfer before installation.
- We use putty to seal all the screw heads and seams (after gluing them with perforated tape). Let the mixture dry.
- Cleaning the surface sandpaper and prime before decorative finishing.
You can use one of the following as a diagram:
Of course, any element that appears in the room should match the style and mood of the interior, and not seem superfluous.
You should not decorate the fireplace portal in a Provence room with brutal dark brick. Or use aged brick in a modern interior - only experienced designers who know how to play with space can afford such bold experiments.
A plasterboard fireplace portal can easily be decorated with polyurethane stucco, moldings, wood or MDF panels, plaster or stone. The choice of material also depends on the purpose of the fireplace.
If an electric burner is inserted into the false fireplace, then fire-resistant materials are chosen for finishing: tiles, bricks, stone. In all other cases, the decoration is dictated by the style of the room itself.
Each finishing material has its pros and cons. Let's look at each of them.


- Decorative brick or stone. The most suitable material for finishing an existing fireplace is brick or decorative refractory stone. The portal itself is also made of brick. in this case, it is necessary to provide a small brick “cushion” under the entire structure. In principle, if the bricks are laid neatly, then the finishing can be abandoned if the appearance fits into the style of the room. The bricks just cover protective agent or tint. If brick acts as a building material, then it is better to use fireproof stone to decorate the existing fireplace.
- MDF boards. Such material is used quite rarely for decorating fireplace portals. Firstly, because appearance— such slabs often imitate the texture and pattern of wood, but who makes fireplaces from wood? Secondly, even if you choose a pattern similar to brick or masonry, MDF boards are inferior in price to the same ceramic tiles or plaster.
- Tree. Warm and natural material, often used in classic or rustic styles. It can be smooth, polished and varnished wood or deliberately rough, with an aging effect in a Provence living room. Most often, the top shelf of false fireplaces is made of wood.
- Ceramic tiles or porcelain tiles. One of the universal materials is ceramic tiles or porcelain stoneware. The first advantage is affordable price. In principle, from a wide range of modern ceramic tiles, you can choose the one that suits you in color, texture, and style. The second advantage is resistance to high temperatures, which is important for the design of a working fireplace. But along with fire-resistant tiles, you also need to use a special heat-resistant adhesive.
- Mosaic. Another suitable material for decorating the fireplace portal - mosaic. In turn, it can also be made of glass, ceramics, mirror or wooden elements. There are even individual specimens from natural natural materials — sea pebbles, shell rock, marble or granite. You can choose any mosaic that meets the most stringent requirements, and also combine several types, creating patterns and ornaments.

- Marble. This one is environmentally friendly safe material has proven itself in the construction business. It is not for nothing that the palaces and castles of kings were decorated with this material. Marble is durable, practical and has excellent decorative properties. However, decorating false fireplaces with marble is quite difficult, since it is still stone, and lightweight design made of plasterboard is unlikely to withstand such weight.
- Decorative plaster. This finishing material It can easily imitate wood, stone, or even recreate a smooth, uniform surface. It is for its versatility that designers love plaster. It can be tinted in any color or painted on top, formed into fancy patterns and ornaments - any method is good, the main thing is that the end result matches the style of the room.
- Glass. Glass is a rare guest on the walls of a false fireplace, but with its help you can create a unique and unique portal, for example, using the technique of painting on glass. Basically, glass is used as a partition in electric operating fireplaces. Glass stained glass also has a right to exist, but to really achieve desired effect, you will have to come up with original lighting.
- Metal. One of the “coolest” materials for interior decoration. It is mainly used in styles such as modern, high-tech or loft. But artistic forging can add a touch of romanticism to Provence or country. An openwork partition will be appropriate in any ornate interior - classical, art deco, Victorian, rococo.
- Self-adhesive film. An excellent alternative for a minimal budget would be self-adhesive - a PVC-based film with an adhesive base. The pattern and texture of the film can be very different: with imitation of marble, other stone, wood, brick, tile.
What to put in the fireplace niche
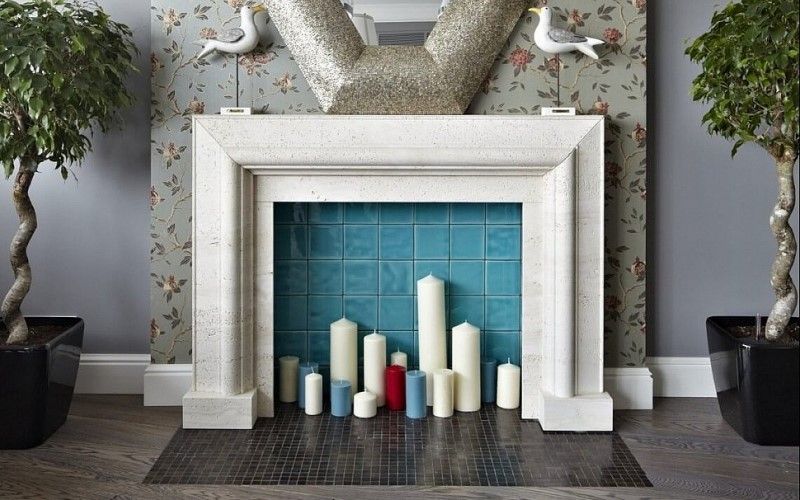
The most exciting issue in decorating a false fireplace is the niche (the place where the firebox should be). If the hearth is not operational and there is no firewood in the firebox, then what to put or put in its place? And the design of the back wall of the firebox also matters. It can be formatted in different ways:
- Cover with mirrors to visually expand the boundaries of the fireplace portal;
- Paint it black, which will also visually deepen the niche;
- Cover with photo wallpaper depicting a real flame, brick or firewood;
- Paint to match the wall on which the fireplace is located;
- Lay out contrasting ceramic tiles or tiles with patterns.


In the very niche of the fireplace you can place:
- A set of candles of different shapes and sizes (but suitable in style);
- Books or magazines;
- Flowers in pots and flowerpots;
- Firewood and logs - this will create the impression that the hearth is working;
- A stack of pillows;
- Antique effect suitcases;
- Thematic or seasonal decorative elements: Halloween pumpkins, Christmas tree New Year, angels for Christmas, fresh flowers for March 8, etc.
- Figurines and figurines.
By the way, those elements that you place in the fireplace niche should stylistically overlap with the objects placed on the shelf itself or above the hearth.
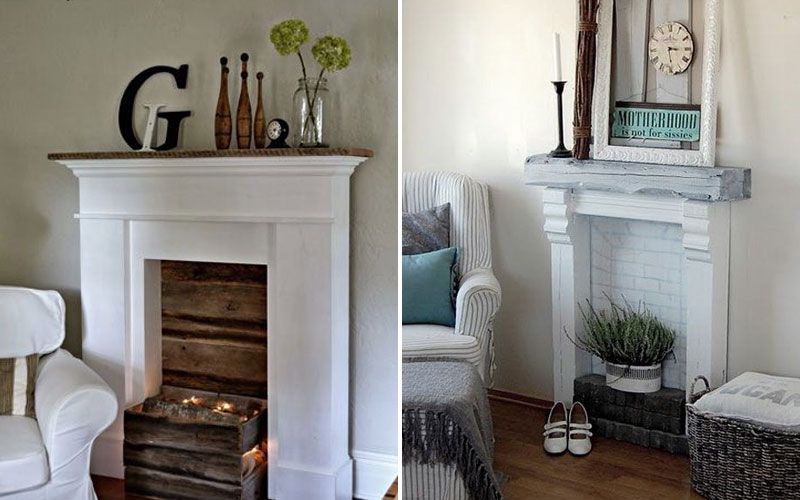
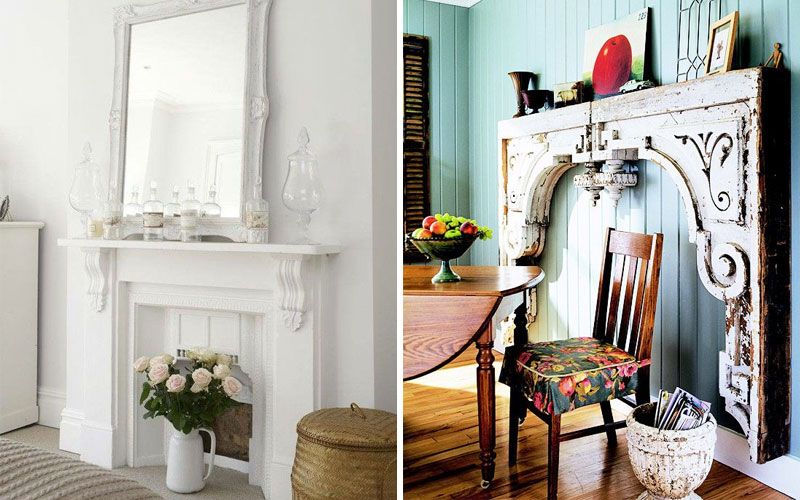
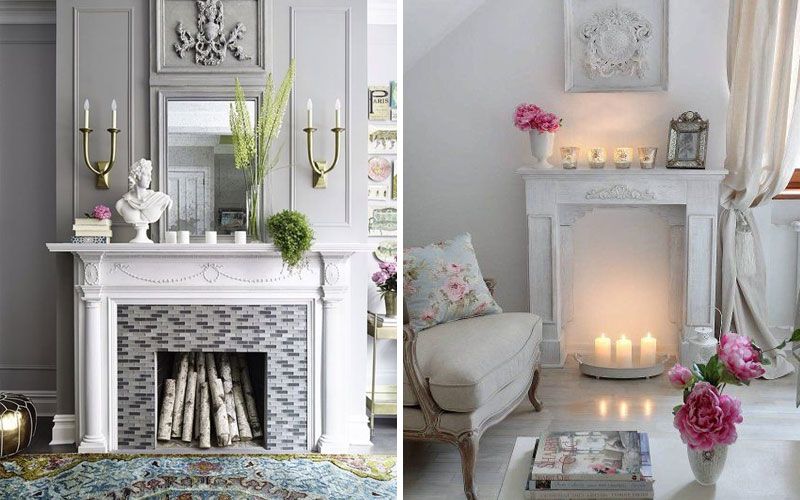
If you are still wondering how to decorate a fireplace in your apartment, photos of ready-made solutions will help you decide. Just look at our selection of ready-made false fireplaces.


If you want to create additional coziness in your home, there is one solution that will help save both money and time, and at the same time create a very homely, cozy and comfortable atmosphere. And this solution is a fireplace made by yourself. It will look great in any home and will decorate any interior. The fashion for fireplaces will never go away, especially for fireplaces self made. Their relevance is only growing every year.

Kinds
Before you start creating an artificial fireplace with your own hands, you need to find out what kind of fireplaces there are.


The very first question that arises for someone who wants to make a fireplace is the design. What is it like? Which one should you choose to build your fireplace? So, there are three types in total: bio-fireplace, imitation fireplace and electric fireplace (backlight).

Let's take a closer look at each of them.


Biofireplace
The function of the combustion process in a biofireplace is performed by the burner. It runs on biofuel. This is an excellent option for simulating fire, but very expensive.

Imitation fireplace
In fact, in in this case, it is much easier and more convenient to solve this issue yourself using improvised means and without much of a hit to your wallet. What materials can be used here? Of course, this is drywall, a frame from old furniture, wood or even an ordinary box.

Electric fireplace
As for the electric fireplace, it shows a visualization of the fire, as well as the sound of the burning flame, on a special screen.

Made of brick
The construction of an artificial fireplace made of brick is very different from the construction of a real fireplace, where the lining is made only of fire-resistant bricks High Quality. To make a fireplace, you can use both facing and decorative brick. There is no fundamental difference here.


In the end, all you need to do is make a mantelpiece.


It is important to pay attention to such a nuance that the finished structure will weigh a lot and it is necessary to initially evaluate how reliable the ceilings made are, and, based on this, make a decision about continuing the planned installation work.

Made from wood
For lovers of vintage furniture, as well as those who prefer furniture made from environmentally friendly materials, we recommend using wood to create a fireplace. Both edged and unedged board, as well as parquet. Once finished, you can coat it with varnish to give it a more attractive look. A wood fireplace made by yourself should not be placed on the floor, but on a platform previously made for this purpose.


A fireplace made of this material has many advantages. One of them is the low weight of this design, which allows it to be made of any size and installed in any convenient and suitable place in the apartment.

From furniture panels
Such a fireplace can be made either from ordinary plywood or from ready-made furniture panels, which must be purchased at a specialized store. Making such a fireplace yourself will not be difficult. At the same time, the fireplace can be made of absolutely any size by first painting (if desired) the panels in any color you like or gluing special colored wallpaper on them.

Thus, you can make a modern and colorful fireplace with your own hands without any effort. special effort and without large investments Money.


Step-by-step instruction
The scheme for creating a fireplace from boards, plywood, wood and furniture panels is the same.


What needs to be done first is to assemble the frame. A galvanized profile is best suited for this purpose.
It is very important to first draw up a plan or drawing of the fireplace that you plan to assemble, indicating, at least approximately, the main dimensions. After this, cut the profile using special scissors.


It is important to do everything in accordance with the dimensions and width of the parts so that there are no inconsistencies during the manufacturing process. On next stage Check all the sheathing boards again. If necessary, all edges need to be trimmed. Using self-tapping screws, attach the sheathing to the frame. Carefully screw in the screws, the caps should be invisible.

The next step is to put the plugs on the fasteners, preferably decorative ones. And also paint in bright color or cover the surface with varnish. And on final stage you need to install a shelf on which you can then put various souvenirs and interior decorations.

Metal
A homemade fireplace made of metal will look prestigious and very modern in the interior. But working with this type of material is quite complicated and is suitable only for those who have already encountered this and have experience and skill in working with metal parts and designs.

The pieces can come in different sizes and shapes, depending on your tastes. A homemade fireplace made from this material will fit perfectly into modern interior, especially if it is dominated by silver, brown and light gray tones.

Step by step creation
As was written above, not everyone can afford an artificial fireplace made of metal structures. Making it is quite difficult, so all stages of its production must be treated with increased care and responsibility.

So, the steps are described below.

Preparation
Just like in the previous case, making a fireplace should start with a small detailed plan or diagrams indicating all sizes and dimensions. And you need to think through all the smallest nuances already at this stage.

Marking
Once the plan is drawn up, you can begin marking. Marks should be made on the wall in the places where the fasteners will be placed. This work should be given Special attention and approach it with full responsibility.

Assembly
After this, we begin assembling the entire structure. The support in this case is a frame made of aluminum profile. It needs to be cut and then attached to where the marks were previously applied.


Installation
At the penultimate, final stage, place an artificial hearth in the finished structure. If the fireplace is not only an interior decoration, but also a source of heat, do not forget to secure the layer thermal insulation material on the inner wall metal structure the side on which it is attached.


From plasterboard
Even a beginner can build a fireplace made of plasterboard. It's the easiest to create. Although this type of material has its own characteristics. Difficulty may arise only at the stage of creating a metal frame, but we can solve this issue too.

Manufacturing instructions
First of all, of course, you need to make a frame. Can be used as metal profiles, and wooden sticks. Then assemble a box without a back wall from the profiles. Use a knife to cut drywall and glue the pieces together with glue.

Prepare the base in accordance with all dimensions and place it against the wall. It will be better and more stable if the box is attached to the floor, thus creating a reliable foundation. We glue the assembled future fireplace to the prepared box. We install the mantel on top of the structure.

Glue the baseboard under the mantel. This must be done in stages. To make the transition smooth and beautiful, steps are used different widths.

Now we install a homemade hearth.

To complete the creation of a beautiful homemade fireplace, we finish it using previously selected materials.

From stone
In any apartment and any house, a fireplace made of stone looks truly luxurious and expensive. Such decoration of the house speaks of the exceptional taste of its owner.

Step-by-step production
It is quite possible to make a stone fireplace with your own hands. It is convenient to attach a material such as stone to various surfaces, be it brick, drywall or any other material. But here it is important not to forget that the stone has quite a lot of weight, and take this into account when planning the creation of such a heavy structure.


First of all, you need to prepare the stone for further work with it, namely, clean the surface. If the fireplace is attached to a stone wall, it is necessary to make small indentations using some sharp tool.
The warmth of a home always evokes a feeling of calm, comfort and coziness. Owners of private houses can easily create such an atmosphere in their home. In an apartment, you can make a decorative fireplace with your own hands, without having any special skills. construction work. To do this you need to use step by step instructions and also stock up necessary materials and tools.

 It is very difficult to install an ordinary fireplace in a city apartment. This is due to the lack of a chimney, as well as to the ceiling, which may not withstand serious loads. To build a fireplace structure in a multi-story building, you need to obtain a special permit. A good solution is to make an artificial hearth and enjoy a pleasant sight during the cold season.
Many people living in high-rise buildings buy electric fireplaces. These devices help out when the heating has not yet been turned on. Available in stores big choice such products. They are small in size and will fit into city apartments without any problems. However, more exciting activity is to simulate a fireplace with your own hands. This allows you to show your imagination and also create a unique piece of furniture.
An open fire is not at all necessary in a city apartment, so a DIY false fireplace will become a multifunctional decoration. It will be difficult to distinguish it from the real thing. Arranging an artificial fireplace will not require reconstruction of the living space. Such products are divided into 3 groups:
- reliable;
- conditional;
- symbolic.
DIY cardboard fireplace)))

 Reliable artificial hearths completely imitate real fireplaces. They strictly adhere to the dimensions and principles of design. It is possible to install a bio-fireplace burner in the interior of the firebox. It will create an almost exact effect of a real flame. This option is considered the most expensive, but it looks the most plausible.
Conventional false fireplaces are constructed in the form of a protruding portal from the wall. Further decoration is done according to your taste and wishes. The hole for the firebox is filled with firewood or candles are placed in this area.
round arch with niche, assembly and white version. Installation of drywall.
Symbolic fireplace made from any materials. Its peculiarity lies in the fact that it does not look like a conventional fireplace. Sometimes it looks like a pattern with decorative elements.


To create an artificial fireplace, you can use various materials that are already in the house. To simulate a hearth, you can use:

fireplace #1. Elegant DIY classics, drywall installation. Gypsum Fireplace install.

 You can also use old furniture that has served its purpose as a material. Usually very original items are made from it. Such products in finished form can decorate any room. They are rarely found in apartments, so they look unusual and attractive. It is customary to decorate the surface of the structure with beautiful elements.
If you use an electric fireplace to create a fireplace, it will become an additional source of heat and light. This product will be very useful on cold days when the central heating is not yet connected.
Almost all fireplaces have massive covers that are used as a place to place photos or decorative items. They look especially impressive on New Year's Day, when they are decorated with festive garlands, fir branches, and socks for gifts.
Sometimes false fireplaces are made to hide defects or communications, for example, sockets, wires. Often apartment owners try to hide heating radiators located in the corner under the window or in the wall adjacent room. This flaw can easily be turned into a living room decoration. Around the radiator is done decorative portal, from which heat continues to flow.


Decorative fireplaces have now become very popular because their installation and creation do not take much time and effort. It's much easier than making a real hearth. Such products have the following advantages:

Although no one plans to start a fire in such a device, you should still not put paper or other flammable things in it. This is dangerous if the fireplace is built into the radiator area or when there are electrical appliances in the firebox.
Few interior items are so associated with the concepts of “comfort” and “home warmth” as a fireplace. On the fire, people in their homes cooked food, gathered together, rested and warmed up in front of the flames of burning wood.
Today, to have such a warm corner, it is enough to use a false fireplace, built with your own hands, and it is not at all necessary to build a real one. Even an imitation of fire will attract the eyes of guests and home owners.
What is a false fireplace
False fireplaces are lightweight compared to brickwork. There is no need to install a chimney, the installation of which will require permits and design documents from various authorities. You can add electric decorative heaters with a visual flame effect.
A pseudo-fireplace is just a decoration, one of the decorative techniques when decorating any room. This structure is suitable for rooms in apartments, country houses and country houses.
Advantages
First of all, this design is quite successful design solution when masking flaws in the layout of communications: in the box you can hide unsuccessfully protruding heating pipes, a large number of sockets and wires.
Advantages:
- finishing styling can be selected for any direction;
- no open flame;
- wide variety of materials for self-installation and decoration without specific skills and specialized equipment;
- ready-made portals with and without finishing are available for sale;
- concealment of communications;
- can serve as a shelf for books and souvenirs.
Depending on the width of the top cover and the reliability of the design, not only small figurines and candlesticks, but also large vases can be placed on the resulting tabletop.

Types of false fireplaces
In order to begin choosing materials, you need to decide on the type and design of the fireplace, what it will consist of and where it will be located.
By type they are:
- reliable or as realistic as possible;
- conventional fireplaces with partial imitation;
- symbolic.
Depending on the size of the room, the type of structure is selected. For spacious living rooms in country houses a reliable type will do. He will be able to emphasize the stylization of the room and become bright accent. Conditional and symbolic are more often made in apartments and have small sizes.
Reliable
This type of design contains all the elements of the original, thereby achieving visual authenticity. Real dimensions are used with imitation of a “live” flame. For this task, electric fireplaces or special panels with suitable graphic display are installed in the resulting niches.
Materials for the base of the portal are used with increased resistance to loads. This is a rather expensive option.

Conditional
A less expensive option made from inexpensive building materials. Dimensions are selected according to the size of the room. The side width of the frame can be 10-20 cm with the width of the top cover five centimeters longer. These models are mainly used as shelves.
The finish can imitate brickwork, wood grain and plaster stucco. Niches can be equipped decorative corner, where to add scented candles and other decorations to represent the hearth. It is possible to install panels with graphics.

Symbolic
You can make a decorative fireplace with your own hands from polyurethane cornices, moldings ( decorative details in the form of a convex strip), wooden planks and even thick cardboard. In design, they are more reminiscent of a picture frame. The hearth can be painted or pasted with appropriate photo wallpaper. The design is made in a flat solution, as a result of which the width of the top shelf cover can be only five centimeters.
A symbolic false fireplace is suitable for small or narrow rooms - when there is nowhere to place it, but you really want it.

Materials for manufacturing
After choosing the type and dimensions of the structure, drawing up a drawing, determining the style direction and color range you can begin to determine the future fireplace necessary materials.
Brick
Suitable for mounting the frame of a high-quality portal. Due to its heavy weight, use is only permissible in country houses. Even the hollow look is not suitable for an apartment. Ceilings may not withstand such a large point load.
For exterior finishing brickwork can be imitated with almost any finishing material: gypsum, plastic, foam “bricks” or even putty. You can simply paint them or cover the fireplace with vinyl 3D wallpaper with the corresponding image.

Laminated boards
LDSP (sanded chipboard) or MDF ( medium density fiberboard) suitable for assembling the frame, and how finishing coat. If a frame is assembled from slabs, then the finishing can be done with an imitation of the same wood or brick.
Suitable for this:
- plasters and putties to create texture;
- paints and varnishes;
- stucco.
The purchased laminated MDF may not require additional finishing. All screw heads can be sealed with special tape, seams and joints can be covered with moldings.

Polyurethane
Ceiling cornices, small and large pseudo-stucco parts are mainly made from this material. Since it is lightweight, the frame can be made of lightweight chipboard, MDF, or plasterboard. Before gluing, the surface must be treated with a primer or PVA glue diluted with water in a 1:1 ratio.
Various elements suitable for creating imitation fireplaces with your own hands in an apartment where there is very little space. The most important thing is to choose the glue, since fastenings with screws and nails are unacceptable.

Drywall
Used for covering the frame of a portal assembled from metal profiles or wooden blocks. It is installed in dry rooms, because when exposed to moisture it swells, deforms and delaminates, and ultimately crumbles.
It can be used for cladding curved surfaces. For example, an arched vault. It cuts effortlessly, the screws are easily screwed in, and the surface is smooth. As a finishing material from gypsum plasterboard ( plasterboard sheets) make bricks and paint them in the desired color.

Tree
Wood - quite high quality and reliable material both for the frame and for the cladding. Various bars and planks can be used to create the base of the portal. For decorative border elements, you can use purchased blanks with wood carvings, parquet boards and their trimmings. They lend themselves well to processing when creating aging effects.
Do not forget about protective impregnations that repel all insects, as well as protect against mold and fungi. Appropriate varnishes are used to add gloss or matte finish.

Styrofoam
If large loads are not envisaged, then a frame can be mounted from foam sheets. Otherwise, this material is used in the form of elements to decorate the same cornices or rosettes for stucco molding. You can also cut out figures from it yourself.
Foam plastic is not afraid of moisture, but is unstable even to light impacts. It must be glued with a special glue; others can simply dissolve it.
Painting should be done after priming and only acrylic paints- solvent-based enamels destroy it.

How to make it yourself
To make a false fireplace yourself, you do not need to have construction skills or design education. You need to choose the type of construction and materials that will not cause difficulties to work with.
Preparation and sizing
At the preparatory stage, a sketch is drawn or a photo is printed ready-made version from the Internet. On this basis, a drawing is made with dimensions, then materials are calculated.
Dimensions are selected based on the size of the room. They must be proportionate to the room in which the installation will take place. A small fireplace will get lost in a spacious living room, and a large one will clutter up a small bedroom. Optimal size is 1/3 of the length of the wall along which the structure will be located.

Polyurethane for the portal
Ready-made portals are sold with or without finishing. A wide range allows you to choose the size and style - from minimalism to luxurious Victorian, from classic straight lines to imitation wood carvings and gypsum stucco. The selected copy is mounted to the wall using glue.
Cornices, moldings and rosettes made of polyurethane are suitable for creating the desired composition. They are sold for painting.
Parts purchased:
- cut to the required size;
- mounted to the wall with glue;
- covered with finishing material.
As a result, you can get a fireplace that looks like wood, metallic, bronze with patina, or gold.

Plywood or old furniture
Materials that are easy to cut are plywood and laminated chipboard from old furniture. Preferences are determined based on the appearance of the finished structure. If in plans wooden version, then it is better to use plywood with a ready-made pattern, which is made brighter and more expressive with the help of impregnations. If the first layer consists of soft wood veneer, then the relief can be made with a wire brush.
First of all, a sketch is drawn indicating the dimensions. Then a drawing and calculation of the material is carried out to scale. This will help when purchasing a large sheet: having the dimensions in hand, you can immediately cut it into blanks. This makes it easier to transport, and all you have to do at home is assemble it.
If using an old cabinet, only a few cuts will be needed. Doors or shelves can be used for assembly using old ties or screws in their original form - this will significantly reduce the cost of the finished product.
Materials:
- plywood or old furniture;
- cornices, moldings or rosettes;
- putty for filling seams and creating a relief surface;
- primers, paints, varnishes and powders;
- glitter, rhinestones optional.
Tools:
- a simple pencil or marker for marking;
- alignment square right angle, ruler or tape measure;
- jigsaw or hacksaw;
- screws or ties;
- screwdriver and screwdrivers;
- sanding cloths;
- brushes and rollers.
Procedure:
- Mark the blanks and cut them out.
- Ends and varnished surface sand if necessary (depending on the planned finish).
- Assemble and twist the structure at the selected location.
- Add decorating elements.
- Cover with paints and varnish.
The final finishing can be done with putty and decorative cornices, followed by painting. If desired, glitter or aging effects are added.

Drywall - new life for leftovers after renovation
Even if you buy a whole sheet, it is not more expensive finished product. Details various configurations They can be easily cut out using a regular stationery knife, but to do this you need to apply the design on both sides with complete coincidence. A jigsaw or an angle grinder (“grinder”) will make the work easier, but there will be a burning smell and a lot of dust.
To reduce the amount of dust, the cutting line is soaked in water. But under the influence of water, plasterboard becomes brittle, and the edge can be broken. If you have an assistant, you can put him with a vacuum cleaner while cutting and do without moisturizing.
Materials:
- sheet for cutting or remaining trimmings;
- metal guides or wooden blocks;
- perforated corners;
- finishing putty;
- primer;
- painting mesh;
- paints, varnishes and decorations.
Tools:
- simple pencil;
- square, ruler or tape measure;
- stationery knife, jigsaw or grinder;
- smoothing and textured spatulas;
- level;
- screws;
- screwdriver or screwdrivers;
- sandpaper;
- brushes, rollers and sponges.
The dimensions of the portal are transferred to the wall in the selected location. After this is done visual assessment location and size: view from the window, door and from the opposite wall. If necessary, you can make amendments by marking them on the drawing and sketch.
Assembly steps:
- Frame assembly. Cut metal guides or wooden blocks are twisted according to the markings. IN concrete surface Holes are drilled and dowels are inserted into them. The resulting base is attached to the wall. All formed angles are checked with a square, and the vertical is checked with a building level.
- The prepared gypsum board blanks are screwed into place to the frame. The head of the screw should be slightly recessed. The pitch between screws is 10-15 cm.
- All surfaces are primed.
- The joints are glued masking tape and putty. If the corners cannot be made even, then you can use perforated corners.
- The dried surface is cleaned with sandpaper and re-treated with primer.
The portal frame is ready for decorative finishing.

Brick
This material produces very heavy structures, and when erecting them, it is necessary to ensure that the floor is able to withstand such a load. If everything is in order, then it is used for work facing brick.
To make the product beautiful, you need to have styling skills.
Materials and tools:
- lightweight brick of the selected color;
- primer;
- composition for masonry;
- container for preparing the solution;
- trowel and spatula;
- level;
- drill with mixer attachment;
- a simple pencil or marker.
Based on the drawing, you can independently calculate required quantity bricks and mixtures. If it doesn’t work out, the seller will help you with this when purchasing.
All works with construction mixtures must be carried out wearing protective gloves.
The solution is mixed in strict accordance with the instructions. Its quality characteristics are maintained for a certain period, which the manufacturer indicates on the packaging. Therefore, you should mix in small quantities so that you have time to use it before hardening.
Using a trowel, the mortar is applied to the brick, but without adding one centimeter to the edges: when tapping and subsequent loading, the mortar will not float along the side walls and will not smear the brick. The protruding mixture should be wiped off immediately with a damp cloth.
- A sketch is drawn and a drawing is made.
- Markings are made on the floor and wall.
- The location and dimensions are visually assessed.
- The brick is laid, wiping away smudges and forming masonry joints.
The lid is placed on top. A brick false fireplace does not require further decorative finishing.

Carton boxes
After purchase large equipment remain carton boxes, which can not be thrown away, but used as building material for assembling a fireplace structure.
For this you will need:
- cardboard or boxes;
- wood glue;
- scotch;
- tape measure and ruler;
- stationery knife and scissors;
- facing paper or wallpaper;
- paints, varnish;
- roller, brush.
A false fireplace made of cardboard can be a one-time craft for a holiday or family photo shoot. If it is no longer needed, you can throw it away or give it to someone. Children's creativity centers will be happy with such a gift.
Step by step execution:
- Draw the unfolded sheet according to the prepared diagram and glue the base of the portal.
- After drying, cover the joints with masking tape to strengthen them.
- Carpentry or wallpaper glue cover the portal.
At the final stage, paint and decorate the surface.

Foam
Another material for quick and inexpensive assembly of a product. It is better to purchase sheets with a thickness of 100 mm. The foam left over after purchasing the equipment is also suitable - it has a denser structure.
Based on the drawn up drawing, the amount of foam is calculated.
Materials:
- foam glue;
- primer;
- painting mesh;
- finishing putty;
- putty knife;
- level;
- metal cloth and a stationery knife.
It is better to cut foam plastic with a hacksaw with fine teeth - this will reduce the likelihood of breakage and the edges will crumble less. If you use a stationery knife, then cuts are made on both sides.
The workpieces should be glued only after priming with a special glue; other mixtures will not be able to do this. The composition is prepared strictly according to the instructions.
An adhesive solution is applied to the prepared markings and the blanks are installed. Before the composition dries, the level is checked for correct installation, and adjustments are made if necessary. The entire surface is covered with a painting net so that the putty does not fall off.
The dried frame is primed, puttied and sanded. Next comes the finishing touches.

Decorative finishing
The most creative moment in making a fireplace is its decorative finishing.
How to imitate fire
To create a picture of a fake flame, you can use 3D holograms with stereo effects, LCD technologies and digital panels.
Can be applied:
- an ordinary dummy painted on the back wall;
- LCD TV;
- Christmas tree garland with control of light transmission against the background of a 3D image;
- salt electric lamp;
- decorative firewood made of plastic or ceramics with or without internal lighting.
The listed materials are perfectly combined into a single composition and can both complement each other and create accents.

What to cover the roof with
The cladding option depends on the material from which the portal is made. For strong structures made of brick, plywood, plasterboard or chipboard, you can use something heavier.
Such as:
- boards;
- floor tiles from artificial stone;
- plywood scraps lined with laminate, porcelain stoneware or glass mosaic.
For more fragile structures, you can use the same material as for the false fireplace, painted in the same or contrasting color.

What to put in the firebox and how to decorate the back wall
If you need to decorate an electric fireplace, then the depth of the niche for it should be at least 40 cm, and it needs an outlet. In other options, a depth of 20 cm is sufficient.
A wide variety of elements can be placed in the firebox:
- candles with and without scent;
- real or artificial logs;
- large pebbles mixed with other colorful pebbles;
- diode tape along the contour of the bottom of the fireplace under transparent plexiglass, on which pebbles can be laid;
- cover the back wall with a photograph or draw the composition yourself;
- vases with flowers, figurines of different sizes and even soft toys.
Decorations for the back wall are selected depending on what will be in the firebox itself.
Finish options:
- continuation of the portal;
- cladding with plastic or gypsum “brick”;
- a painted or pasted picture;
- mirror tiles of different sizes or solid panels;
- mosaic tiles or small tiles with ornaments.
Even without a live flame, a false fireplace can bring a touch of calm and tranquility to an everyday evening.

Video about creating a false fireplace with your own hands
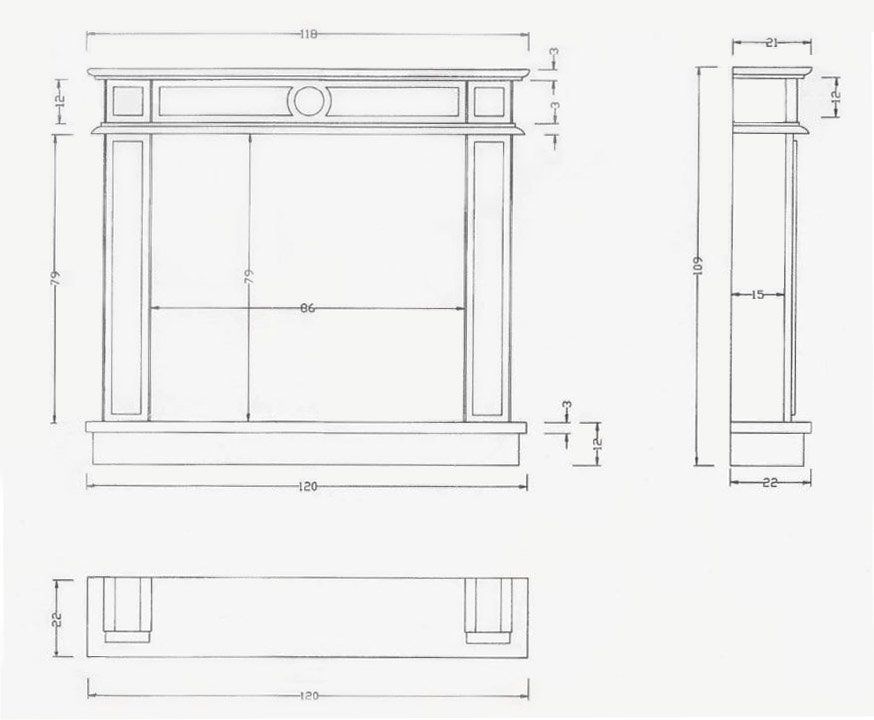
In the video - detailed description creating a false fireplace with your own hands, indicating its dimensions.
If just a few years ago an artificial fireplace was a symbol of luxury and an element of an elite interior, today such designs are available to almost everyone. Moreover, you can assemble an artificial fireplace with your own hands in the shortest possible time. First you need to choose optimal material specifically for your interior, and then arrange a decorative fireplace in accordance with simple and understandable instructions.
Artificial fireplace can be built from a wide variety of materials. First of all, think about exactly what the finished faux fireplace should look like. Choose the appropriate style, dimensions, shape and decorative elements.

Next, take a close look at your pantry. It is quite possible that you have a sufficient amount of some material left that is suitable for arranging an artificial fireplace. For the rest, be guided by your own preferences, remembering to take into account the important characteristics of each available material.

If a traditional wood-burning fireplace needs to be covered with exceptionally high-quality bricks with high fire-resistant properties, then to lay out an artificial fireplace you can use absolutely any brick - even facing brick, some colored decorative brick, even ordinary silicate brick.

You can immediately embroider the masonry seams and your fireplace will take on an attractive appearance. At the end, all that remains is to install the fireplace mantel. Brick faux fireplaces are best suited for country style rooms.
Take into account the fact that the finished structure made from the material in question will have quite a lot of weight, so before starting work, objectively assess the quality and reliability of the existing floors.

Fans of environmentally friendly materials should pay attention to wood structures. You can use parquet, unedged and edged boards. To give an aesthetic appearance, the wood is coated with stain or varnish. The fireplace itself is best placed on a platform made in the form of a pre-furnace sheet.
Wood is a lightweight material, so the dimensions and shape of such an artificial fireplace for your home can be almost anything, completely to your taste. When assembling a small structure, glue can be used to connect boards. If the device is quite massive, use self-tapping screws, or even better, a complex connection of self-tapping screws and glue.

If you wish, you can come to your nearest furniture store, buy ready-made panels there and lay out an artificial fireplace from them. High-quality MDF and chipboard boards are suitable. Plywood also works well.
The slabs can be pre-painted in the desired color or covered with decorative film. A fireplace portal of the desired size and configuration can be easily assembled from ready-made panels.
Chipboard can even be faced with tiles or decorative stone. Here, focus on your preferences and available budget.
DIY wood fireplace
Boards, furniture panels and slabs - all this is attached in approximately the same way.
First stage. Assemble the frame of the artificial fireplace. It is best to use a galvanized profile for this.

First sketch out at least a basic drawing of the future fireplace indicating the main dimensions. Cut the profile into pieces of the desired size using a hacksaw or special scissors.
Attach the vertical frame posts to the floor and walls using a screwdriver and self-tapping screws. Attach horizontal crossbars to the vertical posts for greater stability.
In the process of planning the step between the frame posts, pay attention to the dimensions of the selected material for the cladding, i.e. width of the boards, wood boards, shields, etc.
Second phase. Fit the sheathing boards to the frame. If necessary, trim the bottom, top or end boards to fill the entire space nicely.
Third stage.

Attach the sheathing to the frame using self-tapping screws. An electric screwdriver will help you with this. Screw in the screws so that their heads go slightly into the wood and are not noticeable in the future after finishing.

Fourth stage.

Cover the fastener installation sites with decorative plugs. Paint the trim, varnish it, or use another finishing material of your choice. Fifth stage. Install a fireplace mantel. You can place various decorations on it.
The shape and other design features depend solely on your personal preferences. Metal fireplaces fit best into high-tech interiors and other modern styles.

Metal faux fireplaces are more complex to assemble compared to their counterparts made from other materials. Therefore, you need to take the work as responsibly as possible and do everything in full accordance with the recommendations received.
The first stage is preparing a plan. Determine the preferred shape of the fireplace, the optimal dimensions of the structure, and think about the decorative finish. Display all your ideas on paper indicating important dimensions.
The second stage is marking work. Mark the wall for the placement of fasteners. If possible, try to make the markings as accurate as possible, observing all levels.
The third stage is the assembly of structural elements. The support of such an artificial fireplace will be a frame made of aluminum profile. Cut the profile into pieces of the required size and attach them to the wall in accordance with the previously applied markings.
Assemble the frame and attach it to the wall using anchors.
Install protruding structural elements. Cover the frame with sheets of the selected material. Typically, aluminum or stainless steel is used for cladding. To obtain more effective and beautiful design You can use metal sheets of different colors.
For example, you can make the main faces from light material, and the ends are made of dark, or vice versa. When done correctly, this technique allows you to avoid finishing the fireplace. Or you can sheathe the frame with the most ordinary sheet metal, and then simply paint it in the desired color.
The fourth stage is equipment installation. Place an artificial fire in the assembled base.
If the fireplace you choose is not just a decoration, but also provides warmth, before installing it, attach a layer of heat-insulating material to the inner metal walls of the base. Mineral wool insulation is ideal.


The most popular and easiest to implement option. The only difficulty for a beginner may arise at the stage of constructing a metal frame; you just need to practice a little.
Drywall is extremely easy to process and install. You can effortlessly cut the sheet into pieces of the required shape, bend drywall and perform other necessary actions.
DIY plasterboard fireplace
First stage. Make a frame using wooden beams or metal profiles. Assemble a box measuring 130x120x30 cm from plasterboard sheets. The box should have no bottom and back walls. Use a sharp knife or hacksaw to cut drywall. Glue the box parts together using assembly adhesive.


Second phase. Prepare a base measuring 150x40x20 cm from drywall. Install the finished “foundation” near the wall. For added security, glue the box to the floor using mounting adhesive.
Third stage.
Glue the previously assembled fireplace structure to the “foundation”. Install a suitable size mantel on top.
Glue it carefully ceiling plinth to the “foundation” and the main part of the structure. In the case of the main part of the structure, the plinth should be glued under the fireplace mantel. Here it is better to place it in steps, using products of different widths to obtain a beautiful smooth transition.
Sixth stage.

Install inside
plasterboard construction


your own artificial fire. Seventh stage. Finish the faux fireplace. Do as you please here. For finishing, you can use water-dispersed paint, wallpaper, foam tiles and other suitable materials.
Fireplace finishing. Possible variant
Pay attention to proper decoration of the surrounding space. The wall near the fireplace should be in harmony with it in style.
Artificial fireplaces lined with stone look very elegant, stylish and expensive. Decorative tiles will add a unique charm to the environment and become
worthy decoration
Third step.

“Try on” the cladding elements dry. It is most convenient to do this on the floor or some other plane. Simply transfer the projection of the fireplace to the surface and place the cladding elements on it. This way you can adjust the stones according to shape, color and other indicators.

Fourth step.
Proceed to attaching the cladding elements. To obtain the highest quality and durable coating, start tiling by installing the thickest tiles. You will be guided by them and will be able to understand what layer of glue to apply to thinner stones.
Attach the first tile in the lower corner. Lay out the corner completely and proceed to installing the top horizontal row of cladding. The stones will be attached in the direction from the top of the fireplace to its base. To attach the tiles, it is recommended to use adhesive specially developed for such materials.
Usually the glue dries in 2-3 days. Check the instructions for your product for the exact time. Wait for the glue to dry completely and rub the seams. First make sure that the selected grout does not leave marks on your cladding. This can be done on some third-party piece of stone.
Decide on the most suitable material for your case and start arranging an artificial fireplace.
If none of the materials considered suits you, you can use your imagination and create a truly original design. For example, some masters make beautiful hearths from large aquariums. It is enough to fill the bottom of the container with pebbles and install a bio-fireplace in it.