Volumetric images on the wall can become an original decoration of the interior. Unlike moldings (decorative overlays), they are created only by hand. Making a high-quality bas-relief is painstaking work, but with a strong desire and the presence of at least elementary modeling skills, you can create it yourself. Beginners can use stencils.
Materials and tools
To create a bas-relief you will need:sketch of the future image;
pencil, marker;
plastic sheets for creating stencils;
Bas-relief stencil
masking tape;
color or paint for gypsum solutions (if the bas-relief is colored);
paint brush;
palette knives: steel or plastic blades used to create textured and embossed images;

Palette knives
Gypsum, plaster, clay, alabaster or other plastic material.

Gypsum kneading
Create a sketch
Even if the work will be done using stencils, it is necessary to make a life-size sketch of it to check how the drawing will fit with the rest of the decor of the room. You may have to correct it - remove the excess or, on the contrary, add details to close some gaps. The finished drawing is transferred on tracing paper or thin film.
Transferring an image to film
For beginners, it is better not to use too voluminous images with multi-stage relief. A large flower or a composition of several flowers, fruits or berries, branches with leaves, the simplest contours of animals, birds, etc. will look quite original on the wall.

A three-dimensional image may consist of several simple details transferred to the wall using a stencil
Surface preparation
The bas-relief is performed on a pre-leveled and plastered surface. To increase adhesion to gypsum or plaster, it primed at least 2 times. In a room with high humidity, it is better to use an antifungal composition.So that the wall does not look perfectly flat, you can apply a base of acrylic putty or satengipsa(fine-grained gypsum). To obtain a relief surface after applying the solution, the wall is treated with a roller or spatula with chaotic strokes. A fairly original and convex pattern can be obtained even with crumpled paper or film.

Obtaining a relief surface using a wrinkled film

Venetian plaster

Creating an uneven surface with a spatula
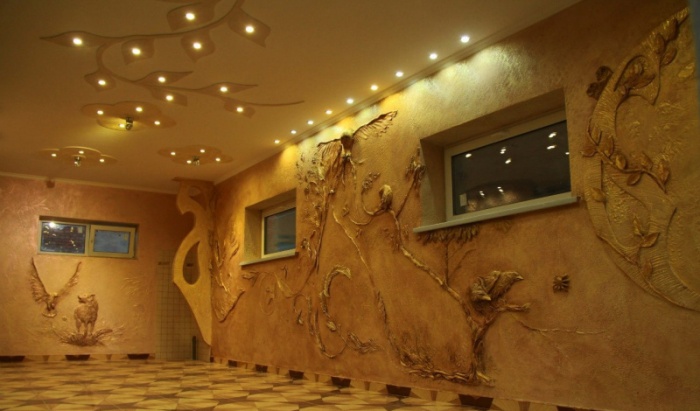
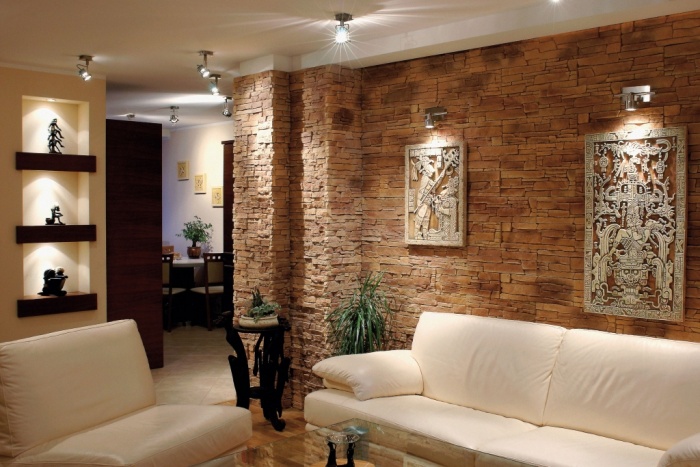
Looks very original bas-relief with backlight. In order not to damage the image and not cover it with dust, it is better to install lamps for it in advance.

Volumetric image on the wall with backlight

Bas-relief lamp
Making a bas-relief
1. To move sketch on the wall, you should fix the carbon paper on it, and then attach the drawing on top with masking tape. Places of gluing in the future are carefully rubbed.2. You can transfer the sketch to the wall in another way. To do this, a small layer of solution is applied to it, a drawing is applied, and its contour is outlined with a palette knife with a pointed end, a match or a toothpick.
3. If the bas-relief is voluminous, it is better to twist it in the thickest places of the image self-tapping screws. They will act as reinforcement, preventing the image from crumbling.
4. Material for stencils should be thick enough. Moreover, the more voluminous the bas-relief is, the greater the thickness of the stencil should be. It should be removed very carefully so as not to damage the image. A damaged bas-relief can be corrected at any time.
Advice. You can remove minor irregularities and flaws after the plaster or gypsum has completely dried. To do this, along the edges of the picture, you should walk with fine sandpaper.
5. Convex images can also be obtained using wall mounts cardboard blanks or pieces of foam, followed by coating with a solution. It will hold on stronger if the blanks are pre-treated with a primer.

The blank for the bas-relief can be fixed on self-tapping screws
6. Additional strength to large elements of the image can be given with a regular or plaster bandage soaked in a solution. You can buy it at any pharmacy.

Plaster bandage
7. Plaster, gypsum or alabaster are diluted with water according to the instructions. The solution is thoroughly mixed.
8. Mortar is applied to the wall in several layers. Each subsequent layer should be performed after the previous one has completely dried.

Drawing an image with a palette knife
9. Convex parts are rolled out with your fingers, and then attached to the wall, slightly pressed down and leveled.

Bas-relief of grapes
10. The last layer of the image is best done from a finishing (fine) putty, which is easy to grind.
11. Drawing small lines and sealing cracks is done at the end of all work.
12. Thin veins on leaves and flowers can be applied with a medical syringe.
13. The finished drawing is covered with a primer. Such a topcoat will not allow plaster or gypsum to crumble.
Advice. So that the bas-relief does not crack when it dries, it should be periodically moistened with a damp brush.

Entrance door decoration
14. You can colorize an image in a variety of ways: like adding acrylic paint colors directly into the solution, and by applying paints for gypsum mortars with an art brush. Excess paint is removed with a damp sponge.

coloring image
Advice. You can get subtle color transitions when applying paint to a still wet bas-relief.

Finished Image
Terra technique
Work in this technique does not require special skills. Just stock up ahead of time. dry branches, herbs, flowers or ears of corn. You can also use sand, cereals, noodles, small stones, etc.On primed with PVA glue wall (it should be diluted in a ratio of 1: 1), using the same PVA, a composition of dry plants is pressed. After the composition has completely dried, the drawing is covered with glue several more times, and then processed with acrylic paint or finishing putty.


Advice. If you treat the foliage and flowers that have not yet turned yellow with glycerin, they can be preserved. In this case, real color pictures of herbs and leaves can be created on the wall. So that they do not crumble, they are treated several times with PVA glue.

Bas-relief of sunflowers treated with glycerin
28.06.2019 0
How to make a bas-relief with your own hands step by step on the wall
Originality, beauty have always been in a special place in the interior of the premises. The bas-relief on the wall is a drawing that is only half the volume. The sophistication and creativity of the decor is due to the correct location of the fragments on the surface.


Carving on stone or wood, as an element of decoration of the interior of the premises, appeared many centuries ago. The protruding half-dimensional decor can depict any animate or inanimate object.

In the art of creating sculptures, there are two concepts: bas-relief and high relief. Their main difference is in the height of the figures. For example, if a fragment protrudes from the surface a little more than half of its volume, this is a high relief. In addition, the high relief elements are much higher, and some of them can be freestanding.
The bas-relief organically fits into the interior in any light (except very dim). High relief, on the contrary, needs only diffused light.
Advantages and disadvantages of the bas-relief on the wall
Like other types of finishing work, the relief on the wall has its own advantages and disadvantages. Among the special advantages is the ability to create an image in almost any room. Subject to all the rules in the process of compiling and applying decorative ornaments, you can:
- Disguise errors in the wall, including significant differences;
- You can create a whole panel and thereby occupy an empty wall;
- Visually zone the room;
- Ability to create unique compositions;
- Individual interior with a special charm;
- If desired, the whole process can be carried out independently, without resorting to the services of a master.

Among the main disadvantages:
- The presence of a certain experience, creativity and at least the basic skills of an artist;
- The process is time-consuming, scrupulous with drawing and performing the smallest details, therefore, most often all work is entrusted to masters. The cost of such work is quite high.
But still, if you have a lot of information with step-by-step instructions, you can create a high relief on the wall yourself. There would be a desire and time.
The main types of materials from which the bas-relief is made
Initially, only stone or wood was used to create compositions. The modern choice of materials is much wider. Today's elements can be built by hand or by casting. For a bas-relief on a wall with your own hands, almost any material that can be cut, sculpted is suitable, it can be suitable for pouring into the appropriate shape:
- Gypsum;
- Limestone;
- Clay;
- Polymer compounds;
- Stone;
- Wood;
- Decorative and other similar compositions.

To artificially add age to the elements, a patina is applied to them. To give additional volume, they are covered with bronze or gilding. At the same time, the bas-relief harmoniously looks with wrought iron, stone. Therefore, fireplaces are often decorated with such decor.
The main types of drawings for bas-relief
The first images of the bas-relief must necessarily contain the figure of a man in their composition. This attribute is currently optional. Thematic focus, as well as the number of panels, dimensions depend on the total area of the room.
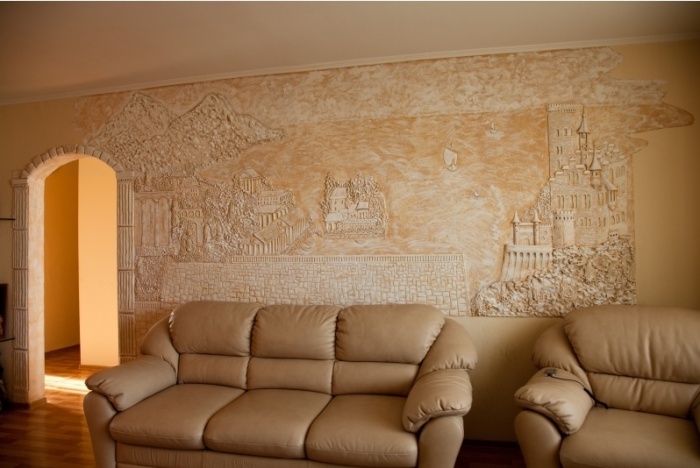
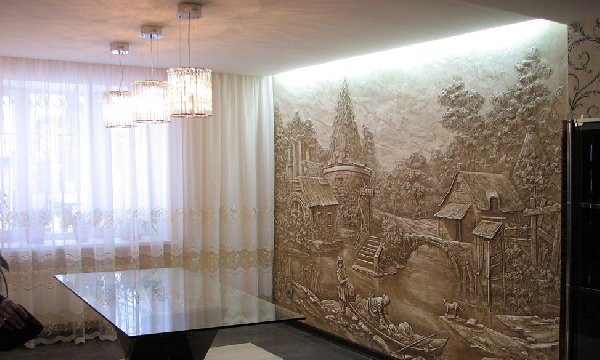
These can be plot compositions that occupy an entire wall or only a small corner. Previously, it was assumed that embossed three-dimensional images are relevant only for classical styles with their inherent soft lines and elaborate details. Several types of images are popular.
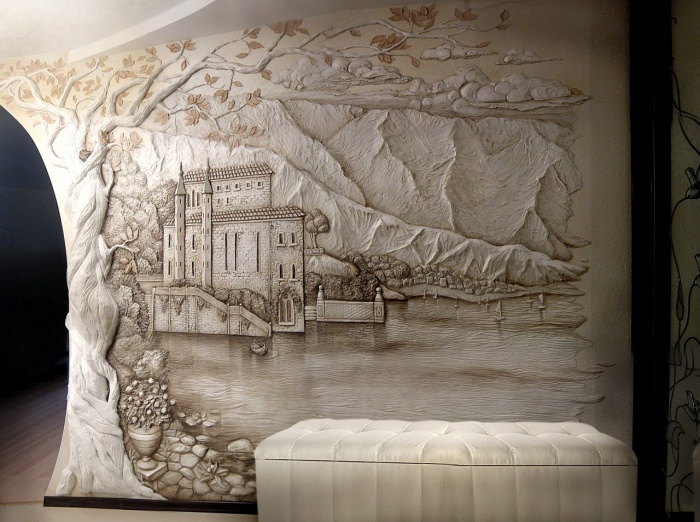
Nature (landscape)
This type of bas-relief is relevant not only for classics, art nouveau, modern, empire or rococo, but also for modern design trends. You can depict a small area of \u200b\u200bthe forest or think over a seascape. These include coral fields, schools of fish, algae, the image of a newt.

Sakura
The bas-reliefs of cherry blossoms on the wall refer to the Japanese flavor, which can be complemented by images of dragons. A branch of cherry blossoms looks organically on the hay of the hallway, kitchen. The whole tree has a bright personality. The living room especially benefits from such a composition.
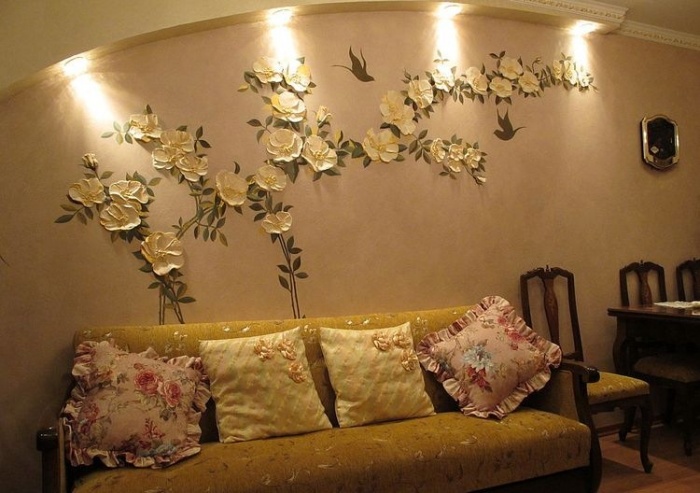
Rose
The association with flowers is immediately evoked by the bas-reliefs of roses on the wall. There are a lot of options for its use, as well as varieties of a flower. In a bedroom with a classic design, embossed panels with lush tea roses will be appropriate, not forgetting to paint them in the appropriate color. A scattering of small little roses is suitable for any room. Having chosen the right shade, such an ornament looks good with materials such as stone or textured brick.

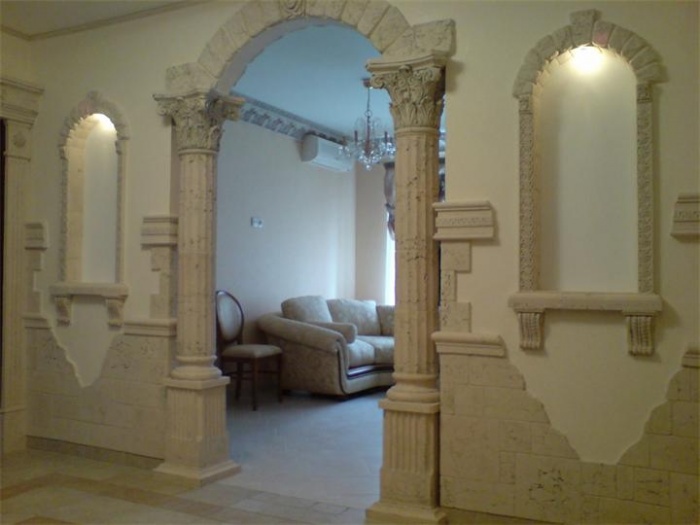
Vine
The vine ornament will emphasize the sophistication of the Italian style. It can decorate columns or empty niches. A white vine looks good on painted walls and vice versa, a colored vine will serve as an accent on a white surface.
apple trees
The bas-relief tree on the wall is equally suitable for any room. However, given its size, the hallway should be treated with special care. The voluminous bas-relief in this part of the house is able to visually reduce the already small area of the room.

And other options
Drawing volumetric drawings on the walls can have different themes. It all depends on the skills and practical experience of the master. The more panels with the presence of small details, the more difficult and painstaking work.
Necessary materials and tools for creating a bas-relief on the wall
For sculpting on the walls in an apartment with your own hands, you will need specialized tools that can be purchased at art stores or building markets. As a container for mixing the solution, experts advise choosing a ball, or rather half of it. By turning it inside out, you can save time scraping and cleaning the last batch and preparing the next batch. In addition, it is very convenient to collect a solution from such a container, since it has no corners.
Palette knives are special spatulas in the form of spatulas of various shapes. To create some elements of the bas-relief, for example, a vine, you will need convex and concave palette knives. They cost more, because masters often replace them with ordinary spoons of various configurations and volumes (coffee, tea, dessert, tablespoons).

Easy to use plastic spoons. A little heat will help to give the desired shape to the handle-holder.
As a rule, an aluminum spoon serves as the main tool, and a plastic auxiliary one. An art knife is used to create a fine texture on the image. An ordinary shoe knife can serve as its analogue.
A confectionery syringe with nozzles, as well as a medical syringe that helps to create very fine lines. Additionally, you will need brushes, 2 flat and 2 round. Before each intake of the next portion of the mixture, the instruments (except syringes) are pre-dipped in water.
Preparatory work before creating a bas-relief on the wall
At the preliminary stage, it is important to prepare the surface for the process. The wall should be cleaned of the previous coating. Leaving a layer of putty, primed and let dry well. In order to give additional strength to the bas-reliefs, two-thirds of the self-tapping screws are inserted in thicker places. Flower petals and other similar parts are prepared from foam (cardboard or salt dough) in advance, after which they are carefully treated with a primer.
Make a solution according to the attached instructions. At this stage, it is very important to know the characteristics of a particular mixture. How long does it take to set, is it possible to add dyes to it, and so on. If the bas-relief contains elements with a bulge of 10 millimeters or more, you need to make a wire frame (reinforcement). For the manufacture of various elements, ready-made forms are used. If these are not commercially available, then you can make them yourself.
Stages of creating a bas-relief on the wall with your own hands
Masters advise beginners to use ready-made molded parts that can only be attached to the surface. You can also form a convex pattern using a template.
- A drawing is applied to the surface with a simple pencil. Without special creative skills, you can use ready-made stencils, drawings printed on tracing paper, after which it is drawn on the surface with a marker. Also, the contours can be circled with a toothpick;
- After setting the mixture, it is necessary to apply the contour of the ornament. Only after that, the volume is increased. Putty should be applied to separate areas. Each subsequent layer is applied only after the previous one has completely dried;

In some cases, an in-depth image is required. It can be done in two ways:
- Grow a background layer around the image. At the end, the background is sanded.
- Make notches corresponding to the image using a chisel or cutter.
- Covering the surface with an ordinary transparent film, if necessary, draw the details;
- After the finished relief image has dried, it is painted in the desired shades;
- Use sandpaper to remove unnecessary irregularities.

Features of creating a bas-relief from different materials
Each material has its own characteristics in processing. In interiors, gypsum or wood is most often used.
from wood
To create a bas-relief from wood, in addition to the source material, you will need slightly different materials. Mills of conic and trailer form. The first cutter is used for finishing the canvas, the second for rough work. High-precision equipment, including special programs, is used for overall panels.

plaster
Gypsum is a very malleable material with good technical characteristics. It is with gypsum that masters advise beginners to start. With the right proportions, the solution is homogeneous with good adhesion.

Fastening the finished bas-relief to the wall
In the case of using a finished bas-relief, it must be attached to a wall or a sheet of drywall. The second option is applicable if you plan to make the bas-relief removable.
It is necessary to create a single conglomerate between the image and the base, removing any errors. To attach a separate picture, you will need special tile adhesive. If the image is overall, then it is fixed with the help of self-tapping screws, nails. The finished panel should be sanded with sandpaper. After cleaning all the seams and depressions, the surface is primed and painted with water-based paint.

Creating such a decor is initially difficult. It requires skill, patience and perseverance. In order for the images to turn out to be of high quality, it is necessary to strictly observe the application technology. Otherwise, the structure will not be able to dry to the end and will soon collapse.
Let's talk about how you can make a bas-relief with your own hands. This issue worries many property owners, and therefore deserves a detailed study. Many people in our time are trying to bring some zest to the created interior.
For example, the bas-relief in the interior is gradually gaining new fans. It makes it possible to implement interesting ideas for decorating the interior of a living space into reality.

How to make a bas-relief on the wall with your own hands? Stylists often use this design technique when decorating mansions that have a real fireplace.
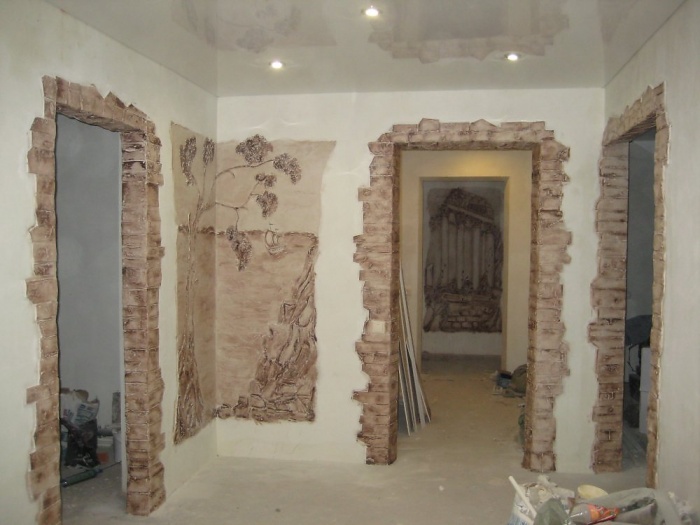
Original gypsum ornaments can encircle the fireplace, as well as decorate window and door openings.
Attention! Aerobatics in the interior world is considered a decorative pattern, which includes additional lighting. With its help, you can give images the volume of 3D graphics.
How to make a bas-relief on the wall with your own hands? We offer step-by-step instructions, the observance of which will allow you to create an original relief on the wall with your own hands.
How to create a three-dimensional drawing with your own hands
Those owners of country houses, whose profession is not related to repairs, believe that such a decorative element as a bas-relief is a prefabricated structure cast from plaster. In reality, this decorative element is made by hand, so it can be considered an original work of modern art.
Any elements of gypsum and putty are unique decorative elements; when they are created, a sketch is first drawn up.
Advice! In order to create a three-dimensional drawing on the wall, you need some skills and abilities, compliance with technological features.
Before creating bas-reliefs on the wall, it is important to first select materials. Currently, alabaster, gypsum, plaster, and clay are used to make bas-reliefs.
Having chosen the material for making the decor, you can proceed to the manufacture of the base, which will be the basis for the future bas-relief. For work, you will need a wooden box with low sides.
Attention! The bottom in the created box will be plywood.
The dimensions of such a box will correspond to the dimensions of the created bas-relief. Instead of a box, you can use a box that has a rigid base and walls. The base of the box is carefully covered with a polymer film, making sure that wrinkles do not form. Then you can proceed to the process of preparing the solution, fully observing all the recommendations of the manufacturer.
After the solution is ready, it is carefully poured into the mold.

Attention! In the manufacture of bas-reliefs with high patterns, wire will be required for the reinforcement process.
The poured mixture remains in the box until completely dry, the drying time depends on the composition of the solution.
Then you can proceed to the direct manufacture of the future bas-relief. The main condition is the creation of a certain contour of the intended ornament, followed by filling it with a mixture. The decor builds up gradually, and the previous layer must dry completely, only then it will be possible to create a new layer.
Advice! To draw contours on the finished surface, you can use the film. After all the contours are drawn, the film can be removed.
Interior stylists consider plaster to be a good material for making an original bas-relief. Among the many advantages of this material, we highlight the convenience of working with it when wet. This material is quite malleable, so you can remove excess plaster, adjust the shape of the pattern being created.
Plaster that is not completely dry can be sanded, giving the finished bas-relief a sophisticated look.
As a prerequisite for creating a high-quality and beautiful bas-relief, professionals note the complete hardening of each fragment.
In order to create recesses in the wall panel, you can use several methods:
- cut through the material and remove some parts of the created bas-relief with a chisel;
- build up the background around some point, which, after finishing, will be lower.

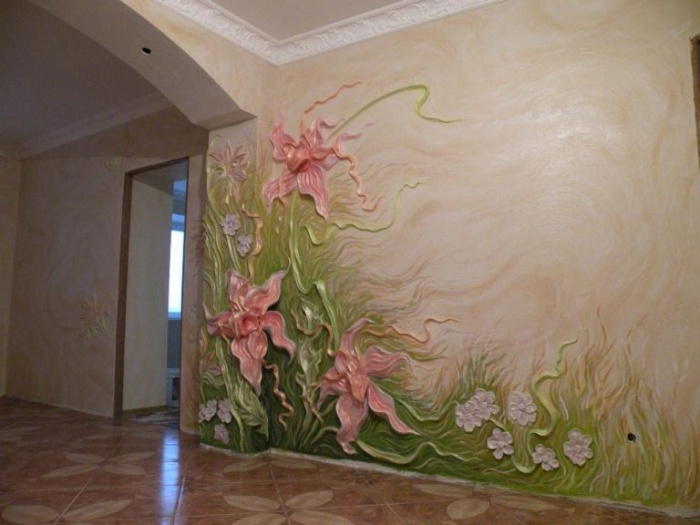
Basically, a flower is used as the basis for the images on the created bas-relief: a tulip or a lily. Not everyone will be able to make such a complex drawing on their own, so many owners of country houses try to order a bas-relief from professional craftsmen.
In order to simplify the process of creating a lily from gypsum or plaster, you can immediately apply it to the wall surface.
In such situations, all other interior elements must be covered with a special masking tape to prevent damage. Then the base of the pattern being created is covered with putty, and after complete drying, a primer is performed.
Advice! Professionals recommend choosing paint for priming - a primer, the properties of which make it possible to create an excellent coupling with the decorative elements of the bas-relief being created. It takes three to four hours for the finished mixture to dry completely.

With the help of a trowel, Marseille wax, which is a quick-drying material, is applied to the bas-relief. By fixing the film on the surface of the created bas-relief, it will be possible to draw small details.
Attention! The film must be fixed so that, if necessary, one of its edges can be bent.

The outlines of the planned pattern on the film can be drawn using a colored marker. Further, having unfolded the polymer film, on the traces made, you can draw a lily using Marseille wax. The painting is carried out on the wall, so there is no need to use a special substrate.
Many interior designers choose white wax for work related to the manufacture of bas-reliefs. The main task of the master is to give the created bas-relief optimal realism.
Advice! Acrylic paints are suitable for making the final layer of the created composition.

Conclusion
For a person who does not encounter such a decorative element, it is difficult to decide on an independent creation of an unusual bas-relief in his country house or city apartment.

Basically, the bas-reliefs depict trees, flowers, animals, birds, and also create original plot compositions.
The fashion trend of the last season is the creation of three-dimensional images, which are initially created in a box, then fixed on the wall.
Even when creating the simplest version of gypsum stucco, you can count on getting a solemn and elegant interior.
To obtain complex compositions, professionals recommend creating bas-reliefs directly on the surface of the wall.
The bas-reliefs fit perfectly into the interior of the bedroom, the living room space. With it, you can make the kitchen individual and unique, focus on its decoration.
Ready-made bas-reliefs are suitable for interiors of different styles, from modern to fusion. To create large paintings, you will need perseverance, accuracy, desire.
To make an individual genre painting, which will depict wild animals, you will need a professional master.
The modern kitchen is increasingly moving away from outdated norms in the design of this place in the house. The fashion includes originality, brightness, bold design, combined with convenience and practicality. The wall design sets the tone for the entire kitchen. And in this case, we are talking not only about wallpaper or painting, but also about wall decor. Among the large number of wall decor options in the kitchen, there is sure to be one that you like and will be available for implementation, for example, a drawing on the entire wall.
Kitchen decor
Ideally, the design of the walls is fully thought out at the stage of the kitchen project and if you are at the stage. But a number of possible ways of decor can refresh the kitchen even when the old design is “bored” and you are not ready for a major renovation. Consider possible examples of wall decoration in the kitchen.
Drawing on the wall
A great opportunity to make the interior stylish and original - drawing on the wall. This solution is suitable both for focusing on one of the walls, and for filling an empty space. The drawing can be applied both with a stencil and hand-painted.
To make the design fashionable and beautiful, such techniques as accenting zones, unusual combinations of materials can.
Acrylic drawings
In order to apply a picture on the wall that will delight the eye, you must either have the appropriate skills or contact a professional artist. Any interior designer can draw on your project, this is a fairly popular service.
Wallpaper is removed from the wall on which the drawing will be applied, the wall is leveled and painted in one tone. First, a drawing project is created, applied to the wall with a pencil. Then, after the approval of the project, a painting is made. A drawing on a wall properly prepared for application can last more than 10 years.
Before drawing a picture, you need to take care of the absence of all unnecessary elements that can reduce the effect of the picture: sockets, switches, protrusions. If it is impossible to get rid of them, they must be skillfully included in the composition.
Drawings with liquid wallpaper
The computer can also be used for the geometric method. On the Internet, you can find free special color matching programs and determine those color combinations that will look most aesthetically pleasing in your interior.
There are also ready-made mosaic modules, the choice of patterns is quite wide and satisfies any request. The technology of laying such a mosaic is greatly simplified.
To create a mosaic panel, special matrices, mosaic grids are used. The squares are glued to the frame and a tile of a certain size is obtained. Find out how to transform an old table with a ceramic countertop.
To create complex drawings, you can use special computer programs, they will help to divide the image into squares with great accuracy, select the optimal color for each fragment so that the resulting image is as close as possible to the original.
Mosaic laying
The mosaic laying process consists of the following steps:
1. Preparatory work. The surface on which the mosaic matrix will be applied is carefully leveled and primed. It is very important that the surface is well cleaned and dry.
2. Surface marking. Matrix sheets should be laid out on the floor according to the drawing, measurements should be taken. Then control marks are placed on the wall in accordance with the measurements.
3. Apply glue to the surface. After that, the laying begins directly. The adhesive does not need to be applied immediately to the entire surface, otherwise it will dry before the entire mosaic matrix is applied. The matrices are stacked and, after the final adjustment of the sheets to each other, are firmly pressed into the adhesive solution.
4. Grout. After you make sure that the solution has solidified completely, remove the protective layer from the mosaic, after soaking it. Do not wait for the grout to dry, as the grout will then be difficult to remove.
Mosaic adhesive must be of color, its type is selected in accordance with the surface material. A special spatula suitable for applying the adhesive solution should be about twice as large as the sides of the mosaic module. Proper selection of the spatula will prevent the adhesive from protruding onto the surface of the mosaic when laying it.
Bas-reliefs in the kitchen
Bas-relief is a three-dimensional painting technique, a convex image that stands out above the surface of the wall. The bas-relief can take the form of different objects, figures.

The bas-relief is made exclusively by hand from gypsum, plaster, clay, putty and other materials.
The bas-relief, additionally illuminated by a directional lamp, looks quite impressive. You should not create too majestic bas-relief: it is not easy to maintain and may look out of place in the kitchen.
Stucco in the kitchen
In the old days, such decorative elements as bas-reliefs and stucco moldings could only be afforded by very wealthy people. Currently, there are affordable materials and simple technologies that make it possible to design rooms in ordinary homes in this way. Stucco is created from gypsum or polyurethane. Polyurethane is considered the most suitable, as it is lightweight, resistant to moisture and easy to install. There is a wide variety of possible stucco decor elements: rosettes, borders, plinths, domes, cornices and other products.
Ceiling stucco molding is very popular in the kitchen. It gives the room a sophisticated look, allows you to hide some defects in the finish, and can also be used to install hidden lighting.
Watch the video of the master class on how to make a bas-relief with your own hands:
Volumetric drawing in the interior in the kitchen
With the help of decorative plaster, you can implement any design ideas: ethnic motifs, landscapes, retro elements and much more. A tree, columns or flowers protruding against the background of the wall looks great. Volumetric drawings are created using special stencils, but a guest artist can create complex decorative panels.

Modern bas-reliefs look unusual, stylish and fashionable.
The stencil allows you to apply a three-dimensional image yourself. To do this, you need to strengthen the stencil, put a layer of plaster mixture on top, after which the stencil is removed and, after drying, it is cleaned, leveled and painted.
What to paint on the wall: types of decorative painting
When choosing a plot for a picture on the kitchen wall, first of all, you should consider the still life option: the association with food looks appropriate, creates comfort and increases appetite. The theme of winemaking, images of gourmet dishes are well suited. Another classic option for the kitchen is various plants, flowers and birds, tree branches. Learn about the secrets of harmony in the kitchen according to Feng Shui by.
If you want to create a feeling of spaciousness, the pattern should be light. For this purpose, the image of landscapes, windows, valleys is well suited. Drawings of warm colors, picturesque compositions with nature, the old town, images of cutlery and funny chefs will help create comfort.
But even a beginner can draw such a drawing
So, modern tools allow you to create an unusual and unique design that does not require large financial costs and time to invest labor. Remember that decor is primarily wall art and a flight of fancy. Therefore, after reading all the tips and tricks, also use your intuition and imagination, and then you will find the very idea (theme) for your interior that will create the right atmosphere, warm the house and surprise your guests! And you can practice creating an interior in services where you can.
A bas-relief is a three-dimensional relief on the wall surface - an ornament or pattern that protrudes above the plane. It helps to create an exclusive interior, because each work is unique, and it is impossible to repeat it exactly.
Advantages of a bas-relief on the wall
Not a single type of finish can be compared in terms of aesthetics with a bas-relief. It attracts attention at first sight, looks unusual and interesting. You can create a drawing yourself. The advantages of the bas-relief are:
- originality and showiness of finishing;
- the ability to mask the unevenness of the walls;
- the ability to act as a means of zoning a room.
Even more interior design ideas can be found on the website https://masterinterera.ru/

You can create a bas-relief in the interior with your own hands, and this is another advantage of this type of wall decoration.

I don’t want to glue wallpaper, and painting the walls seems not an interesting enough way to finish - complement it with a bas-relief, which can be created from various materials:
- gypsum;
- plasters;
- clay.

The base can be made of wood or metal - they are poured or processed, creating original compositions on the wall.


Types and themes of bas-relief
Not every relief pattern on the wall is called a bas-relief, but only one whose elements protrude from the surface by no more than half. If more - this is a high relief.

The wooden bas-relief looks original in the interior, if you choose it according to the design style of the room, the color that matches the color of the furniture. In this case, it will harmoniously fit into the overall style.

Bas-relief ideas can be varied. Depending on the style, these can be plant and animal motifs, abstract elements or antique scenes look aesthetically pleasing. Size, plot and difficulty will depend on:
- the volume of the room;
- decoration style.

Often a three-dimensional image is made directly on the wall, however, it is possible to install pre-prepared plates with a ready-made relief. We also recommend that you look at the options for finishing with decorative panels on this site http://mirstrojka.ru/dekorativnye-paneli/


DIY bas-relief
Many people order wall decoration with volumetric drawings from specialists, however, knowing what to make a bas-relief from, you can do the work yourself.

For a bas-relief based on putty, you will need:
- putty;
- glue;
- putty knife;
- cutter;
- acrylic paints;
- brushes;
- stained glass outline.

At the first stage, a sketch of the future three-dimensional picture is transferred to the wall surface. It is transferred to paper, covered with a film and the contour is transferred to it. An abrasion-resistant marker or felt-tip pen is suitable for this.

Foundation preparation is the second stage. It is necessary to apply acrylic putty, fine-grained gypsum is the basis of the future bas-relief. They need to be leveled and allowed to dry, but not completely. After 15 minutes, you can get to work - transfer the drawing to the wall.

Fix the film on the wall with masking tape, circle the pattern so that the image is printed on the wall. Simple ways to create a bas-relief for beginners involve the following steps:

Putty is applied along the contour on the wall - one layer after another. Subsequent layers are applied only after the previous ones have dried.


Then, with the help of palette knives, they cut through the image, outlining every detail. The largest and most convex elements must be reinforced with self-tapping screws. So the image will be strong.


When all the details are drawn, the panels need to be dried well, treated with sandpaper. It is necessary to smooth out all the roughness, corners, convex and concave elements. Work at this stage requires accuracy and caution.

After finishing, the drawing is primed and painted. It is better to use water-based paint. In order for the surface around the three-dimensional drawing not to look unnaturally even, apply a small layer of plaster and treat it with crumpled paper, polyethylene, so that the surface becomes rough.

Do-it-yourself gypsum bas-relief has a slightly different manufacturing technology. It is better to use ready-made molds for casting elements from a mixture of gypsum and PVA glue. The mass should be like plasticine.

Using ready-made forms, you can cast individual elements of the ornament, dry it and stick it on the wall. Those parts for which there are no molds, or they are too small for casting, can be molded by hand.

When the whole drawing is ready, all the cracks are sealed with white sealant. Further, as in the case of putty, the bas-relief is coated with a primer and painted. You can apply paint, wax, add gilding.


Bas-relief in the interior
The bas-relief goes well with many finishing materials:
- plaster;
- marble;
- skin;
- tree;
- mirrors.

Numerous photos of the bas-relief on the wall of the living room or ceiling, in arched openings, niches, in bedrooms of different styles indicate that it looks harmonious both in a classic and in a room stylized as an antique interior.

A bas-relief that is simple in shape and pattern will give an original look to a modern minimalist interior, while a classic one is appropriate even in a loft style.

The bas-relief will be appropriate in different rooms:
- in the living room, with the help of a bas-relief, you can recreate the interior of an ancient castle, palace, or, conversely, complement a modern interior with it;
- in the bedroom, an original solution would be to place a large panel above the head of the bed or in the entire wall;
- in the kitchen, a three-dimensional panel is appropriate in the dining area or on the kitchen apron. You can decorate a whole wall or a free niche in this way;
- in a spacious bathroom, a bas-relief can complement the decoration of the walls with marble.
- in a large hallway, you can decorate part of the wall with stucco molding; for a small room, it is better not to use three-dimensional images.

Small stucco elements can complement a plain wall if paintings, photographs, shelves with souvenirs, collections are placed on others. This way it won't look empty.


Volumetric floral pattern fills the space well, without overloading the interior.

The room can be transformed if you complement the design with a few stucco elements on the walls or ceiling. Sometimes a bas-relief can become a compositional, organizing center of a room.

When creating a bas-relief, it is important to provide the right lighting so that the three-dimensional image “plays” - this will achieve the maximum decorative effect.

Photo of a bas-relief on the wall


