Since ancient times, people have tried to enclose their possessions with a fence, a hedge, unconsciously perceiving the fence as a symbol of reliability and strength. But many do not think about the fact that the fence has not only a protective function, but also a decorative one. There are many types of fences. When choosing them, it is advisable to resort to the help of contractor teams who perfectly know how to build a fence. There is quite big choice materials from which it is possible. For example, wood, concrete, stone, corrugated board, metal, net or plants (for hedges).
Types of fences: corrugated board, brick, stone, concrete, picket fence, chain-link mesh.
Consider the features of the main types of fences, options for their construction and some of the nuances.
And then we build a fence.
Building a wooden fence
One of the less labor-intensive options for fencing, as well as the least expensive in financial terms. More wooden fence with its wide distribution, it gives you the opportunity to roam your imagination in choosing a construction method.

So, how to build a wooden fence? Mounted wooden fence is quite easy. The pillars go deep into the ground approximately 120 cm, after which they are poured with cement-concrete mortar. The installation depth of the pillars is determined by the soil and terrain features. Often used as poles profile pipes diameter 60*80 mm. Next, the pillars are connected by girders, which are attached respectively to the pillars, and lastly, the boards are attached - the main part of the fence. In order to install the posts evenly, first install the first and last. After that, pulling a rope between them, they mount the remaining ones, equaling the extreme pillars. When choosing such a fence, it is necessary to take into account the mandatory annual impregnation to prevent decay.
Back to index
Building a metal fence

A metal fence is rightfully considered one of the most expensive, but also the least demanding of care (some types are desirable to be painted once a year). During installation, pits are dug for pillars with a depth of at least 1.5 m. After installing the pillars (they are poured with a cement-concrete mixture), horizontal railings from the corners are welded. Their number will depend on the height of the fence, the recommended distance is 50-70 cm. Holes for bolts are drilled in the corners, after which they proceed to fasten the sheets of the fence itself using self-tapping screws or special rivets. Sheets are overlapped. It should be remembered that for the opening of the gate, poles are installed with a larger diameter. A metal fence is very difficult to install yourself.
Back to index
We build a brick fence

A brick fence on a strip foundation with blind masonry between the pillars: 1. Strip foundation 2. Ground level 3. Iron pillar 4. Brickwork
Of course, there are many ways to reduce the cost of a brick fence, but they are all used at the expense of quality. A strip foundation is necessarily made under a brick fence, since a brick fence is a rather heavy structure. Used for laying bricks cement mortar, and for better adhesion, the brick is pre-soaked in water. It is necessary to ensure that between the rows of bricks there is the same amount of mortar. Excess solution must be removed immediately. At the end of the work, the seams of the fence are treated with a special compound or protective impregnation.
Back to index
concrete fence

It is impossible to cope with the installation of the fence on your own without certain knowledge. How to build a concrete fence? Before installation, the site is marked, you need to calculate overall length fence, determine the location of future gates and gates. This is followed by the calculation of the differences in ground level and the height of the fence. The method of installing the fence, the location of long and short openings will mainly depend on the quality of the soil. Then markings are made for the location of future pillars, gates, gates. Pits for poles are dug to the depth of soil freezing, approximately 1.5 m. Sand and gravel are laid in the pits to the height of the lower part of the pole. Water is poured from above, and only after that the supports are installed. A plinth slab is laid between all the pillars. And only after that the plates are poured with liquid cement. After the cement has hardened (usually 3 days), you can proceed with the installation of the remaining part of the fence. The wicket gates are hung last.
Arrangement of a summer cottage without fail implies the installation of a fence. It plays an important role in protecting adjoining territory from the penetration of unwanted guests, animals and prying eyes. Also, the fence clearly defines your entire territory. Today, fences are of various types.
Country fences can be made of a variety of materials that have their own distinctive features. In this article, we will divide all existing structures into classifications of their structures and materials used. We will present to your attention the main types of fences for summer cottages. After that, it will be much easier for you to make your choice.

Classification of fences by design
There are 3 types of design classifications:
- Open.
- Deaf.
- Combined.

An open fence in the country is used very often. It has many positive aspects. For example, its construction will be quite cheap. In addition to saving on building materials, the pace of its construction is very accelerating. In just a short period of time, you will have a new open fence in your country house. Open does not give much shade. This allows you to plant a variety of plants, especially those that need sunlight.

As for the deaf structures in the country, such structures are mainly built in order to protect their territory from prying eyes. Plus, through a blank fence in the country, less dust penetrates. There are plants that are unpretentious and can be planted along a blank fence, even if there is a lot of shade. Some summer residents even plant fruit trees.

The last type of construction is combined. It can be both simple structures and complex ones. There are no special rules here. For example, a part may be deaf, and individual elements open. In this case, you can use various building materials and technologies. It all depends on your vision of the whole situation. This article provides many options for fences for giving in the photo. This will help you make your choice.
Advice! When choosing a fence design for a summer residence, consider who your neighbors are, the landscape, financial opportunities and personal preference.
Material classification

Now we come to a more voluminous section that requires serious research. The modern market offers a wide variety building materials, which allow you to build a simple fence in the shortest possible time. We suggest you consider the following categories:
- Wood.
- Metal.
- Polycarbonate.
- reinforced concrete / brick.
Wood

If we talk about the availability of material, then wood best option. Built fences in the country made of wood are distinguished by their durability and beauty. However, such a construction requires special and regular care, for example, from time to time to paint and replace rotten elements of the fence. Plus, wood is recommended to be treated with fire retardants and other antiseptics to protect it from negative impact environment. As for the disadvantages, this is the likelihood that, under the influence of atmospheric phenomena, the wood may crack, change color, and so on.

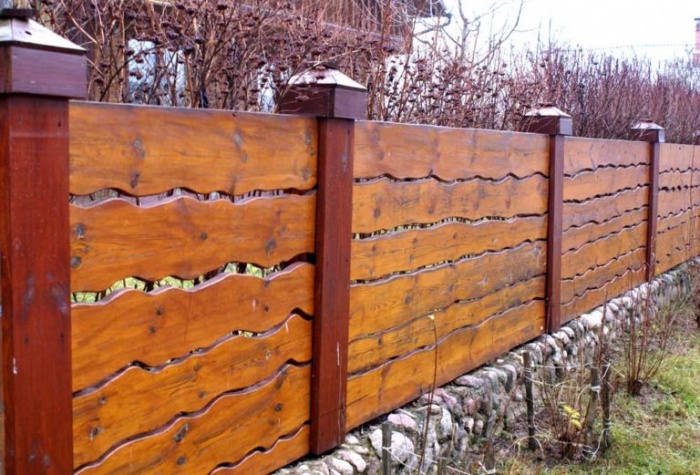
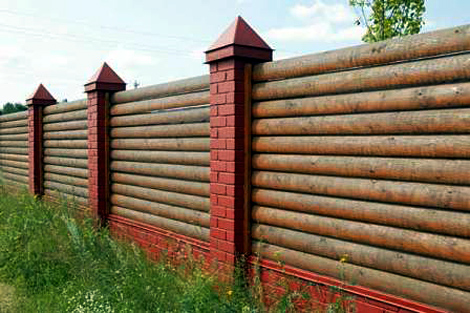
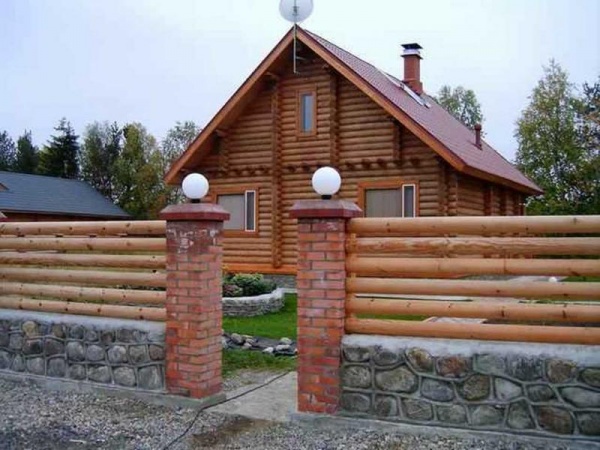
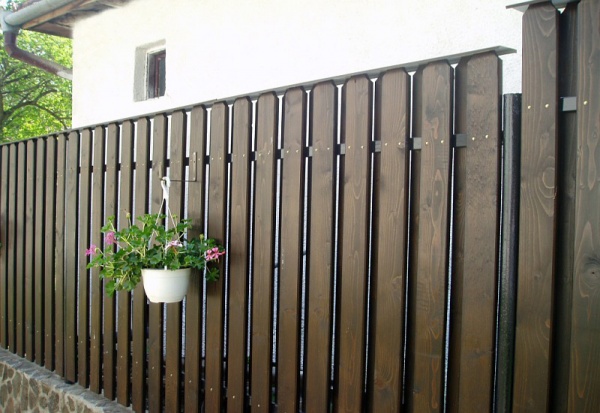
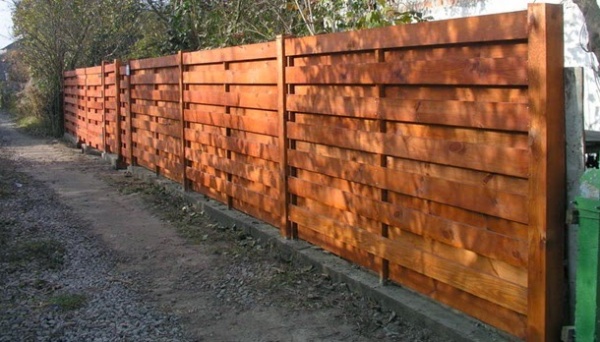
Today, there are many varieties of what kind of fences can be built from wood in the country. For example, a log cabin is often used. Beautifully laid bars horizontally will give your dacha a beautiful and unique look. Some install the bars vertically. This is a more time-consuming process, but the result is worth it.

Among other things, a picket fence is used. This is a classic version of the construction of a wooden fence for a summer residence. In this case, the structure may be open or deaf. Using a picket fence allows you to grow different flowers near the fence. Light can penetrate through the fence, which will favorably affect the development of plants. So if you want beautiful fence, then the tree is a good solution. However, remember that before its installation it is necessary to make its high-quality preparation and processing.

Metal
Today you can find a lot of original metal fences for summer cottages. This includes forged fences, chain-link mesh, corrugated board, reinforcement, and more. Consider some of the features of these materials.

Decking is often used for the construction of a deaf structure. Its main distinguishing features are durability and reliability. On the market, corrugated board is presented in different color solutions.
Attention! Installation of a fence from corrugated board in the country is a troublesome business. It is important to be careful not to deform the corrugated board during installation.

For such a fence, it is necessary to build columnar foundation with metal supports. When working, you must use welding machine to weld the crossbars on which the sheets of corrugated board will be attached directly.

You can also do metal fence from a fence. This is a good alternative to a corrugated board structure. In appearance, such a fence looks much more beautiful. You can also make it yourself. The basis must be established metal poles supports and weld the crossbars. The frame design is the same as that of a corrugated fence.
Advice! For a more attractive look, the support poles can be laid out from natural stone, and fill the spans with a metal picket fence.

A mesh fence also falls into this category. The metal chain-link mesh will last more than one year. This is an open structure. To install it, you need to install support poles. They can be metal or wood. In the market, chain-link mesh is sold in different colors solutions. Although it is about metal mesh, also a similar material is made of plastic.
reinforced concrete or brick
If you want to build a capital fence, then iron is suitable here, by the way. concrete structures or brick. These materials are durable. Their construction requires a lot of financial investments and labor costs. But the end result will allow you to use it for many years and even more than one generation. There are many building technologies. You can see the fences for giving in the photo below.

Polycarbonate
This type of fence looks quite original. Polycarbonate is available in different colors, which allows you to build beautiful fence for giving. It is worth noting that this material is quite fragile. Therefore, there is always a risk of damage to it. Plus, polycarbonate can be combined with other materials. For example, build pillars of brick, and fill the spans with polycarbonate.
Fences from improvised materials

This type of fence can be built from the very different material which is located in your country house. We invite you to consider several options. For example, a fence may be wicker. For this purpose, willow rods are collected and a fence for a summer residence is woven from them. It is very cheap and does not take much time to build.
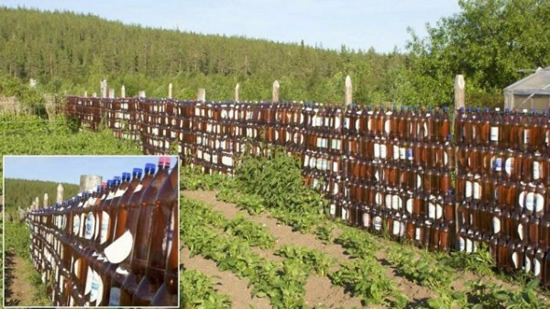
There is an idea to use plastic or glass bottles different colors. Also, some craftsmen build fences in the country from old car tires. They can be stacked in a checkerboard pattern. Near such fences, flower beds with fresh flowers are often planted. In a word, there are many options for making fences for giving from improvised materials. The main condition is to connect your imagination and creativity. You can use the remnants of building materials, combine them with each other. The result is a beautiful combination.
Conclusion

So, we have considered with you a variety of options for fences that you can build in the country with your own hands. Of course, some of them require large financial investments and labor costs. Some fences can be made quickly and relatively cheaply. The choice is yours alone. On the Internet you can also find a lot of ideas from improvised materials. This article has several photos on the subject.

Dacha is, first of all, its own land. Standard six acres of a summer cottage, make it possible to realize dreams of own house. And, like any property, it is fenced off, separated from the rest of the space.
Majority suburban buildings- These are houses for seasonal living, so the construction of a capital fence is not advisable.
Saving money - this is the main issue that takes the developer when solving any summer issue. And erecting a fence for garden house- not an exception.
But any private owner wants his fence to be not only cheap, but also beautiful and reliable. Can it meet these expectations? inexpensive fence for a summer residence?
Which fence is cheaper?
The cost of the fence is affected by the choice of its size and design.
A high fence, of course, will be more expensive than a low one, and a solid fence will be more expensive than a transparent one.
A fence that is attached to dug-in or concreted pillars will be cheaper than a fence mounted on a strip foundation.
Having decided on the construct, we proceed to the choice of material from which the fence can be built.
Options for inexpensive fences for summer cottages
Wooden fence
Building an inexpensive wooden fence is a smart option. It is inexpensive, beautiful and easy to install. There are several varieties of such fences.
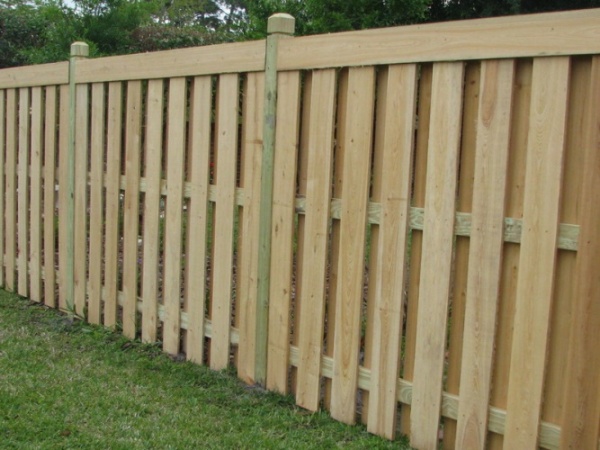
- Picket fence, board (edged and unedged).
- Ranch fence.
- Wattle (interlaced rods).
The most popular material for country fence- picket fence. It consists of planks made of wood, with a thickness of 18 to 22 mm and a width of 7 to 14 cm. The height of such a fence can be selected in the range from 1.2 to 4 meters. For fastening the picket fence, horizontal beams are used, fixed on wooden (oak) metal or concrete posts.

The one who believes that a beautiful fence cannot be made from a picket fence is mistaken. There are many examples of original designs from this material.

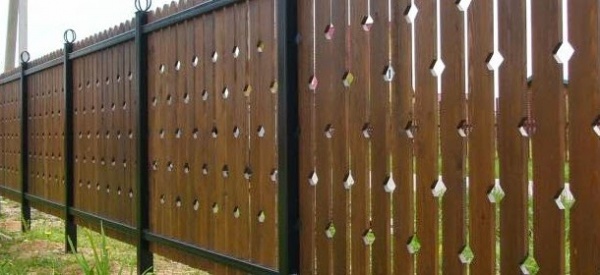
The picket fence, fixed at an angle, forms an openwork fence
The estimated cost of picket fence is 700 rubles/m2. The final price of the fence depends on the chosen installation option. Installing a picket fence in a checkerboard pattern or herringbone pattern increases the price of the structure by 15-20%. The strip foundation, instead of simply driving the posts into the ground, adds 20-25% to the cost.
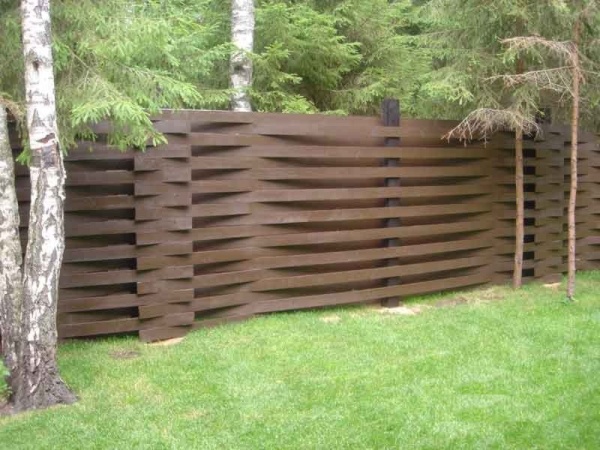
Fences made of thin wicker boards and a blockhouse are more expensive (from 1000 rubles / m2). A fence made of wicker boards attracts attention with an original look, and a blockhouse fence wins the hearts of summer residents with the quality factor of a wooden log house.

Wicker Board Fence

Wooden blockhouse fence
The fence called Ranch came to us from the Wild West. Its main feature is the use of wide horizontal boards or beams mounted on low wooden poles.

Ranch fence - cows won't get through, children will climb over
The obvious disadvantage of such a fence is the weak protection of the site from the penetration of unauthorized persons. It is quite understandable, since this fence was created for a vast pasture area. In terms of the cost of materials and work, the Ranch fence is comparable to the price of a picket fence.
fans rustic style the wattle fence will certainly be of interest - a fence assembled from hazel or willow branches. It is original, strong enough and durable. With a strong desire, the technique of weaving branches can be mastered with your own hands in a matter of hours. If you have no time to engage in manual creativity, then you will have to pay from 500 rubles per 1m2 for the manufacture and installation of wattle.

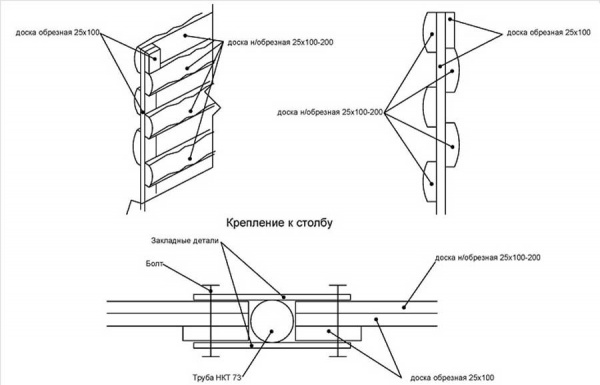
Anyone who is going to build an inexpensive fence for a summer residence, we advise you to pay attention to an unedged board. Having freed it from the bark, sanded it and opened it with varnish, you will get a beautiful fence for a summer cottage at the lowest price (450-550 rubles / m2).

Stuffing unedged boards overlap makes the fence very durable
Regarding the durability of wooden fences, the following should be said: the service life of autoclaved wood increases to 30 years. The service life of an ordinary, painted board does not exceed 15 years.
metal fences
metal has always been more expensive than wood, but even here summer residents can find acceptable options for themselves:
- Rabitz.
- Corrugated (woven) mesh.
- Welded rolled and flat welded mesh (3D).
- Euro picket.
- Decking.
Chain-link mesh - a guest from Australia
The cheapest fence can be built from a chain-link mesh. It is issued in different options height (1.0-3.0 meters), length (10-18 meters) and cell size (20-100 mm). To protect the wire from corrosion, galvanizing and polymer coating are used.

You can put up such a fence by rolling out the mesh and fixing it to metal or concrete posts. The second option is the manufacture of mesh sections (frames from corners or pipes) and their installation on poles.
The durability of mesh fences reaches 30 years. They do not obscure the site and create a serious barrier to uninvited guests. The average cost of 1 m2 of a turnkey chain-link fence is 160-240 rubles/m2.
corrugated mesh
It was created not for fences, but for sifting crushed stone and gravel (screens). Corrugated steel mesh is made from bent wires using the perpendicular weave method. Main advantage this material in front of the chain-link - higher rigidity.

The corrugated (kanilirovannaya) mesh does not come in rolls, but in flat sections measuring 1.75 x 4.5 meters. Having fixed it on the poles, we will get a high and durable fence. At a price, it is significantly more expensive than a chain-link (400 rubles versus 80 for 1m2). Savings on posts (the width of the section is 4.5 meters versus 2.5 m for the chain-link mesh) does not save the situation.
Welded mesh

Reasoning about which fence is cheaper drew our attention to rolled welded mesh. The estimated cost of a turnkey fence made of this material in 2016 is 400 rubles per 1m2.
Welded mesh 3D
Steel wire mesh (3D) in last years very popular with gardeners. Anyone who does not like chain-link fences can order a fence made of this material.

The unusual name 3D is explained in two ways. First of all, it tells us that this mesh is not flat, but formed by a bent wire with a diameter of 3.5 to 5 mm. The second reason is a marketing ploy that fixes the material in the mind of the buyer due to the general enthusiasm for spatial technologies.
A welded 3D mesh is produced in sections, from 0.33 to 3.33 meters high and from 1.5 to 3 meters long. The cost of its turnkey installation is from 500 rubles / m2.
Euro picket fence
The habit of adding the prefix "euro" to the name of the material worked this time as well. At its core, it does not explain anything, but it sounds modern and beautiful. The popularity of wooden picket fences prompted stamped metal manufacturers to create something similar. The result is a very aesthetic and durable material.

In terms of service life, wood cannot be compared with it. In addition, a fence made of eurostudent does not require periodic tinting and antiseptics. The protective polymer film, which is used to cover galvanized steel, retains its color and integrity for 25-30 years.
Installation of a fence made of eurostudent, taking into account the cost of materials and work, is from 800 rubles per 1 m2.

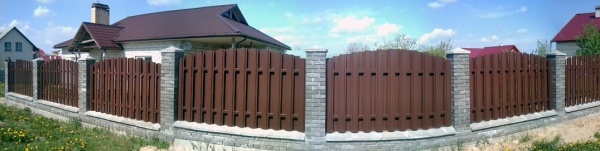
Use of the euro picket fence different color and his custom installation make the fence attractive
Decking
The undisputed leader of the country "fence building". The reasons for the popularity are, simple installation and durability. Added to this is a huge selection. colors and textured profile sheet.

Fence from a professional flooring with imitation of wood. Looks great, lasts a long time
Given the high demand for corrugated fencing, we will give several recommendations for the selection and installation of this material:
- It is advisable to use corrugated board with a thickness of 0.5 mm. It is not much more expensive than 0.4 mm thick flooring, but it will not be covered with dents and will not lose its attractiveness.
- If we take the distance between the supports at 3 m, then under the influence of wind loads, the fence canvas will begin to bend, and may lose its original appearance. Therefore, the step of the supports should be no more than 2-2.5 m, ideally 1.5 m.
- It is necessary to dig in the pipes of the supports to a depth of at least 1.5 m, be sure to concrete them.
- The fence post must be made of a pipe 60-80 mm, with a wall thickness of at least 2 mm.
- It is necessary to take corrugated board with double-sided, polymer coated, since galvanized flooring (without painting), after two years, becomes stained, loses its luster and may begin to corrode.
The cost of a fence made of corrugated board, excluding work, is lower than the price of a fence made of euro picket fence and is approximately 650-900 rubles per 1m2.
Plastic
When thinking about what is cheaper to make a fence from, do not lose sight of such a popular material as cellular polycarbonate. It is durable and beautiful, and framed with a steel profile, it creates a fairly strong enclosing structure.

Fence made of honeycomb polycarbate
There are two options for mounting polycarbonate: on steel logs (girders) or in profile sections. The first way is cheaper. Its price starts from 1000 rubles / m2. Installation on sections is more expensive (from 1500 rubles / m2), but allows you to get a more durable structure.
Slate
For the installation of the fence, you can use both flat and wavy asbestos-cement slate. The first is stronger because it has a greater thickness.

Installation flat slate large format (1.5x3 meters) is faster than the installation of a smaller wavy (1.75x1.125 m). They put the slate on steel profile runs, welded or bolted to metal posts.
Slate fencing is characterized by high strength, resistance to frost and heat. It is more durable than wood and is not afraid of corrosion like metal. A significant drawback of slate is fragility. Another disadvantage of the slate fence is a nondescript gray look. It is easily corrected by staining with special paint.
The average cost of slate fences (with work) is 800 rubles / m2.
conclusions
The first place in terms of accessibility is occupied by chain-link fences (200 rubles / m2).
The third position can be awarded to fences made of corrugated board, slate, blockhouse and edged board(700-1000 rubles/m2).
Fence Installation
In order for the fence to be quite inexpensive, it must be built with your own hands. The main points to pay attention to during installation:
- The supporting structure of the fence is made in accordance with the weight of the fence canvas.
- The foundation load-bearing structure- must be securely deepened and fixed in the ground.
- Depending on the filling of the fence, the pitch of the supports is determined.
- Before installing the type of fence you have chosen, be sure to ask about the technology of its installation, consult with a specialist.
The fence has been installed, we are summing up the results: if you wish, you can always choose such a fence garden plot, which will be both beautiful, and reliable, and relatively cheap.
What is a fence for? What functions does it perform? How important is the quality of the fence to you? Is it possible to install a fence with your own hands. so cheap and beautiful?
One of the main functions of the fence is the protective function and security! Remember how, without having time to purchase your country cottage area, you immediately came up with the idea that it would not hurt to fence yourself in and, thereby, secure your rights to the newly acquired land. The second thought that came to you was a picture of your site, enclosed by a beautiful fence. All sorts of fruits and vegetables, flower beds quietly grew on the site - and all this without the danger of being collected by "night guests", who often make their "ruinous" visits to poorly protected areas.
Your initial wish was very correct! You definitely need to put a strong and reliable fence around your site. Will you be building, or will you be engaged in gardening and horticulture - the fence will protect and keep your valuables from the “envying eyes” and “grabbing hands”.
Once the decision has been made, it's time to take action! But... on modern market Lots of different fences! Some require considerable financial costs, others require certain knowledge, others require experience, and others require a neighbor who has the same ...
This question is not easy to answer! Each fence has its own advantages and disadvantages. We will now try to describe in more detail the most popular fences, so that each of the readers can make a choice for themselves.
By the way, if you, the reader, do not belong to the number of happy owners of fat wallets, then this article will help you decide and put up a fence around your site yourself! This activity is fascinating, during the installation process you will learn many new skills, learn some tricks and subtleties! Self-education is always good! Another reason to raise your self-esteem and test your self-respect! A self-made fence will be proof of your thriftiness.

First of all, fences are solid capital and lattice decorative. Some completely close everything that happens in your yard, while others allow you to see everything, but do not allow inside.
What are the fences in our time?
- Wood;
- From concrete slabs solid and decorative;
- Plastic;
- Brick;
- Grid;
- From corrugated board.
Let's take a closer look at each type of fence and how to install it yourself.

Wooden fences are very popular, they are easy to install and carry out. repair work. Let's get acquainted with the advantages and disadvantages of such a fence.
Advantages of a wooden fence:
Relatively inexpensive;
A wide variety of shapes and models;
Easy to install, even an amateur can handle it.

Flaws:
Requires constant personal care (painting);
Short-lived, service life rarely exceeds 10 years.
To install a wooden fence with your own hands, you will need the following materials and tools:
- Hammer, nails;
- Level;
- Pegs and rope;
- Wooden or metal posts;
- cement mortar;
- Wooden bars 2-2.5 m long;
- Stafetins made of wood of the shape you like;
- Lacquer, drying oil, paint;
- Hinged hinges;
- Latch or lock on the gate.

In order to purchase the material necessary for construction, you can contact any hardware store, where you can choose your favorite shape and dimensions of blanks. The most suitable size for future staples is 85 x 145 mm. This option is less time-consuming, but more costly in finance. If you want to save a little on, then contact the timber warehouse, where they will offer you a cheaper product that requires additional processing - a cut board. True, you will have to tinker with it a little - plan it, go through a grinder - but it will be possible to save a lot.

For columns it is desirable to use metal pipes, channel, but if this is not possible, wood treated with special mixtures will also come off to prevent rapid decay.
Whatever material you purchase, be sure to properly proliferate and dry it! The service life of your wooden fence will depend on this.

- To get started, mark the border along which your fence will pass with the help of a peg and a rope. Pull the rope evenly around the entire perimeter of the future fence.
- Decide where the gate will be located, its dimensions, mark the location of the columns.
- Mark the location of your posts at a distance of 2 - 2.5 m from one another. Dig holes for posts at least 30 cm deep.

- Install and dig in the posts, while be sure to set the posts strictly according to the level - they should stand straight and not fall to one side. If desired and possible, you can concrete the posts, so they will last much longer.
- For each column at the top and bottom, we fasten bars with a cross section of at least 50 x 50 mm with self-tapping screws.
- Between the posts above and below we lay the crossbars and screw them on both sides with self-tapping screws or nails.
- The turn came to the prepared skeleton to nail the crossbars. The distance between the staples can be at least 1.5-2 cm, however, if you want to make this wooden fence solid, nail one board close to the other.
- When your fence is already fully installed, you should start painting it. To do this, process everything again wooden elements fence with drying oil, and after it dries with varnish or paint.

For a richer color and enhanced protection against natural phenomena, paint over the fence 2-3 times. This will extend its service life.
Video: Overview of fences. Homemade wooden fences
Concrete decorative fence in the last decade has gained immense popularity. The reason for the increase in popularity was the invention of collapsible structures that are convenient for transportation and installation. Designers have improved these concrete structures and filled the markets with all sorts of models of such fences. These fences are ideal for industrial enterprises, and for the private sector (houses, dachas).

Advantages of a concrete fence
- unpretentious;
- Long service life - more than 100 years;
- Easy and quick to assemble;
- Affordable price;
- Variety of models.
The disadvantages of such a fence:
- It is difficult to carry out all the operations for assembling the fence on your own; during delivery and installation, the help of 2-3 people will definitely be required.
Types of concrete fences:
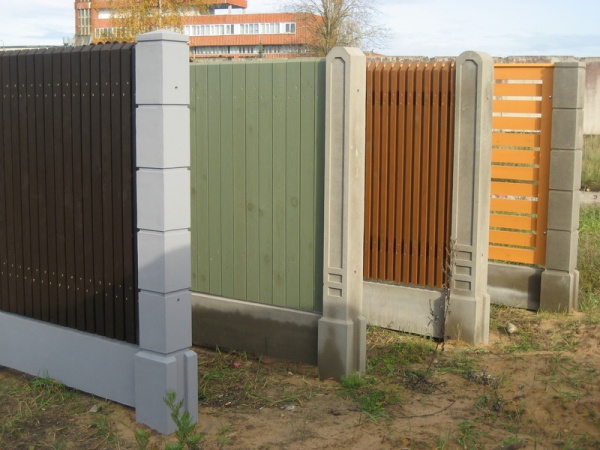
Sectional typesetting - widely used for fencing private houses, they are diverse. They are assembled from small sections that are inserted into the grooves of the posts. Everyone can choose for themselves the height of the fence and a certain model. There are openwork sections, lattice and solid. 2-3 people are enough for assembly;

Self-contained - more often used for fencing industrial facilities, represent a huge solid wall, with a large ornament. Such a fence completely hides from prying eyes everything on the other side of it. The peculiarity of an independent fence is that each section has its own support and does not need poles at all. The downside is that when installing and dismantling it, you can’t do without a crane.

Having decided to install just such a fence on your site, take care of airing the site. If you decide to fence yourself tightly, then the entire ecosystem of your garden may suffer from such a decision. Without regular ventilation, the soil becomes acidic, overgrown with mosses, and trees begin to rot. The situation will be saved by several lattice or openwork sections.

Marking the future fence with a rope and stakes will help you clearly identify the scope of work, calculate required amount sections, designate the places of future columns. Each section is 200 cm long, so the distance from one post to another will be 205 cm. Mark the place for the posts with stakes, and use a rope to check how even your fence will stand.
Unloading building materials. Sections of concrete fencing have a weight of about 70 kg. The pole itself weighs 90 kg. When unloading, it will be very important for you to take this into account and take measures to facilitate the stacking process. If you lay out sections and posts along the entire working area (future fence), then you will significantly reduce both installation time and physical activity.
Installing columns. This system does not require foundation pouring. Initially, the very first pillar and the very last are installed. After that, they dig in all the subsequent ones, strictly in the intended places. If the terrain is uneven, then the height can be adjusted using the height of the posts.

Sections are installed in special grooves located on each column. The lowest layer from below can be overlaid with roofing material.
If desired, the finished sectional fence can be painted in any color, using for painting special formulations for facades.

Despite their high cost, brick fences are still very popular. A very large assortment of bricks encourages the construction of more and more new designs that emphasize the dignity of each brick.
Advantages of brick fences
- Strength;
- Reliability;
- Durability;
- Fire resistance;
- The beauty;
- Fundamentality.
Now it is customary to select a brick for a fence, under the brick from which the house is made - one complements the other! The fence can be solid and with forging elements, gratings - everything is at your discretion.

How to start installation?
Make a drawing of the fence (albeit a primitive one), this will help to calculate right amount building materials. Mark on the plan with dots the places of the columns. Mark the location of the fence on the site. Using a cord and stakes, mark the places of the posts. Do not forget to also mark out a place for a future gate and gate! Carefully measure all corners, each corner must be exactly 90 degrees!

The foundation is the foundation of your fence. The more correctly you put it, the more stable and stronger your fence will be. Initially, you should dig a trench under the foundation. For strip foundation a trench with a depth of at least 40-50 cm is ideal. But the higher the fence, the deeper and wider the foundation should be laid. IMPORTANT: pour the foundation all at once, otherwise the joints will crack and the structure will not be so strong.
Before pouring concrete into the trench, you should prepare a place for the foundation - lay the so-called "bed". For her, sand must first be poured into the bottom of the trench, then gravel, everything should be carefully poured with water from the hose and tamped well. After that, make the formwork, lay the reinforcement. Fill the formwork with concrete, monitor the level. We give the foundation to dry well and acquire the necessary strength. After a week, the formwork is allowed to be removed.

Brick fence. On top of the foundation, be sure to lay a layer of roofing material, it is fixed with liquid glass and cement mortar. Every 2 - 2.5 m we lay out pillars 25x25 cm. Between the pillars a plinth 50 cm high and 25 cm thick is laid, above - the usual masonry in one or half a brick. For a fence, laying in one brick will be sufficient. But if you put high fence, then it is best to lay it in two rows. At your discretion, lay out openwork, single-row or combined masonry. When laying, be sure to monitor the level! At the end of the masonry, do the jointing, observing its width of 5-6 mm.
Video: brick fences do it yourself
Chain-link fences - cheap and beautiful!
Most cheap option fence! Even a beginner can handle the installation! All installation work can be done in one day.

The advantages of such a fence:
Provides ventilation of the area;
Durability - service life up to 30 years;
Profitability - saving time, saving on labor.
Minuses:
The whole area is well visible;

1. Mark your site, use stakes and cord to mark the future location of the posts and grid;
2. Dig holes for the posts. The columns can be both metal and concrete, in the most simplified versions, wooden ones will do.
3. Depending on the soil, take care to strengthen the posts. If the soil is dense, reliable, it will be enough just to dig a column into it to a depth of 60-70 cm, but if there are any features, be sure to prepare holes. Pour sand to the bottom first, and then gravel, insert a column at a right angle (using a level) and fill it with a cement solution.

4. Stretch the net and attach it to the posts. The chain-link can be attached to wooden posts with nails, wire. But you need to attach the chain-link to metal and concrete with special fasteners. However, the most popular view fastening to any poles - all the same wire.

5. With the help of a reinforcing wire stretched between the cells of the grid, it is necessary to properly stretch the grid, to prevent it from sagging. It is recommended to stretch the reinforcing wire both above and below the mesh.
6. To protect the chain-link from metal corrosion, it is necessary to paint the grid cells well with any oil paint on drying oil.

Do-it-yourself fence from corrugated board - an inexpensive option
Fences made of corrugated board are also very popular. A large assortment metal profiles and a huge range of colors contributes to this. In the presence of building materials and necessary tools work will not take much time and effort.

- Sheets of corrugated board;
- metal poles;
- Cross logs (2-3 pieces for each section);
- Screwdriver;
- self-tapping screws;
- Level;
- Welding machine;
- Sand;
- Gravel;
- cement mortar.

Front of work:
Always and everywhere, when installing any fence, you need to mark the location of the fence itself and the posts, as well as the presence of a gate and a gate.
Under the posts, drill or dig holes 1-1.2 m deep.
Using sand, gravel and water, prepare a pillow for each post. The height of such a pillow should be about 25 cm.
Install the prepared metal posts with a section of 50x50mm into the drilled holes directly on the gravel pad. Align the posts with a level and fill their base with cement mortar.

Using self-tapping screws, attach sheets of corrugated board to the resulting frame. But the best option fixing the corrugated board to the logs will be special riveting for metal. Using them, you will protect your brand new fence from intruders.
Installation of a fence from corrugated board, quickly and inexpensively
After reading this article, I hope you have a plan for arranging your particular site and you were finally able to accept the right decision, regarding the material for
Today, wooden fences are gaining popularity again. Modern analogues from other materials, of course, are no worse, but from time immemorial, mankind has appreciated and still appreciates naturalness. Nothing beats natural solid wood. Our site presents several varieties of wooden fences and fences for the house and detailed instructions on how to do it yourself.
The main types of wooden fences
For any owner of a private house, a hand-made fence is a special pride. But before proceeding with its construction, you need to choose the type of structure. Types of wooden fences for private houses and photos for them:
Wattle
Wooden wicker fence. By type, this is the most ancient variety - rods intertwined in a special way and knees driven into the ground. Antique wicker wooden fence (in the photo below you can see in more detail) is very unusual, it’s not difficult to make it with your own hands, but, unfortunately, it has a short service life.

Ranch
Although the name is reminiscent of American films about cowboys, it should be noted that in our country, such structures were erected a long time ago. They fenced gardens, orchards, in agriculture animal grazing areas. By design, these are several boards (poles) nailed to a wooden beam.

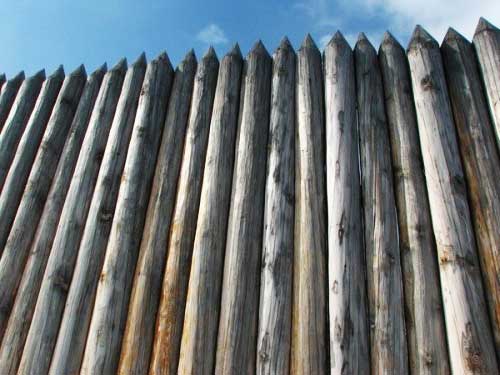
Palisade
This is also a kind of old fences that you can make yourself. Stakes at the top are sharpened at an angle of 40 degrees. Has an impressive appearance
Lattice
Attractive appearance, it is easy to make such an openwork wooden one with your own hands, most often it serves as an element of decor personal plot or for its zoning. The decorative wooden fence does not differ in special durability. You can make it by crossing directly or diagonally slats or narrow boards.

Fence
The traditional type of fence made of wood is a picket fence. The simplest manufacturing option: boards in a vertical position are attached to the veins, and those, in turn, to wooden poles driven into the ground. This is the most economical and fastest way to fence your site. Apparently that's why it's become so popular. Easy to use, do it yourself quickly and easily, and with proper care, it will last a long time.

One more hallmark of this fence is that it clearly outlines the boundaries, without obscuring the site itself.


Separation of wooden fences according to installation technology
Fences made of wood, in the photo above you can see, there are:
- No foundation. In this case, only wooden poles or metal supports are needed.
- On the foundation. The ground part of the foundation base is made simultaneously with a wooden beam.

As for the finish, it can be done using any material, taking into account your preferences: stone, corrugated board, brick. A wooden solid fence with a base always looks respectable, stylish, and thorough. To make it you need to spend a lot of money, there is an option to reduce the cost of the structure - this is to make a wooden fence with your own hands from start to finish.

Stages of installation of wooden fences
Rustic style (Country) has always been and still is at its peak fashion trends. Wooden fences are its bright element, and the simplicity of lines, even without embellishments, always looks modern and elegant. Do with my own hands not difficult at all. How to make a wooden fence more complex design? First you need to decide on the material of manufacture.
Important ! When choosing a material for a wooden fence, make sure that the solid wood is free from decay and other damage. Treat the wood with an antiseptic. Or buy ready-made material.

Step-by-step instructions for installing a wooden fence
If you have already decided on the material, select the proportions: the shape, the height of the wooden fence. Only after that it will be possible to proceed directly to the construction. How to make a wooden fence with your own hands, drawings and detailed instructions see below.

- The first step is marking the area.

- Next, you need to calculate the number of wooden pillars, fences and veins.
- The earth part of the timber must be treated with tar.
- Then marking is carried out along a pre-stretched cord under the beam (recommended distance is 3 meters).
- Holes pop out. The depth of the holes should be equal to the depth of the soil - this is about 1.5 meters. Holes can be dug with a drill.
- Think over well one nuance: if you are planning to make a high and heavy wooden fence, then in this case, be sure to attach a metal plate to the base of the support. This is necessary for stability and so that the fence does not turn out under the influence of gravity.
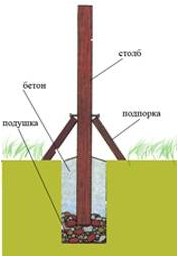
- Wooden supports are installed vertically on sand cushion 12 cm, after which the hole is covered with small portions of soil with sand. Carefully rammed. To make the structure more durable, the hole can be poured with concrete.
- After installing the supports, you need to calculate and determine the places for attaching the veins of wood from above and below.
- The picket fence is selected according to a pre-selected template, but you can make it even by cutting it along a stretched cord.

To simplify the work, you can purchase a ready-made picket fence with or without drawings.


We offer you to watch a short video with a selection of beautiful wooden fences:
How to make a checkerboard fence with your own hands
The next type: do-it-yourself wooden fences checkerboard in the photo, you can clearly see the difference with the previous one.


Compared to the previous one, a wooden checkerboard looks more decorative. Main Feature installation is considered that, you can make it in any performance: dense or with gaps.
The pillars are installed in the same way as described above. After installation, you need to attach the beams. It is possible to cut grooves in wooden poles, in metal poles it is necessary to weld the corners on which the beams will be located by welding.

Decide in what position you want to make a checkerboard: horizontal or vertical, set the guides. With a vertical checkerboard, they are made horizontal and, conversely, with a horizontal checkerboard, they are made vertical.
Further, after installing the guides, you can proceed with the installation of the planks. Place them in a checkerboard pattern, as shown in the picture above (one on each side). You can fasten them either with nails or screws.
Very important ! Clearly measure and mark the attachment points, because small irregularities will give gaps, and this will significantly spoil the appearance of your fence.
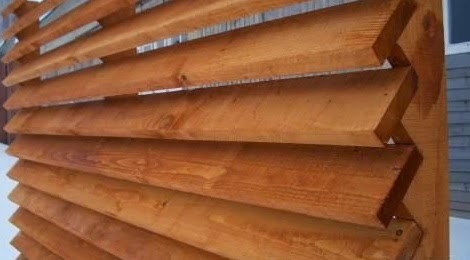
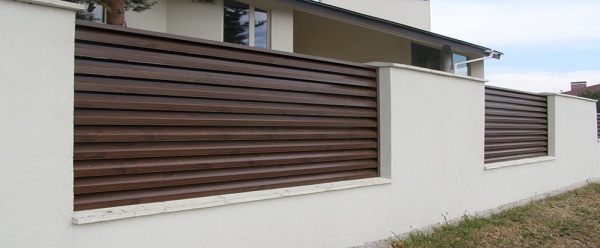
Do-it-yourself wooden fence ladder
A wooden horizontal ladder fence is also very popular, so let's dwell on it in more detail. Making such a structure with your own hands is as easy as the previous ones. Install the supports, according to a similar (described above) principle.

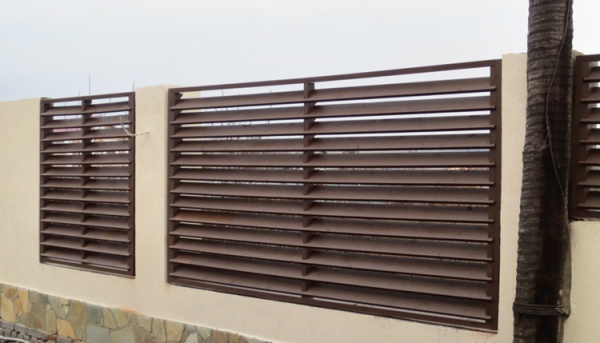
Next, you need to fix decorative wooden linings on both sides - these will be the guides. As a rule, a channel is used for this purpose, it is easier and easier to insert a board into it at an angle. In this case, it is up to you to decide at what angle you want to make a Christmas tree. The position is also chosen by preference. The direction can be either vertical or horizontal.
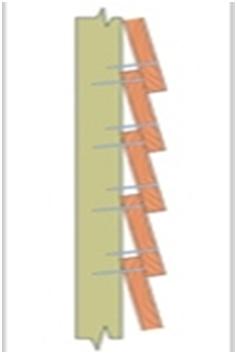
Important ! Do not forget to install gasket material between them along with the boards. This is necessary for ventilation and to preserve the material from rot.
Do-it-yourself wooden fence for giving a ladder. The photo shows some models of finished work.
At the end of the work, treat the fence with an antiseptic and paint the structure.
Pledge of longevity of a fence made of solid wood
as material for making wooden fences you need to choose those wood species that are characterized by strength: ash, mulberry, acacia, oak, aspen, Siberian larch.
By the way, the last option is a truly eternal material; when exposed to water, it does not deteriorate, but, on the contrary, grows stronger. It is also worth limiting the use of pine species to create wooden blocks. You should not use birch if you do not want to change it often, it has the lowest density among all the others.
Bars for fencing are used from wood, and metal, or as an alternative to wood - overlays. The tree should not be discounted. Today thanks to modern technologies there are special metal consoles. Therefore, solid wood supports do not have to be dug deep. The consoles are concreted, and then a wooden beam is attached to them.
The most vulnerable areas of wood are those where the cut is built across the grain. To extend the life of wood in fence blocks, lay the boards horizontally or make canopies. Wood is vulnerable if it directly interacts with air:
- At high humidity swells and is affected by fungal deposits.
- If the air is too dry, it will dry out and crack.
How to process a wooden fence to reduce the risk of damage and damage? This can be done by impregnation with an antiseptic and painting with special materials: Swedish paint, soak with hot drying oil, yacht varnish.
You can make Swedish paint with your own hands at home. To do this, mix the following ingredients:
- Iron vitriol - 260 grams.
- Minium iron - 260 grams.
- Regular table salt -260 grams.
- Rye flour will need 580 grams.
- Drying oil, you can use linseed oil- 240 grams.
- Water about 4.5 liters.
The consumption of this mixture will be approximately 200÷300ml/m2. Expected color - golden. If you need a different color, then replace the red lead with ocher or manganese peroxide.