The decorative framing of windows and roof ends has always been considered the element of decoration that gives the entire structure individuality and recognition. But due to the fact that the complexity and cost of such a decoration is simply enormous, many owners prefer to install trim on windows in wooden house with your own hands.
When planning to save on this operation, it is necessary to soberly assess your capabilities, since the method of manufacturing and installing platbands has a large number technological nuances, ignoring which can reduce to zero all the costs of money and time.
This review discusses several ways to manufacture and install decorative architraves and accents are made on non-standard technical aspects.
Depending on the design of the cashier, different types of equipment may be needed for its independent production. In some cases it is enough standard set“home carpenter”, but if woodcarving is present in the decor elements, you will have to purchase special tools and fixtures.
Consider the relationship between the cashing design and the complexity of the technical equipment used in its manufacture.
From industrial blanks
If window trims are supposed to be made from purchased blanks with an already formed pattern or profile, then the need to purchase additional equipment most likely will not occur.
When writing a review, we proceed from the fact that the workshop of the owner, who decided to equip a wooden house, already contains the following minimum of tools:
- universal screwdrivers;
- pliers and pincers;
- rasps and files;
- hand saw;
- plane;
- a hammer;
- clamp;
- axe;
- measuring devices (tape measure, square, building level).
It will not be a mistake to assume that an electric drill and an electromechanical jigsaw are also included in the mandatory tool kit of any self-respecting home craftsman.
The only thing worth buying before self assembly platbands from industrial blanks - this is a device for cutting boards at a given angle ("miter box") and an end mill for punching blind holes for dowels.
We emphasize that the tools listed in this subsection are a basic set, supplemented by more specialized models as the design of the casing becomes more complex.
With elements of wood carving
In those cases when it is planned to make platbands with elements of wood carving with their own hands, the stage of preliminary preparation of the workshop will be more difficult.
Note that it is not at all necessary to buy all the tools listed in this review, since in this area construction works there is a narrow specialization.
So, to create slotted decorations, it is enough to supplement the basic equipment with the following tools:
- Sander;
- an electrified jigsaw in which a round saw can be used.
 The use of a machine for cutting patterns is not necessary, but highly desirable in cases where the patterns are large in area and contain small elements.
Another situation where a stationary jigsaw is indispensable is the manufacture of plywood trim, since it is extremely difficult to accurately follow the lines of the template with a manual model of such a saw.
Please note that when creating slotted patterns, it is highly recommended to use not a flat, but a round version of jigsaws. This will avoid accidental deviations from the lines of the pattern, the occurrence of which is especially unpleasant in the last stages of processing the product.
To make voluminous carved jewelry yourself, you will need to purchase a set of special chisels.
To cash out the whole house with patterned decor, it is necessary to perform a very large amount of work, so it is necessary to provide for the possibility of quick sharpening of chisels. For these purposes, you can purchase an inexpensive sharpening machine, which, moreover, is useful for straightening drills, knives, planer blades and some types of milling cutters.
Using machine profiling

 Overview of the tool base used in the course exterior finish wooden houses, will be incomplete if we do not mention manual and stationary milling cutters.
A relatively inexpensive manual model of such a device will solve the following tasks:
- creation from ordinary edged boards profiled frames for external and internal architraves;
- quickly cut grooves for tongue-and-groove joints or chamfer when assembling frames "with overlay";
- to make patterned figures on blanks, both in the slotted technique and in the form of volumetric carving (moreover, to do this as soon as possible).
- inlay wooden panels in the original technique of internal carving.
Note that when buying a milling cutter, you need to decide in advance what types of them will be needed in the future, and add the appropriate items to the purchase estimate. The figure below shows the most commonly used designs of edge and internal milling cutters.
We select the material
We talked in detail about what platbands are made of in our article.
Here we recall that in the manufacture of cashing it is necessary to be able to find a balance between the technological qualities of wood and its climatic resistance.
In general, the following rules should be followed:
- for volumetric carving, take soft woods (linden, cherry, alder);
- for the manufacture of frames, use durable and stable types of wood (larch, oak, ash, pine).
 If the decoration is made using slotted technology, then all elements of the casing can be made from hard rock, since manual sawing of patterns is practically not used today.
Separately, we emphasize another advantage of slotted technology - you can use ordinary plywood to make such a decor. Surprisingly, this material, after impregnation with water-polymer compounds, becomes strong as oak, while remaining the most convenient for cutting patterns.
Moreover, volumetric compositions can be made from plywood by gluing several layers into one patch block.
The only disadvantage of such glued compositions is that in order to cut large patterns, a stationary machine is needed that allows the installation of a jigsaw about round shape. Go through all the curves of the drawing without errors and serifs, using only classic flat files, on such thin material practically unrealistic.
When making platbands with your own hands, it must be borne in mind that any decoration, although it is original element decoration, but at the same time remains part of the design window opening.
- First of all, cashing should not interfere with the opening of windows and the closing of shutters. This requirement, simple at first glance, is not so easy to implement in practice, and it is precisely when determining the dimensions of the frame that errors are most often made.
The internal dimensions of the frame must be such that the trim completely covers the end of the pigtail, but at the same time does not interfere with the full opening of the windows. That is, when drawing up a drawing, you must first determine the working area of the windows in the open position and only then develop wiring diagram clypeus.
In those cases when the casing joins with external slopes (and this often happens when PVC installation double-glazed windows into the casing from the embedded beam), its internal contour must correspond to the outer perimeter of the slopes.
- Following general requirement to the design of the platband - the upper block (bar) should be thicker than the lower one. This is necessary to reduce the amount of water entering the lower part cashing out.
 In the classical designs of architraves for wooden and timber houses, this requirement was implemented in the form of a massive cornice, which creates a kind of cover for the entire lower part of the window.
More stringent options for exterior window trim do not imply a difference in the thickness of the planks, but the installation of ebbs, both under the window and above the frame.
- Separately, we emphasize that the casing is exposed to direct exposure to solar ultraviolet radiation for a long time, as well as to strong temperature and moisture changes. No matter how high-quality the wood processing is, it will in any case change its original dimensions and begin to let moisture through to the fasteners.
In view of this, the classical method of its assembly does not involve the use of metal nails and screws (they rust and fall out). The best option manufacturing a wide frame and shields for platbands - the use of glued compositions from boards and wooden dowels.
Below is an example of the manufacture of a prefabricated shield for a decorative cornice without the use of metal parts.
The illustration shows that the shield is assembled from boards glued end-to-end. Laying of boards is carried out with the coordination of the internal pattern of wood. Adhesive composition - PVA or waterproof wood glue (holding time - 2-3 glue polymerization periods).
Pulling is done with the help of ropes and pegs that increase compression.
Production of slotted platbands
As a detailed answer to the question of how to make platbands for a window opening in a wooden house yourself, we will consider the technology for manufacturing and assembling a slotted platband.
Despite the fact that there are more complex options for framing frames (for example, with three-dimensional wood carvings), this description adequately conveys all the subtleties of this stage of facade decoration.
First, we give a complete list of operations that must be performed to make a platband:
- Drawing up a technical sketch and calculation of the main dimensions.
- The choice of the artistic scheme of the product (drawing patterns, preparing templates).
- Preparation (or purchase) of the necessary lumber and fasteners.
- Marking parts and connections.
- Cutting blanks and adjusting dimensions.
- Production of the supporting frame of the platband (for those cases when the slotted pattern is invoiced).
- Transferring pattern patterns to blanks.
- Development of a scheme of cuts and determination of points for drilling initial and closing holes.
- Cutting out a drawing.
- Chamfering and grinding.
- Antiseptic treatment and priming of all parts.
- Painting each part individually (especially if multiple color schemes are used).
- Installation of overhead parts on the frame.
- Installation of supporting rails on the wall of the house (if the house is made of timber or frame, this operation is not needed).
- Installation of the frame on the window opening.
Now consider the most difficult stages in more detail.
Pattern selection
 We note right away that, without having practical experience in wood carving, the pattern for the casing should be chosen as simple as possible, without small details.
Easiest to take ready template and print it full size. It is best to do this on a large plotter, but you can use the partial printing feature found in many graphic editors.
Frame manufacturing
There are two different approaches to making a frame for a platband:
- Cutting a solid frame from a glued shield.
- Assembly from boards of each element of the base (frame, shield for decorative cornice).
The first option was discussed above, but for its application it is desirable to have the appropriate experience and skills.
The second scheme is classic and consists in assembling a square frame of four planks.
Corner joints are performed in two ways:
- by the "thorn-groove" method;
- overlap.
A tongue-and-groove connection is considered more reliable, but special equipment (milling cutter) is required for its manufacture. The overlap joint is made using a simple hacksaw and a drill.
Please note that the base of the platband may include not only a frame, but also a triangular shield for placing decorative elements of the cornice. When assembling it, there is a problem of connecting several boards into a single whole. If end-gluing is excluded, solve this task can be done using anodized brackets and self-tapping screws.
Making carved elements
 The slotted platband can be both overhead and solid. In the first case, the frame and patterns are made as individual elements designs. In the second, each framing plank simultaneously performs a functional and decorative role.
The most popular is the first option (consignment note), due to its manufacturability and versatility.
Pattern cutting is performed after the pattern is transferred from the template to the workpiece. Through holes are drilled at the start points of the cut and in the area of bends.
working tool in this case is a manual or stationary jigsaw.
If, nevertheless, a manual saw model is used, then in order to avoid distortions, the workpiece must be fixed with a clamp on a horizontal plane.
In most cases, the cutting plane is strictly perpendicular outer surface boards, but to give a three-dimensional effect, chamfers can be removed from the outside of the picture.
After the drawing is completed, the workpiece is cleaned of large burrs and chips (inside and out), after which grinding is performed. Cleaning the surfaces inside the decor is performed using a drill and a schreiber. It is most convenient to finish the outer planes with a grinder.
Protective treatment and painting
 All efforts to make a wooden casing will be in vain if measures are not taken to protect it from decay and moisture deformation. This is especially true for carved elements, as they are made from unstable wood species, as well as internal trim installed in baths and saunas.
In order to properly process the carved and power elements of the frame, we recommend that you follow the following sequence of actions:
- Painting.
- Protective lacquer.
The antiseptic composition can be used the same that is used to stabilize logs during the construction of log cabins.
 Painting should be started only after the antiseptic has completely dried. Please note that most modern protective compounds have priming properties, so a separate coating with a primer can be omitted.
Narrow brushes are used to cover the inner surfaces of the pattern, wide brushes are used for the outer ones.
Lacquering is carried out before the assembly of the product: when the painting of all products is completed and after the paint has completely dried.
To protect the platbands on wooden windows fit acrylic lacquer for wood.
In those cases where plastic decorative overlays are used, all the operations listed in this subsection apply only to the frame elements.
Casing assembly
After all the necessary components are made and painted, they must be assembled into a single structure.
This is best done on a flat surface, prior to installation on a window opening.
The fastening of decorative elements to the supporting frame can be done in the following ways:
- self-tapping screws;
- finishing nails;
- deaf wooden dowels with landing on glue.
In cases where it is necessary to sheathe carved patterns the upper edges of the clypeus, decorative element and the frame is joined perpendicularly. Reliable fixation in this type of joints is provided by mounting corners.
Separately, we note that the most durable platband will be obtained when the decor is planted on wooden dowels. At the same time, not only the contact zone, but also the entire inner surface is covered with glue. carved element(to prevent moisture leakage).
If, nevertheless, metal fasteners are used, then it is necessary to select the most protected samples of screws and nails.
Tip: a good "camouflage" for the heads of the screws is obtained from a mixture of fine sawdust and waterproof wood glue.
window installation
 In order to correctly install the assembled casing, it is highly desirable that at least two workers perform this operation. This is necessary in order to accurately align its position before final fixation.
Despite the fact that the installation of the assembled frame is carried out at pre-marked points on the casing, a visual correction of its position will still be required.
It must also be taken into account that in assembled the whole structure can be very heavy, and if you follow all the points of the safety rules, then the installation of such products should be carried out only from scaffolding.
Conclusion
At the end of the review, let's dwell on one more feature of the platbands: non-standard docking with the wall of the house.
Since it is impossible to make fixed connections between the elements of the framing frame and the wall of the house, the problem arises of closing the gap between the inner surface of the casing and the uneven contour of the logs. From a technological point of view, its presence is insignificant, but from an aesthetic point of view it is very noticeable.
Therefore, in those cases when the platband too clearly emphasizes the uneven contour of the wall, they install between the wall and the platband wooden slats, providing sliding contact and giving everything window block more finished look.
The company "Master Srubov" accepts orders for the entire range of work performed in the course of the transformation of a log or log cabin into a comfortable house, including the manufacture and installation of platbands. You can clarify the terms of cooperation and calculate the cost of the work by going to the page and contacting us by any of the methods of communication published there.
Platbands on the windows, despite their simplicity, have great importance in the decoration of the facade of the house. They not only create a neat look and add an element of personality to the building, but also perform the more prosaic task of eliminating the gap between the wall and the window frame. In addition, platbands must withstand the influence of weather factors without losing their qualities.
Window frame function and a bit of history
The platband was first mentioned as an element of the house as early as the 15th century. Now the architraves have somewhat lost their relevance, but their function is still the same, regardless of the material of the building and its decoration. In connection with design features windows of high-rise buildings and in cases where glazing is used, their presence is inappropriate.
Platbands appeared many years ago
Simplified clypeus is wooden frame, having a width of 30-40 mm, which frames the window.
The aesthetic function of this detail is important, but the main task is to bridge the gap formed by the window frame and the wall, which increases thermal insulation and prevents the penetration of dust and moisture from the outside atmosphere, as well as reduces the noise level. In some cases, in the presence of shutters, it performs the function of a frame.
Types and types of platbands for windows
Their form may be:
- curly;
- flat;
- rounded;
- convex.
Flat platbands are characterized by ease of production and low cost. Convex platbands are made using special machines and, in connection with this, the price of products increases significantly. Carved architraves have great aesthetic value and significant cost.
According to the method of installation, platbands are classified:
- telescopic. They have special protrusions that go into the corresponding cavities of the box;
- overhead.
An important factor in choosing the profile of this window element is the slope that is performed at the top of the casing. Its purpose is to remove sediment.
Modern materials and requirements for the elements of houses have determined the trends in the requests of homeowners. The leaders in popularity are carved platbands made of plastic.
Requirements for the material of platbands
In addition to high aesthetic qualities, the platband must meet practical requirements. Its important qualities are the ability to withstand temperature fluctuations and high humidity. In addition, the material must withstand wind loads.
It is important that the material has sufficient strength and is not subject to chipping and cracking. The use of MDF or plywood is out of the question. The properties of these materials are such that they are able to absorb moisture, are prone to cracking, and the paint on them peels off over time. All this is a sign of the fragility of products made from these materials.
In this regard, MDF as a material for platbands can only be used inside the dwelling. The manufacturability of the material determines the simplicity and relatively low cost. In addition, it does not take much time to get ready-made platbands. Such platbands on the facade will require constant care and additional processing.
Our ancestors have been making platbands from wood for many centuries. Oak and beech are the most common types of wood used for this. Pine and birch have found less use for the production of architraves. Wood tends to absorb moisture, so to increase the life of the product and its appearance need application protective coatings. In addition, over time, the tree tends to darken, so the restoration of the original shade of the material is required.
When using gypsum as a decorative facade element, the problem of interaction of the material with moisture is also encountered. When the water that has penetrated into the gypsum freezes and thaws in the process of temperature fluctuations, such architectural details are destroyed.
 Materials are subject to certain requirements.
 The use of glass fiber reinforced concrete and polymer concrete makes it possible to avoid the negative effects of temperature and moisture. Their use is limited by a significant mass of products. In some cases, when installing such platbands, the increased loads on the wall are taken into account and make it more powerful.
Polyurethane compares favorably with other trim materials. This is due to the fact that its use does not allow the problems described above, and also its characteristics make it possible to create additional thermal insulation. In addition, its mass is comparable to the weight of wood, which facilitates the installation of these facade parts.
How to make stencils for platbands on windows?
Choice of wood
Wood for the production of platbands can be used in various options. It can be certain types of it, a combination of rocks by gluing or otherwise connecting.
Simple and shaped stencils for window frames are best made from pine.
The production of carved architraves requires that the material be soft. Linden has this quality. Material requirements are due to the manual processing of wood.
 The choice of wood must be made carefully
 Climatic conditions associated with high humidity or significant dryness, as well as significant temperature fluctuations during the day, determine the use of wood with a dense and solid structure. These include oak and birch. Manual processing they are difficult, so the use of milling machines is necessary. Such products have a long service life.
Required Tools
Before solving the problem of how to make carved platbands, it is necessary to decide on the tool used for these works. The main tools for this are knives and chisels, various in shape and size.
 Tools for the job
 For independent production of platbands, devices for manual milling, an electric jigsaw, and a drill are used. A jigsaw is almost indispensable when performing such work, since with its help you can create almost any pattern. In some cases, a home-made device can be used, which includes a step-down transformer and nichrome wire.
In addition, it may be necessary to make a tool for filing corners. To make such a device, it is necessary to fix two hacksaw blades with a fine tooth between three wooden rails. When working with this device, spikes are sawn with one canvas, and the eyelets of the product are filed with the other.
How to choose patterns for platband?
Using the slotted carving technique suggests that aspen, alder, linden or conifers. The thickness of the board should be in the range from 5 to 50 mm. It is necessary that the selected pattern pattern for the platband is well distinguished at a distance, and act as a single whole. architectural ensemble. Therefore, it is not desirable to create an image with a large number of small elements.
 Trim options
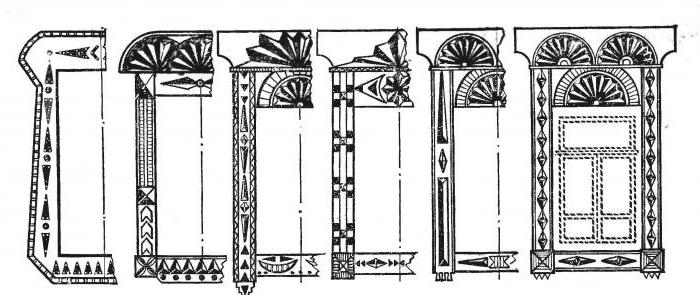
 For a long time at the top of the casing there is a kokoshnik with the image of the Sun. If desired, the top of the casing can be built up using spikes as a connection. Towels - this is the name given to the bottom of the casing. The design must necessarily include the presence of a water-cutting bevel. bottom bar must have a thickness of 10 mm more than the size of the bar at the top of the bar. It is important to observe the unity of the style of both parts.
To avoid the occurrence of cracks in the thread, the parts should be placed along the grain of the wood. As a rule, the endings and openwork bends, which have a small thickness, have significant fragility.
 Structural diagrams
 The simplest cut can be obtained by drilling a round hole with a drill. That is why it is desirable to make a choice on a pattern with a predominance round holes. In most cases, the ornament is made up of repeating elements, each of which is made up of holes and cutouts that have a more complex configuration.
Drawings of platbands on windows contain the following elements:
- bottom bar or profiled belt;
- vertical slats or frame;
- top bar.
 Part Names
 To get a stencil, you need to stretch the pattern along the length. For this purpose, a life-size image is applied to paper. Places suggesting the presence of slots should be highlighted in color. Then, the resulting pattern is glued to the workpiece. Using a drill, drill holes of the appropriate diameter. If it is necessary to work with a jigsaw, small holes are made where necessary.
Production of platbands for windows
 platband
 The opening direction of the window must be taken into account. In the case when it opens outward, the casing should be installed at a distance of 30 mm from the window sashes. In addition, platbands should not become an obstacle to opening the window frame. Other parameters depend on the geometric dimensions of the windows.
On the initial stage for the production of platbands, it is necessary to plan a dry board, the dimensions of which are within: thickness up to 30 mm and width 75-150 mm. In this case, the width of the platbands should exceed the corresponding size of the window frame by 25-50 mm. For a better fit of the platbands to the wall surface, a groove is selected or a gap of no more than 2 mm is made so that it is at a distance of 10-15 mm from the edge.
When working with a power tool, you should not make excessive efforts, as if helping him. This may lead to its failure. If there are difficulties with cutting wood, you should pay attention to sharpening the blade. Long cuts are recommended to be made with a wide blade.
How to mount carved platbands
The fastening of the details of the platbands is carried out by means of deaf or through spikes. Moreover, it is believed that the use of the first of them is preferable, since there is no need to decorate the places where the connection takes place.
The grooves for the spikes are made by drilling several holes, the depth of which is slightly greater than the spike. The removal of partitions between the holes is done with a drill designed for metal. The entry of the spike should be tight, however, without the use of force.
The spikes are fixed with pins made of solid wood. The use of glue is not recommended. This is due to the fact that adhesives are not able to work for a long time under the influence of an aggressive atmosphere.
Platband installation: features
Installation of platbands is carried out without the use of glue using nails. They are driven in in increments of 400-500 mm so that the hat is recessed into the wood. Most often, platbands are attached tightly to the box. In some cases, an indent of 5-20 mm is made to the side, which depends on the direction of opening of the valves.
 Architraves drawing
 The window sill at the window opening and the platband are installed closely. This design allows you to install bedside tables that protect the lower part of the platbands.
Upon completion of installation work, it is imperative to carry out protective treatment architraves. You should also apply paint or varnish, which needs to be updated from time to time.
Photo of platbands of an interesting design
 Beautiful rose trims
  platbands
  Platbands are an important part of the architecture of the house
  Beautiful platbands
  original platbands
 Fabulous beauty that has come down to us from time immemorial. It is visible to everyone on the old, beautiful, logged houses, decorated with interesting carvings of architraves with openwork patterns and rich kokoshniks located on the roof, and delights many modern people. You can admire such beauty for a long time, but creating it yourself is a very difficult task. However, with a great and irresistible desire, you can make carved platbands for windows (patterns) with your own hands.
The problem of creating platbands from wood
The question is not that you need the skills of a real artist or imagination to create geometrically correct, interesting, ornate patterns. The problem is more that products from natural materials, for example, from wood, are rather short-lived due to the influence of external factors. The disadvantage of wooden platbands and carving elements is that they are able to retain their original appearance for many decades if they are stored in dry rooms inside the house. And the humidity on the street will quickly provoke the tree to warp, crack and, possibly, even cause chips to appear in places where the carving is thin. Any paintwork inferior to exposure to ultraviolet rays, and rain only exacerbates the overall picture.
This leads to the need to paint the product every year, constantly spending money on coating and spending a lot of time on labor. Not to mention the fact that you will have to repair or even replace such do-it-yourself carved templates for these products can be made from various materials.
Why You Shouldn't Use Wood
This moment can cause difficulties, but do not get upset ahead of time. There is always a way out, how best to create a cozy and pleasant atmosphere and improve the appearance of the building. Modern technologies made it possible to create many materials that are more resistant to environmental influences.

At the same time, in all construction stores they can be found in abundance. You can, for example, use flat iron instead of wood. With it, you can make durable and no less beautiful carved platbands on the windows in this case, you need it in the same way as in the manufacture of this element of decor from wood.
flat iron
Flat iron or sheet, as it is commonly called, given the factory classifications, is a thin tin, the thickness of which is approximately 0.4-0.7 millimeters. In the store you can find rolls of this material from 20 to 50 meters. The width of such a roll according to the standard is 1025 centimeters. It is customary to cover this material with various colors, and you can find both light and dark tin. In addition, each sheet of iron is covered with a protective film, which allows you to maintain the original characteristics during transportation and prevents scratches and dents.
Necessary materials
To independently make carved flat iron (templates can be seen in this article), you will need the following materials and tools:
- First, you will need flat sheet iron (tin), which will have a standard width of just over a meter.
- Secondly, you need a roll of cheap wallpaper. They are used as an aid in making carved platbands for windows with your own hands. Stencils for wall decor and other patterns are applied specifically to the wallpaper, and only then to the material.
- A set of paper clips with which you can fix the templates. Their fixation will help to more accurately and evenly transfer the pattern with a pattern to the surface of the material from which do-it-yourself carved platbands will be made on the windows. Sketches for creating blanks can be found quite easily and are just as easy to use. In addition, they will be needed when you need to fix the finished parts with each other.
- Connecting brackets. It should be noted that their size should not exceed 4 millimeters.
- An ordinary pencil for drawing a pattern and the necessary notes.
- Eraser: after all, there is a possibility that the first time the pattern may not turn out perfectly even.
- A ruler to better measure all surfaces and determine the accuracy of patterns.

- Drill, the diameter of which will be 8 millimeters. It will be needed in order to create holes for the jigsaw. This will happen in those places where the upper carved platbands on the windows will be cut off. Templates, photos of which we could use as a basis for stencil blanks, we no longer need at this step.
- Drill, the diameter of which will not exceed 4 millimeters. With its help, holes will be created that are necessary in the place where the riveted joints of the parts will be.
- Hacksaw for metal.
- Sandpaper, and both fine and medium are useful. It is needed to eliminate the burrs that inevitably form during the work.
- Riveting machine (manual) and a hammer, preferably rubber. By means of these tools, the blanks will be straightened.
The subtleties of the process of manufacturing platbands from tin
Before proceeding with the creation of carved platbands for windows, it is necessary to manufacture and install high-quality window slopes. Needed to remove correct sizes and in order to make carved platbands for windows with your own hands. Drawings can suggest how to do it correctly. This is done taking into account the protruding edges of the slopes entering the walls. After all dimensions have been taken, it is worth calculating the characteristics of future platbands. The standard width of this product is approximately 30 centimeters.

Next, you need to choose any smooth roll of wallpaper in order to make carved trim on the windows with your own hands from it (templates, of course). When a sample pattern is selected, three "patterns" will need to be prepared. One of them will be longer, it is needed for the side symmetrical parts, the second and third, respectively, will be shorter for the top and bottom of the window.
Create a template
The cut strips must be folded in half, and so that when drawing a sketch, the center of the pattern corresponds to the place of the fold. This manipulation will save time and reduce the likelihood of errors when creating a template.
The fact is that during the cutting of the pattern, both halves of the template will be immediately created, in other words, this will allow you to create perfectly even and regular carved trim on the windows with your own hands. In this case, pattern drawings will not be used as often as with a separate drawing of each part of the workpiece.
Workplace and materials
To create the perfect workplace for further work, you need to move two tables together, the height of which will be the same. Between the tables you need to leave a gap, which will be about 8 centimeters. This distance is necessary for work electric jigsaw. For the manufacture of platbands, metal of two colors is required. This combination is the easiest option. You can change this setting if you wish.
As an overlay top color, for example, choose white. It is on it that the patterns will be cut. As a second layer, you can choose a material of any color, since it will still not be visible, since it is used exclusively as a lining under outer layer a product called carved platbands on windows. We make templates with our own hands, we recall once again.
Creation of platbands from sheet iron
You need to take a sheet of flat iron and cut it into strips to create platbands of the desired width. You should turn the blanks of the upper overlay part face down, and also make a flip to the reverse side after securing the template with paper clips. After that, the openwork pattern is transferred to the material.

After the picture is displayed, you will need an electric drill with a drill with a diameter of 8 millimeters. Need to drill through holes and start cutting out the casing with a file and a jigsaw. Next, you need to put the iron strip on the table, and it is important that it is located clearly in the center of the table. This will allow you to cut out the drawing clearly and evenly without compromising the overall picture.
Create a bottom blank
After being cut top part, you can proceed to the next step, which is responsible for creating the bottom part, which will serve as the background. To do this, you also need to cut the material into strips with the necessary characteristics of width and length. At the same time, do not forget that the part will have a border, that is, the width of this pattern should exceed the indicators of external blanks. The ideal option in this case, there will be an increase in width of about five centimeters. We reverse the sheet so that the front side is on top. Next, you need to put the top blank of the casing on this part, which is located face down and circle the outer edge along the edge of the pattern, taking into account the indent, and after that you can start cutting out the part.
Completion of work with blanks
After both blanks have been prepared, you need to remove the protective film from them and put them on top of each other. After that, the parts should be fixed with paper clips. Next, one or more holes should be made with a drill with a diameter of four millimeters. Using riveting manual machine, you need to make a control coupling of parts, thereby preventing their divergence. Having carried out this action, you can start drilling and riveting the entire structure.
Everything - the product is completely ready for use. You can start next stage- install carved platbands on the windows with your own hands. We made templates for them earlier.
Installation of platbands
In order to carry out the installation of platbands, first you need to find a ladder or stepladder, along which you can get to the windows. To install products on wooden wall, you will need:
- A hammer.
- Small nails, the length of which does not exceed six centimeters.
- Mounting syringe.
- Liquid silicone for mounting. At the same time, it must correspond to the color of the casing, or else be completely colorless. It will be needed to cover the gaps that have arisen.
- A small artistic brush, as well as paint that matches the color of the product, with the help of these tools, the nail heads will be painted so that they do not spoil the appearance of the architraves.
To carry out the installation of platbands on a wall, which consists of stone, you will need:
- Electric drill.
- Drill with a diameter of 4 mm with a pobedite tip.
- Screw plugs. If they are not available, you can cut wooden ones yourself and hammer them into holes.
- Mounting syringe.
- Liquid mounting silicone, the color of which will either match the color of the product, or it will be transparent so as not to spoil the appearance of the structure.
- A small art brush, as well as paint that matches the color scheme of the product. With the help of these tools, the nail heads will be painted so that they do not spoil the appearance of the product, which is called "carved window trim". Do-it-yourself templates can be postponed until the next occasion.
The final stage of work
It is necessary to fit the trims close to the edges of the window slopes that protrude, and fix them to the wall. After that, you need to eliminate all the cracks and irregularities using silicone. After bringing the product into an aesthetic appearance, the work can be safely considered completed.
Based on the information above, it is immediately clear that it is quite possible to create carved platbands for windows with your own hands. Templates - simple or complex - can be found or also made by yourself. Therefore, using even minimal skills and imagination, it is quite possible to ennoble the appearance of the building without spending a lot of money and time.
The creation of the front of the house should be treated with full responsibility. Indeed, from how the building looks externally, the first opinion about the owner of the house is formed. This is the "face" of the whole structure. That is why caring owners try to make it unique and individual. Thanks to the decoration of not only walls, but also windows, it is possible to obtain unsurpassed results. Platbands are able to create the integrity of the composition, visually increase or decrease window openings. With their help, you can achieve any visual effect.
Platband - a traditional element of facade decor
Platbands have been used since ancient times. These are traditional and beloved. Naturally, on apartment buildings platbands are not mounted. They are designed to decorate precisely. With their help, it is possible to change the appearance of the house beyond recognition. Simple design creates a fabulous effect.
Platbands on the windows in a wooden house, photos of which can be viewed on the Internet, clearly show how necessary these elements are. Beautiful and original products complete the building and make it look complete. With their help, it is very easy to create an ensemble of all structures in the yard. That is why many years ago they were used in the most expensive houses. They were proud of them and presented them to guests, because once upon a time they treated their own home in a completely different way. "My home is my fortress" - the ancient people believed and created strong and individual buildings.
The functions of platbands in wooden houses, their advantages
But the elements are famous not only for their beauty and noble appearance. facade decor. Window frames perform different functions:
- decorative element that serves as a real decoration. The platband emphasizes the windows, makes their features more expressive and noticeable. With it, you can give the window a different shape;
- visual change of the window opening. it great option in cases where the window wants to be narrowed or, conversely, enlarged. For example, small windows are very easy to enlarge by framing them in openwork lace trims;
- highlights the style of the house. With the help of such products it is very easy to create a real ensemble of buildings in the yard. If you correctly approach the design and decorate all the windows in the courtyard in the same style, you can achieve the integrity of all structures;
- reliable seam protector. AT wooden village houses the window is placed in the same plane with the wall. At correct installation platband, the product also slightly closes the wall, thereby reliably covering the joint. Thanks to this placement, the seam is reliably protected from cracking, dust and harmful effects environment. It will always remain airtight, will not let the cold into the house.
Modern platbands are beautiful products that securely protect the building. That is why it is worth buying platbands for windows in a wooden house. So in a simple way you will not only decorate your home, but also reliably protect openings from destruction, especially since modern market building materials a huge number of varieties of such an element of facade decoration are provided for choice.
Cons of wooden architraves
In addition to the advantages of platbands, it is worth remembering their shortcomings. Although they are insignificant compared to the advantages, it is still necessary to know about them:
- Platbands are very responsive to weather conditions, because they are not protected by anything. This applies primarily wooden products. To avoid such troubles, wooden architraves processed with special substances that contribute to their long-term service. Products made of artificial materials are less demanding to care for. Modern technologies make it possible to create them outwardly similar to natural ones, but many times exceeding them in functionality.
- They require increased attention. require constant care. They need to be painted or varnished. Cracked architraves look ugly on the building, they adversely affect the entire appearance, making it untidy and sloppy.
- The mismatch of the material can be detrimental to the appearance of the house. The choice of platbands should be approached with an understanding of style and design. It is best to entrust the choice to a professional who will help you choose the most advantageous decor option.
Types of platbands
Today available to consumers different types architraves:
- Slotted, which impress with their beauty and grace. Openwork patterns emphasize the individuality and peculiarity, indicate the excellent taste of the owner of the house. Such products are made as a solid canvas with a beautiful pattern. The windows decorated with such platbands give the impression that the window openings are crowned with elegant lace. platbands for windows in a wooden house are the best type of decoration and a reliable protector from the harmful effects of the environment on the joints.
- Overhead, which are a more complex design. Such products are superimposed on a special plate. They have a variety of patterns. Thin lines are perfectly visible on the “lining”, they impress with their transitions. Such an element can be placed on the platbands that are already on the windows. it The best way update . In addition, if the front material and the openwork casing itself are painted in different colors, then you can get the effect of a three-dimensional pattern.
- Simple. They have a smooth surface. They do not have any patterns. The product can have different shapes, rounded edges. As a rule, this type of trim is installed in order to protect the seam. They also give facade finished look. The choice of such platbands can also be an element of stylish design.
Whatever the shape and appearance of the casing, it must withstand adverse weather, temperature changes, and not react to humidity. That is why special requirements are put forward for such products. architraves on windows in a wooden house allow you to create such an element that will meet the requirements of the owner of the building.