The washing room in the bathhouse is a room no less important than the steam room. In the old days it was not provided, but in modern times a sauna and a Russian bathhouse cannot do without a washing room. The interior of the bathhouse washroom should fit harmoniously into the overall design solution.
Planning during the construction phase
The arrangement of the washing room must be thought through at the bathhouse design stage. There are several important points to consider:
- Organization of water flow. On average, about fifty liters of water are consumed per bathhouse visitor. If the bathhouse is equipped with a shower, water will be used much more economically. If there is no shower, moisture should escape through the floor. Do not place the drain hole directly under the washing room floor. Dampness in this place will certainly cause mold and a musty smell in the bathhouse.
- Drain arrangement. The floor surface must have a slope to direct water to the drainage point. The slope should be sufficient so that moisture does not form puddles, but not too steep, since it is easy to slip on such a floor
Washing room floors wooden bath should be finished with material that is resistant to moisture.
In addition to high humidity, the wash compartment differs from the steam room and dressing room in temperature conditions. It should be more comfortable than in a hot steam room, but at the same time it should not be cold here. Insulating the floor and organizing heating in the washing room are important stages in the construction of a bathhouse.
The washroom must have a shower or a bench and a container with warm water. In modern baths, sun loungers are installed in this room for massage and relaxation after the steam room.
Important! Full ventilation is important for a washing bath. Even with proper drainage and drainage of water, active air circulation must be organized to protect against dampness.
The ceiling and wall coverings of the bathhouse must retain heat and be reliably protected from moisture. The finishing of the washroom is selected from environmentally friendly materials that do not emit toxic substances when heated and wet.
Frequent mistakes in finishing the washroom in a bathhouse:
- defects in the thermal insulation of the floor and walls lead to rapid cooling of the room;
- poorly organized ventilation contributes to the development of mold and fungal formations;
- the use of plastic in the design of the walls and ceiling of a bathhouse is undesirable, since the material deforms over time and releases toxins when heated;
- Glazed tiles on the washroom floor can cause falls and serious injury;
- The bathhouse is not finished with tongue and groove boards; its surface can become suitable soil for the development of bacteria and mold.
How to choose finishing materials
When finishing the washroom, you should adhere to several basic recommendations:
- materials for decorating the interior of a bathhouse must have a natural base; the use of linoleum, plastic, oil paint, fiberboards;
- the dimensions of the washing room must correspond to the formula 1 person x at least 1.2 square meters of area;
- It is better to use wood to decorate the walls of the washroom coniferous species, resistant to moisture.
The bathhouse needs regular cleaning. Tile covering convenient to wash and treat with special products. Ceramic tiles are a material that is resistant to the development of mold and mildew.
The combination of ceramics and wood for a washroom is the most practical option.

Advice! To prevent sauna visitors from accidentally slipping on wet tiles, you can install a wooden grate on the floor. After use, the grate should be dried in a steam room or in the fresh air.
Pros and cons of finishing materials for washing rooms
The interior design of a washing room in a bathhouse made of timber, logs or other materials should be not only attractive, but also practical. That is why not all finishing options and materials are applicable for this room. Advantages and disadvantages of traditional finishing materials:
Tile
Finishing with washable ceramic tiles looks neat and attractive. It is quite applicable for finishing the walls and floor of a bathhouse. Before laying tiles wooden walls need to be treated with waterproofing material. On the floor for tiling, a screed is made with a slight slope towards the drain hole. The positive qualities of this finishing material include strength, resistance to the adverse effects of moisture, ease of maintenance and environmental friendliness. The material has great color scheme and may vary in pattern and texture. The downside is the tightness of the coating, the demanding cladding process and the fragility of the material.
Advice! When finishing floors with ceramic tiles, it is better to extend the walls at least forty centimeters. With this option, water will not get on the wall covering.

Tree
In the interior design of a washing room, this material can be used for walls, floors and ceilings. Resinous wood species resist better high humidity bathhouse premises. Material treated with special means successfully resists dampness. For these purposes, wax, oils, water paints. There are practically no downsides to wooden finishing, except that wood loses its attractive appearance over time.
Advice! Wax coating of wood is considered the most expensive, but it is also the most effective. It is the wax that will preserve and emphasize the rich texture for a long time. natural wood.
Stone
This material is used to treat the floor and walls of the bathhouse. You can combine finishes natural stone and a tree. Among positive qualities stone, it is worth noting its durability, strength and environmental friendliness. But stone is a heavy finishing material and requires certain skills in installation. Natural stone is not a cheap pleasure.
Advice! You can compensate for the shortcomings of natural stone by using its artificial counterpart. It is relatively lightweight, easy to install and inexpensive.

Plastic
Plastic panels - attractive and inexpensive material for finishing the washroom. They are connected using the tongue-and-groove method and create an airtight covering of the ceiling and walls. The panels have a wide range of colors and can imitate wooden lining. But this material is very sensitive to temperature changes; it can lose its shape and, if overheated, fill the sink with an unpleasant, pungent odor.
Advice! If the choice is made in favor of using plastic, it is necessary to pay special attention to waterproofing the walls of the bathhouse. Between panel covering and a layer of waterproofing should leave a gap to avoid condensation accumulation.

Dye
Using paint to decorate the washroom is a simple and economical solution. Paints on water based safe for human health and very easy to use. The main disadvantage of this coating is its fragility.
Each of these materials can be used in the interior design of a washroom. They can be combined. If you lack your own skills, finishing work can be entrusted to invited specialists.
Swimming pool and other interior items for the washroom
When designing a bathhouse for a swimming pool, several nuances should be taken into account:
- the font will evaporate a lot of moisture;
- water will splash on the floor and walls of the room;
- If the size of the pool exceeds 3 meters in length, it will require a separate room.
A small font made of plastic or wood can be located in the washing room.

Advice! It is better to drain the pool water after each session. To avoid excessive evaporation of moisture, the font is covered with a lid.
Pools in the washroom can have different shapes and locations. The font can be buried flush with the floor or installed on its surface.
For the interior of a washing room in a bathhouse with a font, you will need to install comfortable sun loungers and benches for relaxation.
In the setting washing bath Applicable items of country furniture - sun loungers.
For lighting, you can use ceiling and wall lamps, LED strip.
Shelves for storing shampoos and washcloths are made of moisture-resistant material. After the bath session they are released to dry.
Advice! Potted plants can be installed in the washroom with a swimming pool. They will “balance” the space and will feel great in a humid environment.
Spathiphyllum, chlorophytum and sansevieria are perfect for landscaping a washing bath.
To decorate the interior, you can use unusual painted tubs or ladles, carved hangers for washcloths. Carved benches of different sizes look good.

- For floors in a washing bath, it is better to choose ceramic tiles with a rough coating that imitates natural wood. This floor will not slip.
- If the size of the washing room allows, you need to install a shower stall and washbasin in it. If the room is small, baths are usually limited to a barrel-font or a dousing bucket
- The room must have at least one bench of suitable size for massage procedures.
- Usage LED lighting- not just a beautiful and original technique, but also a very practical solution. Sealed LEDs cope well with high humidity and operate flawlessly.
- In the design of a washing bath, unusual basins and towels, original washcloths, thermometers, and bottles are appropriate.
The interior design of a bathhouse washroom should take into account the specific features of the room. When finishing walls, floors and ceilings, it is better to use materials that are resistant to high humidity and temperature changes. A wash bath with a pool or plunge pool can also be a relaxation room, especially if it is decorated with live plants and bright accessories.
The article will be useful to those who plan to independently complete the interior decoration of bath rooms. Detailed step by step instructions with photos will help to produce cladding and cladding with high quality and in compliance with construction technologies.
A classic Russian bathhouse necessarily contains such rooms as:
- steam room;
- washing;
- vestibule (locker room).
If the area allows, modern buildings will be equipped with a separate recreation room, a billiard room, a swimming pool, a veranda, a barbecue area and even a full kitchen.


Despite fashion trends, the basic requirements for a bath remain unchanged:
- the steam room requires persistent hot steam,
- in the washing room there are non-slip floors and the possibility of convenient bathing procedures,
- In general, the premises have a comfortable microclimate and an aesthetically pleasing environment.
The functionality of bath rooms largely depends on the correct finishing. Even if your structure is built from rounded logs, and the walls from the inside look beautiful and aesthetically pleasing, it is recommended to carry out interior finishing of the bathhouse, as this will significantly extend its service life.

Each room has a number of features that must be taken into account when choosing materials and cladding methods.
Steam room
When decorating a steam room, the following nuances must be taken into account:
- sudden temperature changes, the upper limit of which can reach 120˚C;
- the presence of hot steam emitted in a powerful and concentrated stream;
- high humidity.

A universal cladding option for a steam room is a cladding board, which must have the following properties:
- do not absorb moisture;
- have a low heat capacity, therefore, do not heat up from high temperatures and contribute to the rapid heating of the steam room;
- have a pleasant color and smell, and do not release resin when heated;
- protect walls from rot and mold, help purify the air.

Of the variety of linings, panels made of linden, aspen, cedar or African tree Abashi. When choosing a cladding material, pay attention to the quality of the wood - well-dried and hewn, without knots or nicks on the surface, it will serve reliably for many years.

The lining in the steam room is not treated with varnish, paint or antiseptic. These substances are toxic and, when heated, can negate all the benefits of bath procedures.
Before covering The cheapest material for these purposes is mineral wool, which is what is most often used for finishing. Often, insulation such as basalt wool is used. It is more durable, as it is not subject to damage from high temperatures. However, cork agglomerate is considered the best insulation for baths. It is anti-allergenic, not susceptible to rotting, burning and fungus.
The floor in the steam room is made warm, non-slippery and pleasant for walking with bare feet.
Prices for lining
Video - Interior of the steam room
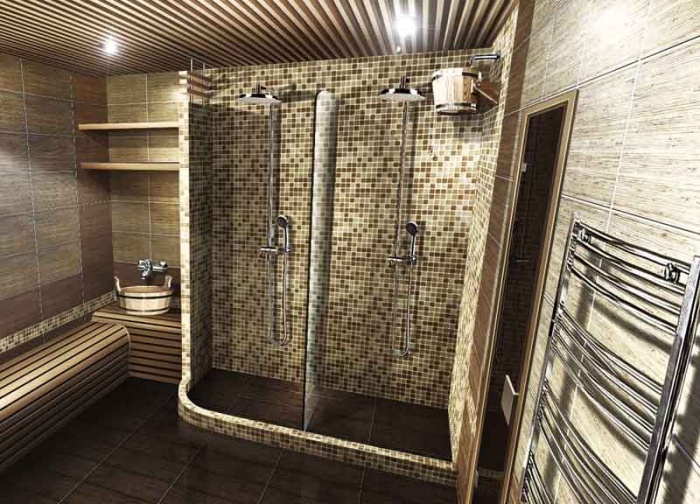
Wash room
In the washing department, you usually not only rinse your body; here you can relax after a hot steam room, have a relaxing massage, or apply products to care for your face, body, or hair. The convenience of the premises for carrying out various procedures must be taken care of already at the stage of construction and subsequent finishing.


The washing room is faced with either ceramic tiles or wood. Moreover, if deciduous varieties of lining were used in the steam room, then in the washing room they give preference to coniferous species - larch, spruce or pine. The resin they contain has moisture-repellent properties and protects materials from rotting.
Particular attention is paid to the floor; it should not be slippery or cold. It is preferable to fill the base in the washing room with concrete, on which tiles are laid. Although it is also possible wooden version floor.

To prevent slipping on a wet surface, it is recommended to lay the flooring on the tiles in the form of removable wooden logs. They should be dried after completing the bath procedures.

Wood flooring on tiled floor- photo
Tambour, locker room, rest room
Along with the washing room and steam room, in the rest bath rooms High air humidity remains. Here you can use both deciduous and coniferous wood for decoration. The following materials are also used:

The combination is common in such rooms various types finishing, for example, wooden lining, tiles and natural stone.
Prices for porcelain tiles
porcelain tiles
Video - Shower and relaxation room in a bathhouse made of thermoolha
Ceiling decoration in the bathhouse
During operation, the ceiling is exposed to the aggressive effects of hot steam and high humidity. It is important to protect the floors with vapor and heat insulation to prevent damage to the materials. For these purposes it is often used aluminium foil or construction membrane. They are equally effective at ensuring they are sealed.

For vapor barrier, do not use foil with cotton wool glued on it. It is much thinner and less convenient when carrying out cladding work. Also, do not use foil with polypropylene foam attached. It is toxic when heated, so it is not suitable for use in bath rooms.


It is important to carefully glue all joints aluminum tape. If during the process of attaching the material you inadvertently damaged it, immediately seal this place, then you may forget to do this and the vapor barrier will be damaged.

In the steam room you need to lay out a hole for the pipe. It is equipped with a box made of thin stainless steel sheet, which is filled with expanded clay.

The ceiling above the stove is additionally insulated steel sheet, which protects the wood from excessive heat.

Step-by-step instructions for installing lining on the ceiling
Step 1. Slats with a cross-section of 2*4 cm are sewn onto the ceiling with a lathing pitch of 40-45 cm. In the places where the frame is attached, it is necessary to provide gaps for ventilation of at least 10 mm.

Step 2. The slats are placed horizontally on the walls, the direction is perpendicular to the lining.
Step 3. Wooden panels begin to be attached from one of the walls. The groove of the first plank is directed outward and the tenon of the next one is driven into it. It can be the other way around, there is no fundamental difference.

On a note! When installing, use pads and a mallet to avoid damaging the material.
Step 4. The planks can be fixed with special clamps; they are attached to the rail with nails or screws. But the simplest and most convenient way is to use construction stapler. It reliably fixes the lining and significantly reduces installation time.


Step 5. Gaps from the walls of 2-2.5 cm are left on the sides. This provides additional ventilation and prevents deformation of the finishing material. The gaps are subsequently hidden by the baseboard.
The first and final panels are nailed with nails with a small head. They are hammered in at an angle, the head is completely driven into the wood using a hammer.

It is important to ensure the verticality of the slats, which is checked after installing each panel using a level. Instead, you can use a simple construction meter. IN in this case you measure the distance from the wall to the edge installed panels on one side and the other.
If there is a discrepancy in measurements, the lining is carefully tapped to the required level. To do this, use a small piece of the same panel, which is inserted into the groove and a mallet (or hammer).
The panels are also trimmed in the following way: a wooden overlay is fixed, under which a pointed sliver is carefully hammered.

The walls in the steam room are decorated with wood. In other rooms you can use tiles or stone.
Wall decoration with clapboard
The basic technique for installing wooden panels on walls is no different from attaching them to the ceiling.
Step 1. We fill a thick beam horizontally along the entire perimeter - every 80-100 cm.


Step 2. We install mineral wool insulation. We cut the insulation to the required sizes with a sharp knife. We lay it between the beams without compacting it.

Step 3. We lay a vapor barrier and carefully seal all joints with aluminum tape.

Note! Carefully monitor the quality of insulation in the corners.
Step 4. To provide a ventilation gap, we stuff the spacer strip. Sheathing is always performed at an angle of 90 degrees to the lining strips. Thus, if you plan to place the panels vertically, the sheathing is nailed horizontally.
First, frame vertical slats are installed at the corners of the wall, the accuracy of their fastening is controlled by a plumb line. To evenly arrange the horizontal slats, you can pull the cords at the top and bottom of the frame slats, that is, near the floor and above the ceiling.
The next strip is inserted after 40-50 cm, and then the remaining strips are attached around the perimeter, with the same step. Constantly check the evenness of the installation with a level or plumb line.
Step 5. Doors and windows are lined with separate bars.
Step 6. Let's start attaching the panels.


When covering walls in bath rooms, it is recommended to mount the lining vertically, starting from one of the corners. This will ensure that moisture quickly drains onto the floor, without trapping it in the grooves of the panels.
If you decide to do horizontal finishing, then lay the boards with the tongue facing up so that moisture does not accumulate in the grooves. With this option, start fastening the boards from the ceiling, and not from the floor. The lathing is nailed vertically.
Wooden panels are fastened using clamps, regular nails, or a construction stapler. When using nails or self-tapping screws, they should be inserted at an angle of 45 degrees, with the head completely buried in the wood.
Be sure to leave 2-3 cm gaps when attaching the lining from the ceiling and floor for ventilation.
Often the lining has to be trimmed. For these purposes, use a saw with small teeth or an electric jigsaw.

Before attaching the last rail, it is trimmed to the right size and attached to the sheathing. On the first panel of the next wall, the ridge is cut off and installed flush against the last batten of the first wall. Corner trimming requires special precision. The main thing here is to determine the required angle and draw a cut line before sawing. Adjacent corners of the panels must fit end to end, without gaps.
Prices for vapor barrier
vapor barrier
Video - Finishing a bathhouse with clapboard
Insulating the furnace from the wall
Special attention must be paid to insulating the stove from the wall. For these purposes, you can use one of the following options:
- stainless steel - attached directly to the wall behind the stove;
- mineralite - heat-resistant boards made in Finland, consisting of cement, mineral fillers and reinforcing fiber. 2 sheets are attached if the stove is located in close proximity to the wall. When the stove is located at a distance of more than 40 cm, it is sufficient to use one sheet of mineralite.;
- heat-resistant kaolin clay tiles, for example from Russian company"Terracotta";
- profile iron is the most cost-effective insulation option;
- red solid brick - laid between the wall and the stove to the base of the pipe. If desired, you can insulate the entire space up to the ceiling.


Minerite prices
Wall tiling
Often the walls in the washing department or in rest rooms are finished with moisture-resistant ceramic tiles. It is made from environmentally friendly, non-toxic materials that are safe for health when heated, do not absorb moisture and give a beautiful and modern look room.
Step-by-step instructions for laying tiles on walls in a bathhouse include the preparatory stage and cladding.
1) Preparation
If the walls are brick or cinder block, then they are cleaned of dirt and dust, rough plastering is done, and unevenness is leveled with mortar.
Wooden walls are covered with waterproofing material - roofing felt or roofing felt. It is nailed down with a construction stapler and sewn on top fine mesh-chain-link. Finishing preparatory work applying a cement mortar that completely covers the metal mesh.
A perfectly flat wooden beam is nailed at floor level, from which it will begin fine finishing. You can use a metal UD profile, which is mounted level along the wall.

To control vertical rows, use a regular plumb line or laser level.
2) Laying tiles
To attach the tiles, you can use either a self-prepared solution of cement and sand (in a ratio of 1/5) or ready-made glue. It is more convenient to use industrial glue designed for baths; it can withstand large temperature changes and high humidity.

Before starting work, the tiles are immersed in a container of water and left until all the air comes out of it. This will provide better adhesion to the solution.

Start facing from below, from the attached level.
It is important to lay out the first row perfectly evenly, since the quality of all subsequent cladding will depend on it.
Using a notched trowel, apply the adhesive to the back of the tile or directly to the wall. The tile is pressed against the wall, the glue should protrude slightly beyond its edges. To ensure that the square sits perfectly straight, align it with a rubber hammer.

Keep an eye on the gap between the rows of tiles; it should be the same along the entire length and height. To do this, when adjacent rows are laid out, plastic crosses are placed in the gaps in the corners of the tiles.


After 2 days the glue will dry completely and you can remove the level.


The gaps between the rows are filled with grout, which matches the color of the cladding. It dries in 11-12 hours.
The final stage is cleaning the walls from grout residues and other contaminants. The tiles are thoroughly washed and wiped dry.

Tiles create a lot of space for creative expression. It can be laid out in even rows, offset or diagonally. For beginners, the simplest and fastest option is recommended, when the squares are located exactly on top of each other.
The running drawing looks like this.

Laying tiles in a “running start”
Facing diagonally.

To create complex combinations of tiles of different colors, it is recommended to first lay out a pattern on the floor, then outline a diagram on the wall, and only then proceed with finishing.
Prices for heat-resistant tile adhesive
heat resistant tile adhesive
Video - The principle of laying tiles
Wall cladding with terracotta flagstone
Heat-resistant terracotta tiles are a popular solution in bath rooms. It is moisture-resistant and durable, can withstand high temperatures and allows you to create an original and beautiful wall design.

The technology for laying it is somewhat different from facing conventional thin ceramic tiles. Terracotta is a heavier material and requires special glue or mastic.

Below are step-by-step instructions for tiling with terracotta flagstone.

- Apply mastic to the flagstone in a thick, thick layer. More adhesive is required than when laying lighter tiles.
- Press it against the wall and level it.

- We install the remaining slabs.
- For even joints, we lay pieces of drywall between the slabs.

- When laying parallel rows, do not forget to check the horizon with a level.
- After 10 hours, the joints can be filled. To do this, we use a special wide-joint heat-resistant grout. We dilute it with water and beat with a construction mixer until it has a homogeneous consistency. Properly prepared mass resembles thick sour cream.
- We free the structure from the plasterboard squares.
- Fill a construction gun with grout. We cut the nose of the gun at an angle of 60 degrees, the hole should be 8-10 mm.
- Fill the gaps between the slabs with grout. The squeezed-out mass should not go beyond the level of the cladding, nor should it fall on the front side of the slabs.

Be careful when handling the gun. If the mastic does get on decorative surface, do not try to wipe it off right away. Wait 2 hours, then scrape off the dried compound without rubbing it.
- The grout is distributed along the seam in any direction convenient for you. You can first go through the horizontal joints, then along the vertical ones, or vice versa.
- After 2 hours we begin decorative stitching. This will give a complete, finished look facing.

- For jointing, you can use a simple screwdriver with a working surface width of 7-8 mm or a rigid wire ring.
- Finally, put on clean gloves and run your index finger along all the seams.

Bathroom floor finishing
If the floor is made of wood, then it does not require any additional finishing.

Start facing from the corner. Unlike wall decoration, an ideal horizon is not created on the floor, i.e. the tile is located at a slight slope towards the drain hole.
Before applying the solution, mark the location of the squares on the floor using a level.
- Cement mortar is poured onto the concrete.
- Level with a spatula.
- The surface is covered according to the size of the tile; in this case, two rows are laid out simultaneously.
- The serrated side of the spatula creates a pattern on the mortar for better adhesion of the cladding surface.
- Lay out rows of tiles. Using a rubber hammer and level, set the desired slope and level it. Please note that for the first row, the tiles do not need to be pre-immersed in water. The rest of the base is covered with soaked cladding.

Photo - laying tiles on the floor

- In the corners, the tiles are cut to the required dimensions. To do this, marks are made on the tiles and followed by a tile cutter.
- Identical plastic crosses are inserted into the gaps.

- After a couple of days, the seams can be filled with grout.

Finishing a bathhouse yourself takes a lot of effort and time. It is necessary to solve a number of important problems - what material to choose, how to attach it correctly, how to ensure safety during operation and create a cozy and harmonious atmosphere in the premises. The recommendations and step-by-step instructions given in the article will help you cope with the task and, after completing all the work, enjoy a good and complete rest during bath procedures.

Tile on the floor - photo
Video - How to lay tiles on a wooden floor in a bathhouse
Modern baths have several compartments at once. The steam room and washing room are made separately. This way the humidity in the steam room is always low and steaming is easier. But I want to make the washing department high quality. The question arises of how to decorate the washing area in a bathhouse if it is traditionally built of wood. And as you know, wood and water are a bad combination. We will discuss with our readers what material is suitable for lining a sink.
What kind of washing area should a bathhouse have?
The washing compartment in the bathhouse must be at least 4 m². Regular bathroom sizes, like those in an apartment, will not fit. The washroom is used not only as a shower, but also as a place for massage or applying various cosmetic masks. It’s not bad if there are 1-2 benches in the room. In order to save money, you can make a bench for the washing room with your own hands from natural wood. The length of the benches must be at least 180 cm, so that the tallest member of the family can fit on it while lying down.
In large baths, the washing department is combined with a swimming pool. In this case, several cabins are installed, and the pool is used for relaxation and diving after the steam room. It is convenient to place the exit from the steam room directly into the washing room, only from there to the rest room. People take a shower not only to wash themselves, but also to wash off sweat and cool down after the steam room, before relaxing and drinking tea.
There will not necessarily be a shower in the washing section of the bathhouse. You can hang several tubs for running in cold water. But in this case, it is necessary to equip a separate place for placing basins for washing.
IN small baths The washing room can be combined with a bathroom. In such a washing room you can install a regular shower stall. In this case, the water will not come into contact with the wall decoration as much.
The material for finishing the washing room is chosen based on the main design in the bathhouse and a number of other criteria, which we will discuss below.
Features of the material for washing
The washing compartment is not exposed to high temperatures, but constant contact with water makes it unfavorable for wood. If, after all, the overall design of the bathhouse is wood, and you don’t want to disturb it, then use lining or imitation timber made of larch or aspen. But the material will not be cheap.
Finishing materials for a bath are selected according to the following criteria:
- High water-repellent characteristics.
- Environmentally friendly.
- Easy to install.
- Washing design.
- Price.
Unfortunately, it is difficult to find combinations of all indicators. Among the most commonly used are: ceramic tiles, natural or artificial stone, wood, water-repellent paint and plastic panels. They are divided according to their purpose: for cladding ceilings, walls and floors. Each of the options has positive and negative qualities; let’s consider them in more detail.
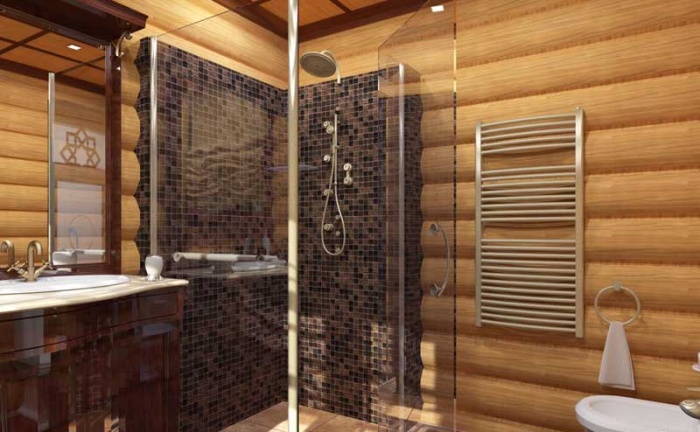
Ceramic tile
Ceramic tiles are moisture-repellent materials. It is used for finishing floors and walls of the washing compartment. If the walls in the bathhouse are wooden, then before cladding you need to lay waterproofing and level the walls. The tile adhesive used is moisture-resistant. The size and color scheme are selected individually, and a large assortment in construction stores makes ceramic tiles affordable for any budget.
Ceramic tiles are most often used for floors. In the washing department, it is important to properly organize the drainage and perform the screed. The floor should have a slight slope towards the drain, which is discharged under the bathhouse or into the general sewer system.
On to the pros ceramic tiles relate:
- Does not allow water to pass through.
- Durability.
- Does not lose strength over the years.
- Does not change color.
- Environmentally friendly.
- Easy to care for.
- Price starts from 120 RUR/m²
- More than 200 colors.
The cons are mainly taken from user reviews:
- The floors in the wash bay slip and it is easy to get injured.
- The walls stop breathing.
- It is difficult to do the installation yourself without a certain skill.
- May break if hit by a heavy or hard object.
If the floors in the washing room are tiled, there should be an overlap on the walls, at least 40 cm, so water will not get to wooden structure walls Above the tiles, you can use water-repellent paint on a natural basis.
Tree - pros and cons
Wood in the finishing of the washing room is used for walls. If all other rooms are finished with imitation timber, clapboard or block house, then the washing room can also be finished with this material. But it is better to use cladding from coniferous varieties wood A high resin content will make the walls more resistant to moisture.
Larch and aspen are considered the most resistant, but the price for panels made from this wood starts from 350 rubles.
Pine and spruce can be coated with water-repellent compounds and their service life will increase. The following are used as water-repellent compositions:
- Natural oils.
- Wax.
- Water based paint.
Wood, if well processed, will be an excellent finish in a washing bath.
Oils are impregnating compounds and penetrate deep into the wood. Before application, the surface is sanded and cleaned of dust and dirt. It is necessary to apply oils in the washing machine in 2-3 layers. After complete drying, the walls will become less susceptible to moisture. The durability of an oil coating is less than, for example, that of wax.
Wax is one of the most expensive wood coatings. It is applied by rubbing movements using a special soft cloth. Wax creates a film on the surface of the wood that reliably protects the wood, but does not block the penetration of oxygen inside. At the same time, the appearance of the wood only improves, the pattern becomes more expressive, and the shade is deeper.
Paint is used only on a natural basis, but water-repellent. It can be matte or glossy. In this case, the color scheme depends only on the owner’s imagination. Apply with a brush or roller in 2 layers. Dries within 12 hours. The only negative is that the surface wears out quickly, so the treatment must be repeated once a year.
Wooden finishes go well with natural or artificial stone.
Stone in the finishing of the sink
You can use stone to decorate walls and floors in whole or in part. They combine the walls by laying artificial or natural stone in the area where the shower is located. Natural stone is expensive and has a number of advantages:
- Eco-friendly.
- Beautiful appearance.
- Durable.
- Not afraid of mechanical influences.
- Does not allow water to pass through.
The main disadvantages include:
- Heavy material.
- It is difficult to do the finishing yourself.
- A flat surface is required for installation.
- High price.
But the disadvantages can be compensated for by using artificial stone. It is not as environmentally friendly, but lighter. And if you take correct form, then it is no more difficult to install than tiles. The price of artificial turf is 2-3 times lower than natural turf.
Plastic lining and panels
The most economical way to finish a washroom is to use plastic panels. Moreover, they are wide with a tongue and groove, which makes it possible to create the most airtight finish. Color solutions are different. The use of thin plastic panels resembles the appearance of painted wooden paneling. used for cladding walls and ceilings. The main advantages of the material include:
- Easy installation.
- Lightweight material, therefore easy to install on lightweight sheathing.
- Price from 70 RUR/panel.
- Does not absorb water.
- Aesthetic appearance of the walls after finishing.
The cash in question has a number of negative qualities, which users mention more than once in reviews:
- Afraid of mechanical influences.
- Not environmentally friendly.
- Prevents oxygen from getting inside.
If you do not purchase quality material, it will emit a pungent, persistent odor.
When installing plastic panels, you need to install thorough waterproofing of the walls and ceiling. To do this, a foil film is attached to the surface or PVC as a cost-saving measure. It is necessary to leave a gap of 1-2 cm between the panels and the waterproofing, otherwise condensation may accumulate under the panels and the walls will begin to rot.
Installation of plastic panels in the washing compartment is permissible only after the house has completely settled. Otherwise, they may become distorted and the seal will be compromised, and in rare cases the finish will crack.
Sink finishing paint
The easiest way to finish a washing gypsum lining and paint it with water-repellent paint. But this method is short-lived and must be done once a year. renovation work. In addition, when installing gypsum fiber boards, part of the room area is lost. This method is not the best, since it is recommended to use it if a separate closed shower stall is installed in the washing room.
Paints can only be used on a natural basis, and their main disadvantage is their fragility.
Any of the listed finishing materials can be used for interior finishing of a washing room in a bathhouse. But choosing the right material is only half the battle; it is important to carry out the installation correctly and efficiently. If experience is not enough, it is better to entrust the work to professionals.
How to decorate a bathhouse sink: Tips from the experts
Choosing what to decorate the bathhouse sink with. What are the pros and cons of tiles, natural and artificial stone, plastic panels, paint.
Washing room: separate room in the bathhouse
Today, many people dream of relaxing in a bathhouse, so their construction is becoming more and more popular. A separate area that requires special attention is the washing room - a room that must be present in a sauna or bathhouse. You can do it yourself, there is nothing complicated about it.

Option for organizing a washing room in a bathhouse
Advantages of a separate washing room
According to the standards, the washing room should be organized in a separate room, closed from the rest room and steam room. It is possible, if space does not allow, to combine these zones, but make a small fence to make the interior more comfortable. The basis of the finishing in the bathhouse is wood, but the washing installation requires additional materials - tiles and protective curtains.

A sink finished with wood looks organic
It is important to remember that a combined washing room and steam room saves space, but the design is less comfortable. The interior of the bathhouse as a whole begins with the washing room, since it is located immediately near the entrance.
Advantages of a separate sink:
- allows you to create comfortable interior and beautiful design;
- if the room allows, then you can accommodate a large group of people;
- the shower cabin does not spoil the overall atmosphere with its unusual appearance for this room.
In turn, the combination will save money on materials and firewood, since there will be no need for additional heating of the sink.
Advice: the shower cabin and hot water tank (baller) can be decorated, for example, by sticking a film with a wood pattern. This is especially true if the sink is not insulated. The installation of this part of the bath or sauna requires some skills and knowledge, since the humidity levels in the shower room are much higher than in the rest of the room.

Materials other than wood are often used in the washroom.
It is important to remember that high-quality and powerful ventilation is necessary here, so maximum attention must be paid to it. For comfortable placement in a room shared with a steam room, it is recommended to arrange them at different levels. For example, a shower will occupy the lower zone, and a shelf for relaxation will be placed at the top. Most often, a washing room and a steam room are combined if the total area of the building is less than 16 m2.
Arrangement of walls and floors
The finishing touches in the bathhouse suggest that most of the interior will have wooden elements, but the washing compartment allows the floor and walls to be finished with tiles as well. The cabin in which the shower will be located can be either plastic or made with your own hands from the same wood, which will look stylish and the interior will be completely harmonious. It is important to remember that the installation of a washing room is carried out exclusively with moisture-resistant wood species. Cedar will cope with the task perfectly. It is used both for finishing walls and for covering floors if the use of tiles is not provided. Design and interior also benefit in this case. For wooden finishes will suit also linden, larch and abashi.

The floor in the washing room is tiled, and the walls are made of natural wood.
The lining can be fastened in different directions:
Today it is very fashionable to place it diagonally or combining directions.
In order to create a washing room, you will need to create a frame, which is then covered with clapboard, which creates not only a pleasant design, but also fills the entire room with a pleasant woody aroma. Fastening is done both with nails and self-tapping screws.
Installing a floor in a washing room yourself is also not difficult. It is important to ensure that it does not end up slippery. If you want to move away from the usual and make a modern floor, then experts advise paying attention to ceramic tiles that do not have glaze. Its installation is carried out directly on the concrete floor (rough).
Advice: It is best to ensure good drainage of water. For this purpose, special structures called ladders should be used. You can make them yourself from wooden slats . Ordinary rubber mats will also help get rid of slippery floors and excess moisture. Do not use toxic materials for flooring.

A modern version of finishing a bathhouse sink
In addition, installing a floor with your own hands requires taking into account the fact that the ground cushion, heat insulating material, and the floor screed must not be connected to the foundation to prevent distortion and shrinkage.
Water supply and ventilation system
In a modern bathhouse it is necessary to do not only good shower, respect the design and interior, but also provide ventilation and ensure uninterrupted water supply. This applies primarily to the washing room.
Ventilation is necessary to remove water that may accumulate under the floor, especially where the shower is installed. The blowing device will prevent rotting and will also ensure a stable air temperature. Installing a ventilation pipe together with the stove will keep the floor warm.

It is practical to install a bathtub in the washing room
In the bathhouse there is a natural and forced system for pumping air masses. Natural ventilation occurs due to the difference in air pressure inside and outside the room. The interior will not suffer damage, since there is no need to purchase special devices that spoil the appearance. Forced ventilation, the design of which is especially important for large rooms, involves the use of ventilation and filters.
The water supply in the sink and bathhouse as a whole must be made reliable, so that there is both hot and cold water. A separate heater can be installed in the shower.

A shower stall in a washroom can look very organic
Advice: to save resources, you can make a preliminary calculation to determine the optimal amount of water per person.
Then the pipes are laid out. In order for the washing area to be fully supplied with hot and cold water, you can use gas or electric heater as a supplement or alternative. The shower can be made joint or separate, then you need to think about the number of heaters in advance.

The sink can be completely tiled
There are times when water is limited because there is no way to ensure its flow to the site. Then the water supply arrangement looks like this: calculations are made in liters per number of people, after which water is delivered into containers using buckets - in this case, it is most practical to install one shower. Afterwards the hot water is heated to 90°C. Cold water is stored separately. Approximately 40 liters of water per adult, of which at least 10 liters are hot.
Thus, installing a washing bath in a bathhouse is a task that can easily be done with your own hands, without spending money or the help of specialists. Design, interior, furniture - all this is chosen by the owner, but water supply and ventilation should be arranged according to the rules and regulations. The shower in a modern bathhouse can be supplemented with a separate tank - a water heater for comfort and better, more complete rest.
I have long been interested in the question of arranging a separate washing room. Thanks to this article, I learned everything that interested me. Thank you!
I used tiles for the floor in the sink, but for other safety, as the author advised, I installed rubber mats. The material is good, a lot of useful information.
When I installed the washing room, it turned out that the existing ventilation was not enough. Therefore, I advise everyone to think about quality ventilation in advance!
Washing room in the bathhouse (photo)
Advantages of a separate washing room in the bathhouse. Features of the arrangement of walls and floors. Options and nuances of water supply systems and ventilation.
Finishing of the washing bath
The interior decoration of the washing bath should be carried out taking into account the operating conditions of the room. First of all, you need to decide on the design features. The room can be separate or combined with a steam room. The second option is much less common and imposes more stringent restrictions on the choice of materials.
Washing room in the steam room

In this case, the facing material will have to face higher temperatures. The washing room becomes an extension of the steam room, so the heat will also affect the finishing of the washing compartment of the bathhouse. To avoid problems during operation, it is recommended to choose coniferous wood as a material, both for cladding walls and ceilings. But you can also choose deciduous, moisture-resistant ones, such as oak or cedar.
TO finishing works start after shrinkage wooden log house. This rule is not relevant when building a bathhouse made of brick or lightweight concrete.
Finishing a washing room in a wooden bathhouse begins with the outer and inner caulking of the walls. It must be done efficiently to prevent cold and drafts from entering the room in the future. Wooden lining is most often used for cladding. The work is performed in the following order:
- Alignment of walls.
- Fastening the frame for finishing. The sheathing slats are placed perpendicular to the lining. If you plan to attach the facing material vertically, but the frame will be horizontal. The same rule applies to the ceiling. The pitch of the frame slats is taken to be 40-50 cm. The thickness of the sheathing is usually 40 mm.
- Checking the evenness of the frame. To do this, use a building level or plumb line.
- A thermal insulation material 5-10 cm thick is fixed between the slats. To protect the insulation from moisture from the room, a foil vapor barrier is used. It will also become an additional barrier to cold air and will reflect heat into the building.
- At the next stage, the lining is attached to the sheathing. Self-tapping screws, nails or clamps are used as fastening elements.
- Wooden finishes are treated with antiseptics to prevent mold and rot, with wax or a water-repellent solution.
- Lastly, trims are installed on doors and windows.
Separate washing area

In this case, the list of possible materials significantly expands. Just as in the previous case, you can use wood. The technology for performing the work remains the same. Three more options are added to the lining:
- ceramic tile;
- natural or artificial stone;
- plastic panels.
When choosing a cladding method, it is important to consider several material requirements:
- moisture resistance;
- resistance to high temperatures;
- environmental friendliness;
- safety.
Ceramic tile cladding

Finishing the washing area in the bathhouse with tiles is done only for the walls. The advantages of this material include high strength, durability and resistance to high humidity. Nowadays manufacturers offer a wide range of different colors and textures, from which it is easy to choose suitable option. The disadvantages will be the complexity of the work and the large volumetric weight of the tiles.
Wall tiles are used in both brick and wooden baths. Before starting work, you need to carefully select the adhesive solution. It must be designed for wet areas. When choosing tiles for a wooden building, you should carefully consider the load-bearing capacity of the walls. If they are thin, it is recommended to choose a lighter cladding.
The work is performed in this order:
- Preparation of walls, caulking, leveling, treatment with antiseptic compounds.
- Covering walls with waterproofing material. For this, roofing felt is often chosen. You can also consider more modern analogues, for example, linochrome or hydroisol. The waterproofing is attached with an overlap of at least 10 cm using a construction stapler.
- A fine mesh netting is sewn on top of the waterproofing. A layer of cement mortar is applied on top of it. It should completely cover the mesh.
- Installation of tiles begins from the lightest corner. To cover the walls around the perimeter at floor level, a wooden beam or metallic profile. Its evenness is checked using building level. This beam will become the support for the first row of ceramics.
- The tiles are laid from below using glue, which is applied to the back side of each element. To ensure evenness of the seams, special crosses are used.
- After finishing is completed, all seams are rubbed with a hydrophobic compound.
Facing stone

Finishing a bathhouse shower with natural stone is highly labor-intensive and costly. has been gaining more and more popularity lately artificial variant. The technology for performing the work is very similar to installing ceramic tiles. The work order looks like this:
- preparation of the base;
- waterproofing;
- cement screed on a grid;
- applying glue to stone and wall;
- gluing the finish and checking the level;
- grouting joints.
PVC panels
Finishing a shower in a wooden bath with plastic panels - possible variant. This is also true for buildings made of brick or concrete. But before making a final decision, you need to carefully weigh the pros and cons. The advantages of plastic panels include:
The disadvantages include:
- fragility;
- low strength;
- the seams begin to darken after half a year.
If you buy low quality PVC panel, it may emit an unpleasant odor when heated. This effect indicates the use of low-grade raw materials for the manufacture of finishing materials.
Plastic is used both for finishing walls and ceilings. The installation procedure is as follows:
- preparation of the base (when finishing the ceiling - plaster);
- fixing waterproofing;
- installation of sheathing (the same as for wooden lining);
- installation of panels using a tongue-and-groove system.
Floor finishing

It is not recommended to use synthetic materials as floor coverings. In this case, ceramic tiles or wood are used. The texture of the tile should be chosen so that it prevents slipping. You can also lay wooden gratings on the tile floor to avoid injury.
Wooden floors must be treated with an antiseptic composition and protected from moisture. To increase water-repellent characteristics use:
- wood varnish (renewed every 5-7 years);
- tinting (every 2 years);
- oil (once a month).
To extend the service life of walls, floors and ceilings, it is worth taking care of ventilation. If natural ventilation is not enough (when using tiles, plastic, stone as cladding), a forced system (exhaust) can be used. This option will require additional financial investments, but will ensure a comfortable microclimate and prevent frequent finishing repairs.
The washing room is the main room in the bathhouse

Washing room in the steam room
When building a bathhouse with their own hands, every owner wants it to be not only functional, but also aesthetic. Therefore, even at the design stage, consideration is given to different variants arrangement and decoration of premises. Until recently, the bathhouse was used only for hygienic purposes. Today it is a place to relax with friends, an opportunity to relax and relieve stress. But the main thing is to get the maximum boost of energy, improve your body health and lose extra pounds.
Nowadays there are always three or even four rooms in the bathhouse:
The most important are the steam room and washing room. Special attention is given to the arrangement of these objects, especially if you do everything yourself. There can be no trifles here. If the visitor feels comfortable after the steam room, it means that the washing room is designed correctly. It should be optimally preserved low temperature and air humidity. In such conditions, a person can stay indoors for quite a long time.
What should be in the washing room?
A shower must be installed in the room. If the bathhouse is designed to be visited by several people at the same time, there may be two or three showers. The main thing here is the area of the sauna, as well as the desire of the owner, who builds the facility with his own hands.
The effectiveness of the procedures carried out in the bathhouse, including cosmetic and hygienic ones, depends on the arrangement of the washing room.
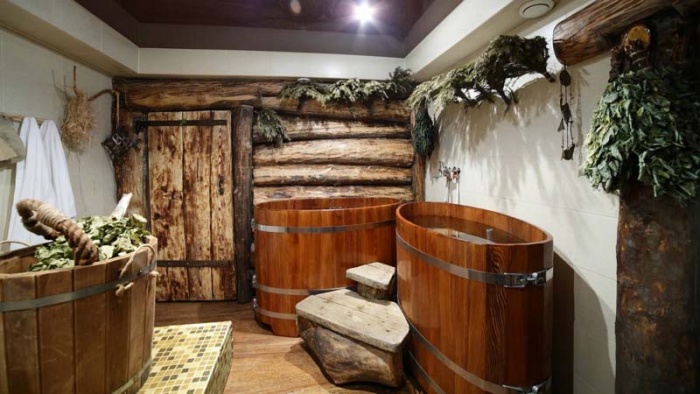
If we are talking about traditional way washing, then most often wooden tubs are installed at a height in the room. A special device supplies them with cold water, and the visitor, by pulling the rope, can douse himself with life-giving moisture. This method of cooling after a steam room is especially pleasant.
If the size of the bathhouse allows, you can build a small pool with your own hands. Diving into it is a real pleasure. When the washing room is not so large, install a wooden trough with cold water in it. Before entering the steam room, you can soak a broom in it, and after visiting the sauna, sit in this container, feeling how your hot body is pleasantly tingled by cold bubbles. It is also recommended to drop aromatic oil into the water.
Another mandatory attribute of a washroom are benches. There should be several of them so that there is enough space for everyone who wants to carry out health procedures, for example, such as rubbing the body with various compositions. This helps you lose weight or get rid of cellulite and improve your skin. Some people do cosmetic body wraps, which also requires benches on which you can then lie down.
It is in the washing room that massage is done, so it is worth installing a massage trestle bed here. It should have dimensions of 180 by 65 cm. On a bath day, the bench is usually installed so that it can be approached from all sides, and on any other day it can be moved against the wall. Therefore, the trestle bed should be made of lightweight material. Of course, arranging a washing room is an individual matter. Each owner himself determines the set of accessories he needs, often creating them with his own hands.
The best finish is wood
When building a bathhouse, the finishing of the walls and floor is usually thought out in advance. The choice depends on the properties of the material, as well as the financial capabilities of the owner. Most often, wood is used as a natural finishing option that is resistant to humidity and temperature changes. The tree easily absorbs moisture, growing, and then just as easily takes on its previous appearance after drying.

Wood finishing sink
It is best to use deciduous trees:
In the Russian climate, linden is most often used. Walls upholstered with clapboard made of this material retain heat well and are not threatened by high humidity, which is inevitably present in a washing room. In addition, linden lining does not emit resin and cannot burn, since it does not heat up to a high temperature. Another advantage of linden is the smell that the wood emits when heated, and the essential oils it produces.
If possible, try using abash. True, a square meter of this wood costs a lot. Therefore, benches and canopies in the steam room are most often made from it, but the walls are still sheathed with linden. Aspen has one significant drawback: hidden rot can only be detected after exposure of the wood to steam.
When choosing a material for wall decoration, you should take into account the efficiency of its operation.
You can decorate the walls with ceramic tiles. It washes well and lasts for many years. However, this material is cold and is rarely used for home baths. Some install tiles not to the full height of the walls, but to about 1.8 meters, and then paint the walls with water-repellent paint. This is a budget finishing option. But in any case, it is best to make the ceiling wooden. Then condensation will not accumulate on it.
If you decide to use wood for finishing, you should treat it in advance. To begin with, they lead you through the forest sandpaper, and already on smooth surface apply an antiseptic. The board must be treated on both sides, this will protect the lining from mold. It is important that the impregnation is water-based.
What should the floor be like?
Particular attention in the washing room should be paid to the floors. It should be understood that water has a particularly intense effect on them, so it is not advisable to make them from wood. The wood will quickly rot and the flooring will have to be replaced. Experts recommend using one of two materials for finishing the floor:
When constructing a floor in a bathhouse, the main principles must be observed: technological requirements. We are talking about fast water drainage and ease of cleaning the floor covering.

Concrete floor covered with tiles
When constructing a floor, you need to take into account the condition of the soil on which the structure is built. When the soil is sandy and easily absorbs moisture, the floor can be made sloping towards a hole, which is dug in the washing room and then filled with crushed stone, sand, and broken bricks. Water will drain perfectly from such a floor. If the soil is clayey, make a pit where the water flows through a drain pipe. Both bases are then covered with a layer of concrete.
If the bathhouse is built in an area with a cold climate, then the concrete floors should be insulated. To do this, the solution is mixed with expanded clay. When pouring concrete in layers, insulation should be laid between them. This can be mineral wool or construction felt, which must be pre-impregnated with hot bitumen. And in the place where the floor connects to the wall, it is necessary to pour bitumen. This will help protect the floor from moisture.
You can leave the concrete floor in the washroom, but build on top wooden laths. The benefits of such a floor are obvious. Firstly, the wood will protect against slipping. Secondly, the grates can be periodically taken outside to dry. This way the floor will last a long time.
Another option is to lay ceramic tiles over the concrete. This type coatings are certainly more aesthetically pleasing than wooden sheathing. However, when exposed to water, tiles become slippery and you can easily fall on them. Therefore, rubber mats or the same lathing from the forest are laid on the tiles, the legs of which are stuffed with rubber bands.
The washing room in the bathhouse must be provided with good ventilation, otherwise there will be little pleasure from being in the room. Air circulation affects the visitor's condition. If it does not work correctly, after a few minutes in the bathhouse you will practically not be able to breathe. It is important to create a system so that exhaust air leaves the room freely, and fresh air flows take its place.
In the absence of ventilation, high air humidity is felt in the washing room. In this case, the body cannot be wiped dry. Over time, the sink becomes overgrown with mold and mildew. Other signs that the ventilation is not doing its job will indicate:
- condensation on the ceiling and walls;
- unpleasant odor;
- no marks on the hood.
Usually in a bathhouse forced ventilation system. It implies the presence of supply and exhaust pipes. Moreover, they must be the same diameter. They must have valves that regulate air circulation. Ventilation should be installed so that air flows are directed to secondary rooms. For example, from the washing room to the vestibule.
The exhaust pipe is installed higher than the roof, so the air will escape more efficiently. The supply is located approximately two meters above ground level. Sometimes it is advisable to install forced ventilation. It is driven by an electric motor, which can be connected to electrical wiring. In this case, the ventilation system in the bathhouse will work every time the light turns on.
Water supply - which type to choose?
In the washing room you cannot do without water; you need it both cold and hot. It’s great if centralized water supply can be easily installed in the bathhouse. Then the task will be greatly simplified; you will only need to install water supply in the bathhouse.

Another option involves getting water from a well. It is necessary to dig a trench from the source to the room; it should be located at a depth below the freezing level of the soil. Water supply pipes are laid in the trench. A system should be installed in the bathhouse, which includes two pumps, a cleaning structure and a tank where water will accumulate. One of the pumps supplies water to the bathhouse, the other distributes it throughout the premises.
Some people make a sauna the old fashioned way: they place a container on the stove into which water is poured. And yet, today most people prefer to use water heaters. Water must be in the washing room. In the steam room, it is enough to install a container with a ladle.
How to build benches correctly?
An indispensable attribute of the washing room are various benches and sun loungers. Doing them yourself is very exciting activity, which almost everyone can handle. It is necessary to follow basic rules to ensure that the furniture is multifunctional, beautiful and safe.
It all starts with the choice of wood. Usually give preference deciduous trees trees, such as linden. It has a number of advantages, but only one drawback - over time, the wood darkens under the influence of steam and high temperature. Before use, the boards must be treated with antiseptic agents. They cannot be coated with varnish or paint. At high temperatures, such wood releases hazardous substances.
It’s quite simple to build benches for a washing machine with your own hands. Will be needed wooden blocks, planks and fastenings. All benches are made the same way. First, the bars are assembled into a frame, onto which the slats are then placed. The distance between them should be such that air can circulate freely. If the wood is fastened with nails or screws, they need to be sunk deeper into the wood. Better yet, putty on top. This way, visitors will not get burned when they come into contact with heated iron. A do-it-yourself sink will become the owner’s real pride.
Interior finishing of a washing room in a bathhouse with panels, tiles or stone
To decorate the premises of a bathhouse or sauna, you must use only environmentally friendly, natural materials. But when it comes to the washing compartment, the material’s resistance to moisture is primarily important. During washing, water can get on the walls and ceiling, and if you choose the wrong material, repairs will have to be done at least once every three months. We learn and choose the interior decoration of the bathhouse washing room, the material and its features together with the readers.
Interior decoration of a washing room in a bathhouse: choosing the material
To decorate the walls of the washing compartment, you can use any moisture-resistant material, and you should not be afraid of high temperatures. If the washing room is planned separately from the steam room, then it does not exceed 45º. What basic requirements must the material for finishing the washing room meet:
- are not afraid of moisture;
- easy to install (if you do it yourself);
- has an affordable price and high quality.
Is wood suitable for finishing the washing compartment?
Wood is considered optimal material for finishing a sauna or bathhouse. But when choosing a material for a shower, the characteristics of the wood type are taken into account. For the steam room, take linden or oak, since at high temperatures, resin-containing wood begins to cry drops of resin. For the washing compartment, on the contrary, it is necessary to use lining with a high resin content, since it is less susceptible to moisture. Lumber from aspen or larch is suitable for finishing; on the contrary, when moisture gets on it, it only becomes stronger.
Aspen or larch have one big disadvantage: the price of lining or imitation timber made from these types of wood is high. You can use pine or spruce, but after paneling, the walls are covered protective compounds, for example, varnish or wax. They form a thin layer on the surface protective film which will prevent moisture from getting inside the wood.
If you choose the right wood for finishing the sink and protect the walls and ceiling from moisture, the finishing will last for at least 1–2 years.
For durable finish It is worth paying attention to ceramic or plastic materials.
Tiles in the washing area
Ceramic tiles have been used to decorate baths for several decades. The material withstands moisture well and is quite durable. Modern tiles are available in various designs; you can choose them at prices starting from 100 rubles/m².
When choosing ceramic tiles for finishing your shower, do not forget that the floor covered with the material will be quite slippery. To prevent the risk of injury, wooden gratings are placed on top of the tiles. After each shower, dry the grates, otherwise they will quickly darken and begin to rot.
You can put together the gratings with your own hands, but the fasteners used are not simple nails, but galvanized or brass. Simple iron ones are susceptible to corrosion.
Among the various ceramic tiles, it is more practical to use glazed ones. The coating on top will provide additional protection from moisture and the material will be more aesthetically pleasing.
Granite or marble in bath decoration
Granite or marble tiles are the most expensive of all finishing materials. Do not forget that the stone is heavy, so it is not recommended to mount it on the ceiling. To save money, the walls can be finished with granite or marble mosaic up to half or 40 cm from the floor.
Natural stone looks rich in the interior, but laying out the material yourself without experience is difficult. We recommend that before attaching the stone to the wall, lay out a design on the floor, only then attach each element in its place. The work is painstaking and requires a lot of time and perseverance.
The price of granite and marble is high, starting from 1200 m2, but the finishing will last for 30 years or more.
Plastic panels in the finishing of a washing bath
The most inexpensive option is to decorate the shower with plastic lining and panels. Modern panels have different patterns, for example, to resemble tiles. Can be combined Wall panels with tiled floors. Attaching the panels is not difficult, so all the work can be easily done with your own hands. Plastic is not afraid of moisture and is easy to clean.
The main disadvantage of plastic panels is their fragility. The material is afraid of mechanical and chemical influences. The seams darken over time, as they are quite difficult to clean. But the price of plastic is low.
Another negative point concerns inexpensive Chinese plastic panels. A room decorated with such material has an unpleasant synthetic odor, which for a long time does not erode. When choosing plastic for finishing the walls and ceiling of your bathhouse, buy only high-quality material from well-known manufacturers.
When choosing what to decorate your bathhouse sink with, consider your capabilities and preferences. You can make the finishing out of plastic, but repairs will have to be done more often. Wood and ceramic tiles are in the middle of the price-quality ratio. But there are some nuances that need to be taken into account. Thus, wood without an additional moisture-resistant coating will not last long, with the exception of expensive aspen and larch.
Granite and marble are considered the most durable and environmentally friendly, but the price of the material is high. Doing the finishing with stone yourself is problematic, so you will have to fork out and pay for the work of professionals.
Plastic is suitable for the walls and ceiling of a washing room, but you need to choose the material carefully.
Another nuance that must be taken into account when choosing materials is what the walls, floor and ceiling of the washing room are made of. It is easier to finish a bathhouse made of timber or round timber with clapboards, or from aerated blocks or bricks with tiles or stone.
Whatever material is chosen, it is necessary to take care of the ventilation of the shower compartment, since after each procedure the premises must be dried and well ventilated. Otherwise, any material on the walls, floor, ceiling will become moldy and the finish will quickly become unusable. The interior decoration of the washing bath must be done correctly, otherwise repairs will have to be performed frequently.
Remember, a bathhouse should give pleasure and bring health, which means that any room, and especially the washing room, should be kept clean!
Do-it-yourself interior decoration of a washing room in a bathhouse - Do it yourself
Do-it-yourself interior decoration of a washing room in a bathhouse with your own hands You can read reviews here Interior finishing of a washing room in a bathhouse with panels, tiles or stones For finishing the premises of a bathhouse or
16227 2 12
Finishing the bath: choosing the best materials for the steam room, washing room and changing room
Steam room
Many years ago, having just moved to the village and built our first bathhouse, we were also very arrogant. And they lined the steam room with pine boards. Aroma! Beauty! There was no limit to the joy until hot drops of resin began to drip onto my head, and ugly streaks appeared on the walls.
I had to improve my theory, and not just be proud of my ability to work with my hands. The head in this matter is also not superfluous.
Materials for walls and ceilings

It will not be news to anyone that no synthetic materials are strictly used for lining the steam room. Many of them tolerate heat and moisture well, but when heated they emit harmful substances or get very hot themselves.
But not all natural finishing materials are suitable for this purpose. The most suitable one is wood in the form of a polished edged board, lining, blockhouse or imitation timber. However, there are limitations here too!
Are all breeds able to withstand temperature changes, resist fungus, and not rot due to constant contact with moist air? Not everyone. And many of those that are capable have certain disadvantages: they are expensive, get very hot, or “cry” with resin.
Brief characteristics different varieties wood, which is most often used to decorate baths and saunas, will help you make your choice:
- Linden. Changes very little under the influence of steam and temperature, maintaining a beautiful creamy shade. Fills the steam room with a delicate pleasant aroma. But it gets very hot, so the linden shelf needs to be doused with cold water or covered with a sheet before planting. Insulate the walls simply with linden lining without thermal insulation material It is unlikely to succeed due to its high thermal conductivity. Cost of 1 sq.m. 600-800 rubles.

- Black alder. According to operational characteristics perfect material: almost does not change the appearance and properties, on the contrary, the aroma and color of wood become more saturated over time. Besides doesn't heat up, allowing you not to be afraid of burns. But it does not emit particularly useful phytoncides and is more expensive than linden - 750-1200 rubles.

- Aspen. Finishing the inside of a bathhouse with aspen is not the best solution in terms of aesthetics, since when exposed to moisture it turns gray. But in terms of thermal conductivity, it is similar to alder - it does not heat up and can itself become a good additional heat insulator for walls and ceilings. In addition, it allows you to save money, since it costs 400-500 rubles per sq.m.

- Larch. If you need high-quality, beautiful and, as they say, lasting for centuries, then larch is an excellent choice. Including price (up to 1000 rubles per square), if you compare it with the cost valuable species wood with similar properties. She has the highest resistance to moisture, which only increases over time. But decorating a steam room in a bathhouse with larch is a difficult task, since this dense wood difficult to process.

- Ash. This wood already belongs to valuable varieties and a square meter of such lining costs between 1500-2000 rubles. As for the use of a steam room for finishing, it is ideally suited for this purpose: it has beautiful texture, does not darken, is not afraid of high humidity and temperature and, moreover, has healing properties , especially useful for people with respiratory diseases.

- Oak. Of our local wood species, this is the densest and most beautiful. In all respects it is suitable for tiling a steam room, it looks solid and reliable, but it also costs a decent amount: 2300-2800 rubles. This finish is already considered elite.

- Abashi. For those who do not expect large expenses, this and the next paragraph can be skipped, since even small room African abashi oak will be very expensive. 3000-3300 rubles per sq.m. This exotic wood surpasses all others in moisture resistance and has an unusual richness. But all this is unlikely to justify its price, since it does not provide any benefit to the body and, moreover, gets very hot.

- Canadian cedar. The most expensive material listed, used only in elite baths. Exudes a pleasant aroma and is healthy essential oils. Very beautiful, easy to process. Depending on the thickness of the lining, it can cost from 4,000 to 8,000 rubles per square meter.

The range of prices in these examples is explained not only by the different thickness of the boards, but also by their length. Short ones are cheaper. In general, all of these are grade A or Extra products, so you can find them cheaper.
Now about very popular and inexpensive breeds, but completely unsuitable for use in hot and humid rooms.
- Pine and spruce. The most inexpensive lining, costing 200-240 rubles per square meter, is made from just these conifers. And it is perfect for covering walls in a recreation room and making furniture for it. The exterior decoration of a pine blockhouse is also quite beautiful and durable if the walls are built from bricks or blocks.
But you can’t put pine in the steam room. I have already described the reasons above - this is the “tearfulness” of the tree under the influence of high temperatures. Moreover, due to humidity it becomes loose. And since protective impregnations cannot be used here, it will not last long.

- Birch. Completely unsuitable for wet rooms - steam rooms and especially showers in bathhouses. Very afraid of moisture: it quickly loses its appearance, begins to rot and mold. But in dry and well-ventilated rooms, it is not inferior to larch or oak in terms of strength and wear resistance. It can be considered as a finishing material for a rest room. Especially if it is spacious and you are looking for something not very expensive. 400-440 rubles per square meter is quite tolerable.

To be honest, from an aesthetic point of view, it is not so important what you line the walls and ceiling with: very few people, at one glance, expensive wood they will understand how much it cost you. It is much more important how to decorate the bathhouse. Well-polished, well-fitted boards that are pleasant to touch are half the success.
Judge for yourself whether the traditional finishing for our region and the exotic finishing are very different:


If your imagination and patience are enough for decorative finishing in the form of backs, headrests and beautiful grilles - even better. All this can be done from expensive varieties.

All these tricks with wall cladding are not needed if they are made of thick logs suitable breeds. It is enough to caulk the seams well and sand the frame. But finishing a block or brick bathhouse is not only about decorating unsightly surfaces, but also about the possibility of insulating them and reducing heat loss. But that is another topic.
It is also necessary to think through such an issue as fireproof finishing of a bathhouse made of timber or logs.

I will not repeat in the following sections about the suitability of this or that type of wood for finishing other premises. Their characteristics speak for themselves; making a choice will not be difficult.
Floor
The floor in the steam room should not be slippery and not get too hot. The most inexpensive solution is a cement screed with wooden ladders laid on top. A little more expensive - tiles or porcelain stoneware with the same drains.

Ladders are gratings made of thick boards or bars that can always be taken out and dried or lifted and washed on all sides. Therefore, there are no special requirements for the type of wood; you can even use pine - on the floor it will not get so hot as to release resin.
Solid wood flooring is another matter. Here you will have to choose species that are resistant to moisture - larch, oak, alder.

There is another option - heat-treated board. It undergoes special treatment with hot (180-200 degrees) steam in the absence of oxygen, thereby acquiring very high resistance to moisture, strength and dark shade.

The price depends on the type of wood. For example, a square meter of 40 mm thick pine flooring will cost about 1,250 rubles, and 2,700 for alder.
Washing room
The washing machine may be different. If water is supplied to the bathhouse from a centralized network or a well with a pump, and there is a water heater, it is enough to install a shower stall or simply equip a shower corner.
This is impossible without running water, so benches and watering cans are needed. Often both are found, complemented by a large plunge pool or even a swimming pool. And also washing rooms combined with a steam room.
In every case interior decoration wooden bath will be different:
- For the common room, all the materials described in the previous chapter are used. This is a wood that can withstand intense heat on walls and ceilings and tiled or concrete floors with drains.
- In a wash room, separated from the steam room and without a shower, for wall decoration You can use any wood except birch. Including coniferous. Here the temperature is not so high, so the resin is unlikely to flow. But the air will be filled with a pleasant aroma.

- Finishing a shower in a wooden bath can also be done with clapboard, but in this case need good supply and exhaust ventilation so that the boards dry after finishing the procedures. They must be treated with a moisture-repellent agent and the coating must be renewed periodically.


- It will be much more durable to cover the walls with tiles or stone at least one and a half meters from the floor. If load-bearing walls wooden ones, they are waterproofed, sheathed with moisture-resistant plasterboard, and tiles are glued onto it.


- A very convenient option is a shower room with a door or curtain. It can be arranged in a dead end or fenced off a corner with a partition. And there will be no questions about how to decorate the walls in the washing room: with tiles. And the rest of the space, where there will be no heat, no high humidity, whatever.

- It’s even easier to install a ready-made shower stall, and then you don’t have to worry too much about wall cladding; plastic panels will do. In this case, finishing materials are selected in the same way as for a bathroom in an apartment.

The ceiling here can be plastered and covered with moisture-resistant paint that is resistant to washing. But if you regularly use the bathhouse, you will need to update the coating at least once every two years.
Types of finishing such as wood and plastic lining, rack or suspended ceiling. They are not afraid of moisture, spotlights can be built into them, and the space between the ceiling and the cladding can be filled with thermal insulation.

If the bathhouse is wooden, built from ordinary logs or timber, finishing can begin no earlier than in a year. Because it will settle as the wood shrinks, deforming the cladding.
If you don’t want to wait, you can bother with a floating frame for drywall and tiles. How to do this correctly is described in the article “Facing a wooden house with plasterboard.” And unlined walls must be treated with a natural-based antifungal antiseptic impregnation.
Locker room
The materials for decorating this room can be very different. But it’s hard to come up with anything better than a tree. However, it can be supplemented with other types of finishes: decorative plaster, artificial stone tiles, various wall tiles, etc.
It all depends on the size and purpose:
- If this is a small dressing room in a free-standing bathhouse, intended only for undressing and dressing, it is better to limit yourself to moisture-resistant wooden finishing. Especially if the bathhouse is heated once a week, and the rest of the time it is not heated.

- If this big room holiday with a heating system from home, then your desires are unlimited. Even wallpaper and painting on the walls - as long as you like it.
Examples for inspiration:


As for how to decorate the outside of the bathhouse, you can use any facade materials. Most often, a beautiful log house is left without cladding, limited to caulking the joints, sanding and treating with decorative and protective agents.

And buildings made of brick, foam blocks and other building stones are finished in accordance with the house or imitate a log house using a wooden, plastic or metal blockhouse.

Conclusion
Now you know what materials to use so that the interior decoration of a timber bathhouse will please you for many years in a row, without requiring repairs or alterations. To do this, it is not necessary to use expensive exotic materials that have little health benefits. In this regard, our native linden wins a hundred points over the African oak, and it looks no worse.
If you have anything to say or ask on the topic, you are welcome to comment. Let's discuss.
Usually baths are equipped with several compartments. This is a rest room, a dressing room and a washing area. Particular attention must be paid to the last room in the bathhouse, since it is in the washing room that the temperature regime and humidity level. In a washing bath, it would be appropriate to equip a shower room, purchase and install tubs, or even make a small pool.
But benches are indispensable elements in the washing department of a bathhouse. They are very convenient for performing various procedures, for example, for massage. Such a washing machine in a bathhouse will delight you for many years.

Nuances in arrangement
What the washing compartment of the bathhouse will look like and what elements will be present in it must be thought out in advance. First of all, it is necessary to provide a device for the flow of water into the bathhouse, how it will be heated and a method for draining it. Ventilation is also of no small importance in the washing section of the bathhouse, since moisture is constantly present there and heat. With high humidity in the bath, there is a risk of mold and mildew.
Next, we determine the dimensions of the washing compartment of the bathhouse. Here you need to decide exactly how many people will wash in the bathhouse. It is traditionally believed that there is approximately up to 1.2 m2 per person. But in principle, everything is decided by the tastes and capabilities of the bathhouse owners.
As for the material, the interior finishing of the sink should be made only from natural materials.
Wood finishing
In the washing section of the bathhouse it is necessary to use coniferous wood. Since the bathhouse has a high level of humidity, and the peculiarity of these rocks is the resistance to moisture due to the resin content, which prevents the material from rotting. In order to provide greater protection, the wood should be treated with special products.
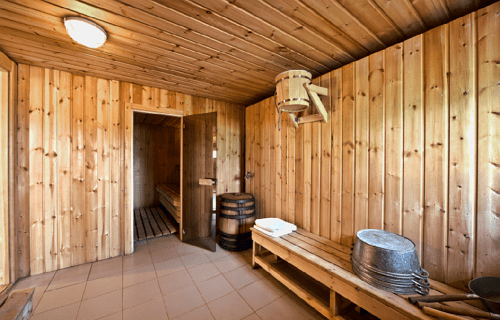
Facing tiles in the washing compartment of the bathhouse
This is one of the most durable materials. It is distinguished by such characteristics as durability and ease of maintenance. The variety of materials is very large, both in color and in original design solutions. The sizes of the tiles are also different and you can choose any one if necessary. The disadvantages of this material are that the surface of ceramic tiles is very slippery. Recently, types of ceramic tiles have appeared special characteristics, which allow it to be used for finishing in a bathroom or bathhouse. But, nevertheless, in order to avoid injury, it is better to additionally use wooden grates or rubber mats on the floor in the washing compartment of the bathhouse.

Application of natural stone
It is used much less frequently due to its high cost. Most often, this type of finishing is performed in combination with ceramic tiles or wood. The advantages of this material include its durability, strength and environmental friendliness. But the downside is that working with this material is quite labor-intensive and can hardly be done without the help of specialists. It is much easier to work with artificial stone. It is very light, and finishing the walls of the bathhouse yourself will not be difficult. And in price it wins compared to natural material.

Lining and PVC panels
The characteristics of natural materials were presented above. But in some cases, artificial ones can also be used. These include lining and PVC panels. First of all, this material is affordable. It also wins in terms of installation method. But it is significantly inferior in environmental friendliness and resistance to mechanical damage.

The use of materials such as fiberboard and chipboard, as well as impregnated wood, is strictly prohibited. At elevated temperatures, these materials begin to release substances harmful to the human body.
Features of arrangement at the construction stage
Everyone knows that the washing compartment is the part of the bathhouse in which moisture is constantly present. And this fact must be taken into account even at the stage of construction of the bathhouse. Here you need to select Construction Materials, which are able to withstand such a load and ensure the durability of the washing compartment in the bathhouse. In addition to the need to purchase materials such as clay, crushed stone, sand, cement, sawdust, you should definitely think about waterproofing materials. These include both the already common roofing felt and mastic, as well as the less commonly used expanded clay and insulation. various types and moisture-resistant drywall.

Also, at the construction stage of the bathhouse, it is necessary to consider the arrangement of all communications. First of all, this is the water supply and provision of drainage in the washing compartment. If you plan to install a shower cabin, then you need to purchase it ready-made. But the option of installing a shower yourself cannot be ruled out.
For the exhaust and ventilation device, all the necessary elements are purchased. At the stage of construction of the bathhouse, there must be pipes to ensure air flow and exhaust.
Installation of a drain in a washing room
For correct device drainage in the washing compartment, it is necessary to correctly calculate the load that this system will carry. Here you should take into account the water consumption during bathing of one person. Typically, up to 10 liters of hot and 40 liters of cold water are consumed. It is clear that with more active use of the washing compartment, the consumption will be much higher. And here you should think about whether the water drainage will cope with such a load and what dimensions can suit it. Therefore, it is necessary to produce a high quality drainage device.

Here is an example of a water drainage device in the washing compartment of a bathhouse and the procedure for carrying out the work:

Important! Under no circumstances should you install a drain well directly under the bathhouse, as this can lead to constant dampness in the room.
Washing room floor
Recently, in the washing department of the bathhouse, the floor lining has been made of ceramic tiles. Here you can save on facing materials and buy inexpensive tiles. Since in this room it is recommended to cover the floor surface with rubber mats or install wooden stands. This is due to the fact that it is very easy to slip on a wet surface of a ceramic floor.
Let's look at some tips for arranging floors in the washing department of a bathhouse.
First, you should fill the floor with concrete; after it hardens, we screed it with cement-sand mortar. It is advisable to insulate the floor. To do this, add expanded clay to the solution and fill it in layers. We place insulation between them. Special felt used in construction can act as insulation. First, it needs to be impregnated with bitumen. In the corners between the floor and walls we treat with bitumen to increase waterproofing.
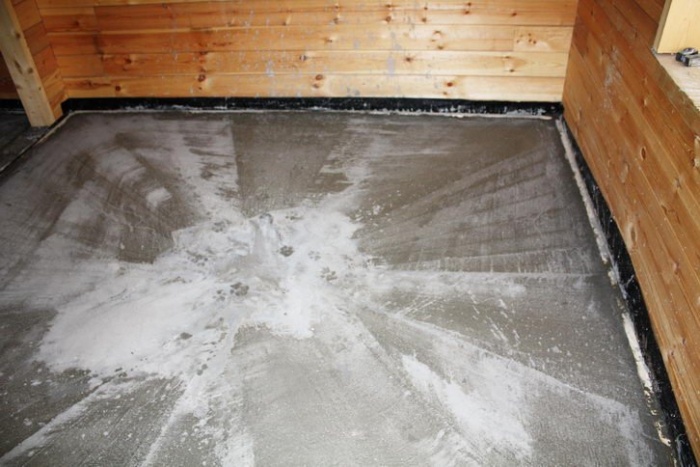
Important! The floor in the washing compartment must be made with a slight slope in the direction of the drain hole.
When installing a wooden floor, it is necessary to completely cover the entire concrete with roofing felt and install the sheathing. A board is laid on the floor sheathing. If the floor is finished using ceramic tiles, then before laying it is necessary to treat the concrete with mastic.
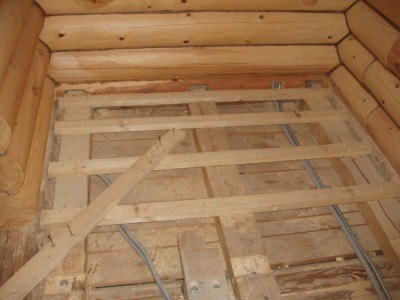
In some cases, they refuse to finish the floor with any material, and simply lay wooden gratings tightly together. Before this, the slats of the gratings must be carefully sanded so as not to injure your feet with splinters during washing.
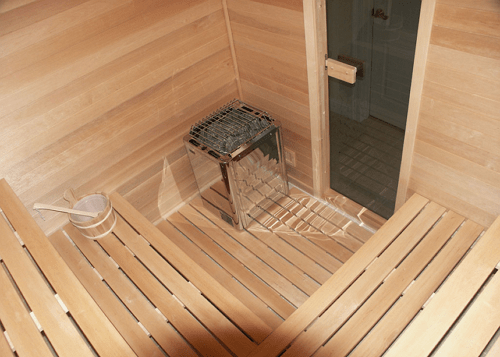
Important! You cannot cover the floor surface in the washing compartment of a bathhouse with linoleum. This type of flooring is not suitable for use in rooms with high level moisture.
Walls and ceiling
The finishing of the walls and ceiling in the washing compartment of the bathhouse can be done with the following materials:
- wood materials;
- ceramic tile;
- natural or artificial stone;
- lining.
Very often materials are combined.
Here are some instructions for finishing the walls and ceiling of the washing compartment in the bathhouse:

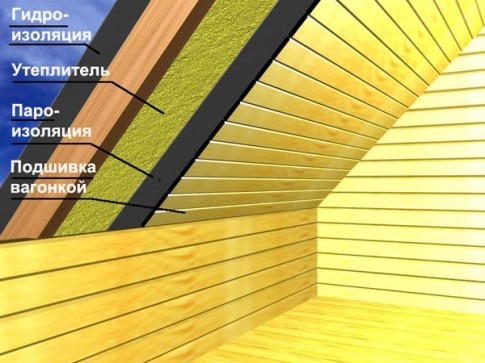
Conclusion
Before starting work on the installation of a bathhouse washing compartment, it is necessary to accurately determine all aspects: location, finishing material, drain arrangement. If the instructions given in this article are strictly followed, you can be sure that the bathhouse will delight you for many years without the need to make any alterations.