Every owner suburban area understands the importance of a garden path. With its help, it is easier to move around the territory and decorate the landscape. Today we will talk about how to make garden paths from wood with their own hands.
First you need to decide on the directions of the path, for example, from the house to the toilet, to the bathhouse, gazebo, utility room.

In addition, you should decide what type of wood you will use, as well as whether your path will be built from a saw cut or board. All this will help to calculate the cost of the source material. Laying a wooden path does not take much time, moreover, you do not need a special tool for this. All you need to do is strictly follow all the instructions below. First, we will discuss the laying of the track from the saw cut.
Preparing the saw cut for laying
The easiest way is to buy a ready-made saw cut for laying the track, but it will cost much more, and you will not be able to show your skills. You can prepare the source material at home, and the lesson is not so difficult. To prepare, you will need an antiseptic for wood processing, which is sold in a specialty store. Besides, good results can be achieved by soaking the cut in a solution of water with copper sulphate (10%). After that, the source material for the garden path should dry out.

On the next preparatory stage the underside of each blockhouse must be covered with molten bitumen. It is most convenient to buy bitumen in briquettes. One bag will be enough for you, and you can use the rest of it in the household. Melting briquettes is a simple matter, here you need to show a little imagination. For example, you can organize a simple stove in the yard. To do this, you need to lay out a few bricks that serve as a stand, and place a metal container on them, for example, a bucket and fill it with briquettes. Then under them you need to kindle a fire. Dip the log house with the bottom part in bitumen and lay it out to dry. There is another method for melting bitumen. As in the first case, the bitumen must be placed in a metal bucket or pan, then it should be filled with gasoline, and then closed with a lid. After a few days, the bitumen will melt. Cold molten bitumen can be processed with saw cuts in the same way as hot.
We lay the tracks from the saw cut

- First, you should dig a trench corresponding to the shape of the future wooden path. You can outline it with the help of pegs and thread. The depth of the trench should be approximately 30 cm.
- Now it's time to take care of good drainage. To do this, lay the bottom with gravel.

- To separate the layer of stone and sand, a film or geotextile should be laid between them.
- Now you can start filling the path with sand. You need to fill it in thin layers, each time adding water and tamping. The sand cushion should eventually take about 10 cm of the base under the wooden path.

- The saw cuts must be laid so that they are located as close to each other as possible. For this, it is better to use both large and small sizes of cuts. If you want to lay a wooden path outside the box, then you can lay out the saw cuts in the intended order, and fill the remaining space with rubble or pebbles.
- With the standard laying of garden paths, small gaps also remain from the saw cut. They are covered with sand or clay. You can then plant a special moss in the clay, which decorates the path.

most durable wood material larch is used for the garden path, if you like oak more, then keep in mind that this material will last no more than 10 years. Aspen and pine paths serve even less, namely up to 7 years.
Now you can begin to describe the laying of a wooden path.
We use wooden planks
As with preparing a saw cut for laying a garden path, planks should be treated with special agents that slow down decay. As in the previous case, best material larch will be used to make a durable garden wooden path, because it does not rot.

As a rule, paths from boards are raised above ground level. To achieve this goal, they fit into solid foundation, which can be made from massive beams, pre-treated special tool from decay. The bars also cannot be installed on wet ground, therefore, a 5-6 cm layer of gravel is first poured on it, which is evenly leveled. After graduation preparatory processes you can start laying processed wooden planks.
They are laid with a small gap of 2 cm. Why? The fact is that air must pass between the boards, then they will last you longer. The work of laying a garden path from planks is scrupulous, however, everyone can do it on their own!

If your imagination allows you to create an interesting pattern, then you can lay out boards like parquet on a good cast base. Or maybe you are attracted by a creative approach? Then you will like the garden path, laid out at regular intervals, covered with gravel or pebbles.
If you have ideas on how else you can make garden paths in an interesting and non-standard way, then by all means share them! Do you have experience in laying a wooden garden path? Did you notice any nuances in the process of work? Share your observations with us! Any unforeseen difficulties during installation? Which? How did you deal with them? Share your skills with us!
A photo
We offer you several photo tracks made of wood for inspiration and new ideas.


Video
This video shows another idea for making a wooden walkway.
Having done wooden walkways in the country with your own hands, you can equip the site quickly, inexpensively and beautifully. Wood is environmentally friendly pure material, which has an attractive appearance and low thermal conductivity. Walking on a tree is convenient, comfortable and pleasant. Paths are made from wood, which are distinguished by originality and a variety of shapes.
Even the fact that natural raw materials are subject to dampness is not an obstacle to making a decision on construction. cottage path from wood. The big advantage of such a project is that each farm will always have a sufficient number of boards, beams and battens that have been idle for years. Having built a path from wooden saw cuts, you can use the sawn trees with benefit. Consider how to make wooden walkways on your own, and what is required for this.
wooden path design
Today, there are many options for arranging these engineering structures. They are made in various lengths, widths and configurations. The only limitation for construction is moisture. Paths should not be laid in lowlands, where rain and ground water. From frequent wetting, the wood quickly collapses.
To properly equip your site, you need to follow these recommendations:
- In the depths of the garden between the trees you should not make wide paths. For a walk of one person, the width of the walkway of 40-50 cm is quite enough. Wider flooring will look ridiculous, occupying a usable area.
- In the center of the garden, you need to build paths with a width of at least 100 cm. This distance is justified by the need to freely disperse for two people and to comfortably ride a country car.
- Slopes must be equipped with steps. Wood absorbs and holds water well. At the same time, it becomes very slippery. Steps will make moving around the garden a comfortable and safe event.
When planning the improvement of your land allotment, you can and should build trails of this form:
- straight;
- broken lines;
- winding;
- double;
- solid;
- patterned (ornament, parquet, sleepers);
- in combination with sand, stone, lawn grass.
In order to build a strong, beautiful and durable path in the country, you need to have high-quality raw materials in sufficient quantities and a set of serviceable equipment.
What is needed for work

As a rule, everything you need to perform such a task can be found in any barn or garage.
For construction, you will need the following tools:
- shovel;
- Grinder;
- manual tamper;
- roulette;
- nail puller;
- oil level;
- gasoline or electric saw;
- hacksaw with large teeth;
- a hammer;
- rubber mallet;
- screwdriver;
- paint brush.
It should be remembered that it will take many years to use the equipped path. In order for this structure to serve for a long time, it is necessary to carefully select the material for its manufacture. Only dry wood without cracks and signs of decay can serve as the raw material.
Additionally you will need:
- geotextile;
- crushed stone;
- sand;
- antiseptic;
- acrylic paint;
- deep penetration primer;
- bitumen;
- nails;
- self-tapping screws.
You can save a lot if, instead of factory-made impregnations, you use used engine oil, drying oil and copper sulfate left after repair.
Before starting work, all wood must be processed in several stages. First, it is covered with an antiseptic liquid. After the blanks are completely dry, they must be painted on the front side in the selected color. As soon as the paint dries, the workpieces are immersed in mining, drying oil or heated tar. Such preparation allows for several years to protect the wood from moisture.
Making a boardwalk

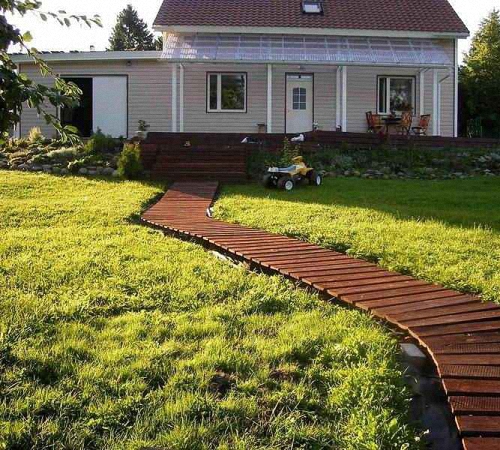
Stitches from boards are made in several versions. Reiki can lie along, across or obliquely. On one track you can alternate various options styling, changing the color of the coating. Boards are laid in the ground, placed on its surface or stacked on supports.
Let's see how the most complex structure- a path elevated above the ground.
It is made in the following sequence:
- Tracing is carried out on the ground. For this, a tape measure, a level, stakes and a cord are used. Places of installation of steps should be marked separately. On straight sections, 2 m between stakes is sufficient. In places of bending, the distance should be reduced to 30-50 cm.
- Removed along the drawn contour upper layer soil, a trench is dug 20 cm deep. The bottom of the trench is cleared of plant roots, it is leveled and compacted. Steps are being dug.
- A strip of geotextile fabric is laid in the trench. On top of it crushed stone and sand are poured 10 cm each. The shock-absorbing cushion is wetted, leveled and rammed. Such a technique will prevent the erosion of the base and the germination of plants under the boards.
- Laying load-bearing beam over the pillow. Depending on the curvature of the track, the assembly is carried out from blanks different lengths. Between themselves, the timber is fastened with strips of metal or slats screwed from the inside. The number of guide lines is determined by the width of the path. If it has a width of up to 50 cm, then two lines of supports along the edges are sufficient. With an increase in width for every 50 cm, another reference line is added.
- Fastening on a bar of planks. A distance of 5-8 mm should be left between them. Slots are necessary for water drainage, ventilation and expansion of wood when gaining moisture. It is better to fix the boards with screw nails. These products are much stronger and more reliable than hardened screws. The edges of the boards can be left raw, or they can be adjusted to fit the cut of the timber. It depends on the preferences of the owners of the site.
The completed structure must be covered with paint or varnish immediately after assembly is completed. Periodically, you should walk along the path and sink the nail heads that have come out.
How to make a path from saw cuts
From logs different diameter make original, convenient and practical platforms and paths. You can prepare saw cuts separately, or you can use firewood from a woodpile. Trees that have been felled or cut down for preventive purposes can become a source of material. Not only trunks are used, but also thick branches of plants. It is good to fill the gaps between round timber of large diameter with blanks from branches.
Trees are sawn into fragments 25-30 cm high. During harvesting, you need to try to make the cuts perfectly even. Round timber should be dried in a dark and cool place for at least six months. Otherwise, they will crack. raw wood it cannot be used in work, because after backfilling it will decrease in size by 25-35%, due to which the masonry will lose its presentability. After complete drying, the round timber is treated with an antiseptic and damp impregnation. Wherein upper part can be tinted with copper sulfate or stain.
After the preparation of blanks, the following activities are carried out:
- The contour of the future route is outlined. In the case of saw cuts, it can be given the most diverse and sharp bends, provide platforms and interchanges.
- A pit is dug 10 cm wide more than the design one. The depth of the pit should be 10 cm higher than the height of the cuts. So, with their average height of 30 cm, the trench should be 40 cm deep.
- A strip of dense polyethylene, oilcloth or geotextile is laid at the bottom of the pit. The edges of the waterproofing are displayed above the ground level. A layer of crushed stone 6 cm and sand 6 cm is poured over the fabric. The pillow is leveled and compacted.
- Roundabouts are being installed. This is done in random order, so that there is a minimum gap between the blanks. An opening 3-5 cm wide should be left between the logs and the edges of the ditch.
- The gaps between the logs and the walls of the trench are filled granite screenings, sand or small gravel. The aggregate is carefully compacted.
Staying in the sun, under snow and rain does not go unnoticed for wood. In spring and autumn, the paths need to be maintained. They need to be treated with an antiseptic and hydrophobic impregnation. Chips and cracks should be sealed with special mastic. If one of the masonry fragments has rotted or collapsed, then it should be replaced. For this, any log from a woodshed will do.
Almost every home owner thought about how to make a garden path with his own hands, whether it is worth creating it for his site and how to choose the right design option. Of course, this design deserves a location on your site, because they will not only perform decorative role, but also help to navigate comfortably in the area of the garden. And for other questions, you will find answers directly in the article itself.
Why are paths made of saw cuts or lumber so popular?
The question to this answer is very simple, people are attracted by the advantages of a wooden walkway:
1. Available to everyone. Of course, prices for wooden crafts very tall and fast growing, but wooden walkways are an exception. Their cost is several times lower than that of other options (for example, stone paths, brick paving slabs, etc.). Plus, it is possible to use lumber left after other repair work or fallen trees on your property.
2. Unique texture. It allows you to create extraordinary track designs without any extra effort. In particular, they like to use such designs in eco-style.
3. Easy to work. The construction of this type of path does not require the possession of special building skills or the availability of special tools.
4. Ecological cleanliness. The tree is completely safe for human health, and also perfectly combines and interacts with the environment
No matter how annoying, but this species tracks also have disadvantages. First of all, it is worth noting the susceptibility of the material to the appearance of mold or fungi. Also, wood can be damaged due to insect activity.
Some note short service life as a disadvantage. But, in fact, how long the track will serve depends on many factors. For example, the type of wood, the correct processing of blanks, their installation, the reliability of the base. Therefore, if the rules are followed during the execution of work and use in the future, the tracks can last up to 40 years.

We prepare the base
Often people encounter problems such as heaving, falling through, overgrowing with weeds and scattering of the garden path. All these are the consequences of improper preparation of the foundation.
Step-by-step instructions for preparing the bed:
1. We mark the contours of the future path. This stage does not carry any complexity, but still the process itself is laborious. To create markings, you need to do the following: on the site, using a cord stretched over hammered rods, we outline the boundaries of future tracks. If the territory has flat surface, the rods are installed in increments of 2.5 m, in the case when there are bends, it will be necessary to drive in the rods very often (about every 40 cm). Sometimes people have difficulty with this marking method (especially if the path is winding enough), then you can use sand, chalk or lime. When planning a track with borders, it is necessary to calculate the width of the base in accordance with the required indents even before the marking starts.

2. The next step is to dig a trench approximately 25 cm deep. We constantly control that the created ditch does not go beyond the markings, and its level is the same everywhere. Please note that this step must be performed only in dry weather, because if the trench is flooded with water, the quality of the bed will noticeably deteriorate.
3. If it is planned to install curbs, then it is necessary to pour sand, preferably compacted, and install them, leveling them with a building level.
4. We tamp the base and line it with geotextile or a polyethylene film may come up. This process will protect the path from overgrowing with weeds, and also prevent subsidence.
5. Over the entire bottom area, we settle a drainage layer of gravel or gravel (with a fine fraction and having a height of 5-11 cm, the value of which depends on the stability of the earth). The use of sand-gravel mixture (8:2) is also allowed. We tamp the drainage layer using a vibrating plate, a skating rink or a manual (hand-made) rammer.
6. There are types of paths that need a sand cushion that is laid on the drainage and has the same height. It is poured in stages, layer by layer. At the same time, it is necessary not to forget to moisturize and tamp them well.

Where can I get saw cuts
Of course, you can buy ready-made saw cuts from any breed in a building materials store. Some manufacturers even offer their products already treated with special solutions, which can only be installed, following the installation rules. But this option only suitable if the budget allows it. After all, the purchase is not cheap.
We give an example from the price of one well-known manufacturer: saw cuts from larch, without pre-treatment, having a diameter of 25 cm and a height of 15 cm cost 150 rubles apiece. That is, one meter of a track (50 cm wide) made of this material will cost 8,000 rubles, not counting the cost of delivery and processing solution. But do not despair, because the cuts can be made independently.

Making saw cuts with your own hands
To reduce the cost of the process, you can make saw cuts yourself. Ideally, if you or your friends have a fallen tree on the site, which does nothing but clutter up the place. Then the blanks will be practically free. But not everyone has this opportunity. In this case, you will need to purchase a round timber.
Any tree species is suitable for saw cuts, but larch will, of course, be the best option. Also, blanks made of pine, oak, alder, hornbeam, acacia will last a long time. But keep in mind that the processing of larch and oak is very difficult for self-manufacturing. Another important factor when choosing a tree is its dryness. If the wood is wet, then the saw cuts can warp, crack and the path will simply fall apart.
After the purchase, we begin to prepare necessary tools. Of these, you will need an electric or chainsaw, a tape measure, marking pencils, templates and a plow for skinning.
To make saw cuts, you will need to perform the following steps:
1. We clear the trunk of all the branches that are present on it.
2. We sand the trunk using a plow or a scraper (you can sand ready-made cuts, depending on personal preferences).
3. Using templates, we mark the trunk in equal parts of 15-25 cm (depending on the thickness of the log, the greater the thickness, the higher the height of the cuts). Keep in mind that at a height of less than 15 cm, the saw cut path will not be stable.
4. We dissolve the trunk according to the marks.
At this stage, the cuts are ready.

Processing blanks with special solutions
Before you start laying the trail, you need to process the blanks. It will protect the future path from the appearance of fungus and mold, as well as from harmful insects. For processing, you can use different kinds solutions. For example, you can use special antiseptics, impregnations (in this case, you can use only those that have deep penetration and be sure to follow the instructions for use).
Also, it is possible to independently prepare a solution for processing. To do this, you need to mix blue vitriol with water in a ratio of 2: 8, leave to settle for the 2nd day, and dry it in the shade for the same amount of time. When applying this solution, one important detail must be taken into account: copper sulphate, when interacting with a tree, makes it darken. This will create the effect of "aged" cuts. If such design decision If you don't like it, use another option.
Do-it-yourself solution can be prepared using drying oil, for this we bring it almost to a boil. And you can also use the old-fashioned method: brew larch bark and soak the blanks with this solution, this will allow the wood to get antiseptic properties, as well as a beautiful dark red hue.
In addition to applying the treatment solution, it is necessary to cover lower part blanks with a waterproofing layer. It is not so easy to do this: we melt the bitumen (the melting temperature reaches 200 degrees Celsius), always in a metal bowl, and dip the saw cuts in it. To the complexity of execution is added the unsafety of this operation. But there is another way: we place bitumen briquettes in a metal bowl and fill it with gasoline. Next, you need to leave the solution for a couple of days, before a liquefied bituminous mass is formed. We dip the bottom of the blanks into it.

Installing a track from saw cuts
We proceed to the most creative stage of all our work - the creation of the trail. Many are worried about how the track from the saw cuts will look like; we posted it at the end of the article. So you will not only get rid of your worries, but also be able to choose the design you like.
Instructions for making a track from wood saw cuts:
1. We check the readiness of the cuts and the level of the bed.
2. We start paving.
3. We install each part in its rightful place, while pressing it into sand cushion and align by carefully tapping with a hammer having a wooden or rubber head.
4. We control the evenness of the cuts so that they are on the same level.
5. We lay out the cuts according to the planned scheme, which depends solely on the ideas of the performer and appearance blanks.
6. In places of gaps between saw cuts, it is necessary to get rid of the void. To do this, fill these places with sand, screening gravel or small stones mixed with soil.
7. Decorate our path by planting in between ornamental plants or moss.
8. Decorate the edges: decorate with decorative stone, we fall asleep with gravel, gravel and tamp well.

Creating a path from lumber
Sometimes harvesting and laying saw cuts for people seems to be a rather difficult and too long process, but the idea of \u200b\u200bmaking a wooden path on your own is still to your liking. In this case, the output will be a path of lumber. The time to create it is much shorter, and the materials used do not need additional processing.
Lumber for the track can be very diverse: bars, boards of various lengths, etc. The lightest and affordable option- shield flooring, it does not require laborious preparation of the bed. That is why we consider this version of the track.
Instructions for creating a panel deck:
1. We prepare everything necessary elements: edged boards, of the same length, if possible equal to the width, wooden beams, nails. Main tool for a lumber track, this is a hacksaw, but you will also need a hammer.
2. We mark the trail.
3. We level the ground in the places where the future path will be located (pits are filled up, we cut off the tubercles, we compact the soil).
4. We cut the bars into parts having equal lengths.
5. Trim the boards.
6. We cover everything wooden details antiseptic.
7. We process the lower parts of the boards with bitumen putty, or cover them with kuzbaslak, wait for it to completely harden.

8. We put the bars on the base every one and a half meters, pin the boards to them, sinking the nail heads. The best option become galvanized nails.
9. In places located between the planks, we leave gaps of up to 6 mm, this is necessary to ensure ventilation, as well as water drainage.
10. We sew the shields together with the help of bars.
11. We sand the joints using sandpaper.
12. We paint the resulting path using the paint used in outdoor work.
Another simple trail construction is a wooden walking track. In addition to ease of execution, it is famous for its low cost of materials. To create this option, do the following:
1. We prepare the base according to the principle described above. The only difference is that the depth of the trench for such a track is 6-8 cm.
2. We cut out segments that have a length equal to the width of the path from the bars.
3. We process them according to the same principle that was used during the manufacture of the shield flooring.
4. We place the boards over the entire area of the bed, making intervals of half a meter, pressing them into the backfill.
5. We paint.
Track care
In order for a wooden walkway to please the eye and be comfortable to use for a long time, appropriate care is needed for it:
1. Once a year, clean the dirt using a metal scraper, then treat the wooden parts with an antiseptic and cover them with drying oil.
2. Get rid of weeds in time, which have the ability to destroy the base of the coating.
3. Be sure to prevent the possibility of flooding or erosion of the coating. To prevent this from happening, you can use the services of special grooves or dig ditch paths along the sides.
4. In winter time year to clean off the snow and prevent ice from forming on the wooden surface.
5. Do not use salt or other substances to clean the ice, which may contribute to the destruction of wood.
After reading this article, each owner of a summer cottage will be able to independently make a path from saw cuts or lumber, while not ruining his wallet, without asking outside help and without too much effort. Also after the article there is a photo various variations track arrangements. You can choose the one that will harmoniously fit into your garden design.
Paths give your garden a neat, finished look. In our time, when people are striving for environmentally friendly products and materials, wooden garden paths are more relevant than ever.
Asphalt gets boring in the city and, choosing what material is best for a path in the garden, you want something natural and at the same time unusual. We tried to consider the advantages of the most popular materials.
Design and purpose
First of all, it should be noted that the path must always lead to a certain place. Psychologists say that a path that leads nowhere or runs into a fence can cause internal discomfort. Therefore, initially, you should draw a sketch of the site, on which you indicate the main parameters of the designed zones and apply the exact location of the tracks.
Paths in the garden are like arteries in the body. It is not at all necessary that they all be the same size, plus material for garden paths can be combined depending on the functional load and type. So garden paths made of concrete or paving slabs are more suitable for paths with a large functional load.

Wooden garden paths or plastic garden paths will not be able to support the weight of the car and will quickly become unusable in areas between the house, garage and summer kitchen. But they are the best suited for arranging the territory of the site. The beauty of such trails fits perfectly into most types of landscape design.
Another important thing is how to make paths in the garden. Square parallel-perpendicular lines correct form now rarely used. Their advantage is only in the simplicity of arrangement.
It is quite inconvenient to overcome right angles with a wheelbarrow, hilling the beds. Plus, the rectangular configuration visually makes the area smaller, so in landscape design such are used infrequently and only in large areas.

The best option are rounded, arched shapes. In some cases, straight lines can be used, but they are laid diagonally. Unlike a square, a diagonal arrangement visually enlarges the territory.
Important: I want to warn against overly winding paths. Intricate labyrinths will subconsciously annoy, there is always a desire to go straight. Therefore, for ease of movement, it is better to make the arc smooth.
Paths laid in summer cottages or on the territory of private estates are conditionally divided into several types.

- The most common can safely be called paths mounted from a hard block material or concrete. This includes garden paths made of stone different kind and configurations paving slabs, brick or concrete screed. Such structures are distinguished by enviable longevity and endurance. But the cost of arranging such roads, as a rule, is quite high.
- In some cases, hosts prefer soft cover, this includes gravel, crushed stone, small pebbles, sand or tree bark. The only advantage of such a coating is the low price and ease of arrangement. But often these options are abandoned over time. Because due to fine fraction soft underlying material is gradually spread throughout the site.

- Wooden garden paths are now experiencing their rebirth, in our mighty country this material has been used for at least 200 years, but with the advent of asphalt, it was undeservedly forgotten. Relatively little durability, these designs compensate for the exceptional beauty and naturalness.
- Currently, wood is worthy of competition with plastic modules for garden paths.. Plastic can emit any material, including wood, plastic garden paths are easy to install with your own hands and last a long time. The only serious disadvantage is the artificial origin, not every person, escaping from the city, wants to walk on plastic.
The subtleties of the installation of wooden tracks
Before you make a garden path out of wood, you need to decide what kind of structure you want to assemble. The most common material now are wooden logs, laid vertically with the cut up. But sometimes you can find garden paths from boards, the installation instructions are a little simpler here, although first things first.

Ring decking
The flooring made of rings or wooden logs is especially beautiful, because the pattern on each ring is unique and such a coating lasts much longer than ordinary boards. Such material for garden paths is also attracted by the fact that old, fallen trees can be found in the nearest planting, so the price of such a design will be minimal.
Experts recommend using hardwoods for this purpose, oak is best of course, but larch or aspen is not much inferior to it. conifers are considered less strong and, despite the abundance of resin, quickly become unusable.

The height of the ring ranges from 100 to 250 mm. Rings that are too thin, especially those made from large diameter barrels, can break quickly. Since a lot of material is needed, it is better to use gasoline or electric saw. It is desirable to remove the bark from the trunk, since it can contain many pests, and it will become an obstacle to the impregnating protective composition.
To save time, we recommend that you immediately start treating the rings with a protective solution. As a rule, drying oil or machine oil is used for this. The substance should be heated to a boil and the workpiece should be immersed in it for a couple of minutes, after which the workpiece should dry.
There is another way to process. Cold drying oil is applied twice to the workpiece. After the tree dries, its lower part, which is in the ground, is dipped in boiling bitumen and dried. Bituminous film will more reliably protect against decay and pests.

Tip: if you want to artificially age the material, then there is a simple folk method. The tree must be covered with copper sulphate.
While the material is drying, you can equip the foundation pit for laying. The depth of excavation varies depending on the height of the rings. Keep in mind that the flooring should rise 2-3 cm above the ground, otherwise it will gradually silt up. The size of the drainage cushion under the posts is made in the region of 100 mm.
When the pit is ready, the bottom should be well tamped and covered with geotextiles; technical polyethylene is also suitable for bedding. If there is clay below, then you can do without bedding, you just need to tamp it well.

In order for the tree to deteriorate less, a drainage layer of 100 mm of sand or gravel is laid and compacted. While you are doing preparatory work, protective layer dry on the wood and you can start laying.
In order for the laying to be as dense as possible, immediately prepare cuts of different diameters. Natural gaps between the blanks are filled with sand or sawdust. To seal the gaps, the surface of the track must be periodically moistened.

Important: it is desirable to completely exclude direct contact of wood with the ground. Experts recommend equipping borders in order to protect the flooring from the sides and prevent the drainage layer from being washed out.
Whiteboard use
Garden paths from boards are a little easier to mount. The preparation of wood and the pit is carried out in the manner described above. Timber is used as the material itself. rectangular section with dimensions 150x250 mm.
Such blocks are laid directly on the drainage and the cracks are filled with sand. The gap between the blocks must be at least 5 mm so that they do not crack in the winter cold.
Often the owners go the simpler way, using wood from pallets. It is also treated with a protective solution, but the length of the board on the pallet is 1m and it is better to cut it in half. A bar from the same pallets is laid as guides on both sides. The entire structure is installed on a gravel pad and, if possible, waterproofed.

Tip: on this moment industry produces the so-called garden parquet. Of course, it cannot be called 100% natural due to deep impregnation polymer varnishes, but it has a decent appearance and lasts a long time. It fits in the same pattern as the circles.
In the video in this article, you can trace the subtleties of styling.
Conclusion

Wooden garden paths are a capricious material and require constant care. Such flooring must be processed from above at least once a year. protective compounds. If the instructions were followed in full, then such material for garden paths will serve for about 10 years.
Cheapness is one of the main advantages wood flooring, however, is far from decisive. Many homeowners prefer wooden paths in the country because of their decorative look, which fits perfectly into, and walking barefoot along such a path is very pleasant - wooden paths in the country house do not heat up as much as stone ones.
From boards and a round saw cut, you can make a variety of combinations of flooring, both in a strict modern style and in a natural forest one. Many do not dare to such experiments, since wood in contact with wet soil is short-lived, however, when right approach and following the technology, garden paths made of wood can last for several decades.
The material is often at your fingertips - these are old logs, and various boards that were left idle, and thick branches obtained after pruning trees. Quite often they lie around and slowly rot in the barn - so why not be of use to them! Preparing the boards for laying is very simple - cut them into pieces of the same length. The same must be done with saw cuts - in order for the path to be durable, saw cuts are made up to 15 cm thick. And then the technology for creating paths in different cases is significantly different!
If you value your time and at the same time want to get a beautiful and high-quality paved path, consider purchasing one like this.

Form for making garden paths
To begin with, the boards need to be treated with antiseptic compounds or a solution. blue vitriol, however, a specialized antiseptic will cope with its task more efficiently.
When the boards are dry, you can proceed with their installation. Under the path, you need to dig a small trench up to 20 cm deep. So that weeds do not grow in the trench in the future, we cover the bottom with geotextiles, and make a 10-centimeter mound of gravel or rubble on top. In the process of filling the trench with stones on the sides and in the center along the pit, install bars - boards will be nailed to them. This design will fit into almost any interior design.
The second option is to lay the boards directly on a bed of gravel, "sinking" them between the stones. In this case, the boards can be arranged as if randomly, which will give the paths a natural look. In any case, try to lay them so that they do not touch the soil - such contact will significantly reduce the life of the wood. The advantage of such tracks is that after some time, failed elements can be completely easily replaced.
Logs should not stand idle - they can be used to make original furniture for summer cottages and textured garden paths. Wooden saw cuts are laid in a dug trench up to 40 cm deep. Geotextiles are covered at the bottom of the trench, and then a pillow of sand is poured, with a layer of 15-20 cm. Prepared saw cuts begin to be laid on top. The preparation of the tree consists in the treatment with antiseptics and bitumen. Bitumen is melted in a metal container and immersed in it with the lower part of the saw cut.
When it dries, you can start laying. From above, treat garden paths from tree cuts with drying oil, preferably several times. Laying can be done in several styles. If the saw cuts are the same size, they can be laid out in a checkerboard pattern or in rows, and the gaps between them can be filled with earth and sown with a lawn. If the saw cuts are of different diameters, they should be laid out in a chaotic manner, and the gaps between individual logs should be filled with saw cuts from small branches.