Today a wide range of building materials allows you to create without any problemssuspended ceiling with your own hands, all you need is the ability to use the tools and clear instructions. It is worth noting that you cannot cope with the installation alone - you need to take care of at least two assistants.
Construction device
A suspended (another name is suspended) ceiling is iron structure, consisting of one or several levels, which is attached to the ceiling and sheathed with plasterboard (installed if desired).

The frame usually consists of metal profiles UD or CD, connected to each other with self-tapping screws, and fastening “crabs”. The frame is attached to the ceiling with special hangers (they can be spring or straight).

Attention! The structure is sheathed with sheets 0.95 cm thick and dimensions 60x120x150-250 cm (the last value is length). If installed correctly, the weight of the ceiling will be 13 kg/m².
Now let's look at the installation technology.
Stage 1. Preparatory work
Despite the fact that suspended ceilings hide the entire floor area, the surface will still have to be prepared.
Step 1: Remove old finish.

Step 2. The ceiling is inspected for cracks, dents, etc.
Step 3. If everything is fine, the ceiling is primed and puttied. The result should be a flat and smooth surface.

Prices for mixtures for leveling walls and ceilings
Mixtures for leveling walls and ceilings
Stage 2. Creating a project
To create a project, it is advisable to use one of the many architectural programs that allow you to get ready-made diagram with exact quantity Supplies. But if you plan to do everything on paper, then you will have to spend a lot more time and effort.

Step 1. First, the perimeter is determined - there is a special formula for this (for example, the dimensions of the room are 5x3 m):
(5 + 3) x 2 = 16 m (P)
The resulting figure will also be the length of the guides. The calculation results are transferred to graph paper.
Attention! If the lengths of opposite walls are different (this often happens), then a larger value should be taken as a basis.
Step 2. Next, the frame profile is calculated. A 2.7x6 cm profile will be used for the frame - it is attached in 60 cm increments. The length of one profile should be equal to the width of the room. To calculate the number of slats, the width of the room (300 cm) is divided by the pitch (60 cm), resulting in 8.3 (rounded to 8).
The first and last planks must be installed 10 cm from the walls, the rest - with the above step. By the way, the length of the step is not accidental, since standard plasterboard sheets have a width of 60 cm or 120 cm.
The location of the planks is indicated in the project.

Step 3. The number of hangers is determined, which are fixed with the same step of 60 cm. 300/60 x 8 = 40 pieces. The first and last of them are installed 30 cm from the walls. The location of the hangers is indicated in the project by crosses.
- the height of the hanging structure exceeds 12 cm;
- The ceiling surface is absolutely flat.
Step 4. Calculate the number of connecting jumpers (necessary to increase rigidity):
((300/60) – 1) x 8 = 32 pieces
Step 5. Next, all that remains is to calculate the amount of drywall and screws. There is nothing complicated about this, because the total area of the room is already known (15 m²), and the area of one sheet (determined by size) will be 3 m². Therefore, a total of five sheets will be required.
Calculating the number of screws consists of several stages.
- Products 6x60 are used for the ceiling (step – 60 cm) and walls (step – 30 cm).
- Thirty-point self-tapping screws will be required to fix the drywall (step – 25 cm).
- The fittings are fastened with self-tapping screws LN-11, two pieces each for profiles and hangers, four pieces each for profiles and “crabs”.
After this, the project notes lighting, quantity is determined.
Stage 3. Surface marking
First you should mark ceiling, which requires a marker and tape measure.
Step 1. The height of the suspended ceiling is measured (the thickness of the drywall is not taken into account). Three or four marks are made on each wall, which are connected using painter's thread into a continuous line. In the future, a guide profile will be installed along this line.
Step 2. Next, the ceiling is marked for suspensions and the main profile (2.7x6 cm). An indentation is made from the walls at the distance indicated above, several marks are made and a line is drawn (the same as in the previous paragraph). The procedure is repeated for all planks, that is, every 60 cm. The points of attachment of the suspensions are marked along the lines.
Stage 4. Installation of the suspended ceiling frame

To assemble the frame, you need to prepare the following materials:
- profiles (guides and for ceilings);
- dowels;
- self-tapping screws of all specified types;
- pendants;
- X-shaped brackets.
Step 1. A guide profile is installed around the entire perimeter. Holes for dowels are drilled along the previously made line, and similar ones are made in the profiles. Then dowels are driven into the holes and the profile is screwed on.
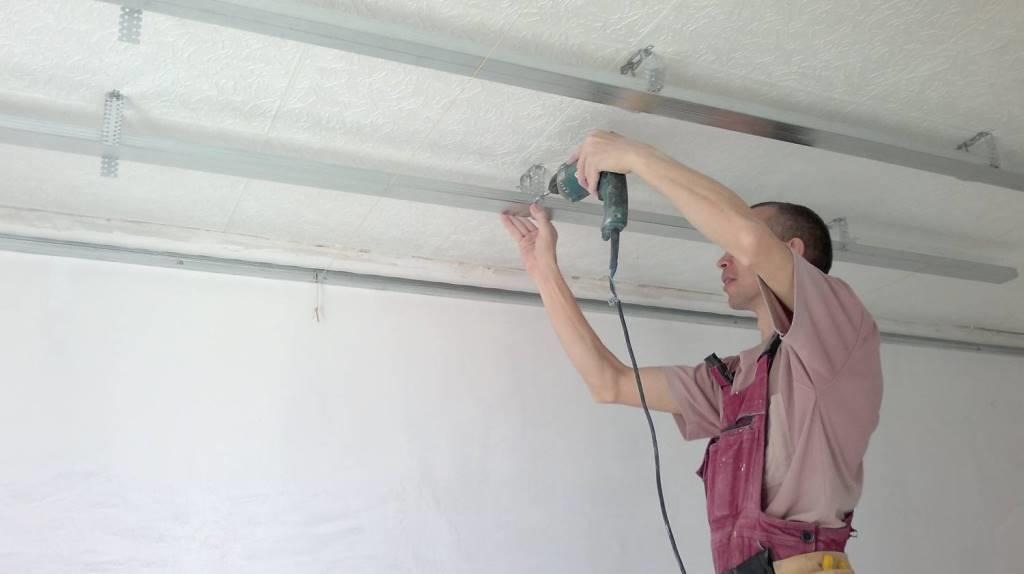
Attention! It is advisable to use a screwdriver in your work, since you will have to screw in a lot of different screws. This tool will make the job much easier.
Step 2. Next, the hangers are fixed. Each hanger is applied to the mark strictly in the center of the line, after which the locations for the dowels are marked and holes are made. Then the dowels are driven in and the suspension is attached. A similar procedure is carried out for each of the forty suspensions.

Attention! To fasten each element, you can use either one or two screws. It all depends on the desired strength of the structure.
Step 3. The frame is installed. All suspensions have antennae that are bent downward enough so that a profile can fit between them. The profiles are inserted inside and fixed with self-tapping screws at the required height.
Step 4. After attaching the planks, mark the places where the “crabs” are fixed (you will need a tape measure). The “crabs” are inserted with their tendrils down over the slats and pressed tightly until they snap into place.
Step 5. Jumpers are cut from a 2.7x6 cm profile. First, the whole profile is cut into pieces with a grinder so that each ready jumper entered tightly between the guides.
Step 6. After cutting, the jumpers are mounted. Each jumper is placed under the “crab” and pressed against it so that it snaps into place. After installing all jumpers, they should be aligned in accordance with the diagram.
Step 7. The profiles are connected to the “crabs” with four screws.

Stage 5. Insulation

If desired, the suspended ceiling can be insulated, which will require a dense mineral wool and a special fastening system for it, known as a “fungus”.
Prices for thermal insulation materials
Thermal insulation materials
Stage 6. Sheathing with plasterboard


The sheathing procedure is quite simple and does not require detailed description. Plasterboard sheets are applied to the finished frame and screwed to the profiles using screws. You need to ensure that the edges of the material fit exactly on the profile.
Attention! For reliability, drywall can be attached “staggered”, which is why some sheets will have to be trimmed a little. This is easy to do: on one side the material is cut under the ruler, then the plaster is broken, and only after that on the reverse side.
Video - Installation of a suspended ceiling
Stage 7. Final finishing of the ceiling
Once the installation is complete, all that remains is to do the final finishing.
Step 1. First, all joints between the sheets are carefully aligned.
Step 2. After the putty has dried, a layer of finishing material is applied (for example, paint, plaster, etc.).
Step 3. Lighting devices are installed.


Video - Insertion of spotlights
Prices for various models of recessed lamps
Recessed luminaires
Features of operation

Conclusion
As it turned out, the work of installing a suspended ceiling is quite simple and even a person without experience in the construction trade can handle it. Only required quality building materials and strict adherence to technology.

Find out and also review the instructions for self-execution works, from our new article.
Tsugunov Anton Valerievich
Reading time: 6 minutes
A plasterboard ceiling is the optimal solution for those who want to tidy up the ceiling surface themselves, but are not eager to bother with plaster or buy expensive heat gun For stretched PVC fabric. Let's find out how to make a suspended ceiling from gypsum plasterboard sheets and get acquainted with the instructions, which explain in detail how to attach drywall to the ceiling correctly.
When should you choose drywall?
Suspended ceilings from plasterboard sheets will be the right choice if:
- the work needs to be done quickly and with a minimum of effort - installing a plasterboard ceiling is much easier for a beginner than plastering, and besides, you don’t have to wait for each layer of mortar to dry;
- it is necessary to hide wires and communications;
- you want to use spotlights;
- it is necessary to make sound or thermal insulation - it is convenient to hide any insulating material behind the plasterboard on the ceiling;
- there is a need for a perfectly smooth ceiling surface in the absence of skills in working with plaster.
If you are already seriously thinking about how to make a plasterboard ceiling, take into account some of its disadvantages:
- Like any suspended ceilings, it will reduce the height of the room.
- Covering the ceiling with plasterboard requires the use of tools such as a hammer drill, a screwdriver, and a laser or water level.
- Cracks may appear at the joints of gypsum boards over time.
- Leveling the ceiling with plasterboard cannot be done alone.
Materials for work
Before we start figuring out how to make a plasterboard ceiling, let's find out what needs to be prepared before installation. We will need:
- thickness from 8.5 to 9 mm. If you are planning to make a false ceiling in the kitchen or bathroom, then you need to choose moisture resistant material- GKLV.
- Ceiling profiles (PP or CD) 60 X 27 mm.
- Ceiling guides (PNP or UD) 28 X 27 mm.
- Dowels and screws, anchors.
- Special suspensions.
- Cross-shaped fasteners for connecting perpendicularly joined profiles - “crabs”.
- Sealing self-adhesive tape for a tight fit of the frame.
You can also make a suspended ceiling from GVL -, which are durable and non-flammable, but in this case reinforced profiles will be required, since this material is quite heavy.
Tools
How to cover a ceiling with plasterboard using available tools? Minimum you will need:
- roulette;
- laser level or hydraulic level;
- pencil;
- perforator;
- screwdriver;
- hammer;
- knife for cutting sheets;
- metal scissors;
- marking cord.
If we are talking about how to make a suspended ceiling from start to finish, you need to remember about the tools and materials for its processing and puttying, which include:
- spatulas;
- sanding mesh;
- mesh grater;
- sickle tape for joints;
- putty;
- primer.
Preparation for installation
Before you start leveling the ceiling with plasterboard, you must:
- Complete the work on leveling the walls in the room: in the places where the profile is attached, the surface must be absolutely flat.
- Make a design sketch to accurately calculate the amount of materials (profiles, sheets, screws, fasteners). A diagram of a plasterboard ceiling frame with a calculated step between the sheathing elements will help to avoid a situation where the edge of the sheet does not coincide with the profile and it cannot be secured.
- Eliminate defects in the base surface. Although plasterboard ceilings will hide it, this step is necessary to prevent the old coating from falling off. Before attaching the profile to the ceiling, repair cracks, clean crumbling areas, and apply a deep-penetrating primer.
The final finishing of the room is carried out after the suspended ceilings are installed.
Marking
Installation of a plasterboard ceiling is unthinkable without preliminary marking. The goal is a perfectly flat horizontal line, perpendicular to the floor and running around the perimeter of the entire room. It will serve as a guide for setting the starting profile. To make the markup correctly, you need to:
- Decide on the height of the plasterboard ceiling. For a design with spotlights, the surface will have to be lowered by at least 8 cm; if they are not used, a gap of 4–5 cm will be sufficient.
- Find the bottom point of the base ceiling surface. To do this, you need to measure the ceiling height in all corners and in the center of the room. The lowest height is marked on one of the walls using a tape measure and a pencil, then the distance to which the plasterboard ceiling will be lowered is set aside from it.
- The resulting height is transferred to each wall, the points are connected by a horizontal line using a tapping cord.
When marking the surface for a plasterboard ceiling, it is much more convenient to use a laser level.
To mark the main profiles for a plasterboard ceiling, you need to take into account 2 points:
- The extreme profiles should be at a distance of 20–25 cm from the walls.
- The step between profiles is 40 cm.
Hangers can be placed at a distance of 50 cm from each other, the outer ones - 25 cm from the walls. To mark anchor locations, place the hangers against the ceiling and mark 2 points for each.
Frame installation technology
Installation of the frame begins with the installation of guide profiles:
- The guide is applied with its lower edge to the line, and marks for the dowels are made through the holes in the profile.
If there are no holes at the edges of the profiles, you need to step back 10 cm from its ends and make them yourself.
- Holes are drilled using a hammer drill.
- A sealing tape is glued to the profile, and it is fixed to the wall with dowels.
The suspended ceiling is secured using hangers, also covered with sealing tape and secured with anchors.
Bearing strips are fixed on the hangers, the ends of which are inserted into the guides. After fixing the profiles on both sides on hangers, their free ends are bent.
If the length of the profiles is not enough, you need to use special extensions designed to connect two strips.
If you are making a suspended ceiling in a bathroom or hallway, following these instructions will be enough. Suspended ceilings for the kitchen, living room or bedroom, that is, for larger rooms, will require the installation of additional transverse profiles, to which the short sides of the gypsum board sheets will need to be attached. Perpendicularly joined profiles are secured using “crabs”. The result should be a lattice frame.
Covering the frame with plasterboard
Before sheathing the ceiling, you need to take care of the communications. Wires are placed in corrugated pipe, wiring for lighting fixtures is in progress.
The prepared sheets are applied to the frame so that their edges meet in the center of the profiles, and are screwed with self-tapping screws:
Important points to consider when fixing drywall to the ceiling:
- There should be a chamfer on the edge of the sheets at the joints; if there is none, you need to make it yourself using a knife or a special plane. The sheets should fit tightly enough to each other, the gap between them should be from 1 to 2 cm.
- Since some sheets of drywall will most likely have to be cut, when deciding how to sheathe the ceiling, it is better to start by securing entire sheets. When this part of the work is done, you can more accurately determine the dimensions of the sheet to be cut.
- It is necessary to leave a small gap of 0.5–1 cm between the sheathing and the wall.
Putty
Once the suspended ceilings are installed, all that remains is to finish them. First of all, it is carried out, the same for all types of plasterboard structures:
- The joints are covered with reinforcing tape.
- Seams and entry points of self-tapping screws are puttied.
- After the putty has dried, the seams are rubbed with a special mesh, the entire surface of the plasterboard ceiling is primed, and a thin layer of finishing putty is applied to it.
After the putty has dried, it needs to be sanded. Then the plasterboard ceiling is primed again and painted or wallpapered.
Now you know how to make a suspended ceiling from gypsum board sheets. This process should not cause you any particular difficulties, if you strictly follow the instructions, everything will definitely work out.
To install a suspended ceiling yourself, you do not need to have any special skills. Anyone who knows how to hold a tool in their hands will cope with the task. This type ceiling finishing - great option in premises for any purpose, including offices, retail space, housing. Each of them can choose their own style.
There are many solutions available today and facing coatings. In conditions limited budget And high requirements This is the best solution in terms of quality. To do this, you need to carefully select and install everything. As a result this coating will look harmonious in any room.
Advantages of hanging structures
The main reason for its popularity is the ability to effortlessly mask defects in the rough floor.
From the majority positive qualities hanging canvases, we note that there is no need to prepare the surface, even if there are significant unevenness.
Whenever possible to hide coating defects, suspensions are in no way inferior tension systems, although the costs will be less. Moreover, having done the work on our own, save even more. Another advantage is the ability to place communications in the inter-ceiling space.
Materials used
Unlike suspended ceilings, where polyvinyl chloride fabric is used, in hanging options mounted on metal profiles hard materials. This gives the mounted system additional benefits, increasing the possibilities of interior design. Thanks to this, they are extremely famous among experienced designers because they implement bold solutions.

This quality ensures popularity among ordinary people interested in simple but effective options finishing. When installing a suspended ceiling, it is possible to use any coating materials - from PVC panels (the most economical option) to dry gypsum plaster.
How and from what to make hanging structures? More often used plastic panels, metal slats, sheets of waterproof plasterboard, different kinds facing tiles, including those based on glass with mirror elements.
Flaws
In this species interior decoration there are also disadvantages. The main negative point is that after installing the coating, the height of the room becomes smaller. Therefore, the hanging system cannot be installed in an initially low bathroom. You need to understand that such a design will reduce the height by another 10 or even 15 cm.
The interceiling space is often used for laying electrical wiring (if it is not hidden), cables, split system route, ventilation, etc. Installation of communications must be carried out before installing the ceiling. After assembly ceiling structure, access will be difficult.
You will need to plan lighting locations and install cables with their fixation.
Making changes, as in the case of communications, will become difficult.

Types of structures
Many people do this kind of work with their own hands today. There are open and indoor views ceiling. In the first case, the frame parts remain outside, in the second they are masked with decorative elements. The structures are tile and slatted. The latter are secured using hangers into which slats of different colors and shades are inserted. The tiled ceiling is assembled from profiles in the form of cells, into which the elements are then laid.
Before you start work, decide on the type of construction appropriate for the room. This can be a continuous single-level or multi-level plasterboard covering. The gypsum board ceiling is characterized by high operational properties, low maintenance requirements and ease of installation. A non-professional can handle this type of material. Installation of suspended plasterboard ceilings on one level, and even more complex ones, is within the capabilities of an amateur.
Installation
Despite the ease of installing hanging structures, not everyone understands the process. This requires simple skills. Previously, even before installation, markings are made for installing profiles using building level. They retreat 10-20 cm from the base of the ceiling. Profiles are attached with dowels along the perimeter of the room. Fastening is carried out according to the marks made using a level.

Next we install the main guides and also attach the hangers. The elements are placed in increments of 60 cm. After completing this stage, it is necessary to mark and secure the longitudinal profiles. To connect the parts, “crab” type hangers are used.
After installation of the metal profile lathing is completed, the installation of the plasterboard structure begins. The sheets are placed across the longitudinal guides, fixing them on the profiles using self-tapping screws. The fastening step is 15-20 cm.
After assembling the suspended ceiling structure, all that remains is to mask the seams between the gypsum boards with sickle tape and smooth them with putty.
If desired, in plasterboard ceiling Illumination is done using lamps or LED strip.
Advantages of Armstrong type suspension systems
It is known that such designs are popular due to their easy installation. This process is so simple that anyone can do it themselves. Such ceilings have very good performance properties. A wide range of special slabs are offered for cladding.
Before installation, it is imperative to make a layout and assembly plan depending on the room where it will be used. With the help of such a project, the amount of material needed is calculated. In addition, you need to choose the right layout of all elements.

The installation process is mastered quickly by following the assembly instructions specified by the manufacturer in the instructions. If the recommendations are followed, this work can be completed by a person who previously had no idea about the existence of such systems.
Assembly of Armstrong type structure
First pick necessary materials and tools. Purchase slabs with a reserve of 5 or 10%, which will avoid shortages when completing the work. You also need to choose the right option ceiling tiles. They can be smooth or textured. If necessary, the elements are painted in the desired color with acrylic or water-based paint.
Not so long ago, the installation of suspended ceilings with a 3D image printed on them began to be actively practiced. The design of such plates is limited only by the consumer’s imagination. As during the assembly of a plasterboard structure, the installation of an Armstrong-type suspended ceiling is preceded by the laying of communications that will be located above it, otherwise inconvenience will arise.
The Armstrong type suspension system is selected based on the weight of the integrated equipment that is supposed to be placed in the false ceiling. Fasteners suspended structures this type are designed taking into account distributed load up to 6.5 kg per 1 m², some hold up to 10 kg per 1 m².
To date, a lot has been achieved constructive solutions for finishing the ceiling. They allow you to use many different finishing materials, create unique interiors. The most popular are suspended (suspended) ceilings, this is greatly facilitated by the relative ease of installation of the structure, which can be handled even by a person with minimal construction skills. So, let's try to figure out how to make a suspended ceiling with your own hands.
Advantages of hanging structures
Apart from excellent appearance hinged structures also have engineering advantages.
- The suspended ceiling structure can play the role of a sound insulator; these qualities are enhanced when special materials are placed in the frame of the system. The same method is used to insulate the room, so it is possible to kill two birds with one stone, because as a bonus you get a method for improving sound and heat insulation (see).

- Many Decoration Materials, used for suspended ceilings, increase the fire safety of the room (plasterboard (see), various types of metals, glass).
- As strange as it may sound, certain models can even reduce energy consumption for lighting. The reflective properties of polished metals and mirrors make it possible to create a more even distribution of light, which reduces the number of lamps required for a room.
- Due to the distance to the ceiling, there is the possibility of hidden wiring of various communications.
Types of suspended ceilings
All main types of ceiling finishing, depending on the installation method, can be divided into the following conditional groups.
Plasterboard ceilings

This group also includes structures whose cladding uses PVC panels (see) and other similar materials. They are united by the same design of the supporting frame.
Before you make such a ceiling yourself, you need to draw up a clear layout of the frame elements, this will simplify further work.
A similar system is assembled from wooden beam with a cross section of 25x30 mm, or a special metal profile:
- The starting profile UD, has dimensions of 27x28 mm, is mounted on the wall, forming the outline of the future ceiling. Fastening is carried out using dowel nails " quick installation"or simple self-tapping screws, for example, to wooden surfaces.
- The CD profile is the main element of the frame. With its edges it is inserted into starting profile, and attached to the ceiling using ordinary direct hangers.
The installation step of the supporting profiles is usually 40 or 60 cm, depending on the location of the gypsum board sheet. Beginners, when deciding how to install a suspended ceiling, sometimes try to save on the number of points for attaching the profile to the ceiling; this approach is fundamentally wrong.
The manufacturer clearly indicates the fastening step, no more than 400 mm. Otherwise, such savings can lead to deformation of the entire structure after some time.
The supporting profiles are connected to each other by special jumpers made of the same material. It is better to fasten them together using special connectors, crabs.
Advice! If you have some experience, you can do without them; the profile is simply cut in a certain way and secured with self-tapping screws.

Modular hanging systems
Another great option to solve this issue. Particularly suitable for offices, premises with large area, but, when non-standard approach can become a decoration for a residential apartment.
Cassette suspended ceilings
Cassette models are distinguished by the ease of installation of the frame and the variety of materials used.
Unified frame elements simplify the installation process. Basically, in structures of this type, wall (L-shaped) and load-bearing (T-shaped) profiles are used. To simplify fastening, the supporting shelf of the profile is perforated, that is, it is possible to fasten it with adjustable butterfly hangers. The principles of height adjustment are standard; leveling it is not difficult.
The cell size is usually 600x600 or 600x1200 mm, it all depends on the material of the slab and your design desires. Original design create the use of stained glass or metal modules.

Slatted suspended ceilings
Their difference lies in the use decorative elements, the length of which is significantly greater than the width. In principle, this is clear from the name. The slats, which have a slightly rounded cross-section, are fastened to special supporting profiles called stringers.
The advantage of this type of design is the absence of additional fasteners; you will be surprised to learn how to make a ceiling of this design yourself. The decorative strip is installed on the stringer installed according to the technology by lightly pressing, the shaped base of the supporting profile will reliably fix the element of the future ceiling.
Advice! The length of the strip should be several smaller size rooms, literally by 5-10 mm, then it will be easier to install the rail.
Materials used for similar designs, allow you to create ceilings various configurations, and the bending of the coating allows you to do smooth transition between different ceiling levels.

Lattice suspended ceiling
This the clearest example how high-tech ceilings are made. The lattice structure of such a ceiling, covered on the back side with the material you like, could easily pass for the design of a spaceship or the room of a representative of an extraterrestrial civilization.
Considering that the cell size is relatively small (from 50x50 to 200x200 mm), the result is a rather rich and original structure. The material used is usually decorative polished metals.

Stretch ceilings - modern classics of the genre
One of the most expensive, but also one of the most worthy options. Does not require additional load-bearing structures, it is enough to install a special profile along the contour of the ceiling. A special PVC membrane, which is most often used as the starting material, stretches under the influence of a flow of warm air.
After installation, during the cooling process, the true size of the workpiece is restored, resulting in a perfect Smooth surface, the color and texture of which will depend only on your taste.

As a conclusion, I would like to say the following. Today, the use of such ceiling finishing structures is the most acceptable option even for small apartments. Comparing how to make suspended ceilings and how to level out differences between floor slabs that reach 10 cm or more, you understand that the first option is simpler.
And if you have any other questions or lack visual information on the topic, just watch the video below. If in this case a lot of questions arise, entrust this work to a professional.
Considering that you will already be thoroughly savvy, it will not be difficult to control the quality of any stage of work. Yes and real professional, whose services we hope you will resort to, will never allow himself any hack work.
Want to liven up your space but don't know where to start? A do-it-yourself suspended ceiling (or suspended ceiling) is a great way to transform a room with minimal costs, and step-by-step instructions and recommendations will help you complete the installation efficiently and quickly. By doing the renovation yourself, you get much more satisfaction, both from the process and from the final result.
The decisive factor in the interior is simplicity and beauty, as well as affordable price. In the current conditions, when building materials hit the wallet, repairs turn into real money laundering. A suspended ceiling requires little cost, and it is also easy to do it yourself, without resorting to calling craftsmen for an additional fee.

What materials are suitable:
- Drywall;
- PVC or MDF panels;
- Ceiling tiles;
- Armstrong panels;
- Metal modules;
- Rack plates.
The last three options are the most expensive, so there is no point in talking about them in detail. But it is worth noting the cladding made of plasterboard, PVC panels (or MDF) and ceiling tiles.
Suspended ceilings made from these materials can most often be found in Russian apartments. The design for all materials is the same and does not differ significantly.
Step-by-step instructions for installing suspended ceilings with your own hands
Repairs should begin with an assessment of your capabilities: both physical and material.
Installation suspended ceilings with your own hands can be roughly divided into 4 stages:
- Design;
- Marking;
- Installation of the box (frame);
- Finishing.

Do-it-yourself installation of suspended ceilings does not require specific knowledge in construction industry, but you will still need to spend several days to do everything correctly and efficiently.
It’s not difficult to do the installation yourself, the main thing is to follow step by step instructions and know some of the nuances.
Design of suspended ceilings
Points 1 and 2 are needed for a rough understanding of the sequence in which the installation will take place and what it will look like in the end. At the first stage, the height of the structure is assessed. This is necessary in order to calculate the required space for placing lamps and communications. If you can't visualize what you want, use design programs. There are a great many of them on the Internet.
Modeling programs are available on the Internet and are available for download for free.
Markings for suspended ceilings
Having a “diamond eye” is good, but it’s better not to trust your ego and do everything in accordance with technology. Preliminary markings on the walls are needed to determine the level of the future ceiling.

The following recommendations will help you make the marks correctly:
- Draw a line at an arbitrary height using a laser level;
- Find the lowest point on the surface by measuring the distance from the drawn line to the ceiling;
- Lay down the length by which you want the ceiling to be lowered and make a mark;
- Draw a new horizontal line starting from the previous mark.
Everything in a renovation must be clearly planned. Mistakes can cost money in restoration or rework. It is better to use the saying “measure 7 times – cut once” than to regret the money and time spent later.
Carry out markings efficiently and accurately, following all recommendations. If you draw the lines incorrectly, the design will become crooked and will have to be redone.
Frame installation
The process of manufacturing a structure for further cladding is not complicated. You need to purchase the necessary materials and begin installation. IN in this case We will talk about a metal frame. This type is considered stronger and more durable than wooden slats.
The metal frame is reliable and simple. In case of installation wooden slats additional processing of the material is required. This option is not suitable for city apartments.
Step-by-step installation instructions metal frame for suspended ceilings:
- The profile guides are attached to a horizontal line on the wall (delayed height) using dowels, screws or anchors;
- The metal frame is installed along the entire perimeter of the ceiling;
- The profiles are strengthened using special hangers so that in the future the structure does not sag and lose its appearance;
- The metal frame is connected to suspensions and is adjustable in one plane horizontally;
- Before the final cladding, you should make sure that all technology has been followed correctly and the structure is securely fixed to the ceiling.
Making the frame is the most difficult part of the entire installation. This is followed by cladding with the material of your choice (MDF or PVC panels, plasterboard, Armstrong or polystyrene foam boards) and final processing(painting, installation of lighting equipment).
Detailed video installation instructions are available on the Internet for best understanding what you have to deal with. Review them in advance so that questions and controversial situations do not arise during the process.
Final work on installation of suspended ceilings
If you choose Armstrong panels, they are simply installed in pre-made areas in the structure. If you prefer drywall, then using self-tapping screws the sheets are attached to metal profiles and finished with putty followed by painting. MDF and PVC panels require fastening to the frame using hardware. After completing the final work, all that remains is to admire your own creation and accept the well-deserved praise.
Advantages of suspended ceilings
When deciding to make repairs and choosing this or that type of material, you should weigh all the pros and cons and make right choice. The name “suspended ceiling” speaks for itself. Its structure is attached to the main surface using hangers at a certain distance.

Many arguments can be made in favor of suspended ceilings. The most significant advantages are:
- Installation is easy to do with your own hands;
- The design hides ceiling imperfections (unevenness, cracks), as well as ugly communications and wires;
- The surface is perfectly flat;
- The coating does not accumulate condensation;
- No specific surface care is required (most materials are dust-repellent, which means they simply do not become dirty);
- The color range of coatings allows you to choose an option for any room with a wide variety of designs;
- Possibility to install lighting fixtures in any order.
While describing the advantages, one cannot fail to mention the most important disadvantage of such structures - this is a significant height fence. Installation requires a significant sacrifice of space. Of course, this is not such a big minus, but oh chic chandeliers will have to forget. This problem is especially acute in small-sized apartments with an old layout.
How to make a suspended ceiling with your own hands (video)
Suspended ceilings are inexpensive, but beautiful way transform your home. Considering the number of advantages and minor disadvantages, choosing this option is definitely worth making. Huge popularity this method can be explained by the fact that the installation of the structure is easy to do independently and without huge material costs.