The main purpose of the garage is to park vehicles, but in most cases it is also used to store a large number of tools and things designed to care for your beloved child. Thrifty owner will definitely take care of order in your garage, which is much easier to maintain with numerous shelves. You can buy them ready-made, but it is much more practical to make the shelves yourself, choosing the required size and placement.
Types of shelves
A wide range of shelf applications involves the use various materials for their manufacture depending on the planned load. Most often, to make a design, they resort to three options:
- equip the garage with metal products;
- work with wood;
- in some cases it is practical to make combined racks, where metal carcass complemented by wooden flooring.
Things stored in the garage have different dimensions and weight, so you should decide in advance what shape of shelves is best to make. Attention should be paid to the following designs:
- For stationary shelving, you will need a frame consisting of vertical posts connected by transverse elements onto which the shelves are fixed. Basically, they are designed to accommodate heavy loads, so for vertical racks it is worth making additional fixation to the wall using brackets. Fastening is also expected between the frame and the shelves. Significant weight requires equipment with a structure made entirely of metal. If you do not plan to store heavy items in the garage, you can make wooden shelves.
- Collapsible garage structures differ from the stationary version in that the frame is made of perforated metal, which ensures that the shelves are attached to different heights. For this purpose, mounting angles, bolts and nuts are used. In the finished version, these are the garage racks that are most often found.
- You can make mobile products by equipping them with wheels, and moving around the garage will not require preliminary unloading.
Note! Similar design needs a flat floor surface and does not involve storing excessively heavy materials on it.

- It is convenient to place a variety of small items on a rotating structure, similar to a stand for storing discs. If you have enough space in the garage, you can also make a kind of shield on the wall for small tools.
- Hanging shelves under the ceiling allow you to rationally use all the space in the garage. Their main purpose is to store things that are rarely needed. Mounting for such shelves can be done on the wall or ceiling; keep in mind that there are also load restrictions here. If the bulk of the stored tools and parts are not heavy, then you can equip the garage exclusively with hanging shelves.
When choosing suitable design, focus on the number and weight of stored items, as well as the availability of free space.
Design
Any structures require preliminary design. After inspecting the garage and taking measurements, we move on to planning the parameters. A practical solution would be to free up one wall completely for shelving, then the structure will be very spacious. The distance between the shelves is calculated based on the dimensions of the stored items. The lower level is usually equipped to accommodate canisters and replacement rubber. You can make the first shelf higher from the floor so that large-sized motorist accessories can be placed under it. For ease of use, when designing racks, the following dimensions are usually adhered to:
- The length of the shelf varies depending on the depth of the garage; it is recommended to leave a gap of 20 cm for ease of installation work.
- The height of the structure reaches the ceiling.
- The distance between the vertical posts is proportional to the weight of the stored cargo: the larger it is, the more often the posts are located. The maximum step does not exceed 1.5 m; it is optimal to install vertical supports every 1 m.
- To store most things, it is enough to equip shelves with a depth of 50-60 cm. Increasing this parameter interferes with convenient operation; for small tools and fasteners, racks with a depth of 30-40 cm are suitable.
- The height between levels is 25-60 cm; large items require free space with a height of 0.8 to 1.0 m.
After the sketch on paper, they are determined with suitable material and proceed to bring the idea to life.

Combined option: metal frame with wooden shelves
The key advantage of making garage shelves yourself is the ability to create a heavy-duty structure that can last long time. The following materials are suitable for equipping vertical racks:
- metal corner 30x30 or 50x50 mm;
- rectangular profile from 40 to 50 mm;
- To install shelves, use a 15-25 mm corner.
The shelf frame is fixed to the vertical posts using welding. Lack of necessary skills and tools will require making several holes and securing individual elements bolts.
Important ! The second method is more labor intensive, but makes it possible to further adjust the height of the shelves in the garage.
It is better to make the flooring from wooden boards with a thickness of 15 to 25 mm, it all depends on the required strength. When storing light equipment in the garage, the shelves are made of chipboard, regular or laminated plywood. All wooden elements require pre-treatment by special means, this will protect them from damage by fungus or moisture. Installation of garage shelves includes the following steps:
- Cut according to selected sizes metal parts for the frame using a grinder. For an additional fee, this procedure can be done on a base that works with metal.
- The vertical posts mark the places where the shelves will be fixed.
- We connect the corner for fastening the shelves with vertical parts. The work is accompanied by regular monitoring of the horizontal level.
- The finished metal frame for garage shelves is coated with a primer and then exposed with paint. This will provide protection against corrosion.
- Then they move on to working with wood. You can arrange the boards along the frame or across it. The second option is more acceptable for a garage, as it will prevent the shelves from bending under the weight of the load.
- After checking the size correspondence between the wooden elements and the metal frame, you can proceed to connecting the entire structure together. The shelves are fixed to the frame provided they are completely dry after processing. protective equipment. Using self-tapping screws, the boards are installed with a tight fit to each other.
Important ! To give the racks greater stability, it is recommended to additionally attach the frame to the garage walls using brackets.

Methods of equipping wooden structures
If you want to save on purchasing metal products, you can make it entirely from wood. The frame is installed from timber with a thickness of 100 mm; for the shelves, a material similar to combined designs(boards 15-25 mm, chipboard or plywood). The connection of the shelves and the frame is carried out using mounting angles and M5 bolts 60 mm long. The load capacity of this design is slightly lower metal version, therefore more suitable for storing lightweight items in the garage.
For motorists who often work in the garage minor repairs, you'll like the idea of making it convenient wooden shield for storing tools. To do this, you will need to anchor the perforated chipboard to the wall and equip it with various tool holders, compact shelves and hooks. Additional lighting can be provided above original shelf with adjustable direction of light flow, this will create comfortable conditions for work in the garage.

Attachments
You can save free space in your garage by making hanging shelves. To do this you will need to prepare:
- large anchors;
- hex and regular nuts;
- Grover washers;
- studs and flat washers;
- flooring material (chipboard or plywood).

Installing a hanging garage shelf includes the following steps:
- Wooden elements are cut out in accordance with the chosen project. The distance between the studs should not exceed 70 cm.
- Places for pins are marked along the edges of the shelf. It is recommended to retreat 5-7 cm from the edges of the slab.
- After drilling the holes, the shelf is placed against the garage ceiling to mark the locations of the studs.
- Then recesses are prepared for the anchors, which are driven all the way into the concrete, and the nuts are tightened.
- Next you need to connect the studs and anchors.
- Finally, the shelf is fixed to the studs.
These are not all the options on how to make convenient shelves for the garage. In most cases, before installing them, the surfaces should be prepared: there should be a high-quality screed on the floor, and it is recommended to plaster the garage walls. Such precautions will prevent the occurrence of unpleasant moments in the form of condensation on instruments or distortion of stationary racks.

Over time, a lot of things and “important” little things accumulate in the garage, which need to be found in such a place that they are easy to find and quickly take. Proper organization of space will help with this, essential element which - shelves. Today it is not just a complex of horizontal and vertical crossbars. Designed to the maximum convenient designs, height-adjustable, safe and durable, which you can make yourself.
Shelves in the garage are needed to systematize internal “wealth”
For Russians, the garage has long become a multifunctional space. This is no longer just a place for storing and servicing a car, but also a workshop, as well as a warehouse for a variety of things, including:
- spare parts for the car;
- wheels;
- electric and pneumatic tools;
- oils and gasoline;
- fishing rods and other fishing, hunting and tourist equipment;
- wearables and other things;
- food preparations;
- detergents to maintain cleanliness.
All this must be organized, kept dry and in good order. For this purpose, there are only two designs: and shelves. The first differ from the second in that I can be mobile. Shelves are always stationary and mounted on a wall or partition.
For things with different geometric parameters, you need storage space of the appropriate size. In this regard, there are several types of shelves:
- for tools, with crossbars to prevent this expensive equipment from falling;
- for storing long items: building materials such as boards and metal corners, as well as fishing rods, shovels, spare parts;
- for large-sized products: machine tools, heat guns, auto parts;
- for small hand tools, keys, insulating and other materials.
Therefore, the design of the shelves must be selected based on several parameters:
- the dimensions of the items that will be stored on them;
- frequency of their use;
- weight.
Using the same criteria, the location of the shelf is determined and the material for its manufacture is selected.
Types of shelves and possible materials for manufacturing

Hanging shelves are great for things you don't use often.
There are several types of garage shelves:
- Prefabricated. These structures can fully be called shelving, since they can be moved to any place convenient for the owner. They can also be stationary, the frame of which is attached to the wall.
- Suspended, fixed in the ceiling space. They are optimal for storing rarely used items and materials. When designing and manufacturing such structures Special attention pay attention to the strength of fasteners and the ability of materials to withstand significant weight loads. A ceiling shelf that collapses along with heavy objects can not only damage the car, but also cause serious injuries to people and animals in the room.
- Mounted. Structurally they resemble wall cabinets without doors.
- Rotating. Ideal for storing small items and frequently used tools.
- In the form of a flat shield with many pins for hanging small items.
- With solid (monolithic) horizontal surfaces or made of crossbars located at a certain distance from each other.
Materials for production:
- wooden blocks;
- boards;
- sheet metal;
- metal corners;
- round, rectangular or square pipes;
- brackets;
- metal studs.

This design will be very convenient for storing large items.
Also, for the manufacture of shelves and drawers, items suitable for this purpose are used: empty plastic canisters, flower pots and other, durable and light-weight containers.

Corner shelves are highly stable
Metal corner is a reliable material suitable for constructing structures that can withstand significant weight loads. You can make it hard hanging frame

for storing wheels. Moreover, the metal must be painted or coated with an anti-corrosion primer. The rules for storing wheels require that they be installed in a vertical position, and they can be placed at any height, even under the ceiling. If you are planning a multi-tiered corner shelf, bottom part
reserve for the heaviest items
A corner shelf can be made in the form of a stable multi-tiered structure, on which it is convenient to store heavy and large items. To do this, first of all, they determine what exactly will be located here. The most bulky and heaviest things are usually placed on the bottom shelf, so the distance from it to the next upper horizontal surface should be significant.

Design + drawing
Drawing of shelves from a corner Corner shelf - simple design
- , consisting of several elements:
- vertical racks;
- horizontal frame crossbars;
steel or wooden sheets laid on them.
- The design process consists of several stages:
- decide what will be on the shelves;
- find the optimal distance between them;
- choose the number of shelves; determined with others geometric parameters
designs: width and depth of horizontal panels, height of racks.

Advice! The most convenient to use shelves are 40-60 cm deep and 100-120 cm long.
Metal corners are ready to become shelves
- To make shelves you will need the following materials:
- metal corner 20x20x3 mm;
- sheet metal 1.5-2 mm thick (can be replaced with plywood or OSB 9-12 mm thick);
- anchor bolts No. 8;
- bolts M6x30 DIN 933; metal studs with external thread
- M6x40;
- M6 washers;
The listed fastening elements (studs, bolts, nuts and washers) are necessary if a prefabricated metal frame is being installed. The structure can be made in another way - connecting its elements to each other using welding.
To complete the work you will need the following tools:
- drill and metal drills;
- spanners;
- roulette;
- bubble level;
- marker or simple pencil;
- grinder with a disc for metal.
Manufacturing instructions

Now you can force
Step 1. Using a grinder, cut the metal corner into sections equal to the height of the vertical posts. For standard design 4 supports will be required.
Step 2. Markings are made on the wall in the selected location: mark the location of two vertical supports, spaced from each other at a distance equal to the length of the shelves.
Step 3. Prepare the segments metal corner for arranging frames of horizontal shelves.
Step 4. From sheet metal or OSB/plywood is cut directly into the shelves themselves. If the frame dimensions are 30x1200 or 60x1200 mm, fabrics of 288x1188 or 588x1188 mm are prepared, respectively.
Step 5. The frames are assembled using the chosen method: by welding or using bolts with nuts and washers.
Step 6. In accordance with the project, install the upper and lower shelves using welding or bolted connections.
Step 7. Place the structure against the wall in accordance with the previously made markings.
Step 8. Attach the vertical posts to the wall using M8 anchor bolts.
Step 9. Install the frames of the intermediate shelves.
Step 10. Place prepared sheets of metal or wood on the horizontal protrusions of the metal corner.
Important! All metal elements Before starting work, they are coated with an anti-corrosion primer.
Wood shelf

Wood is more environmentally friendly and economical compared to metal
The most common solution for arranging a garage is the installation of wooden shelves. The choice of this option is due to the availability and low price of wood: bars and boards. In order for the structure to be aesthetically attractive and safe to use, all its elements are pre-treated: leveled, sanded, coated with a fire-retardant composition.
Advice! A surface planer is used to calibrate lumber. With its help, you can make all identical structural elements identical in size.
A corner shelf can be made in the form of a stable multi-tiered structure, on which it is convenient to store heavy and large items. To do this, first of all, they determine what exactly will be located here. The most bulky and heaviest things are usually placed on the bottom shelf, so the distance from it to the next upper horizontal surface should be significant.

Drawing of a wooden shelf
Designing a shelf made of wood is no different from a similar process in the manufacture of metal structures. The dimensions of the parts are chosen at your discretion. The most convenient are shelves whose length corresponds to the distance of an outstretched arm. The height can be any, up to the ceiling. The easiest way to design and manufacture a stationary wall structure. It is installed in a corner or on a plane.
Required tools and materials

Before starting work, the tree must be planed
To work with wood you will need:
- drill or screwdriver;
- drill;
- hacksaw or jigsaw;
- sander;
- bubble level;
- construction square;
- ruler and tape measure;
- simple pencil.
Materials for making a simple wall shelf 110 cm long, 30 cm high and 25 cm deep (width):
- planed boards 16 mm thick;
- wood screws;
- dowels for fastening to the wall;
- brackets
- fire-retardant composition.
Advice! If the shelves are made of chipboard, it is advisable to laminate the ends with special adhesive tape. This will prevent moisture from penetrating and swelling of the particle board.
Manufacturing instructions

Surface preparation in full swing
Step 1. Using a jigsaw or hacksaw, prepare two blades for the side walls. Between them there will be two horizontal shelves. The distance between them is equal to the height of the end ones.
Step 2. Prepare canvas for horizontal shelves.
Step 3. Process the parts with a grinder.
Step 4. Cover the workpieces with a fire-retardant composition and allow drying time recommended by the manufacturer.
Step 5. Start assembling the structure and lay the bottom sheet on a flat horizontal surface. Take a ruler and a simple pencil, measure 8 mm on the right and left, draw two parallel lines.
Step 6. On each line from above and below towards the middle of the canvas, measure 5 mm and put marks.
Step 7. Drill 4 holes at the found points.
Step 8. In a similar way, mark the surface of the upper shelf and drill 4 holes in it.
Step 9. Install the left end shelf on the bottom shelf. Connect the parts with self-tapping screws.
Step 10. The right end board is attached in a similar way.
Step 11. Place the top shelf on the resulting structure and attach it through the previously drilled holes.
Step 12. Brackets are attached to the upper part of the back surface of the end boards.
Step 13. Try the shelf against the wall, make markings for the dowels.
Step 14. Drill holes in the wall.
Step 15. Screw in the dowels.
Step 16. Hang the shelf.
Based on the proposed step by step instructions you can make a structure from several shelves, strengthening it with vertically installed bars with a section of 40x50 mm or 50x50 mm. In order to give the shelf stability, it is attached to the wall with anchors or dowels.
Other options
For making shelves, the most suitable different materials. The main requirement for them is strength, the ability to withstand the expected load.. Craftsmen find original and practical solutions for organizing garage space.

Cable racks make very durable shelves
Cable racks, trays, profiles – products necessary for the implementation electrical installation work. From these parts you can assemble a strong and reliable design from several shelves and sections. Also, these products are suitable for constructing a frame on which wooden, glass or plastic shelves are installed.
In assortment auxiliary materials for electrical installation work, a complete set of fastening elements for assembling structures from cable racks. All these products are affordable and sold in the hardware or electrical materials departments of any construction hypermarket and shopping center.
From canisters

Shelf made of canisters - option for originals
A plastic canister is a real find for those who love original solutions for installing storage systems in the garage. Entire racks are built from these containers. Canisters act as drawers, one of the side walls of which is neatly cut off. This way you get a hollow box with a handle.
Installation of such racks is simple. In production, it is recommended to focus on the instructions for installing wooden shelves suggested above. First of all, a multi-sectional frame is constructed from boards, in each opening of which a canister laid on its side is installed. Get comfortable, deep, drawer with a handle.
Attention! Used canisters for solvents, oils, and chemical solutions must be thoroughly rinsed. This will eliminate the odor and eliminate the risk of fire.
How to arrange shelves in the garage

Try to use shelves as much as possible
The installation of simple devices will help to significantly increase the ease of use of storage systems. Thus, horizontal crossbars installed along the shelves will prevent accidental falling and damage to objects, or injury to legs or arms from heavy tools. Often, shelving in garages is overloaded, and when you take out one part, you have to move many others. Horizontal bars will keep objects within a given space.
The owner’s task is to use it as profitably as possible. small area garage, using all available surfaces. For this purpose, corner multi-tier shelves are installed, ideal for storing a variety of small items: containers with screws and self-tapping screws, fasteners.
It is important to place the shelves so that they do not interfere with free passage, and there is no risk of accidentally hitting your head or hands on them. An excellent solution is to install shelves along the perimeter of the walls at a height exceeding the owner’s height by 20-30 cm. On these surfaces you can store everything that is rarely used, but should always be at hand.

Magnetic holder is a real godsend for the garage owner
Another option for arranging shelves is to attach a wooden block with a magnetic holder to the wall. It is convenient to fix any, small in weight and size, hardware: bits, drills, wrenches, screwdrivers. This is very convenient way storage, appreciated by all garage owners who have used this method organization of space.
A high multi-tier shelf can act as a partition for zoning a room. In order to prevent things from falling from the rack located in the passage area, arrange sliding doors like a wardrobe, or install horizontal holding bars.
Video: DIY garage shelves
Without shelves, it is impossible to properly organize the garage space and operate it in the most convenient way. There are many options for arranging storage spaces, and you can always find the one most suitable for your needs. specific situation. Any shelves, metal or wooden, are easy to make with your own hands. Detailed step-by-step instructions will help you with this.
Many men use the garage for more than just parking. Often, tools or old things are stored in the garage that are a pity to throw away, and there is no room for them in the apartment. Also, the building often undergoes repairs or other work that requires tools and bulky materials. Thus, the structure often becomes similar to a warehouse.
Wall or hanging shelves in the garage are a great way to store many things without cluttering the usable space of the room.


Durable and reliable material designed for heavy loads. Metal shelves can withstand heavy weight, they are convenient for storing parts and tools. The metal is also durable and wear-resistant. If the material is covered special composition from corrosion and rust, then structures made from it can last for many decades.

Unlike metal, wood is more affordable. Easy to process and does not require welding. Wooden shelves can also serve for a long time; the only drawback is their low resistance to changes in temperature and humidity conditions.
To improve wear resistance and durability wooden elements shelves, it is necessary to periodically coat the material with special covering paints. This will help the wood avoid rotting, deformation and damage by pests.
Other materials, such as plastic, plywood, stone, are rarely used for making shelves.
Design variations of suspended shelves

Can be open or closed. With or without back wall. Most often, a metal corner and a wooden base are used to make such structures. Suspended on the walls with anchors. The type of fastening can be permanent or dismantled.

These structures are made of metal angle, wooden base, a special cable or a metal round profile fixed to special anchors is used as side walls.
These shelves are hung on special hooks driven or welded into ceiling beams ceilings The advantages of ceiling shelves are quick dismantling if necessary. Disadvantages - rather shaky design, which can sway when touched.
It is not recommended to store expensive tools or fragile items on such shelves.
Shelf in the form of a shield for tools

This design is equipped with small shelves for storing small items and special hanging fittings. The shield consists of a strong back wall, fixed to the wall with anchors. Shelves, special hooks or tool holders are mounted on the wall.
This shelf is very convenient for carpentry and plumbing work. Most often, such a shield is hung in front of the workbench so that everything necessary tools were at hand. Sometimes the shield is equipped with additional lighting in the form of a lamp on a movable leg.

If you want to save money usable area premises, then you can make a hanging shelf with your own hands and attach it to the ceiling.
Materials required for the manufacture of the structure

Tools for work
- Drill with a drill bit for wood. The diameter of the drill must match the diameter of the stud.
- A hammer drill for drilling holes in the ceiling for mounting anchors. The drill should have a little smaller size than the diameter of the anchor.
- Wrenches, their markings must match the size of the nuts used.
- Jigsaw.
- Screwdriver.
- Bubble level.
Work order

Step 1. To begin with, a shelf of the required width and length is cut out of a sheet of plywood or fiberboard.
It is worth knowing that it is recommended to place load-bearing studs at an average load on the material every 60-70 cm. If the shelf is longer, then over time plywood or fiberboard sheet will noticeably bend and sag.

Step 2. To enhance the strength of the material, it can be secured at the ends of the slab metallic profile, equipped with internal stiffeners.

Step 3. Holes for pins are marked along the edges of the shelf. It is worth knowing that it is advisable to drill 5-7 cm from the edges of the slab. If the holes are located too close to the ends, the material may crumble under the weight of the items placed on the shelf.
Step 4. After the holes are drilled, you need to attach the shelf to the ceiling and use a pencil to transfer the location of the holes to the ceiling. This way the structure will be positioned without distortion and you won’t have to worry about the studs becoming deformed.
Holes for anchors are drilled in the ceiling and dust is removed from them. The anchors are driven into the concrete all the way and the nuts are tightened.


Long metal studs connect to anchors placed on the ceiling. The connection is secured using coupling nuts. It is also advisable to secure the connection with an additional regular nut, which is screwed onto the thread of the stud.


Step 5. After the studs are firmly fixed to the ceiling, the period of installation of the shelf begins. A nut is screwed onto the stud, then a washer. After this, a shelf is strung on the ends of the studs.

The shelf is fixed using a Grover washer and a control nut. The washers protect the shelf holes from breaking under loads. The bushing serves as protection against loosening of the fastening nut. You can use two nuts for safety and greater structural strength. The final adjustment of fastening fittings is carried out according to the level.


This hanging shelf will significantly save space in the garage. The only drawback is the mobility of the structure. You can eliminate it using a special metal corner. One edge of the corner is attached to the wall, the second - to the base of the shelf. In this way, the entire suspended structure. Also, a metal corner will strengthen the shelf, which will affect its durability.
DIY tool shelf

In order to have all the small tools at hand during plumbing or carpentry work, you can think over and make a special shield. Shield shelves are not distinguished by their high load-carrying capacity and strength; heavy tools cannot be stored on them, but for small and necessary things that always get lost, this design will be ideal.
It is important to know!
- It is advisable to hang a shelf with a tool on a plastered wall, otherwise condensation will accumulate between the brick or block surface and the wall of the shelf. Constant high humidity will negatively affect the shield material and can cause it to deform or rot.
- Average load per one square meter shield surface should not exceed 14 kg. Weighting the structure will lead to rapid destruction.
- The height of the shield is determined by the height of the garage owner. The top edge of the shelf should not be higher than human height. Otherwise, it will be inconvenient to take tools from the shield.
- If shelves are designed on the shield, it is not advisable to make them closed. This will also make the job more difficult. All small tools and parts must be in the public domain.
How to make a shield with your own hands

Materials and tools

Step 1. First you need to select the dimensions of the shield. Most often, such a shelf is fixed in front of a workbench, behind which a person is engaged in repair work. It is desirable that the width of the shield is not much larger than the dimensions of the workbench.
Step 2. Then a shield is cut out of plywood or other material. Places for small shelves are immediately marked on it.
Step 3. Then, using a jigsaw, the shelves with side walls are cut out. Side walls shelves can be made the same size as the length of the shield. Next, using long self-tapping screws, the shelf structure is assembled and attached to the surface of the shield. A place for storing jars and boxes with nails and other small things is ready.

Step 4. Attaching hooks. To do this, holes are drilled in the shield and dowels are driven into them and special threaded hooks are screwed in. It is advisable to think in advance where and what kind of tool will be located. Based on this, the hooks are drilled.
Lugs or brackets are then attached to the back wall to secure the shelf to the wall. Final stage- mounting the shelf on the wall. Holes are drilled using a hammer drill and anchors are driven into them. If the shelf is fastened “tightly”, then you can strengthen the fixation of the structure using a special washer, which will prevent the eyes from sliding off the anchor.
A simple and convenient shield for tools and parts is ready. If you have all the tools and materials, you can make it in a few hours.
Video - Small shelves on the wall for storing keys and other tools
How to make a shelving unit for a garage and shed
An example of a simple wooden shelving unit for a garage
Drawing of a shelving unit for a garage
Wooden frame, plywood or OSB shelves. Dimensions in inches. Very practical design, any man, and even a business woman, will be able to assemble one.

How to make a shelving unit in the garage
Everything is extremely simple, the main thing is to secure the frame to the wall so that it does not fall.

How to make a shelving for a garage - connecting nodes
The shelving structure is held together with self-tapping screws, just take yellow ones, not black ones!
Video - how to make a shelving unit for the garage
This video shows how to make a simple shelving unit for your garage or shed.

Example of a shelving unit in a garage
You can lay the shelves with plywood, or OSB, or boards, whichever is more convenient for you. Additionally, I recommend getting plastic boxes for storing items, this way you will significantly increase the capacity of your rack.
Boxes can be labeled and everything in them can be stored in sorted form, so as not to waste time searching for the right thing.
Video - how to make a convenient shelving in the garage
A rack with many shelves for equipment will help you organize your space in the garage and put everything in order.
Hanging shelving option for garage

Hanging shelving in the garage
I can also suggest an option for a hanging rack using triangular spacers, or whatever you call them... There may be corners... Everything should be clear in the photo, but I’m giving you an idea, so, men, sorry if I called something wrong!

Supporting element of a hanging rack in a garage
Design wooden corner closer. It is recommended to lay boards on top for strength, or two boards on the sides, and then plywood or OSB board on them. This will also be quite reliable.
This rack design looks lighter and more beautiful due to the lack of racks, but it can also withstand much less weight. And if you plan to load your racks in the garage to the maximum, then do the first option, with racks.
Garage ceiling rack option

Ceiling rack for a cottage or garage
If your garage or shed ceilings are high enough, then you can optimize storage space by additionally installing ceiling shelving. They won’t take up space, but they will significantly increase the usable storage area.
Garage rack made of pipes and chipboard

You will need: pipes (4 pieces, diameter - 25 mm, length - 1100 mm), chipboard, flanges 28 pieces, screwdriver, screws, electric drill, bushings for legs 4 pieces, feather drill diameter 27-30 mm, ruler, compass, pencil, edge tape.
How to make a shelving unit in the garage
1. You will need to cut four shelves measuring 60 x 28 cm from chipboard. You will need to smooth the edges and use an iron to finish them with edge tape.
3. Using a compass, mark the places where the flanges and holes are attached.
4. Screw the flanges on both sides of three shelves, and screw the fourth one from the bottom.
5. Now let's start assembling the rack. Place the top shelf upside down on the floor, insert the pipes into the flanges and tighten the clamps. We put the remaining shelves on the pipes, placing them at a distance convenient for you.
6. Now insert the bushings into the pipes and screw the legs. Insert bushings into the pipes and screw the legs.
Corner shelving idea

The example shows a good option, but it can be done without guides. We're just leftovers OSB boards sawed into triangles and placed on guides screwed into the corner.

Here I found an example of a simple corner shelf for a summer house or garage. You can store shoes and some items. Corners are usually not used, but here it turns out to be a very practical use of space.
Storage rack for long items

A great idea for storing long items is under the ceiling. There is always plenty of space there, and long pipes and slats can be safely stored in this way.
The idea of storing screws, nails and bolts in the garage and shed

All fasteners can be stored in used oil and coolant cans. They are convenient to cut and take by the handle. Additionally, you can label each container to see what exactly is stored in each.
Power tool storage shelf idea

All power tools can be stored on this convenient shelf. Material: plywood.
Idea for a storage rack for shovels, forks and rakes

And this idea is already for the utility unit. This is how you can organize the storage of shovels, rakes and forks with brushes. Convenient and nothing will fall!
Tire storage rack in garage

Like this simple idea rack rack for storing tires in the garage. Everything is clear here even without dimensions. Make the rack a little smaller than your tires and store them vertically without any problems.
Here is another country option for a garage rack

Racks for storing household supplies, tools and other necessary things will be very useful at every dacha, especially since making such a rack with your own hands is not difficult.
Almost any type of dry wood can be used as material for making a rack, but it is better to give preference to pine.
Required parts:
Wooden slats 1200Х40Х30 – 82 pcs.
Slats 400Х40Х30 – 28 pcs.
Slats 200Х40Х30 – 30 pcs.
Wooden stands 30X30 in diameter – 60 pcs.
Flexible APV pins 2.5 sq.m. 3Х1900 in diameter – 2 pcs.; 3Х100 – 2 pcs.; 3Х900 – 2 pcs.
Wooden parts are impregnated with an anti-humidity solution. The slats are connected to each other and to the posts with flexible aluminum pins made of wire in a vinyl chloride braid.
2 transverse slats (400 mm) are laid on the floor, pins are inserted into the holes on them, the length of which corresponds to the height of the room (in our case, 1900). 0.9 pins are installed on the front of these slats, with their ends at the base of the slats bent into a knot.
A longitudinal wooden slats 1.2 m, after which wooden posts are installed on the pins in front of the slats.
In this way, a rack 0.7 m high is assembled, after which it is assembled into two opposite transverse slats 400 m long, having a distance of 180 mm from the end drilled holes, meter-long pins are inserted, the ends of which are tied into a knot to prevent them from falling out. Transverse slats of 200 mm are strung on pins.
To make shelves, longitudinal slats of 1.2 m are installed in the openings of the transverse slats at the required height.
Using this method, you can assemble racks of almost any size and purpose.
Shelf shelving ideas for an attic or attic

And this is already an idea for a rack shelf for an attic or attic. The space under the roof can also be used to store items that will not be in demand for a long time, but which would be a pity to throw away. The main thing is to occasionally audit such warehouses and still get rid of completely unnecessary things.
It just so happens that the garage is not only a home for the “iron horse”, but also for files, clamps, cogs, bolts, self-tapping screws, drills, drills, hammers, axes, grinders, motor oil, technical fluids, old rusty disks and other useful and important things. In addition, the garage is the last refuge for an old bicycle in case grandchildren ride it, an electric kettle that broke last year, a chair from the living room worn out to holes, bedside tables with torn off doors and other furniture left after renovation. Is this a familiar picture? It turns out to be almost a communal apartment. So, in order to safely drive your car without fear of running over screws lying in bulk on the floor, or a jigsaw that fell from the bedside table, you should think about installing shelving for the garage and placing all the useful things on them so that they do not interfere and at the same time were easily accessible.
Have you ever been to a “model” garage where you walk in and realize that you don’t mind staying there? At home, a man can scatter his dirty socks and not know where his things that he wears every day are, but his garage is not a place for chaos. Everything should be in its place there, neatly laid out and, if necessary, even signed, in the area of first accessibility. To rationally accommodate all the inhabitants of the garage, you will have to use the space from floor to ceiling by equipping racks and shelves. How to do this is of interest to any zealous owner.
What types of garage racks are there?
There are several shelving designs that are advisable to install in a garage:
Stationary racks They are a frame of vertical posts and horizontal crossbars onto which shelves are attached. Such racks are designed to withstand maximum weights, so all the pressure of the weight of the loaded racks falls on the floor, the shelves in them are attached what is called “tightly”, and the vertical racks are additionally attached to the wall using brackets. Most often, metal racks are used for the garage, but if you do not plan to store too heavy things, you can also make wooden ones.
Prefabricated - collapsible racks They differ from stationary ones in that the vertical racks in them are made of perforated metal, so that with the help of bolts, nuts and mounting angles, shelves can be mounted on them at any height. This type of shelving option is offered in abundance on the modern market.
Garage shelving: photos - examples


Mobile racks equipped with wheels, so that they can be moved from place to place without first unloading. This design feature imposes certain restrictions on permissible weight. You can purchase such racks ready-made and assemble them yourself as a designer.

for storing small items. A small vertical rack, somewhat reminiscent of a CD rack, can be used for self-tapping screws, bolts, nails and for small hand tools, keys, screwdrivers, etc. By rotating the rack around its axis, you will have access to any tool, you won’t have to search for or get it for a long time, shifting the unnecessary one into this moment trash.

Wall shelves hardly relate to the classical understanding of the word “rack”, but for rational use space in the garage they are irreplaceable. All unnecessary or infrequently useful things can be stored on shelves along the entire garage under the ceiling, above the level of the car, at a height that would not interfere with the free passage and maintenance of the car. Wall-mounted shelves are attached to the wall using special fasteners. The weight that such shelves can support is much less than that of a stationary rack. But if you plan to store only light parts and tools, then sometimes the entire rack along the wall from the floor to the ceiling of the garage is made hinged.

When choosing which garage rack to choose, you need to focus on the amount and weight of the cargo you are going to fill it with, as well as the amount of free space that can be used for storage.
How to make a shelving unit in the garage
Like any important undertaking, making storage for “useful things” begins with a project. First of all, we look around the garage, take a master’s glance at all its contents and figure out what size rack we need. We measure the free space. The ideal solution will free up completely or almost completely one wall of the garage and leave it under the shelving. The height of the shelves depends on the dimensions of the cargo that is planned to be stored. For example, the bottom shelf of the rack is always made high so that it can accommodate rubber, canisters, and more.
We calculate how many shelves we need and what depth. We stock up on dimensions and draw a sketch on paper. Most often, the following racks are made for a garage:
Length shelving along the entire length of the wall minus 5 - 10 cm for ease of installation.
Height shelving from floor to ceiling.
Shelf width(the distance from one vertical support to another) depends on the weight of the load and should be no more than 1.5 m. The most common option is 1 m.
Shelf depths 50 - 60 cm is enough to store most tools and things. A large depth is impractical, since it is inconvenient to get from the depth, but racks with a shallower depth of 30 - 40 cm are suitable for hand tools and fasteners.
Shelf height made from 25 cm to 60 cm between higher shelves and about 80 - 100 cm - the lower shelf for storing large items.

When the sketch with the required dimensions is ready, it’s time to think about how to bring this idea to life.
Prefabricated shelving for the garage - a minimum of hassle
The easiest way to get a shelving unit is, of course, to buy one. Gone are the days when everything was in short supply, you had to dodge and make from what came to hand. Modern market ready to provide racks for every taste and color. Moreover, the latter in literally. Ready-made prefabricated racks are made in different color solutions, which can fit into any interior, for example, imitation wood.
Prefabricated racks are made of galvanized metal coated with paint or polymer coating. The shelves are also made of galvanized sheet metal. Perforated racks allow you to install shelves at any height. An undeniable advantage metal shelving is their resistance to corrosion, influence high humidity, mold, and complete fire safety. After all, barrels and cans of fuel and lubricants are stored in the garage.
The designs of some types of shelving allow the use of another type of shelves: wooden, chipboard or plywood. For prefabricated garage shelving, the price depends on its load capacity and width. Most often they are made in the following sizes: width 900, 1500 and 1800 mm.

After purchasing such a rack, you only have to assemble it into single design, for which you will need pliers and a screwdriver. All elements of the rack are assembled like a Lego set, and fastening elements: angles for fastening, bolts and nuts are included in the kit.
Important! It is more convenient to assemble the finished rack in horizontal position, and then raise.
First, we assemble the vertical posts, and then attach the shelves to them at the required distance. Please note that, despite the fact that it is more convenient to store large items directly on the floor, for greater stability of the structure, a shelf must be attached at the bottom of the rack; it will serve as a spacer for the vertical racks.
Rack made of metal frame with wooden shelves
If ready-made options You are not satisfied with the shelving for one reason or another, and you want to make shelving for the garage with your own hands, then it makes sense to immediately make it “forever”, i.e. use the most durable materials, capable of withstanding enormous weights.

For vertical racks, you can use a metal corner with a shelf from 30 to 50 mm or a rectangular profile (it is easier to work with) with larger side 40 - 50 mm.
To attach the shelves, you should make a frame from a metal corner with a shelf of 15 - 25 mm. The frame for the shelves can be attached to the vertical posts by welding, or you can drill holes and tighten them with bolts. The second method, although it has a dubious advantage: it will be possible to change the height of the shelves, but it is more labor-intensive. If the farm has welding machine and an inverter, it’s better to weld the rack.
The shelves themselves can be made from wooden boards from 15 to 25 mm thick (the thicker, the stronger). But you can also use chipboard, laminated or regular plywood. Wooden shelves will need to be painted or even pre-oiled to protect them from fungus and moisture.

- First of all, stock up on everything you need building material, according to the drawn drawing.
- We cut metal for required sizes using a grinder (trimming can also be done at a metal depot, but this service is paid there).
- We mark the vertical posts and mark where to attach the shelves.
- We weld pieces of the corner, which serves as a frame for the shelves, to the vertical posts. We make sure to check the horizontal position so that our tools don’t fall off the shelves later.

- When the entire metal frame is ready, it must be primed and painted to protect it from corrosion.
- Next we cut the wooden shelves. They can be placed either along the frame or across it. But the second option is more stable, so the shelves will sag less.
- We try on the shelves to the frame, if everything fits, there is no need to file anywhere, then before fixing them, we first treat them with impregnation or paint.
- After the shelves have dried, we screw them to the frame with self-tapping screws, fitting them tightly to each other.
That's it - the rack can be loaded. For greater stability, you can attach it to the vertical posts with brackets to the wall.

Wooden shelving is made only if you want to save on metal; after all, wood is cheaper. Then, for vertical racks, a beam of at least 100 mm thick is used (if the rack is from floor to ceiling), and for shelves, a 15 - 25 mm board, plywood or chipboard is used.
A wooden rack is a durable structure, but its load capacity is much less than a metal one, and the fire hazard is also high. It can be used to store small tools and materials.
To secure shelves to wooden frame metal mounting angles are used (the same as in prefabricated structures) and M5 bolts 60 mm long.
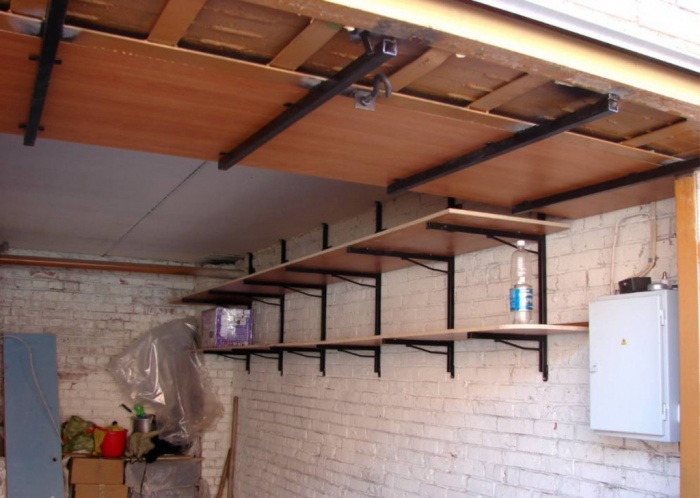
How to make a hanging shelf under the garage ceiling
For fastening wall shelves special brackets are used, which can have completely different designs. Our task is to select those that are capable of maximally compensating for the pressure of the load and distributing it over the surface of the wall (along the bracket) so as not to concentrate it at one point.

We measure and draw a strictly horizontal line on the wall, along which we will attach the brackets. It is best to secure it with anchors rather than self-tapping screws, it is more reliable. After all the fasteners are installed, you can lay a shelf on them - wooden or plywood. We attach it to the brackets with self-tapping screws.
For greater structural strength, you can first attach 15x15 mm corners to the brackets, and then on top wooden shelf. Such a trick will only affect the fact that the shelf will not sag under the weight of the load.
A rack is an essential attribute of a garage if a car owner likes to do things with his own hands and repair his car. When installing a rack, it is important to install it on flat surface, i.e. it is desirable that the floor has high-quality cement-sand screed. Before installing a stationary rack, it is better to plaster the walls.