There are several easy techniques for making stained glass at home.
Real stained glass is not cheap, and they are made experienced craftsmen. There are several simple methods for making stained glass at home. A window opening or door with stained glass will add an authentic touch to the room. Stained glass windows look expensive and, finally, they are simply beautiful.
There are several easy techniques for making stained glass at home. They will not require unusual skills or large financial outlays from you. A pencil sketch of the stained glass window you like is applied to whatman paper or tracing paper. This will probably be: silhouettes of animals, geometric pattern, exotic birds or floral ornament. Fragments of the sketch are marked with the desired color tone.
Types of technologies for making stained glass
Stained glass can be used in the decoration of a wide variety of interior items. Glass can be inserted into window frames, doors, decorate ceilings, use as a partition screen or apron in the kitchen. Sometimes mirrors are decorated with stained glass frames.
To create a stained glass window, you will need a palette of translucent and three-dimensional paints, markers for marking and sketches of the design on tracing paper. After completion of the work, the self-leveling stained glass window can be secured with transparent varnish. After heat treatment, the stained glass window becomes moisture resistant.
Tiffany stained glass is a little more difficult to make. The materials you will need are a set of colored glass and stained glass foil. If you have skills in cutting glass and working with a soldering iron, then making a Tiffany stained glass window will not be difficult.
Film stained glass is the easiest to make. Multi-colored translucent self-adhesive film is cut out according to sketches and glued to the glass. Work can be carried out even vertical plane without removing the glass. Selection of colored self-adhesive films in construction stores very big.
The work of making any type of stained glass cannot be rushed and requires attention and scrupulousness.
Manufacturing of stained glass windows
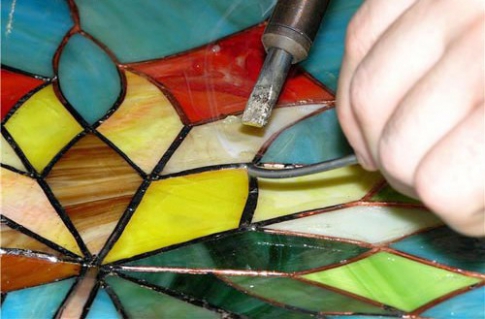
On horizontal set table A sketch of the stained glass design on a scale of 1:1 is placed. Cleaned from dirt and degreased glass is placed on top of the sketch. Relief paint is applied along the contour lines of the design. Tubes of this paint are equipped with nozzles different diameters, and in color scheme there are tones similar to the colors of metals. Relief paint it is applied along the contour in uniform rolls, and after drying it forms a side 3–4 mm high.
The contour edging can be made from a special stained glass tape. This is a lead strip on a self-adhesive base in metallized colors. The ribbon can be a natural lead color or imitating copper, bronze, gold plated, etc. The width of the ribbon has different sizes.
Sometimes the edging is made of aluminum wire 2 mm thick. The wire is flattened with a hammer, bent along the contour pattern of the sketch, coated with thick PVA glue and pressed tightly against the glass.
Acrylic paints diluted with water are used for stained glass designs, or colored varnish is prepared. For colored varnish, a little transparent nitro varnish is taken into clean plastic jars and diluted with solvent to a liquid consistency. Add a little oil artistic paint and stirs. Colored varnish is poured into the free openings of the stained glass pattern according to the marked markings and left to dry in horizontal position. The tone and thickness of the layer of colored varnish is selected depending on the desired light transmission of the stained glass.
Aniline or acrylic paints diluted with water with the addition of PVA emulsion. The paint is applied in strokes, from the outline of the fragment to the middle. After the first layer has dried and the color saturation has been adjusted, the stained glass fragments are finally filled.
The stained glass window is coated with transparent varnish, and when installed in the frame, a rubber seal is used.
Technology for stained glass "Tiffany"
Two sketches of a stained glass drawing are being prepared. The fragments on them are numbered and color coded. One of the sketches is cut along the contour lines into fragments. The cut out elements will serve as a template for cutting colored glass.
Technical supply stores or art stores sell sets of colored glass for Tiffany stained glass windows. They have different thickness, texture and color density. It is advisable to purchase glass uniform quality and always the same thickness. Edging copper foil - folia - is also purchased there. Folia - a strip of copper foil with a one-sided adhesive surface. Depending on the type of patina chosen, black or copper foil is purchased.
Fragments of a stained glass sketch cut out of paper are glued onto colored glass. The elements of the design are cut out using them using a glass cutter. By using grinder the part is adjusted to size and chamfered. Glass elements are degreased and blotted dry with a napkin. Each piece is wrapped in foil.
A second whole sketch of the stained glass window is placed on a sheet of thick plywood. Elements of stained glass are laid out on it, starting from the corner. Along the outer perimeter, the stained glass window is fixed with strips or baguette slats. The laid out several elements are nailed and soldered.
The seams are treated with flux, and tin solder is evenly distributed over them with a hot soldering iron. Wood slats along the perimeter are removed and the stained glass window is edged with a U-shaped frame profile. The contact points of the profile and seams are secured by soldering for strength.
A fully soldered Tiffany stained glass window reveals a patina at the seams. The patina solution is applied with a sponge. Stained glass is cleaned with glass cleaner and installed in the frame.
The simplest film stained glass windows
To make stained glass from self-adhesive film you will need:
- a set of translucent multi-colored adhesive film;
- lead stained glass tape;
- scissors;
- stationery knife;
- sketch;
- marker.
Work can be done even with the glass in a vertical position. Dirt is removed from the glass and wiped with a degreasing solvent. According to the film pattern different color fragments of stained glass are cut out. A sketch of a stained glass window is glued to the opposite side of the glass using double-sided tape.
Along the lines visible through the glass, a relief rim made of lead flexible tape is glued. The joints of the contour side can be soldered. Colored pieces of film are glued into the free openings. The film is applied in the central part of the fragment and smoothed to the edges of the contour. Excess film is trimmed with a sharp stationery knife. The air sinuses that appear when gluing the film are pierced with a needle and smoothed out with your fingers.
Conclusion
Home-made stained glass is difficult to distinguish from factory-made glass. Be careful and patient when working. It is recommended to place stained glass for windows on the south side of the house. In this case, they look more beautiful in the light and “steal” little sunlight. published
Stained glass is special kind decor that allows you to visually enrich and effectively highlight any interior. But this is not only the merit of stained glass art, but also the entire process of reproduction. Making stained glass is a very painstaking job that will take a lot of time and effort. Without skill, it is unlikely that you will be able to create any masterpiece, which is why masters of their craft are valued very highly. But today's trend is that people are trying to create their own beautiful decoration their premises, so they are interested in a completely reasonable question: is it possible to learn this art, and how to make stained glass with your own hands?
If a person is talented in anything, then he is talented in everything. If you have a great desire to learn this skill and you have all the data for this, then nothing is impossible. First, let's figure out what types of stained glass there are.
The definition of stained glass includes several techniques, the execution of which is very different from each other. We will list the most popular options, many of which will enchant you with their beauty and uniqueness.
So, what stained glass windows are very popular:
- Film stained glass . This is the most a budget option design, but also the most modern. Only with this technique is it possible to create pseudo-stained glass windows, the principle of which is based on tinting the glass surface with special films. Among the advantages of this method is the use of solid glass. In addition to convenience during work, it is also safe, which is why craftsmen often resort to this technology. Stained glass in this design weighs very little, and its surface is perfectly flat. Despite this, it is very difficult to classify this technology as stained glass, since it is more like applique, only instead of paper, a special lavsan film is used.
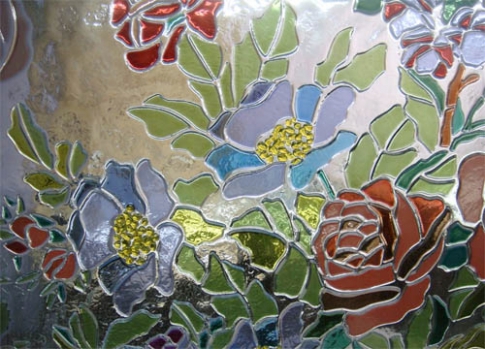
- Glass mosaic
. Stained glass windows using this technique look very impressive, and the work itself is not difficult. First you need to prepare colored fragments of tempered glass and lay them down to form the intended pattern. This image is very voluminous, so it is usually used to decorate ceilings and windows.

- Stained glass windows in fusing style.
Making such decor requires special conditions, since you will have to use ovens. First, you need to make a sketch of the drawing, then lay out colored glass fragments along it, and send the entire composition to a special oven for baking.

- Stained glass using Tiffany technology
. This decor is called classic. To understand how this is done, you need to watch master classes by craftswomen. First they form small fragments of glass, the desired shape and colors, fastening all parts of the composition with copper foil.

- Etched stained glass.
Decor of this class can only be made by a specialist who has not only the materials for this, but also the relevant experience and knowledge. Using an aggressive acid, it is necessary to apply the contours of the design onto the glass. This will allow us to draw the boundaries of the future creation. And then it’s a matter of technology.

- Pseudo-stained glass or painted decor.
It is considered the easiest to perform. All you need for work is to purchase special paints for painting glass, which can be found in every store. There you can also see stencils that will help you create a masterpiece.

- Faceted stained glass windows
. These decorative elements are used by craftsmen if it is extremely important to emphasize architectural features interior, playing on the refraction of artificial and natural light. This technology helps create the illusion of glass decoration precious stones, which emphasizes the style and wealth of the home owner.

- Filled stained glass windows
. The technology of such decoration is based on manual way playback Of course, it is very difficult to do this without artistic talent, so many turn to specialists. Initially, you need to create a polymer contour that will look like a metal broach. After it dries, the design can be filled with paint or stained glass varnish.

Advantages and disadvantages
Like other decorative elements, stained glass can have advantages and disadvantages.
The advantages of stained glass decor include:
- Ideal harmony with any interior style, be it hi-tech or baroque.
- Refraction of light, which makes them softer and more enveloping. Thanks to this quality, the interior achieves an atmosphere of comfort and warmth.
- Does not depend on the size of the room. The good thing about stained glass is that they can be used in all rooms, regardless of their size.
- Stained glass decor is already an excellent interior decoration, so there is no need to clutter the room with unnecessary objects.
Stained glass does not have a negative side, well, at least designers never mention these disadvantages. But from a financial point of view, a real work of art is very expensive, so not everyone can afford it. Therefore, this, of course, is a minus.
Practicality or expediency?
Most people who decide to decorate their interior with stained glass elements ask the same question: how practical is this product and whether it is advisable to install it in their home. You can find the answer to this question by listening to several designers whose advice relates to the use of stained glass at home:
- firstly, you should not use stained glass art to decorate the floor, but this is more relevant spacious premises, because you can easily decorate the bathtub in this way;
- Secondly, household items interior, such as lamps or tabletops, will be purchased additional functions and will not lose their relevance, so this is a big plus;
- thirdly, if stained glass windows are used to decorate the ceiling or niches, then you will effectively transform your room, giving it a touch of sophistication and pretentiousness.
The sophistication of your room may suffer if you overload it with elements of this decor, so designers recommend using them as accents in the room.
Making stained glass with your own hands - the beginning
For this work, it is not enough to have theoretical knowledge; at a minimum, you also need a great desire to learn a new thing. If you are interested in this activity, the first thing you need to do is develop a sketch of the future drawing. To do this, several requirements must be met:
- All drawings and sketches must be drawn in full height. To do this, take a sheet of paper and cardboard of the appropriate size;
- draw the outlines of the future drawing on paper so that you can see the division of the image into separate zones;
- on a sheet of cardboard, indicate the color and material that will be used in the work;
- if this is a type-setting stained glass window, then you will also have to indicate the direction of the glass fibers and number the parts.
In theory this may look very difficult. But with a little practice, you will gain enough experience and will be able to create a truly enchanting design on your mirror or window.
Externally, the drawing on paper looks like a coloring book for kids, only in each zone there is a number indicating a certain color or texture of the material. In addition to numbers, there may be arrows or other symbols that should help put the picture together and make your work process as easy as possible. Over time, your drawings will become more and more complex, which will speak about your mastery and acquired skills, only then can you say with confidence that this is your favorite activity.
Modern technologies can significantly save time on developing sketches and drawings. You can purchase a stencil or download it from the Internet. Your only concern will be transferring the design onto the glass.
Manufacturing technology
In order to make stained glass with your own hands, you need to decide on its technology. But first, find a place to place it where it will be used: on a window, ceiling, lamp or glass picture. Each specific case will have its own implementation nuances, so it is very important to decide on this at the initial stage.
Outside the workshops, at home, you can make three types of stained glass windows that do not require special conditions. This decor includes:
- Tiffany stained glass;
- film stained glass;
- stained glass window
Unlike fusing, you do not need complex equipment and furnaces, and the workshop can be replaced an ordinary apartment, you won’t be diluting chemicals and abrasives there. But let’s not get too far ahead of ourselves, first let’s look at how to make a Tiffany stained glass window. Experts say that Tiffany combined several design methods that imitate all classical techniques.
Making stained glass Tiffany
For such decoration, it is necessary to create a sketch, according to which templates of the necessary cardboard parts should be prepared. Their contours need to be transferred to the glass and the parts cut out using a glass cutter. This is followed by a grinding step to ensure that the edges of the parts are not jagged. Copper foil must be placed around the perimeter of each element, securing it. After this, you can begin to connect the whole picture, tightly comparing each individual element, assembling a kind of mosaic. The extreme elements must be fixed with small nails, and the joints of the foil should be treated with flux, soldered on one and the other side of the product, and installed in a prepared frame, from metal profile. Solder is used to fix the stained glass to the frame. 
Each stage of manufacturing such a stained glass window has its own nuances:
- when developing sketches, avoid sharp-angled and S-shaped figures; it is better if they are smooth lines with beautiful gentle curves;
- Experienced experts recommend purchasing not solid glass as the main material, but broken glass, at least until you gain sufficient experience in making stained glass and cutting glass;
- for cutting take diamond glass cutter, and practice using cheaper material to handle them, this will save you from major expenses;
- The production of stained glass elements and the formation of the pattern must be carried out simultaneously, performing the work step by step. This is the only way you can accurately select all the parts and move them as closely as possible to each other;
If you use a backlit surface to assemble the drawing, it will be much easier for you to do this work.
- To solder parts, you need to take a 100-watt soldering iron, the tip of which will be nickel-plated. And as solder you should use low-melting tin without rosin;
- When soldering glass elements, avoid large plots grip to prevent the glass from cracking, then you will have to make the same element again.
You can see this in more detail in the video below:
Production of film stained glass
To make film stained glass, you will need less effort, since the technology itself is very simple: 
- First you need to clean the glass and place a pre-drawn sketch under it. Lead tape should be used to lay out the contours, and its ends should be secured with subsequent sections. When the entire design has been applied, it needs to be rolled with a roller.
- Now you need to turn the glass over. Wipe and prepare film elements along the outlined contours, gluing them to the back side. After this you should take special roller for the film, and roll the surface again.
- The joints of the film must be glued with lead tape, exactly repeating the contours on the other side and rolled again with a roller.
- The finished stained glass should be wiped with any detergent.
If it seems to you that such a stained glass window has an unfinished look, you can decorate it with various glass elements by placing them on glue.
Manufacturing of jellied decor
For poured stained glass you need to prepare a polymer contour, acrylic lacquer or special paint for stained glass. 
The work consists of several stages:
- First you need to prepare a sketch, which should then be placed under glass. Alternatively, you can transfer the drawing with a disappearing marker; there are no strict instructions on this matter.
- The working surface of the glass should be cleaned and degreased.
- According to the applied drawing, draw the boundaries of the sketch with a polymer contour, forming closed areas.
- When the outline is dry, you can begin to fill in these areas by filling them with paint or varnish.
You can watch this in more detail in the video:
The application of paint or varnish must be done very carefully so as not to touch the outline of the design. You cannot smear the paint on the glass; it must spread itself over its surface to create a stained glass window that plays with light.
In conclusion, we can say that stained glass, undeservedly forgotten a few years ago, is becoming in demand in our time. They not only decorate and revive our interiors, but also make them more comfortable and impressive. The great advantage of this decor is the ability to use several techniques at home, without resorting to complex equipment, which allows a person to admire a corner of luxury at home.
HideTo achieve originality in the interior, you can use an idea such as the use of stained glass. To do this, it is not at all necessary to hire a craftsman or purchase expensive finished products. It is quite possible to create a stained glass window with your own hands at home, with some effort and studying the proposed material.
Methods for making stained glass
First of all, you need to decide which images will receive your . To do this, you need to come up with a sketch or find a ready-made one. To do this you will need:
- Paper or cardboard, the same size as the stained glass window.
- A drawing with clear contours and elements.
- Mark with numbers the fragments of the drawing to be painted in the corresponding color.
- If typesetting is enabled, you can specify the direction of the grain.
Externally, the blank resembles a numbered children's coloring book.
Drawing skills are not necessary: just print a suitable basic stencil. A disappearing marker will be needed to transfer the image onto the glass.
Using thumbnails
Requires a sketch that includes small elements. Small drawings It's easy enough to print, large images will require hand drawing and transferring to glass. You can make a photocopy of the drawing for templates. The main stencil is made using the original, transferring it to the glass. You will need to purchase template scissors: they differ from regular scissors in the presence of a third blade. This will allow you to cut a strip 1.76mm wide.
A copy of the sketch must be glued to thick cardboard of at least 0.5 mm; a box will do. This is necessary for tracing contours. They must be tough. The paper must be glued evenly over the plane, avoiding it getting wet. It is worth numbering the parts of the sketch in advance.
Step by step work
Wondering how to make it yourself at home , it is necessary to develop a work plan. You need to start with simple actions, gradually moving on to more complex ones.
It’s the easiest thing to do with your own hands at home, and that’s where you should start. For this purpose, it is necessary to transfer the image onto a glass base. Curbs are simulated. You can use self-adhesive film. The surface for gluing must be well degreased. If bubbles appear on the film, they can be pierced with a sewing needle.
This method is simple and cheap, but upon careful examination it will be noticeable that the stained glass window is not real. It has no view from the street side. Do-it-yourself film stained glass windows are most often made for ceilings, since they do not have a back side and are located far enough from the eyes. For the ceiling, this type of stained glass is also good because it is light in weight and completely safe in case of collapse. Can be used for ceiling acrylic base, glass should be avoided.

Contour stained glass windows and glass painting
Imitation lead binding
The original stained glass windows have a metal binding. The imitation should repeat it too, so that its appearance is more realistic. There are several ways to simulate this element:
- Gluing borders with special tape. You can buy one at an artist's salon. The tape will help shape the contours. The tape is 1/8″ wide and is designed like regular tape, only it is colored to match. It is very easy to work with this material.
- This method illustrates how to make stained glass windows with your own hands using imitation binding using wire. You will need aluminum or copper wire and porcelain glue, you need to find dish glue. Superglue is not suitable as it leaves a lot of marks. You can use any wire with a thickness from 0.02 to 2.5 mm, depending on the size of your work: it is carefully glued to the seams, then covered with patina.
- You can make the plate yourself. To do this you will need:
- PVA glue for porcelain 50 ml.
- Mascara 30 ml.
- Aluminum powder 40 gr.
All these components must be mixed until smooth. If you want to achieve the color of brass, you need to use bronze powder instead of aluminum. Before dyeing the product, check what color you have obtained. Please note that the paste is not suitable for storage; it must be cooked as needed and stirred constantly. The mixture must be applied using a brush or a small syringe. This requires skill.

Imitation lead binding
Types of stained glass
Making stained glass at home X allows you to show your imagination and use different technologies, not limited to one recipe.
Fusing is a rather complex technology for making stained glass . It requires the use of solid glass onto which elements are applied different shades. The fragments have clearly defined boundaries; there is no dividing metal strip between them. The finished fabric requires calcination in an oven. The outline of the drawing can be varied depending on the author’s idea. This technique is available for production, and it is unlikely to be repeated at home.
- these are also stained glass windows, but consisting of separate parts, which are held together by soldering with metal strips. This style is distinguished by its intricate shapes. It has a complex design and bright, varied colors. Most often, this technology is used to make various items, for example, lamps, lamps, and toy houses.
This technology for making stained glass with your own hands can have a number of problems:

Film stained glass
Making it on glass yourself is quite difficult, so a very affordable technology is gluing a special film onto the glass. For this you will need:
- Self-adhesive film in various colors.
- Lead based tape.
- Rubber roller.
- Glass.
- Paper knife.
This technique is safe, a teenager can master it, so you can invite him to make such stained glass with his own hands.
To create a picture, you will need to transfer the outline of the picture onto the prepared glass using film. First, a template is created. It can be drawn or printed, then it is applied to the glass using a marker, the outlines are covered with lead tape, the colored film is cut out and glued to the glass. After this, the lead film is applied again. To secure the elements, a rubber roller is passed over them.

Production of film stained glass
Stained glass paints
The paints will help solve the problem of how to make stained glass on glass with your own hands, without using complex technology, while achieving realism. The outline of the drawing is applied to ordinary glass using special paints; You can do this work with your children.
It is worth considering that the paint takes quite a long time to dry. It will take about a day to dry completely.

Stained glass paints and contours
Sketch development
Making stained glass with your own hands should not start immediately with windows or doors. It’s worth trying on an old piece of glass, a decorative vase, or a glass. The paints offered for this work differ: there are fired and unfired types. The first require heating the product in an oven, which is not very convenient if, for example, you are painting a plastic window.
After firing, the paint will become dull and lose its brightness.
Unfired paints do not lose their brightness and do not require heat treatment, but are difficult to wash. They are afraid of aggressive detergents. A window decorated with them will need to be washed very carefully. If you are just trying to create stained glass windows with your own hands , don't skimp on paint. Buy products from high-quality imported manufacturers. Such materials have optimal density and are often equipped with dispensers. They don't flow or smear.
Contours for stained glass can also be purchased separately. They are sold in tubes, making them convenient to apply. You should not immediately purchase a black outline: it is difficult to work with. For a beginner, silver or white will work well. You won’t be able to achieve the required width without experience – you will need to practice. Excess material must be wiped off with a damp sponge immediately, otherwise it will dry out.

For training, you can use any glass or mirror. First you need to clean its surface from dirt, degrease it: this can be done with alcohol or a special solvent. Before making stained glass , think about the sketch. If you created a drawing, it is better to make several photocopies, ready-made option can be printed on a printer. If you started your practice by creating a lamp, roll up the sheet, insert it inside the glass and attach it with tape. After this, the drawing can be outlined on the glass with a marker. It is better to take a erasable marker. After this, you can use the stained glass outline. Gently apply it to the surface and let the paint dry.
Before use, gently shake the paint tube. There is no need to shake it. otherwise, bubbles will appear in the paint. The paint is applied in a thick layer; you need to paint over each element of the design. After this, let the paint dry completely. In order to protect the colored layer, you can use acrylic varnish or heat the glass in an oven. The second option is used exclusively for heat-resistant glass.
Are you thinking of installing stained glass windows? Read our material and how much it will cost.
Find out what the advantages and disadvantages of classic stained glass windows are, read consumer reviews and find out prices in our article
Glass should not be used. You can get by with safe film. Take the file and insert a sheet with the desired image into it. Show your child how to make stained glass. To do this, you need to outline the drawing with a marker and paint it with previously made paints. After the paint has dried, the film needs to be cut out and glued to the glass. Let your child come up with a drawing on his own. Many children enjoy being creative, drawing and making stained glass windows.
Conclusion: create original decoration you can decorate the interior yourself, and you will get a lot of positive emotions, you can do creative process together with the family.
The oldest example of stained glass art that has survived to this day dates back to the 7th century BC. No matter how strange it may sound, the process of creating colored glass is so simple that even children can learn how to create stained glass with their own hands.
Stained glass styles
Behind for a long time Since the existence of this type of creativity, the technology for creating glass drawings with your own hands has significantly improved. New types and technological features have appeared.
Having studied all the techniques, you will be able to choose the one you need, each time planning new interesting stained glass windows.
Classic way
The classic technology of creating stained glass with your own hands has survived to this day. The master draws sketches on the main glass, cuts them out, and using these blanks prepares the details of the future composition from colored glass. The particles are inserted into a pre-prepared forged frame.
After installation of colored glass is completed, the iron partition is sealed for greater strength. Ready product is a beautiful picture of large geometric elements with a clearly defined metal outline.
In ancient times, wide openings of buildings were decorated in this way. Stained glass was especially often used to decorate windows in Christian and Muslim churches - the ideas for the designs were taken from biblical and Koranic motifs.
The beauty of the classic method is that it allows you to connect large-sized parts with your own hands. Unfortunately, the design turns out to be quite bulky and heavy, so it is not recommended to use it to decorate the ceiling. In addition, rough metal does not make it possible to create a pattern from small curved parts.
Tiffany stained glass
The improved technology was developed by the founder of the Tiffany jewelry company, Louis Tiffany, at the turn of the 19th and 20th centuries.
He proposed a fairly simple solution, thanks to which the stained glass windows began to look different. Instead of using lead rods, Louis began wrapping glass parts with thin strips of copper with his own hands. As a rule, the strip protrudes slightly above the plane of the part.

After drawing up the drawing, the parts are treated with flux to prevent rust and are soldered together. Projecting edge copper tape leveled over the surface of the glass, creating additional protection against parts falling out of the frame.
Thanks to Tiffany's technique, stained glass windows turned into real works of art! Thin filigree patterns consisting of small particles allow you to achieve a smoother color transition and a more natural image.
Tiffany stained glass can be used to create almost any product due to its lightness and beauty.
Fusing glass
The amazing fusing technique allows you to create the most various products- from glass inserts in doors and furniture to painted dishes. But this method is too labor-intensive to make large stained glass windows with your own hands.
The peculiarity of the technique is that colored elements are laid out on top of the main transparent glass. The workpiece is sent to the oven, where under the influence high temperature the parts are fused into each other. This way you get colored glass without an iron partition.
Another disadvantage of fusing is that it is difficult to find a kiln in which large products can be placed.
Pseudo-stained glass
Modern technologies have given people the opportunity to create stained glass windows with their own hands without learning the labor-intensive process of forging, metal working and glass cutting.
All you need is a piece of clear glass certain size and a special film with colored patterns that transmits light. There are several types of film:
- self-adhesive - a sticky layer is applied to one side of the material;
- a film that must be attached to the glass using a special colorless glue.
Film stained glass windows help save on interior decoration, while maintaining an interesting appearance glass

In addition to the film method, the use of special stained glass paints. Transparent gel-like mixtures are applied to the workpiece in the form of a specific pattern. After they harden, the glass takes on the appearance of a transparent stained glass product.
This technology is so simple that Lately Children's creativity kits began to appear, allowing you to create painted stained glass windows with your own hands.
Tiffany stained glass: master class
Tiffany stained glass is very easy to create even at home. Prepare colored glass shards, a glass cutting knife, thin copper foil, a soldering iron, grinding machine, flux, soldering tin.
- Create a blank sketch - the more T-shaped connecting lines in the drawing, the tighter the stained glass parts will hold.

- Print 2 copies of the sketch in full size. Number the parts on each sketch and cut one of them along the joint lines.
- The second whole sketch is covered with tape and inserted into a wooden working frame.

After working on the sketch, you can begin preparing the parts.
- Attach the cut out parts of the first sketch to the fragments of a certain color.
- Take the glass cutter and start cutting out the colored element, holding the tool at an angle of 45 degrees relative to the surface. Try to cut the part in one continuous line, maintaining constant pressure, otherwise you may end up with chips and cracks.

- After the glass cutter, microcracks formed in the glass. With just a tap, you can separate your piece.
- Use a sander to smooth and roughen the edges of the glass before the next steps.
- Now wrap the piece with copper wire. Use foil, a special thin, long copper material with one adhesive side.
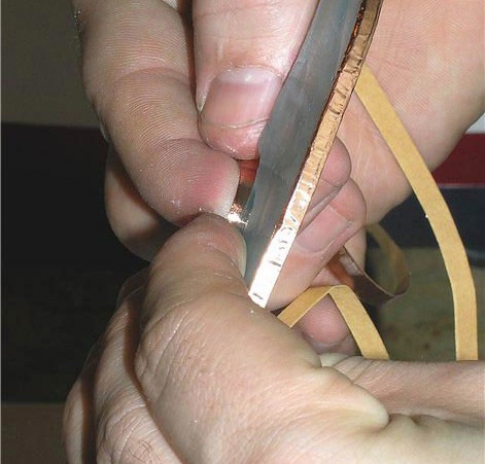
- Fold and smooth the protruding edges of the foil onto the product.

- Install the finished element in the overall picture using nails driven around it.

- When all the parts are in place, remove the nails and flux the gaps between them.

The preparatory stage is completed - you can start soldering!
- Place the tip of the tin wire over the joint and heat it on top with a soldering iron. In this way, gradually process all the seams with your own hands. Don't keep the soldering iron in one place for too long - you can overheat the foil and glass, as well as melt too much tin.
- After soldering the pattern is complete, remove the wooden frame and bring the iron blanks to the sides of the painting.
- Using tin, solder them to the image where they touch the seams.
Leave the product to cool in a dry, ventilated area for an hour or two. When it reaches room temperature, rinse the painting thoroughly with a sponge, water and non-greasy detergents.

Now your creation can be hung on the wall or placed on a shelf.
Filled stained glass: master class
Try making stained glass windows with your child - your child will surely enjoy the process of non-standard drawing. The main thing is to follow safety rules: after all, your main material- glass - can cause injuries and cuts.
Prepare stained glass paints - they are easy to find in large office supply stores - and a small square piece of glass. Pre-insert it into a frame with rounded corners to protect the child from sharp edges.
Using dark paint, draw thin sketch lines on the glass with your own hands. The most commonly used color is black. You have formed defined hollow areas. Near the black color, but not on it, drop a few drops of the colored shade - it should spread on its own throughout the cell.

You can create beautiful stained glass windows with your own hands to decorate a candlestick by watching the following video.
Using this technique you can decorate a glass photo frame, a cabinet door or a window in a nursery.
Today we will talk about creating stained glass: how to choose a pattern for a stained glass window, ways to transfer a pattern to stained glass, materials and tools for making stained glass yourself, two ways to create a painted stained glass window, self-production stained glass paint, how to get a matte glass surface.
Among the many in various ways For room decoration, stained glass windows stand out for their special brightness and unusual appearance. The play of sunlight or special lighting will add a special charm to the room where the stained glass products are installed. By the way, if classic stained glass is an ornament made of colored glass through which natural light is passed, then the modern concept of stained glass is much broader. Artistic stained glass windows can be placed in any room - even in one where there is no natural light at all.
Traditionally, stained glass compositions were created from fragments of colored glass held together with lead gaskets (lead is quite soft). When creating stained glass windows from colorless glass, painting on it was done with silicate-based paints.

Modern stained glass windows are connected by lead and brass profiles (brass with a steel insert), they can be installed either in window openings, and as lampshades for interior lamps in a building, for installing suspended ceilings, forming internal partitions, creating showcase compositions and panels. Decorative items, such as Tiffany stained glass, are independent decorative elements.
Stained glass art - technology of creation
— is created using the classical stained glass technique, with the only difference being that the edges of some (or all) stained glass elements are cut (the bevel is removed). Thanks to this operation it is achieved big game sunlight in the created edges, which increases the beauty of the stained glass composition.

— is created by fusing multi-colored glasses in high-temperature furnaces. In this case, the colored elements of the stained glass window are carefully cut out and polished, after which they are placed on a sheet of glass (substrate), forming a finished composition. Next is processing in an oven, after which the substrate and colored elements are soldered into one whole. One more distinctive feature fusing stained glass is their wavy surface.

There is another technology for creating fusing stained glass - gluing elements of a stained glass pattern onto a tempered glass substrate using transparent adhesives, having previously subjected the colored glass to high-temperature treatment. The fact is that using a tempered glass substrate is necessary when creating a completely glass doors and glazing window openings large area, to create fusing stained glass, it is impossible - during heat treatment it will become brittle. Gluing the elements will allow you to get a strong, highly artistic stained glass composition, and it can even be installed on the ceiling - if for some reason such a stained glass window breaks, it will not cut anyone, because there will be no fragments.
- on glass silicate paints The design is applied, then the glass is heat treated in a furnace. The painted composition is made with a brush or airbrush.

— a stained glass composition is made using one of the above technologies, then a thin layer of titanium nitride is applied to its back side. In this case, the degree of reflection can be increased, decreased, or a one-way transparent mirror can be obtained.

Engraved stained glass— the drawing is created only by hand, using engraving equipment or hand tools. Colored glass - the basis for such stained glass - is created by mixing glasses of different colors, which are heated to a liquid state, then several liquid glasses different colors poured onto the table and rolled out. The glass obtained in this way has a unique color and pattern - it is impossible to obtain two sheets of such stained glass with an identical pattern and color.
- a technique that is especially popular today. To obtain matte stained glass, sandblasting technology is used: fed under high pressure a stream of sand scratches the surface of transparent glass, knocking out microparticles and turning one side of the glass matte. To create a design using this technology, you will need a stencil - it is fixed to the glass and placed in a sandblasting chamber. After processing, the areas covered with the stencil remain transparent, everything else becomes matte.

Of particular interest is the technique of creating stained glass using the deep working method - producing three-dimensional drawings on glass. For this, a sandblasting machine and a more complex, multi-layer stencil are used. The creation technology is as follows: all layers of the stencil are laid on sheet glass and sandblasted (a layer of glass of about 1 mm is removed), then one stencil layer is removed and a new sand blast is carried out (a layer of 1.5 mm is removed), etc. until the desired composition is obtained. It is possible to create stained glass windows in this way only on glass with a thickness of 6 mm or more, and the process itself is quite painstaking and time-consuming.
- looks similar to the classic one, although it is created in a simpler way. Elements of the pattern for batch stained glass are cut out on a machine controlled computer program. The lead gaskets that held together the fragments of the classic stained glass window have been replaced here modern materials, externally similar to lead. After forming the finished stained glass composition, it is glued using a special transparent glue onto a sheet of glass - the finished stained glass window made using this technology is lighter and stronger than the classic one. Often such stained glass is sandwiched between two sheets of transparent glass.

- most cheap way creating a stained glass composition. There is a large assortment of films of different colors on the market; elements of a stained glass pattern are cut out of it manually or using a plotter and glued to sheet glass. The stained glass obtained in this way will not last long, but it is easy to replace.

Drawings for stained glass
An important point in choosing the theme of the sketch for the stained glass composition will be the purpose of the room. If some kind of abstraction is intended, then it is better to perform it in the same color scheme as the room. You should attach importance to the meaning contained in the stained glass composition - this way it will look better in the overall design.
It is important to consider that stained glass designs should not leave too much empty space on the glass, nor should they overload it. In the first case, you can create a stained glass window from a small central design (pattern), adding decorative elements to the picture at the corners of the glass, covering the remaining free space with varnish.

Please note that correcting voids in a finished stained glass composition is much easier than correcting an overly filled stained glass pattern after its completion (this desire often arises when there are a large number of small elements).
Carefully consider the sketch of the stained glass window, experiment with sizes individual elements compositions. It is best to introduce new details into the drawing gradually. No less important color palette stained glass pattern - try several color options.
How to make stained glass with your own hands
At home, creating stained glass using industrial methods is impossible. For example, fusing stained glass requires a special glass furnace and a temperature of 900 °C.
What types of stained glass windows can be made at home? This is Tiffany stained glass, painted stained glass (firing was replaced by varnishing) and film stained glass. Let's consider each of them separately.
We make Tiffany stained glass yourself
You will need a separate room for work (quite painstaking).
From materials: colored glass, special copper foil (sold in rolls, its width is 4.7 mm), transparent glue (not silicate), soldering acid, solder for soldering stained glass elements (tin/lead content 50/50 or 60/40), any product for washing dishes, patina.

From the tools: a diamond glass cutter (preferably a diamond one), pliers, small wire cutters, a small machine for turning glass edges or a sharpening stone, a thin soldering iron.

We create a sketch of the future stained glass window - first on plain paper (preferably checkered), then transfer the final version to thicker paper (cardboard or whatman paper). You need to cut the sketch into elements, put them on colored glass of a suitable color and trace along the outline with a marker.

Using a glass cutter, we cut out the elements of the future Tiffany stained glass window from glass. Carefully break off the glass along the cut line; the resulting irregularities need to be broken off with small pliers: for this we take cardboard box of a suitable size, hold the glass element (without pinching it too hard!) with pliers, take the small pliers in the other hand and break it off (without the box, the pieces of glass will scatter throughout the room).

The next stage is turning the edge. If there is a special machine, we work on it, but if not, you need to put water in a bowl (preferably metal), put a sharpening stone there (it should be submerged in water) and grind off the sharp protrusions on the glass against it. We check the quality on a general sketch; if all the glass elements fit perfectly together, then you can move on to next stage- wrapping the edges with copper foil.

We use special copper foil in the form of a tape with one adhesive side. We wrap the edge with it: placing the middle of the copper tape in the center of the edge, we bend it on both sides. It is important that the fold edges are the same on both sides glass element Tiffany stained glass. Carefully smooth the foil onto the glass using a wooden spatula (not metal - it will scratch). When all the glass fragments of the stained glass window are wrapped in foil, fold them into a composition and check the fit again.

Next, you will need to treat the edge covered with copper foil with soldering acid - it will act as a flux during soldering. To apply soldering acid, use a cotton swab attached to a stick. Soldering queue: heat up the soldering iron, put drops of tin on it and solder the Tiffany stained glass elements along the edges, connecting them together. The tin seam should be continuous and resemble a small roller - this will be beautiful and neat. The tin should completely cover the entire visible part of the copper foil - both between the stained glass elements and along their outer edges. You are unlikely to succeed right away, so practice. If the Tiffany stained glass window you are making is intended to be hung, then solder a wire loop to it.

Upon completion of soldering, it’s time to wash the soldered stained glass window - if this operation is skipped, then the remaining soldering acid will cause moss-like formations to appear on the tin seam. To wash a Tiffany stained glass window, regular dish detergent and a sponge are quite suitable.
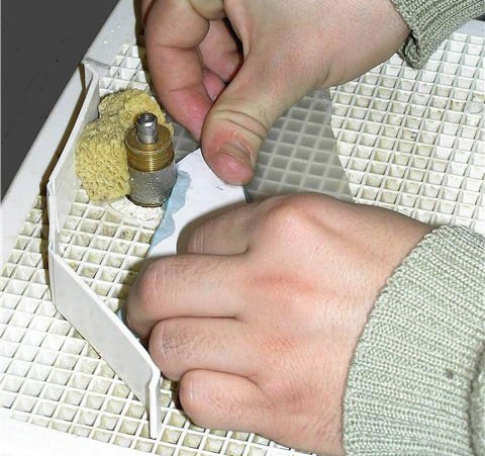
Allow the stained glass to dry, then cover the tin seams with a patina (black or copper color, depending on your taste). The patina should be applied with a cotton swab: apply a little patina to the swab, then rub it firmly into the surface of the tin joint. Having completed this operation, you need to wash the stained glass window again. That's it, the job is finished!

Stained glass painted with paints is one of the oldest techniques. We offer you two ways to create a painted stained glass window: in the first of them, the design is formed by applying it with a brush and paints, in the second, paint is poured onto the design.
The first thing you need to do is select a design for the stained glass window, prepare a sketch of it, enlarging the image proportionally (if necessary).
After preparing the stained glass for drawing, wipe it thoroughly with a cotton swab or a clean cloth, moistened with alcohol. This simple operation will big influence on the durability of future stained glass painting.
It's time to transfer the contours of the design onto the glass. By the way, you need to paint on glass in a horizontal position - the paint will not spread. The easiest way to transfer a sketch of a design is to stick it with tape on the back side of the glass and redraw its outline with thin lines - first with a marker, then with special stained glass paint applied to a thin brush (see below for methods of making it).

Start painting the drawing, first you need to paint the fragments that are separated from each other (i.e., not adjacent), in this case it will be possible to correct the paint going beyond the contour and it will not mix with paint of a different color from the adjacent fragment of the drawing.
There is another way to paint stained glass fragments. To execute it, you will need to cut out on a paper sketch only the fragment that you intend to paint this time. Align it along the contour with a similar area on the glass and paint it with a brush or spray. After the paint has dried, prepare a new fragment - and so on, until the stained glass pattern is completely painted.
It will take three days for the painted fragments to dry completely. After this, apply paint to the remaining areas and let it dry. Then apply an outline over the painted areas of the picture using a thin squirrel brush and stained glass paint - this way you can give the image clarity and hide small gaps and drips. Be careful and leisurely!

After three days, you need to perform the final operation - apply a layer of varnish to the stained glass window using a wide brush or paint sprayer. Cover the entire stained glass window with varnish, including those areas of glass that do not have a pattern. This time the drying period is a week. For the entire drying period, place the glass with a stained glass pattern in a clean, dry and well-ventilated room, do not touch it, and exclude access to it by children and pets. After seven days, the stained glass window is ready, it can be inserted into a frame or, for example, into an interior door.
Painted stained glass using paint pouring method
The beginning of work on creating such a stained glass window lies in choosing a stained glass pattern and transferring its outline onto the glass. Next, you need to make the contour convex (volumetric) to create boundaries that prevent paint from spilling beyond the intended area.
Here you will need to make a special contour paint, for this you need:
- 50 ml PVA glue, suitable for gluing porcelain and glass;
- black mascara - 20-30 ml;
- silver (aluminum powder) - about 30-40 g.

Contour paint is created like this: take a small glass jar, pour PVA glue into it, add black ink, mix and add silver while stirring. The consistency of the paint obtained in this way should resemble lead-colored liquid sour cream.
Let us immediately note that if during the process of applying a volumetric contour on the glass, the paint in the jar thickens, then by adding some warm water and a little black ink (for the desired color), it will return to the state you need.
The contour formed by such homemade paint will stick firmly to the glass and will look similar to the lead gaskets connecting the elements of a classic stained glass window. Moreover, you can improvise with the width of the contour when applying it - this will give your stained glass originality. So, we arm ourselves with a squirrel or kolinsky brush and start drawing the outline - it should turn out to be voluminous (convex) to a sufficient extent, so don’t skimp on the paint, but you need to apply it carefully and carefully. In the process of creating a volumetric contour, it is necessary to periodically stir the paint, since lighter silver particles will begin to accumulate on its surface. Do not delay with contour work - the longer the paint you prepare sits, the more its color will change, which means the monotony of the contour lines will be lost.

After drawing the outline of the stained glass pattern, we wait 3 hours for the paint to dry completely.
How to make stained glass paints
The continuation of the material on creating a stained glass pattern using the paint pouring method will be below, but for now it’s time to present here several ways to create stained glass paint at home.
First way. You will need nitrovarnish NTs-218 (you can use 222 or 2141), 647th solvent and oil paints For artwork. Pour about a third of the nitro varnish into the jar, add a solvent (up to about 40% of the amount of nitro varnish), mix until a composition similar to water is obtained. Then add a drop (the size of a pea) of art paint, mix, add more paint if the color is not bright enough (paint will need up to 10% of the amount of nitro varnish). As a result, we get a well-flowing colored varnish, which is perfect for filling a stained glass pattern.
Second way. You will need light BF-2 glue, acetone, and alcohol-soluble paint (you can use ballpoint pen paste). Pour glue into a glass jar, dilute it with acetone in a 1:1 ratio, mix and add paint until the desired color saturation is obtained.

Third way. You will need gelatin, warm water, dry dyes for cotton, wool or silk fabrics. About 6 g of gelatin should be diluted in 200 g of warm water and mixed. Separately in warm water dilute dry paints. Pour a little solution of water with gelatin into a new glass jar and add required amount paint solution, mix. After applying this paint to the stained glass window and drying it, you will need to cover the top of the drawing with colorless nitro varnish.
Important: all stained glass paint recipes given below must be mixed exclusively in glassware(Glass baby food jars are ideal).
We continue to create stained glass using the paint pour method
So, the contour paint on the stained glass window has dried, and the paint for filling is ready. Before you start painting the stained glass, make sure that the glass sheet is in a strictly horizontal position - any, even slight, distortion will cause the paint layer to run off and thicken at the lowest point of the fragment being painted.
We arm ourselves with a large round brush (squirrel or kolinsky), and paint on it a large number of paint and apply it to the specified fragments of the stained glass window. In this case, the main thing is not to cross the boundary of the contour and completely fill each of the fragments with paint a certain color. If you get paint on the outline itself, it’s okay; on the contrary, it’s even good, because it will completely eliminate any unpainted areas near the outline. Fight the appearance of air bubbles - watch for their appearance and quickly remove them with a movement of the brush. Having completed the painting, we pause for 3-4 hours - let the paint dry completely.

The next step is to re-draw the outline. Try to repeat the previous contour lines, apply paint as liberally as when you first drew the contour. Now you can be sure of the complete elimination of any irregularities and flaws. The next stage of work is 2-3 hours after the applied contour has dried.
To complete the work on the stained glass window, you need to apply 3-4 layers of transparent nitro varnish to it, covering the entire surface of the glass with a thin layer. This measure will protect the drawing from scratches and moisture and extend its service life. It is best to apply nitro varnish not with a brush, but with a sprayer, allowing at least 10 minutes before each new layer to dry the previous layer.

The work of creating the stained glass window is completed - you just need to insert it into the frame. This hand-drawn stained glass window will serve you for at least 10 years.
Additional stained glass works
We consider it unnecessary to present a detailed method for creating a film stained glass window here - the work here is the simplest, you need to prepare a sketch, apply it to the glass and to the tinting film, cut out the necessary fragments and attach it to the glass. The film will stick to the glass itself.

In some cases, stained glass doors are required to be opaque, especially if these doors lead to a bathroom or bedroom. To solve this issue, it is necessary to give the side of the glass opposite the stained glass pattern matte finish or stick a tint film on it. There are two ways to create a matte surface: using compositions based on liquid glass or using compositions based on hydrofluoric acid.
Compositions based on liquid glass:
- It is necessary to dilute the liquid glass a little with distilled water, then add a small amount of tooth powder to it and mix thoroughly.
- Mix 10 parts of liquid glass with 15 parts of distilled water, add 8 parts of barium sulfate and 1 part of silicic acid to this solution. The last ingredient can be obtained by mixing liquid glass with a significant amount of sulfuric or hydrochloric acid - silicic acid will precipitate, it must be isolated, dried and ground into powder.

Before applying any of these compounds, the glass must be thoroughly washed with soapy water and dried. To apply, use a smooth roller - dip it in the composition, roll it and carefully cover the entire surface of the glass with the solution. After drying, the glass should be rinsed under water.
It must be taken into account that when working with solutions based on liquid glass, you need to apply the coating as carefully as possible - the matte surface created by this composition will reveal all defects.
Compositions based on hydrofluoric acid:
- 12 parts of hydrofluoric acid, 10 parts of barium sulfate and 10 parts of ammonium fluoride are mixed together, then poured into a thin layer on the surface of the glass. After drying, the treated surface should be washed with a soda solution (5%) and then with water.
- 50% hydrofluoric acid is applied in a thin layer to the previously prepared glass. The preparation is as follows - the glass is placed in a wooden frame, covered on the back side with two layers of PVC film, along the edge of the glass (along wooden frame) the side is made from plasticine. The layer of hydrofluoric acid is kept on the glass surface for 10 s, the temperature of the acid solution should be 30-40 °C. After the curing period has expired, rinse the treated surface with a solution baking soda 5%, then with water.

Unlike compositions on liquid glass, the use of hydrofluoric acid gives a more even matte surface, regardless of errors made during application.