Grout between tile joints carried out at the final stage of the device. Work should be carried out after the drying time has elapsed. adhesive composition(indicated by the manufacturer).
Tools: Small spatula, rubber spatula, sponge, bucket, mixer (nozzle), drill
Consumables: Grout, water, sanitary sealant
The seams must be dry and completely free of adhesive residues and other contaminants. Seal before starting work masking tape surfaces and elements adjacent to the cladding - to protect them from contamination by the grout.
Solution preparation
The amount of grout mixture is determined based on the width of the seam, the size of the tile and the total area of \u200b\u200bthe cladding. As a rule, the mixture consumption table is given on the commercial packaging with grout (see Table 1).
When grouting joints between mosaic tiles, especially if the mosaic cells are thicker (more than 5 mm), the mixture consumption may significantly exceed the nominal value. Be careful and always purchase material with a margin.
Table 1. Approximate consumption of grout mixture
| Tile size, cm | Seam width, mm | Approximate consumption of the mixture, kg / m2 |
| 5*5 | 2 | 0,5 |
| 5*5 | 3 | 0,7 |
| 10*10 | 2 | 0,4 |
| 10*20 | 3 | 0,4 |
| 15*15 | 3 | 0,4 |
| 20*20 | 5 | 0,5 |
To prepare the solution, pour a measured amount of clean water into a container. cold water. Pour the mixture into the water in small portions and mix thoroughly. Small amounts of mortar can be mixed by hand using a small mixing bowl. Mixers are used to prepare a significant amount of grout. Be careful when adding water - too much water can cause discoloration of the grout.
IMPORTANT: Prepare exactly as much solution as you can use during the working time of the mixture indicated on the package. Remember - the material loses its plasticity very quickly and it becomes inconvenient to work with it.
Grouting sequence
Grouting is usually done in three steps:
- Filling the seam with mortar;
- Formation of the contour of the seam;
- Surface cleaning.
Seam filling
Immediately before starting work, lightly dampen the surface of the tiles with a spray bottle.
To enlarge work time grout mixture - the material should be periodically moistened with a spray gun, while thoroughly mixing the mixture.
Forming the contour of the seam

A straight seam is the easiest to form. This method of grouting is effective on large areas, as well as on small tiles. The direct seam technique is most preferred when grouting mosaic tiles.
The formation of seams is carried out using sponge floats.
Execution of works
Dampen the grater and wring it out thoroughly to remove excess moisture. After that, running the sponge surface over the tiles at a 45 degree angle to the seam lines, remove excess grout from the surface of the cladding.

For final cleaning of the surface, you can use a sponge dipped in warm, clean water.
Conditions for applying the method
 A prerequisite for the use of the straight seam method is the special configuration of the tile ends. The ends of all tiles must be even (without rounding).
Tiles with a straight end, as a rule, are made of porcelain stoneware.
Disadvantages of the method
A significant disadvantage this method grouting is rough appearance seams - i.e. their uneven width. However, the manifestation of such a defect largely depends on the qualifications of the master.

The round seam method is used if facing tiles have pronounced fillets (fillets) on the upper end faces.
Most often, fillets are present on tiles.
 Tiles, due to the softness of the clay, cannot be cut and processed during the production process without the formation of microcracks. To eliminate these defects, the faces are processed and acquire a rounded contour.
Quite often, to create an additional decorating effect, chamfers are used - bevels along the edges of the tile.
Fillets and chamfers do not allow the use of sponges for grouting the seam - in this case, the seam will be too rough.
For the device of round seams, special rubber spatulas are used.


The contour of the seam obtained with their help looks aesthetically pleasing, and also reliably protects the facing seams from moisture.
Execution of works
A seam previously filled with a flat trowel (or the flat side of a rubber trowel) is carried out with the round side soaked in water. The design of the spatula also allows the processing of fillet welds.

Formation of narrow seams
To form narrow seams (1-1.5 mm), special round spatulas should be used.


This tool is rarely available in retail, however, it is quite easy to make it yourself - from a round cord with a diameter of 6.5 mm, used to power computers and other household electrical appliances.
The procedure for performing work is similar to the one above. A spatula (wire) moistened with water is drawn along the filled grout seam, forming an even and smooth contour.

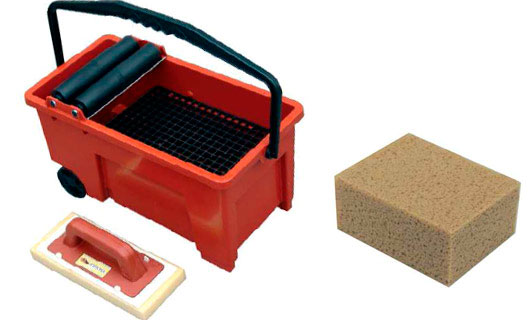
Professional trowel work
For professional and regular performance trowel work on large areas, special sets are used, consisting of a container, dehumidifiers (grids and rollers), as well as several graters and sponges of different sizes.

In addition to the aesthetics of perception, the grout provides an equally important protective function, covering the end edges of the tiles, which are most susceptible to the damaging effects of moisture and microorganisms.

Don't forget, even quality cladding will not be durable if its seams have significant defects - potholes and bumps. The surface of the joints should be as uniform and smooth as possible.


The device of expansion joints
The expansion joints created during the lining are filled with a special sanitary sealant, which is selected from the catalog (in accordance with the shade of the grout).
The sealant is applied with a gun. The seam is formed with a finger dipped in water or a small one.

Surface cleaning
After the composition has dried (see instructions), excess grout is removed with a dry cloth. To remove significant dirt, a flat wooden (plastic) scraper or spatula can be used.
IMPORTANT: Moisture-resistant grout modifications can be cleaned using a damp cloth or sponge.


Non-moisture resistant types of grouts should be additionally treated with a special impregnation to increase their water-repellent properties.
When grouting after tiling, two significant results can be obtained. Firstly, a harmonious surface is created that will fully comply with the design ideas. Secondly, the possibility of mold and mildew is neutralized, and general pollution is also reduced. Naturally, the work must be carried out in compliance with certain rules.
There is a certain period that must be waited before taking the necessary measures. Yes, grouting ceramic tiles carried out one day after laying the material. Much depends on the glue used. Why can't we wait longer? There are several reasons for this:
- On the second day, the mixture used for lining retains a little elasticity. This means that it will be easy to remove when cleaning the seams. Subsequently, you will have to make much more effort.
- The moisture remaining in the solution contributes to better adhesion. Of course, it is possible to wet the gaps additionally. But this can lead to some disadvantages: it becomes liquid and less elastic. Working with such a mixture is much more difficult.
- Open seams get dirty quickly. Small particles of dust and dirt quickly get into open holes and clog them. This leads to the fact that it becomes much more difficult to apply the solution.
It becomes extremely clear that such work must be done on time. Then it will be possible to get a coverage that will meet all the necessary requirements.
 Grouting after laying ceramic tiles is carried out after a day
 Solution preparation
For work, you can use a ready-made mixture, which is sold in construction stores. It just needs to be mixed well before use. There are also dry solutions, they have to be diluted in advance. For cooking you will need the following:
- Water room temperature. She is allowed to settle beforehand so that possible inclusions settle to the bottom of the bucket.
- Mixing container. It should be comfortable to work with, and also be larger than the intended amount of the mixture. It should be borne in mind that the amount of material being prepared must be such that it is used up before drying begins.
- Spatula or trowel. This tool is essential for kneading. Of course, you can use a drill with a mixer attachment, but given the small amount of mixture being prepared, this will be a pointless exercise. It is better to do everything by hand to get the desired result and not to collect the solution from the walls of the container.
 Grout mortar is best kneaded with a spatula or trowel
 The cooking process looks like this:
- Each grout for tile joints contains instructions from the manufacturer. It indicates the amount of water needed to prepare the desired volume of the mixture.
- Water is poured into the mixing container. Next, a small part of the material is poured. Now you should mix the composition well. If it turns out too dry, then more water is added, or vice versa.
- All components must be diluted to a pasty state. After that, the grouting solution is left for five minutes. Then the stirring is repeated.
It turns out a homogeneous substance, which has sufficient viscosity and elasticity. She is very comfortable to work with. But after a while, the properties will begin to deteriorate.
 After mixing all the components, a viscous and very elastic mixture is obtained.
 Grout technology
It should be borne in mind that grouting tiles with your own hands is carried out in several stages. The area of continuous work should be two square meters. This is how you get everything done right. Of course, when there is enough experience, the process is much faster.
Before grouting tiles, prepare essential tool: rubber spatula, grater, rags, sponge, spatula for forming a seam (smoothener).
 Immediately before applying the grout, it is necessary to prepare the necessary tools and rubber gloves
The next steps are:
- When unglazed tiles are used, they are pre-wetted. This is done with a sponge, which helps water penetrate deep into the joints. But this must be done very carefully, it is impossible to prevent the occurrence of streaks and the formation of excess moisture. When the material is glazed, this process can be skipped.
Advice! It is better not to use tile sponges that are used for washing dishes. There are other options, they are sold in departments for car service.
- The pre-prepared mixture is applied to the grater for grouting. The tool is placed at an angle of thirty degrees to the surface and they begin to move it diagonally. This method is used due to the fact that when performing a horizontal or vertical movement, it is not possible to apply the composition evenly.
 When applying grout to a tile, move diagonally
 - The procedure for grouting tile joints requires some effort. It is necessary to press on the grater so that all possible voids are filled. You can also use a rubber spatula to work. But then the process will take much longer. After all, you will have to press the solution in small portions throughout the entire area of \u200b\u200bwork. The spatula is great for hard-to-reach places and corners.
On a note! Corners are a very prominent place that gets noticed a lot. Therefore, work in such areas must be done very carefully.
- Having filled all the gaps in the selected area of work, proceed to the grout using the dry method. To do this, clean the grater from the remnants of the mixture and place it at an angle of eighty degrees to the surface. And again, all movements are performed exclusively diagonally. This makes it possible to remove excess composition. It happens that unintentional removal of the mortar from the seam occurs - then the mixture is applied again.
- The surface is left for fifteen minutes. During this time, you can overwrite another area. Now it's time to use wet way. To do this, the sponge is moistened in water, and very abundantly, and they begin to drive it diagonally. But before proceeding with these manipulations, they check that the putty is no longer removed from the seam. You have to experiment a little first.

- Coming next stage. It resembles the previous one, but the differences are that the sponge is well wrung out. And the movements should be circular. Excessive pressure should be avoided. After all, this way you can remove the grouting material. It must be remembered that the sponge must be constantly rinsed and squeezed well.
On a note! Such a process can quickly spoil the sponge, turning it into a useless thing. Therefore, you should have a spare product.
- Sealing between tiles is not finished. Next, it's time to use special tools to form beautiful gaps between adjacent elements. It is convenient to use a special spatula, it looks like a small round stick. When the procedure is completed, the next turn of the sponge comes. It is led parallel to the seam - erasing all unnecessary. It is possible to obtain a rounded seam. If this is not required, then the gaps are simply leveled flush with the tiles.
- Glazed material. All activities must be carried out very carefully. Such a surface is very easy to damage or even completely spoil. Therefore, the work area is additionally pasted over with masking tape. And for work, sealant is used in tubes, which is applied with a special gun.
- Products without glaze. Many craftsmen advise covering the entire surface with a protective compound, including tile. Of course, you will get a layer that will protect it from various influences, but this will spoil the whole appearance. In addition, there is a high probability that such a layer will peel off.
 A special round spatula allows you to create beautiful seams
 It seems that do-it-yourself grouting of ceramic tiles is coming to an end. In fact, it should be borne in mind that the event is quite long and requires further continuation. Now it is necessary to wait for the moment when the suture material dries sufficiently, and it will be possible to begin to remove the remaining excess, which will be everywhere present on the front side of the product.
For work, an irreplaceable sponge is used, which is well washed and squeezed. With quick movements, it is carried out over the surface to the length of an outstretched arm. Each successive pass must be parallel to the previous one. If everything is done correctly, then in this way it is possible to remove all the remnants of the solution. Of course, it will be difficult to do this completely, but it is not necessary. The main thing is to remove large excess from the tile, which will dry quickly.
 Removing excess grout on tiles
 Sealing
Sealing - required process, which is performed immediately after the completion of the trowel work. It is needed to give the seam increased strength. This will protect it from the effects of various chemical substances and water. The choice of material is approached with all care. For work it is better to use compositions that are completely transparent. They are made from silicone.
On a note! This solution has a rather specific smell, similar to ammonia. Therefore, it is better to perform work in a respirator.
 The sealing process makes the seam more durable
Before sealing joints protective compounds, are determined from next steps, which will be focused on the type of ceramic product:
It becomes clear how to use grout and protective compounds. Sometimes it is believed that such work does not require compliance with many of the steps described. You can apply the mixture and quickly form a seam. But the result will be rather deplorable. Therefore, only strict adherence to all technological processes– a guarantee of reliability, quality and attractive appearance.
VIDEO: how to properly grout the seams on the tile
It would seem that the first rubber spatula for grouting, or even an ordinary gum, is suitable for jointing. But the convenience of the work and the final result will depend on the quality of the tool. If you often do tile laying or just appreciate ease of use, this article is for you. In it I will talk about the tool for grouting tiles, its choice and differences.
In the photo you can see several options for rubber spatulas.
- The first spatula is the most popular. It has a comfortable handle, but a small work surface, so work productivity is reduced. Imagine how long it will take to grout a mosaic with such a tool.
- The second option has an uncomfortable handle, so it is more difficult for them to work, hands will get dirty.
- A third angled spatula will sometimes come in handy when plastering works, filling the seams between decorative stone, in corners or in curly friezes.
- The fourth trapezoidal rubber spatula from Raimondi is better than all the previous options: it has a comfortable handle and a large working surface. In fact, this is an improved version of the second option.
- Number 5 shows several options. grout spatulas from the Raimondi catalog. Many master tilers prefer to work with such graters. They have interchangeable tips made of rubber or rubber. Such a tool can easily last even a dozen years, you can see confirmation of this in the photo. But when working with it, you need to carefully squeeze out the rubber from the remnants of the grout, otherwise it will lose elasticity over time. So I switched now to a thick rubber cone. The sharp edge of the grater makes it easy to crush the mixture even in the corners. Rubber is easy to clean and does not clog with the mixture.

A spatula with a rubber nozzle lasted about 10 years. Over time, the side became uneven, so I had to grind it with a grinder.
Quick article navigation
Grouting tools
It is also worth mentioning other tools for grouting.

Tools for cleaning tiles from grout
Summing up
Grout master class floor tiles look at the video:
Basically, all the presented tools are needed for professional tilers. For one-time work, it will be enough to buy only one spatula-grater with a rubber nozzle.
Clinker tiles were invented in the first half of the 19th century and are tiles in the form of ceramic stone. It is made from fired clay, and its first production was established in Holland.
The tile turned out to be strong enough and they began to use it as a building material in those countries where mining natural stone was insufficient to satisfy the need. They began to pave roads, sidewalks with it, use it in the construction of a house, as well as for their decoration.
Currently, clinker tiles are made from special slate clay, which has elevated temperature melting. In addition, impurities such as salt and carbonate must be completely removed from the clay. To color or give it additional properties, various metal oxides are added to the composition.
Process heat treatment occurs from 36 to 48 hours with maintaining a temperature of more than 1300 degrees. But the result is excellent. The tile is baked completely and evenly. In addition, it acquires water-repellent properties, it is very durable, does not change its color under the influence of UV, is resistant to aggressive environments, and, most importantly, it is environmentally friendly. Naturally, such properties of the tile make it very popular. building material.
 The use of clinker tiles in the construction of a house and landscaping
 It is lined with pools, facades of houses, sidewalks and roads, and much more. For example, it is very expensive to build a house from facing bricks. You can even use a used brick and overlay it with “brick-like” clinker tiles.
This material is used both for outdoor and for internal works. The use as a cladding in the bathroom has the advantage that the foot practically does not slip on wet floor. She has proven herself well for facing fireplaces and stoves.
Works on laying clinker tiles
In order for the beauty of this material to be fully revealed, it must be properly laid. It is very important to achieve beautiful and even seams. No matter how beautiful the material is, but clumsily laid, it does not create the appropriate look.
The use of grout or, as it is also called, a fugue, in addition, aims not only to improve the appearance, but also to provide protection from moisture ingress under the coating, while preventing the growth and spread of mold. This applies to indoor work.
If the tiles are laid outdoors, it is important to protect them from moisture, so that when freezing, the tiles do not swell after the “freeze-thaw” process.
Of course, there is also a purely aesthetic purpose - you can choose different colors grout so that the color of the tile looks good. There are still situations when you need to align the edges of the tile, which sometimes has small irregularities. A fugue can help hide this.
For work, use special tools for grouting tile joints. They are of two types: a tool for grouting clinker tiles and a tool for removing grout from tile joints.
 Tile Grout Tool
 The first tools are needed in order to apply the mixture between the tiles and compact it well. The quality of the work depends on how tight the seam is. For a tool such as a mason's jointing, a grout that has a semi-dry appearance is used. It is used to work with tiles in the form of bricks, since with this tool a seam with a slightly rough structure is obtained, as it should be with real brickwork.
Use narrow thin spatulas to level the seams and a spatula or trowel made of either plywood or sheet metal.
 Grout tool - special trowel for applying semi-dry mixes
 Of course, only competent and experienced specialists use this method. The disadvantage is that you can only get two colors of grout - gray and beige.
There is also such a type of grout application - this is the application of a composition that has the density of store-bought sour cream, which is then leveled and compacted with a special grater with a rubber sole. After drying, the residues are removed either with a special tool for removing grout from the tile joints or with a special sponge, placing it on the edge at an angle of 45 degrees. Usually, if the grout good quality, it is easily removed from the tile. If the grout Bad quality or it was not removed on time, they use special means, with the help of which the tiles are cleaned of dirt.
 The process of working with liquid composition grout.
 Of course, the price of such a composition is high, especially considering the waste, but it is quite versatile and durable in use.
Finally, a gun is also used on the masonry to apply the composition, diluted to a pasty state. At the same time, excess composition does not stain the tile, which is especially important for vertical application.
 Application of the composition with a gun
 Then a certain time is maintained, which is indicated in the instructions. It must be remembered that each manufacturer gives its own recommendations for the use of grout. After the specified time, the excess is removed, and the seam is leveled with a special tool for grouting clinker tiles.
 Aligning the seam with a tool
 Again, the quality composition does not leave streaks. True, special substances are added to the composition that make the grout more plastic and convenient when using a gun, which increases its cost, but there are many shades for application and it is easy to work with such a composition.
To do all this work, you need good tool, which it is advisable not to make from improvised means, but to buy in specialized stores.
To buy a tool for grouting tiles, you need to know what composition you will work with. If this is a composition for continuous application, then only a grater is needed, which has a rubber sponge on the bottom, and the body can be made of plastic, wood.
For example, it might be like this:
Buying a set of tools for grouting clinker tiles is simple, the main thing is to make sure that they will work well. To do this, it is better to buy a tool in person, and not through an online store, if possible. The trowels themselves for leveling and filling the seams are better to take Polish ones - both the quality is good and the price is not sky-high. True, for a pistol you will have to pay an amount of 3,500 rubles. But the cost of the work will quickly pay for the cost of a good tool.
 Grout gun
 Works with laying corrugated tiles
In addition to the long-known clinker tiles, which have a great advantage over other types of ceramic tiles, designers, together with technologists, have released such a type of cladding as porcelain stoneware tiles with a special surface that has the form of convexities and concavities in the form of a pattern.
 Types of application of corrugated tiles
 When laying, a single pattern is obtained, and in the manufacture of such tiles, the edges are aligned, polished, so the seams remain almost invisible. In addition, it is very suitable for laying on the floor in the bathroom or kitchen, as the bulges prevent slipping. After additives were invented that prevent dirt from lingering in the tile pattern, its use received a new round.
 Laying corrugated tiles
 After laying the tiles on the surface, it needs to stand for a day. This optimal time, since there is still some moisture left under the tile, which will work well for better adhesion of the grout to the tile. Since the composition does not need to be used in a creamy state, it is better to use the grout in the form of a semi-dry and pasty mixture.
The best tool for grouting corrugated tiles can be called either a gun or a spatula, it depends on the size of the surface to be treated.
 Applying a fugue to the seams when laying corrugated tiles
 After that, all seams are smeared with a special soft cloth or a special grater with bottom from a sponge (not to be confused with foam rubber, this is different).
The next step, without waiting for complete drying, with the help of a tool for removing the grout from the tile joints, we remove everything superfluous, wipe it. This tool is called a jointer and is used specifically for this purpose.
 Tool for removing grout from seams.
 You can simply do without this tool, just use cardboard for cleaning in the course of work, then a soft cloth and, after a while, rinse.
If you need to update the grout to provide additional antifungal properties, you can use various electrical appliances eg dremel.
 Removing old grout with a dremel.
 We clean the place of work with a brush and a rag and apply the desired new composition.
Online store site offers to buy a tool for grouting tiles special formulations based epoxy resins, which are widely used due to the unique set performance characteristics. Mixtures of this type, in contrast to cement mortars, retain color for a long time, provide tightness, show high resistance to temperature extremes, ultraviolet and other negative impacts. An excellent selection of tools is presented in our catalog.
Our range
- Spatulas. The flat trowel with rubber sole and rigid handle helps you to apply mortar and fill joints as quickly as possible. This is important given the short pot life of grouts.
- Sponges combined. The structure of the product differs from the usual foam rubber: it is specially adapted to work with epoxy mixtures. With the help of a sponge, it is possible to obtain tight, even seams in one pass.
- Spatulas with a sole from synthetic fiber . The product is used to remove grout and perfectly removes excess mixture from both tiles and mosaics.
To buy a tool for grouting, call the company's website or leave a request in the form on the website.