The desire of mankind to do everything “quickly” was reflected in such painstaking garden art as topiary. The formation of a bizarre tree crown, which sometimes takes decades, now takes no more than a few months. Who made the hard work of a gardener so easy? As usual, the most hurried nation in the world. Trying to quickly absorb another portion of fast food, one of the Americans figured out how to make fast topiary quickly and easily. Growing an intricate green figure, thanks to a sparkling thought from overseas, is now easier than ever - you don’t need to wait for years for the tree to grow, and then trim it for a long time to achieve a certain crown configuration. You just need to purchase a ready-made wire frame and fill it earth mixture, plant ground cover plants and – voila! The topiary is ready. Curious? To be continued…
The desire to diversify our lives motivates us all to search exciting activity, designed to brighten up monotonous everyday life in bright colors. If your passion is gardening, why not give yours a makeover? personal plot an original plant figure - a duck or a peacock, an elephant or a lion... or maybe you prefer a flower car? Ancient art topiary, recut into modern style, will allow you, without straining, to create a topiary with your own hands literally within one day. Of course, provided that you are not planning to do something large-scale that will amaze the owners of nearby land with its size. To begin with, it is better to try your hand at creating a small garden figurine using the topiary frame technique, gradually moving on to more complex compositions.
Learn how to make topiary with your own hands using ready-made metal frame, can be done by any gardener with the proper amount of patience and perseverance. First, you need to choose a frame for the future green sculpture. Its size and shape should fit harmoniously into the garden landscape. It is better to take a small but expressive form - after all, you are creating an accent that simply must attract attention.

An expressive green sculpture inspired by Formula 1, made from ground cover plants frame based

Exotic ostriches, created on the basis of spherical topiary bushes, will bring a touch of extravagance to your garden
Ready-made frames, which can be purchased at specialized garden stores, are made from 2-3 mm wire. They are a lattice structure with enough gaps to allow penetration. In addition, in the upper part of the frame there is a lid, which is designed to further simplify access to the “insides” of the metal structure when filling it with a substrate - a mixture of earth with peat or sphagnum moss.
Before you start filling the frame, the moss must be soaked in warm water about 30 minutes. When filling the structure of the future topiary with substrate, it is necessary to prudently create holes into which ground cover or climbing, succulent or herbaceous plants are then planted horticultural crops. The following are perfect for such purposes: juveniles, saxifrage, sedum, loosestrife, ivy, grapes.
When forming a topiary from weaving plants, the earthen ball is moved from a plastic container to a metal form, and the shoots are distributed along the frame and grabbed with U-shaped clips. If the figure to create a topiary is medium or large in size, bags of crushed polystyrene foam are placed inside the substrate to lighten its weight.
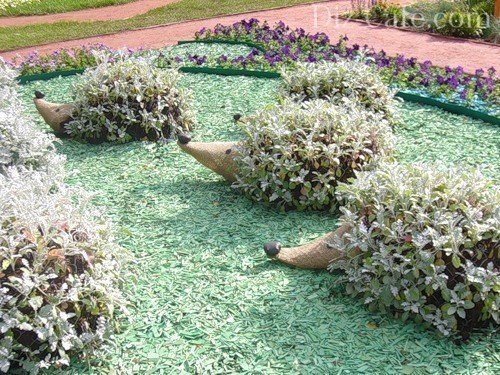
Fluffy hedgehogs, born thanks to frame topiary, will decorate the green lawn on your site

A cute family of pigs, made on the basis of a frame and ground cover plants, will create an unusual color in the garden
Caring for frame topiary involves regular watering and fertilizing, pinching and pruning. It should be remembered that such a green sculpture cannot be left to overwinter. outdoors– it is better to bring it into an unheated room with an air temperature of about 5 degrees. If the weight or volume of the topiary does not allow this, you can cover it with a wooden box insulated with straw or polystyrene foam.

Shaped shrub trimming – elephant-shaped topiary can be done experienced craftsmen green sculpture
Technique #2 – espresso topiary
In an effort to further speed up the process of creating a green sculpture of complex shape, express topiary was invented. The essence this method topiary formation is simple - in the spring open ground climbing plants such as periwinkle are planted, girl's grapes, ivy or hops, which tend to quickly form shoots.
Then, a metal mesh frame is installed on top of the planting, which serves as the basis for creating the topiary. As they grow, the branches of the plants are distributed along the frame and secured with rope made of natural material or are pruned. By the end of the season the frame will be overgrown, metal rods will be completely hidden under the green cover - you just need to remember to water and feed the topiary.

Just a couple of months will pass and the frame of a retro car will turn into a green sculpture of unprecedented beauty

The pyramidal shapes of trees, created using the topiary technique, add solemnity and elegance to the garden landscape
Technique #3 – classic topiary
Of course, the ancient Roman gardeners could not even imagine how modern society will transform classical park art, similar in concept to sculptural modeling. Indulging in topiary, they did not at all try to speed up the process of creating a living sculpture; on the contrary, they found charm in the leisurely search perfect shape. If the classical approach is closer to your spirit, then you can make topiary the way the Romans did it, and after them the gardeners of the 18-19 centuries. What is needed for this? A lot of patience, imagination and well-honed tools: garden or trellis shears, loppers, secateurs, wooden slats.
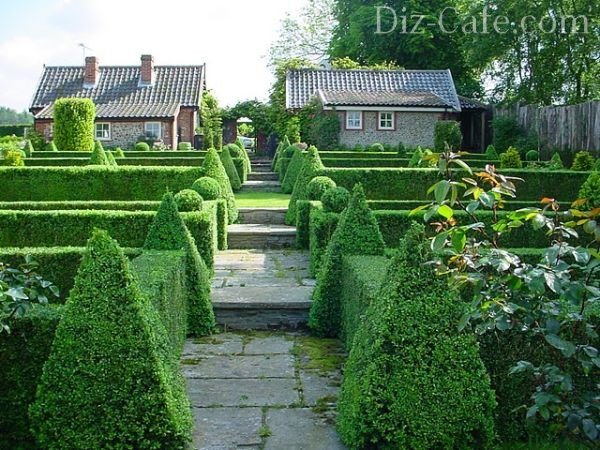
A combination of trimmed borders and pyramid-shaped topiary clearly separates the lawn from the path
Here are some tips on how to make a classic topiary. It is best to start “sharpening” your skills with simple geometric shapes. Moreover, a simple three-dimensional figure can easily be complicated by transforming it into another - turning a cube into a ball, a cylinder or a pyramid - into a cone.

Pyramidal topiaries, towering against the background of spherical bushes, create an unusual contrast of shape and color
Topiary of a simple geometric shape
You need to start by identifying the “patient” for your first exercises. So, let's go on a search. Your goal is a tree or bush aged 5 years or older, with a well-developed root system and a crown larger than the intended size of the figure. Good options for making topiary, choose from plants such as Norway spruce or prickly spruce, brilliant cotoneaster, purple bladdercarp, pinnately incised hawthorn, and Tatarian maple. Topiary cutting is best done in March or April, or from June to August, but not in the fall, so as not to weaken the plant before wintering.

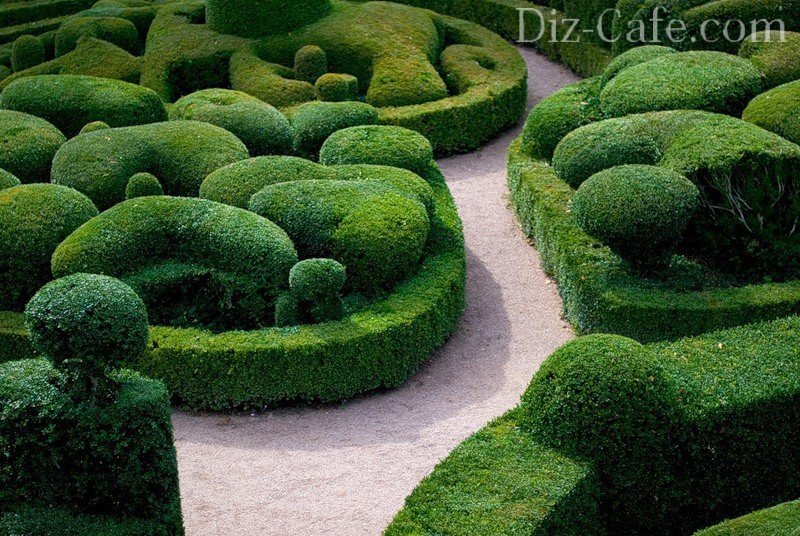
Topiaries of complex geometric shapes take years to create - they require painstaking trimming of the crown as it grows
Here are step-by-step instructions that will help you make a topiary in the form of a cube:
- On the ground, under the crown of a tree, you need to draw a square with the desired length of the side of the cube.
- At the corners of the square, install wooden slats or bamboo sticks with a diameter of 2-3 cm and fasten them together with horizontal transverse strips - this will be your reference frame.
- Using trellis scissors, make a rough cut, outlining the approximate contours of the figure - start with the top edge, then work on the sides.
- After checking the sides of the cube for curvature, correct the planes and proceed to a final cut, gradually trimming the volume.
- Apply the finishing touch with pruning shears, removing small branches that stand out from the total mass.
It is important to know! Periodically move 3-4 meters away from the topiary to evaluate the correctness of the form from afar.
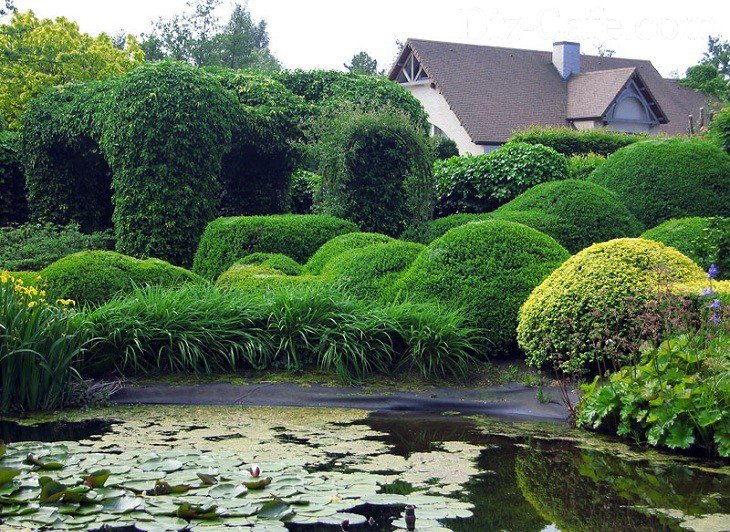
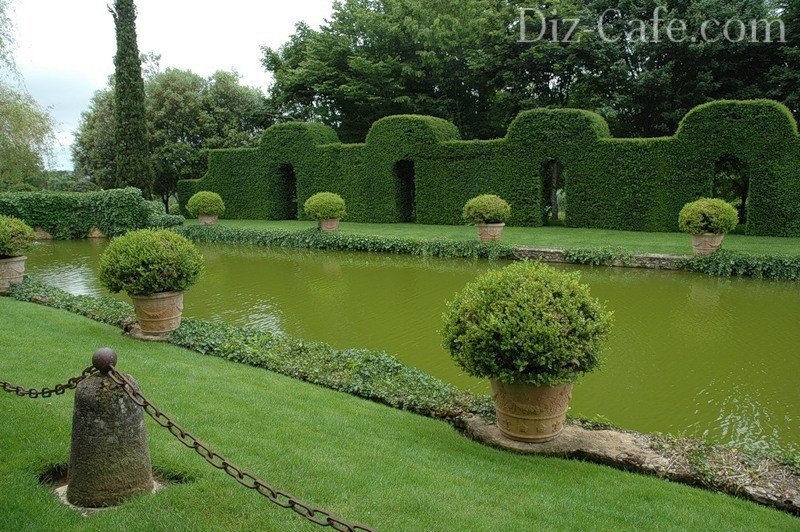
A gazebo made of grapes exists harmoniously next to the unusual landscape created with the help of topiary on the shore of the lake
Topiary of complex shape
A topiary in the form of a ball can be made from a cube by truncating its edges. The most suitable plants for a spherical topiary: purple willow, Thunberg barberry, bladderwort, western thuja, gray spirea, common spruce, yew, boxwood and many others.

A spherical topiary molded from a standard tree will look impressive both in a regular and landscape landscape
A cylindrical topiary can usually be easily made from Thuja occidentalis, a variety of which is naturally column-shaped. Good cylinders can also be obtained from European larch, serviceberry roundifolia, and small-leaved linden. The principle of cutting a columnar topiary is the same as a cubic one. Under the crown of the tree you draw a circle, install guide wooden stakes and, bolder than the cube you conquered, cut out a cylinder.
Topiaries in the form of a cone and a truncated cone look good. In order to build a frame for a cone-shaped topiary, dig in at least three poles and fasten them in the center, at the imaginary top of the future cone - like an Indian wigwam. Again, nature itself comes to the aid of beginning topiaries, creating thuja occidentalis with a cone-shaped crown “smaragd”.
Cutting topiary in the form of clouds or “pompoms” creates the effect of a landscape of extraterrestrial origin

Topiary in the form of cones or columns can serve as an excellent frame for a green path leading to a fantasy arch
By training your hand steadiness, you can later try your hand at making pyramidal topiaries with three and four sides, arranging a mini-complex of Egyptian pyramids in your garden, giving your site a completely unique look. Having brought your skills to perfection, you will smoothly move on to creating such complex green sculptures as a spiral, tiered geometric volumes and their combinations, and not far off - to the figures of animals and people.

Thanks to modern vision, topiary is taking on more and more complex and unexpected forms.
Classic topiary with frame
A removable metal frame, which is placed on top of the crown of a tree or bush, will greatly simplify the process of cutting a classic topiary. Like auxiliary element used to make it easier to make topiary with your own hands and how not to would be better suited for beginner topiaries.
The easiest option for a beginner topiary is to create a green ball from a boxwood bush planted in a pot

A separate trend in topiary art is Japanese nivaki, which is a trimming of tree crowns in the form of clouds.
The plant “lives” in a mesh robe, adapting to the given shape, and all you have to do is trim off the unruly branches that make their way contrary to the imposed growth trajectory. Upon completion of crown formation, the frame is removed. However, many gardeners do not agree with this approach to how to make topiary - the plant tends to become so fused with its “outfit” that it cannot be removed without damaging the crown.
Topiary as a species garden design, known since Ancient Rome. In the gardens of wealthy citizens one could see intricately trimmed trees and shrubs. Plants were given strict geometric shapes, patterns were cut out, and even figures of animals or birds were formed. Currently, the art of garden topiary is still at the height of fashion. In parks, public and private gardens, in city squares you can see not only neatly trimmed hedges, but also real works of art - green figures of people, animals, compositions of flowering sculptures.
In addition to the imagination and skill of the gardener, the choice of a suitable plant plays a huge role in the successful result of creating a topiary. It must meet several requirements:
- respond well to a haircut;
- be unpretentious and winter-hardy;
- have the ability to actively form new shoots from dormant buds;
- grow slowly;
- grows well in the shade.
Many trees and shrubs meet these requirements. They can be divided into two groups: deciduous plants and conifers. Conifers grow more slowly, you will have to wait longer for the results of your work, but they are decorative all year round. From conifers to create garden sculptures fit:
- common and prickly spruce;
- thuja occidentalis;
- Cossack and common juniper;
- fir;
- boxwood;
- Siberian larch.
Deciduous plants for topiary:
- Tatarian maple and ginnala;
- apple (wild) and pear;
- small-leaved elm;
- small-leaved linden;
- barberry and Thunberga;
- vesicular carp;
- cotoneaster;
- hawthorn;
- euonymus;
- irga;
- spirea;
- golden currant.
Whatever the gardener's choice, the plant must be healthy. Typically, the formation required forms begin no earlier than the trees are five years old. By this time it will have formed a well-developed root system and will quickly recover after a haircut.
Basic rules for creating topiary
There are clipped and frame topiaries. The first ones are simpler; even a beginner can create them. Plants are given simple shapes by shearing:
- pyramidal,
- spherical,
- cuboid.
Frame ones are more complex and allow you to create real green sculptures of animals, people and any objects (cars, houses, furniture). For such forms, a metal frame is made, inside which plants are planted. They fill the space of the frame; all unnecessary branches extending outwards are cut off. Small parts of the frame are filled with a mixture of peat and moss, where seedlings are planted, achieving the desired density and volume. It is not at all necessary to create a sculpture from one type of plant. Forms consisting of foliage look very picturesque different shades and shapes. Often flowering crops or cereals are additionally planted in a frame topiary.
- Haircuts are carried out no more than 2 times per summer, removing no more than a third of the crown. The latest pruning is carried out no later than September. This way the plant will be able to regain its strength before wintering and will not get sick.
- During the season you need to give necessary fertilizing seedlings
- Sometimes, if the crown is too thick, it is necessary to thin out the dense branches, letting light in. If this is not done, you can end up with bare areas - not receiving enough light, the branch will simply shed its foliage.
- Be patient. Even creating simple geometric shapes takes at least 3 years.
Tools for work
For work, the gardener will need: a lopper, trellis shears, pruning shears, a level, wire and slats for constructing the frame, a template, and garden varnish for covering the cuts. All cutting tools must be sharp.

If you plan to arrange a topiary in the shape of a ball or other complex shape, you cannot do without making a template. Lines of the required shapes are drawn on a piece of cardboard or plywood, and the excess is cut off. For example, if you plan to trim the crown of a tree in the shape of a ball, then an arc of half a circle is drawn on the template, the right size. The inner part of the circle is removed.
When working with a seedling, the template is applied vertically to the crown, and all shoots extending beyond it are cut off. Here it is important to hold the template evenly relative to the vertical so that the ball is formed on all sides without distortion.
You can make a template for a spherical topiary from wire. An arc of the desired shape and size is bent from it, and small hooks are bent at the ends. The lower end is attached (not tightly!) to the trunk of the seedling from below, the upper hook of the template clings to the central vertical branch (if there is one). Carefully guiding the template in a circle around the plant, cut off the excess shoots.
For more complex shapes the wire frame is bent directly around the seedling. Sometimes a metal or plastic flexible mesh is used, securing it over the main frame. If you paint it in advance in the color of the tree’s crown, it will become completely invisible.
The grid greatly facilitates the work when creating a green sculpture.
Step-by-step instructions for creating a pyramid-shaped topiary
- Select a healthy, well-developed plant with a dense crown (thuja, larch, barberry, yew), at least 5 years old.
- An even triangle is drawn on the ground around the seedling - this is the future base of the pyramid.
- Even long blocks are installed at the vertices of the triangle. Their ends are tied together at the top of the “pyramid”. The frame of the future topiary is ready.
- First, with a lopper, then with scissors and pruning shears, they begin to cut off the branches protruding beyond the frame. They form even corners and a top, then level the planes. To make it easier to align the sides of the pyramid, periodically apply a wide, even strip to the end bars.
- When finished, remove the template.

During the season, the sculpture is regularly trimmed, giving the edges clarity. All the beauty geometric shapes in plants - in their even and straight lines. The slightest carelessness and crookedness is noticeable and ugly.
The ideal way to show the world your own Creative skills and assert oneself is the creation garden figures and sculptures. You don't have to graduate as an artist or be an advanced designer to do this. A little imagination proper care and trimming plants will soon provide your garden with a park of exotic animals and green sculptures that vaguely resemble the appearance and shape of your beloved woman.
From Gurzuf to Kamchatka we will trim the bushes smoothly
Curly pruning of bushes and trees, as an art, has its roots in direct and figuratively goes back to the times of the Roman Empire. The first element in the form of a cube or ball, cut by the deft hands of a gardener, appeared godfather garden topiary.
Most beautiful garden plots now it is impossible to imagine without original and expressive figures in the form of geometric volumes, architectural structures or funny animals. Today, the fashion for topiary from flowers or plants is at its peak. But to master the techniques and techniques of a curly haircut, you will need patience and imagination, as well as love and time.
The first timid attempts to create something similar in Gurzuf Park were clumsy and inexpressive. Something was missing when creating the figures: either the gardener was afraid to cut off the excess, or he lacked wild imagination and the embodiment of his ideas. If you fully possess all these qualities, or strive to acquire them, then this type garden art for you!

But the imagination of newly minted topiary gardeners knows no bounds at the dachas and landscape areas. Today, magnificent figures can be seen not only in boring Jurassic parks. How to become a real toriarian?

Topiary techniques or how to make a green beast
There are several techniques for creating topiary. These are frameless and frame technologies.

frameless technology
Frameless technology is based on manual trimming of shrubby plants garden shears. With frameless technology, the accuracy of cutting and the creation of the required volume depends on the skill and skill of the gardener. With frameless technology, you should choose suitable plant so that the possibility of an overgrown crown influences the choice of the shape of the desired figure. This largely depends on the type of plant and the density of the foliage, its length and the shape of the leaves. Let us tell you that to create a beautiful topiary or hedge, it is preferable to use thuja, boxwood, privet (Ligustrim) and conifers.

every gardener wants to know
Not all plants and shrubs are suitable for creating topiary. These should be plants with hard and fast-growing leaves, such as thuja and boxwood. Thuja is a genus of evergreens coniferous trees and shrubs of small height of the cypress family. There are several types of thuja that are suitable for creating topiary.
Boxwood is also a representative of evergreen shrubs and has about 40 species. Boxwood is a shrub up to 12 m high with densely leafy shoots. Sessile leaves are different sizes. Boxwood is planted in the spring and when rooting, the first cutting of the leaves is carried out. With timely watering and spraying of the bush, it does not stop the growth of shoots, which ensures a dense green crown.

Privet is a genus of shrubby plants in the olive family and has 40 species.
Used for sculptures and figures climbing plants, namely: akebia quintuple, common ivy, round-leaved tree pliers, tripointed and five-leafed maiden vine. The duration of green cover is determined by the climate of the area and the variety of plant for topiary with the possibility of wintering.

Helpful tips: choosing plants for topiary
To create shapes and sculptures with your own hands, it is better to give preference to plants with small leaves, which are capable of forming replacement shoots throughout the growing season. It’s not bad if there are a lot of living dormant buds on the branch, ready for subsequent foliage growth. Now it's up to the right choice tool for cutting plants.

hair cutting tool
A real topiary workshop should have in its arsenal a powerful tool - a tool for cutting foliage. What criteria should you use to select a cutting tool?
For daily care of figures and bush sculptures you will need minimum set a tool that is represented by sharply sharpened trellis (garden) scissors, pruning shears (straight and side), a lopper and a saw.

Care using tools involves regular leveling of the crown and cutting off growing shoots according to the meaning of the plant. In addition, care involves watering and feeding the plant.
frame technology
The frame technique is fundamentally different from a curly haircut.
Having mastered the technique, you can confidently answer the question: “How to make topiary with your own hands.” IN frame technology topiary relies on the technique of filling the frame of a figure with a soil mixture and then planting vegetation in the frame.
The process of creating a figure or sculpture consists of the following stages:
Selecting the location of the figure and plant
Creating a layout and wire frame
Filling the frame with soil mixture
Planting vegetation in a filled frame.

The basis of topiary frame is a homemade or purchased ready-made wire frame. Using the frame, they create complex sculptural forms and tiny tabletop compositions.
Any step-by-step topiary using the frame technique begins with a sketch of a wire frame and embodies the idea in a cardboard model. Layout will allow you to make adjustments to the image of the sculpture and eliminate modeling errors.

frame anatomy
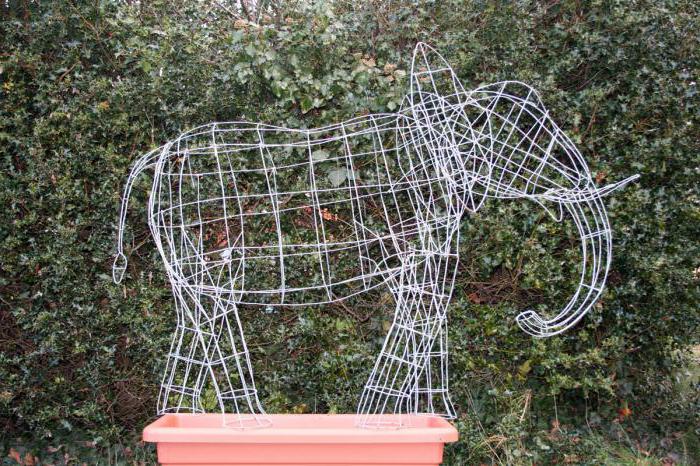
The anatomy of the frame must correspond to the design of the figure. Let us tell you that if a hare is planned, then the emphasis must be increased on the long ears, and if it is an elephant, then on the trunk and tail. The long hind legs of a hare are anatomically completely unsuitable for an elephant and vice versa. There is also a new feature in topiary – animals with lamps.

Imagine a lynx or a tiger standing on its two hind legs and holding a lamp in its front legs. Therefore, all the dynamics of the green beast will have to be conveyed in the frame.
Then the frame of the mold is assembled from the wire, taking into account the possibilities of layering until three-dimensionality is formed. At the intersection points, the wire is secured by welding, ensuring the stability of the sculpture. The finished frame is braided with a mesh with cells no larger than 10 mm.

Helpful tips: collecting soil for filling
The soil mixture for the contents of the frame is carefully selected. In one container, mix the nutrient mixture and soil, consisting of leaf soil, turf and the top layer of peat. Then finely chopped straw is added to the resulting mass. Thanks to the presence of straws and the moistening of the soil mixture, the latter will not spill out of the frame. The mixture is then made into balls and placed in a frame container.
How to fill the frame with soil is shown here.
landscaping filling
The final stage of creating a frame topiary is landscaping the filler. The filler is populated with plants in the order in which they will subsequently grow. This means that the “culture” is first planted, and then the lawn. For example, to create an imitation of the skin of a lion, initially sprouted seeds were infused into the soil mixture, and then for the mane, a lawn mixture with long stems was added.

Let us tell you that filling the frame with landscaping begins with small parts– tail, ears, beak and limbs. The planting technology is as follows: make a hole in a lump of mixture with a sharp object to a depth that will accommodate seeds or plants with roots.
After such an injection, the depression is sealed and compacted with moss.
Each frame figure is equipped with support posts and platforms, thanks to which the frame, filled with soil mixture, stands stably in a designated place.

For ease of maintenance of the structure, the system is thought out and implemented drip irrigation. The tubes are placed along the frame for uniform watering, making it easier to care for an original and picturesque object suburban area- for topiary.
“Green sculptures” were made in gardens back in the days of the Roman Empire. In the gardens of Julius Caesar, as described by Pliny the Younger in his writings, trees and shrubs were used to create complex animal figures, inscriptions, obelisks and pyramids.
The art of creating topiaries flourished during the Renaissance. In the gardens of France, which is considered a trendsetter in this type of landscape design, real green labyrinths and rooms were created, gardeners came up with interesting and very beautiful shapes. It was the Versailles gardens in France with their exquisite topiary that became the source of inspiration for the creation of the Peterhof gardens in Russia.
In China and Japan, the art of curly pruning of trees - bonsai - is also popular. The gardens and parks in these countries are unique. Masters, cutting off all unnecessary things, create unique compositions with their own.
How to create a topiary garden
Creation is a very painstaking and lengthy process. To form perfect figure, you need the imagination of a master and a good eye. Before you start creating a topiary, you need to carefully prepare the soil and mark out the places for planting. Fertilize the soil before planting, based on the needs of the crop. This will help speed up the growth of shrubs and trees and make them more lush. Plant the plants in the garden according to the prepared plan and after they take root, you can begin to create topiaries.
The choice of trees and shrubs for a topiary garden depends on the preferences of its owners; many plants tolerate pruning well. But it is best to form figures from shrubs and trees with dense, small foliage or needles.
Easiest to shape conifers, such as:
- Thuja occidentalis Smarand,
- thuja Globoza,
- Cossack juniper,
- prickly spruce.
To create topiary from deciduous plants will go well:
- boxwood,
- barberry,
- honeysuckle,
- cotoneaster,
- hawthorn,
- Noble laurel.
You can create unusual topiaries and large figures from elm or linden. You can grow a topiary garden very quickly using beautiful spirea, bladderwort, and Tatarian maple. However, only simple geometric shapes can be formed from these plants, for example, a ball or a cube, since the plants grow very quickly and require constant trimming. 
Step-by-step master class on creating topiary
Topiary in the form of a cubeStep 1. To form a topiary, make a frame. To create a cube shape. To do this, draw a square on the ground around the plant.
Step 2. At each corner of the square, install wooden slats and firmly fasten them together with slats located horizontally. Directly above the bush you will get a structure, the wooden slats of which will serve as parameters for cutting.
Step 3. Take trellis shears and cut off the branches that extend beyond the structure. Cut slightly above the line set by the slats so that you can correct it if you make a mistake.
Step 4. Move away from the bush about 3 meters and evaluate whether it turned out evenly. Take the pruning shears and bring the figure to perfection and remove the slats.
Topiary in the form of a ball
Step 1. Form a cube from the bush, as described in the previous master class.
Step 2. Make a frame out of cardboard. Measure the height and radius of the bush, subtract 2 cm from these measurements (per cut) and mark them on the sheet. Draw a semicircle and cut out the template.
Step 3. Attach the pattern to the bush vertically and cut off the branches that extend beyond the template. Then place the leaf on the other side of the bush and also cut off any excess branches. Periodically move away from the plant to evaluate whether you have trimmed the bush evenly. 
Having learned to create beautiful geometric figures With your own hands, you can start creating creative shapes and form topiaries in the form of spirals, buttons, and complex shapes. New ideas will be suggested by the natural contours of the tree or shrub that you have chosen to form your topiary with your own hands. And your source of inspiration will be topiaries created by masters of famous gardens in the world, among which are the Ladue Public Garden in Maryland, USA, Longwood Gardens in Pennsylvania, Drummond Park in Scotland, the park at the Levens Hall estate in England, the terraced garden of the Chateau de Villandry in France, and lovers of garden art can admire not only their photographs, but also live ones. All of them are open to visits.
Gardeners form not only neat hedges, arches, geometric and creative shapes. They created topiaries, the ideas of which are suggested by the surrounding environment and which are real works of garden art.
Topiary care
Do not forget to regularly feed trimmed plants with complex fertilizers and water them so that they grow green mass and there are no bare branches. Please note that cutting stimulates tillering; accordingly, the buds located close to the cutting site begin to actively grow. As the branches grow, adjust the shape of the topiary.
It is best to start forming plants in the spring, after the foliage has appeared; adjustments to the shape can be carried out throughout the summer. Please note that it is not worth forming topiary before winter, since cutting is always stressful for the plant, and during a period when growth and development slows down, cutting can lead to the fact that it will be weakened and, as a result, susceptible to pests and diseases.
One of the popular trends in modern landscape design- topiary art. Topiaries are geometric figures and sculptures from a similar way of decorating a landscape, which was born in ancient Rome.
Craftsmen create topiary figures in the form of balls, cubes, people and animals from trees and shrubs. Unusual creations allow you to make your garden different from others, alive and interesting.
Varieties
The art of creating sculptures from plants is varied in technique and style. There are two types of topiary figures:
- traditional;
- frame.
Traditional technique involves finished tree, which is given the desired shape with the help of a haircut. Simple shapes for the garden (cubes, balls, cones) can be created by simple cutting by eye, without the use of other materials. Complex designs obtained using a metal frame a certain shape, dug into the ground near the plant. When the tree grows and begins to go beyond the boundaries of the frame, it is pruned, and in the end the desired shape is obtained.
Frame technology is more painstaking in nature. It differs from the traditional one by the presence of a special metal frame in which a tree or shrub is grown. A frame is first made, soil for planting is placed in it. Then the crop is planted. As she grows up, she fills the frame. Branches extending beyond its limits are cut off. The plant is cared for by regular watering and pruning.
Plants
Not just any plant can be used to create a green sculpture. A suitable one must have the following characteristics:
- resistance to winter frosts;
- unpretentiousness to growing conditions;
- the presence of replacement shoots;
- specific crown shape;
- slow growth.
Plants have the following properties:
- western thuja;
- common spruce;
- small-leaved elm;
- cotoneaster brilliant.
Of course, 3D shapes can be created from other plants. And the mentioned crops are most suitable for climatic conditions middle zone Russia.
Nowadays, many owners of their own garden plots use topiary landscaping. Step-by-step descriptions We will look at creating shapes next.

Frame method
The required frame can be made from 2-3 mm wire or purchased at a special store. The finished frame has gaps for penetration inside. There is a cover on top for access to inner part sculptures so that it is convenient to fill with earthen substrate or moss. By the way, before filling, the moss is soaked in water for about 30 minutes.
When filling the frame with substrate, you need to make holes where climbing plants, herbs or succulents are planted. Perfect for this:
- ivy;
- grape;
- stone rose;
- loosestrife;
- saxifrage.
When creating a topiary from climbing crops, plants with a clod of earth are transplanted from a plastic container into a metal frame, and the shoots are distributed over a stand and secured with paper clips. To make large topiary figures lighter, bags of foam balls are placed inside.
When caring for topiary, it is watered, trimmed, and pinched. For the winter, the figure is brought into a cool room or simply covered with a warm box.
Express topiary
Experts have simplified the process of creating topiary and proposed the following scheme:
- In spring, climbing plants (ivy, hops, grapes) are planted in the ground.
- A frame is installed over the plantings.
- As the plants grow, their branches are distributed over the frame, secured and trimmed.
- By the end of summer, the frame of the frame will be completely covered with green shoots.
- Further care consists of watering and pruning the plants.
Classic technology
To create a topiary using traditional technology, you will need a lot of patience, imagination, as well as the presence of sharp garden tools.
It’s better to start with the simplest geometric shapes: a ball, a cone, a cube. It is best to trim plants in March-April or summer. It is not recommended to trim in the fall; this will undermine the plant before winter.
The figure creation scheme is as follows:
- A mature shrub or tree with strong roots and lush crown. It could be spruce, hawthorn, black maple.
- A shape is drawn on the ground surface under the tree, for example a square if a topiary figure is created in the form of a cube.
- Slats or sticks are placed in the corners of the square and secured with planks. This will be an indicative frame.
- The plant is cut with trellis scissors, giving approximate outlines. It’s better to start from the top, then work on the sides.
- Check the sides for evenness and gradually trim them.
- Small protruding branches are trimmed with pruning shears.
This is how they are created simple figures for garden.

Complex geometric models
The ball is considered a complex figure in topiary art. It can be obtained from a cube by trimming its edges. The best plants for this purpose are: thuja, barberry, yew, boxwood and other plants. So, for example, you can create a topiary figure " Earth", using plants that differ in shades of green.
Cylindrical shapes are obtained from western thuja, larch, serviceberry, linden. To get such a figure, adhere to the following scheme:
- A circle is drawn on the ground.
- Install wooden stakes.
- The cylinder is cut.
To create a cone-shaped figure, dig in three poles and fasten them at an imaginary top.

Traditional technology using a frame
When creating topiary figures, the frame can be used to simplify the process of cutting the desired shapes from plants. To do this, you need a removable metal frame, which is installed on top of the wood. This technique is usually used by beginner topiaries.
The plant develops in a mesh frame, and the master only needs to trim off the stray branches. Once the crown is formed, the frame is removed. However, this is not always easy to do; often the tree grows together with its “frame”. You need to remove the frame very carefully so as not to damage the crown.
Artificial topiary
Not everyone can create natural topiary. An excellent alternative to them are topiary figures from Their advantages are obvious:

The process of caring for artificial figures involves regular removal of dust and snow.
The elements of the figure are fixed to a wire frame. Imitation leaves and green fabric are used. The master's fantasy in this case is not limited by anything. This creation can be installed outdoors or indoors.
The art of topiary is extremely diverse and attractive. No wonder it is gaining more and more fans. Starting with green figurines in pots, you can move on to real garden masterpieces.