The first paper stapler was made in the 18th century for the French Emperor Louis XV. Each staple was marked with the sign of the royal court.
In 1867, D. McGill received a patent for a press that allowed sheets to be fastened using brass fixtures.
His device became the basis for modern staplers. Modern devices have smaller sizes and weight. They are much more convenient to use.
Types of staplers
In 1997, the stapleless stapler was invented. This stapler staples paper into small strips cut from paper. Therefore, its owner does not have a question about how to charge the stapler. There are three types of staplers: standard, mini and construction.
They are equipped with manual or electric drive. A stationery stapler is used to staple paper sheets with metal staples. It is used to make brochures and notebooks. The conventional stapler staples up to 50 sheets. One pack contains 20 plates of 50 staples. When you press the handle of the device, the spring that is inside is stretched and unclenched, driving in the bracket. It passes through the paper and hits the deflecting plate, which bends its ends. Some models of staplers bend the staples in two different ways: inside or outside. In the second case, the bracket is easily pulled out. This stitching method is used to temporarily secure the sheets. At the back of some models there is a protrusion for extracting the staples. They are also equipped with a mechanical amplifier. best material for the stapler - metal coated with plastic. To prevent the device from scratching the surface of the table, plastic or rubber pads are put on its bottom.
A construction stapler is used for upholstery of furniture and walls. It has a high rate of fire and fires up to 60 hits per minute.
There are also stapler cartridges in some models of copiers and printers.
How to load the stapler with staples?
Before filling the stapler, you need to make sure that the selected staples fit it in size. Manufacturers indicate their size on the packaging of the device. For convenience, they are marked with numbers. How to charge the stapler? Most models open from the top. In some cases, before opening, you need to move the side fasteners. Other staplers open at the push of a button. The opening method is indicated in the user manual.

How to load the stapler with staples? They are placed in the compartment so that their ends fall into the slots. You can use tweezers to refill the mini stapler. Then the stapler is closed. In this case, a characteristic click should be heard. The stapler is checked by fastening a pack of sheets of paper. If the staples are bent and stuck inside, you need to open the stapler and align their rows.

How to charge the stapler? First you need to make sure that the stapler is locked. Then you need to find the button that opens the tray. It is usually located on the back of the device. How to charge the stapler? Remove the staple holder from the device. The remaining staples are discarded. The stapler is cleaned of dust and debris. Then it is turned over and the staples are inserted into it upside down.
Using a stapler, without any nails, you can fasten materials of small width and density. It is an indispensable tool in stationery, construction and furniture industry. In the article we will figure out how to insert paper clips into the stapler.
Stationery staplers
These tools are very simple and designed for the average average person who is not versed in technical "troubles". Everything is simple here. You flip the top cover - and the spring with the clamping mechanism has moved back. Insert a clip of paper clips with the tips down and close the lid. The clamping mechanism returns to its place, and the tool is ready for work again.
Those who wish can watch a video in which the boy shows how it is done correctly.

Construction staplers
They are more massive and have a slightly different structure, although the principle of operation is the same. The spring clamping mechanism pushes the clip clip to the shock, after each operation the next clip takes its starting position and as a result of pressing the spring key percussion mechanism drives it into the right place, thereby pressing the next sheet of cardboard against the wall with a paper clip, the material against the wood from which the frame is made upholstered furniture, or only to the formwork of the future concrete foundation. Let's figure out how to insert paper clips into a construction stapler.

Wrong option
The mistake of many is that when the stapler runs out of staples, they, having pulled back the double-sided protrusions of the frame lock, open it and try to insert the next clip of staples through the front part from the side of the impact mechanism. As a result, with an awkward movement, the spring mechanism now and then throws the clip back, and it flies away for many meters, after which it has to be searched for a long time. Often, a clip can also fly into the eye of an unlucky "stapler operator." Here is a video that shows how not to do it, although the operator himself does not suspect it.

Correct option
The right way how to insert staples into a stapler for construction or furniture variety is to, by pressing on the back of the spring-loaded staple feed holder, release its groove from the lock hole and pull it out completely. After that, you can even insert more than one clip into the frame and return the spring of the mechanism to its place, thereby ensuring its smooth operation for a long time. Here is a video on how to do it right.

The frame should be opened as in the first, incorrect case only when one of the staples gets stuck in the exit slot.
We hope our article was useful to you. Happy reloading!
Mechanical stapler allows you to nail plastic panels, clasps for lining, fabric for furniture, wooden or plastic surfaces.
There are three types of staplers: mechanical, electrical and pneumatic.
Mechanical staplers are affordable, compact, lightweight, and easy to maneuver. In the following, we will only talk about them.
How to choose a stapler?
In short, it is undesirable to buy the cheapest options, as well as plastic models. metal tool more powerful and more reliable.
Choose professional models that have an adjusting screw (lamb) at the top. It helps to regulate the force with which the tool will punch through the material.
Many people forget
Before working, adjust the adjusting screw according to the material of the surface to be worked on.
If it's a hard plywood, it will need a lot of punching through the material, so it's worth setting a lot of force. If it is a loose surface, the force must be reduced so as not to break through the fabric, or for example pvc panel which you shoot.
During operation, it is recommended to press the lever with one hand, and press the adjusting screw with the thumb of the other hand. Then the return will be minimal and the load will be distributed evenly in the stapler. You will be able to hammer in the brackets much better.
How to load staples into the receiver
The design of all mechanical hammers is almost the same. There is a handle-lever, due to which the pressure occurs, and at the bottom of the stapler there is a metal plate that opens the receiver. Here we have to load the brackets.
Before buying brackets in hardware store, you need to find out which size is suitable for your device. As a rule, the size and type of suitable staples are indicated on its body.
For example, on the body of our stapler, the width is 12 mm and the depth is 6-14 mm. This means that you will only be able to charge staples from that range.
Smaller or larger brackets will not fit the receiver. The size of the staples in millimeters is also indicated on their packaging.
To fill the shells into the stapler, you need to open the metal plate on the back surface.
To do this, you need to take it big and index finger on both sides, then pull towards you and slightly down. Thus, we wring out a metal tab on the back of the plate, and pull out a metal spring, similar to the one in a regular stationery stapler.
If there are still staples left in your stapler, they will fall out after you pull out the spring. If they are not there, then it is time to put new ones for further work.
Staples are inserted into the receiver (hole in the position of the letter "P"). Next, we insert the spring back, closing the metal foot. That's it, the tool is loaded and ready to go!
How many shells will fit
Now a little about how many shells fit in the stapler. Staples are sold in small rows. The row can be divided into several parts independently, slightly breaking it with your hands.
1-1.5 rows are loaded into the tool. 2 rows rarely fit in the receiver, so if there is a lot of work to be done, it is better to prepare halves of the rows before starting work.
What to do if the bracket is stuck
It is worth noting another very important point which will help you in your work. It happens that the brackets are bent and stuck in the exit hole. They cannot be hammered into the surface and cannot be pulled out by hand.
In this case, we need to pull out the feed magazine completely.
This possibility exists for almost all professional staplers.
First you have to repeat the opening of the metal plate and pull out the spring.
In this way, you will pull out the entire feed magazine that was in the tool.
You will see a jammed bracket, which is now easy to pull out with your hands.
Assembling the stapler back is not difficult: the entire pulled out block returns to its place with a push. When you do this, you should hear a click. After that, do not forget to put the spring in place.
More than just brackets
Some staplers can work not only with staples, but also with cloves. various forms. The designations with which the stapler works are indicated on its body or in the instructions.
Carnations are tucked into the stapler in the same way with staples, but you need to be careful after pulling out the spring. A number of carnations must be loaded along one of the outer faces of the letter "P", and not inside this very letter!
If you want it to give out two nails at once side by side when working with a stapler, the second row is loaded along the second outer edge. Next, the spring is inserted and the stapler closes.
The construction stapler is a multifunctional mechanism. They are used when it is necessary to connect the same or different not very hard materials to each other, for example, plastic, wood, film, insulation, plywood. This tool is called differently: tacker, staple gun, stapler, nailer, stapler. Fastening individual elements between themselves is carried out using staples, studs or small nails. To know how to work with a construction stapler, you need to understand its design, the types of fasteners suitable for it, the method of setting up and replacing staples.
The furniture stapler is widely used by builders and furniture makers, as well as representatives of other fields of activity. By type of energy used for the implementation of the shot during operation, the following types of takers are distinguished:
- mechanical;
- electrical;
- pneumatic.
The first two varieties are for domestic use, and the last type of tool is considered professional and is used mainly when performing work in large volumes. The principle of operation of mechanical and electric staple guns is based on the ejection of fasteners by the force of a cocked (compressed) spring. After pressing the trigger, it unclenches, which causes the movement of the striker. He strikes the staple (nail or stud), driving it into the surface of the material.
Construction of a mechanical stapler
Manual (mechanical) staplers differ from analogues in a simpler design. They consist of the following components and parts:
- cocking handle;
- a safety bracket that protects against accidental shots when transporting the tool;
- percussion springs;
- shock absorber;
- drummer;
- striker;
- impact force regulator, which provides the ability to work with material of varying degrees of hardness (different density);
- corps;
- cocking spring;
- store for fasteners;
- rammer (with spring and latch);
- a tip that allows you to accurately hammer fasteners.
The scheme of the device of the staple gun is shown in the photo below.

Impact mechanism- this is master node stapler, cocked by the strength of the muscles of the worker. It can be equipped with two types of springs:
- twisted;
- spring (lamellar).
Manufacturers indicate in the operating instructions for the products the type of spring installed.
coiled spring mechanism, presented in the photo above, equip cheap models. They can be easily distinguished by the adjusting screw located on the tool body with opposite side from the opening of the staples. But it is also possible that the lamb will be missing, then you will need to refer to the instructions to determine the type of spring installed.
leaf springs more powerful, but more expensive than twisted analogues. At the same time, the return of the tool equipped with them during operation is less. They also have a long service life and are easier to cock. The lamellar spring mechanism is installed on models intended for professional use.

For the convenience of working with the tool, the handle is covered with rubber pads, and the magazine is made with a transparent insert (which helps to easily control the presence of staples or nails).
Design features of electric and pneumatic staplers
The device of the electric stapler of the network type is shown in the photo below.
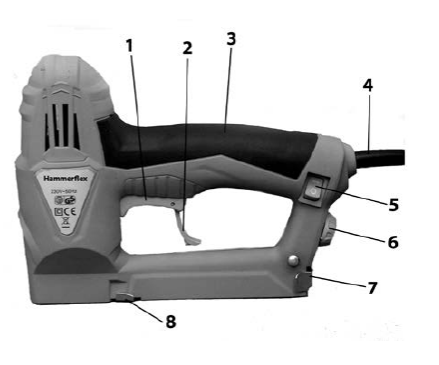
The numbers in the photo correspond to the following structural elements:
- trigger;
- fuse;
- handle with a special coating;
- power cord;
- on/off switch;
- shock force regulator;
- push mechanism;
- score.
Inside the instrument is electric drive and shock mechanisms. In this case, the electric motor is designed to cock the spring.
Battery models do not have a power cord; batteries are installed instead.
The device of a pneumatic type furniture stapler is more complicated than mechanical counterparts. The pneumatic tool consists of the following structural elements:
- corps;
- a cylinder with a piston inside it;
- start-up systems (trigger mechanism);
- shop for fasteners with a pusher;
- percussion mechanism;
- inlet fitting designed to be connected to a hose tool high pressure;
- fastener penetration depth regulator (impact force);
- air distribution unit.

The pneumatic type shotgun is powered by the energy of compressed air supplied by a compressor or from a cylinder. After pressing the trigger, the gas passes through the air distribution unit. Further compressed air enters the cylinder, causing the piston to move. The latter transfers energy to the striker striking the fastener. After impact, the staple or nail is driven into the surface of the material.
Classification of used staples
Staples are required to use the stapler. They are divided into certain types according to the following criteria:
- according to the material from which they are made;
- according to the degree of hardness;
- by the presence of coverage;
- by size;
- in form.
According to the material of manufacture
Staples according to the material are:
- aluminum, used in working with non-solid materials;
- copper (expensive), also intended for soft parts;
- steel, suitable for both non-solid and soft materials, but rusting over time;
- made of stainless steel (stainless steel) reliable option in the most different conditions, but at a high price.
Furniture staples can also be galvanized to prevent them from rusting.

By hardness
By hardness, fasteners are divided into the following varieties:
- simple;
- very hard;
- red-hot.
Fastener ends can also be sharpened differently, facilitating its driving under certain conditions.
By shape
Based on the shape of the brackets, the following varieties are distinguished:
- U-shaped;
- U-shaped;
- T-shaped (pins).
Most often in practice, fasteners in the form of the letter P are used, and U-shaped ones are used mainly during laying cable lines. Pins are almost invisible fasteners. They are used when fasteners need to be as invisible as possible.

Standard staple sizes
Almost all manufacturers of tackers also produce their own brackets for them. But at the same time, there is a mandatory standardization of product sizes - this allows you to insert staples into a staple gun from different companies when replacing.
Under the dimensions of fasteners understand the following parameters:
- staple thickness (denoted English letter a);
- the length (width) of its back (b);
- leg height (depth).
Based on these overall parameters, the following are distinguished the most popular types of brackets in practice.
- 53 - the most common size with a = 0.7 mm, b = 11.4 mm and a leg height of 4 ÷ 14 mm.
- 140 having following sizes: backrest width equal to 10.6 mm, thickness 1.2 mm and depth from 4 to 14 mm.
- 36 - this marking indicates that U-shaped fasteners can be used for the staple gun.
- 300 are nails that are only suitable for a staple gun.
It should be taken into account that various companies the same types of fasteners are designated differently. To match fasteners from different manufacturers use the table below. In terms of size, it will not be difficult to determine the brackets at all.

There are no universal types of fasteners suitable for any job.
How to insert staples into a stapler
Changing staples in a mechanical tacker is easy. To load new fasteners, proceed as follows:
- the tool is blocked from accidental switching on with a fuse;
- on the back side of the staple gun, the magazine cover is opened, behind which there is a groove for fasteners;
- a rod equipped with a pusher spring is taken out from the inside;
- the rail of brackets is turned with the tips against the handle, and then inserted into the groove;
- install a rod with a spring inside the tool to its original place, where they clamp the fasteners;
- close the store lid;
- remove the fuse;
- make several shots in test mode to test the tool's performance.
With nails when charging the stapler, proceed in the same way.
The photo below shows how to place staples in a mechanical stapler.

Blocking the staple gun from an accidental shot is a mandatory procedure that ensures the safety of the work.
To load pneumatic staples or electric staplers, act according to a scheme similar to a mechanical tool:
- block the device
- turn over the tool;
- by pressing a special button, they take out the tray for fasteners;
- correctly insert staples or pins (nails) into the tray;
- insert the "clip" until a click appears;
- unlock the tool and check its operation.
When you press the button on the stapler, the fastener tray may pop out or its lid may open, depending on the stapler model you are using.
Some modifications of mechanical staple guns have a different principle for replacing fasteners: they are made with a chute that extends when the button is pressed. Staples are placed in the elongated tray and inserted back into the store until it clicks. The whole process, showing in detail how to thread the staples in this case, is demonstrated in the video:
Stapler adjustment sequence
Setting the staple gun is needed in such cases:
- after purchasing a tool before starting work;
- if the stapler stops completely driving fasteners;
- when starting to work with a material of a different density than the previous one.
If the stapler stops driving fasteners completely, this is due to gradual shock spring wear or with its loosening. Until some time, regulation will help, but after that you will need to purchase a new stapler.
The dimensions of the fasteners for which the tacker is designed should be taken into account: if the size of the brackets exceeds the allowable according to the operating instructions, then the adjustment has nothing to do with it, you just need to select the appropriate consumables.
Mechanical staple guns with a coiled spring have a screw that regulates the degree of its compression.. It is shown in the photo below with a red arrow.

If you turn the adjusting screw clockwise, then the spring will be compressed more strongly, its potential energy will increase. The result will be a blow of greater force. The ejected staple will go deeper into the surface of the material. Turning the adjuster counterclockwise will loosen the spring. The blow will also become weaker. By turning the screw, you can adjust the stapler to work with material of different hardness (density).
At mechanical models staple guns with a spring (lamellar) spring of the percussion mechanism, the regulator is located under the handle. By rotating it in different directions, they regulate the force of the shot. It is required to reconfigure the impact mechanism each time, starting to work with a different material. After adjusting the spring compression, it is recommended to check the operation of the tool on a workpiece that is no longer needed.
The tuning process ends when the fasteners enter the material with the entire length of the legs without punching it with a “back”. It is recommended to practice by turning the adjuster from minimum to maximum spring compression.
Rules for the safe operation of the tool
When working with a construction stapler, it is imperative to follow safety regulations. The main requirements are reduced to the following points.
- When replacing staples, block tool with the help of a fuse against sudden, unforeseen switching on.
- It is forbidden to point the tool at the hand or other part of your own body, as well as at other people or animals.
- When transporting or storing the stapler, it is necessary to fix its handle with a fuse.
- Only a person in a normal psychological state (not under the influence of alcohol, psychotropic substances or drugs) is allowed to work with the staple gun.
- The workplace should be well lit and kept clean.
- It is necessary to constantly use such funds personal protection like glasses so that nothing accidentally flies into the eye. So that the bracket does not fly off when fired, it is necessary to monitor the presence of metal inclusions on the working surface, bypassing or removing them in a timely manner.
- If the fastener gets stuck, then it must be carefully removed.
- When working with blanks small size they must be fixed motionless with a vice or clamps; it is forbidden to hold them with your hands.
- The body position should always be stable and as comfortable as possible, and shoes with non-slip soles.
Instructions for safe work with electric and pneumatic staplers contains additional items:
- mains power tools must not be used inside hazardous areas;
- it is allowed to connect only turned off equipment to the outlet;
- the power cord with plug and the body of the model being used must be intact;
- it is forbidden to use an electric staple gun in the rain or indoors with a high level of humidity;
- unauthorized persons must be at a distance of more than 2 m;
- the pneumatic tool used, the high-pressure hose to it, as well as the rest of the system must be free of mechanical damage;
- during work, it is necessary to ensure that the power cord is located behind the tool so that it does not interfere.
Nothing complicated when using mechanical, pneumatic, as well as electrical types construction staplers no. It is only necessary to use suitable fasteners (specified in the operating instructions) for work, and in front of it, adjust the impact mechanism for a specific material. At the same time, constant observance of safety precautions will prevent injury. Attentiveness and accuracy is one of the main guarantees of high-quality performance of any work.
A mechanical stapler allows you to nail plastic panels, lining clamps, fabric to furniture, wooden or plastic surfaces.
There are three types of staplers: mechanical, electrical and pneumatic.
Mechanical staplers are affordable, compact, lightweight, and easy to maneuver. In the following, we will only talk about them.
How to choose a stapler?
In short, it is undesirable to buy the cheapest options, as well as plastic models. The metal tool is more powerful and more reliable.
Choose professional models that have an adjusting screw (lamb) at the top. It helps to regulate the force with which the tool will punch through the material.
Many people forget
Before working, adjust the adjusting screw according to the material of the surface to be worked on.
If it's a hard plywood, it will need a lot of punching through the material, so it's worth setting a lot of force. If it is a loose surface, the force must be reduced so as not to break through the fabric, or for example the pvc panel that you are targeting.
During operation, it is recommended to press the lever with one hand, and press the adjusting screw with the thumb of the other hand. Then the return will be minimal and the load will be distributed evenly in the stapler. You will be able to hammer in the brackets much better.
How to load staples into the receiver
The design of all mechanical hammers is almost the same. There is a handle-lever, due to which the pressure occurs, and at the bottom of the stapler there is a metal plate that opens the receiver. Here we have to load the brackets.
Before buying brackets at a hardware store, you need to find out what size is right for your machine.
How to fill a construction stapler
As a rule, the size and type of suitable staples are indicated on its body.
For example, on the body of our stapler, the width is 12 mm and the depth is 6-14 mm. This means that you will only be able to charge staples from that range.
Smaller or larger brackets will not fit the receiver. The size of the staples in millimeters is also indicated on their packaging.
To fill the shells into the stapler, you need to open the metal plate on the back surface.
To do this, you need to take it with your thumb and forefinger on both sides, then pull it towards you and slightly down. Thus, we wring out a metal tab on the back of the plate, and pull out a metal spring, similar to the one in a regular stationery stapler.
If there are still staples left in your stapler, they will fall out after you pull out the spring. If they are not there, then it is time to put new ones for further work.
Staples are inserted into the receiver (hole in the position of the letter "P"). Next, we insert the spring back, closing the metal foot. That's it, the tool is loaded and ready to go!
How many shells will fit
Now a little about how many shells fit in the stapler. Staples are sold in small rows. The row can be divided into several parts independently, slightly breaking it with your hands.
1-1.5 rows are loaded into the tool. 2 rows rarely fit in the receiver, so if there is a lot of work to be done, it is better to prepare halves of the rows before starting work.
What to do if the bracket is stuck
It is worth noting another very important point that will help you in your work. It happens that the brackets are bent and stuck in the exit hole. They cannot be hammered into the surface and cannot be pulled out by hand.
In this case, we need to pull out the feed magazine completely.
This possibility exists for almost all professional staplers.
First you have to repeat the opening of the metal plate and pull out the spring.
In this way, you will pull out the entire feed magazine that was in the tool.
You will see a jammed bracket, which is now easy to pull out with your hands.
Assembling the stapler back is not difficult: the entire pulled out block returns to its place with a push. When you do this, you should hear a click. After that, do not forget to put the spring in place.
More than just brackets
Some staplers can work not only with staples, but also with carnations of various shapes. The designations with which the stapler works are indicated on its body or in the instructions.
Carnations are tucked into the stapler in the same way with staples, but you need to be careful after pulling out the spring. A number of carnations must be loaded along one of the outer faces of the letter "P", and not inside this very letter!
If you want it to give out two nails at once side by side when working with a stapler, the second row is loaded along the second outer edge. Next, the spring is inserted and the stapler closes.