To understand which autofocus mode to choose, you must first understand what you are photographing. Autofocus modes and settings on all cameras are about the same. They may differ in name and be managed differently, but the principle is the same everywhere. So what is autofocus?
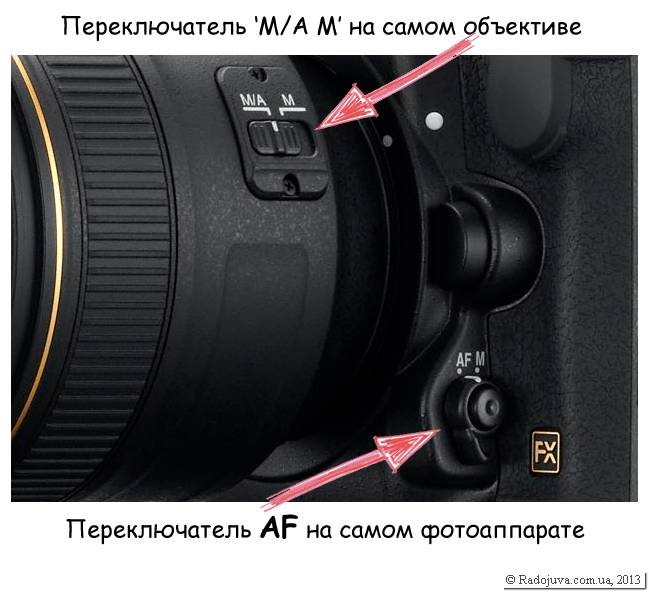
First, make sure you have autofocus turned on. On advanced cameras (Nikon D700/D800/D7000) there is a separate switch that has M (manual focus) mode and some other modes - different autofocus, or just AF.

The M (Manual) mode works the same way cameras did in the 50s, that is, without autofocus. If you do not have such a switch, then the autofocus modes on your camera are controlled through the menu.
In addition, autofocus lenses with a built-in motor () also have an autofocus switch, very often marked M / A - M. Make sure that the lens is not in manual mode either. Do not confuse the AF-S lens type with the AF-S autofocus mode, they are different things, although they are called the same thing.
Autofocus modes are as follows:
AF-A (Auto). Automatic mode, in which the camera decides for you how to focus. If you are not sure which mode you need, choose the automatic mode.
AF-S (Single). Mode for static scenes. In this mode, the camera focuses once when you press the shutter button to the middle, and that's it. The camera no longer focuses until you release the button. Great option for landscapes and.

AF-C (Continuous). Tracking mode, where the camera constantly follows the subject and adjusts autofocus continuously until you release the shutter button. Turns on when you press the shutter button halfway. This mode is indispensable for photographing wildlife, sports events, etc.

In the Custom Settings Menu, in the Autofocus section, you can find AF-S / AF-C priority selection.
Release is the shutter release immediately, even if the image is not at all in focus. I hardly remember ever having .
Focus The shutter only works when the image is strictly in focus. This is very slow and you risk missing a frame.
I recommend value release+focus for AF-C, it's something in between. Even if the first frame is out of focus, the next ones will be much better in continuous shooting. In this case, you will not lose the first frame, although it will be a little blurry. Focus is good for AF-S because nothing moves in the frame.
In addition, you still have to choose the type of autofocus area.
Nikon usually offers three options:

On some cameras (Nikon D3100), instead of a switch, this is done through the menu:

white rectangle. This is focusing on the nearest object, this mode can be considered automatic, because the camera itself decides which autofocus sensors to use. If you are in doubt about which mode you need, choose a white rectangle. In AF-S mode, the AF points where the image is in focus will be highlighted. The more dots highlighted, the better. In AF-C mode, nothing will be highlighted.
crosshair. This is the dynamic zone mode, used when photographing moving objects and requires further adjustment, which is described below. The crosshair works dynamically in AF-C mode. In AF-S mode, this is the same as spot focusing. In dynamic mode, you select the focus point, and further autofocus behavior depends on the selected autofocus area.
Dot. You simply focus on the selected point, and select the point with the selector that you usually use to scroll through photos. It's very handy when you know exactly what needs to be guaranteed in focus, such as the eyes when photographing a portrait.

Selecting the autofocus area. The AF area for dynamic mode (crosshair) depends on the specific camera model, namely how many AF points are available. The more expensive the camera, the more points. The RGB sensor, which was mentioned in the article about polarization, is responsible for controlling the autofocus zones.
Conditionally, the areas can be divided into two types:
Multiple sensors (AF-Area). Focus information comes not only from the sensor you have selected, but also from the surrounding points, and the surrounding sensors are not highlighted in any way. For example, on the Nikon D7000, you can select a zone from 9, 21 or 39 points. Usually, the faster something moves in the frame, the more area is required. To be honest, I don't use these zones, I prefer 3D-tracking.
3D tracking. This mode can be on some models along with a white rectangle and a crosshair, on other models somewhere else, for example, when choosing the size of the autofocus area. As the name implies, this is a tracking mode, and when tracking, not only the distance to the object is taken into account, but also the color. You choose a focus point, autofocus clings to what is under this sensor, and then starts to follow it if the subject moves or you turn the camera.
The fundamental difference between AF-Area and 3D-tracking is that in the first case, the camera focuses on what falls into the selected autofocus area, and in the second case, the camera itself moves the area behind the object, switching autofocus sensors. Therefore, in 3D mode, it is very convenient to focus on something specific, then move the camera to frame it differently, but the autofocus will still focus on what it was originally focused on. This differs from the AF-S mode in that AF-S is not aware if the object moved further or closer during framing, or even flew out the window.

In addition, 3D tracking can even replace single focus point selection. Instead of going through the points with the selector until you get to the one you need, you can simply visit the center in 3D mode and then crop it as you need, while the camera will keep focus on the object, moving the focus point, switching autofocus sensors. The object, at the same time, will not be able to escape from autofocus.

Keep autofocus in auto mode (AF-A, white rectangle), this mode will work fine in most situations without your help. If the work of autofocus did not suit you in any particular case, then start thoughtful settings.
That's all autofocus.
When photographing, along with the settings, ISO and image quality, one of the most important parameters for a SLR camera is correct setting focus mode and method.
Nikon has a variety of options for how focus works with different combinations of focus modes and focus areas. Typically, focusing on modern Nikon digital SLR cameras occurs when pressing the shutter button halfway, or by pressing the dedicated AF-ON button.
Focus modes:
'AF-S' or ‘S’ (Auto Focus Single)- focus mode cameras, at which the camera focuses when the shutter button is pressed halfway, and when successful focusing is achieved, it stops focusing. Once pressed - once focused. In camera manuals, the mode is often translated as ‘ Single-servo AF‘. To change the aiming accuracy, you need to release the button and press again. The mode is suitable for static scenes.

Focus mode switch to . The same is available on cameras, D1, D2, etc.
'AF-C' or ‘C’ (Auto Focus Continuous)- tracking continuous (continuous) auto focus mode of the camera (in the instructions often translated as ' Continuous Servo AF‘). When the shutter button is pressed halfway, the camera constantly tries to focus correctly. Press the button - and the camera constantly monitors the focus. A very useful mode when subjects are moving or the composition is changing.

This is how the focus mode on cameras is selected by type, D4
AF-A (Auto Focus Automatic)- automatic focus mode selection cameras. In this mode, the camera can choose to work in AF-S or AF-C mode. Basically, all amateurs shoot in AF-A mode and often do not even know about the presence of other modes. I noticed that the mode AF-A often behaves like AF-S mode.

AF (auto focus)- general auto focus mode. The mode is turned on on the camera itself, not to be confused with the 'A' mode on the lens itself.
AF focus mode switch (lever) on the camera
MF(manual focusing)- manual focus cameras. The mode is activated using the camera menu. Usually, only focusing has such a mode. In this mode, you need to manually turn the focus ring on the lens to achieve the correct focus. On the one hand: manual focus can be difficult for beginners, on the other hand: it vital required method focus for advanced photographers and professionals. Manual focusing on the CZK is one of the major advantages over conventional digital cameras (soap dishes). Very often, the automation of the camera and the lens cannot determine how to focus correctly, and to achieve optimal focus, it is enough to switch to manual mode and tell the camera to focus manually.

Focus mode switch using Nikon D5100 camera menu
M (M - manual focusing) - manual focus on the lens or on the camera. Same as MF. Attention: Not all lenses have a focus mode switch, for example, the lens does not have any focus switches at all. Important: In order to switch to MF manual focus mode with a lens that does not have a focus mode switch, you need to switch the focus lever on the focus camera to ; on the focus camera, only MF mode with such a lens will always be available. About different types of lenses and cameras are described in detail in the section.

A (Auto)- auto focus mode lens. In this position of the focus switch on the lens, only automatic focusing with the lens is available. Attention: not all lenses have such a focus operation switch, for example, the switch on the lens is shown below.

M/A (autofocus with manual override)- auto focus lens with manual override. Attention: Not all lenses have this focus mode, the example below shows the switch on the lens. This mode involves automatic focusing. with instant manual focus adjustment, while the lens does not need to be switched to focus mode 'M'. You can read more about this mode.

AF-F ( Full Time Servo Auto Focus) - continuous focus mode for shooting video. Attention: This focus mode is only available on modern cameras with video recording capabilities. This mode does not work when taking pictures. Normally you can't find the mode in the menu AF-F, it is only available in Live View when entering the info menu. This is very useful mode, it allows you to record movies with full-time auto focus. This mode is only available in cameras starting from .

Important: due to the fact that all Nikon CZKs have different controls and different menus, each camera switches focus modes in its own way. In the general case, the choice of focus mode M, AF, S, C is responsible switch near lens mount to focus and adjust in the menu of the camera itself. For non-motorized cameras, the focus mode is selected only through the camera menu. Various combinations settings for different types chambers are shown in the diagrams above.
Damn important: if you use a focusing camera, and there is a lens on it with auto focusing but focusing and without a focus mode switch on the lens itself, for example, a bundle (camera) and a lens (without a focus motor and without a focus mode switch) - for manual focusing, you must definitely switch lever near the camera mount to the 'M' position, otherwise with manual focus can damage the camera.
A number of cameras from Nikon have a built-in rangefinder (focus indicator in the viewfinder). The rangefinder in the viewfinder can tell you in which direction you need to turn the focusing ring on the lens in order to achieve the correct focus. The rangefinder works with both automatic and manual focusing. There is a rangefinder in cameras, etc. In general, on old lenses that could not focus automatically, there is a special focusing scale on which the distances to the focusing object are indicated. It's a pity that when using old optics on younger Nikon cameras, the rangefinder refuses to work. With manual optics, the rangefinder only works on older Nikon cameras.

On any Nikon CZK camera, a green circle in the viewfinder in the lower left corner of the viewfinder is responsible for the accuracy of focusing on the selected focus point. When it is lit, it means that the sharpness of the selected point is normal. The green dot (focus confirmation point) is an indispensable assistant when working with old class lenses and the like, for example, such as

Advanced cameras have fine-tuning how focus works: release priority and focus priority in AF-C and AF-S mode.
Usually in AF-C mode, the choice is:
- FPS frequency - shutter release is more important for the camera than focus accuracy, this is called release priority
- FPS + AF frequency - shutter is more important for the camera, but it also takes into account focusing accuracy (not available on all cameras)
- Focus - focus is the most important thing for a camera, not shooting speed.
Using the priority setting, you can set what is more important when shooting - focusing and then releasing the shutter, or releasing the shutter and ignoring focus. I set AF-S priority to focus priority mode, AF-C to shutter priority mode.

Important note:
Live View (live view)
live view allows you to turn a complex SLR camera into an ordinary soap dish, that is, you can focus (take pictures) using the large display of the camera itself, and not through the optical viewfinder (peephole). In Live View mode, focusing is by contrast. This method is much slower than normal focusing through the optical viewfinder. Moreover, the difference in focusing speed in Live View mode and through the optical viewfinder can be dozens of times. Some cameras have two focus modes in Live View. The first is “tripod” focusing, it is done as on conventional digital cameras (dichotomously, in contrast). The second is that you can frame the frame through Live View, but when you press the shutter button to focus, the camera turns off Live View, focuses through the normal focus system, and then turns on Live View again or takes a picture. A simple description of how Live View works can be found on Dmitry Evtifeev's blog.


Settings are responsible for working with focus points AF-area mode (focus area mode).
- Automatic (auto-area AF), indicated as a white rectangle. Focuses on the nearest subject using all available points.
- Dynamic (dynamic-area AF), focusing works only on one point, but takes into account information from nearby points
- Single point AF, focusing is performed on only one point.
- Additional: 3D-tracking, or a choice of several zones. These settings are not available on all cameras and are often sub-functions of dynamic focus area selection.

Important:
It is very convenient to set up the selection of the focus area method for amateur and advanced amateur cameras using a soft key (as I did on). This will allow you to switch very quickly between focusing on one point, automatic selection zones, dynamic mode, 3D tracking, etc. Nikon professional and flagship cameras have a special zone switch, which simplifies the work with professional equipment.
Attention:
in manual focus mode (M, MF), only one focus point can be focused.
Important:
A number of cameras can show on the picture which point or group of points was in focus. When viewing a picture, you can activate a mode in which the focus points will be indicated by squares. This mode is supported only by professional cameras of the type, and all full-frame. This is convenient because when setting up a quick preview of the image at a scale of 1 to 1, zooming is done exactly at the focus point that was taken. This allows you to quickly check and select good sharp shots. On advanced amateur and amateur cameras, to view the correct focusing, you should hold down the zoom button, and then use the selector to find the area in the picture that was focused on. If your camera does not have a function that shows which point was in focus, you can use the ViewNX software that came with your camera. The focus points can be displayed on the computer display. Sometimes this is very helpful. In the photo examples, I just copied the work of the ViewNX 2 program.
Important:
ViewNX only shows focus points on the computer when the picture was taken in AF-A, AF-S, AF-C with focus priority. If AF-S, AF-C with shutter priority is selected, the program will show focus points only if the camera was sure that focus was achieved correctly.
Important:
Not all Nikon cameras allow you to change the focus area and type when using automatic modes (green mode). AT modes P,A,S,M everything can be customized to your taste.

Function "circle focus points"
This function simply allows you to move the focus point in a circle, thus looping it. When the far right point is selected, pressing the selector right will move the focus point to the far left. This function simply allows you to speed up the work when focusing on a single point.
Wide and standard focus area
In some cameras, you can select a wide focus area, as opposed to a normal one. A wide focus area reduces the number of focus points (zones). For example, with 11 focus points, 7 wide zones are created. Optically in the viewfinders, the zones will be larger in size than the dots. This sometimes makes it easier to work with the camera.
Focus adjustment (adjustment)
Sometimes the lens may malfunction and focus behind the subject (back) or in front of the subject (front) of focus. Popularly, such a lack of lenses is called back focus, front focus (back and front focus). Some cameras may adjust to the "wrong" lens. To do this, you need to find a focus adjustment in the camera and correct the focus. Only , D500 , D7500 , D800e , D800E , D810 , D810a , , D3x , , D4s , , , have tuning.
Focusing with "dark" lenses
Almost all Nikon cameras can focus automatically without problems only when using lenses with apertures up to F / 5.6. This is stated in the camera manual. When using lenses with a smaller aperture, such as the Tamron 28-300mm F/3.5-6.3 XR Di VC LD Asph (IF) Macro, focusing problems at F/6.3 may occur. Also, when using , which lower the effective "converter lens" values, focusing problems may also occur. Only a few cameras can focus without problems with lenses with an aperture of F / 8.0 - these are Nikon D4, D4s,,
Single point focusing with Nikon D2Xs camera
Cross-shaped focus points (sensors) vs regular focus points
No matter how much I used focusing on one point, I did not find a difference in the quality of focusing on a cross-shaped point and on a regular focus point. Basically, they say that cross-shaped focus points (sensors) are much better at focusing than ordinary points. It is generally accepted that cross-shaped focus points do a better job with scenes like 'wire against the sky'.
Focus illumination
Nikon cameras have a special light bulb that helps to focus in dark conditions. The light bulb simply illuminates the subject of focus and autofocus is easier to deal with focusing. In AF-C mode, the backlight may not turn on. The focus light is often referred to as a "spotlight" and is recommended to be turned off. Personally, I have the backlight turned off, but in poor lighting conditions I use a flash that has its own "red spotlight" with a long range. More details about flash spotlight in.
Everything is complicated and little is clear?
Then just turn on AF-A and the icon with a rectangular focus area. Automation does a good job with basic tasks. I recommend fully automatic focusing for "home" use. Sometimes fine-tuning focus point modes doesn't pay off.
Which Nikon camera has the best focus?
Conclusions:
Learning how to manage focus modes will help you achieve the desired result more accurately and quickly. I strongly recommend experimenting with the modes and focus areas on your camera.
When setting up the camera before shooting, along with shutter speed, aperture and ISO value, you need to set the focus mode.
Nikon cameras have many various options focus. You can select both modes and focus areas.
Focus modes:
AF-S (auto focus single)- In this focus mode, the camera starts to automatically focus when the shutter button is pressed halfway. In order to focus again, you need to release the button and press halfway again. This mode is suitable for static scenes.
AF-C (auto focus continuous)- This is the tracking focus mode. When the shutter button is pressed halfway, the camera constantly tries to focus. It monitors the change in composition or the movement of objects. It is very convenient to use this mode in dynamic scenes.
AF-A (auto focus automatic) is the automatic mode. The camera decides which focus mode to use. She chooses between AF-S or AF-C. Many people prefer to use this mode, and novice photographers may not even be aware of the existence of other focus modes.
M (MF - manual focusing) is manual focus. It turns on near the lens mount in cameras with a motor, and in the camera menu in cameras without a motor. This mode involves manual focusing by rotating the corresponding ring on the lens. For newbies this method focusing may seem complicated, but professionals use it mostly. Manual focus mode is hallmark professional cameras from compacts (soap dishes). Auto focus does not work correctly in many situations, and in this case only manual adjustment can help.

The picture shows the focus point at which focus has been achieved.
Attention: manual mode provides the ability to focus on only one point.
Some Nikon cameras have a built-in rangefinder. It shows the photographer where to turn the focus ring to focus on a specific subject. Many older lenses that do not have auto focus have focus dials.

Any Nikon CZK camera has a pointing accuracy sensor. It looks like a green circle in the lower left corner of the viewfinder. When it lights up, it means that the sharpness is normal for the selected focus point. This indicator is a great help when working with older lenses, such as the Nikon 100mm F/2.8 Series E MF
Advanced cameras have fine focus adjustment - release priority and focus priority. It is available in AF-C mode.
The most commonly available settings in AF-C mode are:
- FPS - frequency - for the camera, shutter release is more important than focus accuracy. It got the name release priority
- FPS frequency + AF - shutter is priority for the camera, but focus is also taken into account.
- Focus - Focusing is the top priority for the camera.
These priority settings determine how the camera will act. She can focus first and then take a picture, or take pictures, regardless of the quality of the focus. There is also an average value.

Note:
More budget Nikon models do not work in shutter priority mode ( release priority) in AF-S/AF-C modes. They operate in focus priority mode. Such cameras cannot quickly take a picture. Even though the shutter button is pressed all the way down, the camera will not take a picture until it is sure that the focus is correct. This is a very serious flaw that occurs in Nikon D40, D40x, D3000, D60, D5000, D3100, D3200 amateur cameras.
To combat this inconvenience, you can shoot in manual focus mode (M). Some lenses have an M/(M/A) mode. It allows you to take instant pictures with manual focus adjustment.
Note 2:
Nikon professional cameras, shooting in AF-C mode, work with Release Priority. This mode allows you to take pictures by pressing the shutter button fully, whether the camera is in focus or not. Some cameras have this mode built in by default.
Live View (live view)
In this mode, focusing is much slower. The decrease in focusing speed reaches tens of times. Live View mode focuses on contrast. Some cameras have two focus modes in Live View. In the first, the camera focuses on contrast, as in amateur cameras. In the second, during focusing, the camera turns off Live View, focuses, takes a picture, and turns Live View back on.
Focus points and areas
Each camera has different quantity points and focus areas. For the focus itself, the module is responsible, which is located under the mirror of the camera. This module is engaged in the calculation of phase values and gives commands for focusing. Typically, focusing modules have several points on which focusing is calculated. By 2012, Nikon cameras have modules with three, five, eleven, thirty-nine and fifty-one focus points. The ease of use of the camera and the accuracy of focusing depend on the number of points.
Working with focus points is carried out in the focus area mode - AF area mode.
- Auto (auto-area AF), automatic focusing on the nearest object that falls into the area of the white rectangle. Focusing is performed on all available points.
- Dynamic focus (dynamic-area AF). It works on one point, but the setting takes into account the values of a number of points standing near it.
- One point (Single Point AF). This type focusing is performed only on one point.
- Additional: multi-zone selection or 3D-tracking. These settings are not available in all chambers.

Single-point AF-S focusing
Advice:
In amateur and advanced cameras, there is a programmable button on which it is very convenient to set the focus mode switch for quick adjustment. On professional cameras, there is a dedicated focus mode switch that simplifies and makes it faster.
Note:
Some cameras can show which points have been focused. Focus points are marked with square markers. This feature is only available on professional (D200, D300) and full frame cameras. This mode is convenient because the focus points are scaled, so you can easily assess the quality of focusing. In amateur cameras, such a check can be performed by zooming in on the picture in playback mode and scrolling it with the selector to the desired point. Sometimes the camera does not show which point was in focus. In this case, you can use ViewNX. it comes with the camera. You can view the focus points in greater detail on the computer display.
Note:
Some Nikon cameras in automatic mode do not allow you to change the area and type of focus. Other modes allow you to customize everything the way you want.

Single point focus in AF-C mode
Looping focus points
This feature allows you to move the focus point in a circle. For example, if the rightmost point is selected, then to move it, you need to press the selector in the appropriate direction. This function allows you to quickly switch focus points.
Focus area width
Some cameras, such as the Nikon D200, allow you to expand the focus area by reducing the points. For example, a camera with 11 focus points switches to 7-point mode, but the focus area expands (creates 7 wide areas). In the viewfinder, the zones will visually appear wider, which can sometimes make focusing easier.
Fine-tuning (adjustment) focusing
It happens that the camera erroneously focuses when focusing behind the subject or in front of the subject. This is called back focus and front focus, respectively. To correct this shortcoming, some cameras have an adjustment. This setting is not available on all cameras. Nikon D300, D7000, D300s, D700, D3(s,x), D800(e), D4 have it.
"Dark" lenses and focusing
Almost all Nikon cameras use auto focus without problems only with lenses whose aperture is no darker than F / 5.6. You can read about it in the instructions. With darker lenses, autofocus may fail. For example, Tamron 28-300mm F / 3.5-6.3 XR Di VC LD Asph (IF) Macro will not work correctly when shooting with aperture F / 6.3. The use of teleconverters also affects autofocus. They lower the effective aperture value. Only a few models can work with dark lenses up to F8.0, such as the Nikon D4, although it does not guarantee accuracy at full aperture.
Cross-shaped and regular focus points
There is no noticeable difference between cruciform and regular focus points, but it is believed that cruciform ones do a better job with the task assigned to them.
Focus illumination
Nikon cameras have a special llama that helps you focus in low light conditions. The lamp simply illuminates the subjects, thereby helping the autofocus adjust the focus. Sometimes best result can be obtained using the red flash spotlight.
Note:
Many Nikon cameras do not turn on focus illuminator when single point focus mode is selected and a non-center point is selected.
Nikon flagship cameras such as Dh, D2hs, D2h, D1, D1x, D2x, D2xs, D3s, D4, D3, D3x are not equipped with backlights at all.

Single-point focusing in AF-S mode
For those who do not understand everything?
If a given material hard to comprehend, just switch your camera to AF-A and set it to display a rectangular focus area. For the daily home use Auto mode will do the job just fine. In addition, in professional shooting, the use of precise settings is not always justified.
Conclusion:
Usage manual settings focus helps to achieve the desired result faster. In order to understand the difference between the focus modes, you just need to try them all and see how they work and what they affect.
Based on materials from the site:
Canon autofocus setting is simple process, which consists of several stages designed to check the accuracy of the focus and make adjustments, if any. In order to present the material as best as possible, I use part of the response of Canon technical PR - Chuck Westfall (Chuck Westfall), who 12 times a year answers questions from users in the online resource TheDigitalJournalist.
Regrettably, but the accuracy of the autofocus system is really a big problem for Canon. Here, technical flaws in production and cases of incompatibility are possible. In general, the incompatibility of initially compatible parts is strong philosophical theme, but this phenomenon sometimes happens, and not only with Canon.
Perhaps, due to a pronounced problem, an autofocus adjustment system was developed, which, of course, is very, very convenient! This feature allows you to adjust almost any working lens! It's great! Previously, in order to align the kit, you had to carry the camera and lens to an authorized service center. This was a huge problem for people from small towns, where such a service center simply did not exist.
Now, autofocus correction has become affordable and convenient, and our task is to figure out how to use it.
Before getting down to business, I will say a few more words about the adjustment process. In short, in order to determine the accuracy of the lens, you need to take a series of shots, thanks to which it becomes clear whether autofocus hits or misses. Misses can be of two types: focus point overshoot and undershot, back focus and front focus, respectively.

If everything is fine, then you forget about this article and enjoy life. If you find mistakes, then you need to understand what they are and make the appropriate correction to the camera, which, by the way, does not change the factory firmware. This type of correction works as follows: the camera receives not one command (to focus), but two, the second command is to move the focus point back or forward by a certain amount.
Such autofocus adjustment can still be divided into two types according to autofocus misses. In the first case, the camera misses with all lenses equally, and in the second with each lens at a different distance.
Both types of settings are completely different. Unless it's time consuming in the presence of a large fleet of lenses, in this case the first setting option will be faster.
Let's finish the long introduction and go directly to the autofocus adjustment, which, by the way, was written by the aforementioned Chuck Westfall.
How to set up autofocus on canon?
- set the camera on a good sturdy tripod;
- set the correct target with which to check the autofocus. You can download it. The characteristics of the target and its location are described in detail in the article "";

- sufficient homogeneous light should hit the target;
- the distance to the target must be at least 50 times the focal length of the lens. For example, for a lens with a focal length of 105 mm, the target should be located at a distance of 5.25 m (105 mm x 50 \u003d 5250 mm \u003d 5.25 m);
- canon autofocus mode must be enabled on the lens;
- camera focus mode - One-Shot AF;
- the test requires a central focus point;
- test shots are taken with the most open aperture value;
- use aperture priority mode (Av) or full manual mode (M);
- proper exposure is essential for a successful test;
- use the highest possible ISO value;
- if the lens has a stabilization system, then be sure to turn it off;
- use a cable release or shutter release timer to prevent shaking;
- an excellent result will be given by the included function of the preliminary lifting of the mirror;
- you need to take three series of shots that will use autofocus adjustment with values from -5 to +5. The series will be as follows: 3 shots in a row with a value of -5; three snapshots in a row with values of 0 and the last 3 snapshots with -5;
- view the photos you have taken on a calibrated monitor with a scale of 100%;
- repeat a series of test shots with different autofocus adjustment values and thus achieve the sharpest photos;
- enter the resulting maximum sharp adjustment values in the corresponding menu of the camera.
Before checking and adjusting autofocus, I recommend that you read the recommendations below, which will allow you to conduct tests even more accurately:
Eliminate the angles between the AF test target and the optical axis of the lens. The presence of such angles greatly reduces the stability and efficiency of autofocus. It is worth remembering that the autofocus sensor of a digital camera is assembled from a large number linear groups of pixels. Focusing on a target line at an angle to the optical axis of the lens may result in only a few pixels from each group being able to identify the target. Ideal conditions test would be a complete match of the contrasting part of the target to the entire area of the central autofocus sensor.
To get the best possible test shots, manually reset the focus before each shutter release. To do this, set the lens to infinity. Only after completing this procedure, focus.
If you shoot the same groups of pictures, most likely the photos in them will be slightly different. This is a normal situation due to the tolerances of the camera's autofocus system.
For the record, the autofocus adjustment of lenses becomes stronger, the longer the focal length of the lens.
You should be aware that the autofocus adjustment of a zoom lens will be relevant on this lens only at the focal length value at which you conducted the test. In other words, when testing a 28-70 lens at a focal length of 50mm, the adjustments you make will only work at a focal length of 50mm. Manufacturer in this case recommends adjusting such a lens at the maximum usable focal length.
It may happen that for a particular lens-camera pair, the autofocus setting will not be effective. In this case, contact an authorized service center for adjustment on special stands.
You also need to know what this moment there is no official system for adjusting autofocus. The method described above is one in which more cases had a positive result. Therefore, if you come up with a more efficient or fast technique- use it!
Views: 25065
Now in our photography course there will be a couple of rather boring, but necessary lessons on the way to professional photography. The first one is about working with focus. More specifically, how to properly adjust the focus, what are the focus modes, focus areas, and when is it better to use which focus mode.
Involuntary epigraph. I advise you to read this lesson of our photo school with digital, best of all with a mirror, camera in hand and try to apply what is written immediately in practice.
The games are over, and it's time to take the first step into adulthood. Today I will tell you in detail about focus and how to work with it. (I talked about what focus is and its basic properties in our Photography Lesson #3).
So. The camera needs to be shown WHAT to focus on. To do this, he has focus zones.
Focus zones.
The sizes of the focus areas can vary: from a simple point to a fairly large area.
This is what the focus area switch might look like.
With a dot, everything is more or less clear:
1. Choose where the focus will occur (for example, in the center of the frame or along the edges of the zone). In this case, focusing occurs only in the small square that you have selected.
2. Frame the frame. In this case, what you will focus on should be in the zone you have chosen.
3. Actually, take pictures.
In this case, you rigidly indicate where focusing will occur, taking away any initiative from the poor camera. In a camera, this type of focusing is called " single-zone autofocus.
In most cases, the focus area is left in the center. And in those rare moments when the focus object is not in the middle, they do this:
- put the object they want to focus on in the middle.
- press the shutter button halfway (in this position, the camera does not take a picture, but adjusts the focus. Shooting will occur if you press the shutter button all the way). They wait until the camera adjusts the focus, emitting, as a rule, a characteristic squeak (if it didn’t, read the “focus modes” below in the same chapter. You can throw the camera out if anything a little later).
- keeping the button pressed halfway, in order to keep the focus fixed, build the frame as necessary. For example, so that the subject is in the upper right corner.
- press the shutter button to the end. Get a professional photo.
In the second option, you choose a small area consisting of MULTIPLE points. And already move it in the viewfinder. It turns out that the focus is caught not by one point, but by a kind of trap for a point. This method is called "group dynamic autofocus"
The third way for the most courageous - you "give the camera" the entire autofocus area, and he already looks for the CLOSEST object in it and focuses on it. This method has a "simple" name. "autofocus with dynamic focus selection and closest subject priority."
That's all I wanted to tell you about focus areas. But this is not far from the end of the photo lesson. In order to completely confuse you, they also came up with focus modes. Although those villains who invented them sincerely believed that they were doing a good and useful deed.
Focus modes
When I talked about focus areas, I was answering the question "WHERE will focusing occur?". Now I will tell you how it will work.
Let's try to figure it out in order. There are three focus modes: tracking, single-frame and manual (who would have thought, but sometimes you need it too!).
This is what the focus mode switch might look like.
When should you use single-frame focus?
Single frame focusing is, in my personal opinion, the most perfect and easiest kind of focusing. It's usually enabled by default. digital cameras. It works as follows.
First option. You press the shutter button halfway, not all the way. The camera focuses on the subject. Beeps and LOCKS focus. That is, it does not change it anymore. After that, you can (while holding the button halfway down) shift the frame in the direction you need and take a picture.
My friend, who often shoots with his favorite "soap box" in clubs, ran into a problem - in many club rooms it is too dark, and autofocus does not work there. He solves this problem in the following way. Looks for something in the illuminated area of the club that is about the same distance as the object he wants to shoot. Focuses on a "light object",blocks autofocus, moves the camera to a dark place and already takes a picture.
The second option is even easier. Just select the subject and press the shutter button all the way down. The camera focuses and immediately takes the picture.
As I said, this method of focusing is most often used. It is the most accurate and is suitable for shooting still and slow-moving objects.
When should you use focus tracking?
Focus tracking is useful for shooting moving subjects. In fact, the camera is TRYING ( keyword) to keep a moving subject in focus. That is, the focus motor works constantly and changes the focal length. But how he does it depends on where you shoot, and on what kind of object it is, and how fast it moves. And, of course, from the camera itself. This option can be useful when you're taking multiple photos in a row (or burst shooting).
The AF tracking mode starts working when you press the shutter button halfway. While you press it, the camera tries to keep the subject in focus. When you press the button, it will take a picture. If you let go, it will stop working.
When to use manual focus
How manual focus works is clear - with handles, my dear friend, with handles! Turn the focus ring or wheel, or pull the lever. And here are the cases when it should be used.
1. A small amount of light.
It is clear why. The camera itself does not see what to focus on - it is dark for it. Many cameras have an autofocus light that is designed to help with focusing, but it often fails.
2. Photo in motion.
Usually, in order to shoot moving objects, tracking autofocus is needed. But, if he does not cope and does not keep up with the object, then you can do the following. Use manual focus to set the camera to where the subject is expected to appear. When he appeared in this place, the main thing is to press the shutter button in time.
3. Shooting a portrait or some conceived complex composition.
When only some detail is in focus, it is often easier and more convenient to adjust the focus manually.
4. Shooting through glass or mesh.
Well, everything is clear here. The camera does not know that you need to shoot what is behind the fence, and stubbornly focuses on the reflection in the glass or on the grid. Therefore, it is necessary to forcibly adjust the focus on objects “behind the glass”.
5. Macro photography.
I will not explain what this is within the framework of this photo lesson. In a nutshell - shooting objects from a very close distance. So that in the frame they turn out very large.
The camera does not always willingly and obediently focus on such short distances. Sometimes they don't focus at all. Yes, and with focus areas is not so simple.
6. Photo invoice - flat surface on which there are no contrasting places.
The fact is that autofocus is based on the contrast of colors. If you try to bring something that has a flat white surface to your eyes (for example, a sheet of paper), then you can easily notice that the eyes themselves begin to look for strokes, dashes, villi - anything. Because the eye cannot focus on a really monophonic material. Likewise for the camera. The greater the contrast, the easier it is to focus (especially in difficult lighting). And if the filmed is something monotonous and inexpressive, also poorly lit, then the camera may simply not focus on it, and you will have to use manual focus.
And finally. Each lens (or a camera with a lens, if they are indivisible "until death us do part") has minimum distance on which he can focus. That is, closer - the image in the photo will already be blurry. You can find out this “critical” distance from the passport, from the scale on the lens ...
Or experimentally, having tried to shoot, gradually reducing the distance. By the way, it happens that the “passport” distance differs from the real one.
Max Distance focus is usually infinity. And it comes after a certain footage. That is. Up to, for example, one and a half meters, you need to adjust the focus. After one and a half meters - no more. Anything further will be sharp.
I have given you a lot of information about focusing. All of them apply to most SLR cameras. The notation may be different, but the meaning remains the same. Cameras have different controls, the number of focus points, the availability of modes, but the principle remains the same. I would advise you to practice a little various modes. Over time, you will, without hesitation, choose optimal mode. Well, when you become a professional photographer... Although you need it? Maybe it's better to just be a person who takes beautiful photos?