From time to time, modern users wonder how to enable Android developer mode. Doing this is much easier than it looks. Using this menu item, you can find some hidden functions of the mobile device. Next, we will tell you all about how to enable and disable the study mode in your phone.
Mode Description
What is developer mode?
This state of the mobile phone is not so important for ordinary users. It allows you to debug the device via USB, find out information about the memory and processor, and also see application statistics.
However, sometimes this state is extremely useful. But how to enable android developer mode? Every modern person can do this. Usually, the procedure does not have any features. But there are some secrets you need to know.
Up to version 4
How to enable android developer mode? In older builds of the Android operating system, the user can bring the idea to life using a special button.
You will have to do approximately the following:
- Turn on phone.
- Open the main menu of the device.
- Enter the "Settings" section.
- Click on "Developer Mode" or "Hidden Settings".
Fast, simple, convenient. But such a scenario in modern phones is almost never found. And so we have to act differently.

Source of problems
How to enable android developer mode? For some time now, the corresponding menu item has not been available in the operating system of the phone. But this does not mean that it was completely removed.
It is because of this phenomenon that users do not know how to act. Following the instructions below, a person will be able to quickly cope with the task.
"Android" 4.2.2
The developer menu, as we have already said, has ceased to be displayed for some time now. Particularly attentive users could notice such changes already in Android 4.2 Jelly Bian.
To return this component, you can act like this:
- Go to "Settings" on your mobile device.
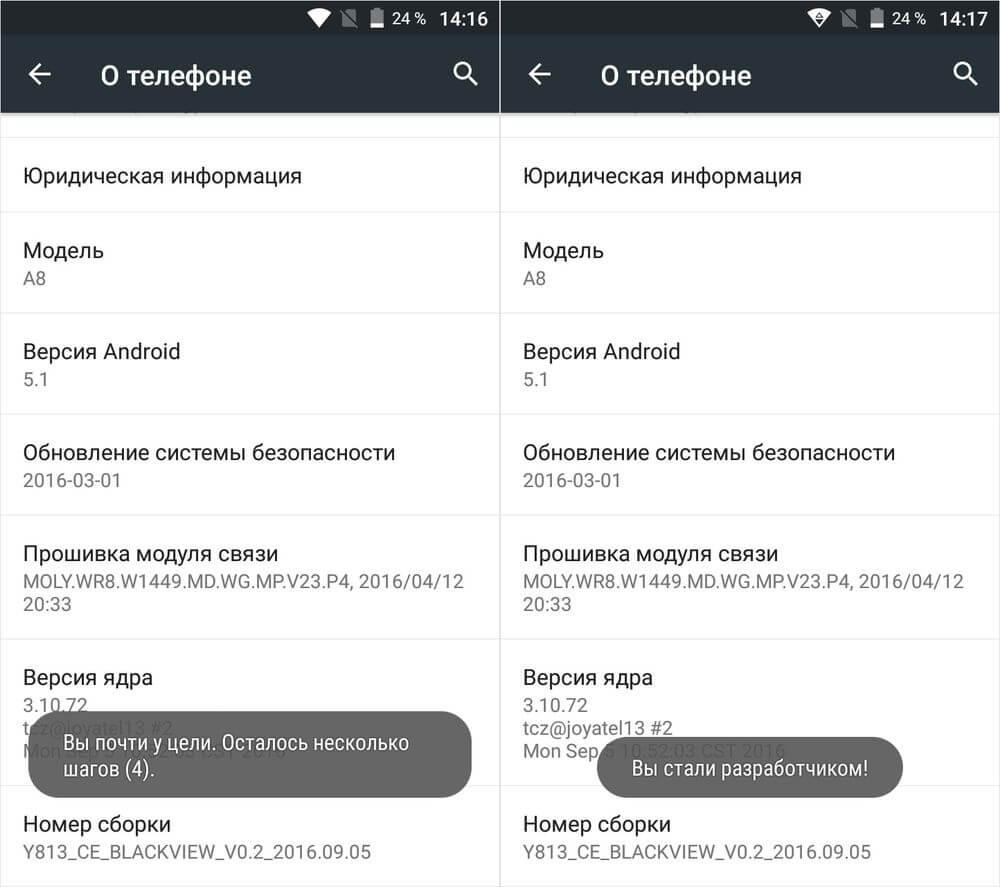
- Open subsection "About phone".
- Scroll through the menu that opens to the very end. We need the "Build number" item.
- Tap on the area under the inscription "Build number" several times. To be more precise, you will have to click on it about 7-8 times.
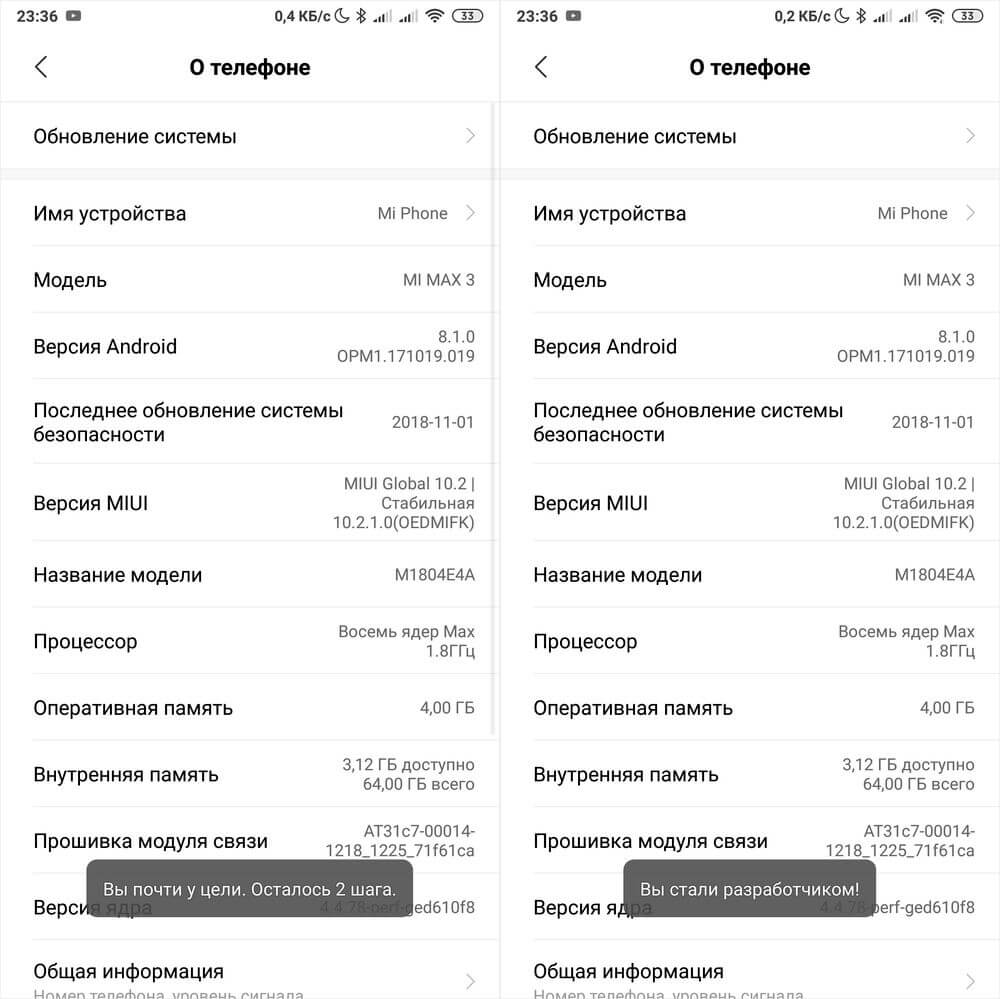
Already after 4 taps, the user will see a message that will say how many clicks the studied menu will turn on. Ready! Now the "For Developers" section will appear in the settings. He is what we need. From now on, it is clear how to enable developer mode in Android 4.2.2.

After 5.0
In new versions of "Android" there is also no studied menu item. And it's not hard to get it back. The main thing is to know how to act in this or that case.
How to enable developer mode in Android 5.1? The following guide will help you cope with the task:
- Get started with your mobile device.
- Open the main phone settings.
- Enter the "About device" section.
- Find "Build Number".
- Tap on the corresponding line about 5-7 times.
In general, the algorithm will be exactly the same as in the previous case. After the done actions, the user will be able to see the "Developer Options" section. In just a few minutes, it will be possible to bring the idea to life.
After the 6th
And how to enable developer mode in Android 6.0? To do this is not difficult. Especially for those who have already worked with the studied mode on older versions of mobile OS.
The fact is that, in general, the instruction will not differ much from the previously proposed instructions. In general, the algorithm of actions is as follows:
- Open "Settings" in the main menu of the mobile device.
- Visit the "About phone" item. On some devices, this section is called "About device".
- Find "Build Number".
- Tap on the corresponding menu item about 7 times.
- Return to the "Settings" section.
- Open the sub-item "Advanced".
- Go to the "Developer Mode" menu.
That's all. From now on, it is clear how to enable developer mode in Android. This is one of the simpler procedures that every modern user should be familiar with.

Xiaomi and mode
It is worth paying attention to the fact that the listed instructions may differ slightly from each other. It all depends on the specific mobile device. A number of items are signed differently.
For example, as we have already said, somewhere the "About phone" section is called "About the device. On Xiaomi smartphones, there is no "Build number" item. Instead, you can see "MIUI Version".
Accordingly, you will have to repeat all of the above actions using this menu item. Otherwise, the proposed instructions are no different from the instructions we have previously studied.
Version 7.0
How to enable developer mode on Android 7.0? A similar question arises in many modern users. After all, operating systems are being improved, finalized and changing their "appearance".
To bring the idea to life, you will have to use the instructions for Android version 6.0 and higher. It is these instructions that work on new versions of the operating system. There is no difference in them.

Tablets
How to enable developer mode in Android 6 (and beyond) on tablet devices? Is it possible to complete the task at all?
Yes. Tablets also allow you to enter the developer menu. To do this, you will have to follow the previously suggested instructions. But with some changes.
Namely - in the device settings you will need to select the "About the tablet" section. It serves as a replacement for the "About phone" option. Otherwise, the instructions for enabling developer mode remain the same. It varies slightly depending on the version of the mobile device.
Disable mode
We figured out how to enable Android developer mode in one case or another. How can I disable this section? Everyone should also be aware of this. After all, an inexperienced user is able to damage the operating system of the device with their work in developer mode.
To deal with disabling the mentioned option, you need to:
- Go to the main settings of the gadget.
- Open the "Additional" section.
- Select "Developer Mode".
- In the upper right corner of the screen, move the slider to the "Off" state.
After the above steps, the studied mode will not disappear - it will still remain in the phone or tablet settings. However, the parameter will not work temporarily.
In order to re-enable the developer mode, you just need to move the toggle switch to the "On" state. Fast, simple, convenient!

Finally
We have figured out how to enable developer mode in Android. Getting the job done is easier than you think. Even a schoolboy can do it. Just a few minutes and it's done.
But it must be remembered: the developer mode in the inept hands of the average user is doom for the modern gadget. Therefore, if a person has turned on the corresponding menu item, it is recommended to switch it to the "Off" mode. So it will be possible to secure the OS from unnecessary operations and changes in system settings.
Many computer games have cheats that can be entered to make the gameplay much easier. However, a much more interesting feature is the developer mode. It is not available in every game, but if it is, then you can be sure that you will not need any cheats. Naturally, you will first have to figure out exactly how it can be enabled, since each game has its own way of doing this. This article will show you how to enable developer mode in Undertale. This game is very popular, so many gamers ask online about this mode. Therefore, you should read this material in order to save yourself from having to look for answers on the net. You can be sure that after reading this article, you will find the answer to the question of how to enable developer mode in Undertale, and you will be able to use it freely.
What is this mode?
Before you learn how to enable developer mode in Undertale, you should understand what developer mode is in general in PC games. It is used by the creators of the game to test the gameplay and various features of the project, while not spending a lot of time on it. That is why most computer games do not have such a mode. Developers delete it before releasing their project for sale. However, in some cases, they simply block it, and if you find the appropriate way, you can unlock and use it. As a matter of fact, talking about this is the purpose of this article, in which you will learn how to enable developer mode in Undertale.
Turning on the mode

So, if you are wondering how to enable developer mode in Undertale 1.0, then you should understand that for this you will have to change the game code in the root files. So if you don't understand programming at all and don't want to mess up anything, then you better look for the person who will do it for you. However, the process is so simple that you really have no reason to be afraid of anything. All you have to do is find the data.win file, which contains some rather obscure code. You do not need to understand it, just find one line: in the old version of the game it is 00752B20, and in the new one it is 00725D8C. This line of code has a default value of 00, and your task is to change this value to 01. After that, save the file and run the game. Now that you know how to enable developer mode in Undertale, you won't need cheats.
What does it give?

In the game itself, the mode does not need to be activated. You just need to remember the buttons that interest you and use them. For example, if you press the G button with developer mode enabled while in the store, you will receive five thousand coins. Almost every key on the keyboard in this mode has its own function, so it's worth spending a little time to figure out the possibilities that are now open to you. Moreover, there are even combinations such as R+6 or F+6. Such combinations are responsible for teleporting the character to a specific location in the game world, so they can also be useful to you.
Developer Mode is a hidden feature found on Android smartphones and tablets for programmers and developers. In this mode, a ton of various settings and features are available. Learn more about the most interesting features.
Total smartphone optimization
More recently, experts have found several interesting features in the developer mode that allow you to double the speed of the gadget and extend its operation time.
Previously, such a “trick” was hidden from the eyes of most Android users, now experts have shed light on the possibility of optimizing the gadget.
In order to start the developer mode, you must:
- Go to the "Settings" section of Android.
- Find the item "About device", click on it.
- Go to the "Build Number" option.
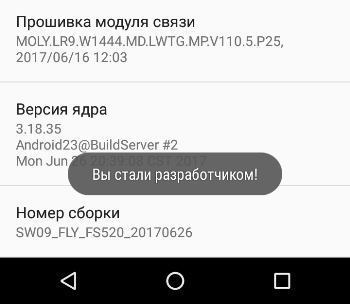
As a result of the above actions, a solemn notification “You are now a developer” is displayed on the screen. After that, you need to exit the "About device" section and go to the "For Developer" tab.
Now, in order to optimize the performance of the gadget, you need to set the value “0.25 px” or “0.5 px” in the “drawing” or “drawing” parameters, after which you need to restart the smartphone.
According to the promises of experts, the speed of the smartphone after such simple manipulations will double, and the battery savings will increase by 10%.
Backup Data Protection
In developer mode, a useful feature is available that allows you to set a password to protect backup data from unauthorized access. To enable this feature, you must:
- Open the option "For Developers" item "Password for backup".
- Enter a new password on the second line, and then confirm it by entering it again on the third line.
- Click on the "Save Password" button.
To remove the password, just open the above item, enter the current password in the first line, but leave the second and third untouched.
Detailed report on the use of WI-FI connection
In developer mode, there is an extremely useful feature that can certainly be useful to thousands of users, because when distributing WI-FI in Russia, you can often encounter problems at various levels of the OSI network model.
To monitor and save data on various WI-FI connection parameters, there is a Wi-Fi Log function. You can launch it in the "Networks" section ("For Developers" options).
USB configuration
A useful feature that allows you to set the connection mode of your smartphone to a PC without connecting it directly via a USB cable. This setting can be useful when you need to set the "Charging" mode, but the notification does not come when you connect the phone to the PC.
Entering text
For those who shoot overviews, tutorials and other videos using screencasting, the Visual Response feature will be useful, which allows you to position the cursor in those parts of the screen where the click was just made.
The "Show wishes" option allows you to visualize taps and gestures on the screen.
Drawing
In the range of possibilities of the "Drawing" option, there are not only functions that allow you to speed up the smartphone, but also options that provide various conveniences.
For example, the settings for highlighting the window when they are updated, framed in the “Show surface update” item, can be useful when notifications arrive, when they are not only displayed in the status bar, but also make the screen flash completely.
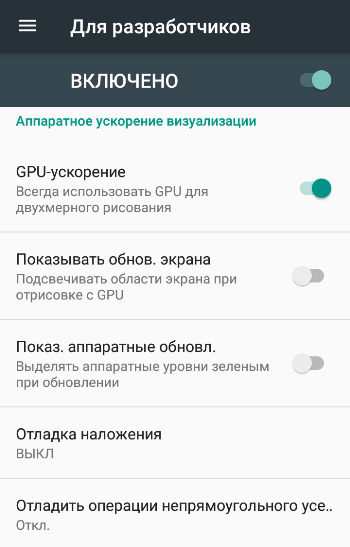
Hardware accelerated rendering
Multiple sampling of screen smoothing allows you to get a better picture. It is activated in the "4x MSAA" option, but do not forget that this function will be useful for high-performance devices, in other devices, an increase in anti-aliasing will only slow down the smartphone.
Useful video:
Android Developer Mode is a special set of features that is grayed out and hidden by default. After activation, it opens access to a set of auxiliary settings and features. Among them: additional items for working with hardware and smartphone software, tools for debugging, logging, reporting, device diagnostics, etc.
In most cases, the functions of the developer mode are of little interest to a simple user, as they are intended primarily for professionals: programmers, firmware developers, application creators and service center masters. But sometimes the need to use the developer mode arises for an ordinary user. It is impossible to do without accessing the functions hidden in this section, when necessary, to allow unlocking the bootloader or (for example, for). And how to activate this mode and get into its menu, read below.
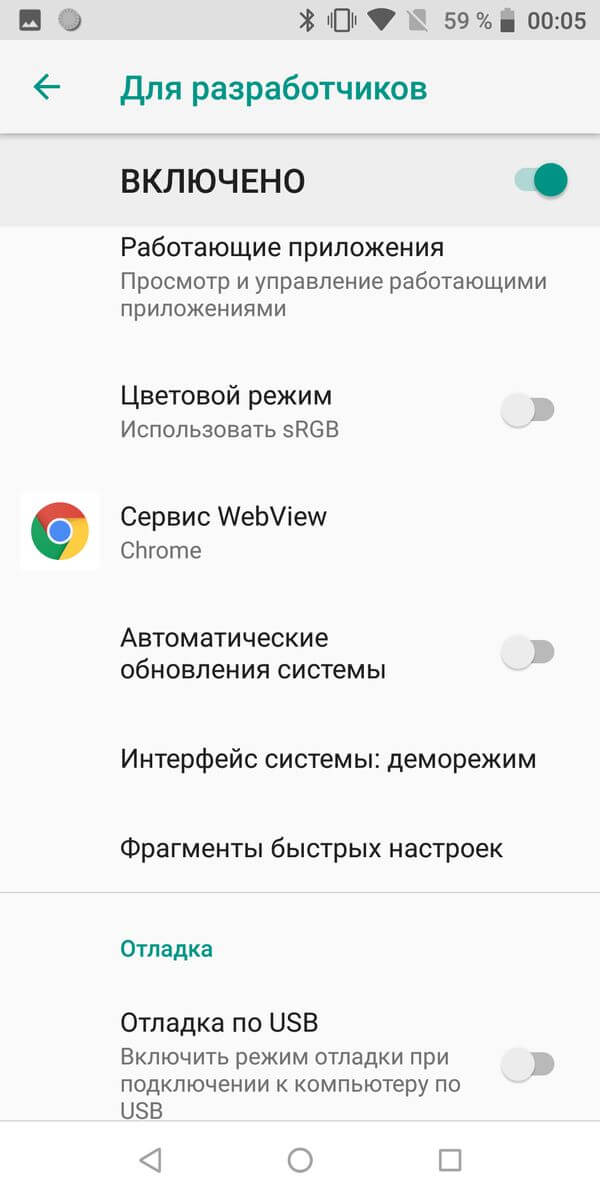
On Android 4.1 and below, "For Developers" is located in the settings menu. In new versions of the OS, it is hidden by default.
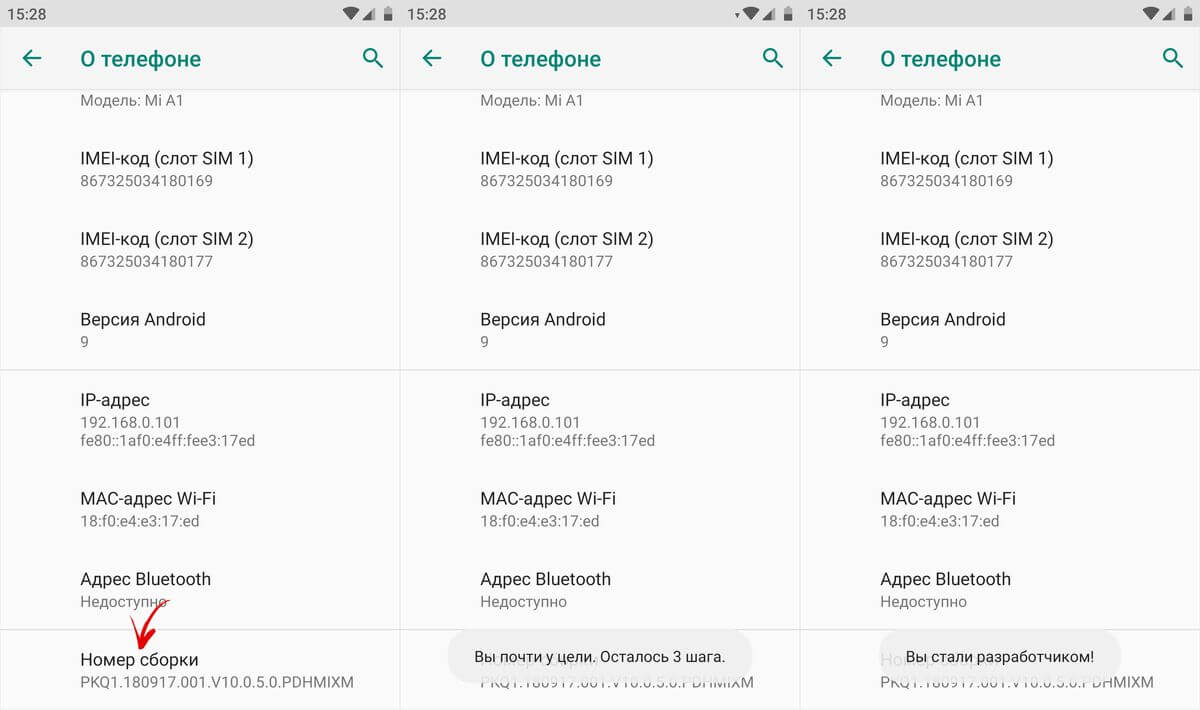
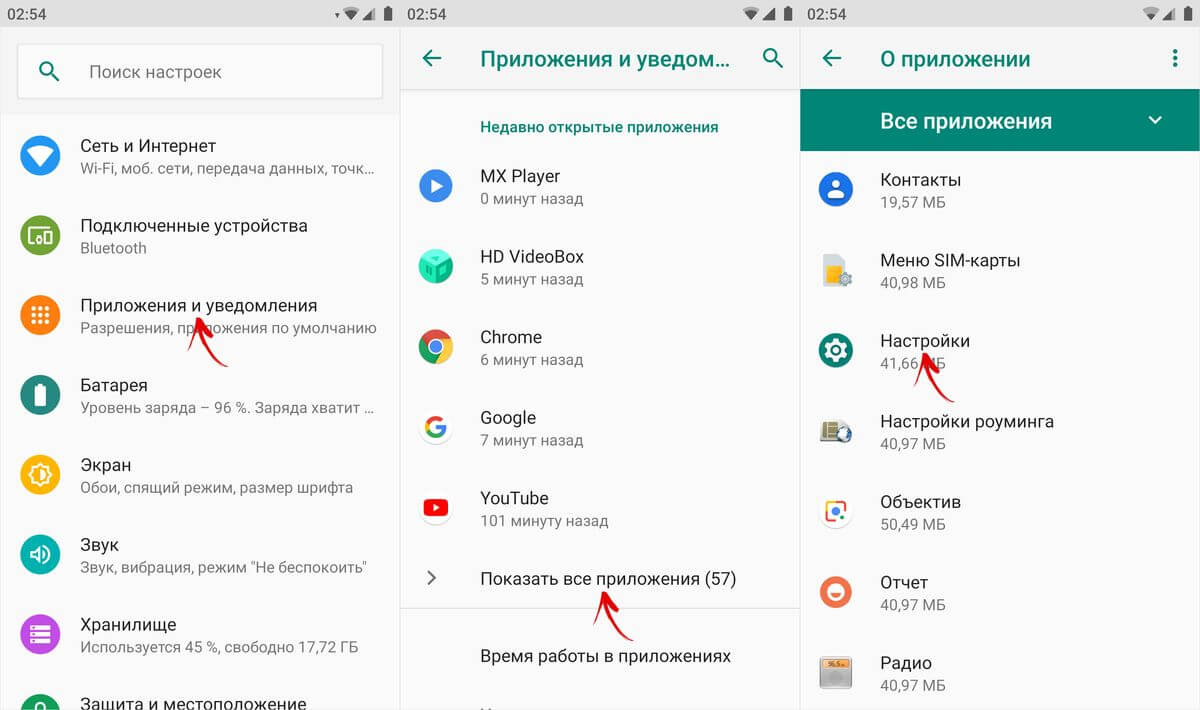
To activate it, starting with Android 4.2 and ending with Android 7.1, go to the settings and find the "About phone" section (at the end of the settings menu). Find the item "Build number" there and quickly click on it 7 times in a row.
A message will appear on the screen, in which it will be written how many times there are left to click. Continue until you see the notification "You are now a developer!".
After that, the "For Developers" section will appear in the main settings menu.

How to activate the item "For developers" on Android 8 and 9
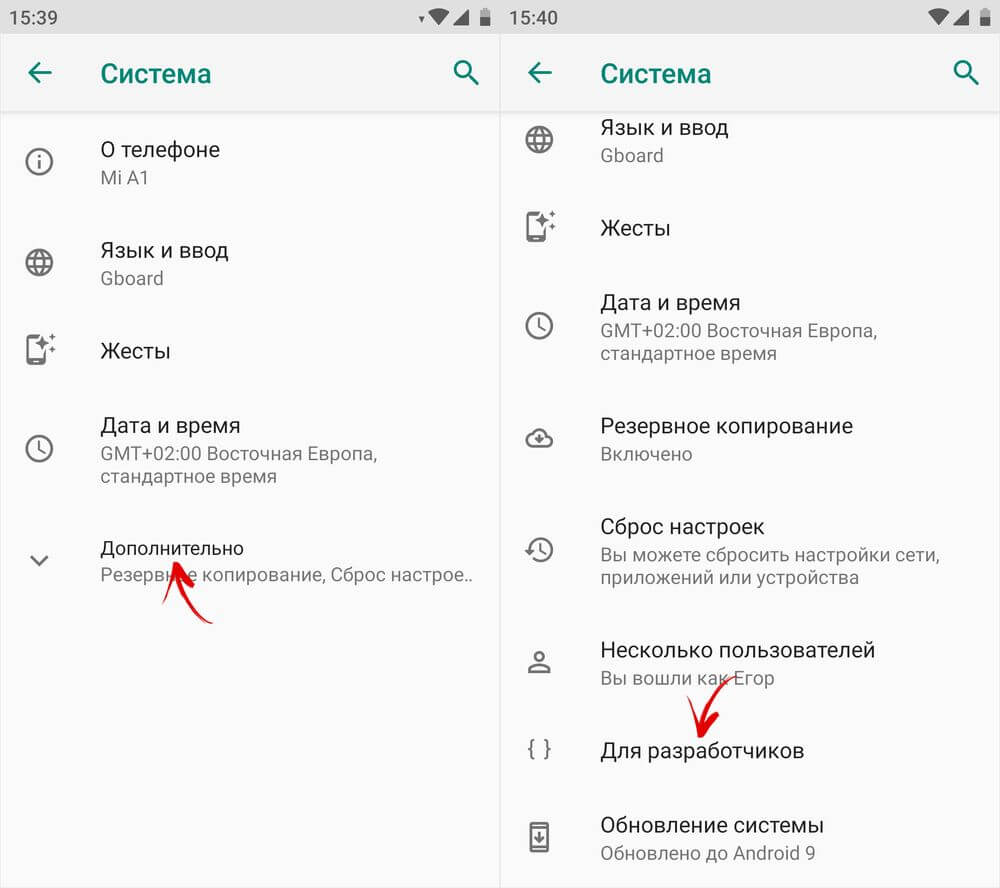
On Android 8.0 and later, to enable the developer menu, go to the System section (the last item in the settings menu). In this section, find the sub-item "About phone" (also at the very bottom).

By clicking on the "Build number" line 7 times, you will receive a notification that you have become a developer.
The "For Developers" item will appear in the "System" section of the main settings menu.
Developer Mode in MIUI on Xiaomi
In MIUI firmware on Xiaomi, the developer menu is activated in a similar way. The item "About phone" is the first in the settings menu. Go into it and find the "MIUI Version" parameter. By quickly tapping on it 7 times in a row, the notification “You have become a developer!” will appear on the screen.
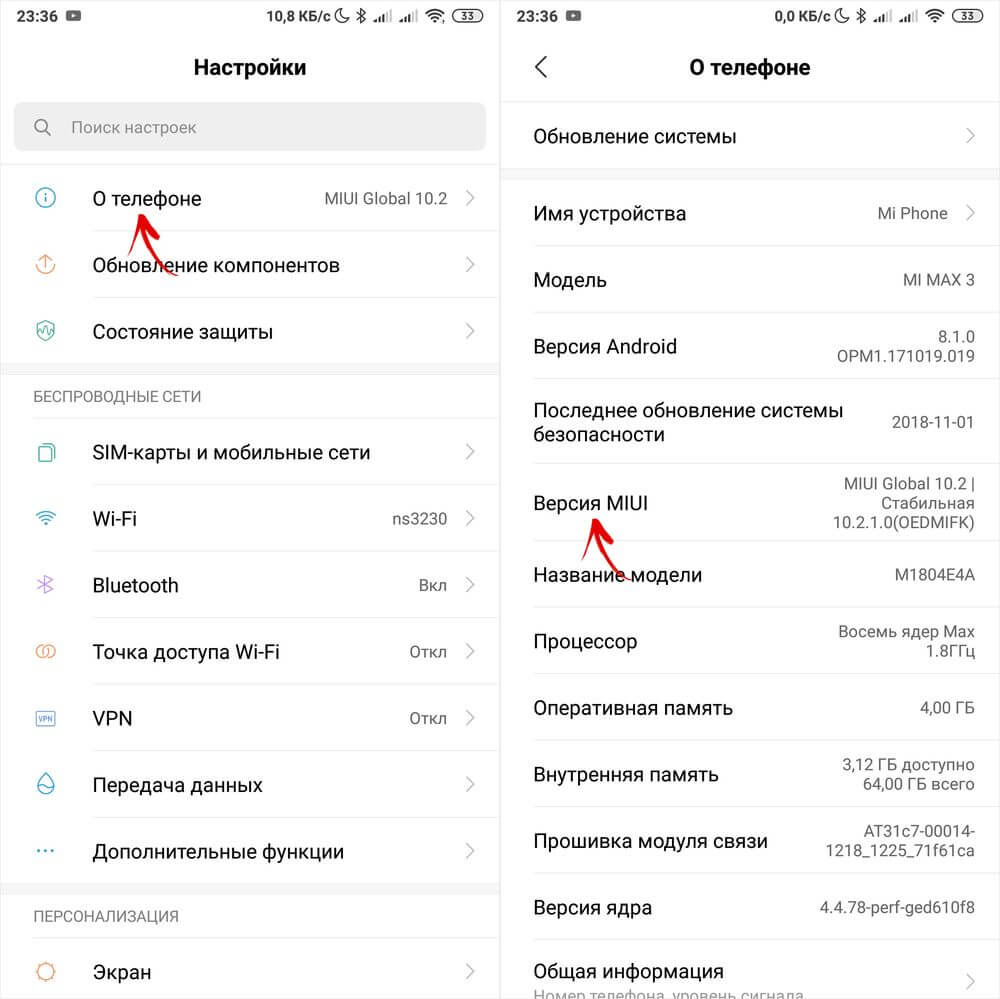
After activating the mode, go to the main settings menu and find the “Advanced settings” item there (in the “System and device” group). The "For Developers" menu is at the end of the list, it's the third item from the bottom.

Overview of Menu Functions for Developers
The features in the developer menu are grouped by category. A brief description of each of them is below. Some options are not present in all smartphones, but since the developer mode is part of the kernel, most of the options are available regardless of the firmware (pure Android, MIUI, EMUI, Flyme, etc.).

Memory. Displays the average memory consumption of the Android OS and apps over the last time they were used.
Bug report. Can be interactive and detailed. The first allows you to take a screenshot, supplement it with information about the problem, and track the status. Detailed - collects detailed information about the system, covering many parameters. It is used if the smartphone does not work well, does not respond to actions, or slows down a lot.

Backup password. Allows you to set a password to protect your backed up data.
Keep the screen on. Keeps the screen backlight always on when the device is charging.
Enable HCI Bluetooth log. Allows you to save Bluetooth HCI data packets to the BTSNOOP_HCI.log log file (file location differs on different smartphones and OS versions). With the help of special software, you can analyze the log data, for example, determine in which mode the sound is transmitted to the headphones (SBC, AAC, aptX, etc.).
Factory unlock. Allows/denies unlocking the bootloader on devices with it locked. Activation is required, for example, for.
Running Applications. A list of running programs and displaying the consumption of system resources by each of them.
Color mode. Activates the sRGB color scheme.
WebView Service. The choice of engine for processing web pages by applications that do not have regular browser functions.
Automatic system updates. Turns on when the device is rebooted.
Debugging
The “Debug” mode items are responsible for debugging the OS from a PC via a USB cable.
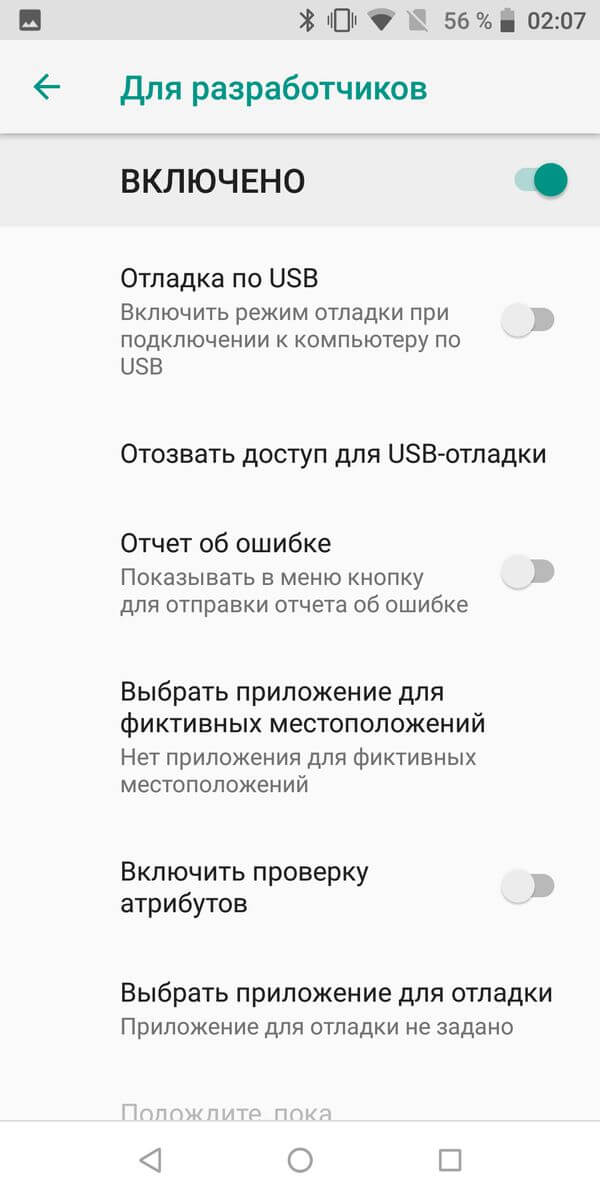
USB Debugging. Enable/disable debugging support from the computer.
Revoke access. Prohibit interfering with the operation of the system on computers from which debugging was previously carried out.
Bug report. Displays the corresponding key in the menu.
Choose app for mock locations. Responsible for selecting an application that transmits false location coordinates (Fake GPS).

Enable Attribute Validation. Enables attribute checking in debug mode.
Select application to debug. Selecting an individual application for debugging. Useful for programmers and software developers.
Wait for the debugger to connect. The item is inactive until the application for debugging is set.
Check application during installation. Checking application security when installing via ADB / ADT.
Log buffer size. Responsible for the size of the buffer into which the log of the debugging process is written.
GPU Debugging. Enables loading GPU debug layers.
Tracking System Updates. Monitor and analyze workflows to increase OS performance.
networks
This section of the developer menu is responsible for wired and wireless (USB, BT, Wi-Fi) connections.

Wireless Monitor Certification. Displays WiDi/Miracast display certification options.
Detailed Wi-Fi log. Extended log for network connections.
Switch to mobile network. Automatically goes to the mobile. internet if wifi is bad.
Always turn on the search for Wi-Fi networks. The smartphone searches for networks even when using EDGE/3G/4G.
Do not turn off mobile internet. Keeps the EDGE/3G/LTE connection active at all times, even when Wi-Fi is on. Useful for unstable Wi-Fi connection.
Hardware acceleration in tethering mode. Using acceleration when connected as a modem. May come in handy when the Internet speed is low.
USB configuration. PC connection mode: charging, MTP (data transfer), PTP (in camera mode), RNDIS (network card), audio source, MIDI (sound synthesizer).

Show Bluetooth devices without names. Displays the MAC addresses of available wireless gadgets.
Disable absolute volume. Turn off the absolute volume level. May help if BT headphones are too quiet/loud.

Enable in-band playback. Transmits audio signals from the phone to the headphones. Activate if the headset does not report an incoming call or message in any way.
Bluetooth Version AVRCP. Select the control signal protocol version. The change sometimes helps if the smartphone does not respond correctly to button presses (pause, rewind, volume) of wireless headphones / speakers.
Audio codec for transmission via Bluetooth. Select the audio encoding mode. Allows you to switch between SBC, AAC, LDAC, aptX, etc. Which is logical, it only works if the headphones support several codecs.

Sampling rate when transmitting via Bluetooth. BT audio sampling frequency. The higher - the better the quality, but it does not always work, and is effective only for Lose-less music formats.
Bluetooth audio encoding depth. Similarly, the higher, the better the quality.
Bluetooth audio channel mode. Switch between mono and stereo. Can be useful if the headphones don't want to play in stereo.
LDAC Audio Codec for Bluetooth: Playback Quality. The choice of balance between quality and connection speed. Increasing sometimes improves the sound, lowering - improves the quality of communication.
Input
The section responsible for displaying touches. Allows you to test the touch screen.

Visual response. Shows finger touch points. The correct operation of the sensor is checked.
Show taps. The same, but in the form of dotted lines, not dots.
Rendering
A set of settings responsible for the interface. Useful mainly for developers, inexperienced users are of little interest, except for the last point.

Show surface updates. Shows UI elements that are being updated with blinks.
Show element borders. Displays the borders of interface elements.
Reflect interface. Forces radio buttons, sliders and checkboxes to the right, aligns text to the left (Arabic style).

Window Animation. Animation speed in application windows.
Transition Animation. Animation speed when switching between items/programs.
Animation duration. Approximately the same as the previous paragraph.
Emulation of additional screens. Displaying an additional screen, on top of the main one, with a duplicated interface.
Minimum Width. The most useful item is designed to control the scale of the interface. If the elements are too large - you can increase the DPI, too small - reduce (minimum 320). The feature is present in Android 7 and later, but not everywhere.
Hardware accelerated rendering
Work with graphics. In addition to developers, it may be necessary for problems with 3D.

GPU acceleration. Enables continuous use of the GPU for 2D processing.
Show screen updates. Blink highlights areas of the interface processed by the graph. processor.
Show hardware updates. Highlights in green the elements processed by the hardware.
Overlay Debugging. Highlights areas where GUI elements overlap.

Debugging complex shape truncation operations. Selection of elements of a complex form in the GUI.
Enable 4x MSAA. Enables 4x image smoothing. Makes the picture smoother, but loads the chipset.
Disable hardware overlays. Graph is enabled. overlay processor.
Simulate anomaly. Adapts color rendering for people with impaired color perception (color blindness, etc.). Monochrome mode can be useful for devices with OLED screens in reading mode (when color pictures are not needed), as it saves battery power.

renderer. Choice of graphics processing engine. The item is not present on all smartphones.
Multimedia
Disable Audio Transfer (USB). Disables audio output to external devices such as amplifiers/DACs/sound cards/Type C headphones with digital output.

Monitoring
Strict regime. Makes the backlight flicker when performing resource-intensive tasks.
Show CPU usage. Displays information about the processor load. Not available on all smartphones.
Profile GPU rendering. Displays the activity of the GPU, in the form of graph bars, or transfers to ADB.
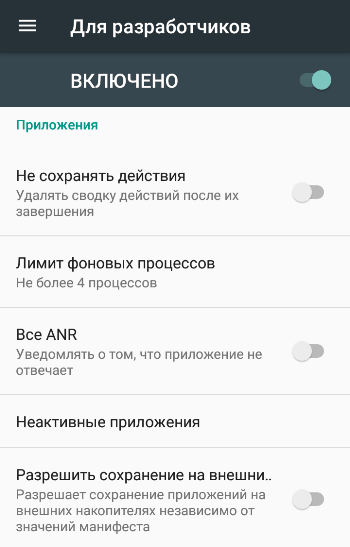
Applications
This subsection is responsible for working with applications.
Preempting Background Activities. Deletes app data when they end.
Background process limit. Limits the number of processes active in the background at the same time. Can help get rid of excessive battery consumption.

Background check. Shows processes running in the background.
All ANRs. Activates notifications that the application is frozen and not responding, even if it is minimized.
Show Alert Channel Alerts. Enables display of notifications outside the allowed channel.
Inactive Applications. Displays and allows you to change the status of active / inactive applications.

Allow saving to external drives. You can, even if they don't support it. May help on devices with small (8-16 GB) memory, but not always.
Resizing in multi-window mode. Gives the ability to force resizing of application windows in multi-window mode, even if they do not support it.
Enable MIUI optimization. An item available in the developer menu on Xiaomi. Improves system performance, therefore it is active, but disabling it can help with some bugs.
Notify about dangerous features. Available on Xiaomi. Warns if the program shows unusual activity and wants to do something suspicious.
How to disable developer mode
You can turn off developer mode on Android using the toggle at the very top of its menu. But to completely hide it, you may need to clear the settings program data.

On older versions of Android, to remove the "For Developers" menu from the settings, open the "Applications" submenu. Select “All” (double swipe to the right), open the “Settings” application card, click on the “Erase data” button and confirm the deletion of data.
![]()
On Android 8 and later, select "Apps & notifications" in the settings. Click the "Show all applications" button, find "Settings" in the list. After selecting it, you will see the "Storage" option among the items. Open it and click "Erase data".
![]()
In MIUI on Xiaomi, select "All apps" in the settings. Find the Settings application in the list and open its card.

Click on the "Clear" button at the bottom, click on "Clear All" and select "OK".
![]()
Done, developer mode is disabled and removed from settings. You can turn it back on in the way described at the beginning of the article.
(4,40 out of 5 rated: 10 )
Welcome friends. Today we will tell you how to enable multi-windows for all applications on Android 7, as well as how to make your phone run faster. This is a very simple trick, but you must enable Developer Options to do it. Developer Options is like a secret world for Android lovers to do cool stuff. Not only can you speed up animations, but you can also force all applications to create multi-windows and more, he says. If you are an advanced Android user, you need to know these tricks.
The developer options have been around since Android 4.2, but until now they've been tucked away in the same place. The good news is that enabling the options is easy, and they work the same way on just about every Android phone or tablet.
The steps below should work on any device that has a KitKat system or higher. The process may be slightly different, but you just need to find "Build Number."
- Go to Settings > About phone/tablet
- (Some phones will have an extra step. Click Software Information)
- Find the Build Number and click on it a few times
- End pressing when he says you are now a developer!
- Return to the main page in Settings
- You should see Developer Options at the bottom or in Advanced settings
- This is it!
Why do it?
As we mentioned above, there are some cool tricks that can be done with Developer Options. A trick we always recommend is speeding up animations and transitions. This will make your phone run faster when you open apps and work on the user interface. Every Android user should know this simple trick.
How to speed up your Android phone
- Open Settings > Developer Options
- Scroll down, select Animation window 0.5x
- Select Animation transition 0.5x
- Select Animation speed 0.5x
- You can disable animation completely. Once you've done everything, go back to the main screen and turn off the display with the power button. Turn on your phone and enjoy faster animation and interface.

How to force all applications to use multi-windows
Android 7.0 introduced native multi-window mode, but not all apps support it. In fact, many applications don't support it, so it's not very useful. But you can force the app to be compatible with the new feature and all you have to do is go back into the secret developer settings.
- Follow the steps above to enable developer mode
- Open Settings > Developer Options
- Scroll down and select Force activities to be resizable(Force apps to resize)
- Reboot your phone

Now you can open any application in multi-window mode. It should be noted that some applications may force close when you put them in multi-window mode. Apps that don't support it will say "This app can't run in multi-window mode," but most of them still work fine.
Secret Developer Options is one of our favorite things about Android. The average user is not aware of this, but enthusiasts can use them to push their phones to the limit.
Developer Mode is a Pandora's box that opens up the control possibilities of the Android operating system. Of course, the developer mode is an indispensable tool for the Android application developer, but ordinary people can also use some tricks.
We will tell you about five useful features of the developer mode on Android.
How to Enable Developer Mode on Android

Developer mode is a special section in the mobile device settings menu, which is not active by default. To activate the menu, you need to go to "Settings" - "Information about the phone" and click on the inscription "Build number" several times until a notification appears that the developer mode has been activated. After that, you can return to the main settings menu, where "For developers" will appear in the "System" section.
1. Disable animation

You can turn off animations completely, thereby making app loading as fast as your smartphone hardware allows. In addition, you can make the animation twice as fast or turn it off completely.
To change the animation speed, or turn it off, you need to go to the developers menu and find options such as "Window Animation", "Transition Animation", "Animation Duration". If you want to speed up the animation, you must select the "0.5x" parameter. If you want to disable animation completely, select No Animation.
2.4x MSAA

This option allows you to improve the quality of graphics in OpenGL ES 2.0 games and applications. I noticed that a smartphone with the option enabled gets better performance and also consumes more battery power. However, if you need high quality in games and applications, then the 4x MSAA option will improve the image with Multi Sample Anti-Aliasing 4x pixel anti-aliasing.
3. Enable USB Debugging

This is one of the most used options for developers. This feature allows programs on your computer to access your mobile device via USB. In addition, USB debugging is used for recovery, rooting, unlocking, creating a backup on the computer, and more.
4. Backup password

If you want to back up your smartphone, it is highly recommended to protect it with a password. This option encrypts the copies so that an unauthorized person cannot access it unless they know the password. To create a password, click on the line "Password for backup" and enter your password.
5. Use a dummy location

Under the Debug section, there is one option called "Select Application for Mock Locations". To use this feature, you need to install the Fake GPS Location application, which will simulate the location of the smartphone in a fictitious location.
Once you select the app, you can go to Google Maps and check the location of your smartphone. So you can take beautiful photos on Instagram or Vkontakte with location in Hawaii or Paris.
No modern operating system for portable devices can compete with Android in terms of settings and customization options. No wonder, because in the OS from Google you can configure absolutely everything, any little thing.
However, many users are not aware that a huge number of features of their Android device remain hidden. We are talking about the ability to debug the device and some other features that are only possible in "developer mode", which in most cases is disabled and hidden from the user's eyes. We will tell you how to enable it and what features it provides in this guide.
After activating this mode, a new section appears in the Android settings menu called "For Developers". It opens up new possibilities for the user. Some of them, which can be useful even for a simple user, we will consider below:
- Log buffer size - provides the ability to select the amount of memory;
- GPU acceleration - activates the processing of two-dimensional graphics;
- Show CPU usage - displays a screen with information about the current CPU usage;
- USB connection – selection of the device operation mode when connecting it to a PC via USB;
- USB Debugging - Enables debug mode when you connect your Android to a PC with a cable.
- Fake device location - allows you to make applications "think" that you are in another part of the world.
Activation
Enabling developer mode is easy. For this you need:
List of available settings
Now let's analyze the functions of the section for developers in more detail.
Be careful: when working with the settings in developer mode, due to the inexperience of users, the device may fail and even data may be lost. Therefore, it is recommended to enable and disable certain features with caution.
- Create a bug report. The option is intended for sending error reports. Files for sending are created within a couple of minutes.
- Backup password. This item allows you to use ADB to create a backup of data on a PC. To create a copy, a mandatory password is required.
- Active mode. If this option is enabled, the screen of the device will not turn off when it is connected to a PC. It should be used with caution, as prolonged use of the screen can ruin it.
- Selecting a working module. Tool to select ART or Davlik. You shouldn't change anything if you don't know what they are for.
- Enable HCI Bluetooth Operation Broadcast Log. This feature is only useful for developers as it allows you to intercept and parse Bluetooth packets. After enabling this option, packages will be saved in the "btsnoop_hci.log" file. The file can be opened and analyzed with Wireshark or similar.
- Process statistics. Shows information about the processes that are currently running on the device. It is of no use to the average user.
- USB debugging. Allows you to connect your device to PC via ADB.
- Revoke USB debugging authorization. When debugging a device via USB for the first time, it needs to be authorized using keys for this. With this setting, you can undo this action and repeat it again.
- Bug reports. This option is very useful for testing applications. By holding down the power button, you can collect and send crash and error reports.
- fictitious locations. Allows you to manually set the location. Used by some developers to test geo-referenced applications.
- Debugging applications. You can manually set applications for debugging. Helps developers to ensure that the application code works correctly.
- USB check. Using this option, you can scan applications installed via ADB and detect malicious activity.
- Touch display. If the option is activated, visual effects will appear on the screen, showing touches on the screen.
- Pointer location. Displays the coordinates of the last touched point on the screen.
- Show layout borders. Displaying element outlines in dialog boxes. Allows you to more precisely determine where you need to click to activate an element on the screen.
- Writing from right to left. Enables screen orientation change. This option is required to work with right-hand character input (required for some languages).
- Emulation of an additional display. Only useful for developers as it allows emulating different display sizes.
- Forced rendering. Enables applications to use hardware 2D rendering. In some cases, it can give an increase in productivity, in others, on the contrary, ruin everything. Better to use with caution.
- Overlay debugging. Allows you to see the overlays that occur when the graphics system draws images on top of something.
- 4x MSAA activation. Forces enhanced anti-aliasing. After activation, the performance of the device noticeably deteriorates.
- Display CPU load. Displays information about the current CPU load on the screen.
- Installing a GPU profile. This option allows you to save the graphics system loading schedule to a separate file.
- Open GL tracing. Allows you to save all OpenGL errors to a separate file.
- background processes. This option allows you to manually set the number of processes running simultaneously in the background.
- ANR display. Enables the display of system messages when applications freeze. Useful if applications conflict with each other.
Deactivation
This process is also quite simple to complete. On some devices, you just need to find and open the section in the settings menu. "For developers", and in it move the switch to the "Off" position. But in this way, we will only turn off this mode, that is, it will still remain in the settings. And again, make a reservation, this feature is not available on all devices.
To completely remove the function from the menu, you must do the following:

Conclusion
Of course, most of the users do not need the settings described above at all. If you don't understand options well and don't understand what they are for, it's best to leave them alone and don't change anything. Remember, developer configurations are not just hidden from mere mortals. Use them wisely.
The developer options on an Android device can bring a lot of useful settings and display a whole bunch of useful information about your device. For example, in order to adjust the volume of your favorite gadget, you will also need the "For Developers" menu.
Basically, all new smartphones and tablets out of the box do not provide open access to this menu. In this case, we need to figure out how to enable it.
How to Enable Developer Options on Android
1. Go to the general "Settings" of the device and look for the "About phone" section below:


3. After a quick click on this item, the system will give you the following message: "You have become a developer!". Visually it looks like this:
4. Now you can return to the main "Settings" of our Android smartphone or tablet and see the long-awaited "For Developers" menu. We have successfully activated or enabled it:

This completes the procedure for enabling this menu.
Now let's assume that we want to lend our apparatus to someone and are afraid that no one there will change anything serious without our consent. Then this fad "For developers" is better, of course, to hide or disable
How to Disable the Developer Options Menu on Android
Disabling or hiding (hide) the developers menu on Android can be as easy as activating it.
1. Again we go to the general “Settings” of the device and find the “Applications” section there:

2. After opening this section, go to the "All" tab:

3. Then you have to find the "Settings" application there and tap on it once. The following context menu should appear:
![]()
4. Click on the button "Erase data" and that's it. The "For Developers" menu has been successfully disabled, hidden or deleted if you like. You shouldn't be afraid of it.
Of course, the system will warn you that "All data of this application will be permanently deleted, including all files, databases, settings, accounts, etc." I have not noticed anything like this on my smartphone. Everything remained "as it was."
Operation completed successfully!
Made a detailed review of the developer mode.
Android developer mode is a hidden section of special functions for programmers and developers that allows you to significantly expand your smartphone settings. This functionality is hidden from ordinary users, but finding and opening it is quite simple.
How to enable developer mode?
Developer settings mode is available on all modern versions of Android:
- Android 4.0 Kitkat.
- Android 5.0 Lollipop.
- Android 6.0 Marshmallow.
- Android 7.0 Nougat.
- Android 8.0 Oreo.
- Android 9.0 Pie.
To access this settings section, you need to follow the instructions:
- Go to "Settings" - "About phone".
- Find the item "Kernel version" (or "Build number") and click on it several times in a row (5-10).
If everything is done correctly, a message will appear with the words "You have become a developer." After that, the “For Developers” section will appear in the device settings, a detailed review of which we suggest reading below.
Developer Mode Settings
This section is divided into thematic subsections. We will talk about all the features and capabilities that the creators of the Android operating system offer.
- Error Report:
- Interactive - allows you to track the status of the report, provide additional information about the problem, and take a screenshot. Some sections may be omitted to reduce report preparation time.
- Verbose - used when the device does not respond to user actions or is too slow.
- Backup password: Change the data backup password to protect copies of device data.
- Keep the screen on: The smartphone display will always be on when the device is charging.
- Enable Bluetooth HCI Log: All Bluetooth HCI packets will be logged to a file.
- Factory Unlock: Enable or disable OS bootloader unlock.
- Applications Running (CPU Statistics): View all applications running on the processor and applications, as well as data on the amount of RAM consumed by them and the time they have been running.
- Color Mode: Ability to enable sRGB color space.
- WebView service and multiprocessing WebView (allows you to open web links in applications without using a browser). The last point allows you to execute WebView handlers separately.
- Automatic system updates: enable/disable.
- Demo: Activate the demo mode. At this time, the smartphone shows a 100 percent charge level and a full network and Wi-Fi signal level.


Debugging
- : switch on switch off.
- Deny access for USB debugging.
- Bug report. Show a button in the menu to send a report.
- App selection for mock locations.
- Enable attribute validation.
- Selecting an application to debug.
- Wait for the debugger.
- Installation via USB.
- Logger buffer size (0-16 MB).


networks
- Show wireless monitor certifications.
- Detailed Wi-Fi logging. When selecting a network, indicate in the RSSI log for each SSID.
- Switch to mobile. Forced switching to mobile networks when the Wi-Fi signal is weak.
- Always turn on the search for Wi-Fi networks. Enable or disable Wi-Fi search based on traffic volume.
- Do not turn off data transfer even when connected to a Wi-Fi network (for fast switching between networks).
- USB configuration:
- charger;
- MTP (multimedia transfer);
- PTP (Picture Transfer);
- RNDIS (USB Ethernet);
- audio source and MIDI.
- Mute Bluetooth absolute volume when problems occur on remote devices, such as when the volume is too loud.


Entering text
- visual response. The places you press on will be shown on the display.
- Show touches. Gestures and clicks are visualized.
Drawing
- Show surface updates (windows are highlighted when updating).
- Show element borders: fields, buttons, and so on.
- Writing from right to left: enable/disable.
- Window: scale. Disable animation or adjust animation between 0.5x and 10x.
- Transition: scale. Disable animation or customize it.
- Animation speed: Select animation speed or turn it off (helps).
- Emulation of additional screens.
- Minimum width in dp.


- . Constantly use the GPU for 2D drawing.
- Show screen updates. Highlighting an area of the screen when rendering with a GPU.
- Show hardware updates (highlighted in green).
- Overlay debugging (on/off).
- Debug non-rectangular truncation.
- Enable 4x MSAA in OpenGL 2.0 applications.
- Disable hardware overlays - always use the GPU when compositing the screen.
- Simulate anomaly (on/off).

- Enabling strict mode - highlighting the screen during long operations.
- GPU time recording (on/off).
- Show CPU usage.

Applications
- Do not save activities (deleting the summary of activities after they are completed).
- Background processor limit: Standard limit, no background processor, no more than one, two, three, or four processes.
- All ANRs: notify when an application is not responding.
- Inactive applications (full list).
- Allow saving to external drives.
- Resizing in multi-window mode.
- Reset counters in ShortcutManager.