Even the smallest and outwardly unremarkable garden plot can be made cozy and interesting if you equip it with an artificial pond. A decorative pond in the garden can not only fit harmoniously into the landscape of a personal plot, but also visually expand the space.
Artificial pond in the landscape of a personal plot

The presence of a pond or a small artificial waterfall on personal plot is determined not only by aesthetic considerations, but also by a practical component. On a hot summer day, even a small body of water feels cool, the air seems much cleaner and fresher, and the calm surface or the measured murmur will help relieve nervous tension and fatigue.
Most popular types artificial reservoirs in landscape design:
- pond;
- Creek;
- fountain;
- waterfall.
The shape of reservoirs on personal plots can be either round, with an irregular coastline, or regular geometric shape - square, rectangular and diamond-shaped. It all depends on the style of the site as a whole, its location, the characteristics of the site and your imagination. The main rule here is that the reservoir must ideally fit into the surrounding landscape and become its integral element.

The most common shape for an artificial pond is round or oval. This is exactly what natural lakes look like, so if you want to create a corner of nature near your house or in the garden, then this option will be the most acceptable. In this case, there may even be an irregular coastline and asymmetric planting of the reservoir with plants.
If the pond is located on an area where everything is done in a classic style, straight lines dominate and there is no room for natural forms, then a pond is built correct form. Often, this is the basis for a fountain, which is the center of the exhibition. Since such a pool does not have a natural barrier in the form of vegetation and stones, its sides must be placed higher to prevent it from falling into the water. As an option, protect such a pond with a low forged lattice.
It should be noted that the most common and least expensive in terms of labor and financial investments is a pond. But it is quite possible to arrange one on your site yourself without involving specialists.
The main thing here is experience. When it appears, the pond you create may become the first in the whole complex, connected by waterfalls, streams, and decorative bridges.

DIY decorative pond - where to start?

If a wonderful idea has occurred to you about arranging an artificial pond on your garden plot, you should not rush headlong to get a shovel. First of all, you need to choose a good place. The following factors must be taken into account:
- plot size;
- illumination;
- relief;
- degree of landscaping;
- soil type.

It is best to equip a pond closer to your home. In this case, it should be positioned in such a way that the entire area of the reservoir is illuminated by the sun for at least 5 hours a day. Otherwise, over time, a once beautiful pond may simply turn into a stinking swamp.
The terrain is also of great importance. Optimal place is a low-lying area where the water level in a well or well is closer to the surface of the earth.
During the selection process, you should also pay attention to the presence of vegetation - large trees located along the banks will pollute the reservoir with fallen leaves in the autumn, and tree roots can damage protective film at the bottom.
The type of soil is important. Loamy and clayey soils, as well as peat soils, are suitable for arranging a reservoir; chernozem is less preferable - it promotes the formation of silt. On acidic soils, it is not practical to equip a reservoir without reliable protection side walls and bottom.
Once the site has been selected, shapes and sizes have been determined - it's time to stock up necessary materials and tools. Most often, to create a pond, they use ready-made rigid containers, which can be purchased at a specialized store, or flexible waterproofing, much less often - concrete (the most expensive and labor-intensive process).

Types of waterproofing for an artificial pond:
- polyethylene film - an inexpensive material that is not resistant to ultraviolet radiation;
- LDPE - polyethylene high pressure. Visually, it is practically no different from polyethylene, but has greater flexibility and durability.
- PVC - polyvinyl chloride - is a strong and durable material, the edges of which are welded together.
- rubber and butyl sheets are the most optimal, but expensive option. The service life of this material is practically unlimited.

Experts recommend avoiding plastic film for waterproofing. It copes with its function, but lasts no more than 2 years. If you want your pond to last longer, choose more durable materials.
Materials and tools:
- shovel;
- protective film or reservoir;
- pipes for supplying and draining water;
- valve;
- geotextile material or sand
It's better to see it once. The whole process of arranging a pond in pictures looks like this:
Construction of a decorative pond

There is another way to arrange a pond - a concrete bowl, but this method is labor-intensive and expensive, so it is not currently used. Construction begins by marking the selected area and removing a layer of turf. After this, you can start digging a pit of the desired shape. In this case, be sure to leave the edges slightly inclined (flat, not steep). Next, if you plan to make a decorative pond using polyvinyl chloride film rather than a finished tank, you need to line the bottom of the future reservoir with waterproof material. Clay is quite suitable for these purposes. It must be laid in two layers - the second after the first has completely dried (a waterproof film must be laid between them). After this, you should fill the bottom with gravel.
Important: if you plan to plant a pond with plants, you should make special depressions at the bottom and fill them with fertile soil.
How to make a decorative pond so that the water in it is always clean and fresh?
In order to ensure that the appearance of the reservoir located on your site always pleases with its appearance and gives freshness and coolness, it is necessary to ensure that the water in it is running. For these purposes, you need to lay two pipes: flow and waste. Through the flow pipe, water will flow into the reservoir, and through the waste pipe it will be discharged into the ditch. Please note: the level of the drainage ditch should be slightly lower than the level of the pond. For ease of use, you can install a valve on the drain pipe or simply close the hole with a plug as needed. The first option is the most practical.
Construction of a decorative pond using galoshes
You will need significantly less labor costs if you purchase a special tank for an artificial pond. People called these containers “galoshes.” Why is that? Everything is very simple: they are made of black plastic, and the shape of such tanks in its external outline resembles rubber shoes. But if you wish, you can always find and buy a bowl for a pond of the shape that suits you.

In order to arrange a decorative pond at the dacha , you will need to purchase a special tank of a suitable size and shape: the cost of these is relatively low.
The main stages of arranging a reservoir:
- contour marking;
- digging pits;
- installation of container.
In order to correctly mark the contour of the reservoir, it is necessary to install the tank on the ground and vertically install slats along its perimeter at intervals of 40-50 cm, then tie them with twine. This way you will get the outline of the future pond.
The container must be installed strictly horizontally. The tank should be filled with water gradually, while the gaps existing between it and the walls of the pit must be carefully filled with sand.
Note: if you want to equip the fountain in artificial reservoir, it is important to purchase in advance a special pump and nozzles, which are installed during the installation of the reservoir.
The final stage is the design of the reservoir. In order for your man-made pond to look truly stylish and beautiful, for example, just like the fancy decorative ponds, photos of which we posted, you need to properly design its banks.
Decoration of the banks of an artificial reservoir
On at this stage work you can not limit the flight of your imagination. To decorate an artificial pond, you can use ceramic tiles, marble, granite, fake diamond, pebbles, wood, etc. These materials need to be used to camouflage the edges of the reservoir, which looks close to natural. It is important to fix them with cement mortar. If you plan to additionally equip your pond with a fountain, during the work you need to make sure that the pump hoses are hidden under tiles or stones.

Next, you can sprinkle the bottom of the reservoir with pre-washed sand, lay small pebbles and plant aquatic plants in pots or baskets. You can plant decorative shrubs or just a flower bed around the pond.

Decorative pond inhabitants are always a joy. It could be aquarium fish, and dwarf turtles. And if you run lights along the bottom of the pond or place floating flashlights on batteries on the surface, you can create a real extravaganza of light and water.

Pond care
- To keep an artificial pond in good condition, it will need maintenance.
- First of all, you need to get a bottom vacuum cleaner to collect debris.
- During leaf fall, you will need to cover the pond with a net to prevent leaves from falling into the water.
- If there are fish living in the pond, then they will need filtration and aeration of the water.
- To avoid greening of the water, it is either filtered and purified (for this the reservoir must be flowing), or planted with oxygen-producing plants: swampweed, hornwort, elodea.
- If you plant water lilies or egg capsules in a pond, their wide leaves will prevent the sun's rays and overheating of the water.

An artificial pond in your backyard is an important element landscape design, the arrangement of which must be approached with sense, feeling, and arrangement! And then the beauty created by your hands will delight both you and your guests!
A decorative pond in a dacha is a unique element of landscape design, an object for pleasant contemplation. In addition, the pond will humidify the air and improve the illumination of the garden, thanks to the reflective surface of the water surface. If you are thinking about arranging a personal artificial pond, you immediately need to wisely choose the style, lighting and decorative elements.
Choosing a location for a pond
The choice of place to create a reservoir depends on many factors: soil, landscape, relief, lighting, and the presence of vegetation should be taken into account.
| Relief and soil | When choosing a place for a future pond, it is better to stay in an area that remains wet for a long time after rain. Obviously, somewhere in the soil layers in this place there is clay or loam. If the choice of places is limited, then it is always better to choose low-lying areas. |
| Illumination | The correct choice of lighting will make it possible to avoid strong growth of algae and flowering of the pond. The ideal option is that at noon the shading reaches at least 40% of its area, and the total illumination reaches 6 hours. |
| Neighborhood with plants | The pond should be set up in an open place, away from tall vegetation, which will pollute its surface with leaves, seeds, and debris. |
| Landscape | The pond must fit harmoniously into the landscape of the site. Often it settles down in front of the house or near the gazebo. |
There are some specifics if the pond is planned to be equipped with live fish: for example, with koi carp. In this case, it will be important to provide them with optimal water temperature, which depends on the breed of fish.
Excavation and waterproofing works
You have chosen a place for the pond and determined what shape it will be. Now it's time to dig the pit. First, turning points and contours are marked with pegs. Then terraces are torn off, 30 cm deep and 20 cm wide. Several levels of terraces can be formed to place plants on them.
Now the main bowl is dug out. The slope of the banks should be approximately 45 °C. The walls of the bowl should taper downward to prevent soil from crumbling and reduce the load of water mass. The minimum depth of the reservoir should not exceed 60-80 cm: a shallow reservoir will freeze completely in winter and become very warm in summer, which will make it impossible to breed flora and fauna.
If waterproofing with film is planned, to secure it, a ditch about 15 cm deep is torn around the perimeter. After the pit is ready, its bottom is leveled, all stones and roots that could damage the film are removed. The surface is covered with clean, washed sand to a depth of 5 cm, and poured on top monolithic slab made of M150 concrete. After hardening, it is completely covered with geotextile fabric. All these measures will help protect waterproofing film from damage and extend its service life.
The next step will be waterproofing - laying butyl rubber or PVC maple. The size of the canvas is calculated from the total length of the pond and twice the depth. To secure the canvas along the edge, about half a meter of reserve is enough. The sheet is laid out freely, securing the edges with bricks along the edge. For elimination negative impact groundwater, a reliable drainage system, which is also included in the waterproofing system.
All of the above waterproofing work is carried out before concreting, if this form of waterproofing device is chosen. When creating small ponds, first carry out concrete works, and then the concrete surface is treated in several layers with a mixture of Hydroshield.
Do-it-yourself concrete foundation installation
Concrete work begins before waterproofing with the casting of a base plate made of M150 concrete, which is designed to protect the reservoir bowl from ground movements. On top of this slab, after it dries, waterproofing is laid.
After the base for the bowl has been dug, a drainage system has been installed, a sand and gravel cushion 20-30 cm thick has been poured, a concrete preparation 10 cm thick has been poured, and the walls of the pool are reinforced. For this you will need reinforcement A 12 mm. The rods are connected with knitting wire in the form of a mesh with cells of 20 x 20 cm.
Installation of mortgages - important stage work. Before the start of formwork work, the following components are installed: bottom drain, nozzles, lights, skimmers. Electrical wiring is also being installed.
The formwork is installed using moisture-resistant plywood 15 mm thick and wooden support beams. High-quality formwork will help save material and other leveling agents.
Concreting is carried out with high-grade heavy concrete with plasticizers. The walls vibrate to prevent voids from forming. It is more convenient to fill the bowl in 2 steps - first the bottom, then the walls. To prevent water from penetrating through the cold seam of a leaking joint, a self-expanding bentonite cord is placed into the joint when pouring, which increases 6 times when exposed to water.
The pool bowl is leveled with a layer of plaster. Using plaster, you can achieve a perfectly smooth pool bowl. The plastered surface of the bowl has no cracks, voids, depressions or other irregularities.
Devices for creating water effects and lighting
If the pond was originally planned using water effects: fountains, cascades, jets, then an underground, waterproof electrical cable must be connected to it in advance. Lighting and pump can be connected to one source.
What energy design elements can be introduced into the design of a pond at the dacha:
- A closed-circuit fountain, where a pump from a reservoir drives water into the fountain bowl, from where the water flows back into the reservoir. Subsequently, the water flows back into the tank.
- It is better to place a cascade or waterfall on the shore, where it will be in harmony with the alpine slide.
- For illumination, you can use lamps located in the water, above the water, and even built into the body of the fountain. Along the contour you can install garden lamps that are recharged from the sun and provide light in the dark.
Aquatic plants in design
There is a huge variety of aquatic plants. In order for the pond design to look attractive and function properly, the following types of aquatic plants must be present in it:
- Oxygenators are plants that produce oxygen. They carry out biological treatment water and are food for fish (for example, koi carp). These include swamp turcha, hornwort, spicate urut, and water star.
- Floating plants serve to decorate the pond's surface. They can be placed in containers on underwater terraces. The most popular are duckweed, watercolor, azolla, and thick-petioled eichornia.
- For shallow ponds, deep-water plants are used in combination with floating ones. They are also planted in containers. The easiest to care for are water lily, egg capsule, and apongeton.
- Embankment plants are necessary to decorate the contours of the pond and to protect the water from overheating. Typically, low embankment plants are used for these purposes: fern, thuja, barberry, juniper, etc. Other plants planted in pots also look good.
Design of banks and reservoirs
There are many ways to design the shoreline of a reservoir:
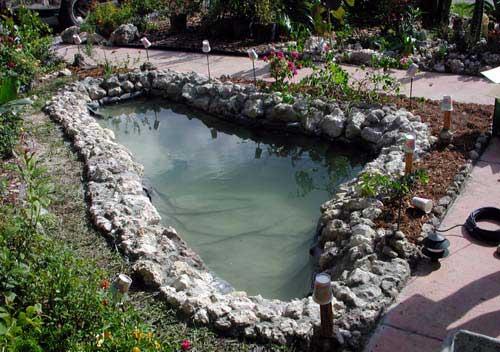
- use of large stones different shapes. The main types of stone used for decoration are marble, granite, sandstone, quartzite, etc.;
- construction of decks and bridges from logs;
- decorating the shore with slabs or tiles;
- with a special decorative film, immediately covered with a layer of gravel and imitating rocky terrain.
When choosing a design method for a reservoir, you need to take into account its size and shape. The size of the stone should be proportional to the pond itself. Large stones will harmoniously combine with a large pond, and small ones with a small one. IN ideal The shape of the stones should be similar.
Large boulders are placed around the perimeter so that part of the stone hangs over the water. No need to do continuous coastline from stones. The edging of the pond should alternate plants and stones in random order. After placing all the stones, they need to be fixed in cement, buried in the solution to a third of their height.
It is better to edge reservoirs of strict geometric shapes similar materials: tiles, logs, boards.
Stylistic design
The design of the pond can be different - the main thing is that it is combined with the landscape of the site. A variety of stylistic solutions allows you to create amazing compositions that demonstrate the beauty of the water element.
Chinese
The pond is an obligatory companion Chinese gardens. Traditionally, a path of large boulders should lead to a Chinese pond, and the banks should smoothly descend into the water. A small wooden bridge was often thrown across the pond, and a gazebo was placed next to it for contemplation and tea drinking. Koi carp and lotus are a typical feature of a Chinese pond. A Chinese-style pond is decorated with bright and lush vegetation.
French
The French pond is an example of elegance and sophistication and at the same time severity of form. It attracts with its clear boundaries and neat shape. As a rule, the shores in french style rise above ground level. This style features fountains, cascades, steps and sculptures.
Italian
A characteristic feature of the Italian pond is its symmetry. A reservoir of regular geometric shape, usually with decorative fountain or cascade type is at the head of the garden. Since Italian landscapes are regular, compositional, and terraced, the pond may also have several levels. The banks are framed by many ornamental plants in terracotta pots, or in tubs and beautiful containers. Italian ponds are often decorated with street lamps.
Japanese
A Japanese pond should resemble a natural one as much as possible. You will never find rectangular ponds in nature, that’s why they don’t exist in Japanese style. A Japanese pond may have a waterfall, but not a fountain. In general, the art of creating a Japanese pond is similar to creating a bonsai - everything is real, but in miniature. The pond should look like the ocean, the pebble on the shore should look like a rock rising above the ocean. On the shore you can place a sculpture depicting Buddha, a dragon, an animal or a bird so that it is reflected in the water surface.
English
Pond in english style much easier to arrange, since it does not require clear boundaries. The lines of an English pond should be smooth. An English pond is usually created as a landscape type - trees and shrubs grow in abundance around it. English ponds look natural.
After constructing a pond at your summer cottage and designing the landscape, you will have to take care of the reservoir. What is included in the concept of care:
- In spring, the filters and pump are usually turned on in mid-April. Immediately you need to carry out bottom cleaning and clean the surface of debris. At the same time, annual plants are planted.
- Tropical plants have been planted since June.
- Bottom cleaning should be regular and done using a bottom vacuum cleaner.
- In summer, a skimmer must be used to remove debris from the surface of the water surface.
- In summer, thread algae must be removed. If oxygen generators do not have time to clear the water of green algae, you can use special chemicals - algaecides.
- Water lilies and irises need to be fed with fertilizers.
- All summer it is necessary to monitor water quality with special tests.
- In the fall, tropical plants are removed from the pond, placed in containers with water and placed in a bright, frost-free room for the winter.
- In autumn, during leaf fall, it will be more convenient to cover the surface of the pond with a fine mesh so that yellow leaves did not sink to the bottom, but remove it by winter.
- In winter, the water from the pond is drained. It is necessary to drain water from all pipes and hoses. Remove and clean filters and pumps.
Conclusion
A pond on a garden plot is prestigious, fashionable and simply beautiful. If maintaining a large deep pond with fish is quite troublesome, then building a small pond with your own hands is within the means and within the power of even the owner of a small plot.
The most common artificial decorative ponds in summer cottages These are ponds and pools. Everyone can afford a small pond. Everything depends not so much on financial opportunities, how much from desire and hard work. An artificially created pond can have absolutely any shape, just like in nature. Marsh plants are usually planted along the perimeter of such ponds; it goes well with any type of landscape design. You can make a pond of a certain geometric shape; such a pond will fit well into the design idea, in which clear, regular shapes also predominate.
To create an artificial reservoir at your dacha, the most important task is to choose its future location and size. It should be remembered that the condition of the pond is poorly affected by direct sunlight for more than 6 hours a day (long-term exposure can stimulate the growth of bacteria), as well as the close proximity of trees - leaves falling into the water will pollute the pond, and tree roots can completely destroy the structure of the reservoir .
The size of the pond depends directly on how much free space there is. garden plot. But it is worth remembering that the larger the pond, the easier it is to create a stable ecosystem, that is, a balance between the animal and flora in a reservoir, therefore it is easier to care for a large reservoir than a small one.

At the base of the future reservoir there can be either a ready-made container (for example, an old cast-iron bathtub or any plastic container), or a film made of polyvinyl chloride or butyl rubber, or even a reinforced concrete bowl.
Of course, using a ready-made container makes it easier and faster to make a pond. For the existing container, simply dig a hole and place it there. It is, of course, impossible to make a large reservoir in this way.

Using film you can make a pond of any shape and depth. Although this option will require a fair amount of tinkering, it is more economical and convenient. It is not recommended to use ordinary polyethylene for film reservoirs, since it has a short service life and will lose its properties in a couple of years.
A reinforced concrete bowl at the base is the most reliable way to create a pond. However, this option is the most expensive, and it will be very difficult to remake such a decorative pond at the dacha with your own hands.
So, due to the many options in size and shape and cost-effectiveness, the most common type of dacha ponds are ponds created using film.
To create such a pond, you need to complete several steps:
- Preparing the bottom of the future reservoir (pit). The main thing for film reservoirs is to create a flat bottom, without stones, roots and other sharp protrusions, so as not to damage the film.
- Drainage. To prevent shrinkage, place a layer of sand on the bottom. To protect against rodents, it is also recommended to lay a geotextile layer.
- Laying the film.
- Pouring water.
- Decor. Here everything depends on the designer’s imagination.
- Pond care. It should be remembered that artificial reservoirs require filtration to prevent water stagnation. For these purposes, either special filtration systems are used, or plants that can saturate the water with oxygen and absorb carbon dioxide and mineral salts are placed in the pond.

A combination of these methods can be used. On winter period water should be removed from the pond, and the plants should be sent to an aquarium or a large pond located nearby to overwinter.
DIY artificial decorative ponds
Summer is just around the corner, which means it's time to open the summer season. To make your work at your dacha easier and to improve your dacha plot, you can build an artificial pond on it. An artificial pond will decorate your site, and will also serve as a source for watering plants, swimming, and breeding fish.
Ponds on the site can be of different geometric shapes, but they must be raised above the soil level. When building a pond, as with any other construction, you need to adhere to a certain algorithm. First you need to determine the location of the artificial pond on your summer cottage. It is recommended to place it not far from trees and shrubs in an area with turf.
Trees and shrubs should be located at least 1.5 - 2 meters from the pond, so that tree roots do not distort the landscape of the pond, and fallen leaves do not litter it. Provide free access to the pond from all sides, make paths around it. Paths can be lined with stones or plastic plugs.

This will make the appearance of the pond more aesthetically pleasing. The pond should be located on a sunny, but slightly dark side, so that the water in it does not heat up too much. Strong heating of the water will promote flowering of the pond and rapid growth of algae.
Once the location has been chosen, construction can begin. First you need to dig a pit of the desired shape. Its depth should be at least one meter, total area 3-4 sq. m.
When constructing an artificial reservoir, a difficult dilemma arises: “What should the bottom be made of?” You can make the bottom of the reservoir by filling it with concrete, laying it out with granite or even marble. But this will require large financial investments and will make the pond unnatural; also, when redeveloping the garden, changing the position of such a pond will be problematic.
Therefore, bottom planning must be taken very seriously. It will be convenient and practical next construction. Pour sand into the bottom of the pit and distribute it evenly. Cover the bottom of the pit with a waterproof film on top of the sand. We fix the edges of the film along the shore line.
Be sure to use heavy stones to strengthen it, and then fill the edges with river pebbles or gravel. Ready-made plastic containers, which already have recesses for planting, are also very convenient for organizing the bottom.

We install a pump in the pond to circulate water and carry out artificial lighting. So that the pond would please your eyes even in the evening. After the pond is built, it must be decorated with plants and decorative elements. To do this, we plant the plants in baskets, which we strengthen at the bottom of the pond. Water lilies, lilies, and egg capsules can also serve as a good decorative element for your pond.
 Lilies on a decorative pond
 If you wish, you can populate the pond with fish, but keep in mind that the fish will need to be looked after and the pond must be cleaned in a timely manner. A properly equipped and organized artificial pond will decorate and enhance your area.
How to make a reservoir - a pond on a plot, in a dacha - video instructions
How to care for an artificial pond
It’s not enough to create a small pond on your summer cottage - it still requires care, without the owner’s care it will turn into a dirty swamp which will then dry up over time. To prevent this from happening, experts advise what and when to do so that the pond is always colorful.

Spring
It is recommended to carry out the first inspection of the year as soon as the ice melts - from mid to late March. This is the most favorable time - work in the garden and beds has not yet begun, so you can thoroughly and slowly examine the entire pond. Everything must be inspected, starting with appearance— how the banks survived the winter, are they intact?
If the fish spent the winter in a deep pond, their condition is checked to see if they are alive. It is necessary to pay attention to all electrical devices - how filters and pumps work. The integrity of the bottom must be checked - if a leak or crack appears, the fish will be temporarily resettled and the damage repaired.
At the same time, at the end of March you can take care of plants. If the owners are satisfied with the plants they had last year, plant them; if it is necessary to update the plants, purchase new ones. Also don't forget about the garden.

After the autumn winds, a lot of foliage blew into the pond - in the spring it must be removed so that the rotting leaves do not spoil the quality of the water - this can affect the health and life of the fish. If the pond is small, they practice pumping out water, relocating fish and cleaning the walls and bottom with a regular brush. Dirty water drains and changes to clean.
Summer
The most important and pressing problem for summer period in a pond - maintaining the water level. The spring maintenance of the pond ended with the stabilization of order, and in the summer it is only necessary to maintain this order. When the water level drops due to evaporation, the water is pumped up; if the days are too hot, the oxygen level in the water is artificially increased using compressors and creating shade.

The second action near the pond in the summer is to check the condition of the plants - their growth, and trim them if necessary. If there are weeds in the plants, they are removed. Insect control is also carried out - it is better to wash them off in water - the fish will receive fresh food and the leaves of the plants will be freed from dust. After each feeding of the fish, the remaining food in the pond is checked and removed so that it does not spoil the quality of the water.
Autumn
With the onset of autumn and the beginning of leaf fall, the most important thing in caring for a pond is to preserve it from contamination by leaves and debris carried by the wind. Fallen leaves are systematically removed, the plants are trimmed on the shore and hung over the pond fine mesh to prevent leaves from falling onto the water.
Plants that have sprouted buds are removed until spring in a warm room. If there are pots with plants near the pond, they are also brought into warm room. The fish are being fed - they should have reserves for the winter nutrients and fat reserves, since fish are not active in winter - this is quite enough for the winter.
Winter
A shallow pond that can freeze to the bottom and kill the fish is pumped out. The fish are temporarily moved indoors until spring. If the fish winter in a pond, it is necessary to provide for the creation of wormwood - either by placing a hot object on the ice or by drilling out the wormwood. In winter, if necessary, you can heat the water.
Many summer residents dream of building a beautiful pond in their garden plot. However, not everyone can boast large area plot of land, trying in vain to place on it a vegetable garden, fruit trees, as well as several flower beds with favorite flowers. In addition, the construction of a pond involves significant costs, which not everyone can afford.
A small charming pond is not difficult to build yourselfSeveral options for a small pond
Our photos show various options artificial reservoirs in summer cottages. Among them you can find budget ones and you can choose one of the simplest ones. In addition, the choice of option should be determined by the composition of the soil, as well as the availability of free space in the garden or yard. It’s easy to build a mini pond with your own hands if you have the appropriate building materials on hand. Available materials can serve as the main argument in finding a solution.
Film pond - a universal solution
To prevent water from escaping from a homemade pond, it must be sealed. In a good way the use of film is considered. If you want to save money, you can use leftover plastic film that was purchased for greenhouses, but such a pond will only last a few years.
If it is possible to purchase a butyl rubber-based film, which is designed specifically for constructing ponds, the life of the pond will significantly increase. A compromise option is dense polyvinyl chloride film.
It happens that the remains of the film are scattered pieces - in this case they can be glued together to obtain a coating the right size. To do this, it is advisable to use a special glue, which can also be used to seal cuts and other material defects.
 A film pond allows you to build a pond of any shape and size
 In addition to the main material, you will need sand, geotextile and stones. To arrange a pond with your own hands, you should act according to the plan:
- Mark the area for the pond. You should not arrange it right in the garden next to fruit trees. It is advisable to choose a flat surface so that the bank levels are the same height - otherwise the water from the pond will pour out on one side.
- Dig a pit, making sure that its walls are flat, which will allow the banks not to crumble during operation. The angle of inclination of the pit walls should be up to 45˚. If desired, the banks can be made into ledges.
- Next, you need to carefully compact the bottom of the pit, and then fill it with sand to a height of 5–10 cm. Lay a piece of geofabric on the sand; some craftsmen replace it with old blankets.
- Now the pond can be lined with film. This should be done slowly, trying to immediately straighten any wrinkles that arise. Place the edges of the covering on the banks.
- You need to pour water into the reservoir in parts, this will prevent the coating from tearing. It is recommended to take a two-hour break between each stage.
- Once again we check the level of the banks and, if necessary, level them by adding soil. We secure the waterproofing along the entire shore using stones.
Important: it is best to work with film in the summer, on a hot day. This will make all manipulations with the material easier, since it will be softer.
 A small pond made of a plastic bowl under guard
 Plastic bowl - quick and easy
If you don’t want to work with film, you can speed up the work on building a small pond. To do this, you should choose a ready-made PVC bowl. Similar containers are sold in hardware stores and can vary in shape and size. In addition, plastic inserts differ markedly in price and quality. Low-quality plastic quickly breaks down under the influence of frost and ultraviolet radiation sun. The choice is yours. Below are instructions for installing a reservoir with your own hands:
- First you need to mark the place for the pit. To do this, drive pegs around the perimeter (corners) and tie them with rope. Make markings larger than the dimensions of the bowl, 20 cm on all sides. Dig a pit with a depth equal to the height of the bowl plus 20cm.
- Now you need to fill the bottom of the hole with sand, achieving it flat surface, – this can be checked using a level. Moisten the sand and compact it. Next, place the bowl in the pit, trying to ensure that its edges are level with the surface of the earth.
- When the bowl is installed, it is necessary to pour sand between its side parts and the walls of the pit (in the same reserve of 20 cm). The sand should be poured in and compacted lightly as the bowl is filled with water. This will avoid deformation of the tank walls.
- You should not pour water into the bowl all at once, but in small portions. A sudden load on the plastic can lead to distortion and damage.

 The easiest way to make a small pond is from a plastic bowl
 Concrete pit - a reliable option
The method of constructing an artificial pond from concrete is suitable for those who know how to work with concrete. Such a pond has an undoubted advantage over its counterparts - it is reliable and durable. However, it will not be possible to move it to another place; therefore, before starting work, it is worth thinking carefully about its configuration and choosing the most suitable one. appropriate place Location on. Let's take a closer look at how to build a concrete pond with your own hands:
- The pit under the pond should be made with ledges. Let its walls be flat; here it is also important to adhere to an angle of up to 45˚. The hole needs to be compacted well.
- Next, you need to fill in the sand, but the layer should be small - 3 cm is enough. On top of the sand you need to lay a film of polyethylene or polyvinyl chloride, which should not be pulled too tightly.
- It is necessary to lay concrete starting from the walls, and only then move to the bottom. It is important to complete this work within one day to avoid cracking of the concrete at the joints.
- Next, you need to wait until the composition hardens slightly, and then press it into it. metal mesh for concrete reinforcement. This must be done so that the edges of the mesh protrude above the surface of the reservoir.
- After the concrete has completely dried, it is necessary to pour the next layer. Before starting work on the second layer, the lower concrete must be sprinkled with water. Experts recommend at this moment to check the bottom surface to ensure it is horizontal.
As soon as upper layer When the concrete is completely dry, you can pour water into the pool. Then start decorating it - planting plants on the banks, introducing fish or arranging lighting.
Miniature pond plus scrap materials
Budget options for creating ponds in the countryside involve using all kinds of available materials, instead of buying a bowl or film. Some craftsmen build a pond from an old cast iron or children's bathtub, while others were able to adapt car tire or an old basin. The pond will turn out to be quite small, but caring for the mini pond is not difficult. Changing water is easier than in a large tank, and with the help of plants in tubs and decorative stones it can easily be turned into a blooming oasis.
Preparing a pit for a pond from a bathtub
After many years of use, the bathtub loses its original appearance. If there are no through holes in the bowl, it can be used in the country as a makeshift pond. To build a small pond without high costs, you need:
- First you need to mark the place under the pond, and then add 10 centimeters on each side. Dig a pit, the depth of which will be 20 cm greater than the height of the bath.
- Now you need to mark at the bottom of the hole the place where the bowl drain will be located. There you need to dig a hole with a diameter of 30 cm and a depth of half a meter. This will be drainage. You need to insert a rolled sheet of metal into a cylindrical hole and fill it with crushed stone. The edge of the metal should protrude 15-25cm above the pit.
- After preparing the drainage, you need to make a “cushion” for the bath, which will allow it not to sag over time. To do this, a layer of crushed stone is poured onto the bottom of the pit and sand on top. This pillow should be about 20cm high. All this must be thoroughly compacted, after which the sheet of metal should be removed.

 At correct installation bath pond will last for many years
 Pit for a two-level pond
If you decide to build a pond from an old bathtub, you can make it quite unusual. We propose to create a two-level pond with your own hands, the construction of which will require a little more effort. Work plan, step by step:
- Before digging a pit for a bathtub, you need to mark the area, adding half a meter on each side. The external outlines should be slightly modified - make this line wavy, giving it a contour reminiscent of the natural outlines of a lake.
- Now you can start digging a pit. To do this, you need to dig a hole 30-40 cm deep, focusing on the outer contours. Next, at the bottom of the dug pit, you need to mark the outline for the bathtub and deepen the pit under the bowl as described above. That is, the total depth of the pit will be greater than in the first option by the same 30-40 cm.
- When the bathtub is installed, the outer contour of the reservoir should be limited by fiberglass slate. A corrugated hose must be placed on the edge of the slate.
- Next, the space that has formed between the bathtub and the slate must be filled with sand and compacted, or filled with concrete.
- The bowl must be covered with film, forming a single pool for water. The film should be secured with stones.
 A two-level pond is more difficult to make, but no one will guess that a bathtub is used in the pond
 Installing a bath
After preparing the place for the bath, bricks should be laid at the bottom of the pit - several bricks in each corner, on which the bath is installed. This precaution will prevent the bulky container from sagging. Next, you should check how level the bathtub is installed and make sure that its edge is level with the ground. There is empty space between the walls of the bathtub and the pit. It must be covered with sand, which must be moistened and compacted thoroughly.
Mini pond made from a tire
If you can use an old tire, you can quickly and easily build a miniature tire pond with your own hands. A tire from a KAMAZ wheel or tractor will make it possible to make the reservoir much larger.
First you need to dig a pit of such a size that the tire can easily fit into it. Before installing it in the hole, it is necessary to cut it with a knife top part rubber. You should end up with a bowl with a hole at the bottom. Next, you need to take the film, cover the bottom and sides of the tire with it, bringing the edges up. They need to be tucked over the edges of the tank. All that remains is to pour water into the finished tire pool and decorate its edges with plants and stones. In a similar way, you can build a pond from a plastic basin.

 A tire pond will not take up much space and will be an excellent garden decoration.
 Several ways to decorate a pond
Today there are many ways to decorate a mini pond. Among them are the installation of plaster figures on its banks, the laying of decorative stones and tiles. Any body of water will be decorated with greenery, which can be placed around it directly in flowerpots. In other cases, soil is poured on the banks of the lake, interspersed with stones. Moisture-loving perennials are planted in the ground, which over time form beautiful thickets on the shore.

 A small waterfall and beautiful lilies will decorate and enliven the pond
 If you want to plant aquatic plants, you need to ensure that they do not grow too much. Otherwise, the surface of the pond will be completely covered with greenery. Experts recommend using water hyacinth for this purpose.
You can also decorate the pond with a bridge and install lanterns around it. Another way to enliven the water of an artificial pond is a fountain or waterfall. All this can be built later, the main thing is to take into account the possibility of modernizing the pond at the stage of choosing a place for the pond.