In this material we will tell you how quickly and easily make your own plastic furniture for the garden from plastic bottles. With the help of visual master class with photos you can easily make a comfortable sofa , for example, for the garden - so convenient furniture made from plastic bottles will serve you for a long time (the frame made of bottles is durable, and can quickly be completely replaced and reupholster the sofa with fabric not difficult). Be sure to involve your child to help you while you work. Do DIY ottomans , tables and sofas made from bottles are a very exciting and useful activity for a child’s development (and you can start by creating simple crafts from plastic bottles according to lessons with photos, which you can find in the article DIY crafts from plastic bottles).
Why is it needed? plastic garden furniture? This is the most the best option, for the setting country house, summer cafes, as well as various outdoor events. Plastic furniture popular for street presentations for the cold market, and our company will help you make your business more comfortable and attractive. Furniture is provided for your choice different designs And color palette. The main irrefutable advantage of plastic garden furniture is its extreme mobility, and when carrying out various outdoor events, convenient transportability is the key to your peace of mind and confidence! Is it possible to make furniture from plastic bottles with your own hands? Below you can find a master class on making such furniture.
To make your own chair You will need about 260 plastic bottles, for a single bed - approximately 780 plastic bottles, for a double sofa - 500-600 plastic bottles. Use only two-liter plastic bottles for work. Part C of the bottle must correspond to part B of the neck. To craftable modules from bottles were strong and elastic, they must be wrapped with thick tape with sufficient pressure and tightened well, making sure that the shape of the module is square and not deformed. Combine 16 modules bottles with each other, as in the photo.

The products we offer are the best and highest quality in all of Russia, because the manufacturing companies have many years of experience and an excellent reputation in the sales market. Plastic furniture, which is provided in our catalogs, is particularly wear-resistant, this is very important, because outdoor furniture is susceptible to various destructive factors. This allows you to use it much longer than its analogues. Range of furniture uses made of plastic, practically unlimited! It can be found at stadiums, beaches and cottages. Plastic furniture is used not only for arranging summer cafes and snack bars, but even for the most ordinary apartments!
Why is it increasingly possible to hear that many consumers choose plastic furniture for their garden or for furnishing their own home (designer plastic tables and chairs bright colors)? The answer is very simple! Plastic is very easy to care for and is not at all fussy about external factors. Also, such furniture looks very aesthetically pleasing and modern. The advantages include its low cost.
Plastic furniture for cottages Made conscientiously and of good quality. But if you decide to compare it with the Italian analogue of plastic furniture, you will not discover that hidden chic and good quality that simply cannot be expressed in words.
Furniture for arranging outdoor areas and for the beach does not have much luxury or gloss, and attracts its customers precisely with its simplicity and convenience.
NEXT ARTICLE.
IN modern times Many handicraftsmen have appeared who are trying to make furniture and interior items out of old and unnecessary things. The scope for imagination in this area is enormous, so no one tries to limit themselves. Many people wonder how to make a sofa from bottles, because there is a great abundance of this raw material, and it is not very profitable to simply dispose of it.
And in fact, bottle sofas are very popular. They can fit very harmoniously into any country house or summer house. But people’s imagination is very developed and now some are already installing plastic sofas in their apartments. This is because it is very simple to make, you just need to be patient and have a large number of bottles of different denominations, but of the same shape.

Exist special instructions How to make a sofa from plastic bottles with your own hands, step by step. To do this you will, of course, need a large number of bottles It all depends on what shape you choose for your furniture. If you are making a sofa for the first time, then you should not aim at huge models; a small two-seater option is enough. If you do simple furniture and you are not going to cover it and soften it with foam rubber, then you can cope with this task in just a few hours. To do this you will need the following equipment:
- sharp and large scissors;
- regular and double-sided tape;
- about five hundred bottles with a denomination of two liters and four hundred with a denomination of one liter;
- sharp knife.
It is worth noting that the sofas made are very durable. If they are designed for two people, then they will hold up without any problems, even if the person sitting heavy weight. The sofa parts themselves are very durable and can ultimately last much longer than standard view furniture.
Assembly technology
You can even assemble a complete model alone. First, you should prepare the bottles, wash them, remove excess labels, stickers and other interfering elements. Then, you need to assemble one strong block from three bottles and secure it with tape.
- Cut off the neck of the bottle.
- We insert it into bottom part, cork down.
- Insert another, whole bottle into the resulting vase.
- Cover its neck with the cut-off lower part from the third bottle.
Overall, you get a fairly strong block, which in addition needs to be secured with tape. To make it more convenient to fold the selected model, you need to fasten four bars together. This must be done carefully, so that the bottles do not move, or rather do not move at all, in the assembled pack.
Next, you can use your imagination. All the instructions offered on the Internet are different, so you can come up with your own version of a convenient and homemade sofa. The main thing is to pay attention to proper gluing, so that after some time the parts do not begin to move apart, ruining appearance furniture.
If a person has a creative streak, there is no such thing as “garbage” for him. For him, any production is waste-free. From small scraps of fabric we will sew a doll or a blanket in the patchwork style. We will make snowflakes, flowers, and a garland from paper. Ribbons and lace, glass and plastic – everything has a use. Craftsmen can even create furniture. And not only from wood, but also from such a material that would seem completely unsuitable for this purpose, like a plastic bottle. So let's see how you can make plastic furniture.
Start collecting bottles. You can’t even imagine what flights of fancy you can allow yourself when creating plastic products! This article will focus exclusively on furniture. Get ready, an amazing master class awaits you.
We will provide you with some interesting ideas. You can clearly see how to make furniture from plastic bottles in the photos that will accompany our story.
Furniture made from plastic bottles: armchair
The first idea is a chair.
Using this chair as an example, we will show the basic principle of fastening bottles. Study it carefully, we will need it when creating other things.
It is clear that to create furniture, you will need a considerable number of bottles. However, this depends on the size of the furniture. The photo shows the assembly diagram. It is universal. To make it clearer, we will describe the entire process that is depicted.
Take the bottle and cut it in half. Turn the top over and insert it into the bottom. Then insert a whole bottle there and cover the top with only the bottom part of another one. It turns out something like a “log”. It's quite strong. When a sufficient number of “logs” are collected, they can turn into not only a chair, but also an entire sofa. But more on that later.
We fasten our “logs” (it would be more correct to call them modules) in the amount of four pieces. To secure them together, we simply wrap them with transparent tape. From four such parts we assemble a larger module and also fasten it with tape.

The back and sides of the chair are made by extending the same modules to the required length and fastening them with tape (see photo).

By the way, adhesive tape can be replaced with a special one cling film. It is not difficult to find in any hardware department. The film connects the parts more firmly than tape.
That's all, actually. The chair is ready. You just need to sew a cover for it from a suitable fabric. The appearance of the chair depends on the cover, so when choosing fabric, take this into account. For convenience, place under the seat soft material such as foam rubber or padding polyester.

Sofa
Using the same principle as we made a chair, you can make a sofa. Of course, you will need much more bottles here than for a chair. But they will need to be assembled according to exactly the same pattern. Having folded the “logs” - modules of four pieces each, we also carefully wrap them with tape. Don’t skimp on adhesive tape, because we need a reliable and durable structure that can serve us for many years, so it’s better not to skimp on it. Just as in the previous description, modules consisting of four bottles are assembled into larger modules.

They continue to increase the modules to the sizes required for the sofa. It is preferable to cover the sofa with foam rubber or padding polyester, because this is upholstered furniture. And sew him a suitable cover from a beautiful fabric.

Such a sofa - shining example that country furniture made from plastic bottles can be not only beautiful, but also functional.
More details in the video:
Furniture made from plastic bottles: table
A table is the simplest version of furniture made from plastic bottles.

It consists of forty bottles with a capacity of two liters. We also need a finished countertop. You can buy it or cut it yourself from plywood, in which case do not forget to varnish it. You can also use a tabletop from an old broken table.
We screw bottle caps onto the underside of the tabletop using bolts. Correctly calculate the distance between the corks; it should be equal to the diameter of the bottle.

As you understand, each of the legs consists of two bottles held together at the bottoms. They are fastened with glue and after complete drying they are simply screwed into the lids located under the tabletop.
Since the table looks quite simple, and there is no provision for sewing a cover, it is more suitable for the garden.

Our article presents only a small part of the ideas that can be brought to life using unnecessary plastic bottles. You can find many other crafts made from plastic bottles - furniture, toys, figurines of birds and animals, and even jewelry in our other articles.
Ottoman
Additional video lessons
The amount of garbage that each person “produces” is growing every year. The problem is becoming global, as flying plastic bags and plastic bottles lying everywhere have become an eyesore for everyone. I’m grieving, it turns out that you can help, and even for your own benefit. In any case, this applies to plastic bottles. You will be surprised how diverse and, importantly, useful crafts You can make one from plastic bottles in just a few minutes. Well, or a watch... Depends on the scale.
The buildings
PET (polyethylene terephthalate) is a thermoplastic from which bottles are made. It will be useful to know its physical properties:
- density - 1.38-1.4 g/cm³,
- softening temperature (t size) - 245 °C,
- melting temperature (t pl.) - 260 °C,
- glass transition temperature (t st.) - 70 °C,
- decomposition temperature - 350 °C.
Plastic bottles are very convenient to use, but are harmful to the environment, since the polyethylene from which they are made takes more than 200 years to decompose. This same property allows the use of almost waste raw materials as construction material. Craftsmen already even build houses from plastic bottles, as well as sheds, dachas, greenhouses, greenhouses, and fences. Worked out various technologies- the approach is quite serious.
How to build a house from plastic bottles
The main idea is to pour into bottles bulk material, screw them on with lids and use them as bricks. Fill bottles with sand and soil. Sand is preferable because there is too much plant debris in the soil that can rot. It must be sifted, dried, filled into bottles, compacted well, and topped up. The result is a kind of brick.

To build a house from plastic bottles, you will need a solution that fills the gaps between the “bricks”. There are options here too. It could be ordinary solution, which is used when laying brick walls, can be made clay mortar. To keep the “bricks” in the wall until the mortar sets, they are tied with twine on the side of the lids. Later, these “grids” will come in handy when you plaster the walls. They turn out uneven, so you can’t do without leveling.
We make a greenhouse, barn, greenhouse
You can build a greenhouse or hotbed from plastic bottles. In this case, only transparent plastic is used, since it is necessary for sufficient light to pass through. To build a shed, on the contrary, it makes sense to choose darker plastic - it will be less visible what’s inside.

The first technology - one to one
The second requirement for bottles as a building material is an even shape. This one, you know, without recesses. Otherwise, folding the walls so that they retain heat will not work - it will “siphon” into the curly cutouts. Remove labels from bottles and dry. You also need to prepare pins or rods - bottles are strung on them. Their diameter is small so that the neck passes freely. Now you can start building a greenhouse/shed from plastic bottles.
To build a greenhouse or shed, pillars are dug in the corners. Frames are assembled from timber according to the size of the walls. These frames will be the base for the bottle walls. We collect them (frames) on the ground and in finished form We attach it to the dug-in pillars. When you make the frames, don't forget the doorway and windows.

We build a frame, cut off the bottom of the bottles, and string them onto a pin. From such “columns” we assemble walls, roof
The construction process begins with cutting off the bottom. We string the cut bottles onto pins, pointing the necks in one direction. We insert the bottles with force so that they become very tight. Having collected a row of the required height, we attach it to the frame. You can fasten it with clamps, strips cut from metal, nails... In any way available to you. We press the second row against the first so that there is a slight deformation. We fasten it in this position. So, row by row, we assemble all the walls, then the roof.

Using the same technology you can make a gazebo. But here there is no need for tightness, so you can collect shaped and colored containers. This will make it even more interesting (example in the photo).
Second technology - sewing plastic
Bottles will also need to be smooth, transparent or yellow. The central part is cut out of them, obtaining a piece of plastic square shape. The pieces are sewn together into long strips. In the strip, the pieces are placed so that they curl in one direction. Then the strips are sewn into canvases. To make the canvas even, the strips are positioned so that they curl in different directions. As a result, they equalize each other. The finished canvases are nailed to the frame. This completes the construction of the greenhouse for plastic bottles.
This type of “cladding” for greenhouses withstands winters well; it does not need to be removed. Due to the firmware (many small holes), there is no absolute tightness, which allows you to regulate humidity. You won’t be able to heat such a greenhouse, but it will delay autumn for you and speed up the arrival of spring.
You can sew plastic for a greenhouse by hand, but it is not easy. It will be easier for those who have non-capricious Sewing machines. Old Podolsk machines cope with this task. There may be problems with others.
Fence and enclosure
You can make a fence from plastic bottles different ways. If you need a serious monolithic fence, you can use bottles as bricks. The technology is the same as when building a house. To avoid plaster (after all, there is a high risk that it will collapse) - select the color of the plastic to obtain the required Rusinka. But in this case you will have to look for “building materials” of the same diameter or from different sizes lay out patterns. In general, the process is creative, no matter how you look at it.

You can also make filling for the fence from plastic bottles. Make a frame, say, from wood, and come up with a beautiful filling from shaped containers and their parts.
Furniture from scrap materials: recycling plastic bottles
Not only can you make a house and a fence from plastic bottles, they are also used as a basis for upholstered furniture. The idea is to use plastic containers rather than wood for the frame. With the lids screwed tightly on, they have a high bearing capacity, and assembled into blocks, they are quite capable of withstanding loads of up to 100 kg or more.

A bed made of plastic bottles... you need a good mattress, and the base is not too difficult to make
Although the furniture is made differently, the general algorithm of actions is the same:
- Select “building material” that is the same height and tighten the lids well.
- Collecting blocks the right size, fastening them with tape.
- Having assembled the base of the required shape, sew the cover. For softness, adding furniture foam.
The trick is to ensure that the bottles fit very tightly against each other and do not move. The slightest play can lead to destruction of the structure. Therefore, assemble the blocks slowly, carefully securing them. You can stack bottles in layers, securing each layer in several places. For the inner layers, it is better to use double-sided tape - the fixation will be more reliable.
Ottomans/banquettes
The easiest way is to make an ottoman or banquette from plastic bottles. We proceed in the order described above. You need to find bottles of the same height. It’s better if they are the same shape - it’s easier to assemble. From plastic containers with tightly screwed lids we assemble a base in the form of a cylinder. It is advisable that the radius of the base be greater than the height of the bottles - this way the bench will not tip over.

Next, you need to cut out two circles from fiberboard, which will be slightly larger than the resulting radius of the base - this is the “bottom” and the base of the seat. We secure them with tape. We take furniture foam rubber and, according to the obtained dimensions, cut out the necessary parts. We sew a cover from furniture fabric, colors that suit the interior.

Such a banquette can be not only round. It is quite possible to make it square. And so that this furniture is not too light, it can be made heavier by pouring water. But water is not very reliable. It's better to pour sand. Both heavier and more reliable.
Sofas, chairs, armchairs
If you need furniture higher than one bottle, proceed as when creating walls for a house. Find “material” of the same shape and height. Leave the first bottle intact, screw the cap tightly (you can add sand to prevent it from turning over). The bottom of the other is cut off and one is placed on top of the other. The bottle goes a certain distance and does not move further, no matter how much effort you make. If the resulting height is enough, great; if not, put on the next one. This is how you assemble rows of the required height, then fasten them into blocks.
There is another way. It is more reliable in the sense that the bottles are not held by compressed air, but due to mechanical stop. And they have double walls, which is also important. Disadvantage: more work large quantity raw materials are needed. The whole process is illustrated step by step.

- Take the bottle, cut it approximately in the middle of the height ( top part with a smaller neck).
- We insert the upper part of the neck (the lid is screwed on) until it stops into the lower part.
- We take a whole one, the same size and shape, and insert it bottom down into the prepared structure.
- We cut the third approximately in half and put the lower part on the top (with a lid).
From such modules we assemble blocks of the required configuration, fastening them with tape. Don't skimp on scotch. You can first fasten two bottles together, then assemble larger blocks from the double ones.
As you understand, with this technology there are a lot of bottle tops left (half of the third bottle). They can be used to make other crafts from plastic bottles: flowers, more practical things for the household.
Flower making methods
The most common crafts made from plastic bottles are garden figurines and flowers. Read about garden figurines There are others interesting ideas, but there are a lot of collected interesting animals and insects. And we’ll tell you about flowers made from plastic bottles below - these are probably the crafts made from plastic bottles that bring the most pleasure. The process is simple, there are a lot of possibilities, the result is amazing.
You've probably noticed that the bottom of a PET bottle looks like a flower. All you need to do is find a bottle of a beautiful color and cut off the bottom. Now you have a nice flower. In the middle you can add petals cut from the central part, a core from plastic strips cut into noodles, or glue beads inside, but more on that in a little more detail.

Using the power of fire
To work, you will need a marker, a lighter or a candle (it’s more convenient with a candle). If available, take pliers, tweezers or pliers to hold the workpiece while processing. You will also need acrylic paints, glue and beads may be needed. The entire manufacturing process comes down to a few steps:

There are a lot of options here. Just start doing it. It may not work out perfectly right away, but you will understand what and how you can fix it. Check out some more pictures from step by step photos process of making flowers from plastic bottles.
The simplest
For beginner crafters, you can try making flowers from plastic bottles simple shapes for garden decoration. In this case, you can also use milk containers. To avoid painting plastic, look for colored ones. And it doesn’t matter so much whether they are transparent or not. They can be combined to produce flowers of different shapes.

To create such flowers, use the part near the neck. It is cut to form petals. Next - warm it up a little, giving the desired bend to the petals, a little paint, the core from a melted piece with a thread (a bottle of a smaller diameter, a pharmacy bottle will do). So it turned out to be a buttercup.
Another option is to cut from the neck into strips of equal width - 1-1.5 cm, bend them (warm up a little at the base). Make a middle whisk from the side of a milk bottle or paint clear plastic with acrylic paint.

The middle is any bright. Here is a piece of cork, but you can cut it into thin noodles, roll it up and then heat it. You will get a shaggy core.
It's all about the form... Despite the imperfections, they decorate the area
The topic is actually inexhaustible. A variety of flowers are made from plastic bottles. From simple and uncomplicated to very realistic. It's not so much a matter of skill as different tastes and desires.
Useful ideas for the home
PET containers turned out to be so good material that they make a lot of useful things. In this section we have collected useful crafts made from plastic bottles that can be used around the house.
For the kitchen and more
If you cut off the bottom of a bottle with a capacity of 2–3 liters, you get a bowl or a bowl, and so that its edges are even, they can be melted on a heated iron. But so that you don’t have to clean the sole later, use a special silicone pad. If you don't have one, you can do this through a sheet of baking parchment.

Container for food. The plastic is food grade...
From the same bottle we cut off the threaded part. There should be 1-2 cm of plastic left around the thread (we melt the edges using a well-known technology). Now it won’t be difficult to seal any package hermetically: we pass it through the cut neck, wrap it outward, and screw on the lid.

The bottom of the bottles attached to the bar makes an excellent newspaper shelf (photo on the right). You can also store umbrellas.
From plastic cut into strips you can weave different shapes containers. Bottles need an even shape, with thick walls. They are cut into strips of a certain thickness. You need to cut in a spiral - the result is quite long strips. If their length is not enough, they are sewn perfectly.

Lampshades
You can even make a lampshade, but under one condition: you will use similar crafts from plastic bottles in lamps - only they hardly heat up. Plastic is incompatible with other lamps. We will describe three ways to make a lampshade from a plastic bottle.
First. You need a large capacity bottle. We draw it into strips of equal width. At the beginning and at the end of each strip, we make holes with a heated soldering iron or a nail heated on fire. We insert scissors into this hole and cut. The result is smooth stripes.

When the strips are cut, we also make a hole in the bottom, pass a thick fishing line through the neck, take it out through the hole in the bottom, and attach the decor to the back side. Maybe a button, maybe a pebble suitable color. Now, by pulling the fishing line, we get an interesting shaped lampshade. You can put a low power light bulb in it.
Another lampshade was made using a similar technology. But then they cut part of the bottle with the neck into strips, wrapped the strips and secured them to the neck. To give the desired shape The bend area can be slightly warmed over the flame of a candle or lighter. We attach the resulting “flowers” to the base. So we get an unusual design.

They also make lampshades from the bottoms. You need to find a sufficient number of identical bottles, cut off the bottom of them, glue them together using universal glue(choose transparent). The main thing is that it glues the plastic and hardens quickly.
Flower vases
Making a vase from a plastic bottle - what could be easier... Just cut off the neck and you're done. But there is a technique that allows you to get patterned walls. You will need a soldering iron with the thinnest tip possible. Its power should not be too high. Then everything is simple: use a heated tip to burn out the patterns.

Magically! To make the drawing appear brighter, take acrylic paint and paint the resulting beauty. The paint can be in a regular can, but it’s faster and more convenient to work with a spray can.

These are the options...
Photo ideas
Crafts from plastic bottles are such a broad topic that it is impossible to talk about everything. What’s nice is that if you know a few tricks, you can easily find out how and what to do just by looking at photographs. So here we have collected a few ideas that we found interesting.


You can even make a boat...

And this is just decoration...


In big fun company There are never any extra chairs. Therefore, hospitable hosts often think about how to make new inexpensive sofas, poufs, stools or chairs.
The idea of recycling plastic bottles is useful from any point of view. Firstly, plastic is a durable material that decomposes over several hundred years, and therefore pollutes environment. And secondly, it is lightweight and durable, ideal for creating furniture frames of almost any size and shape. There is a place for furniture made from plastic raw materials in the country house and on a large loggia, on the beach or playground.
To learn how to create such products, you only need to understand the main idea - how to turn a container with a lid into a hard and elastic material. Each craftsman offers his own original way:
- For example, you can leave it overnight open bottles in the cold, and in the morning close the containers with lids and place in a warm place. After such thermal hardening, the material becomes more durable, and products made from it retain this property for a long time.
- In another case, it is recommended to use whole blocks in the work. To do this, one bottle is tightly closed with a lid. For the other, approximately a third or a quarter is cut off at the top. The remaining bottom one is put on the first container from the side of the lid. The location of the cut is wrapped with tape. Thus, the material will not only be strong, but will acquire good shock-absorbing properties.
Comfortable seat made of plastic raw materials
Do not throw away plastic containers from sweet water, beer, and other drinks. Rinse them thoroughly and store them in the pantry or garage. We recommend making a chair from plastic bottles with your own hands.

To make it you will need
- from 200 to 250 empty two-liter containers, preferably of the same shape;
- wide tape;
- stationery knife or scissors.
Description of work
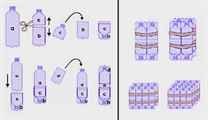
- In the design we will use both whole bottles (A) and cut bottles (B, C, D, E). We will need the cut parts to make strong building blocks. Please take a look at the image below.
- Now you should place part C in bowl B.
- Insert the closed whole bottle A with the bottom part into the part from B and C
- Now place the lower part of the bottle D onto the structure from the lid side. We received a sample block, copies of which will be used to make the seat of our chair. A total of 16 such elements should be made.

- Connect, tightly wrapping with tape, 2 such parts.
Attention! When forming large and small blocks, place the elements on a hard, flat surface. Fasten the parts tightly. Then your structure will be stable and strong.
- Next, connect two by two.
- Then four and four.
- The entire seat is a block of 16 bottles.
- Proceed to form the back from the remaining material. Place the three pieces C+B inside each other on a block similar to those used for the seat. You will get a tall tube-shaped part. You will need two of them in total.
- Now make 2 taller pieces. They will become the outermost elements of the back of the chair.
- Install in one plane: two low parts in the middle, high ones on the sides. To ensure the safety of the backrest, secure the block with tape at three levels.
- Connect the backrest and seat together. Secure the pieces together with three strips of duct tape.
The chair is ready. You can use the product as is or sew a soft fabric cover with a plywood base and thick foam rubber on the seat. And then no one will guess that you made this soft and beautiful chair yourself.
Ottoman made from plastic bottles
A pouf is the simplest piece of furniture that can be quickly made from plastic containers. It can be large or small, square or round - it all depends on how to connect the containers and how many of them to use. A good, stable pouf can easily be turned into a table or footstool. A little imagination and creativity will make your pouf a unique and attractive touch in the interior.

Materials and tools
For a medium sized pouf you will need
- 16 two-liter plastic containers.
- Scissors or utility knife.
- A roll of wide tape.
- A little double sided tape.
- Thick cardboard or a piece of thin plywood.
- Jigsaw (if you use plywood).
- Decorative textiles for the case.
- Wood glue or PVA.
- Technical textiles.
- Thick foam.
- Needle, thread.
- Roulette.
- Sewing machine.
detailed instructions
- Prepare the bottles for use: rinse them, dry them, and close the lids tightly.
- Form a circle from the containers. Start with the first one, then add one at a time, securing each one tightly with tape. Assemble on flat surface(on the table or on the floor).
- Measure the diameter of the resulting structure with a tape measure. Cut 2 circles from foam rubber and 2 from plywood of the same size.
- On Double-sided tape attach plywood circles to the top and bottom of the structure.
- Glue the foam circles on top of the plywood ones, applying strips of glue to them.
- Measure the height of the bottles. Add another 2-3 cm and cut a strip of foam rubber. Wrap the structure with this piece. Hand sew the ends.