It consists in the fact that the location of the logs must correspond to the order - "butt to the top." The natural structure of the logs is such that they become thinner towards the top. To the walls of the future log house were even, it is necessary to alternate the arrangement of logs, in other words, a log with a thin end should be followed by a log with a thick end.
The second principle of stacking logs is that the lower log is stacked with a hump up, and the upper log, with a hump down. After marking and sampling longitudinal groove you will get a parallel arrangement of logs relative to the longitudinal axes. All rows must be laid, adhering to just such a sequence, so that the most even wall is obtained.
To mark the corner bowls and the longitudinal groove, a special tool is used, which is called the "line". It is quite possible to make such a tool yourself from improvised means. To do this, you need to take a thick wire about 10 mm in diameter. Next, it needs to be bent with the letter V, the length of each side should be about 10-15 cm.
The ends of the legs need to be sharpened so that they leave a mark on the wood, scratching it. The resulting tool can be attached to some handle, which can be used as an ordinary stick or hammer handle. To prevent the sides of the tool from moving apart in width, you need to install a wedge between them and wrap them with some kind of cord.
The company "Drevo" is engaged in the construction of houses from hand-cut logs professionally, and therefore our specialists use a professional carpentry "line" for marking. In Europe, a "line" is called a "scriber".
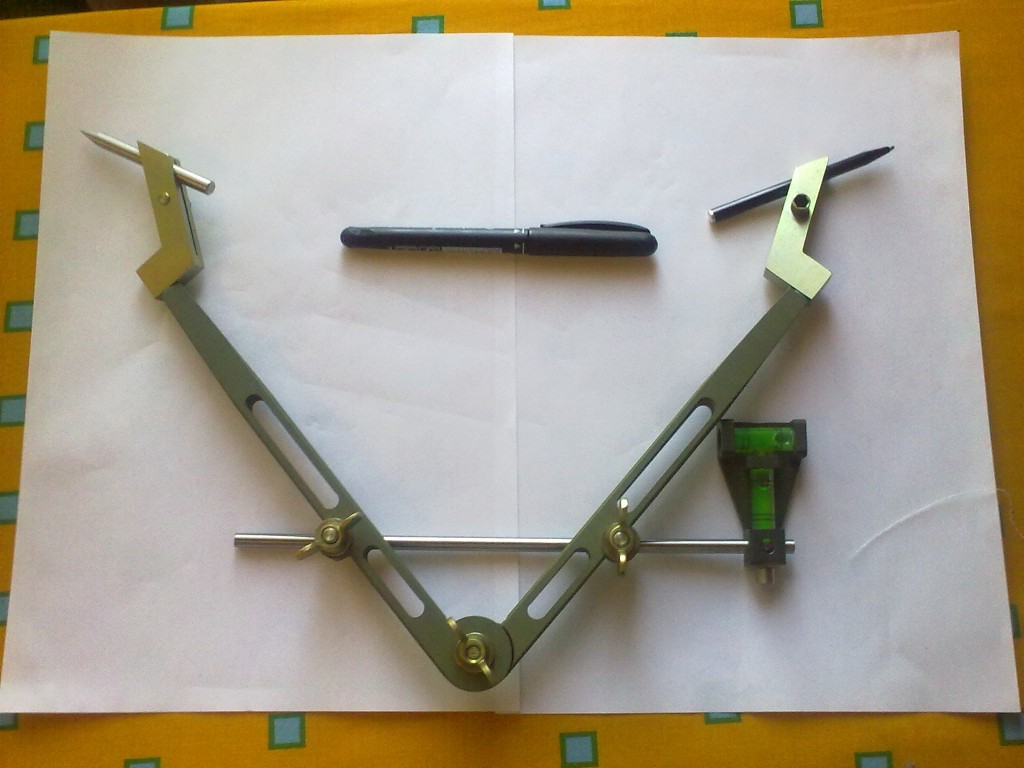
An image of a carpenter's "feature" you can see on fig.1
A professional carpentry "feature" is quite expensive, this is due to its complex device and equipment. Levels are built into the professional carpenter's "line", which enable carpenters to maintain an even vertical position when marking. The entire construction of the log house depends on how correctly the work with the “line” takes place. If you only plan to build one house, then you can not buy a tool for a high cost, instead you can use a level and an ordinary carpenter's compass. Of course, such a process will take large quantity time, but if the construction time is not critical, then this is quite acceptable.
How to use the "dash" ("scriber")
For correct application markings, logs must be laid one on top of the other (not forgetting the rule “butt to the top”), then fastened with brackets. Given the region in which the construction of the log house takes place, the width of the future groove is determined. A mark is placed at the end of the log, the distance from the bottom point of the log to this mark must correspond to the width of the longitudinal groove. Then one leg of the instrument is moved to this mark, and the second is moved to the top of the hump. Thus, we prepared the "line" for work by setting the required interval between the legs of the tool.
Having fixed the legs of the “feature”, we put one leg at the height of our mark, and the other on the surface of the hump of another log, we draw a line. Thus, the second leg of the tool creates a line that repeats the line of the longitudinal groove of the first log. Subsequently, for convenience, the markup can be additionally highlighted with a pencil. The marking must be applied on both sides of the logs, without changing the "line" setting. This completes the marking of the longitudinal groove.
On the fig.2 You can see the layout of the longitudinal groove.
Now let's start creating a longitudinal groove. Outlining the log, we can see the resulting groove, it has a rounded shape, repeating the run of the log.
The log run is a smooth change in the diameter of the log from the butt to the top.
Thus, all slots will alternate side of the slope. This method can only be used when working with logs that have little or no runoff slope, when the log has an almost cylindrical shape. Or it is applicable to logs that are calibrated and have approximately the same thickness at the cut. In this case, the slope of the grooves does not matter.
Logs of different thickness, on which there is a run, need to be drawn to each other in a slightly different way. The lower log must be installed on special stands so that the hump is as level as possible with the horizon, after which the log is fixed with brackets. The upper log is placed so that its butt is located in the direction of the narrow part of the lower log. In the process of delineation, it is necessary to observe the vertical arrangement of the legs of the “feature”, only thanks to this it is possible to achieve an even groove with a changing width.
If you mark the groove incorrectly, this will lead to the so-called “kiss” - the edge of one log will only slightly touch the end of the other. Of course, in this case, we are not talking about the thermal properties of the log house, nor about the required width of the longitudinal groove. Thus, one after another, all the logs are stacked and marked up to the very top, until all the grooves are horizontal.
After the drawing is completed, the log is removed from the brackets and turned up with the side on which the markup is applied. Next, the selection itself is made. The carpenters of the Drevo company use a chainsaw when hauling, making many cuts across the log, moving along the entire length of the trunk, deepening the saw to the depth of the future groove. The specialists of the company "Drevo" do not recommend cutting to the full depth of the groove, and leave from half to one centimeter and then refine it manually. This can extend the life of your building.
To clean the groove, a tool called an "adze" is used. This is an ax in which the sharpened surface is directed across the handle, and not along the length of an ordinary ax. There are two types of adze: small and large. Work with a large adze occurs while standing, hewing the surface strong blows. They can immediately start creating a groove, without using an ax.
For further refinement of the logs, a small adze is used. When the groove is cut, it remains to check how well the logs fit together. For this on upper part a special coloring composition is applied to the lower log, then a log with a cut groove is applied on top. After such a fitting, it will be seen how the coloring pigment has soiled the cut-out groove. Those felling areas that remained clean indicate that they were not touched by the surface of the lower hump.
So you need to remove excess wood, which interferes with the contact of the remaining sections of the groove. Thus, it is necessary to gradually bring the groove until it is completely smeared with pigment. There is another way to check how well the groove is made. For him, you need to take a piece of a log, about one meter in length, and knock it on the logs that are connected.
After that, they remove the log in which the groove is made and see which places in the groove are jammed. In these places there is excess wood that needs to be removed and the procedure repeated again. The bar with which the log is tapped must be made of soft wood so as not to wrinkle the front surface of the log.
ABOUT professional tools we talk all the time. Why do they make log cabins for Tesla? How to control the vertical deviations of the walls with a special plumb line. Some change the shape and quantity of the tree. Others work with appearance log house. There is a third measuring group of specific devices.
How to make a log house with your own hands
Without each of them, the quality of the log house cannot be ensured. For example, the traits of a carpenter.

A carpentry line (scribble) or an imported analogue Scriber is a carpentry tool for preliminary marking. It is used when drawing on the surface of a tree the boundaries of the selection of the interventional stowage groove and elements corner cut. The line looks like a large modified metal compass with a special pencil and a high-strength lead. Leaving a clearly visible mark on the log natural humidity. Many of the carpentry features are equipped with a water or alcohol hydro level. Often two to control position in two dimensions. The line does not require a pencil (smaller tool in the photo on the left) with a smooth markup.
According to the classical scheme, during the felling of a log house, bowls are first selected in rough outline. Then the log is "sit down" - they are thrown in place from above below the ready-made lying one. Then, with the help of a line, the outlines of the laying groove and the bowl are marked on the opposite side surfaces of the log. Then the log is removed, the selection of the groove with the bowls on the ground is made. Or it is not removed when it is inconvenient or the frame is chopped into a low foot.
Lapu dovetail some constantly practicing carpenters, with a steady hand and a normal eye, know how to cut without drawing. They say that there are modifications of the carpenter's line, supposedly allowing you to mark the log in one go. This is not so, or we are talking about the highest skill of individual carpenters.


In the marking tool, you can clamp both a regular slate pencil and a specialized "point" round, oval or faceted. Leaving a perfectly readable line on concrete, stone, metal surface, dry and wet wood. There is another interesting invention - a gas rod from Fisher Space Pen, which writes boldly not only literally on everything, but also at an impressive temperature range, in snow and water.
A carpenter's line is sometimes equipped with a mirror to draw at a height on an outstretched arm or in hard-to-reach places it was more convenient. With the help of this ancient tool, a lot of things were marked out in the past. They even drew (beat off) the boards before edging for their tight fit later.
Overview and examples of working with a carpentry feature.
alexey k: for 8000r she herself must draw!
Silencer Makarych: What price
Nastya Zaitseva: Great work and beautiful work! I wish you success! You have to grow up first. and then evaluate expensive-cheap! And the tongue on the "clave" is the easiest to scratch.
Sergei Savcuk: Hurry how much it costs in dollars I want to buy
Vadim Tarakanov: The regrets of other viewers about the high cost of this device are interesting. Guys, if you are cutting down a house that you intend to earn a few lyams from, will you save on a tool that will save you strength, time and nerves? And if you intend to cut down more than one house? Still 8000 is a lot?
Sergei Sarapulov: Hello. I heard you sell them. What price?
Yaroslav Chashchin: well, a log for ejection is unlikely, you will redraw it by half a centimeter-centimeter and that's all)
Ivan Smirnov: but how did our grandfathers cut before without levels ???
Oleg Panov: nihua yourself 8000 rubles !! you can buy a chainsaw calm
Andrey Kabanov: I use this one! Thanks guys! That's just weakened one of the fasteners (upper), which holds the rod with the level. I had to knock out the riveting with a hammer, otherwise the error turns out, the level dangles. And in the heat, the bubble in the level disappears, you must either store it in the shade, or cold water pour over!
Sergei Makeev: where can i buy
Natalya Andreeva: and where is how to find g.ufa.
Natalya Andreeva: and how much does it cost.
Natalya Andreeva: how to buy your trait.
Akaki Akakievich: and why the level in the line?
Kurlyandr: Previously, a rough bowl was chopped and drawn, but with the help of the Line, now you can immediately clean it up. Before, before. Progress does not stand still. Pitch you say? Yes, in the wind, he didn't give up. Forged feature?
how to make a line for cutting a log house
Show me a forged line with a solution of 15-20 cm, and draw it, and then cut it down. Your tub will come out full of holes ...
vladimir lebedev: While you make the setting, and even if the pencils break off and there’s no time to cut, my father and grandfather taught me to work with a forged line, scratched it and the markings are also on it + a marking board with a plumb line. No hassle
Nick Kos: Yes ... Well, beat the prices guys. Innovation…)
Denis Ermakov: Hello, tell me, is it possible to order a carpentry line from you????? very urgently needed!
Forge Toporsib: Feature on the site in the category "Special tool" .
Video on this topic
carpentry trait

agency of historical projects "Warriors" project "Seven in the Past"
CARPENTRY DEVICE

Carpentry feature / device / principle of operation Our website - http://vologdahouse.ru/ We are Vkontakte - http://vk.com/vologdahouse Forumhouse -…
When cutting a log house, it is necessary to strive to ensure that the gaps between the logs on the sealing grooves and cups are as small as possible. It directly depends on how warm the house will be and how much moss and tow will be needed to caulk the cracks. No two logs are the same, each log in a log house is unique, so you cannot create a single template for marking all logs at once. This is possible only if you have to work with material that is planed to a single size, such as, for example, rounded timber. But with the "wild forest" it is impossible to do this, and each log has to be approached individually.
The most important place in the arsenal of a carpentry tool, along with an ax and a scraper, is occupied by a trait. The dash is for marking corner connections in a log house (cups) and longitudinal grooves in logs (dales). Also for marking blocks and boards, for their tight fit to each other. The earliest finds of features in Veliky Novgorod date back to the 11th century ( Ancient Russia. City, Castle, Village).

By design, the features are very simple: it is either a metal plate with triangular cuts at the ends,


or a two-pronged fork with curved ends,

or a forged metal bar in two.

The line can be bent, for example, from a thick wire,

or just punch in wooden handle two nails at an angle. Also, instead of a line, you can use a metal compass.

The smaller the distance between the teeth of the line, the greater the accuracy of the markup. Marking with a dash requires some skill.

When drawing the teeth, the lines must be strictly oriented horizontally and vertically, any deviation, collapse gives an error in the markup, due to which the log either does not fit into the groove, or vice versa, a gap is formed. Accurate marking skills come with experience, but progress does not stand still, and the classic carpentry line is replaced by a new, accurate tool - the scriber.

In fact, this is a mechanical compass on which the level is set. The level helps to keep the line strictly horizontal and vertical planes, thanks to which errors are avoided, and the markup is very accurate. From personal experience working with a scriber, I can notice that the accuracy of planting logs is so great that a match cannot fit between them. But since our task is to build reconstructions of houses for the Seven in the Past project, we have to use the traditional tool!
The carpenter's line is a tool for marking on wooden surface parallel lines, straight or curved, along which logs are sawn or building forms are made. On one board, the edge is carefully removed, then it is used for drawing with the help of a line for cutting on the next strip, which is leaned against the first.
The metal tip leaves a deep longitudinal mark along which further work is performed.
Features of carpentry trait
Working with a carpenter's line requires care, as a scratch cannot be erased like a pencil mark. Another work that do with the help carpenter's features, is the selection of a longitudinal groove for a tight connection of logs in a wall frame, a log bowl, before subjecting it to the last processing. The line is used for beating and drawing an even line on the block when planing, processing boards for their snug fit. The tool is used to mark connecting places and various marks in carpentry. At the same time, a carpenter's compass is used.
In ancient Russia, when cutting down the walls of houses and churches, carpenters used only an ax and a trait. To connect the logs, peculiar grooves were used that did not require the use of chisels and chisels. This manifested the individual methods of skillful work of the ancient masters.
Subsequently in wood finishing the line is replaced by a thickness gauge, which in German means a device for drawing parallel straight or winding lines. This tool is used to copy dimensions from one shape to another part. The difference between the two devices is that instead of a wedge and a dash ring, a thickness gauge has a moving block with a screw lock.
Drawing principle
 Process drawing crowns during the installation of walls, it requires special skill of a specialist, because the quality of the constructed log house depends on his precise work. Deviations vertically and horizontally when drawing a line are unacceptable, moreover, in the process of work, first a rough markup is made, then a final clean drawing.
For the production of a quality log house carpenter needs a lot of time. At present, the carpentry trait has improved, and almost new tool, which is called a scriber. Drawing includes the following steps:
- installation of a log of the upper belt, on linings, adjustment of the horizontal level, alignment of the vertical axis of the ends;
- after that comes the drawing stage, which consists in spreading the ends-scissors a certain distance, taking into account the thin end of the log, this is done because if you start with a thick butt, then the longitudinal groove may not reach narrow section;
- you need to draw a line according to the level, therefore, spreading the needle and pencil to the lower end and the upper one, respectively, looking at the bubbles in the device, lead the scriber along the log. The same method is used to draw cups.
Possibility to make a tool with your own hands
A simple variant of the trait made from wire thick diameter. A similar solution is to drive in two long nails into a suitable wooden handle. A locksmith's compass is also used to mark the tree. The accuracy of drawing increases with a decrease in the distance between the teeth of the tool; dexterity and experience play an important role.
 scriber is a circle mechanical action with built-in level. The latter is intended for precise marking of the line horizontally and vertically. If everything is done correctly, then marking with your own hands will allow you to assemble the log house so that you cannot push a match between the logs.
The scriber is an advanced carpentry feature that has been provided with two levels. This saved the carpenter time. Indeed, now they do not draw a rough line for basting, but immediately draw a fine markup.
Carpentry Trait Improvement
Time works to improve the tool and does not stand still. When drawing markup, the main thing is to ensure horizontal and vertical matching lines, for this the ends of the carpentry line are set using level bubbles. The Canadian inventor proposed an innovation in the form of a marking tool based on a carpentry line, which he called the scriber. The Russian craftsman-carpenter did not philosophize slyly and developed a different version of the scriber, which later became known as the carpenter's compass.
Tool for making a modern carpenter's bar
To make your own, you will need the following tool:

DIY carpenter's compasses can be completely from improvised materials nearby. You will only have to buy the appropriate washers and nuts in the store, if they are not in the storerooms of the home craftsman.
At the heart of the tool put old, out of use scissors for metal. Carefully cut off the bolt heads and attach them by welding to the handles of the scissors. To install the pencil and needle mounts, use the threads at the ends of the bolt.
They make a socket for installing the needle and the needle itself, then design further. The device for installing a pencil is made in such a way that, in addition to it, a needle can be placed in the mount. Flasks with bubbles are taken from old building levels, you will need two of them, for the horizon and vertical.
To determine needle dilution and a pencil there is a bar for adjustment. It is fixed with nuts, and fixing the compass in the extended position is done with clamps from bolts and washers. To fix the levels, make a mounting platform. In the process of work, the pencil lead is ground off, and with a new extension, the compasses can go astray, so they arrange a special template that provides for a joint design of a screwdriver and a head. Alternatively, you can use another needle instead of a pencil.
Finally It should be noted that if for so many centuries carpenters have used a line for marking, then this tool will be popular in future years, so you can make it yourself and use it to ensure high-quality marking when working with wood.
In construction, carpentry trait (in modern format called "scriber") has importance. Without a line, it is problematic to organize sawing logs or the production of building forms. A scriber is needed for marking on a wooden surface. The markup can be straight, curvilinear, consisting of several parallel lines. We take one board, remove the edge from it, which will be needed in order to obtain a line line for cutting already on the next strip - this strip leans against the 1st. The line is applied precisely due to the carpenter's line.
How to quickly make a scriber with your own hands
You should have the following list of things on hand:
1. Ordinary hammer;
2. Welding tool;
3. Drill, drills (tools must be able to handle metal)
4. Hacksaw for metal;
5. Bulgarian (there must be a cutting and grinding wheel);
6. Files, taps and dies;
7. Levels - horizontal and vertical (old building levels);
8. Plumb.
No specific materials are needed for a carpenter's compass. You will only have to spend money on various nuts and washers if you do not have such things in the house of the appropriate size.
Bolt heads need to be welded to hand shears. Pencil and needle attachment required. In this case, the thread at the ends of the bolt comes to the rescue.
First you need to make a needle, after a nest to install it. When making a pencil mount, make sure the stylus will fit into the mount. The levels noted above are for vial flasks.
The amount of dilution of the pencil and needle should be as accurate as possible. For this purpose, we use an adjustment bar. You can securely fix the bar with the help of nuts. To fix the compass in the extended position, a clamp is used, with which the bolts and washers do an excellent job. You need a mounting platform - this way you can fix the levels. The pencil lead may be damaged during work. There is a chance that the compass will go astray when you re-erect it. This problem is solved using a special template. This design is made using a head and a screwdriver. An alternative method is to use not a pencil, but an additional needle.
An easy way to make a scriber yourself
The key tool at hand is a wire with an exceptionally thick diameter. You can also use a method that involves driving 2 guests of sufficient length into a good wooden handle. Definitely need a locksmith's compasses. To make the drawing as correct as possible, the distance between the teeth of the tool cannot be increased. But if you are a beginner, it is difficult to follow these rules without work experience.
Why do you need a scriber?
This term refers to a compass of mechanical action. It has a built-in corner, due to which you can achieve the correct marking of the line (it does not matter if it is vertical or horizontal). If you use the scriber correctly, then as a result there will not be the slightest free distance between the logs.
Why is a scriber not exactly a carpentry trait? Because the "fresh" tool has two levels. They were decided to implement due to significant time savings. If earlier it was necessary to make a rough line, then with the advent of the scriber, you can immediately proceed to the final correct markup. The term "scriber" comes from Canada. But in Russia, the improved carpenter's feature is still called the carpenter's compass. However, on technical specifications different terminology does not affect in any way.