To maintain order on your home desktop, you need to purchase, or even better, make your own coasters for pencils, pens, scissors and other stationery. A pencil holder will allow you to always keep writing objects at hand, and not look for them in the corners of the bottomless desk drawers. In addition, children can be involved in the manufacture of a pencil box, who will bring something new and interesting to its design. In this review, we will show various stationery stands that you can easily make yourself, you just have to choose the right idea and bring it to life.
1. Stand for pencils made of cut wood.
To implement the idea, it is necessary to prepare a low log cabin of a tree, after which remove its inner part with a chisel and install pencils inside.

2. Pencil from sewer pipes.
Cut with a jigsaw or hand saw different in diameter sewer pipes into small sections. We glue each of the segments in a row on a short thin board (previously, the board, as well as all pipe sections, can be painted from a spray can in shades that combine with each other).


3. Pencil in a vest.
Cut out a triangular piece of “shirt” from white felt, glue it to a can of coffee or canned fruit. Then you take a layer of gray felt, cut out a rectangle from it along the circumference of the can, in front, cut out a triangle according to the size of the glued white “shirt”, bending the edges and stitching it with threads to the collar area. Stick the "vest" on a tin can, draw a tie with a blue marker on a white shirt or cut it out of blue felt.

4. How to make a vintage style pencil holder.
Paste the tin can with a pink cloth, then tie it around the top, bottom and center with a beautiful lace ribbon. On the end part, glue the pre-purchased accessories in the form of a flower with pearls (sold in sewing shops).

5. How to decorate a pencil holder with buttons.
Method number 1. We take an ordinary small glass jar from under baby puree, then we string red and white buttons on a thin elastic band, tie the ends of the elastic band into a knot, and put the resulting composition on the neck of the jar.

Method number 2. On a tin, glue buttons of different sizes (the color can also be any), then paint the product from a spray can in gold or paint in a brick tone, and shade with gold.

6. Do-it-yourself pencil stand decorated with twine.
We take a tin can, cover it with a layer of transparent glue, and wrap it, tightly joining the threads to each other. Finally, a bow can be glued on the front of the product. 
7. Pencil from the bark of a tree.
Carefully remove the bark from a dry tree and glue it to a glass or metal jar.

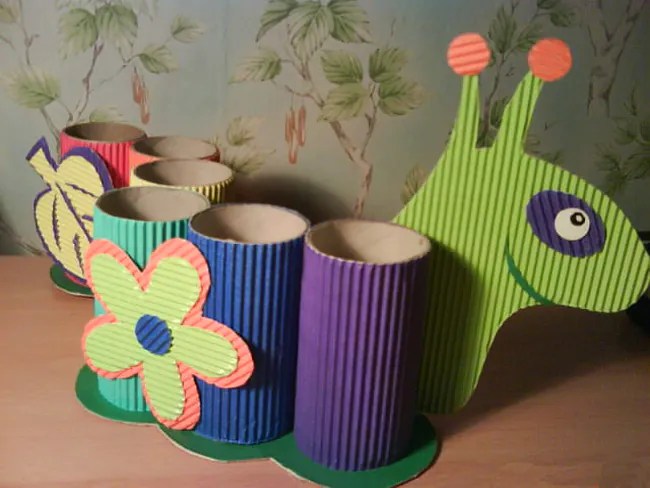
8. How to make pencil holders from toilet paper tubes.
On each tube we put vertical marks, we cut a fringe along them. We apply PVA glue to each petal of the fringe, and glue all the tubes to the cardboard layer. Then, with a marker, draw faces on the front of the stand.


9. Pencils with decorative primer.
We glue a plain sheet of paper on a tin can, which we then paste over with decorative pebbles.

10. Pencil in a marine style.
We take several tubes from paper towels, apply them to the base, cut out of cardboard. We glue each tube with white napkins, forming large folds (you need to glue the napkins on PVA glue). Then we glue the tubes to the cardboard stand, and paint them with water-based blue, yellow and orange paint (you can mix white water-based paint With different colors gouache, in this case mix white with orange, white with blue, and white with yellow). At the end, we glue plastic fish, starfish, shells and artificial algae to the stand, all this can be bought at the pet store.


11. Pencil case.
We cut off the sharpened parts of the pencils, you can cut with a clerical knife or use a jigsaw. We lay the bottom row of pencils on the cardboard tightly to each other, glue each pencil. Then we begin to lay out the walls, place two pencils on the sides and glue to the base, in opposite parts we also glue the pencils, so we continue until the height of the pencil holder satisfies its appearance.

12. Pencil case decorated with burlap.
Glue a piece of burlap on a tin can, glue flowers formed from light linen fabric around the perimeter of the neck.
13. We paste over the pencil stand with wallpaper or kraft paper.
We cut off from the wallpaper or kraft paper a part corresponding to the size tin can, the resulting part is simply glued to the jar.


14. Pencil in a shirt.
From white felt we cut out a rectangle corresponding to the length of the diameter of the tin, in the center we make an incision of about 2 cm, glue the collar to the can, cut in front, join at the back, bend the collar. We cut off a rectangle from an unnecessary shirt and glue it on a jar over the collar. Glue the buttons on the front and tie a tiny tie from a matching ribbon. 
15. How to make a pencil holder from floppy disks.
In four diskettes, it is necessary to melt holes with a hot awl, in each diskette there are 4 holes (two on the sides and two on the bottom), in the lower, fifth diskette in a row we make 8 holes, the awl must be heated over a candle (be careful). Then we form a cube from floppy disks without an upper part, we connect all parts to each other with a flexible wire, connecting its ends in the inner part of the product.

16. Do-it-yourself pencil holder from a shampoo bottle.
We cut the shampoo bottle in half, but not in the middle, but above, the cut line can be smooth rounded or in the form of cones (this will be the hair of the future monster). From the upper unnecessary part, cut out the handles, and glue them at the bottom. From black paper we glue the mouth of the future monster, from white eyes and teeth. You can stick Velcro on the back and fix the monster pencil holder on the wall.
 17. Pencil in vintage style with lace.
We glue satin fabric on a circle of cardboard, glue lace along the edge of the podium. In the center of the circle we glue tubes of different lengths from under paper towels. We decorate them with fabric, lace and artificial pearls. Closer to the edge, we install a mannequin cut out of cardboard, and also decorated with lace, ribbons and beads. In the center we seat the figurine of a bird, and on the other side we put a small photo frame made in appropriate style.

18. Pencil from the catalog.
We divide the flexible catalog into five identical parts, lay it sideways, bend all five parts to the center, in the form of flower petals, gluing them transparent glue. We go over the top of the pages with a layer of glue so that the pages do not fall apart. In the end, the product can be painted with spray paint, and the unpleasant parts can be decorated with beads or lace. 
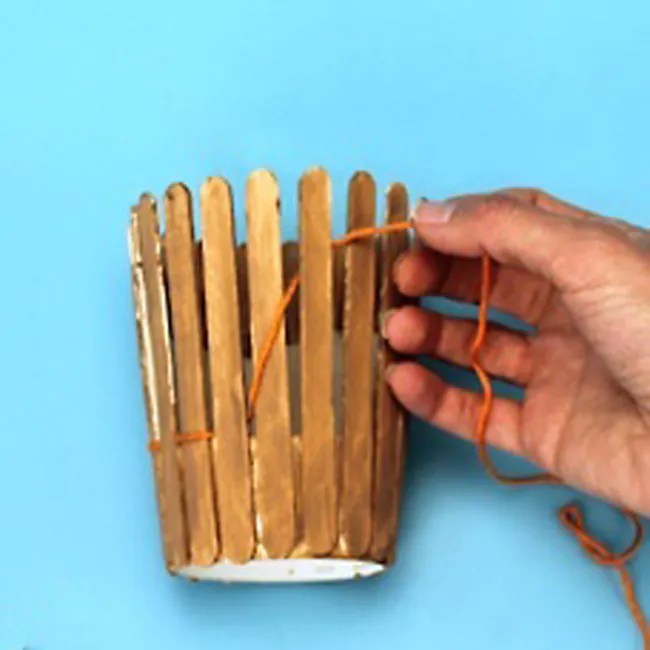
19. Pencil holder decor with ice cream sticks.
We glue the ice cream sticks on two tapes, then glue the resulting picket fence to a tin can. We supplement the product with a wide ribbon tied from the outside.

20. Decor of a pencil holder with a cloth.
We cut out rectangles from dense fabric corresponding to the size of the selected can. Then we decorate each piece with machine stitching with threads of contrasting color. We sew the case along the inside, turn it inside out and put it on the jar. 
21. Pencil from a tree trunk.
We saw off a small part from a dry tree with a saw, then with a drill in the upper part of the stump we create many holes, into which we install pencils. 
Unusual industrial pencil holders.
We also decided to show various factory-made pencil cases, some of them are really impressive. Below you can see what stylish and unusual stands for stationery are, they are available in the form of: camera lenses, monsters, hedgehogs, balls, Rubik's cubes, imitate stacks of folded paper, garbage containers, etc. 


Today we showed you how to make a pencil holder, and more than one! Such beautiful pencil holders will not only bring your workplace in order, and also greatly embellish it. Try to make them together with the children, we assure you, the kids will be delighted.
September 1 is not far off, the time when all children will go to school, and students to technical schools and higher educational institutions, it will be time to gain knowledge. Most Students spend their time in educational institutions, but they spend no less time at home preparing and doing homework.
 In order for the received material to educational institution a better entrenched need for a comfortable and beautiful workplace at home. Certainly important desk, a comfortable chair, and it is also very important that everything you need is always at hand. A desktop stationery set should cope with this task - the keeper of pens, pencils, erasers, paper clips and other such important little things.
 In this article, the news portal "site" has prepared especially for you the best selection most original coasters for pens and pencils, which you can easily make yourself from improvised materials. You can use a homemade stand for pencils and pens on your own, or you can present it as a gift to your girlfriends or friends, brothers or sisters.
Stand for pencils and pens do it yourself

Necessary materials:

- threads;
- scissors;
- plastic jar;
- wooden popsicle ice cream sticks;
- brush and glue.
Manufacturing:
We cut off the top of the plastic jar so that the bottom remains and a few more centimeters up. Using glue, glue wooden sticks to a plastic jar (see photo).
 Now we twist wooden sticks with multi-colored threads, filling the voids with threads.
 Use thread different colors, then the pencil holder will turn out to be especially bright and unusual.
 You can decorate the finished pencil holder with rhinestones, interesting stripes or buttons.
Do-it-yourself tin can pencil stand
Do-it-yourself stand for pencils and pens from newspaper tubes

Necessary materials:
- newspapers or magazines;
- toilet paper roll;
- glue;
- cardboard;
- double sided tape;
- threads;
- acrylic paints.
Manufacturing:
From a newspaper or magazines, wind the tubes, grease the ends of which with glue so that they do not bloom.
 Glue newspaper tubes vertically onto a cardboard roller with glue. For more reliability, tie them with threads.
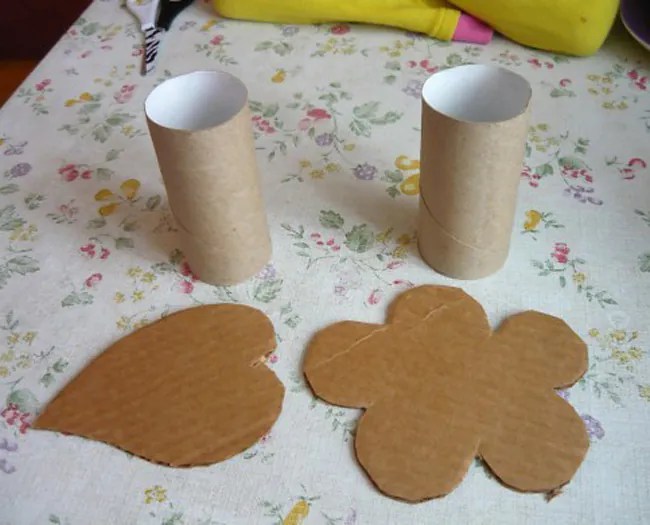 Make the bottom for the pencil case curly from a sheet of thick cardboard (it can be a flower, a leaf) and glue the bottom on double-sided tape.
 Now you can decorate the pencil holder and the bottom.
 You can decorate the finished stand for pencils and pens with the help of different elements- paper-cut grass, leaves, flowers, etc.

Stand for pencils and pens from the telephone directory

Necessary materials:
- thick book (telephone directory);
- glue;
- acrylic paints;
- toilet paper rolls;
- cardboard;
- scissors or utility knife.
Manufacturing:
We cut the telephone directory and wrap the pages of cardboard rollers, fix everything with glue. Cut out a figured bottom from a sheet of thick cardboard and glue it to the finished structure. Now you can decorate everything acrylic paints.
 If you cut the telephone directory into pages of different heights (see photo), then you can end up with an original and unusual pencil case, different in height.


DIY gold pencil holder
Can holder for pencils and pens

Necessary materials:
- tin can;
- the cloth,
- glue;
- decorative braid and ribbons.
Manufacturing:
We measure the tin can and sew a cover for it from the piece of fabric you like. Sheaths the fabric with beautiful ribbons and braid. We put on a cover on the jar.
We fill the edges of the cover inside and glue them on the glue.
Mosaic pencil and pen holder

Necessary materials:
- can;
- a piece of foam;
- primer;
- stationery knife;
- acrylic paints;
- glue
- cement mortar, sealant, or putty.
Manufacturing:
First of all, a layer of primer must be applied to a previously cleaned tin from contamination.
 From a sheet of foam using sharp knife cut out the squares that need to be painted with colored acrylic paints.
 We glue the painted foam pieces with glue to the tin, not forgetting to leave gaps between them.
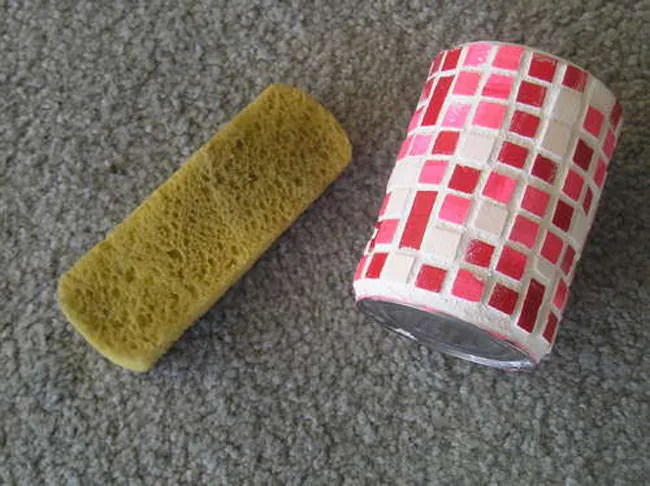 Now fill the gaps with a primer using a regular sponge. Wipe all the excess and the pencil box is ready.

Do-it-yourself tumbler stand for pencils
Stand for pencils and pens made of thread

Necessary materials:

- can;
- threads;
- glue;
- buttons, ribbons, ribbons and bows for decoration
Manufacturing:
A tin can must be carefully wrapped with multi-colored threads, periodically smearing them with glue so that they do not unwind afterwards.
Now you can start decorating. Decorate the pencil holder with buttons, beads, decorative ribbon and rhinestones.
Pencil holder - solving the problems of artists
The pencil holder helps organize your art supplies in a great way. Pencils require sharpening, erasers run out and turn into unused trash. But this smart gadget aims to change all that by solving all three problems at the same time.

The main function is to help with the use of leftover pencils

Simply tuck the pencil into the center cavity
The adjustable eraser serves as a backstop, allowing you to move part of the pencil back and forth depending on its length. Also, the back of the holder (usually where the eraser can be found) has a sharpener.

With this device you will never lose your sharpener!

Really very comfortable
However, a few potential criticisms come to mind. First, someone using this device will have to deal with an extra step to access the eraser. Secondly, the holder is necessarily wider than a pencil, so it will take some getting used to such a tool. Thirdly, the length of the eraser depends on the length of the pencil, so storing a lot of extra erasers can be problematic.
But in general, the idea is not bad and has the right to exist. The instrument is available in teak, black, wild olive, African padauk and Indonesian mahogany.
I myself am far from drawing, but my daughter is a fan of this business. I have already talked about a graphics tablet before, but she also loves to draw "offline". Therefore, I also have to learn different terms, slang of artists, as well as all sorts of interesting devices.
From this series, this one:
For myself, I called it "pencil extension", but it turned out that it is more correct to say "pencil holder". OK. Let there be a holder.
 It is a plastic handle with two clips. A ring acts as a clamp, which can be moved to the edge or inward.
 The inner diameter of the clamps at different ends of the holder is different: on one, about 7.5 mm (for a standard pencil), on the second, about 9 mm (we did not find such pencils).
 You can use it to lengthen your favorite pencil. Or for drawing techniques, when you need to look at the future picture from afar - you fixed a new pencil on the holder, and you draw with your outstretched hand (I could not ...
The holder is made neatly, but not perfectly. Especially clips - if you look closely, you can see traces of processing, oxidized metal, etc. But this, oddly enough, does not spoil appearance, but gives the holder a vintage look. Moreover, such rough metal processing does not bring any inconvenience when using.
A long-postponed post about various office supplies. It all started with the fact that I got the point of the plan "buy an extension for pencils." I climbed to Amazon to look at them and they began to show me various other pleasant things there, and I completely took a walk. Now I’ll show you everything, rejoice with me - here is both useful and stupid :) (I put links to pictures everywhere, don’t ask where to find this :))
The first thing I typed was a pencil holder. and what fell to me was not at all what I wanted, but such a glass for pencils and pens. Well, isn't it cute? :)
Then I saw a bunch of sets of sticky notes in the form of vegetables and fruits - ahh, now I want to!
This is an orange, and it even has a protective mesh :)
And these are strawberry stickers
And these are funny sticker papers with bubbles for thoughts :) They also have bubbles for words.
Houses! I need this with my love for small houses! You can play with them and decorate the table, and at the same time use pieces of paper. These are not considered for notes, but to mark places in the book :)
Tetris stickers! Nostalgic ones :)
And I remember about these, all design sites showed them - sticker notes with leaves. It's funny, probably books to pawn. But there aren't many of them! Only 20 pieces and sell for big money.
But this is extremely difficult for me to refuse :) Ginkgo leaves!

I was reading all sorts of pencil reviews and suddenly came across a mention of a super sharpener, which gives a long taper at the pencil and a great sharp end. She has two holes - in one sharpener - it only sharpens wood to such an ideal cone, and in the second the lead itself sharpens. They sell interchangeable blades for it, they become dull - you can change it. But in this version, a little more expensive than the usual one, there are also sharpeners for leads in mechanical pencils - two diameters - 2 mm and a thick one. Now I want it and put it on my wishlist for my next purchase.
And this is a battery-operated washing machine :) We are completely lazy, it’s already reluctant to move your hand.
On the other hand, there are comics artists who draw an awful lot - and if you can save your hand for movement with a pencil, and give the flutter of the washer to the battery - that's great!
This thing is extremely useful. Natalia recommended it to me conjure
. It is a fixative for pencil and charcoal drawings. The chip in it is that it leaves the surface working. You can continue to draw, you can erase - but the work is not smeared. For drawings with a soft pencil, it’s a godsend. The main thing to use, I read from Western comrades - do not put the album on the floor and do not splash from above. It is better to apply fixatives on vertically placed drawings (it is also possible on inclined ones). Lay something or do it on the street. Then large drops, if they suddenly appear, will fall down the road, and finely weighed spray will fall on the leaf itself.
Well, the fact that I actually went to look :) There are a lot of extension holders for pencils, my eyes run wide.
This one I liked. True, it is not so much an extension cord as a fuse. But with a little leftover pencils, it works great. Firstly, the sharp sharpened end can be put into the holder and thrown into a bag or pocket and it will remain working.
Secondly, take it out and stick it in with the non-working end - there will be an extension cord.
Third, turn out lower part- and there is a portable sharpener.
Plus a clothespin. You can take a notebook, hang a pencil on the cover and start sketching.
And here is a super expensive extension cord from Stadtler. Limited edition of the night of blue color. Japanese. With a washer, a holder and a window for the softness of the pencil. Beautiful, of course - for such money?
But not limited, but the usual one of the same shape, metallic color. And it costs six times less.
Or buy a simple and working one from Koh-i-nora?
I couldn't choose a holder, but I had fun. And you? did you like anything?
I will do the next entertaining review with various Easter things.