Driver is a program that allows the computer to interact with equipment and devices. Without drivers, the normal operation of equipment connected to a PC, such as a video adapter or printer, is impossible.
In most cases, drivers are included with Windows, or you can find them by going to the center Windows updates in the control panel and checking for updates. If Windows doesn't have the driver you need, you can usually find one on the manufacturer's website
When you connect a new device to your computer, Windows tries to find and install a driver for that device. Sometimes you may see a notification that the driver is not signed, has been modified after signing, or cannot be installed by Windows. You can always decide whether to install an unsigned or modified driver.
Signed driver is a device driver that has a digital signature. Digital signature is an electronic security label that can identify the publisher of a given software, as well as the fact that the driver was changed after it was signed. If the driver is signed by the publisher and the authenticity of the signature is confirmed by a certification authority, then you can be sure that the driver was released by this publisher and has not been modified.
Note: 64-bit versions of Windows OS block driver installation without a valid digital signature(or changed after its application). This message only appears when you try to install such a driver on a 64-bit version of Windows. If you receive messages like these while installing a driver, visit the device manufacturer's website to obtain a digitally signed device driver.
Install drivers without a digital signature or not
It is impossible to determine with certainty that a file without a valid digital signature came from the specified source and has not been tampered with (possibly by a virus) after it was published. It is advisable to avoid opening a file unless you are confident in the reliability of the source and the safety of the file's contents. Even valid digital signature does not guarantee that the contents of the file are safe. Based on the identity of the file's publisher and where it was downloaded, you should decide whether the file's contents can be trusted
Selecting an action when installing a driver
When installing a new driver, Windows will display one of the following warnings:
- This driver is not signed
- Windows cannot verify the publisher of this driver
- Windows requires a digitally signed driver
Unfortunately, there are no reliable sources of information that can indicate who published an unsigned driver. Anyone can change the contents of an unsigned driver. The original version of an unsigned driver may indeed have come from the device manufacturer, but if the driver is not signed, then it is possible that someone has modified it. There is no way to know if the driver has been modified by an attacker. Nowadays, most manufacturers sign the drivers they create before they are released.
You should only install an unsigned driver if it was obtained from a manufacturer's licensed disc.
Disabling driver digital signature verification
If you decide to disable digital signature verification, this is how it is done.
Press Win key + R or Start - Run and enter the command gpedit.msc
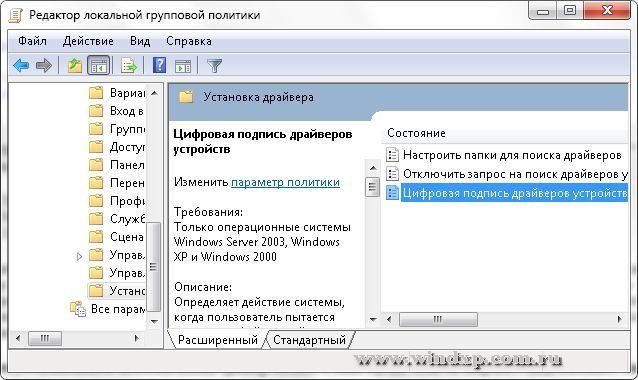
The Local Group Policy Editor will open. We find User Configuration - Administrative Templates - System - Driver Installation.
In the right half of the window we find Device driver digital signature. Double-click or right-click on this item and select Change.
In this window, select the item Disable. Apply and OK. If you select Turn on, then you can additionally choose how the system should respond to a driver without a digital signature

Of course, the choice is always yours, but you don’t have to reinstall drivers so often, so it’s better once again read the warning and think about how to look for the problem later.
May not install on Windows 10 due to signing issues. There is only one way to solve this problem - by disabling driver signature verification. IN this material we will look at three ways to do this in .
Disable driver signature verification when booting Windows 10
The easiest way to disable driver signature verification in Windows 10 is to boot the system with special settings. To do this, open the Start menu and go to “Settings”.
After that, go to the settings section “ Update and Security - Recovery" and click there on the button " Reboot now».

After the computer reboots, you will need to follow the path “ Diagnostics - Advanced Options - Boot Options».

After this, Windows 10 will prompt you to restart. We agree and wait until the computer reboots. After rebooting, a screen with Windows 10 boot options will appear. Here you need to select the option “ Disable mandatory driver signature verification" To do this, simply press F7 on the keyboard.

Press F7 and wait for Windows 10 to load. After downloading Windows 10, you can begin installing unsigned drivers.
It should be noted that this method disabling signature verification only works until the next reboot of the computer. If you want to disable signature verification permanently, then the following two methods should help you.
Disabling driver signature verification through group policies
If you have Windows 10 Pro, you can disable driver signature verification using the Local Group Policy Editor. To use this method, press Windows + R on the keyboard and enter the command “gpedit.msc” in the window that appears. This way you will open " Local Group Policy Editor».

After the editor has opened, go to its section “ User Configuration - System - Driver Installation" and open the parameter there " Digitally signing device drivers».

After that, enable this option and select the “Skip” option. Then close the parameter settings with the “Ok” button.

Let us remind you once again that this method will not work on Windows 10 Home, only on Windows 10 Pro, since the home version does not have the “Local Group Policy Editor”.
Disabling driver signature verification via Command Line
You can also disable driver signature verification in Windows 10 via the Command Prompt. But, in order to take advantage of this opportunity, you must have a computer with BIOS (and not UEFI). If you have a computer with then for this method to work, you need to disable the “Secure Boot" function in the UEFI settings.
So, if the above conditions are met, then press Windows + X on the keyboard and in the menu that appears, select “ Command Line (Administrator)" This way you will launch Command Prompt with administrator rights.
Modern operating systems are not easy to install drivers; they require that these drivers have a special digital signature. Sometimes you have to bypass this requirement and install drivers without a digital signature. If you want to install some special device in Windows 7 or you have a non-proprietary driver, then you have to bypass digital signature verification and require that this Windows function be disabled.
Unfortunately, Windows 7 does not allow you to disable driver digital signature verification as easily as previous versions of this software. operating system(eg XP). Before downloading the driver for any device, you will definitely be required to digitally identify the program in terms of its signature. If Windows 7 does not detect the signature and the driver fails verification, the most likely behavior of the OS will be to disable the device.
On the one hand, the need to have branded drivers in Windows 7 is an urgent need, but on the other hand, very often such programs do not pass verification and the user is faced with the task of installing a driver bypassing system protection.
Sometimes the digital signature in Windows 7 turns out to be a yoke. How can I make sure that this procedure does not interfere with driver installation? In other words, how to disable digital signature verification and avoid the appearance of a system message similar to the one in the picture below:
Let's look at possible alternatives.
A special way to boot the system
In Windows 7 there is one interesting opportunity completely abandon signature verification - we are talking about a special option for loading the system. This function can be disabled when the OS starts by pressing the F8 key. As a result, the familiar system menu appears, in which you need to select the item “Disable mandatory driver signature verification” or in the English version - “Disable Driver Signature Enforcement”. As soon as you log into Windows this way, all checks will be removed. In order not to be unfounded, we present the corresponding picture:
 However, this method has one drawback. You can boot in this way and test the equipment. But once you log in in the usual way– the equipment installation will fail. So this option can only be offered for testing.
Applying a special group policy
Another option is to enable a specific Group Policy. You need to do it like this:
- Go to the Group Policy Editor. To do this, in the “Run” window of the “Start” menu, type the command gpedit.msc.
- In the left panel we find a section called “User Configuration->Administrative Templates->System->Driver Installation”.
- In the panel on the right, double-click on “Code Signing for Device Drivers”.
- An options window will appear, in which you need to set the “Enabled” switch at the top, and select the “Ignore” value at the bottom, as in the figure:
 This will allow you to completely disable the digital signature of drivers in Windows 7 and install any hardware without problems. This option does not suffer from the disadvantages of the alternative above. If you complete the installation, you can be sure that it will be saved even after the system is rebooted.
Working with the command line
As always, the Windows console comes to the rescue. With its help, you can disable an unnecessary function like this:
- We go to the console by cmd command in the Run window.
- We type the following sequence of commands:
 (after each of them press “Enter”).
Then we restart the computer and admire the result. This is exactly what we needed.
Another thing is that installing unsigned drivers is by no means a safe undertaking. Whether you need to do this or not is up to you to decide. After all, installing this kind of system programs can result in the crash of the operating system. It’s good if you can roll back the system to its original state in safe mode.
But this does not always work out. The most reasonable solution is to look for signed device drivers, and don’t fool yourself. This can be done on the websites of manufacturers of specific equipment. It happens that we don’t even think about going to the company website, but grab the first system programs we come across on the first website we come across.
To prevent this from happening, carefully read the user manual that comes with any peripheral - they will probably point you in the right direction.
We wish you good luck in this matter!
Anyone who has installed any programs or drivers has encountered a security message in which the user is offered two options: do not install or install at your own risk. Today we will look at the question “How to disable digital signature verification in Windows 7.”
Windows requires a digitally signed driver. Because it is trying to protect you and tells you that your computer may be harmed, since these programs are possibly malicious. A digital signature means that the software can be trusted because it has been verified and can be used.
Microsoft does not perform such checks for free. That's why most of Small programs do not use the certificate. You can determine which devices on your computer use unsigned drivers. To do this, first open the computer properties.
In the window that appears, click on [k]Device Manager.
As a result, you will see a list like this.
In the above screenshot, all devices have passed driver authentication. If Windows cannot verify the publisher of this software, an exclamation mark will appear next to the hardware in Device Manager.
To prevent such a security message from appearing, you need to:
- disable digital signature verification;
- sign.
Of course, the first option is much more effective, since you will get rid of such red notices forever. But we will look at both methods.
How to disable mandatory signature verification
There are several methods by which you can disable this security message:
- using the console;
- setting up group policies.
As you can see, there are plenty of options. Let's look at each of them in detail.
Console
You can do anything using the command line in Windows 7. To launch it, click the [k]Start button and enter the word [k]cmd there. Then press the Enter button.
As a result of the search, the following will appear at the top of the list: the right application.
Click on this line. The following window will open.
Enter the command below and press the Enter key on the keyboard.
bcdedit.exe /set nointegritychecks on
In the future, if you want to return the security settings, then enter exactly the same command, only at the end, instead of [k]ON, you need to write [k]OFF.
For the changes to take effect, you need to restart your computer.
After this, you will be able to install any programs.
If control is important to you, and working with the program without a signature will be short-term, then it is recommended to boot in a special mode. To do this, press the F8 button during Windows startup. As a result of this you will see a large list various options downloads
Select the option that is highlighted in red and press Enter. In this case, any applications will work. As soon as you boot into normal mode, security will be fully operational.
Group Policy
At any Windows versions 7, in addition to Home Edition, there is a special group policy editor. To launch it, press the Win+R key combination on your keyboard. The following window will appear.
Enter there:
The editor will launch. By default, the folder tree is collapsed. You need to go to the driver installation item.
After you click on this item, you will see the following.
Right-click and select [k]Edit.
In the window that opens, select [k]Disable.
Of course, after this you need to restart your computer.
The methods described above will permanently disable checking for unsigned drivers. If you need to temporarily bypass the security system, you can manually sign the desired file without changing the settings of the entire operating system.
Using Driver Signature Enforcement Overrider
After leaving the operating room Windows systems Vista has been added new level protection for x64 systems. Now you can only use software that has been tested by Microsoft. Of course, the verification is carried out for a fee. There are a huge number of examples that work on Windows x32, but do not run on x64.
- Download the program from the link. To work with this utility, you must have administrator rights. If you are logged in as a standard user, then log in as an administrator or anyone else who has such access. Next, go to the “Control Panel” and select the specified item there.
- Select [k]User Accounts.
- After that, select the desired item at the very bottom.
- You will need to lower the slider all the way to the bottom.
- Click [k]OK and restart your computer.
- We launch the console in the same way as described at the very beginning of the article. Enter the following text there.
bcdedit /set loadoptions DDISABLE_ENTEGRITY_CHECKS

Starting with Windows 7, Microsoft has tightened the requirements for installed drivers. Now each driver must have a Microsoft-certified digital signature, otherwise it will not be possible to install it. The digital signature of drivers is checked at the beginning of their installation and, if one is not detected, the user receives an error like “Windows cannot verify the publisher of this driver.” If you try to force install the driver, and for this purpose there is a corresponding option in the message window, then it still will not install.
To resolve this issue, you will need to disable driver signature verification. It can be either one-time or on an ongoing basis. In most cases, to ensure additional security, it is recommended to disable the scan until the first reboot, but if you are confident in your actions and trust the developer, you can disable it permanently. So, let's see how to disable driver signature verification in Windows 7/10 using different methods.
This option to disable digital signature verification is a one-time option. Selecting a mode with disabled checking is slightly different in different versions operating system. If you're on Windows 10, go through the Settings app to the Update & Security section, switch to the Recovery tab, and click the Restart Now button located under the "Restart Now" heading. Special options downloads".
The action selection screen will load. We do the following. Consistently select Troubleshooting – Advanced Options – Boot Options – Reboot.


The system will reboot and you will see the Boot Options screen where you will need to press the F7 button corresponding to the option to disable mandatory driver signature verification.

Once Windows boots, you will be able to install the unsigned driver without errors or warnings.
We proceed in the same way in Windows 8 and 8.1, only to boot in disabled driver verification mode, open the Charms panel, select there Changing computer settings – Update and recovery – Recovery – Restart now.


Otherwise, almost everything is the same.
In Windows 7 get to the menu additional parameters The easiest way is to press the F8 button when you boot your computer. When the menu appears on the screen, use the arrow keys to select the appropriate option from the list and press Enter.

Disable via Group Policy Editor
If you want to disable driver authentication permanently, you can use the Local Group Policy Editor. This universal method and it works the same in Windows 7, 8/8.1 and 10 with only one condition - the system edition must be higher than Home. Launch the editor with the command gpedit.msc and go to the left column along the path User Configuration – Administrative Templates – System – Driver Installation.

On the right, double-click on the “Digital signing of device drivers” policy. In the settings window that opens, set the radio button to the “Enabled” position, and in the drop-down menu just below, select the “Skip” option.

Save the settings and restart your computer just in case. That's it, after this you can safely install an unsigned driver.
Similar results can be obtained using the regular command line, or more precisely, a console utility bcdedit. This method is also universal, the only condition is that the PC must have a regular BIOS. However, you can resort to it even if your computer is UEFI, but you will definitely need to disable the Secure Boot function. Open classic command line or console PowerShell as administrator and run these two commands in sequence:
bcdedit.exe -set loadoptions DISABLE_INTEGRITY_CHECKS
bcdedit.exe -set TESTSIGNING ON
After executing each command, you should receive a confirmation “Operation completed successfully.”


Restart your computer and install the unsigned driver. Small nuance– after the reboot, you will see a “Test Mode” notification in the lower right corner of the screen indicating the version and edition of the system.

To get rid of it, you will have to re-enable driver signature verification. To do this, run these two commands:
bcdedit.exe /set loadoptions ENABLE_INTEGRITY_CHECKS
bcdedit.exe /set TESTSIGNING OFF
It is unlikely, but it may happen that the next time you reboot the scan will be enabled again. How to disable driver signature verification permanently in this case? There is another way, and it also involves using a console utility bcdedit. This time, you will need to boot Windows into Safe Mode first. It is turned on in the boot parameters (we discussed how to open them above) by pressing the F4 button. In Windows 7, selections are made using the arrow keys.
Once booted into safe mode, open a command prompt as administrator and run the command bcdedit.exe /set nointegritychecks on, and then reboot normally.

Signature verification will also be disabled. According to reviews from many users, this method is more reliable. For the future, if you want to re-enable the scan after booting into safe mode, run the same command, just replace the key in it on key off.