Woodcutter - an extension to the house
The benefit of a woodcutter is that under a canopy, the wood dries up and does not get wet due to snow and rain. Even a raw tree dries out during the season under a canopy and becomes suitable for use in a stove or a fire.
The firewood storage should be built as a separate room, or as an extension to the wall of an existing building.
Woodcutter near the wall of the house
A variant of a woodcutter with an execution near the outer wall of a residential building under a canopy.
 Woodcutter in a country house - an option near the wall of the building
 You can pre-allocate a place near the wall, a niche for future firewood harvesting. It is very convenient in terms of accessibility, the main thing is that the canopy completely protects the wood from precipitation.
Choosing a place for a woodcutter
When choosing a place for a woodcutter, consider the distance to the furnace, it is best to place it near the utility block or shed. Or at the back wall of a residential building.
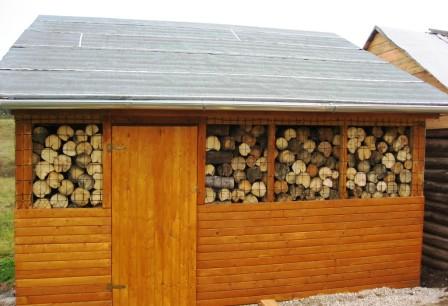
 Woodcutter next to the bath
 The photo shows a variant of the woodpile under the roof of the bath. When storing firewood in this way, take into account the direction of the prevailing winds so that slanting rains do not flood the workpieces.
 A small do-it-yourself woodcutter near the house
 The woodcutter can be small, in the form of a low canopy. This is good for giving, where you do not spend the whole winter, but only part of the time in the off-season. In this case, not much firewood is required. If you come in the winter for the weekend, then you will not need a lot of firewood.
Choosing the type of woodcutter
 Do-it-yourself woodshed
 A woodcutter canopy is the simplest and most convenient design. Allows you to fill the room without problems, the availability of firewood is excellent. Maybe with three walls and a roof, the floor is up to you. Instead of a floor, a variant of wooden logs is possible - guides on which firewood is placed. The canopy can be attached to an existing building, this will limit itself to two walls.
 Do-it-yourself woodshed
 A woodshed in the form of a barn can also be built with your own hands in the shortest possible time. Walls are recommended to be done in increments for better ventilation of the interior space. The roof is usually gable, or shed, at your discretion.
 How to make a woodshed barn with your own hands
 The woodcutter can be combined with a utility room, the photo shows the idea of \u200b\u200bsuch an option. On the right is a woodcutter, and on the left is a utility block for storing country equipment.
Materials for construction: do-it-yourself woodcutter
 DIY wooden woodcutter
 For the construction of woodsheds, wood is usually used, and it can even be used boards or substandard slabs. If your yard has a single design style, then the design of the woodshed, of course, should correspond to the general style of the site. In any case, any room for storing firewood should have natural ventilation.
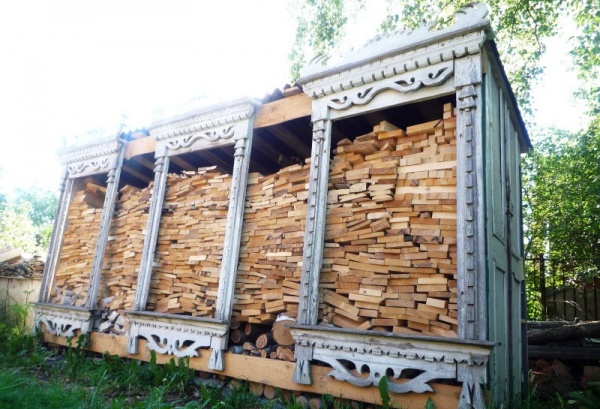
 Beautiful woodcutter - ideas for giving
 Some summer residents make their woodcutter out of polycarbonate. The idea, in my opinion, is interesting, the only thing you should pay attention to is that ventilation in such a structure should be on all sides, since plastic does not breathe and can retain moisture.
 Forged woodcutter in the country
 A small forged woodcutter will be a great addition to a recreation area, a gazebo with a barbecue.
Ready-made woodsheds - for home and garden
 Metal woodcutter for home and garden
 Now you can buy ready-made woodsheds, completely different shapes and sizes. from small woodsheds to full-fledged woodsheds.
Do-it-yourself woodshed construction adjacent to the wall
The woodshed itself is a fairly easy structure to build, you can take any barn as a basis and make a full-fledged woodshed out of it, the main thing is to plan ventilation in advance so that the firewood dries naturally.
If the barn is difficult for you to handle, you can attach a woodcutter to the wall of the house. If possible, choose the north side of the house - and insulate the wall and dry the firewood. If this is not possible, then just look for a free wall and make a canopy.
 How to build a woodshed with your own hands
 As a floor, you can use construction pallets - pallets. They should be put on bricks, or make a full-fledged floor from the boards. The frame can be made of timber, and the roof can be made of profiled sheet or polycarbonate. I do not recommend working with roofing material, as it quickly becomes unusable - in just a couple of seasons.
 Do-it-yourself woodcutter near the wall of the house
 The frame of the woodcutter should be sheathed with boards, with a small step for ventilation.
 Construction of a woodshed - sheathing with boards
 In this case, the roof of the woodcutter is made of flexible tiles. It turned out to be a very attractive option!
 Do-it-yourself woodshed - roof
 Good idea, take note and make a similar woodcutter with your own hands!
Construction of a separate woodshed
 Do-it-yourself woodcutter drawing
 A stand-alone woodcutter can be made on a columnar foundation, or simply on concrete blocks, even without deepening, just on a crushed stone pillow.
The principle of construction of a stationary woodshed is to form the lower trim, logs, lay the subfloor, raise the frame of the walls, make the upper trim and the roof. Then we sheathe the frame with boards or slabs, with slots for natural ventilation, cover the roof with roofing material.
For storing firewood. So the meaning of this word is determined by the dictionaries of the Russian language. The structure is useful, in many cases simply necessary. For a stove in a house or a bathhouse, for a fireplace, barbecue, barbecue, firewood must be stored somewhere. And store properly. You can confine yourself to a simple shed for storage or allocate a place for firewood in the hozblok (it is important that there is natural ventilation in the hozblok), or you can put your hands on it, build a woodcutter in the country with your own hands and decorate your site with an original and pretty structure.
Choosing a place for a woodcutter on the site
In this matter, a rational solution must be found. The woodcutter should not be conspicuous, it should be located not very far from the house so that it is not necessary to carry firewood to the house from afar. And a car with firewood should drive as close as possible to the woodcutter, otherwise it will not be the easiest thing to carry raw firewood from the place where they will be dumped.
If the house does not have a fireplace and stove heating, it makes sense to place a woodcutter near a bathhouse or a barbecue area.
Draw a plan of the site and try to choose a suitable place for placement, taking into account all these points. A woodcutter can be built near the wall of a house or a utility block (barn), or you can build a separate building.
Choosing the type of woodcutter
We chose the location, we need to decide what type of firewood shed we will build. As always, we first decide on the budget. This will immediately eliminate some of the options and moderate the flight of fancy of some family members. The most accessible and cheapest material is wood. The firewood shed can be sheathed on the frame with boards or timber.
Important ! Remember that the new building should organically fit into your suburban area. A good solution is to attach a firewood shed to an already erected building. The amount of work will be less and you will not have to puzzle over the design of the building. In any case, the woodcutter should be located in a dry place, preferably in the shade. In order for the firewood to dry properly and well, they must be ventilated, and direct sunlight is contraindicated for them. If a woodcutter is being built near the wall of a house or a utility block, place it on the north side.
For wall cladding, you can also use corrugated board, slate, polycarbonate. When using such materials for wall cladding, gaps must be left so that there is natural ventilation in the woodshed.
Carefully done work on the construction of a firewood shed, followed by painting or coating wooden parts with colored polyurethane varnish, will make it elegant. Plant climbing plants near the side walls - this will give the structure a beautiful and unusual look.
A lumberjack with walls made of cut trees and grass growing on the roof will make your neighbors believe that you have relatives among the hobbits.

Let's remember that not only the type of cottage can tell a lot about the owner.

We make a drawing, prepare materials and tools
A drawing will be required if you plan to store a tool and some not very necessary things in a firewood shed. This, rather, will already be a barn, combined with a firewood shed.

The drawing will also help you decide on the required area, because the supply of firewood in each household requires a different one. According to calculations, for heating a house with an area of 100 m² in the autumn-winter period, approximately 2.1 m³ of dry pine firewood or 1.7 m³ of birch wood is required. Dry firewood - firewood with a moisture content of not more than 20%, which is achieved after a year of storage in a firewood shed. Much more freshly sawn firewood will be required, their calorific value is approximately two times lower. And you need to have a supply for at least 2 seasons. Of course, each stove has its own efficiency, modern fireplace stoves can have a fantastically high efficiency of over 80%. In such furnaces, one bookmark “works” for 8-10 hours. However, these calculations are made for conventional furnaces. To this amount it is necessary to add firewood for the stove in the bath and for the barbecue.
From the tool we need a drill (if a “rustic” version of a woodcutter with four pillars dug into the ground is chosen), a hacksaw, a hammer, pliers, a plumb line, twine, a stepladder.
We buy building materials after choosing the type of woodcutter - which one is more suitable for your site. The simplest firewood shed can be built from the remnants of materials left over from other construction work or the dismantling of old structures.
Getting Started
Consider the construction of various types of woodsheds: stationary, wall-mounted and portable.
Stationary woodcutter
Let's call such a view stationary, because it can be built on a columnar foundation. This is a non-permanent building. A firewood shed will be reliable and durable, under the foundation columns of which holes are dug to the depth of soil freezing and filled with concrete. You can do with filling the pits with sand and gravel with tamping of each layer.
It is impossible to install posts directly on the ground, the whole structure will “walk”, especially in spring, when the soil swells.

We install columns of bricks or blocks on the foundation, fasten them with mortar. For a small woodcutter, four posts are enough, for a more spacious one or for a utility block combined with a firewood shed, more will be needed.

We tie it with a frame made of timber 150x200 mm. We sew the frame using metal corners and self-tapping screws, or we manage only with long self-tapping screws. The timber (as well as all other wooden parts of the structure) is pre-treated with fire-retardant impregnation and do not forget about waterproofing. It will be enough pieces of roofing material, folded twice.

Using the corners, we install the vertical frame of the woodcutter. First we mount the rear racks, then the middle and front ones.
We make the upper harness and nail the rafters for the roof. To simplify the assembly of the vertical frame, we fix the beam at the time of installation with temporary braces.


In place of the future doorway of the woodcutter, we expose two additional beams. A door will then be hung on them if the option of a closing shed with a woodcutter is selected. For the woodcutter himself, the door is not needed. True, there is one moment. It depends on the situation in the holiday village or village. After all, there is a chance to repeat the fate of the heroes from the old joke: “Masters, do you need firewood?”.
We sheathe the horizontal frame with a floorboard. We do not need an exact fit of the boards, let there be small gaps. But such that you do not accidentally get injured by hitting the gap with your foot. Water will go into small cracks, you can also sweep away garbage from firewood there, plus additional ventilation from below is obtained.

We make the roof of the woodcutter from corrugated board, shed. Optionally, you can arrange a gable. Any roofing material that your budget allows is used as a roofing material.
Important ! Make a visor above the entrance to the firewood shed. So water will not get on the logs during slanting rain or snow in a blizzard. The visor can be made from an end board, which is attached to the front roof board with dies. The end part of the dies is cut off at an angle, an end board is nailed to the dies, which is additionally fixed to the wall with two supports. This is the simplest design, you can choose any suitable option.
We sheathe the walls of the woodcutter with a board or bars. The bars can be filled in increments of about 25-30 mm, the boards can be nailed with a small gap. So in the woodshed there will be good natural ventilation.
We treat all wooden parts with an antiseptic and fire-resistant impregnation, then cover with paint or colored polyurethane varnish. In addition to a beautiful appearance, in this way we extend the life of the firewood shed.
Several photos of do-it-yourself woodsheds from available materials. A distinctive feature is the accuracy and invention in the design of such a simple structure as a firewood shed.


Here is a variant of a brutal woodcutter. Unsightly, in a purely rustic style, without any design, but it does its job.

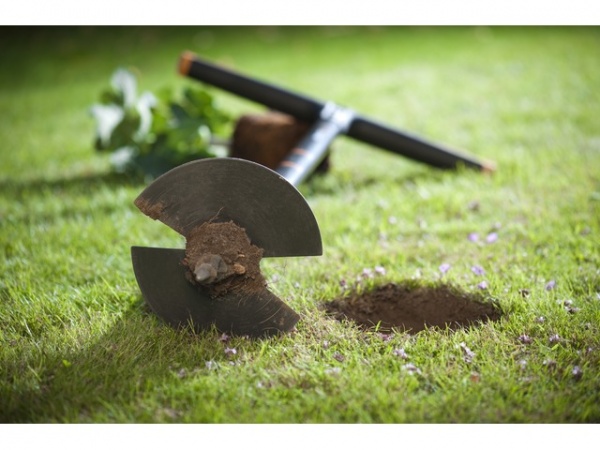
For the construction of such a woodcutter (and any when the beam is dug into the ground or concreted in the ground), a drill is required. With a drill, the work of digging holes for poles will take very little time.
A similar design of a woodcutter is the most budget option. All you need are posts made of unskinned logs with a diameter of about 200 mm, cross-beams made of logs of a smaller diameter, several boards, slate or corrugated roofing.
The support pillars are dug into the ground by about 200-300 mm (the pillars are dug in at different depths in order to make the roof of the woodcutter sloping), after treating the lower end of the pillar with an antiseptic. For this design, you can use used engine oil as an antiseptic - the cheapest option. Then the pillars are concreted or the pits are filled with rubble and rubble.
Support posts are sewn together with crossbars with a diameter of about 100 mm. We nail three crossbars on each side, excluding the front.
The photograph clearly shows that boards are nailed to the support pillars from above, and transverse beams are attached to the boards. We complete the work by nailing sheets of slate to the transverse beams.
Wall variant
We choose the northern wall of a house or a utility block for the construction of a wall-mounted woodcutter. Firewood does not like to "sunbathe" in the sun; proper drying requires good natural ventilation.
When building such a firewood shed, it must be taken into account that water from the walls of a house or a utility block can flow onto firewood. This should be avoided by slightly moving the woodcutter away from the wall, or by installing a roof on it of the desired design.
Otherwise, the construction of the wall-mounted version repeats all the operations for the construction of a separate firewood shed. Feature - in the wall-mounted version, the woodcutter "hides" behind the house or the hozblok. Although here you can show fiction and make this building really interesting. Just look at the photo:


Below is a photo of a woodshed built near a fence. However, the principle of its construction repeats the wall version:

Portable version
Of course, there are many varieties of portable woodcutter that you can buy at the store. Or order a beautiful forged model in the workshop. Yes, it is very difficult to make a forged woodcutter at home. But anyone can show imagination and make from available materials.
The material for the manufacture of the original woodcutter can serve as an old barrel. We put markings on the body. We need the hoop in the central part of the future woodcutter, so we move it with a hammer and fix it. To do this, you can take self-tapping screws or pick up beautiful bolts. We take a jigsaw and, according to the markup, cut out the shape of the woodcutter. We carefully sand the places of cuts.
Using an electric jigsaw, cut out curly legs from the board. We insert the old sanded handle into the drilled holes and fix it. We cover metal parts with paint for metal, wooden parts with stain or colored polyurethane varnish. Such a woodcutter will not be ashamed to put near the fireplace.

Here are some ideas for making a portable metal woodcutter. If you have experience working with metal and the necessary tools in the country, the task is quite feasible:


Most owners of private houses in our country heat their homes with a wood-burning stove. Many use them in summer cottages and in baths. The stove should only be heated with dry wood, but often when buying them, the owner receives them raw. To dry wood fuel before the onset of the autumn-winter season, many put them in a woodpile. However, this is far from the best solution for storing firewood. It is best to arrange a woodcutter.
The firewood in it will dry out faster, while being reliably protected from precipitation. If you do not want to face a situation where the firewood gets wet, then you should consider creating a woodshed on your site. The design of this structure is quite simple, so you will not have any great difficulties with the construction of this object with your own hands.
Selecting the type of woodcutter
Before choosing this structure, the owner of the site must decide what dimensions the future structure will have. They depend on how much firewood the owner plans to store in the woodshed throughout the year.
 You also need to decide how much money you are willing to spend on the construction of firewood on your site. Another important point: you need to decide whether the firewood shed will be built from improvised materials or whether you will use new ones. Today there are a variety of types of these buildings. Photos on the Internet allow you to see all their diversity. How a woodcutter will turn out depends largely on your financial capabilities, as well as your imagination and ability to work as a tool. The most common at the moment are the following types of firewood:
- canopy;
- woodcutter-gazebo;
- woodshed.
Canopy. This is the simplest wood fuel storage option. The firewood shed has three walls, a floor, a roof, which is a canopy, as the main elements of its design. In order for the firewood to be well preserved and not get wet not only from rain, but also from moisture emanating from the ground, it is necessary to arrange a raised floor. A firewood shed can be erected as a separate structure, or you can create an extension to a barn or house.


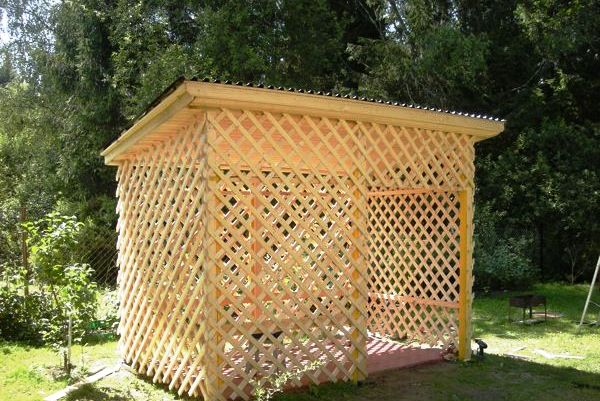
Alcove. An elegant look has a woodshed, which is erected in the form of a gazebo. Using it on his site, the owner has the opportunity for convenient storage of firewood. They will always be dry and the owner can easily access them at any time. This building, in addition to its functionality, is also distinguished by its beautiful view. The construction of such a building on the site is a good opportunity to decorate the courtyard, which will look more attractive.
 Barn. A woodcutter on your site can also be built in the form of a barn. Such a building differs from the traditional hozblok only in smaller sizes. As part of the structure there are entrance doors. To ensure high reliability of the structure, it is best to build a woodshed on a small foundation. In addition to firewood, tools can also be stored in this building. To do this, you need to install shelves. The construction of such a woodcutter is quite fast. A variety of materials can be used to create it:
- boards;
- plywood;
- slate
- profiled sheet.
 Arranging such an object, one should not forget about waterproofing. It is extremely important that moisture does not come into contact with the firewood stored inside the structure. This can be ensured by installing a waterproofing gasket in the roof of the firewood shed.
 Most people in private homes use wood burning stoves. However, some home heating is carried out using a fireplace. They also need a convenient storage for firewood. Therefore, such homeowners are beginning to be interested in how to build a firewood shed with their own hands. The woodcutter in the country or in a country house should be considered as a kind of stand that allows you to conveniently store fuel for the fireplace. Thanks to this storage, the owner is always provided with convenient access to firewood.
A variety of materials are used to make firewood. This design can be indoor or outdoor. Do-it-yourself firewood, placed in the dwelling, provides the owner with the opportunity, without disturbing the interior, to store firewood. In addition to this, the owner, who places a firewood rack in his house, acquires a decorative element that adds originality to the interior of his house. If you need a do-it-yourself firewood for a fireplace, projects on the network are worth a look. They will help determine the design and design of the storage for firewood.
Choosing a place for a woodcutter on the site
In order to be able to conveniently use the woodcutter in the country, it is necessary choose the right place for its placement. There are some nuances here that you should know about in advance. First of all, a firewood shed or other type of structure that you plan to build on your site must be located at a small distance from the house. In this case, you do not have to carry firewood to the house from afar. It is also not worth putting a firewood shed very close to a country house.
The place must be chosen in such a way that the car with firewood can drive as close as possible to the structure. Otherwise, you will have to spend a lot of time and effort in order to drag raw firewood in storage. If your house does not have a fireplace and a wood-burning stove, then it makes sense to place the woodcutter closer to the bathhouse or to the place where you have a barbecue.
 When building a woodshed not without a drawing, if you want to create a functional structure and use it not only to store fuel for a wood stove, but also to place your tools there. Using the drawing before starting construction, you can easily determine the area of \u200b\u200bthe building, since each owner needs a different supply of firewood on the site. Experts cite calculations, according to which about 2.1 cubic meters of dry pine or 1.7 cubic meters of birch firewood are required to heat a house with an area of 100 square meters for autumn and winter.
Materials and tools
In order to build a woodcutter with your own hands in the country, you should look at the photos on the Internet before starting work. They will allow you to quickly determine the design of the object. Materials and tools should be prepared in advance. To carry out the work you will need:
- hacksaw;
- a hammer;
- pliers;
- plumb;
- twine;
- ladder.
If we talk about materials for the construction of a woodcutter, then boards are usually used. If you want to save on the construction of this object, you can use the material that you have left on the site after the construction of the house. Or you can dismantle the structures you do not need that are present on the site. In this case, you will receive free material for the construction of a firewood shed.
Do-it-yourself woodcutter: progress of work
 Stationary woodcutter is the most common firewood storage option. Usually it is built using a columnar foundation as a base. The foundation will be considered reliable and durable if the pits for the posts are dug below the freezing depth. In the process of creating such a foundation, the columns are poured with concrete. In dug pits, it is necessary to create a pillow consisting of sand and gravel. Each layer must be carefully compacted.
The installation of posts for the foundation of the woodshed cannot be performed directly on the ground. In this case, the whole structure in the spring, when the soil thaws and swells, will “walk”.
On the created foundation, columns of bricks or blocks should be installed, which are fastened with mortar. Four columns will be quite enough for a small woodcutter.
Strapping is carried out using a frame made of timber. To create it, a material with a section of 150x200 mm is used. A metal corner is used to stitch the frame, and self-tapping screws are used as fasteners. You can not use corners, but only fasteners, but then you need to use long self-tapping screws. The beam must be treated with special compounds before creating the strapping, which will protect it from fire and insects. Also, do not forget about waterproofing. To do this, just put a few pieces of roofing material.
Using corners, we carry out the installation of the vertical frame of the woodcutter. First you need to mount the rear racks, and then install the middle and front ones.
next step do the top stitching, and also nail the rafters to the firewood for the roof. In order to simplify as much as possible the assembly of the vertical frame of the beam, it is necessary to fix the beam with braces for the duration of the installation work.
At the place where the woodcutter will be located doorway, two additional bars should be installed. A door will be hung on them later. If the choice is made in favor of a closing shed with a firewood shed, then there is no need for a door.
Next, you need to trim the horizontal frame with a floorboard. Precise fitting of the boards is not required. Leave gaps while working. In this case, good ventilation of the stored firewood will be ensured. In order to exclude injuries when the leg gets into the gap, they should be made small.
Best for roofing choose a one-sided design. The most suitable roofing material is corrugated board. If there is a desire and financial possibilities, then you can easily arrange a gable roof. For its device, you can use any roofing material. Here, everything largely depends on the budget that is allocated for the construction of a woodcutter.
When arranging a woodcutter, it is necessary to build a visor. In this case, raindrops and snow will not fall on the firewood. For the manufacture of a visor, you can use the end board, which is fixed on the front roof board with dies. The end part of the dies should be cut at an angle, and then an end board should be nailed to them, which can be fixed in the wall with the help of props. The simplest is this visor design. Without making serious efforts, every person who knows how to work with a tool can do it.
Then we carry out the sheathing of the walls of the woodcutter, using boards or bars.By selecting the bars, they can be filled in increments of 25-30 mm. Boards are nailed with a small gap. In this case, natural ventilation of the building is provided.
Next, it is necessary, using an antiseptic composition and fire-retardant impregnation, to process all wooden parts. When the applied compositions dry, they can be coated with paint or applied with polyurethane varnish. After completion of this work, the owner receives a beautiful structure that will serve for a long time.
Conclusion
Many people use a wood-burning stove to heat their private household. In order for the fuel to always be dry, a woodcutter is needed. If you have a need for such a structure on the site, then instructions from experienced craftsmen, which can be easily found on the Internet, will help you learn how to build a woodcutter. For many owners of suburban areas who need a woodcutter to give their own hands, photos on the net will help you get an idea of what different types of these structures look like. Thanks to the photo, the summer resident will be able to quickly make a choice in favor of a suitable woodcutter.
Making a woodcutter on your site is not a big problem. The first step is to get acquainted with the projects of storage for firewood. Having chosen the appropriate option, you need to draw a drawing, and then engage in construction. In order to do everything correctly during the construction, it is necessary to follow the recommendations in the instructions for the construction of this object. In this case, upon completion of the work, you will receive a reliable firewood shed, in which your firewood will always be dry.