The market of door handles offers the consumer models for any premises and for every taste. Installing a door handle is not an easy task, many people prefer to entrust it to specialists. But if you have the necessary tools and follow the instructions exactly, you can do this work yourself.
Types of door handles
According to the installation method, the following groups of handles can be distinguished:
- Stationary handles. Their installation is very simple and takes only a few minutes. There are overhead and through.
- Latch handles. Depending on the type of handle, there are push and turn. There are models equipped with a keyhole or latch.
- Lockable handles.
- Mortise handles for sliding doors.
- Handles with magnetic lock.
Required Tools
To work, you will need the following tools:
- pencil, tape measure, square;
- screwdriver and screwdriver;
- a drill, a set of feather drills and a 50 mm crown drill (you can buy a set called the “Latch handle insertion kit”);
- a hammer;
- bit;
- awl;
- chisels.
Mounting height calculation
Before proceeding with the installation, you need to determine at what height it is most convenient to place the handle. According to the requirements of GOST, handles must be mounted at a distance of 1 m from the floor. But the average height of each family member is different, and sometimes it is more expedient to mount above or below the specified height, usually 80-120cm.
The most comfortable opening will provide a handle located at the level of a person's belt.
Installation of door handles of various modifications
Below are step-by-step instructions on how to install a door handle of one type or another.
Installation of stationary handles
In order to install a stationary handle, the only tools required are a screwdriver and a drill. Overhead handles are simply attached to the door in the intended place with self-tapping screws. To install through models, it is necessary to drill a hole in the door leaf, insert a threaded stud into it. After that, the handles are screwed onto it from both sides.
Mounting the latch handle
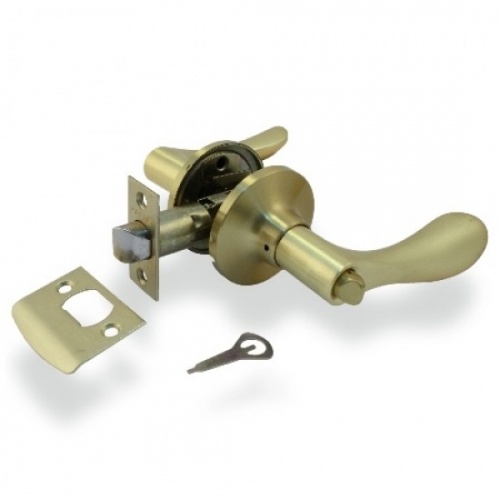
Before installing a rotary or push handle with a latch tongue, you must familiarize yourself with the device of its mechanism. As you can see in the photo, the main details are as follows:

The installation process itself looks like this:


For those models that have 3 additional screws in the kit for attaching the base to the door leaf, it is not necessary to drill a large hole with a crown. It is enough to make a hole for the “square” with a pen drill with a diameter of about 12 mm and holes for the tightening bolts. This design will last longer.
Installing a handle with a lock
A more difficult question is how to put a handle with a lock on the door? In order for the work to be neat, it is better to remove the door from its hinges.
Stages of work:
- We circle the contours of the lock at the end of the door.
- With a drill with a pen drill inside the contour, we drill several holes close to each other, after which we take out the remnants with a chisel, periodically applying the lock. He must fit in there completely.
- We make a recess for the front plate.
- We drill holes for the handles, the diameter must be chosen so that the square rotates freely inside it. The place for drilling must be marked exactly.
- We prepare a hole for the keyhole and make a recess under the base, which can be either a plank or two circles.
- We insert the lock, put a square pin.
- We fasten and fix the base and handles. We make a recess under the reciprocal bar, sink it flush with the box and fasten it.
Installation of handles for sliding doors
Installing a handle on a sliding door will require only a drill with feather and simple drills and a milling cutter with a cylinder cutter. Consider the procedure for installing an oblong handle. It looks like this:


For a round pen, the installation process is much easier. You just need to make a round recess with a pen drill of the desired diameter, and then everything is the same as in the case of an oblong one. If desired, you can additionally install, as well as an end grip, if the handle is equipped with them.
Mounting the handle with magnetic lock
As for the question of how to insert the handle into the door if it is equipped with a magnetic latch, everything here is the same as inserting a handle with a lock. Difficulties arise only when mounting the striker, because it is necessary that the lock snaps into place smoothly.
You need to do the following:
- Close the door and mark the top and bottom of the magnetic latch on the box.
- Attach a striker to the markup and mark the contour of the recess for the magnet.
- Make a recess in the center using a pen drill or a milling cutter.
- We fasten the bar with self-tapping screws and check the operation of the lock. If you need to move the bar a little, we close up the old holes with wooden chopsticks and drill new ones.
A process such as installing a door handle with your own hands requires patience, accuracy and strict adherence to instructions. For more information about the installation process, see the video.
In this material, we will consider with you how to disassemble the knob knob, which have received an unusual distribution on interior doors. And also along the way we learn how these handles are installed. Below you can find not only the instruction in pictures, but also watch the video.
To install the handle-knob, it is necessary to mark on the door and make two main holes, according to the template, which, as a rule, is included with the handle with installation instructions. So, let's start installing the handle, disassembling it along the way.
Given interior door:

We make a sample hole from the end of the door leaf under the latch. Hole diameter from 23 to 25 mm: It is convenient to make a hole with a so-called spade drill for wood.
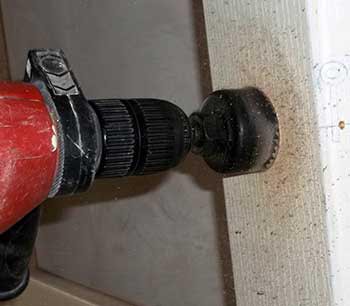
With a crown on a tree with a diameter of 50 mm, a through hole is made for the main fastening of the handle. The distance from the end of the leaf to the center of the hole is 60 or 70 mm, depending on the latch that is included in the kit.

You can find a template for installing a knob-knob from some manufacturers in the form of a stencil on the inside of the box or in the attached instructions. It is very convenient to use ready-made kits for installation, which are called “kits for installing interior handles”. It is not scary (and often, on the contrary, it is useful) if the holes are made with a diameter of 1-2 mm larger than recommended. The latch mechanism is two-position: provides for the possibility of installing a knob on the door, with different widths of the first bar of the door. The removal of the center of the handle-knob from the edge of the door leaf in the standard is 60mm:

but by moving the sleeve under the square, you can set the distance to 70 mm:

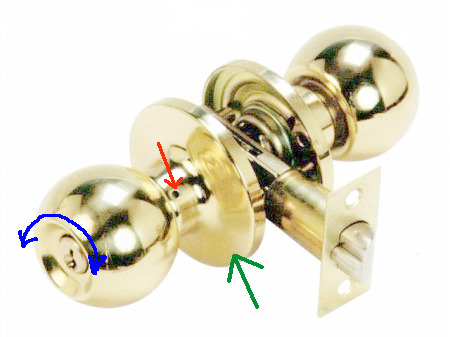
The standard height of the handle on the door is approximately 950 mm from the floor level. Next, to install the knob-knob, we partially disassemble the inner half of the handle in order to gain access to the holes for the mounting tie-down screws. To do this, we will use a special “key” from the handle kit or any suitable item, for example, a knitting needle. There is a special hole on the handle, through which the door knob should be disassembled. In the presented photo, it is round, but it can be of various shapes. This hole is located at the bottom of the handle:

Through the hole we press the spring-loaded latch, while pulling out the handle of the interior knob.

We take out the handle and completely remove it:


Then you need to pry off the outer decorative flange of the handle with any sharp object. Take a closer look, as a rule, the flange has a corresponding groove for this:

well, the knob-knob is disassembled and we got access to the mounting screws

Further assembly of the handle-knob occurs on the door in the reverse order.
First, install the latch in the door and secure with two screws from the end. It will look like this:

The rectangular front plate of the latch mechanism is mounted flush with the door leaf. To do this, marking under it, with a chisel, the required depth is selected at the end of the door leaf. The same applies to the striker of the knob, which is installed according to the markup, on the door frame. Also, under it, the required depth is sampled with a chisel.

Further, it is already possible to assemble the knob-knob on the door leaf, pulling together the disassembled halves with fixing screws. The square of the handle and bushings for the mounting screws will, during installation, pass through the previously installed latch, through its technological holes


Handles-knobs are universal and are not divided into left / right-handed. The design provides for the installation and adjustment of the knob for any door with a thickness of at least 35mm.
If the shape of the knob-knob has an asymmetrical shape of a ball, etc., then after installing the knob on the door, using the method described above, remove the knob handle, and change the outer and inner handles in places, having achieved their correct location, relative to the location of the door leaf ( left or right side). The latch or lock mechanism, if any, is also brought into the correct location, and if required, we also swap the outer and outer sides.
The handle, assembled and without distortions, installed on the door, should work easily in both directions and independently, under the action of a return spring, return to its original position. If this does not happen, then you need to check the evenness of the installation, as well as tighten or loosen the fixing screws, achieving their equal tightening and soft stroke of the knob.
Interior doors are sold without fittings, the delivery set includes only the door leaf and racks, from which the door frame is to be assembled. There are no factory-made holes in the canvas for installing locks and handles. This is due to the fact that handles, being standardized, have different designs and sizes. In addition, the choice of accessories depends entirely on the preferences of the buyer. Therefore, a person who has started repairs with the replacement of interior doors faces the problem of choosing whether to invite a master or install handles on his own. It should be noted that, having decided to install doors with your own hands, you will definitely cope with the installation of door handles.
Types of handles for interior doors
Door handles for interior doors can be classified according to the installation method, operation method, shape, material, and the presence of a lock.
According to the installation method, stationary (overhead) and mortise models are distinguished. Overhead are attached to the door leaf, and for mortise it is required to drill holes in it.
By way of work there are:
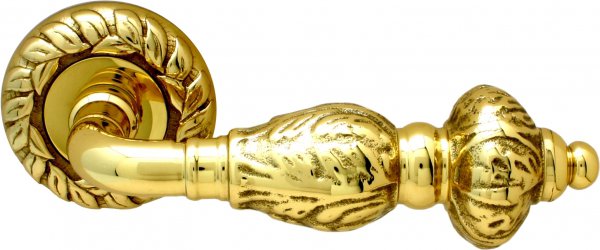
One of the most popular door handle materials is brass. In addition to excellent aesthetic properties, brass is practical and durable.

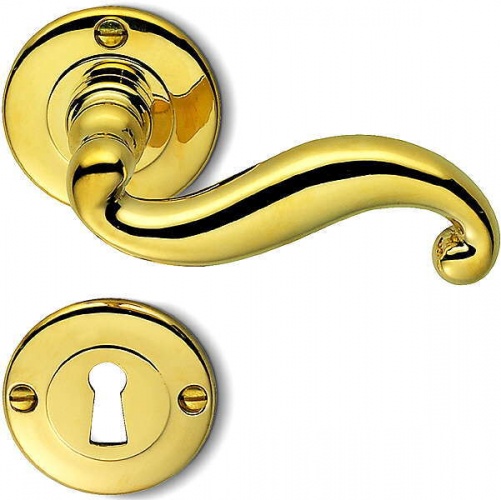
As a rule, complex locking systems are not installed on interior doors. An exception is the sanitary lock installed in bathrooms and toilets.

Installing a handle on an interior door
Consider the installation features of the most popular model for interior doors - knob handles. Handles are usually installed on a hinged door, however, many experts recommend removing the canvas for installation. True, this is not always easy to do.


Advice. If the canvas is not removed from the hinges and the installation is done in the hinged position of the door, move a chair or some object to it so that the door is stationary during your work.
Installation Tool
The tool will require the most common, which is in every home:

A marking scheme is attached to the door latch, but it is easy to make marks for the holes without it. From the bottom edge of the canvas on both sides, 1.0 meters are measured. 6 cm must be measured from each edge of the door and a mark is made. With the help of a square, a strictly horizontal line is drawn that will connect these two points. At the end of the canvas, a mark with a pencil and an awl is placed on this line in the center. A latch bar is applied and the veneer is cut with a sharp knife. Remember that the bar must be recessed into the door leaf so that it forms a single surface with the leaf.
Some experts advise starting drilling from the end of the canvas with a pen drill. With this sequence of work, the chips, when drilling with a crown, will fly into an already made hole, and not clog the teeth of the crown.

The pen drill should go to the depth of the blade, no more. The drill is pressed to a point on the end of the canvas and a hole is drilled. Then, with the help of a crown, holes are drilled alternately on each side of the canvas; it is not necessary to make them through. As soon as the tip of the crown appeared on the opposite side, the drill must be stopped and drilling started on the other side. So the veneer will not be damaged when the crown exits.
After the holes are ready, with the help of a chisel and a hammer, we make a selection along the line cut with a knife under the latch bar. Install the latch and tighten with two self-tapping screws. It is better to take self-tapping screws not "regular", which are attached to the latch (they have ordinary soft metal), but high-quality ones.

Using the key that is included in the kit, we disassemble the handle into two parts so that it can be installed. To do this, one fixing screw must be loosened, the other unscrewed. The central rod is inserted into the hole and on one side the fixing screw is tightly tightened. Then the second half of the knob is put on the rod, and the second screw is tightened. Self-tapping screws are screwed on both sides, which will close the decorative overlays and the screws will not be visible.

After installing the knob-knob, it remains to install the "return" on the box. The door is covered, but not completely, and the upper and lower edges of the tongue are marked with a pencil. Using a square, the distance from the edge of the leaf to the center of the latch bar is determined, and this size is transferred to the door frame. Then a “return” bar is applied to the box, the veneer is cut with a knife, and a cutting is made under the bar and tongue with a chisel. The door is closed and the operation of the latch is checked.

Then a bar is installed on the box. Special “pockets” are sold for recesses under the tongue, they are made of plastic or metal. Self-tapping screws that fix the "return" bar can be closed with self-adhesive plugs. After that, the installation is complete.
How to disassemble and assemble the door handle of an interior door?
The installed handle-knob can be disassembled in two ways, depending on its design. Unfortunately, most of these models are of rather low quality and often fail.
Disassembly of one structure begins with the fact that you need to carefully pry and remove the decorative trim. The lining has a special groove, usually it looks down. The ball-shaped handle will interfere with unscrewing the screws, so you need to press the locking pin and at the same time, with a little effort, remove the handle from the central rod. Once the handle ball is removed, it will be very easy to remove the screws.

To disassemble the second structure, which does not have a locking pin, it is necessary to press the spring pin through the technological hole with the key from the delivery set and remove the handle ball. If the key length is not enough (it happens), use a simple nail. Then the decorative overlay and self-tapping screws are unscrewed. If you can't find the spring pin through the access hole, the knob has not been assembled correctly. Rotate the decorative trim 180° and the problem will be solved.
The handle is assembled in the reverse order.

It is difficult to imagine how to use an interior door without such a mandatory attribute as a handle. At first glance, its installation may seem complicated. However, with a serious approach to the task, the availability of the necessary tools and materials, and the correct organization of work, you can cope with the task yourself. In the presented material, we will consider how the handle is installed on the interior door.
Handle types
There are several types of handles that are suitable for inserting into an interior door:
- rotary;
- with a pressure mechanism;
- without locking mechanism.
Stationary handles, which do not have a mechanical part, allow you to open the door by pulling on yourself. As for pressure systems, the latter have a shutter in the form of a lever. In the process of pressing such a handle, the lock tongue slides inward, which allows you to open the door.
What is an interior door lock with an oval handle? Installing such a system allows you to open the door without pressing the lever. Due to the round shape of the handle, the operation is carried out by turning the holder. The design may be provided with a lock button, which allows you to fix the tongue of the locking mechanism. Thus, you can lock the interior door from the inside.
Tools and materials

What does the installation of handles on interior doors require? During self-assembly, you may need the following tools:
- pencil;
- hand or electric drill with a nozzle in the form of a pen drill;
- screwdriver;
- chisel for woodworking;
- a hammer.
Interior door handle installation height
Before you insert a lock into an interior door, you need to decide on the choice of the optimal location for placing the handle. To do this, it is enough to simulate the opening of the door, to think about what height is most acceptable for each individual user. As practice shows, the right decision is to install the handle on the interior door at a distance of at least 1 meter from the floor plane. The presented footage looks optimal for both adults and children.
Cutting a hole for the handle

Having found the necessary tools and determined the location of the structure, you can proceed directly to creating an opening for mounting the mechanism. First you need to mark the height of the future handle on the door plane and its end part. This is required to determine the exact location where the opening for the double-sided structure will be made.
In order not to make mistakes in the calculations, it is enough to take the latch mechanism, and then measure the distance from its eyelet to the visible edge with a tape measure. The parameter must be marked at a preselected height on the door leaf. As soon as the appropriate markup is made, you can proceed to the selection of a suitable crown for drilling holes.
Having completed the openings, you need a diameter on the plane and the end of the door leaf, here it is necessary to attach the opposite parts of the handle design. If the thickness of the plane does not allow assembly of the product, excess wood should be removed using a chisel. Next, you need to strip the canvas on both sides until the handle fits snugly into place.
Latch mounting
After completing all the preliminary work, it is necessary to position the latch in the prepared hole. handles on the interior door involves screwing it to the door leaf in the prepared opening using fasteners that are included with the product. It is convenient to perform the work using a screwdriver. However, in the absence of the latter, you can use a regular screwdriver.
After strengthening the lock part of the structure, a core is built into it, which is strengthened thanks to the screw, long part. In order not to have problems with the installation of the core, it is necessary to first insert the key into it by moving the locking tongue of the mechanism to the closed position. Only then should the screw be tightened.
Installing a door handle on an interior door

Directly inserting the handle into a previously assembled structure is the simplest stage of the work being done. Here it is enough to insert a square-shaped rod into the corresponding opening of the locking mechanism.
The next step is to fix the handle with fasteners on one side of the door. To do this, you can use self-tapping screws or use screeds. As soon as the first handle is successfully mounted, it is necessary to do similar operations with another part of the structure, which will be placed on the back of the door leaf. Thus, a connection will be established between both elements of the system.
Mounting the plate for the entry of the lock tongue into the door frame

In order for the installation of the handle on the interior door to be considered complete, it is necessary to make an appropriate hole for the entry of the locking part of the locking system into the door frame. To prevent an error in the calculations, applying toothpaste to the tongue of the mechanism along its vertical edge will allow. When closing the door leaf and releasing the handle, the locking element docks with the box part. The remaining mark from the toothpaste will tell you where to make a hole for the tongue.
Using the above method is the optimal solution for determining the correct location of the sheer plate. Despite the primitiveness of the method, even experts resort to it.
The formed imprint from the protruding tongue of the door latch must be drawn with a stable contour using a pencil. Next, you should use a drill and a chisel, with which a hole will be made for the entry of the locking pawl, and then a metal plate with an opening. Previously, it will also be necessary to make openings for fasteners to fix the plate on the boxed part of the door.
After creating all the necessary holes, it is enough to attach the plate to the corresponding area. To fit snugly to the box, the metal element must be firmly screwed to the wooden surface.
Finally

So we looked at how the handle is installed on the interior door. This material provides an example of how to embed a simple mechanism into a wooden plane. Now you have enough knowledge to cope with the task on your own, without resorting to outside help.
Installing the door handle on the interior door is done by hand, since the door blocks are not equipped with fittings. To do this, you need to choose a tool to perform the required work. Each accessory has instructions for use. The installation height convenient for a person from the floor covering, a structural diagram are indicated. If there is no indication of the height of the installation, one condition is required for the door handles. A person should not open the door in a bent position (about 1 m from the floor).
Dimensional drawing for installing door handles
Depending on the wishes of the person, only the handle of the door opening mechanism or door handles with a mechanical or electromechanical lock are installed. The industry produces various locking systems for a dwelling or room. The peculiarity of locks is that millions of structures must be opened with different keys.
Installation work must be performed in a certain sequence:


Step-by-step instructions for installing a handle on a door
Tools for work:
- screwdriver (drill);
- carpentry meter, marking pencil;
- a set of drills for wood, a crown for drilling large diameters.
All door handles can be divided into overhead and mortise. Mortise handles can be divided into rotary designs and rotary with a lock. To protect the lock from unauthorized opening, it is necessary to create production facilities for the production of locks, keys of various modifications and sizes.

Scheme for mounting the door handle
They must be protected from water, frost and from opening with a master key. Many designs require certain professional skills from the master. It is impossible to install a door handle without special skills and tools. If it is a support, then it is not connected with the opening mechanisms.
When marking, it is required to determine a place that will not interfere with the rotation of the key and will be at the level of a person’s hand.

The process of installing a door lock mechanism with a handle
As a rule, they are a decorative decoration of the door. Rotary handles of German manufacturers are especially distinguished. The next most difficult to install is the design of a rotary handle with a lock without a key for locking the doors. Using a simple pencil and tape measure, you need to mark the location of the hole for the handle and lock.

The process of marking the door for installing the handle


Select a metal drill for metal doors and a wood drill for wooden doors according to the diameter of the pivoting rod. With a drill and drills - a pen, drill a hole for the latch to the depth necessary for the full entry of the latch bar.
The next task is to accurately drill a hole for the handle. After removing the latch, drill a signal hole with a small drill. Insert the latch and visually determine the accuracy of the hole in the door leaf and the hole in the latch.

Drilling holes for door handles


After making sure of accuracy, make a hole according to the required size. Having assembled and fixed the handle, in the door leaf, we make markings for the loot with a recess. Using the selection method, pre-assembling and disassembling, we bring the size of the loot to the required size. Such a handle should be the size of the thickness of the door leaf.

Groove door marking

When marking the installation site of the tongue, a groove is hollowed out with a chisel for a strap with screws for fastening and for a snap-in strap in the door frame. On both sides, the rotary handle is fixed with screws and cottered against pulling out.
Installation of mortise locks with handles
Mortise locks with a rotary handle and a lock at the end of the door leaf, with a special design of the lock cylinder, are produced by manufacturers of more than a million types of locks. The number of such models is produced enough for metal and wooden doors. Do-it-yourself installation of mortise mechanisms begins with careful marking on one side of the door of the scheme of mounting mechanisms.

Door marking scheme for installing a door lock
With a chisel, gouge a groove in the body of the door leaf according to the dimensions of the locking system mechanism. The mechanism is installed at the level of the end of the canvas and is closed with a patch plate.
When working, you have to use chisels of different sizes, periodically sharpening on a grinder or bar at a certain angle.
After making sure that the design of the lock is completely recessed into the door leaf, we use a drill to make a signal hole with a thin drill for the rotary handle, after removing the lock from the door. 
We check the accuracy of the hole and drill the door with a crown of the required size from both sides of the door to the middle of the leaf for the handle. After the installation of the lock and handle is completed, it is necessary to tighten all the screws. After checking the operability of the lock without closing the door, you can start marking the groove for the loot.
In the door frame opposite the lock, make a mark on the box for the latch. Having opened the door leaf, mark up, arrange and secure the loot with a groove. 

If the marking of the loot is made with an error and the lock tongue does not enter or there is a large backlash, it is necessary to dismantle the loot and mix the groove with a chisel tool. The loot plate and the lock bar should fit snugly, but without friction.

Putting the handle back in place
If necessary, unscrew the fixing screws and deepen the seat with a chisel. Or make a cardboard lining in size and thickness.
Watch in the video the process of installing a lock on an interior door.