Installing a bathroom sink is the final step in a renovation. The installation of the washbasin itself and the connection of the water supply and sewer siphon to it is carried out after the completion of the finishing work, so accuracy is needed. The assembly of components, installation and related fittings are not something difficult, but it is important to follow the sequence of all stages of the process.
What is important to consider when installing a sink yourself?
In most city apartments, the bathroom and the combined bathroom are too small. And in a cramped room, almost end-to-end, you have to place:
- a tank for taking water procedures (jacuzzi, bath, shower tray);
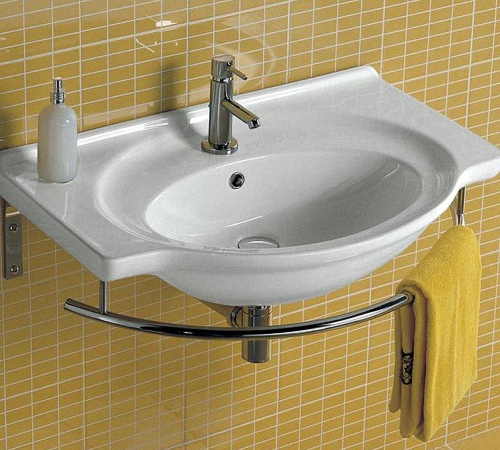
- sink (washbasin, sanitary ware);
- for a bathroom - a toilet bowl;
- occasionally - bidet.

Each personal care item has its own installation method, but installing a bathroom sink is the simplest example.
The construction market offers a large selection of sinks of various designs, but when buying it is important to consider:
- the ratio of the dimensions of all existing tanks and those installed;
- the washbasin and all accessories must comply with the piping and sewerage layout;
- flexible hose and siphon should be enough in length to drain into the sewer pipe.
Sinks come in different materials:
- ceramics;
- porcelain;
- faience;
- marble (another ornamental stone);
- fake diamond;
- strained glass;
- metal (more suitable for the kitchen as a sink).
At the first stage, it is important to understand the type of fastening of sanitary ware. The faucet is mounted on the sink through a special inlet, when the water supply is brought through the container itself. When the faucet is installed above the sink from the wall, it makes no sense to purchase a product with a hole in the center (side), which will have to be covered with something.

All sanitary ware differs in the installation method:
- hanging sinks - mounted on the wall;
- built-in washbasin, part of a cabinet or cabinet;
- tulip sink (on a high narrow stand, behind which the drain hose and the entrance to the sewer are hidden);
- sink-pedestal (on a stand that hides pipes;
- a sink with a semi-pedestal (the same stand, but attached to the wall, arbitrarily choosing a height);
- overhead sink;
- mortise sink with countertop;
- a combination sink with a special design that combines the features of several types.

Install the sink yourself or contact the experts?
Each variety assumes its own type of installation, which is indicated in the instructions for the tank. Of course, the installation of a washbasin with a pedestal is different from a conventional wall-mounted washbasin. And if one or another type raises doubts whether it is possible to install it yourself, then it is better to choose a product with a simple installation scheme.
Is it worth doing the installation of a sanitary sink yourself or entrusting it to specialists? If you already have experience in such a business, then it makes no sense to overpay those who decided to master it a little earlier. And the prices for simple services are clearly too high to make it profitable. If you look at the search queries of your region, how much it costs to install a sink in a bathroom, taking into account home visits, it turns out to be expensive. Sometimes the cost of installing a simple washbasin is more expensive than its price.

If desired, any independent man (or economic woman) will cope with such work without the involvement of specialists. Required to have:
- basic knowledge about connecting water communications;
- tools for assembly and installation;
- detailed instructions for installing the selected type of sink;
- tips from experts from the article.
Attention: It is advisable to purchase a new sink faucet that matches its type! When buying a faucet and washbasin, feel free to find out all the details of the assembly and review the components if you intend to do it yourself.
Helpful Hints:
1. A built-in sink is easiest to install if its dimensions fully correspond to the cabinet on which the product should be located. It remains to assemble the siphon and connect it to the sewer.
2. Mounting a wall-mounted or wall-mounted sink requires reliable brackets or other accessories, which are often included with it.
3. The installation of a countertop sink is made on top of a countertop or another plane and is similar to the installation of a built-in washbasin on a cabinet. Only the tank is fixed on top of the countertop in a hole that matches the configuration. Sometimes this cutout has to be adjusted by contacting a carpentry workshop.
4. There are also semi-built-in washbasins, which require the installation of a washbasin with a cabinet, but partially protrude beyond the edges of the support.
5. It is very convenient to install the tulip sink. Here, the back surface is attached with brackets to a wall or other vertical surface, and partially stands on a leg support. But for some “tulip” models, the weight completely rests on the leg, and additional fixation is carried out by a mixer that comes out from below and is attached to a hidden water pipe.
To simplify fixing and understanding, a simple technology for installing a sanitary sink of any type is sufficient
It should be broken down into main steps:
- mixer assembly;
- sink installation;
- siphon output to the sewer;
- plumbing connection.

The first stage: assembling the sink or washbasin
In general terms, installation of a sink with a pedestal or on a pedestal
involves fixing the mixer and draining the drain siphon from the hole, which causes major difficulties for some beginners. But mixers are mounted in 2 ways:
- horizontally (above the sink);
- vertically (from the washbasin opening).
Tip: Carefully read the instructions for assembling and connecting the purchased sink and faucet. The faucet must have seals, end fittings for connecting to the water supply, flexible and rigid piping. These are rubber or flexible hoses with a metal braid, a corrugated sleeve or special adapters. It is better to replace the flexible rubber hose with a metal braid in the form of a spiral, which will increase the service life of the connection.
The type of fastening is different for each washbasin model, but the fewer parts, the better. And fixing with one large washer or nut is better than other standards, because it does not bend or deform during operation. Due to the imbalance of the mounting, the vertical mixer is often “loose”.
When installing the sink, we connect the mixer strictly according to the instructions supplied by the manufacturer. Usually it is required to screw it into the base and secure it with studs. It is important to be sure to put a gasket in the hole so that water does not seep and flow through the pipe or pedestal. After that, the washer and gasket are screwed on the inside of the tank to finally fix the mixer.

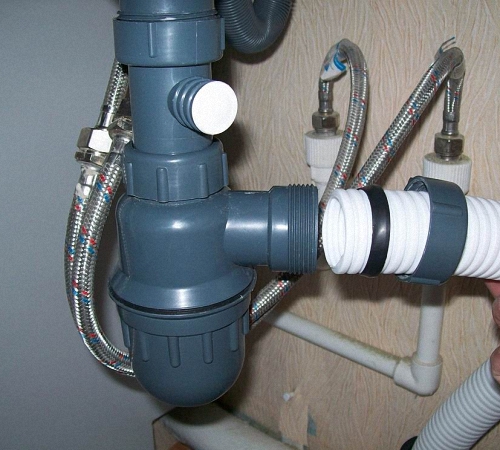
The second stage: connecting and assembling the drain siphon
In the assembly of the drain siphon, there is also nothing difficult when you have on hand:
- all equipment;
- detailed instructions;
- installation diagram in the illustrations in the package.
However, there are some nuances that are important to consider when installing a washbasin. For example, if this is a sink installation with a semi-pedestal, then the sewer inlet is usually on the side of the wall, and not on the floor. All parts of communication must be hidden.
The siphon does not always work flawlessly after installation. And in order not to deal with it after installation in search of the cause of the leak, experts check all areas where there are rubber seals. All irregularities and burrs that interfere with the tightness of the seal are cleaned. In the same way, all burrs work out on gaskets.
On closer examination of the rubber gaskets, it is noticeable that they are not the same on both sides. It is important to put them on correctly - with a cone in the opposite direction from the nut.
Tip: If the gaskets are old (dried, inelastic), you should not be too lazy and buy the same, better ones, otherwise they do not fulfill their main function - ensuring tightness. Sometimes the problem of a small leak can be fixed with a sealant or silicone, but these are temporary measures.
After installing the siphon and mixer, the installation of the base or the washbasin tank itself is completed. On the cabinet, if the dimensions of the sink match the configuration of the hole or the upper horizontal, then no cuts or adjustments are made. The main condition is compliance with the horizontal and strong fixation. The curbstone usually has screw adjustable legs. Sometimes additional adjustment of the height of the sink installation is required.
If the sink is fixed to the wall, and not to the cabinet, then it is necessary to fix the brackets or anchor screws, marking the horizontal line according to the universal building level. If this is a tulip sink standing on a leg, behind which the siphon is hidden, then the tank with the mixer is simply glued to the wall (tile) with silicone. It will turn out quite firmly and reliably if the sink itself stands on a support, and not on weight.
Tip: It is better to check the operation of the siphon even before connecting the water supply, pouring clean water in small portions. If everything is dry, pour another bucket of water - for a control check.

Final step: connecting the water supply
A properly installed mixer is not difficult, but it is important not to confuse where the cold water is and where the hot water is, if it is supposed to be. The connection of the mixer is usually made directly to the water pipes - by connecting a flexible hose.
The most convenient adapter is a corrugated sleeve, fixed with a union nut with rubber gaskets. It is important not to overtighten the nuts so as not to damage the seals.
Installation of a kitchen sink with a curbstone (sinks)
The kitchen sink on the cabinet is installed in the same way. But usually we are not talking about faience or tiled containers, but about a metal sink. In most cases, its dimensions coincide with the cabinet. But sometimes it is mounted on top - like an overhead sink, that is, on top of a common countertop for the entire work plane. If necessary, they turn to specialists who will cut a hole of the required configuration using a machine tool or a special tool.
Sealing is the main condition, since water and excess moisture are everywhere in the kitchen. Sealing joints and sealing gaskets is important to do most carefully. And the wider the overhead sink or sink, the less water splashes onto the countertop.

Step-by-step instructions for replacing an old sink:
- turn off the water supply;
- disconnect the old container from the siphon and mixer and remove from the cabinet;
- try on a new container to a countertop or cabinet and make the necessary fit;
- install the mixer according to the instructions;
- connect the siphon and check the tightness;
- open the blocked water supply and turn on the water - at first a small trickle.
Tip: When installing the pedestal, be sure to align the horizontal. Once again, make sure that everything is connected tightly, and water does not ooze.
Complex varieties of shells can be difficult, and then you should turn to the services of specialists. If the countertop is made of stone or other hard material, then abrasive cutting is required to obtain a hole of a certain size and configuration. It is not made in a carpentry workshop, but in a porcelain stoneware, tile and stone cutting workshop.
One of the last steps in a major bathroom renovation is equipping it with plumbing fixtures. When all the facing work is done, the owner will have to think through everything to the smallest detail (how to arrange the bath and washbasin, where the mirror will hang, where personal hygiene items will be, etc.).
Attaching the sink to the wall and bringing it to the water supply is very simple. This is how the process of installing a sink in a bathroom may seem at first glance.
Today, you can choose a device for morning washing in different sizes, shapes, colors, quality and price ranges. This is the first problem that the user will face when choosing a sink.
Difficulties may arise when installing the sink. The installation principle for all types and sizes of sinks is almost the same. However, before that, the most important thing is to decide on the size and location of the ceramic product. You can read about how to install an acrylic bath with your own hands.
Choosing a place to place the sink
IMPORTANT: in pursuit of an extraordinary design, you must not miss the most important detail - functionality!
Before buying a plumbing product, it is imperative to take measurements of the bathroom and (highly desirable!) Sketch its layout on a piece of paper. This will help you choose the size of the sink, determine its location.
If you choose some compact model, then splashes of water, one way or another, will always be on the walls and floor near the sink. The optimal width for the sink is considered to be 50-65 cm, but the choice still remains with the owner. If you buy a sink that is wider than the standards, then such a device will cause more inconvenience than benefit.
If the bathroom space is quite extensive, then you can even install a double sink. In this case, it must be taken into account that the distance between the central points of the sinks should not be less than 90 cm. Only with this arrangement, people using the washbasins at the same time will not interfere with each other.
Another important point is such a parameter as the height of the sink. Since in most cases family members are of different heights, this also has to be taken into account when choosing a place.
It will not be possible, for example, to place the sink above the washing machine, because small children will not be able to use it. According to regulatory documents, the installation height of the sink for an adult should be 80 cm, for a child - 60 cm, for a teenager - 70 cm. The standard height for installing this ceramic appliance is 80-85 cm from the floor to the side.
Hanging sink installation
Before you start installing the sink, you still need to decide how far from the floor it will be.
Stage one. At the selected height, applying a level, you need to draw a horizontal line - this will be the top of the sink. On the side where the bowl will be in contact with the wall, there are mounting holes. Having attached the sink to the wall parallel to the drawn horizontal line, you need to outline where the mounting holes will be located.
Stage two. In the marked places on the wall, you need to drill holes, hammer in the dowels and carefully screw the mounting pin into them. Mounting studs, dowels, nuts and plastic inserts must be supplied with the sink.
IMPORTANT: the fastening studs must be screwed in such a way that the protruding part is greater than the thickness of the shell (plus 15-20 mm for screwing on the fastening nut).
Stage three. Before fixing the sink on the wall, you need to do. When the device is firmly screwed to the wall, it will be much harder to do.
1 - fixing pin,2 - hot water hose,3 - cold water hose
To do this, you need to carry out some preparatory work:
- in the mixer you need to screw the hose for supplying cold and hot water, the mounting pin (in some mixers there are several such pins);
- using an open-end wrench, tighten the water supply hoses to the end (after fixing the mixer, it will not be possible to tighten them);
- after threading the hoses through special holes in the sink, the mounting studs must be secured with a rubber band, tightened with a washer and tightened the mounting nuts;
- before tightening the nuts, it is imperative to adjust the direction of the mixer spout (it must be at an angle of 90 0 to the fixing wall).
Stage four. Now it remains only to fix the sink with the faucet already screwed on. To do this, you need to put the sink on the mounting studs that protrude from the wall, insert the plastic inserts and tighten the nuts tightly.
IMPORTANT: in order to avoid an emergency, after all operations, before connecting the cold and hot water hoses, it is necessary to check the entire structure for strength.
Stage five. When the sink is securely fixed, you need to connect the cold and hot water hoses to the plumbing system. It is recommended to use a rubber gasket between the faucet and the nut to prevent water from leaking.
Stage six. Installation and connection to the sewer system of the drain siphon. First you need to assemble the siphon, since it is recommended to connect all types of siphons as a rigid assembly. It is allowed to use sinks with a soft corrugated pipe (there are branch pipes with a diameter of 32, 40 and 50 mm), however, in the first case, the connection will be more reliable.
When connecting a soft cuff of a conical shape with an outlet pipe, it is imperative to seal the joint between the siphon, the lining and the pipe. After installing the outlet valve, the remaining sealant is carefully removed.
The plastic nut, which is located on the upper side of the outlet pipe, is hand-tightened until it stops. The siphon itself is set at the desired angle to the sewer system, after which it is fixed at the desired height.
Installation of a sink with a pedestal (tulip)
If the purchased ceramic product has a support leg or is fixed on a nightstand, you do not have to choose the height of its placement.
First you need to install all the supporting elements (bedside table, support leg) in their permanent place, after which it will be possible to start connecting to the sewer system.
With a pedestal, it will not be difficult only when the drain socket is placed at a height of at least 0.5 m, and the sewer pipes are hidden in the wall. Otherwise, you will need to use additional materials (adapters, seals, corrugated pipes).
As in the case of a wall-hung sink, you first need to install the faucet and drain system, and only then install the appliance. The pedestal is attached using the same mounting studs, sealing washers and nuts.
After installing the sink in the bathroom (regardless of shape, type and size), it is necessary to turn on the water and check the entire structure for leaks. If water oozes somewhere, then this place needs to be treated with a sealant again.
A process such as installing a washbasin is simple; it is not necessary to involve specialists for its implementation. Washbasins differ from each other in appearance, in the method of attachment, in the place of their installation, and based on these data, the sink is installed and connected to the sewer.
Ways of fastening, installation of the washbasin depends on the chosen model, the material from which it is made.
- the first method of fastening is standard and is made using studs. This method is used for washbasins made of lightweight materials. Having prepared the place, places for holes are marked, followed by drilling them. Next, dowels with studs are screwed in and the bowl is mounted. After that, a connection to the sewerage system is made using a siphon and related parts. If the plumbing fixture has an overflow, an additional tube is mounted to the siphon. Installation in this way can be done by hand;
- the next mounting method is the same standard, only a bracket is used instead of screws. After drilling the holes, the plugs are clogged, then the bracket is screwed on. The bracket is the most reliable and high-quality of the fastener methods. Having finished screwing the brackets, you can mount the sink on them and connect the siphon to the sewerage system. The bracket for the sink can be made of different materials, which is why the bracket and its rigidity are different. Their choice must be made depending on the selected model of the sink, taking into account the load on them. .
Washbasin brackets

Studs for fixing the washbasin
Types of brackets:
- the cast-iron bracket is a T-shaped rack with a special platform for fastening. Cast iron bracket is reliable and high quality;
- welded steel brackets, the shape of which is in the shape of the letter T or G;
- brackets, the shape of which resembles a frame. This method is as simple as the previous one and fasteners can be done by hand;
- The vanity sink method is used when choosing a washbasin to be built into a piece of furniture, a countertop or a specific, specially purchased cabinet. This method is suitable for a small bathroom.

Steel

cast iron

Preparatory work
Do-it-yourself installation and connection of the sink is a simple process that can be divided into several stages. The first stage is the preparatory measures for the installation of the washbasin.
Choosing a place in the bathroom or dismantling an old washbasin. In a small bathroom, it is better to use a corner sink, or a built-in bathroom furniture, countertop, cabinet, washing machine, which can be placed in the room without taking up much space.
Determining the height of the sink. If it does not have additional accessories, then the standard fixture height is 85 cm, even for a small bathroom. Having noted this height, a line is drawn along which the upper level of the washbasin will be attached. In the case of using a tulip sink or a washbasin built into the countertop, it is not necessary to determine the height of the fixture of the plumbing fixture, since it depends on the height of the pedestal or countertop.


Mount markings
The marking of the fasteners on the wall is carried out as follows: to accurately drill the necessary holes for making fasteners, you need to attach the shell to the wall, aligning the upper level of the shell with the marked line and mark them on the wall through the mounting holes in the bowl. It is better to carry out the steps for marking the mounting holes with your own hands together. Another thing is if you use a sink, tulip or installed in the countertop, placing the bowl on the footboard and moving it to the wall, you can safely make a mark.

Mounting site preparation

We compare by level
Installation of fasteners
The next step is the installation of fixtures, the choice of which depends on the method of installing the sink:
- according to the marking of the mounting holes, they are drilled;
- dowels are hammered into these holes;
- special studs are screwed into the dowel. It is screwed in to a depth such that its protruding edge would allow the sink to be fixed and the fixing nut to be tightened. The length of this edge of the stud should not be small, but slightly more than the thickness of the bowl, plus the distance for the nut.

Making holes

We screw the dowels

Screw in the mounting pins
Connecting the sink to the water supply
The third stage is connecting the do-it-yourself washbasin to the plumbing system. This stage begins with connecting the mixer. It can also be attached after the installation of the washbasin is completed, but it is recommended to do this first, as all connections are made at the bottom of the bowl. Also, depending on the type of sink, the mixer may be mounted on a wall or countertop.

Washbasin faucet
The mixer mounting scheme is as follows:
- special fixing pins are screwed;
- further, a hose is installed, with the help of which the water supply is supplied. They need to be tightened using an open-end wrench, moderate efforts should be made when tightening them;
- hoses are now being drawn to supply water through the openings of the washbasin;
- further, sealing rubber bands, a washer for clamping are put on the studs for fasteners on their reverse side and a nut is baited;
- the last point is to tighten the fixing nuts.

We mount the studs

We screw the hose

We fix all nuts, screws

Water supply to the mixer
Sink installation
By connecting the plumbing device with your own hands to the water supply, you can proceed to the next step, this is the installation of the washbasin:
- this stage is the easiest, the sink must be put on the studs, inserting plastic gaskets to tighten the nuts;
- when using a tulip sink or a sink built into the countertop, it is fixed to the supporting elements.

Mounting the sink on the fixtures

Tulip sink installation
Sewer connection
Having finished the installation work and connecting to the water supply, you need to connect the sink with your own hands to the sewer. This process originates from the installation of a siphon. When installing it, you must consider whether the sink has an overflow or not. If yes, then the siphon must be equipped with an additional tube for overflowing water into the sewerage system.

Types of siphons and material for their manufacture
A siphon is a design resembling the English letter S, the location of which is located immediately under the sink. Its purpose is to connect to the sewerage system for the withdrawal of water. Siphons are of different types:
- bottle siphons. The advantages are the presence of a water seal, the ability to connect the drain of water from the washing machine, independent regular cleaning. This type is often used with overflow;
- siphons are tubular, which resemble a curved pipe. In the bend of this pipe, a shutter is formed that prevents the appearance of specific odors;
- corrugated siphons, reminiscent of tubular ones, with the only difference being that, due to its plasticity, it can take any shape, becoming more compact;
- siphons with overflow, these are all of the above varieties with an additional pipe branch, brought from the siphon to the top of the sink, to prevent water from overflowing from it.

Corrugated

Bottle

Siphon double

Siphon with overflow

Tubular siphon
Siphons are made from different materials:
- cast iron siphon, its advantages are corrosion resistant, strength. The cast-iron siphon also has disadvantages, this is poor cleaning, a difficult dismantling process. Cast iron siphon is used only in bathrooms;
- brass siphons, its advantages are durability, strength, non-corrosive, easy dismantling;
- plastic siphons, the most common type, due to the affordable price, ease of installation and dismantling, are quite durable.
Siphon installation
- it is necessary to place the outlet of the siphon in the bowl and fix it. If a sink with an overflow is mounted an additional tube;
- the pipe is screwed;
- the end of the pipe must be inserted into the sewer outlet. If the pipe size is small and does not match the sewer opening, an adapter called a cuff is used;
- at the end of the installation work, you need to check all connections so that there are no leaks.

Siphon installation
The instructions for installing and connecting the sink discussed above are mainly used for wall-mounted sinks or if you need to hang a corner one that is installed in a small bathroom. When installing a tulip sink, or using a countertop, the fastening method is slightly different. A washbasin that is mounted on a countertop or cabinet has the advantage of good stability and fastening takes place without drilling the surface of the walls.
Rules for attaching a tulip sink
When attaching a tulip shell, there are certain rules:
- as with a standard mount, the tulip must be substituted against the wall to determine the locations of the mounting holes;
- further, a cast-iron bracket is attached, with which the tulip shell is attached. Its fastening is carried out according to the same principle as the dowel with a hairpin;
- the bowl is attached to the screwed bracket, while simultaneously pushing the foot of the structure. It should be noted that the tulip is monolithic, separate, with a shortened footboard, which is used in a small bathroom;
- after the installation of the siphon and only then the mixer;
- the final stage is the installation of the footboard, which will hide all communications.

Tulip sink installation steps
So, installing a sink in a bathroom on your own does not require the help of specialists. Its quality and reliability depend on the materials used, do-it-yourself mounting methods, sink models, thanks to which some types of washbasins can be placed in a small bathroom due to their compactness.
Video
Regardless of the reasons, many people wonder - how? Replacing an old washbasin can take two to four hours. To independently install a new sink does not require special knowledge and skills.
Before starting work, it is important to determine in advance whether the wall can withstand the new washbasin, because it may weigh much more than the old one. If this is true, then it is necessary to use special fasteners - a supporting frame.
How to replace a bathroom sink - step by step
The process of replacing an old sink with a new one consists of several stages:
- Wall marking. Use a measuring tape to measure the dimensions of the old washbasin. When you go shopping for a new sink, it's important to have all your measurements with you.
- Overlapping water. To turn off the water, use a wrench of the desired diameter to turn the valve located under the sink. To make sure that the water is shut off, just turn on the tap.
- Removing the drain pipe. To begin with, it is important to put an empty bucket or a deep container under the siphon, and then loosen the bolts using an adjustable wrench (with their help the siphon is attached to the sink at the bottom). The siphon must be carefully removed from the washbasin.
- Disconnecting the hot and cold water supply hoses with an adjustable wrench.
- Removal of fasteners of old plumbing. The screws are removed with a flathead screwdriver.
- Removal of adhesive material. The adhesive or putty is removed from the wall with a conventional spatula.
- Installation of new plumbing. The sink must be installed on a flat surface, so it is necessary to clean the tile, removing the remnants of adhesive and sealant.
- Removing the drain and faucet from the old plumbing (if you plan to install a new faucet).
- Fastening new fasteners to the wall. After all parts of the sink have been attached, it is necessary to cover the joints of the faucet with sealant.
- Application of silicone sealant to the rim of the bottom of the washbasin. Excess sealant can be removed with napkins or a cloth.
- Fixing the sink to the wall with screws. It is necessary to climb under the sink and use a screwdriver to fasten the screws in the plumbing fixtures.
- Connecting hot and cold water hoses with a wrench. The siphon under the washbasin must also be secured with a key, while it is important not to overtighten the valves.
- Checking the water supply. Do not remove the bucket from under the sink until you are sure that the water is not leaking. If the siphon leaks, then it is necessary to turn off the water and wrap the thread of the hose with fluoroplastic tape.
The arrangement of the bathroom is a responsible event that raises a lot of questions from the owners who install the equipment on their own. A rich selection of sinks provides consumers with the opportunity to select equipment for any interior.
We will talk about how the sink in the bathroom is installed in accordance with building codes and sanitary and hygienic requirements. In the article presented by us, examples of mounting the built-in and console versions are considered. Based on our recommendations, you can easily cope with the work yourself.
The method of installation of sanitary equipment is determined by the type of sink. Leading manufacturers produce several types of sinks.
The most widespread are four types of sinks, differing in the method of installation:
- Embedded. They are installed in the countertop cabinets, tables or any other flat surface. Such models are convenient in that they allow you to completely hide unattractive communications behind the furniture doors.
- Console. They are suspended structures that are fixed on the wall using a ready-made installation system. Models of this type look stylish and modern.
- With a pedestal Models of the "tulip" series have a decorative element in the form of a pedestal, on which a massive bowl rests. The drain fitting is hidden inside the support.
- With half pedestal. Models of this type are also equipped with a pedestal. But he does not rest on the floor, but on the wall. Due to this, wall models look more elegant. The installation of such equipment is complicated by the need to bring the drain to a given height.
Built-in sinks can be mounted on top of the countertop, fixed with sides around the perimeter of the base, or built into the structure from below.
Regardless of the installation method, the bathroom sinks on sale are very diverse in shape and configuration: oval, round, cubic
In bathrooms where it is not possible to install a standard width countertop, it is convenient to use semi-recessed models that simply go around the edge of the countertop.
Image gallery