Provides for the creation of tracks. Moreover, the requirements for them are quite serious: they must be reliable, comfortable, functional, beautiful and very desirable - inexpensive. We will talk about how to make garden paths with your own hands at low cost in this article.
What to make tracks
The pavement can be solid or loose. To create a hard coating, the following materials are used:
- Concrete. Concrete walkways are not just ordinary gray tape. In addition, there are dyes and you can decorate it if you wish. There are also molds for pouring immediately on the spot. It turns out homemade paving slabs. Another option is to pour small concrete slabs of the right size on your own, then put them on the bedding. See photos for design examples.
And everyone in the household has forms for such a path - cut eggplants for water into cylinders, place them as needed and fill with a solution: beautiful and cheap
 And this is a concrete path with expansion joints. If you look closely, you can see that stripes are applied across. This is to ensure that the wet surface is non-slip.
 - Flagstone. This is a natural stone that has been sawn into plates. It is laid on a prepared base (more on this later), the gaps are filled with backfill. It turns out beautifully, reliably, non-slip. No wonder landscape designers love flagstone stone paths so much.
 Backfill is one of the important elements that shape the appearance
 - Brick. Ordinary ceramic brick is a beautiful material, but not for paths. It absorbs moisture, if then it freezes wet, it is torn apart. If you are going to make a path out of broken bricks, then you can walk along it more or less normally only for a couple of years. Then you have to redo it. The resulting cracks will need to be covered with coarse sand or fine gravel. A clinker brick will serve much longer on the track, but this option cannot be called low-cost: the cost of one piece is from several tens of rubles.
These are two types of bricks - ceramic and chipped granite. A clinker brick path is beautiful, you can’t say anything .... but maybe too beautiful for a garden?
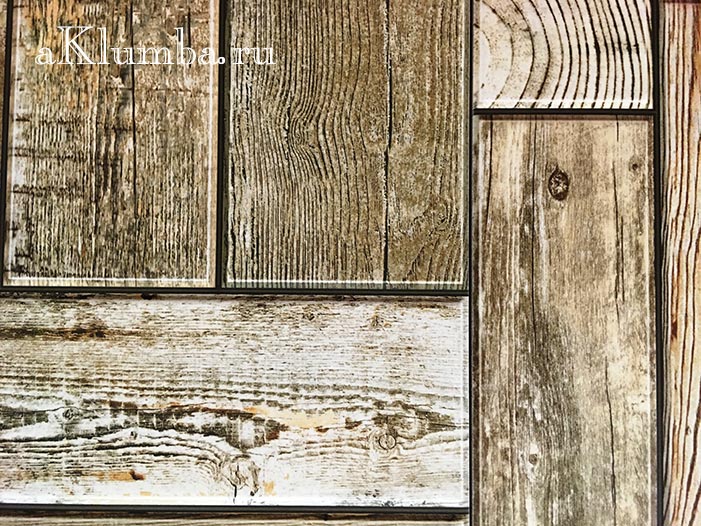
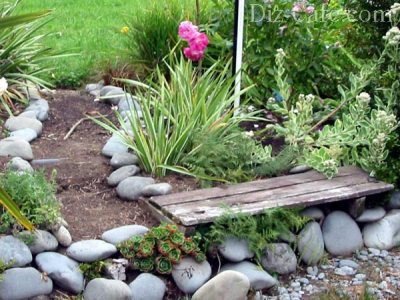
- Wood. Such a seemingly unsuitable material, but with proper processing, it can last a long time. Moreover, many do-it-yourself wood tracks can be classified as low-cost. For example, they came up with the idea of using stumps and saw cuts of trees as borders or coverings. They also make flooring from well-finished boards - terraced is better, but if not, it will also work from the old floor.
Combination with pebbles - it's comfortable to walk And this is how to make a path out of boards
- Plastic. There are tiles for garden paths made of plastic - polyethylene or polypropylene. It has a square shape and a system of locks, which is attached to one another. It can be laid directly on top of the lawn or previously trodden in the country or on the paths. This option is fast and cheap. It can definitely be called "With little cost." It is better, of course, to make a filling of crushed stone and sand according to the rules, and lay plastic elements on top. It's a little longer and more expensive. There is also an immodest, but very beautiful version of plastic tiles for paths. There is also a "garden parquet". These are slabs or boards made of wood-polymer composite - WPC (they are in the photo, they look exactly like parquet). This material appeared relatively recently. It looks and feels like wood, but in fact it is a mixture of wood flour and polymer. These are very beautiful coatings, but their cost is by no means modest. Although not fabulous.
This is garden parquet. Gorgeous, but overpriced
- Pebble. These are rounded natural stones that can be found on the banks of rivers or lakes. Flatter pebbles are more suitable for making tracks. There are different shades of gray, black, white, sometimes you can find burgundy. From these stones, laid close to each other, mosaic paths of amazing beauty are obtained. But this is an occupation for the assiduous and stubborn. Those who lack patience can find large flat boulders or large pebbles and lay them in the sand. It's not as luxurious, but no less reliable. You can also do with granite or other similar stones. It is important that at least one face is relatively flat. You put this flat part up, and bury the rest. The work is not easy, but it will be possible not only to walk along the path, but also to ride.
- Handy materials. Country paths are made from old tires and bottles.
There are also paved paths: these are gravel or crushed stone. Their peculiarity is that with a small layer of 2-3 cm and with sufficient compaction, it is convenient to walk on them. If the layer is slightly larger, unevenness is formed when walking, and such walking is tiring. Therefore, as you have seen in many photographs, gravel and crushed stone are used as backfill, in which rigid elements from other materials are laid. When done correctly, this is convenient: gravel conducts water well and puddles do not form. Those who do not like the gray color can be advised to paint it: many designers do this when organizing rockeries.

How to make garden paths with your own hands
It is not enough to know what you can make garden paths with your own hands. You also need to know how to make them correctly so that it serves more than one season or two. The laying of different materials may vary slightly, but there are several rules and actions that are repeated in any technology.
First rule: when laying or forming a track cover, it is made with a slight slope. If the material allows, a slope of several centimeters is made on both sides of the center. If, for example, a concrete path is poured, then the slope is formed in one direction - from the house, if it is nearby. The slope is made towards the lower part of the site if the path is located on a slope.

Second rule: under any covering preparation of the basis is required. If you lay stones (for example) directly in clay or loam, it will certainly be useful - it will definitely be more convenient to walk, but after some time the stones will “silt up”. Simply trample into the clay. With a backfill, this will take much more time. And if you make another drainage cushion and a side, water drainage will be even more efficient, and everything will look even more beautiful.

Third rule: the level of coverage of the track should be a couple of centimeters higher than the adjacent area. Then the water will quickly drain, it will be more convenient to clean, and cleaning will be required less often: the washed-out earth will not flow either during rains or during irrigation, which are often done along the paths.
Step-by-step instruction
When making garden paths with your own hands, start with markings. In theory, the dimensions and shape should be marked on the site plan, and the markup should take place according to the project. But more often than not, everything is done on the spot. To see the future path more clearly, its contours can first be covered with white sand or something similar. If the shape suits you, you can drive in the pegs and pull the twine between them, but you can also work on backfilling.

Along a beautiful path, you can place a flower garden or flower bed. How to do them, read.
Beautiful do-it-yourself pebble path
If with flagstone, paving stones, brick, everything is more or less clear - everyone has already seen more than once how this is done, then it is not clear how to lay pebbles in patterns.

Below is a photo report on the process of making a pebble track. The main techniques are visible on it: lines are applied to the leveled sand, along which pebbles will be laid out. If these are arcs, they are made with a thread and two sticks / nails.

Picking up stones, they are laid out on the edge close to each other, slightly sunk into the sand.

A board is laid on a folded pattern, a rubber mallet is taken and they knock on the board, hammering the pebbles into the sand. So the whole drawing is deepened, making sure that the edges of the pebbles are at the same height.

Stones are "drowned" in the sand
They take a mixture of sand and cement (sand 2 parts, cement 1 part) and fill in the gaps, leveling the layer with a brush.

A fragment of a pebble path is carefully poured with water so that the backfill does not blur. Wait a few hours until the cement sets a little, then remove the excess with a soft brush.

It is important not to miss the moment: the mortar should not get dirty, but also become a stone. If you pick it with your finger, it should crumble. It's time to clean up the excess.
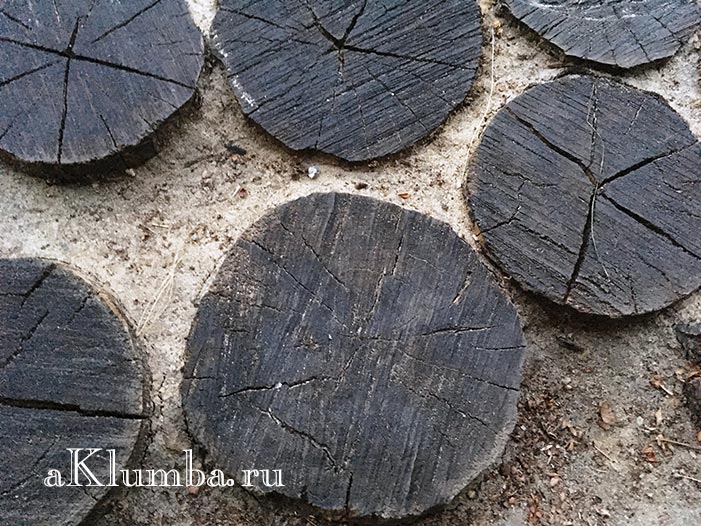
Path of wooden stumps and gravel: video
Old logs or trees can be turned into a beautiful walkway. They are sawn into logs of the required length, the front saw cut is polished, all wood is first treated with a bioprotection composition (it can be soaked with used oil). After drying, they are dipped in Kuzbass varnish and dried again. Then the front parts of the stumps are covered with paint of the desired color - which will protrude outward. Once again dried and only then put in the sand.
The process is detailed in the video. Here it is explained step by step how to make garden paths from stumps or logs with your own hands.
Making your own concrete driveway
The process is generally similar to the one described at the beginning. There are some differences that we'll talk about.
After the trench is dug and the bottom is leveled, formwork is installed along it on both sides. These are boards from 25 mm thick (thicker is possible, thinner is undesirable, plywood 16-18 mm thick can be used). Their height is the height of the track. If you are molding a slope, the boards should be set taking it into account - one side is slightly higher, the other is slightly lower.

The formwork is set to the level - concrete will be leveled on it
To make formwork, pegs are driven into the ground in increments of no more than 60 cm. Boards are nailed to them. It is better to smear the inner surface of the formwork with working off or other oil: so that it can be easily removed. Further, crushed stone is poured onto the bottom and rammed. But it is necessary to ram carefully: if you walk along the bottom, no traces should be visible.
Further, in order for the path not to crack, a metal reinforcing mesh is laid on the rubble. The thickness of the bar is 4-6 mm, the step is 5-10 cm. It is sold in pieces, they must be connected to each other with steel wire.

Then, to compensate for the expansion in the winter, you need to put wooden planks 1.5-2 cm thick. They are placed across the path, set so that the height of the planks is flush with the formwork boards. Compensation strips are set at least every 2 meters. More often you can, less often you can't. Why do it more often? For beauty. Squares look better than long rectangles.
A concrete solution of a grade not lower than M-250 () is poured into the finished frame. For him, take 1 part of cement, 3 parts of sand, 4 - crushed stone. Everything is mixed into a solution of medium fluidity (thick sour cream) and poured into the formwork. When pouring, make sure that there are no air bubbles left. To remove them, the solution is pierced with a pin, slightly shaking it - bayonet. Ideally, if there is a surface vibator for concrete - it quickly compacts the solution, creating a perfectly flat surface. If it is not there, you will have to level with the rule, using the edges of the formwork as beacons.

A few hours later, after the concrete has set, the surface can be treated. You can leave it as it is, you can brush it with a stiff brush, making transverse strips, you can finally put pebbles, stones, flagstone, etc. into a not completely hardened solution. It's not very economical, but reliable. After a couple of days, the formwork can be removed, and you can already walk along the path.
Tire track on a budget
What they just don’t make from tires: swings, and ... tracks. It's simple: you need to cut off the sidewalls of the old tire, leaving only the tread. What can be cut? Bulgarian. Someone manages with a knife, but this is only if the cord is not metal.

The projector is cut across to make a track. Then cuts of 15 centimeters are made on the sides - it depends on the diameter of the tire. They will make it possible to deploy the rubber.

Make incisions on the curved edges - the surface is still non-linear
In this form, it can already be laid on the beds. Will serve for many years. This one is like garden paths at low cost.

This coating will withstand many years of active use.
As you understand, there are a lot of options for how to make garden paths with your own hands. It is impossible to tell and describe about everyone, but we try ...
2014-10-11 113

Content
I am glad to welcome the permanent friends of our design portal! Today, analyzing the statistics of visits, we came to the conclusion that you are actively interested in articles about the improvement of suburban areas. This means that there are a lot of happy owners of hacienda among us. Especially for you, active gardeners, I decided to write this article. Remember, we have already discussed the question of how to choose the right one? I hope you learned this landscape design lesson well. And now it's time to talk directly about the paths, or, if you like, garden alleys.

Main functions
Every self-respecting summer resident does not disregard garden paths. They give the site some kind of, you know, elegance, or something. Well-groomedness, nobility. According to designer fashion, a site without tracks is bad manners. The trodden paths among the thickets of grass do not look very aesthetically pleasing. Such a courtyard reminds me of an untidy person, with greasy curls and dirty hands. Whether it's a dacha with neat winding alleys or geometrically straight and even tile sidewalks. A feast for the eyes!

So, the paths in the country perform, first of all, an aesthetic function. How pleasant it is to walk along a carefully lined alley, enjoying the results of your own labor! And do not be ashamed to invite guests. They will certainly appreciate your efforts. By the way, in this case it does not matter at all whether it will be a simple alley of small squares of concrete or a solid path of paving slabs.
Paths help not only to connect all the buildings together, but also combine individual elements into a harmonious ensemble. Strictly following the chosen style of registration of a suburban area, you can use them to create a unique work of landscape design, the name of which is your dacha.

Variety of species
It is easy to guess that the paths are classified depending on the type of material that is used for their construction. Modern building materials provide a wide choice; wood, plastic, rubber, and paving slabs are used to equip alleys.

The most noble material is natural stone. Garden paths made of stone look expensive, status. Of course, consumables can scare you at a price, but such an alley will last a very long time. This option is suitable for you if you have planned capital construction. By the way, it is not necessary to buy a stone specifically for this purpose. You can get durable paths for giving cheaply if you use the remains of natural stone, for example, from facing buildings or erecting a fence.

Today, country style is in fashion. It is excellent for the general design solution of the suburban area. And wooden garden paths will help to complete the organic ensemble. This material conveys some unusual atmosphere of warmth. Different types of wood are distinguished by a textured pattern on the saw cut - this fact must be taken into account. To extend the life of a wooden alley, use a special impregnation or varnish after installation.

The owners of capital brick houses should not for a second think about how to lay out the paths in the country. The solution to this issue lies literally on the surface. Use a brick! Such a design move will bring the desired harmony to the overall atmosphere. Just keep in mind that it is recommended to take a special paving brick. It is more resistant to moisture and temperature changes than its "regular" white or red relatives.

Paving slabs or paving stones are material for those who want to make paths in the country with their own hands. This option gives you the opportunity to show your imagination to the fullest. The material can be folded like a mosaic, forming patterns and drawings on the alleys. If you draw a laying scheme in advance, noting multi-colored fragments, you will get an absolutely unique ornament. Your cottage will be unique!

In my opinion, the most economical material is gravel. An idea for those who are concerned about the problem: what to make paths in the garden from. Everything is very simple! It will only take an impressive amount of consumables, as it shrinks. The gravel layer should be thick and carefully compacted. I want to emphasize: this option is not suitable for the central alley. A homemade gravel path fits into the wild, so it has a place along the beds, between flower beds, near an artificial reservoir.

This trail evokes nostalgic associations for me. Recall an analogy from childhood. Of course, the path of health in kindergarten! The alley, paved with gravel, is somewhat similar to this invention specifically for hardening babies. By the way, right on the go, an idea was born - why not build such a path near the children's corner on the hacienda? You can use, I give the idea.

Another durable material is concrete. To make concrete paths with their own hands, summer residents use either ready-made solid slabs or special blanks. In building markets, molds are sold for making pieces of concrete of the required configuration. Triangles, squares or asymmetric shapes - you can pour concrete tiles yourself.

Concrete paths are great for weed control. If you're having trouble with an annoying knotweed, or if you want to "thin out" the green carpet of your lawn a bit, lay down large blocks of concrete. In rainy weather, there will be no dirt in your yard, and juicy grass will be a beautiful living edging for the alley.

Forms for garden paths
I would like to talk more about the forms for construction. As I said, they are sold in hardware stores. High-quality tiles for garden paths can be made at home. But this, perhaps, is a task for real masters! Quite a painstaking and lengthy process, but the result is worth it.

How to fill the paths in the country? This is perhaps a topic for a separate article. Speaking briefly about the advantages, then, first of all, it is uniqueness. You have the opportunity to use any type of solution, apply dyes, add decorative elements: pebbles, small stones, even lay out patterns from them on the surface of the resulting blanks.
You know, it's like cooking. You can buy a ready-made cupcake in the store, or you can bake a homemade one. With nuts, raisins, fresh fruits, cream - many variations and each time an unusual taste. Similarly, in the question of how to make a track out of concrete using a special form. Experiment, getting interesting results every time.

How to make a path with your own hands
Garden paths are built in two stages. Foundation preparation is a very responsible process. It's like laying the foundation. For the house to be reliable, you need to take care of a strong foundation. The built path will last a long time if you pay attention to the careful backlog of the base.
Along the entire perimeter of the future alley, it is necessary to dig a continuous trench - the so-called earthen trough. Its depth should be at least 10 cm, regardless of what type of coating will be used in the future.

The bottom of the "trough" is covered with rubble. The height of the flooring is up to 3 cm. And then the gravel must be well compacted. Then a layer of fine gravel and a sand cushion.
The next step is laying the pavement. Its individual elements (bricks, tile fragments, natural stone bowls) must be rammed with a rubber mallet.

A compactor is poured on top - sand to fill the gaps. Making paths in the country is not difficult. Women can also cope with this task, because, as you have seen, power moves are not needed here. The main thing is fantasy, diligence and the desire to transform your dacha.
1. The so-called walking trails look cute. They consist of individual elements, such as concrete squares or saw cuts of large diameter. You can arrange them in a row - you get a kind of chain, or in a checkerboard pattern. This approach reminded me of a hopscotch game.

2. Don't be afraid to mix and match! Feel free to combine materials of different textures. Garden paths made of wood perfectly "make friends" with white pebbles or large stones like sea ones. This method will visually brighten up thematic transitions in the design.

I mean the case if a stone path leading to the gazebo adjoins the central alley, lined with tiles.

3. When starting construction work, take an interest in the weather forecast. Don't start building if the weather forecast is for rain. It is especially not desirable for moisture to get into the earthen trough. But at the stage of completion of work, rain is even useful - it will perfectly compact the top layer, wash off excess sand, and polish the stone.
4. Natural stone is the ideal material for a curved garden path. Individual elements are arranged in a random order, which allows you to make even sharp turns and smooth bends. For alleys winding around the site, choose this noble tool of natural beauty.

Perhaps that's all I wanted to tell you about. I invite readers to discuss the topic: what material do you think is most suitable for garden paths. Share your thoughts, ideas, experiences. Let's inspire each other to new design achievements!
From how the paths will be decorated on a suburban area, its entire design largely depends. Even in such conditions, when it is not possible to perform time-consuming and expensive work, you can choose more affordable options that have been developed and already tested by craftsmen.
Do-it-yourself paths in the country can be made from a variety of materials by choosing the appropriate option from the ones below. For example, ordinary bricks or round logs sawn from logs, round, medium-sized pebbles or ordinary corks from plastic bottles are perfect for these purposes. There are also removable options for tracks that can be laid exclusively for the summer period. By the way, such tracks can also not only be purchased ready-made, but also made independently.
In any case, before laying any garden paths, it is necessary to carry out preparatory work.
Design on paper

First of all, you need to schematically place a house, outbuildings on the plan, connecting them together and paving the way to the entrance gate - these will be the main paths, which you cannot do without in any case.
Then, you need to plan paths leading from the house to various areas of the site, for example, to the gazebo, pool, playground or zone.
If there is a need, then, having brought the path to the garden or garden, it is worth branching it in such a way that it is convenient to get to every corner of the site in any weather, since the lack of paths is especially unpleasant for moving on “bare” ground during or immediately after rain .
After the project is drawn up, you can transfer it to the territory of the site.
Marking on the ground

To determine the width and direction of the tracks, it is necessary to make markings on the ground. This is especially important if they are kept in certain sizes in width - for example, laid out from finished tiles or bricks.

Marking is carried out with the help of driven pegs and a cord pulled over them. To make it more convenient to visually figure out how the direction will look like, and whether the width of the path is sufficient, each border on the sides can be sprinkled with lime a little.

The best option is if, along with the path, you immediately mark the location of the plants that will frame it, since everything looks a little different on the ground than in the project.
At the planting sites of bushes and trees, which will be located along the path, you can install signs or lay out stones, and mark the boundaries of future flower beds with lime.
It must be remembered that the pit to be torn off should be somewhat wider than the path itself, since in order for it to serve for many years, it must be protected on both sides with stone or concrete curbs. Whatever material it is planned to build a track from, such a preparatory part will in any case improve the quality of the work and allow the laid out track to function for a long time.
After marking, you can proceed to the preparatory earthworks.
Preparing the base for the garden path
So that the path does not crumble in a year or is not overgrown with grass with the same sad outcome, serious preparatory work needs to be carried out. At the same time, it must be remembered that the path should have a slight slope in one or both directions. In addition, a small trench is made in the side of the slope, into which water will drain during rain.

- First of all, from the places where the path will pass, a fertile layer is removed, 15 ÷ 200 mm thick. In order for the depth of the pit to be approximately the same along its entire length, it is necessary to control its sides with a ruler.

- Further, in order to maintain the evenness of the edges of the future path, boards are installed inside, along the entire length of the walls of the pit, but under them it is first desirable to add and compact some sand.
- If the pit is limited by concrete curbs, then their width should be 70 ÷ 100 mm greater than the height of the walls of the pit. The curbs are set according to the level, and so that they do not move, they are fixed with reinforcing bars, which are driven into the ground inside the trench, next to the curbs. The length of the rods should be from 250 to 350 mm, and this segment should be clogged by 200 ÷ 300 mm. The pin remaining above the ground will hold the curb in the desired position.

- If the walls of the pit turned out to be uneven due to excessively loose soil, then reinforcing pins will also have to be driven into the walls, and then installed, pressing curbs against them, setting them in level and also fixing on the other hand pins.
 Backfilling gravel or crushed stone to create a "cushion" ...
 - Further, crushed stone or gravel mixed with sand or cement is poured into the bottom of the pit. can be from 50 to 100 mm after tamping.
 … and careful tamping to maximum density
 - After backfilling and distribution over the pit, the resulting surface is periodically moistened and thoroughly compacted.
The type of material to be poured will largely depend on the total thickness of the “cushion”, on the type of top decorative coating. Also, do not forget that between the "cushion" and the top lining, most often a layer of sand should still be placed.
Varieties of garden paths for a suburban area
As mentioned above, paths can be made from different materials. It is worth considering the installation of some of them in order to accurately determine the choice of the most suitable option.
brick path
A fairly reliable, durable and aesthetic path is obtained from a brick. It is laid out, in principle, using the same technology as paving slabs or. In order for such a path to last for a long time, you need to choose high-quality clinker bricks and carry out work very carefully.
- The base for the path, with a compacted upper sand layer, needs to be well leveled using a homemade rule.

The rule is made from a board with perfectly even and smooth end sides. The board should have a length of 200 mm more than the width of the path. The corners of the bottom of the board are cut to the thickness of the brick. Upper, longer uncut parts boards will serve as a stop and limiter when leveling the sand layer.
- When the entire sand layer is leveled, you can proceed with the installation of side bricks in the path, which are installed on the edge and driven half the width into the sand with a rubber mallet.
 Laying and driving in a line of "border" bricks
 - If a curb is not provided in the path device, then the side bricks are fastened together with a mortar, and after it hardens and is removed, they must be fixed from the outside with reinforcing pins, and then a crushed stone bed should be arranged, which will need to be carefully tamped.
- After installing the side bricks on both sides of the path, you need to decide what pattern the middle of the path will be laid out with. The brick can be installed on the end or laid on its wide side.

- To make the masonry rigid, you need to lay one row along and the other across the path, driving bricks into the sand at the same level in height with the framing ones. However, to make the path as reliable as possible, it is advised to fasten the bricks together with a cement-based adhesive solution intended for outdoor work - this will also reduce the risk of grass growing in the gap between the bricks.
It is advisable to put the solution in such a way that it does not protrude from above, but remains inside the masonry, which means that it will not require too much.

- After the laying of the path is completed, the gaps between the bricks are filled with sand. To do this, he spills out onto the path and with a long-haired brush is distributed first over one area, then in another way - and so on until all the gaps are completely filled.
The remaining excess sand is swept off the surface with the same brush.
- Further, when the path is almost ready, the formwork from the boards is removed from its sides. On the outer edge of the path, crushed stone of the middle fraction is poured and carefully compacted, and another layer of crushed stone is freely poured on top of it.
- To brighten the color and prolong its service life, it is recommended to treat the brick with a penetrating primer, and after it dries, cover it with a varnish that is suitable for stone in outdoor conditions.

With some assumption, a variety of such tracks can be considered those that are made of thick ones. How the process takes place is shown in detail in the video.
paving stone prices
Paving stone
Video: garden path laying master class
Round log path
Option number 1

To "paving" the path with columns, you need to take a dried tree of one of the hard species. Round logs should have a flat surface, so they must be cut very carefully.

Then the surface of the stumps is cleaned and leveled.

- For the construction of the path, logs of different diameters are taken, so that it turns out to fill the space of the pit as densely as possible.
The height of the round timber should be twice the height of the walls of the pit, counting from the compacted gravel, that is, the columns should rise above the surface of the soil located around the future path by 100 ÷ 130 mm.
- When the log blanks are prepared, it is necessary to treat their lower part with an antiseptic that will protect the wood from biological pests and the negative impact of ground moisture on it.

This is best done by placing the stumps in turn in a container with liquid and leaving for 3 ÷ 4 minutes. The rest of the surface is simply applied with a wide brush. Before installing the paths in the pit, the round timber is thoroughly dried.
- After drying, the hemp is dipped into the "Kuzbass varnish" for a few seconds - it will perfectly protect the wood from moisture. However, the disadvantage of this composition is that its structure is destroyed by exposure to ultraviolet rays and overheating. However, if it processes only the lower part of the stumps, which will be closed by the wall of the pit, sand, geotextiles and gravel, then such detrimental effects do not threaten.
A regular heated tar can serve as a substitute for varnish, which, when cooled, forms a fairly dense film on the surface of the stumps - it is not afraid of either high temperature or sunlight.
- Prepared round timber from trunks of different diameters begin to install on the rammed at the bottom gravel pit as follows:
- A small amount of sand is poured to the transverse wall of the pit at the beginning of the path.
- Then, the first row of round timber is installed. It must be well sized so that it fits as tightly as possible.
- Sand is poured between the logs to the level of the top of the walls of the pit.

“Such cyclical manipulations continue until the end of the path.
- Along the edge of the path, a sandy border is filled up and compacted.
Option number 2
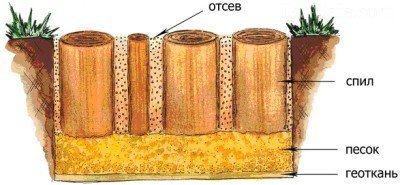
Another option using round stumps, which is arranged in combination with crushed stone or gravel.

In this case, only the curb is mounted from the stumps, and the remaining stages of work with the removal of soil, the embankment of sand and the installation of stumps to the walls of the pit are carried out in the same way as a path completely made of logs. The process goes in the following sequence:
- At the bottom of the pit, a "cushion" of sand is poured and rammed;
- Then, along the edge of the future path, stumps are installed, which are driven into one level and sprinkled with sand. Sand bedding is compacted directly near the bottom of the stumps;
- After the borders of the logs are completely laid out, geotextiles are laid on the entire surface of the track, the edges whom bend on stumps by 80 ÷ 100 mm;

- The next step is an embankment of gravel or medium fraction crushed stone directly on geotextiles;

A mound of gravel is distributed over the entire area of \u200b\u200bthe track in an even layer. If necessary, the layer is increased, since it must be equal in height to the level of the soil of the entire area.

The gravel layer should become the second retaining wall for the stumps in the curb.
- If the top of the stumps have a different color, but you want to achieve harmony in the design of the track, then they can be covered with paint intended for external work, and the shade in this case is selected to the taste of the owner of the site.
Path made of round river stone
 For those who value originality - a mosaic path made of river stone
 Paths with amazing curls are obtained from Altai river stone, which has bluish hues, from very light to dark blue-gray. To make such a wonderful track, you need to prepare round and oval smooth stones of different sizes, clean sand, a rubber or wooden mallet, cement, a sponge, a level, and, of course, water.

The preparatory work takes place in almost the same way as with the construction of a brick path, but with slight deviations.
The whole process begins with the sorting of stones, as they come with a small marriage. If the flaw is not too large, then it can be hidden by turning the stone straight side up.

After going through the stones, you need to choose a pattern that is suitable in size to the width of the track, the base for which has already been prepared. If a suitable one was not found, then it can be easily compiled on your own, using squares as a basis for drawing, into which curls-shells will fit perfectly.
Option number 1
- The drawing from the sketch is transferred to the prepared base. The curl must be placed in the marked square, and it is desirable that this square has from all four sides of the sides, which prevent the mosaic from falling apart.
Since the base is made of crushed stone, the markup can be done with lime.
- The next step is to mix sand with cement, approximately 3:1 or 4:1, add water and make a thick mixture, from which a side is laid out according to the marking, having a width equal to the length of the pebbles. The strips are arranged in small sections to make it easier to equalize the stones in them.
- An oval stone with rounded edges is folded into a small path - it is laid on the side and slightly pressed into the solution.
If the solution has already hardened a little, then to align all the stones, you can tap on them with a rubber mallet.

- When one of the strips is laid out, its evenness must be checked using the building level - there should not be strong protrusions above the general level of the track.

- So, looking at your sketch, row after row, they lay out a similar stone mosaic. It can be used as small oval smooth stones, with their installation on the edge, and round, if they fit well into the pattern being created.

- In addition, you can use different shades of stones, for example, laying out one stripe with light stones, the other with dark ones, or making a smooth color transition.
- Depending on the conceived pattern, the stones can be installed in height. The main thing is to keep constant control with the help of the level.

- After one of the parts of the mosaic is laid out, it is watered with a spray bottle. This will not only strengthen the curing mortar, but also wash away its excess from the surface of the mosaic.

- So, dividing the drawing into separate parts, gradually, in accordance with the sequence thought out in advance, lay out the entire plane reserved for the mosaic. As a result, it should be densely filled with stones.
Option number 2
Another option can be called simpler, since the stones are immediately laid in leveled wet sand, without the use of cement.

However, so that the created composition does not crumble ahead of time, it must be laid out in a limited space. For this, installed borders with temporary partitions can serve, since the mosaic is laid out in parts, or a kind of formwork made of boards, which is removed only after compaction of each of the parts.
- So, curbs, as well as temporary partitions, which will limit the area of work being carried out, are set up and leveled on a base with compacted gravel.
- Further, wet sand is poured into the resulting form, compacted and leveled with a rule. The height of the sand cushion should be 20 ÷ 30 mm lower than the sides of the curb or formwork - it is at this height that the stones will remain on the surface, and the laid mosaic will need to be aligned along the curb.
Lines are drawn on the leveled sandy surface along which the stone mosaic will be laid out.
- It is more convenient to lay out the stones not one at a time, but immediately fold them into a path and, tapping on top with a rubber mallet, deepen to the desired level. If necessary, the sand must be additionally moistened.
When carrying out work, the height of the stones must be constantly monitored using.
- Having laid out a certain section of the mosaic, until the sand has dried, you need to once again walk over the entire surface with a rubber mallet, and then you need to pour more dry sand or a mixture of sand and cement on top. The excess of such backfill must then be immediately brushed off.
- After complete drying of the laid surface, you can once again walk over the surface with a brush.

After a few hours, the sand will compact and sink a little between the stones. After that, you need to repeat the procedure with backfilling and splashing.
- After the next drying of the mosaic, all the stones are washed with a wet sponge.

- The entire composition is wetted with water every day, for a week - this is necessary in order for the track to “gain rigidity”.
- If a work in progress for the installation of mosaics in open space, then in order to avoid blurring it with rain, at night it is best to cover the entire composition with thin foam rubber. It will allow water to pass through, but will not allow sand to be washed out.
- If the work was carried out in the formwork from the boards, after the completion of the masonry and its temporary fencing, it is necessary to strengthen the path by lining it with stones or bricks in the form of a curb.
concrete walkway
For a concrete path, marking is carried out in the same way as described above, and then excavation is carried out along the marked area.
Then, sand is poured to the bottom of the pit, which is moistened and compacted. The final thickness of the compacted layer should be 60 ÷ 70 mm.
Crushed stone is poured on top of the compacted sand, which also needs to be compacted.
A reinforcing grate is installed on the rubble, which will make the path much stronger.

Then, you can do one of two ways, depending on which track you want to get.
1. If a flat surface should be obtained, then a thin one is made, with which the formwork is poured.
- In the case when concrete is poured into the space between already installed curbs, then the rule will need to be made independently, and it must have the same basic form as the one described in the section on sand leveling when constructing a brick path.

- The finished track is reinforced with iron. To do this, dry cement is scattered on a still wet surface with a thin layer, which is immediately gently rubbed with a grout. You can also use commercially available hardening topping mixes.
2. If the path is planned to be made using a form that helps to imitate stone laying, then the concrete mixture is poured into the formwork in two layers.
- The first layer is poured to half the height of the formwork and leveled also using the rule. In this case, a coarse mortar is used, consisting of cement and gravel. The surface should turn out to be fairly even, and in order to achieve this, it is recommended to install beacons of the desired height, and equalize the concrete along them.
- After the concrete has set, a mold is set on its surface and filled with a thin mortar. It aligns with the surface of the form. The form poured with concrete is left to harden for 3 ÷ 5 days.
 Figured shapes for a "paved path" effect
 If there is only one form, then the work, of course, will be carried out for too long, therefore, when using such a technology, it is desirable to have at least two similar forms at your disposal. It should be noted that with their help you can arrange not only paths, but also the floor in the gazebo, the area near the gate or near the garage.
Prices for cement and mixture bases
Cement and mixture bases
Video: an example of using a form to fill a "paved" path
Cover garden paths
A very interesting version of the track - it turns out that it can be made from caps from ordinary plastic bottles. Thanks to their bright, varied colors, they can be used to make various ornamental patterns that will help decorate the landscape of the garden.

The only difficulty that will be encountered on the way of the master who decides to make this work will be the collection of the required number of these "mosaic elements" of the future track.
Having decided to do this work, you need to start collecting covers in advance. While the process with boron is going on, you can think about which pattern to choose for the track and draw up a rough sketch of it.
You should not wait until the required number of covers for the entire length of the path is fully assembled. Having collected a certain number of them, you can begin to mount elements of the future canvas from them. For example, to assemble the fragment shown in the photo, you will need only 19 covers.

A large number of covers are usually found in the summer on the beach. And by the way, you can get three benefits from the collection process:
- at least a little to clean the sand of the beach from foreign objects;
- breathe fresh air while walking along the beach;
- get completely free material for the manufacture of the track.
- To connect the covers in the desired pattern, you will need a “gypsy” needle, an awl, always with a wooden handle, and a large amount of fishing line. A wooden handle is needed due to the fact that the awl will have to be heated on fire so that holes can be easily made in the lids for fastening them together.
- Holes for the passage of the needle are pierced from the sides of the covers, as shown in the photo above.
- First, individual elements are assembled, according to the prepared sketch. , and when several of them are ready, they are interconnected.
- The work on assembling the elements of such a track is quite long and painstaking, but it does not require t ore-intensive preparation of the base associated with earthworks or concrete work.
 In the presence of material and the necessary diligence and patience, it is possible to “pave” quite large areas
 - When the rug from the covers is completely ready, the place for it is prepared as follows:
- marked space for installation, spilled with weed control;
- then, a prepared mat of covers is laid on it;
- so that less soil gets on the surface of the track during operation, it is recommended to install a border of brick or stone along the track;
- for this, the upper soil is removed to a depth of about two-thirds of the brick, and then the space of the trench is half filled with sand, into which the brick is set at a corner and the brick is tapped. The side gaps between the soil and the brick are also filled with sand, which is moistened in advance.
Prefabricated paths made of plastic plates
Mobile garden paths can be laid quickly, without arranging a foundation for them, using special plastic panels.

From them you can assemble a path of any width, as they have fasteners that will allow you to connect them both along and across.

The connecting elements, which are large enough, give the structure rigidity, since every two plates are fastened in two places and serve as a kind of stand-legs.

The advantage of such slabs-panels is not only the speed of installation, but also the fact that their surface is absolutely non-slippery, such tracks can withstand quite large loads, they are very durable in operation.
For the manufacture of plates, frost-resistant plastic is used, which well withstands not only low temperatures up to - 35 ÷ 40, but also high temperatures up to + 45 ÷ 50 degrees. However, leaving such a garden path for the winter does not make much sense - if desired, it can be quickly and easily disassembled, stacked and sent for storage to one of the outbuildings. The tile will not take up much space, and in the spring, the path will not be ore in the shortest possible time to lay it out again anywhere on the site.

The tile has a very convenient size for working with it - it is 570 × 570 mm wide and 570 mm long, and its thickness is 22 mm.
In addition, the convenience of such a tile also lies in the fact that water does not accumulate on it, since there are longitudinal holes on the surface.
By the way, for the winter period, you can lay out a rug from such a tile in front of the front door - its surface is corrugated, which means it will not allow you to slip and get injured.

This option for arranging garden paths does not require much effort for installation, since tiles can be laid both on and on the soil surface. If grass begins to grow through the holes in the tile, the path can be easily moved or disassembled, and after getting rid of the grass, collect it and put it back in place.
"Garden parquet"
"Garden parquet" - quite expensive the type of material that they are used not only for laying on the site, but also for decorating floors in gazebos, on verandas, terraces and balconies.
 Expensive, but very cool - "garden parquet"
 It has characteristics similar to plastic plates. This option is great for laying on garden paths - "garden parquet" is also quickly assembled and disassembled, as it has special fasteners for this, which have their own specific features.
 Fastening tiles "garden parquet"
 Detailed panels can have a different arrangement of the elements that make up its drawing. They are laid on a compacted gravel mixture or fine crushed stone.
 Laying "garden parquet" will never take long
 Such a “parquet” is made from wood treated in a special way and does not react to the usual external “irritants” - it is not afraid of humidity, direct sunlight, temperature changes, biological effects. However, in addition to wood, for the manufacture of "garden parquet" (relatively inexpensive models), special plastic is used, which perfectly imitates natural wood. It is clear that the second version of the parquet tile is much more accessible to the average owner of the site.
So, there is a very large number of suburban paths. After careful consideration, you can always choose the right one for the price, design and complexity of doing all the work yourself. Therefore, if the time comes for planning a site, you need to carefully consider all the nuances and calculate your strengths and capabilities.
Video: A variety of options for garden paths
Walking barefoot on asphalt is less pleasant than walking on seashells, polished cobblestones or logs warmed by the sun. The road surface, without which a metropolis is unthinkable, is inappropriate in a country estate. Almost daily, the owners walk around its territory without shoes, and the kids crawl on all fours anyway.
When gardening, it is important to pay attention not only to the quality care of fruit plantations, but also to remember the general arrangement and appearance of the garden. Do-it-yourself garden paths not only create the convenience of moving around the household, but are also a special part of the overall design. In this article we will talk about the arrangement of tracks with our own hands.
Garden paths - how to combine beauty and convenience
A dacha, a private house, a cottage require not only the arrangement of the interior, exterior, but also embellishment of the area around. Often, owners want to combine practicality and aesthetics in one project. You can realize the idea by laying garden paths.
What you need to know and consider when building
Any design begins with a concept, a thorough study of the area and a plan. The first step is to determine the directions, length, width of future tracks, imagine their shape, decoration. Next, you need to analyze the bearing capacity of the soil in order to choose the right type of building material and only then plan.

It is necessary to draw up a drawing on paper, there will be an opportunity to correct, redo, supplement. You should pay attention to several important factors:
- Component parts must be resistant to the aggressiveness of the environment - high humidity, fungi, corrosion.
- It is good to tolerate temperature fluctuations of different seasons.
- Provide for a possible increase in loads (car, loaded wheelbarrow).
- The optimal angle of inclination of the canvas to avoid the accumulation of water from precipitation.
Advice from a landscape designer - in compact areas it is better to lay not straight garden paths, but with undulating bends and turns. This visually expands the space, deepens the niches for plants.
From what to build a track, each owner decides independently, based on financial capabilities, needs and fantasies. Every coating needs a base. An ideal option would be a compacted earth embankment or crushed stone pillow.

The most popular do-it-yourself materials for garden paths:
- A natural stone. It looks noble, aesthetically pleasing even with non-smoothed corners.
- artificial substitute. The grace of nature, faceted by man.
- Clinker bricks will add bright colors to the garden.
- Gravel or large polished pebbles will provide originality.
- Wood is an affordable, simple, but short-lived species. Looks impressive separately and in composition.
- Decking - garden plastic parquet. New material, resistant to UV, water, mildew, rot.
The decorativeness of the structure to a greater extent depends on the methods of laying blanks. The canvas can be solid, even or consist of separately located elements of different geometric shapes. Having laid out a path of large "leaves", "butterflies", "flowers", it is easy to enjoy comfort and a pleasant walk.

Types of garden paths
Everyone who has a dacha and even a small, but own personal plot, will think more than once about ways to decorate and transform it. There is not always enough money to implement ideas and fantasies. Many will ask: “What then to do?” The answer is quite simple: if you want to ennoble garden paths, but there are no funds for a landscape designer and expensive components, then you should pay attention to improvised and more affordable materials.
For arranging garden paths with your own hands, various types of stones, boards, saw cuts, river pebbles and even plastic bottle caps will come in handy. Now a little about each of the options.
Natural stone walkways
They fit into any site design. They look natural, and with proper styling can last for ages.
These tracks look very impressive. If stones are left after the nearest construction, you can use them. Or those that remain after laying the alpine slide will do. They have uneven shapes, which makes them ideal for a scenic path.
 Natural stone walkway
 Initially, you need to calculate the number of pebbles. One of the methods is a rough layout of stones. So you can estimate whether the amount of material you have is enough.

Sprinkle the place for the track with sand and compact it with high quality. It turned out in some way a "pillow" for pebbles. They need to be processed, adjusted in shape, made more uniform. For good docking and grinding, you can use a grinder or other not too powerful types of tools. Having prepared the stones, they are placed in a mosaic composition.
Since all stones are different in size, they are adjusted to each other with a rubber mallet. At least one of the sides of the stone must be flat for the path to turn out as it should.

When the mosaic is ready, you need to start sealing the seams between the stones. Otherwise, they will start to overgrow. Although some may prefer another option, as natural as possible: a cement-sand mortar is used for grouting.

concrete walkways
They are very similar to stone. First make a bed, the depth of which is approximately 10 cm. Then pour sand on the bottom and tamp it down. Fill the top with a mixture of concrete and sand, set the formwork around the edges. Until the solution has hardened, pour pebbles into it. Lay out the intended pattern from it. A drainage system must be installed next to such a path.
Sometimes a concrete path is made using a ready-made form. It is easy to buy at a hardware store. And then just pour the concrete mixture into the mold in the place you need, level it with a trowel, remove the excess and remove the mold. This is a very easy and fast way, besides, you can lay out such a form at least in several rows.
 How to make concrete walkways with your own hands using ready-made forms
wooden walkways
Wooden paths will serve for a long time, but in the beginning they require care. You can lay them out from sawn boards or timber, using what is left of building a house.
 wooden walkways
 Prepare boards and sticks, the latter can be replaced with steel corners or pipes. Treat them with protective impregnations or bituminous mastic. After soaking, nail the boards to the bars. Mount the track from above, using hemp of various calibers for this. Paint them in one or more colors.
But in domestic climatic conditions, the most modern impregnations will not protect the boards from deformation, rotting and corrosion, therefore, imitation wood is more often used as a material for paths - tiles with an appropriate pattern.
It will be possible to pick up samples so perfect that no one will detect the difference at a distance. It is felt only after tactile contact. The tiles reliably depict the natural texture of pine, beech, oak and other species in the context - as a result, the ersatz is indistinguishable from the original.
DIY gravel garden paths
Gravel is a simple material that has good flowability, allows moisture to pass through, and is relatively cheap. Paths of any width and length can be poured from it, it is even possible to give them a different shape. Such a path looks neat, harmoniously fits into any landscape. Doing it yourself will not be difficult.
 DIY gravel garden paths
 The procedure for the execution of a gravel path
- First you need to mark the track on the site. Marking is carried out with pre-prepared wooden pegs. You can stretch a string between the pegs if you find it difficult to determine the direction "by eye".
- Next, according to the markup, a bed is prepared. To do this, dig a trench in the ground. The depth of the trench can be about 14 - 17 cm.
- Prepare gravel. It is advisable, if possible, to review it and remove unwanted impurities (broken glass, sharp large stones, etc.). Enumerating gravel should be done with thick gloves.
- The gravel is backfilled to the depth of the trench. You can level with a rake or with your hands (also use gloves).
- Next, the laid gravel is rammed.
- At the end, along the edge of the path, you can lay a curb stone. This will give an even more spectacular and finished look. The stone is fixed with a cement foundation. You can lay it either flush with the canvas, or slightly above it.
This algorithm is also suitable for constructing a garden path made of sand. Accordingly, gravel is replaced by sand, and then all work is carried out according to the same scheme.
DIY garden paths made of bricks
This is a very fragile type of material. Before laying it is necessary to check for strength. First, mark the path with string and pegs.
Remove the soil (25 cm), put the drainage below. In this case, it will be simple, but the main thing is that water does not penetrate. Crushed stone must be poured on top of the drainage system. Boards are laid sideways along the edges. Then the brick is laid. You can come up with many different patterns of bricks.
 Clinker path
 The garden path lined with brick chips looks great. It is permissible to pour it on a concrete path. A beautiful mosaic is laid out from broken bricks. If the bricks are of different colors, beautiful patterns are laid out of them. You can leave space between them to fill it with small pebbles, pebbles or soil, so that later there is a green island.
 Homemade brick and stone walkway
 sandstone path
They are made dry or use cement pouring. This method is similar to laying a stone path, and the first one is more natural and original.

Dig a trench, removing some of the soil. Pour sand into it and tamp it down. The middle part should be higher than the edges. You need to go up the slope a bit. This is such a dehumidification system. Next comes the processing of stones.
Sandstone can be of various sizes and shapes. Try on each stone before processing.
Align the stones, making the gaps as small as possible. Processed stones are laid out as you like. For a classic track, you need a bucket of sand and the same amount of mixture with cement. Under each pebble, you must first put the first, then the second. Moreover, the cement should protrude slightly. You need to press the stone firmly. The made path must be washed so as not to spoil the aesthetics with cement residues. Seams are filled with soil or sand.
Walkway made of wood saw cuts
Such a path will look very beautiful and attractive.
 Walkway made of wood saw cuts
 Saw cuts must be taken of different sizes, stacking them so that there is no free space between them. Before laying, the round timber must be treated with an antiseptic composition.
 Saws for a garden path
Another option is to use round timber in the form of curbs, and fill a layer of gravel between them.
Staying in the country, I want to move away from city life, because if not a forest, then a garden, some lucky ones even have a lake or a river. In a word, whatever the surrounding landscape, it encourages rapprochement with nature.
An interesting idea is a path stylized as a forest one. It is fragments of ordinary tree stumps. Round plates of various sizes are laid along the edge of the pond and concreted.

The side of an artificial reservoir is made of them. It is pleasant to sit on such stumps to sunbathe, the contact of the feet with them also gives rise to positive sensations.
Plastic garden paths
Such country paths are sold as modules, ready-made. Their installation does not require preparation and surface treatment. They are very easy and quick to attach, very economical, characterized by durability and long service life. They can be laid out on any site, in the form of any composition. They are environmentally friendly and aesthetic.
River gravel paths
Working with these stones will be difficult, time-consuming and will not end quickly. They are laid in a pre-limited space in wet sand and compacted to the desired depth. The process takes several days.
 River gravel paths
 It happens that the design of country houses is based on the imitation of the styles of bygone times - the ancient era, British classicism, etc. Then you should choose plates ornamented in accordance with the general concept of the site and the residential building. They may have impressions of Mediterranean pebbles, ancient bricks, etc.

Paths from caps from plastic bottles
The most original and interesting way is to lay out the path or part of it with plastic bottle caps. Due to the fact that the covers have a variety of colors, you can make patterns and mosaics, even coming up with whole pictures.
The only negative of this improvised material is its collection, because you will need a lot of covers.
Garden path made of reinforced concrete tiles
Stages of work:

 Do-it-yourself garden path made of reinforced concrete tiles
  Mosaic tiled ceramic tiles
  Paving stones, stone path
  The slabs are laid on a layer of sand, lawn grass is sown in between. Mowing is carried out with a conventional electric lawn mower. The photo was taken 3 years after installation.
 These are just the basic materials from which you can make country paths with your own hands. Human fantasy is limitless, so by the next summer season, they will probably come up with something else. Paths for summer cottages are made by hand from any, sometimes unexpected material. For example, from glass bottles. You can create combinations of different types of material in one composition.


Remember that such paths carry not only convenience and benefits, but also beauty, joy for the eyes, harmony. Imagine, invent, create.

The independent choice of materials for garden paths and the driveway to the cottage is sometimes difficult. Then you just need to set aside time for a scrupulous study of catalogs or a means for consulting with specialists. The result will justify all these costs.
Video master classes


The first thing that meets us behind the country gate is the garden path leading to the porch. From it in all directions: to the bathhouse, and to the garden, and to the garage - similar trails and paths scatter. It is always more pleasant to walk on a durable, well-groomed surface, especially when grass or clay soil is wet from the rain. Let's forget about designers and try to make garden paths with our own hands, and for this we only need desire and building material, affordable and inexpensive.
There are no classifications - both by material for manufacture, and by location, and by size. We will take a division into types based on the method of device.
garden paths
This is a natural look, as the paths appear on their own, without special planning. Usually they are trampled by the feet of people or rammed with wheels of garden equipment and serve to connect the most important points of the site - houses, baths, gardens, gardens, gates. The usual dirt trail has disadvantages (mud after rain, puddles, overgrown with grass), so it is only possible as a temporary option. The path, by the way, can also be ennobled: it is enough to lay out a curb of cobblestones or paving slabs around the edges.
Garden paths - the best option for sites located in dry areas
Paths with a backfill base
It is easy to arrange them: you should dig a ditch, about 100 mm deep, lay out geotextiles along the bottom and edges (density of at least 150 g / m²), strengthen the sides with border tape. It will remain on the finished base to fill in pebbles, crushed stone, marble chips or screenings. If this option seems simple, you can additionally lay stone or concrete slabs on the surface - in an orderly or chaotic manner. For ease of movement, the plates should be drowned in the backfill so that they are flush with the surface.

Having picked up gravel or crushed stone of different colors, you can decorate the paths or divide them into zones
Solid fill tracks
The durable coating is ideal for heavy loads. Paving of garden paths takes place on a concrete base with further laying of decorative elements on it: tiles, paving stones, natural stone. The use of material of different colors gives the decor a natural look. It is better if the finished object will rise above the ground by 50-70 mm - this will save it from erosion by water and soil deposits.

Paths made of slabs or stone, laid on a concrete base, are reliable and durable.
Use in the work of saw cuts and bars
A budget and favorite option for summer residents is wooden garden paths. The most popular are two types:
- using wooden bars;
- from wood chips.
If the climate is more dry than wet, you can use wooden blocks or thick boards, which are easy to purchase at any hardware store. It is better to stay on hardwoods. Identical segments are cut (100 cm long, 30 cm wide and 15-20 cm thick) and laid on a prepared base - gravel or sand.
Each bar should be treated with fuel oil or a special compound that protects against moisture and decay. For the same purpose, liquid asphalt is applied to the underground part of the bar, and sometimes a standard sand cushion is arranged. Such combined coatings are best laid in the fall, since in winter the soil subsides, due to which natural compaction is performed.

For paths made of wooden blocks, it is better to use fine gravel or crushed stone.

Using saw cuts of different sizes and colors, you can create unique track options.
Old fallen trees in the country are a real find for craftsmen. By sawing the trunks into pieces, from the resulting elements - saw cuts - you can make wooden garden paths that look equally good, crossing the lawn or winding among the flower beds. Not only trunks will be used, but also thick branches, with cuts from which it is convenient to fill the voids between large elements.
Screening strengthens individual elements, and the geofabric protects the path from grass sprouting
In order for wooden products to serve for a long time, they need to be treated on all sides with hot drying oil, it is better to repeat the procedure twice. A piece of geotextile or polyethylene is placed between the saw cut and the ground.
A short master class on laying paving slabs
With the help of pictures and descriptions, you can imagine how to make a noble and durable material.

Irregularly shaped paving slabs look more natural than straight ones.
For work you will need:
- wooden mallet;
- rubber mallet;
- stakes;
- Master OK;
- building level;
- cord;
- rake;
- broom;
- watering hose;
- channel;
- manual rammer.
Materials: paving slabs (thickness 50 mm or 60 mm), curb stone, crushed stone (fractions 20-50), dry mix for plaster or cement M400 (M500), sand, geotextiles.
Now consider all the stages of work. The first stage is planning. It includes the creation of a drawing, the choice of a laying scheme and the shape of curly elements, the choice of a color (or several colors). At the same time, they calculate the number of tiles (including spare ones) and the consumption of the rest of the material.
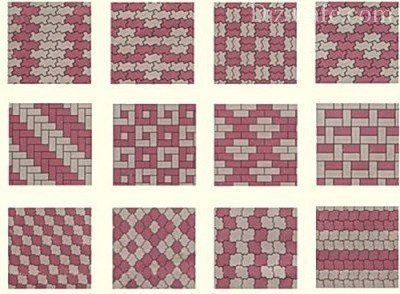
There are many schemes for laying paving slabs based on the alternation of products of different colors.
Next, we do the markup. The accuracy of actions is one of the conditions for proper installation. A tape measure, pegs and a cord will help to determine the boundaries of the work. Sometimes it is necessary to walk along the intended path in order to understand how it is more convenient to lay it.

For the installation of a paving slab track, the accuracy of marking and the sequence of work are important
After marking, it is necessary to prepare the base. First you need to cut to a depth of 20 cm the top layer - turf. If the soil is clayey, drainage will help. Then you should create a sand or gravel cushion and a cement (concrete) screed.

A multi-layered base under the tiles is necessary so that the track is strong, does not settle and is not washed away by water.
Geotextiles can be laid between layers of sand and gravel, making the structure more durable. The top layer is a dry mix purchased at a store, or a self-prepared composition of sand and cement. The layer of the mixture (3-4 cm) should be leveled with a rake and a channel.

Uniform distribution of the cement mixture is carried out using a conventional garden rake.

The channel for leveling the surface can be replaced with an ordinary wooden beam
Now we are laying the tiles. The laying direction is away from you, so as not to spoil the base. Products should fit tightly, but with a gap of 1-2 mm. Each tile must be rammed with a wooden mallet. At the end, you should check the level and trim with a rubber mallet. First, whole elements are laid, and only at the end paving slabs are cut and the missing pieces are laid.

For high-quality laying of paving slabs, simple tools are needed - a rubber mallet and a wooden mallet

For ease of installation, first of all, whole products are placed, leaving voids along the edges

The voids along the curb are filled with pieces of tiles of the required size.
A border is laid out along the edges, fixed with a solution of M100 and covered with sand. The seams between the individual elements are covered with a sand-cement mixture, which is then moistened with water from a hose. Add the mixture to the places where it sank, and repeat watering. In 2-3 days the track will be finally ready.
DIY garden cement paths
Video instruction from 7 parts for working with ready-made forms
Paths made of natural stone: durability for centuries
Spectacular stone garden paths can be made from the material left after building a house or home decor, such as an alpine slide. The picturesque paths are created due to the uneven shape and different sizes of stones.

To create a beautiful path, stones of different sizes and colors are suitable.
The first stage is the calculation of the number of large stones. To do this, they can be laid along the future path. The basis for laying is a pillow of sand poured into a shallow ditch, directly on the ground.
Perhaps, for joining the stones, their processing will be required. A grinder or a more serious tool will help. There are two ways to arrange the finished material: in the form of a pattern (relief, mosaic) or in a chaotic manner, alternating large stones with smaller ones. If you do not fill the seams between the stones with a cement mixture, after a while they will be overgrown with grass. This option is also possible, it looks more natural.

The diagram indicates the approximate thickness of each layer, which should be adhered to during installation.

The combination of stone of different types and plants is an example of a path suitable for a Mediterranean-style site
Stone paths and paths are appropriate when creating a landscape painting of any style.
A modern touch - the use of plastic modules
If there is no time to build a solid stone or tile covering, but there is a desire to quickly install paths in the garden with your own hands, you can use a temporary option - garden plastic paths. Ready-made modules, most often the same in size and color, are sold in the store.

The color of the plastic modules is chosen depending on the area on which they will be laid. Most often these are green or black products.
In addition to low cost, plastic tracks have other advantages:
- retain their shape and appearance for a long time, wear out slowly;
- have holes so that water does not accumulate and go into the ground, that is, they do not form puddles and do not create a smell;
- plastic is practically indestructible;
- do not require constant care and attention, they are well cleaned and washed with water from a hose;
- resistant to chemical attack;
- quickly mounted and assembled according to the principle of the designer;
- equally easy to fit on any base - sand, turf, clay.
At the end of the summer season, plastic modules are dismantled, washed, dried and stored in a utility room until next year.

Plastic paths are a good option for creating temporary paths on lawns

Paths in a summer cottage are created not only for practical use, but also for decorating the territory
In addition to the options listed, there are other types of garden paths - brick, parquet, concrete blocks, as well as all kinds of combined options. The basic rule for choosing the material for the track: it must be combined in texture and color with the house and other buildings.