How to make a wicker fence in the country with your own hands
A wicker fence is a very interesting fencing of a site or a decorative fence of a front garden inside a backyard or summer cottage. The technology of making wicker fences has been preserved since ancient times, when wattle was the most common type of household fences.
The traditional wicker fence is made from improvised means - existing branches, vines, sticks. In modern landscape design, wicker fencing is regarded as environmentally friendly and natural, meeting the requirements of aesthetics and satisfying the artistic taste of the gardener. This is a subject of national Slavic color, a fashionable element of the garden, and a fence fence available for execution.
How to make a wattle fence in the country with your own hands? What technological features need to be known and taken into account for high-quality performance of work? Let us dwell in more detail on the traditional technology of weaving from branches and vines cut from trees and shrubs.
Weaving material: selection and preparation of rods
For the manufacture of wattle, it is necessary to prepare two groups of raw materials: supports and rods. As supports, you can use wooden poles, thick branches (6-8 cm in diameter), metal pipes. Rods need long, flexible branches diameter from 1 to 3 cm(the higher the fence, the larger the diameter of the intertwined vines).
As a raw material for weaving, breeds of fast-growing flexible branches of willow or willow are traditionally used; poplar, maple, birch are also suitable.
In the garden or in the country, you can use cut branches of flexible fruit trees: mulberries, cherries, cherries, walnuts, apple trees (if they are long enough), such raw materials are growth non-fruiting branches of one or two years of age. The time for harvesting branches for rods is spring, before the start of sap flow. You can cut branches in the summer, in dry hot weather, when the movement of juices slows down due to lack of moisture. Cut direction - oblique, under 40-60º.

In the photo - a wicker fence made of vines
Weaving tyn is best from freshly cut vines; they remain flexible for a week after cutting. You can try to soak old, long-cut branches in containers with hot water (for example, heat water in the sun in an outdoor pool) or steam it in a bath. You can prepare a vine for the future for future weaving, for this it is kept in thick sections in water for 1 week, after which the bark is removed with a special tool (pinch) and the branches are dried. After drying, raw treated with stain and varnish.
If it is planned to use cane or cattail wattle, its color can be formed by pre-drying conditions: when the raw reed is dried in the sun, the stems acquire a golden hue, and when kept in the shade, they retain a light green color.
Installing the base for a wicker fence
Wooden supports needed impregnate, burn, tar, especially those ends that will dig into the ground. Larch poles, which do not rot even in water, will be ideal supports made of wood. A well-known fact: Medieval Venice was built on larch.
The depth of the supports depends on the planned height of the fence and is 50 cm for a 1.5 m fence or 30 cm for a meter fence. Low decorative wattle fences can be driven into the ground by 15-20 cm.
The distance between the supports in the fence usually corresponds to 40-50 cm (depending on the thickness of the rods), the thicker the rod, the greater the distance between supports can be left. It is desirable to place the supports at the same distance, or all of 40 cm, or all of 50 cm. Along the edges of the planned wattle fence, the last three supports are located at a small distance: 20-25 cm. Such a seal will help to fix the vines during further weaving.

Twig weaving
The prepared rods are woven into the fence between the supports in turn. The lower vine is fixed at the beginning of weaving in one of two ways: either with wire around the frame, or by digging into the ground by 10-15 cm (for this, the edge of the branch is vertically stuck into the ground). Subsequent vines, especially the upper ones, are fixed only with wire around the frame.
As a rule, each vine has a thicker edge (the one that was closer to the trunk) and a thinner end. The laying of the branches must begin from the thick end, then the current branch remaining at the end is imperceptibly tucked along the support between the already laid vines.
When weaving vines, every 3-4 rows they are compacted by tapping a hammer.
If weaving is done from cattail (reed), you can lay not one stem at once, but an armful of 5-6 stems. In this case, the panicles are pre-cut. 
All edges and cuts are left on the inside of the fence. To increase durability, the finished wattle can be varnished.
Wicker fence decoration
The wattle in itself is a good decoration of the site, but if desired, you can additionally decorate it.
- You can enhance the country style by hanging clay pots and dried peppers, ripe ears, a beautiful orange pumpkin, as well as overseeding sunflowers (sparsely, randomly).
You can fix a wooden wheel from an old cart near the tyne or put a house made of dried pumpkin with windows and doors. - You can enhance romance by hanging baskets with fresh flowers (petunias, violets, marigolds, border chrysanthemums). The existing plastic pot is placed inside the wicker basket and suspended from the fence support from the outside or inside.
Another option for a picturesque flower decoration would be to plant curly small flowers along the fence: bluebells, large clematis or climbing roses. - You can expand the rockery by figuratively laying stones along the tyne.

Types of wicker structures for site fencing
The traditional wattle construction of supports and intertwined branches can be varied in the form of weaving and the material of the vines.
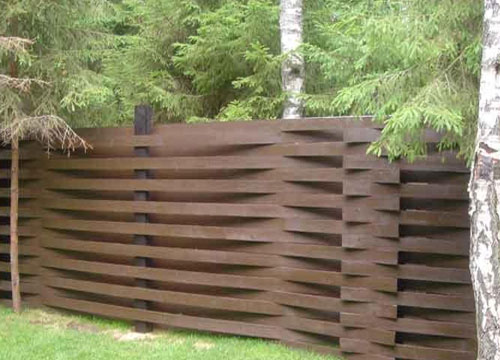
- checkerboard. Horizontal bars are stacked not one at a time, but in a group. With this weaving, a checkerboard pattern is formed.

- vertical weaving. For such a fence, three or four horizontal planks of a wooden beam or tree branch with a diameter of 5-6 cm are rigidly attached to the installed supports. The rods are stacked in a vertical direction, intertwining between the horizontal planks.

- Checkerboard diagonally. This version of the fence is more difficult to manufacture, you will need the skills of weaving and screwing self-tapping screws into the wood material. On the upper wooden frame, fixed between the supports, rods with a diameter of 4-5 cm are attached to self-tapping screws, with a distance of 10-15 cm. The fixed rods turn into a diagonal. Between them, in the direction of the opposite diagonal, other rods are intertwined.

- Veneer weaving. Most often performed as a prefabricated panel structure. In each block (shield), four frames are twisted, on which supports are attached. Veneer cuts go around the installed supports, forming a wattle fence. The veneer is fixed with metal clips or short nails.

- Reed wattle. It is a vertical fence made of bundles of reeds or cattail. There is no weaving in it, there are vertical supports, horizontal cross-beams and bundles of reeds, tightly reinforced with wire to the horizontal beams. Before fastening, the reed or cattail is cut and knitted into sheaves with a diameter of 4-5 cm.

- Wattle from boards. For such a fence, long boards with the minimum possible thickness are used, it can be unedged. The supports are installed at a great distance: if half a meter is observed in a conventional fence between the supports, then for the wattle fence from the boards, the supports are 1-1.5 m apart from each other. The existing boards are laid end-down between the vertical supports.

A wicker fence will become the most original visiting card of a summer cottage. If necessary, it can be a decorative decoration of a concrete slab or old brickwork.
The speed of construction of the wattle fence can affect its durability. Draft tyn, made in haste, will require repair in 1.5-2 years. Correctly made wattle from tree branches, varnished or other protective coating, can last up to 10 years.
The strength of wicker fences is inferior to stone fences, but it gives extraordinary beauty and a feeling of something unusual, old, kind.
Video about the construction of wicker fences
The video shows how to quickly and correctly make a wicker fence yourself:
Today, a do-it-yourself wattle fence serves more as a decorative decoration on the site, although wicker boards or an overgrown hedge create a reliable obstacle to intruders entering the territory.
The simplicity and natural beauty of the rustic style are becoming more and more popular every day in the design of country houses and personal plots. And more and more often, a variety of wattle fences, tyny, hedges or wickerwork are used to protect the territory or decorate the site. In ancient times, a fence woven from thin rods or branches was the most common type of fence.
Varieties of wicker fences, what to make and how to install a wattle fence?
Making a wicker fence with your own hands is easy and not expensive. Traditionally, wattle is constructed from improvised materials: flexible tree branches or thin rods and stakes. Most often, the wattle fence is installed on the site to delimit the space in order to protect the flower bed or beds from animals or create a secluded place to relax. Having decided for the first time to do fence weaving, making a low border for a flower garden will be a good master class before making a tyn with a complex pattern.
Types of wattle
Quite conventionally, wicker fences are divided into groups according to different criteria.

Preparation of material for wattle
For a wicker structure, it is necessary to prepare two types of material.

Wattle in the country


Having properly prepared the rods, you can make wattle from hazel, cherry, apple, willow, aspen or birch. Branches should be cut in early spring or late summer, when sap flow is slowed down in plants. Freshly cut vines remain flexible for a week. It is better to remove the bark from the branches with wire cutters, a pincer, or a home-made device made from a thick branch with a crevice. Elasticity to dry branches is given by weekly soaking, steam or hot water treatment. If desired, you can enhance the brown color of the rods by adding a little potassium permanganate to the water, and bleach with hydrogen peroxide. Vitriol will give a grayish tint to the wood. Reed stalks turn golden when dried in the sun, and after drying in the shade, they retain a pale green color.
The low decorative fence made of thick branches looks original. You can make a rare fence out of them only immediately, until they dry.
The formation of a drainage cushion of sand in the pits for the installation of wooden supports and along the entire length of the wattle fence will prevent wood decay. Through the sand, water will seep faster into the lower layers of the soil and will not have a devastating effect on the wooden fence.
Wicker boards
 A more durable wicker fence will be the "Austrian" wicker board. With a high resin content and affordable, pine boards 20-25 millimeters thick and up to 10 centimeters wide are more often used. For the manufacture of pillars for this fence, a wooden beam or more durable and strong supports made of profiled pipes, sheathed with a board, are used. The length of the span between the supports from 2 to 3 meters is determined by the flexibility of the board. 3-5 intermediate bars are installed between the pillars.
The plinth and fence posts can be laid out of stone or brick, and between them install ready-made sections of horizontal or vertical wicker. Impregnation with an antiseptic agent and varnishing will extend the service life of the wicker structure. Stain can give a wooden fence any color. It is important to know that if weaving from a raw board, then after drying, gaps of 5–10 millimeters are formed.
How to make wattle with your own hands?

Artificial sunflowers and clay pots put on pegs will add national color to the wicker fence. Gardeners will be pleased with the flower beds, fenced with an elegant vine of thin vines and flower beds-baskets woven with their own hands. Having mastered chess weaving, you can decorate your suburban area with an exclusive gazebo or an original canopy over a bench.
Living wattle
An unpretentious willow with easy care can become a beautiful hedge.
Thin twigs cut in early spring, after standing in the water for about a month, will give roots. And already in early May they can be planted in the ground. For a living weave, willow cuttings are planted at an angle, weaving them into a mesh network. The growing branches are woven into the hedge or carefully cut with secateurs. A cheerful green wattle fence will organically complement the rustic exterior of a country house.
The technology of weaving a fence from a vine has remained unchanged since ancient times, when this type of fence was the most common type of fence. Today, wattle is used more as an element of landscape design, characterizing the national Slavic flavor.
How to choose and prepare the material for weaving? What technology should be followed when creating a fence? We will dwell on these and other aspects of the manufacture of the fence in more detail.
Features of wicker homemade hedges
A wicker fence is an interesting option for fencing a front garden or zoning a plot inside a backyard space. Fence fabric is made from a variety of available materials. It can be a hazel, willow, willow or vine branches. Decorative hedge is a component of landscape design and gives the garden a special flavor.

- Among the main advantages of a fence made of vines or other models of "braiding" include:
- High decorative and aesthetic qualities. By combining fences from different materials or different weaving methods, you can create an original design.
- Ease of manufacture. Weaving technology does not cause any difficulties. The main thing is to properly prepare the rods and adhere to the chosen scheme.
- Environmental friendliness of the mini-building. Thanks to natural components, the fence looks organically in the garden, near the gazebo, in the flower bed, etc.
- Affordable cost. If you stock up the rods yourself and do all the work, then the fence will turn out to be very cheap. Possible costs: consumables and the purchase of missing tools.

Despite weighty arguments in favor of a wicker fence, skeptics note some of the disadvantages of such a fence:
- "Pletenka", even from durable materials, is not a complete protection of the site from intruders. Therefore, a fence made of rods is installed mainly for the purpose of zoning a personal plot from the inside.
- Limited period of operation and susceptibility to adverse weather conditions. With strong weaving, the service life of the fence will be no more than 7 years.
- Fire hazard of the fence.
- The difficulty of restoring the damaged area. If one or two rods break, the fence will have to be partially dissolved and twisted.
Varieties of wicker fences
All options for a wicker fence are classified according to the main parameters:
- material of manufacture;
- the size of the finished product;
- weaving method.
Manufacturing material. Braids are made of reed, cattail, hazel and willow. Vine fences are especially popular. More durable models are made of veneer and boards - such a tyn forms a dense panel with a minimum number of gaps.
PVC fences are increasingly common in cottage and summer cottages. Plastic fences are less whimsical to weather conditions, but they are inferior in attractiveness to counterparts made of natural materials.
Wicker fence dimensions. By height, all fences are divided into three types:
- Low products up to 1 m are suitable for fencing flower beds, garden paths and playgrounds.
- Medium fences 1-1.5 m high visually divide the space into different functional zones. For example, the pool area can be fenced off from the rest of the yard.
- High fences - more than 1.5 m. Such fences are installed around the perimeter of the site, acting as a full-fledged fence.
Weaving methods. When arranging the site, the following methods are most often used:

- Vertical weaving - the rods rest on the ground. If you use vine shoots, then over time a hedge with green leaves will form.
- Horizontal weaving is one of the easiest options. Flexible rods are laid along the ground between the installed supports.
- Inclined method - the branches of the canvas are fixed diagonally to each other. Such a fence looks very interesting and does not overload the space at all. Oblique weaving is recommended for shaded small areas.
- Chess way - horizontal bars are placed in groups. The product is difficult to manufacture, additional fixation with self-tapping screws is required. It is better to entrust the creation of a braided checkerboard to experienced craftsmen.
When choosing a material for creating a fence, it is necessary to evaluate the advantages and disadvantages of each of them.
Willow has good strength and flexibility. For the construction of the fence, any kind of "weeping" tree is suitable. With the help of willow, you can create a hedge using young shoots of a tree. The buds on the branches develop rapidly, and the fence is overgrown with leaves.
Cattail and reeds are available and easy to process. However, the material is short-lived due to low strength. Thickets of reeds can be used in the construction of low fences intended for zonal delimitation of space. The main disadvantage of reeds is strong flammability. In hot weather, a carelessly tossed cigarette can start a fire.

A hazel wattle will last up to 10 years. The harvesting of material is carried out in early spring, when the buds have not yet ripened on the branches.
Weave a fence with our own hands: a horizontal design
Selection and preparation of vines for the fence
The following types of vines are best suited for work:
- Beloloz - willow grows on moist soil, it is distinguished by greenish or yellow shoots. During heat treatment, the rods of the vine become bronze in color.
- Hemp willow - greenish-brown branches are very flexible. To build a fence, three-year-old shoots must be used.
- Goat willow is the best option for weaving a fence. The main advantage of the material is the smooth bark.
Important! For the "weaver" it is undesirable to use a willow. The shoots of the red-colored willow have a small core, so the fence will turn out to be dilapidated.

If the rods are used uncleaned, then the workpiece can be performed year-round. If the bark is planned to be removed, then it is necessary to cut off the shoots in October-November with the onset of the first frosts. At this time, the kidneys hide inside, and the rods become smoother. Starting from January, it is not recommended to cut the rods - they become viscous.
There is an easy way to choose a vine for a fence. Bend the cut branch at its thickest point. If the shoot has not cracked and has withstood a 180° bend, then the vine bush is suitable for work.
Rules for cutting rods:
- shoots 2-4 cm thick are suitable for weaving.
- the cut must be made with a sharp pruner at an angle of 60 °.
Vine preparation:
- Remove the bark from the shoots.
- Rods cut in autumn or winter should preferably be boiled for five minutes. In this case, the bark does not need to be removed.
- The temperature regime for storing blanks is above 0°С, but not more than +35°С. The best place is a dry insulated attic.

Immediately before weaving, the “spring” vine must be taken out and dried in the sun for three to four days. Shoots that have overwintered in the attic must be soaked in order to restore flexibility to the material.
Development of a drawing of a wicker fence
Before you start work, you need to decide on the weaving pattern. The drawing must display the length and height of one canvas, the number of racks and the distance between the supports.
Typical drawings of a wicker fence are shown below.


Preparation of materials and site marking
For work, in addition to the prepared rods, you will need the following tools and materials:
- support poles - wooden stakes, metal pipes or rods are suitable;
- manual drill for mounting racks;
- garden pruner;
- wire for forming hedge stiffeners;
- pliers;
- mallet;
- wood preservative.
Clean the site for the installation of the fence from excess branches and debris. Level the surface and mark the places for the installation of support pillars.
Installation of support legs

At the same distance from each other, drive in metal stakes, the depth is about 50 cm. If wooden supports are installed, then drainage must be done under them - fill the pits with sand. The lower ends of the wooden racks must be treated with an antiseptic before installation.
The stakes must support the weight of the finished hedge panel. The thicker the rods are used and the taller the building is, the wider and stronger the supports should be.
Weaving a fabric from rods
Sequencing:

Advice. If the vine is laid in bunches, and not one shoot in a row, then the fence will turn out to be more fundamental and reliable.
How to weave a fence correctly: video
Instructions for weaving a vertical fence
With vertical weaving, thick rods and branches are used. The work is carried out according to the following technology:
- Install vertical support poles.
- Tie or nail horizontal branches to stakes. The optimal distance between the bars is 25 cm.
- The vine is consistently stuck into the ground, intertwined with horizontal rods and cut off on top.

Willow twigs take root easily and by next spring the fence will be green. After two years, the hedge will grow, become denser and stronger. The hedge requires maintenance. Overgrown branches must be cut and formed into the correct shape of the wattle.
Ways to decorate hedges: photo ideas
The rustic style will be complemented by the corresponding paraphernalia: clay pots, jugs, figurines of pets.

Wicker baskets that act as a flower bed look beautiful next to the hedge.

Ampelous plants are often planted next to vine products. Petunias and other flowers grow, wrap around the fences, forming a picturesque hedge.

Complementing the landscape composition with a fence are wooden barrels, wagons and other elements from rural life.

Wicker fence. How to make a wattle fence with your own hands in the country: photos, videos of making.
Wattle - a fence made by weaving flexible rods of branches. The method of weaving in the manufacture of hedges has been used by our ancestors since time immemorial. You can make a wicker fence yourself, it will create an original rustic flavor in your summer cottage.
Here are some photos of the wattle fence in the garden.
The design of a wicker fence consists of vertical pegs driven into the ground, and rods are alternately intertwined between the pegs.
What to make wattle stakes from?
Since ancient times, our ancestors preferred walnut stakes, walnut has a fairly strong wood structure, and when it dries, it becomes very light. But it is not at all necessary to use a walnut, stakes can be made from any wood, it is advisable to use hardwoods - mulberry, apple, pear, birch, oak, acacia.
The height of the fence can be any depending on your wishes, but usually it does not exceed 1.5 meters, the stakes must be driven into the ground to a depth of half a meter. The distance between the stakes is also half a meter.
It is important that the distance between the stakes is the same.
We measure the length of the future fence and calculate how many stakes are needed for the fence.
We make stakes from even branches, the thickness of future stakes should not exceed 5 cm, side branches should be chopped off with an ax or cut with a large knife. We make the lower part of the stakes sharp so that it is easier to hammer them into the ground.
To make the stakes last longer, the bark must be cut off from them.
If the stakes are stuck into the ground without first being treated with a protective compound, they will rot in 2-3 years. Therefore, that part of the stakes that will be in the ground must be processed, you can cover them with bitumen, resin, engine oil waste, an antiseptic, or just char a little on a fire.
Stakes need to be hammered into the ground about half a meter, the height of the stakes can be the same or different. If the fence is up to 1 meter high, then it is enough to hammer the stakes into the ground by 30 cm.
What to make wattle? For the manufacture of a wicker fence, flexible branches of vines, willows, willows, birches are suitable, you can also make wattle from hazel, mountain ash. The thickness of the branches should be no more than 3 cm, the length should be sufficient for braiding at least 3 stakes.
The branches must be freshly cut, dry branches lose their flexibility and cannot be woven. The cut must be made oblique.
Now let's start weaving the fence.
How to make a fence with your own hands photo.
We alternately weave the rods between the stakes, we begin to weave the thicker part of the rod, so that later we can hide the thin part in the braid.
A wicker wooden fence is a good idea for country houses or. Such a structure gives authenticity to the house. Let's look at how to prepare the material for the hedge and how to assemble it.
Low, medium or high?
As a rule, wicker fences are divided into several types depending on the purpose. Fences are used as a decorative element small height (up to 1 meter): they enclose the tracks on and.

For zoning a site into small areas, a fence is well suited about a meter high. Thanks to such a fence in the garden there will be no feeling of a closed space, and at the same time it will emphasize the boundaries of the plots.
Large fences are used to protect the outer perimeter of the site, about two meters high. Depending on the material used, the fence can last a different number of years. So, for example, from cattail or reeds, your fence will last no more than a few years. To make it last longer, about 10 years, use willow, hazel or vine as a material for making.
Important! If you want the fence to serve you even longer, you should treat it with an antiseptic.

How to make a decorative fence
Base preparation
Harvesting is best done in spring or autumn. But if you urgently need to make a fence, then you can prepare branches in the summer: they you need to take even and smooth. To collect the vine, it is recommended to use a sharp knife and cut the vine diagonally. After the required amount of material has been collected, the branches are tied into a bundle and dried. When dry, the branches can be stored for a long time.
Before building a fence, the branches are steamed. This procedure gives them flexibility, making the fence easier to weave. You can not soar the branches, but dip their ends into a container of water. It is best to soak for two weeks. After that, it is easy to weave a fence.
If you planned to make a hedge from freshly cut branches, then the leaves can be left. The support of the hedge is usually made of branches. Pre the bark is removed from them, and the lower cut of the branch is treated with tar or any other type of antiseptic. This is done in order to slow down the process of decay of the support.
Choosing branches
To build wattle, you need natural materials that do not require trips to hardware stores. In addition, such fences are much cheaper in cost.

for weaving use a flexible vine, branches and other materials. Willow branches are especially often used, they have high strength and grow everywhere, besides, do not think about the type of willow, since all types of this tree are suitable for weaving.
When cutting willow in low-lying, often flooded places, choose smooth, elastic rods that are not affected. Harvesting is usually carried out in early spring or late autumn.
Did you know? The highest fence in the world was built in the Republic of South Africa in the 80s of the XX century: it was intended to protect oil storage facilities from terrorist attacks with rockets and reached 290 meters.
After cutting, tie the material into small bundles, which are then must be dried under a canopy on the shelves. An important point in the preparation of material is the correct choice of the length of the vine. You can use another branch as a yardstick.

Equally important in a wicker fence is the support system, which is usually made from thick branches (young trees) at least four centimeters in diameter. The height of such supports should be 50 centimeters more than the fence, since the ends of the supports are driven into. Thick pine branches are well suited for this, which are pointed at the bottom and driven deeper into the ground.
weaving process
The weaving process is not so complicated - the rods prepared in advance need weave between several supports. The lowest vine must be fixed by sticking the end into the ground by 15 centimeters, or by screwing it to the support with wire. Further, the remaining branches are simply tied to a support or frame with a wire.
The branch for the fence will have a thick and thin end, the one that was closer to the top. It is necessary to properly lay the branch from the thick end, while the thin end is braided around the support between the branches laid earlier.
Every 4 stacked vines, they must be tapped with a hammer to seal the weave. If you use reeds for weaving or weave bundles of 5-6 stems with wire, plant panicles should be cut in advance.
Important! Cuts and edges of the wicker fence must be left on its inside. If you want the wattle to last a long time - cover it with varnish.

Fence Installation
The ends that will be dug into the ground must be strengthened by treating the supports with impregnation, firing or resin. Best fit for supports. Due to the fact that it does not rot even in water, the whole of Venice is built on it.
If you plan to put a fence a meter high, bury the supports 30 centimeters into the ground, a higher fence will require more depth. If you use small hedges in landscape design, you need to deepen their supports by at least 20 centimeters.
Should choose the right distance between the supports, which will depend on the thickness of the rods. If the branches in the wattle fence are thick, the distance between the supports should be left from 50 centimeters.
It is advisable to maintain the same distance between the supports throughout the fence, only install the supports at a distance of 20 centimeters from each other along the edges of the fence. Sealing around the edges will secure the vine during further weaving.

Did you know? The wicker palisade in ancient times was erected as a temporary fortification around the fortresses and castles under construction until the stone walls were built.