To begin with, a lover of self-made furniture should learn how to create a stool, since this is the easiest. And then comes the time to study the issue of creating a table.
Table designs vary, however, the simple version is very similar to the process of making a stool.

A simple table for use in the country or during a picnic can be assembled in just a few hours. To do this, you need a hacksaw, hammer or drill.

However, a table based on a similar approach can also be made for living quarters. Because it is able to perfectly replace the current very large version bought at a retail outlet or furniture store.

The process of self-creation of the table is also interesting from the other side, since with the help of it there is freedom of the author's creative expression. It can be imagined as a noticeable element of the interior of the room.
The creators of handmade amateur furniture are called carpenters for a reason. They do not apply the usual definition like: sofas or bedside tables, or maybe cabinets.

Having gained experience in this area, over time it will be possible to create exclusive types of tables with advanced characteristics.

Now consider the issue of self-creation of tables based on wood.

Wood is distinguished by its purity and availability, in addition, it is not as difficult to process as other materials. It conveys the maximum energy of the aesthetic filling of the style of the living room.

Due to its properties, it is condescending to the mistakes of beginners in the field of self-creation of furniture. However, thinner versions of the tables will require an advanced level of skill.

To begin with, having learned how to work with wooden things, then it will be easier to use as a material: glass, plastic or even metal.

Selection of tools and premises for work
To engage in the independent creation of tables or other wooden furniture elements, it is necessary to use only non-residential premises.

This is due to the specifics of working with wood. It leads to the formation of a large amount of dust, chips and other waste.

And the process of toning or creating protection for a stain-based material can form dangerous emissions into the air. Actually, nitro-varnishes can also be dangerous.

Because of this, for a personal carpentry workshop, you will have to take care of airing the room. Experts advise creating artificial ventilation of the room.

Many people use the garage for this, however, production waste can pollute or damage the car because of this, this is not the best option.


Carpentry tools belong to modern and traditional types
For the most part, you can start with a simple carpentry tool, however, later modern versions may be required in the form of:

- A rotary version of the miter box, which helps to create saw cuts based on two planes, adhering to the required size.

- This tool will reveal all its useful properties, first of all, with a bow saw. This couple is considered universal, it can be useful for many jobs.

- A manual version of the universal electric jigsaw, featuring a tilting shoe to help create cuts based on the desired angle in relation to the vertical plane.

- Disc version of the grinder. It will help beginners complete the surface treatment of wood in about 5-15 minutes. An experienced carpenter, along with sandpaper, can do the same job in about an hour.
And there is also a conventional belt grinder for grooves with recessed places, which is distinguished by a protruding version of the working part.


Such tools are distinguished by the price and narrow specialization of the work, experienced craftsmen recommend taking them for a short rental period.

The best specialists, using various sanding machines, can even create the effect of artificial aging of wood, however, this is a very difficult job, as for beginners.

Which tree is the best?
To create a wooden table, any wood that has an average resistance to the rotting process will work well, however, you should refrain from soft versions like: poplar, willow, ailanthus, aspen, and even alder.

From domestic types of wood it is best to use:

- soft options in the form of pine, fir, cedar, horse chestnut, plane tree, juniper or spruce.

- solid in the form of an ideal oak, suitable for many works of beech, maple, walnut or ash, larch, as well as fruit species represented by apples, plums, pears, apricots and quince. And also here it is worth including elm and mountain ash.


- rather hard species based on acacia, yew, stone birch, dogwood and boxwood.

Conclusion
You want to decorate the table and probably all types of furniture created by yourself with an artistic version of the painting, and not with ordinary stripes.

However, over time, the pattern may deteriorate, so that this does not happen, it is necessary to rub the paint into the depth of the tree before the varnishing process. This can be done on the basis of technology - glazing. We are talking about layer-by-layer rubbing of the paints used.

DIY table photo


Making furniture with your own hands is not only a way to save money, but also an exciting thing. You can bring to life the most daring ideas, for example, create a coffee table. After all, this is not only a stylish accent in the interior, but also a functional element of the room.
The procedure for making a table at home is as follows:
- We take a bar with a section of 5x10 cm, saw it into three parts, several pieces each. For example: the length of the first part is 130 cm, it is necessary to cut 9 pieces of beams with this length. The length of the second part is 21 cm - 12 pieces. The length of the third part is 34 cm - 2 pieces. You can first make a drawing of the table.
- The beam is placed in three rows. At this stage, it is necessary to leave a small gap in order to place the legs of the table there later.
- We remove two rows from the top. We begin to move the rest of the beam. So the table will get an original appearance. Then we make markings for the transverse parts.
- We lay the extreme bars of the second row and put marks for cuts. Cuts can be made with a hacksaw or saw. Then we fix the bars with screws.
- Let's move on to the third row. Slightly shift the details and fix them.
- Empty spaces appeared under the table top. They are for legs.
- The table must be treated with a protective compound.

Original coffee tables
Every person wants to have an unusual table in their apartment so that it fits into the interior of the room and pleases the eye. This piece of furniture can be made from any material: wood, chipboard, boxes, etc. Let's look at a few of these options.

Waste paper table
If there are old magazines and newspapers in the house, there is no need to rush to throw them away - perhaps they will serve you as material for the table. True, the design of the interior should be appropriate. By making furniture in this way, you can choose the desired and convenient table height for you. Process making tables from old newspapers and magazines growth:
- We take waste paper and turn it into a tube, fix it with rubber bands.
- We dilute the water-polymer emulsion. And put folded paper in it for 2-7 minutes.
- Then we dry the paper.
- We glue the fart cabinet with glue, you can take PVA. Dry in an upright position, securing with a thread in advance.
- We make the markings of the strips and cut them off.
- We glue the glass tabletop. The glass must be 12 mm thick.

Gallery: coffee table (25 photos)


Stylish log table
This method is more difficult in terms of execution than the previous one. The main elements for creating a table will be logs. The basis is a wooden box, preferably on wheels. After that, it must be furnished with logs. For marking, a home-made thickness gauge is also used. After sawing off all unnecessary elements, you do not need to throw away sawdust. It is better to collect them in any pallet. After that, the rounds are glued to the face. Sawdust must be mixed on liquid nails. The mixture should resemble plasticine. Using a spatula, it is necessary to wipe all the cracks between the rounds. Then, the product must be removed from all sawdust and dirt, sanded and varnished.

DIY coffee table (video)
Creative side table
Make this table it will be difficult on your own, but still possible. The main thing is to follow the rules of manufacture. For the design, you must take any type of wood. You choose the height yourself. Such a property of wood as softening during dry heating is taken as the basis. Then the form is saved. More about manufacturing:


 This table option is for those who love functionality and beauty in one item. With the help of simple manipulations, able to change height and appearance.
When assembled, this is a regular table for various waste paper. One has only to lift the two sidewalls with legs, as it changes its usual size and turns into a dining one.

The basis of another transforming system includes metal frame-pedestals. They are attached to the table top. In their usual position, that is, in the assembled position, they lie horizontally, it is worth changing the size, then the lid rises and rotates on hinges and melts vertically.

When unfolded, the size of the structure is 73 cm. This height is acceptable for a computer desk. Before making a transformer, you need to make a drawing.

DIY coffee table
To make a coffee table, you need to take a sheet of chipboard. Its thickness is 16 mm. Make a markup: find the center at the intersection of two diagonals. A nail is driven into the center, for which a thread with a pencil is tied. With it, you can draw a circle. If you want to make a table of a different shape, then draw bends. After that, the shape is cut out using a jigsaw. The edges must be sanded.

The legs of the table are attached with screws. Paint the tabletop in the color you want.

Table on wheels
 If you have never made tables with your own hands, then you can try the easiest option. Consider the manufacture of a model from chipboard. For its manufacture does not need a lot of knowledge and skills and expensive materials.
You can order saw cut laminated chipboard.
For the manufacture of the structure you will need: a table top, planks, a shelf, a bottom, wheels, plastic corners, self-tapping screws, confirmations. When all the necessary materials are available, you can proceed with the assembly:
- First you need to make a shelf.
- Connect the tabletop and planks to the plastic corners. It turned out vertical strips, on which it is necessary to attach a shelf with the help of a confirmant. To keep her strong. the same must be done with the bottom.
- Attach the wheels with screws.
- At the very end, it is necessary to seal the attachment points with self-adhesives.

As we have already found out, it is not difficult to make a coffee table at home. The article presents options that everyone can handle. Over time, you will be able to create the most original designs.

The height of the coffee table according to GOST should not exceed 50 cm, but no one forbids adjusting it for yourself. For example, the height of the transformer can be 73 cm. It is also worth noting that the table should fit your interior. Making such a piece of furniture yourself is a fascinating process that will also save you money. A little imagination - and you already have an original product.

It would seem, how can a coffee table surprise a modern person? A long-forgotten item in many apartments can no longer be found. A modern person loves space, remembering that they often stumble over a bulky table, here and there newspapers and unsolved crossword puzzles are lying around. What now? It turns out that coffee tables not only have not lost their relevance, but have also become an ultra-modern piece of decor, craftsmen make masterpieces with their own hands. And yes, there are even annual exhibitions dedicated only to this type of furniture.
Read in the article
Yes, what is it like today, a modern coffee table that has survived more than one generation of Russians. The answer is not so simple at all. The only thing that sometimes unites this name is only a collective phenomenon, relating to a certain type of furniture with quite understandable tasks. The rest is a problem.


Sometimes it seems that a person is slightly distraught and drags all sorts of rubbish home. And no…. This is also a piece of furniture art.

It would seem that there is no rational grain in this chaos. But no! It turns out that each of these samples must meet both aesthetic standards and correspond to a certain functionality.
Indeed, for factory products there is a whole list of norms and specifications. For example, they must be stable and safe. Forms - "perfect, providing usability." And the materials should be simple and environmentally friendly. In fact, a coffee table is one of the simplest designs. With this, looking at some amazingly simple and elegant masterpieces, you can’t argue.

Simple, but how elegant! Another recommendation that furniture makers talk about is that the coffee table should be assembled and disassembled. More complex models may have pull-out cabinets, for example, like this. And although some of them are slightly non-standard, such a table will definitely attract the attention of guests.


Another requirement is the accuracy and cleanliness of assembly and fitting of elements. Here again questions arise. And if the table was practically not processed. How to be in these cases?

You will be surprised, but each table that left the factory has a long history of creation. From a simple sketch to a whole pile of papers. All details must be unified. That is why in Soviet times, factory tables created such a dull impression.

And it's great that today there are enough art workshops, videos and other ways to exchange information and knowledge in order to try to spy on really interesting projects to create such small works of art.


The main thing to remember is that the coffee table really needs to be stable and safe. And even the same as in the photo.

How to prepare do-it-yourself drawings with dimensions for a coffee table
Drawings are the most important part of working on your own table project. Here it is important to choose the golden mean between functionality and originality. You can take ready-made drawings as a basis, and there are a huge number of them today, and already in the process of work, modernize it. Variants of schemes that may come in handy during work.


And here is how a seemingly ordinary, at first glance, table can be turned into a small front garden. The main thing is to imagine in advance what your table will be, and the decision will arise by itself.


Advice! To build your own drawing, prepare a piece of paper, a pencil and a tape measure. With a centimeter, you need to measure the area of \u200b\u200bthe space where you plan to put your creation. Based on the data obtained, prepare a drawing.
A schematic drawing is the basis for further work on the creation of furniture. The drawing will help you choose the right basis for the structure, calculate the load on the frame, prepare the required number of corners, screws or clamps, as well as supports or legs on wheels. Do not forget that in the drawings, in addition to the dimensions of other materials, the thickness of the countertop is indicated.
What materials can a coffee table be made from?
A coffee table is most often made from one or two types of materials. Usually it is both metal and glass. However, there are hundreds of solutions to imagine what your dream could be and what it could look like.


The most important thing here is to think over all the elements in advance. Sometimes you have to work with each of them separately. Plastic, glass, metal - all this can become an important part of your art object.
table top
How to make a coffee table from chipboard
To make a simple table, you need to purchase sheets of chipboard. For work we need. In general, the work process resembles the previous instruction, with the only difference being that in the case of sheets, they are attached to the corners.
Advice! If you do not have a jigsaw, then cutting work can be done right in the store. To do this, you just need to name the dimensions of the blanks.
Shelves can be fixed on confirmations. To screw them in, we pre-drill holes with a 4.5 mm drill. If you have questions about the best way to make a coffee table, you can watch this tutorial video.
We make a glass table with our own hands
A glass table will make yours light and airy. Very often, such a technique is resorted to in small rooms so that this piece of furniture does not clutter up the space. In some cases, tabletop painting is allowed.
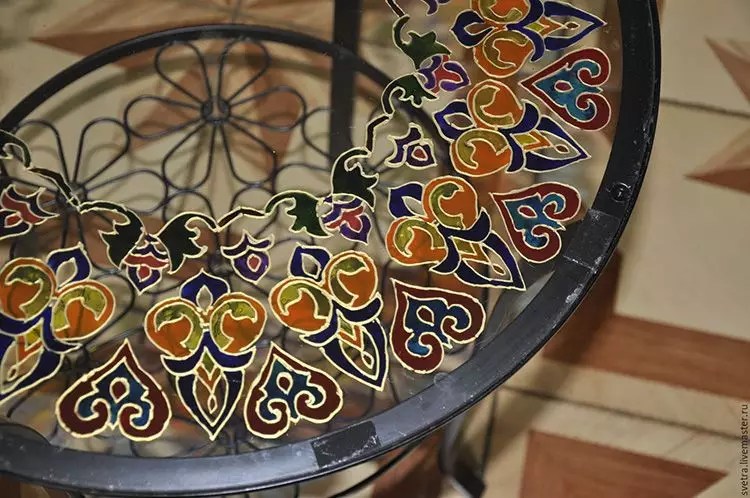
Particular attention should be paid to the quality of glass fasteners. To do this, there are special fixing systems that prevent damage to it.

Making your own coffee table from improvised materials
Despite the abundance of ready-made solutions, in our country, the use of unnecessary things for solving quite mundane tasks has always been considered a favorite pastime. Some crafters share ways to use unexpected materials to create furniture.
Tire table
Tire products are especially popular - they are convenient to install in summer cottages and. Here are some options for such non-standard furniture.

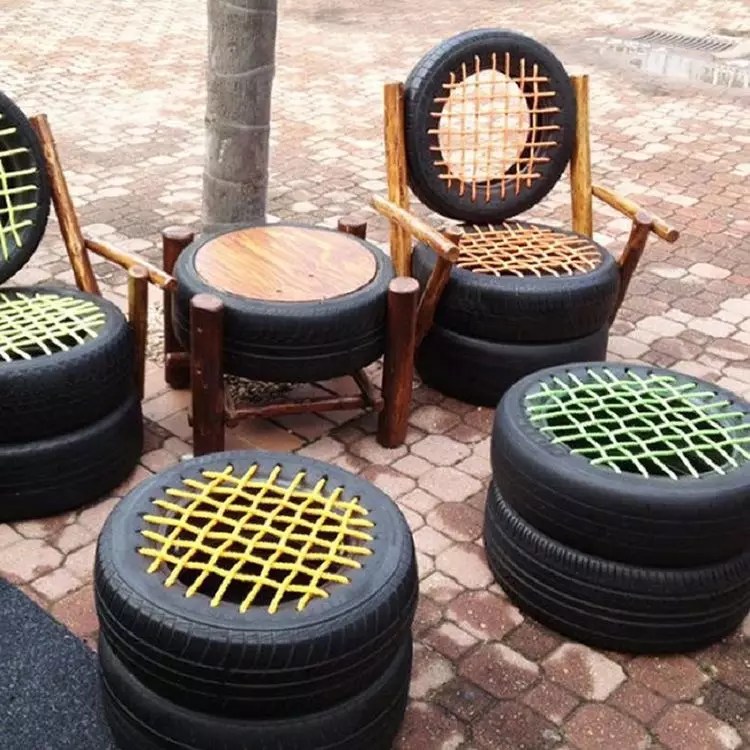
Some masters manage to hide the presence of a junk item with the help of simple, but very effective tricks.
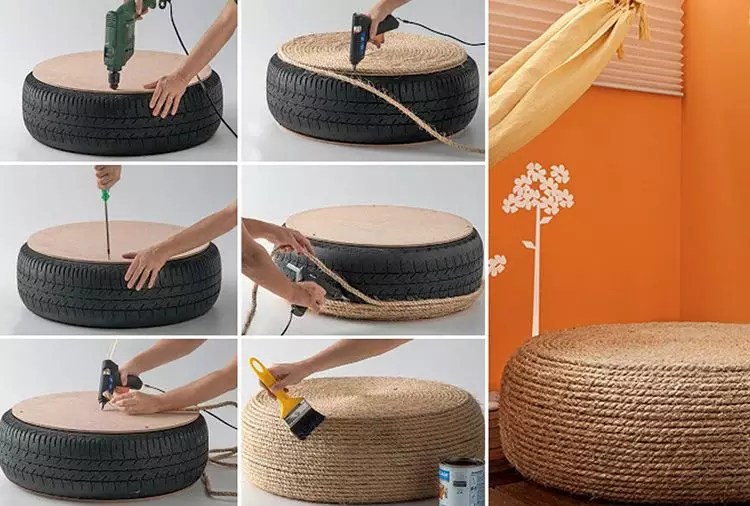
Table-suitcase
Very often, an ordinary travel suitcase is used as the basis for a coffee table.

The main task is to ensure reliable fastening to the base. By itself, such a table will differ considerable functionality.
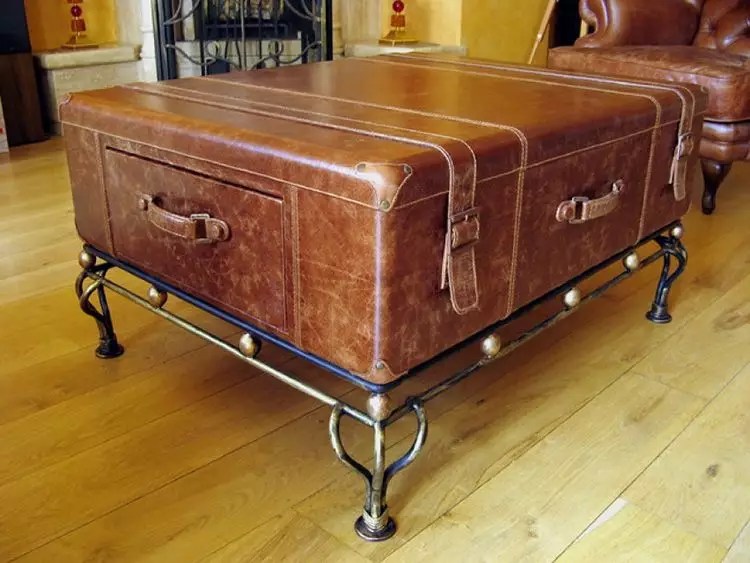

Such tables practically do not require additional processing, and fastenings to the base are very versatile. They can be mounted on a wooden base, tightened with straps to a metal frame.
How to make a coffee table with additional elements with your own hands
And now consider the order of assembly of a simple table. This master class is quite simple to implement and does not require special skills.
Table on wheels
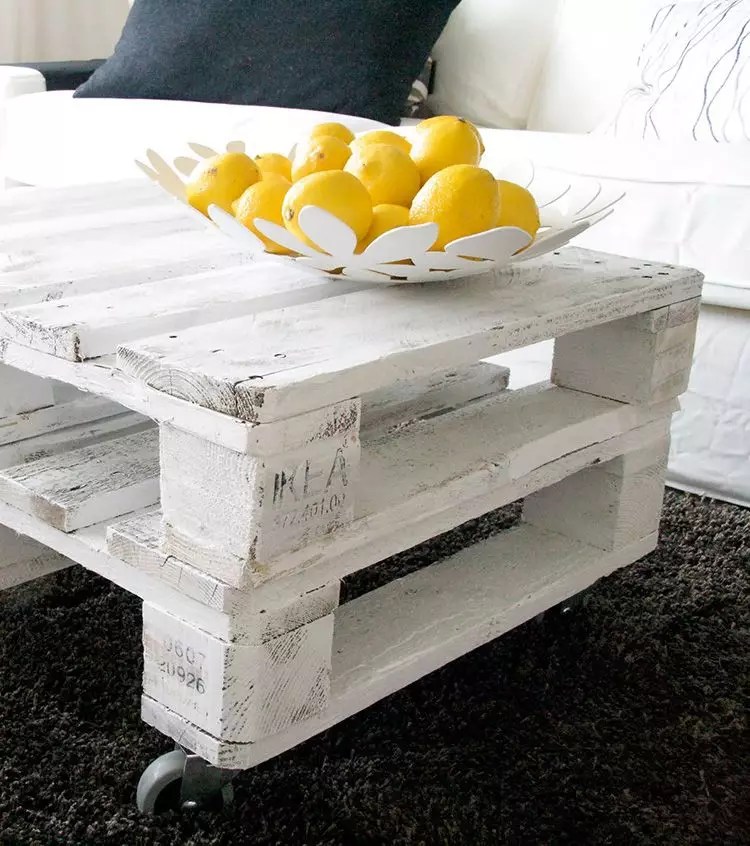
So, today we will analyze how on wheels from old wooden boxes for vegetables or pallets.
| Illustration | Action Description |
 | According to tradition, we will prepare the tools and necessary materials for work. |
 | We begin the assembly of the base, for this we lay out four boards in parallel, fix them with perpendicular segments of the boards. |
 | We fasten all the elements with nails. |
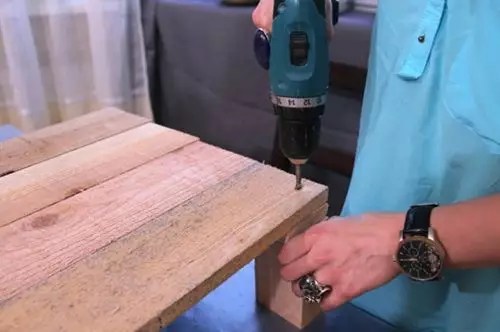 | We fasten the connecting elements that form the frame of the pallet. |
 | We fasten the top of our pallet. Now it's time to move on to decorating. |
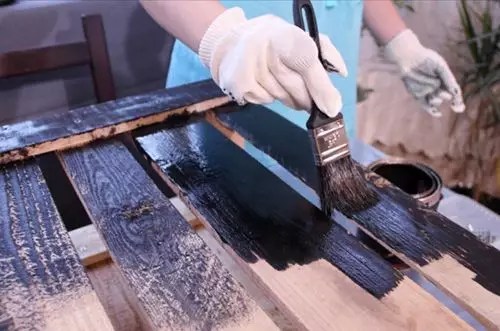 | For coloring, you can choose any color that is close to the desired range. |
 | From suede or leather we prepare an element for fasteners. The material must be strong enough not to tear. |
 | We braid a pigtail. And fix it with screws. |
 | This is how our coffee table turned out. |
Table with drawers
Drawer design is considered one of the most difficult for beginners to perform. Take a closer look at how diverse the options for retractable systems can be.
Choosing a coffee table. Advantages and disadvantages of each material. Which table to choose for your interior? Do you need shelves and drawers in a coffee table? Photo ideas for inspiration: a transforming table. We make a coffee table with our own hands.
Material choice, pros and cons
The coffee table is considered the most functional and versatile piece of furniture in any interior. It is present in almost every living room. Often it can be found in. The coffee table will fit even on yours if you like to sit there reading or working on the computer. With its help, the space will become more comfortable and aesthetically more beautiful. We will tell you what types of coffee tables are divided into, what materials exist for their manufacture, as well as the pros and cons of each.


| Classification: | Classification characteristic: |
|---|---|
By form; Height; According to the material from which the frame is made; According to the material from which the countertop is made; Depending on the mode of travel; Depending on the presence of a folding mechanism. | Circle, oval, square, rectangle, triangle, polygon, arbitrary (unusual) tabletop shape; The average height of an ordinary coffee table does not exceed 50 cm (however, there are models of lower and higher tables); Wood (snag, stump), glass, metal (forged products), plastic; Wood, chipboard (laminated), “wickerwork” (vine), fabric or leather upholstery, tempered glass (including tinted glass), plastic, veneer, metal sheets, mirror surface, stone, mosaic; On wheels (mobile) and without (stationary); Tables-transformers or ordinary. |


The coffee table is considered the most functional and versatile piece of furniture in any interior. It is present in almost every living room. Often it can be found in a spacious bedroom.
from wood
Wooden coffee tables are the most popular option that can easily fit into almost any interior. It is enough to choose a shade that will be in harmony with the rest of the furniture in this room. It is desirable that the decoration of such a table was made in the appropriate style.


From glass
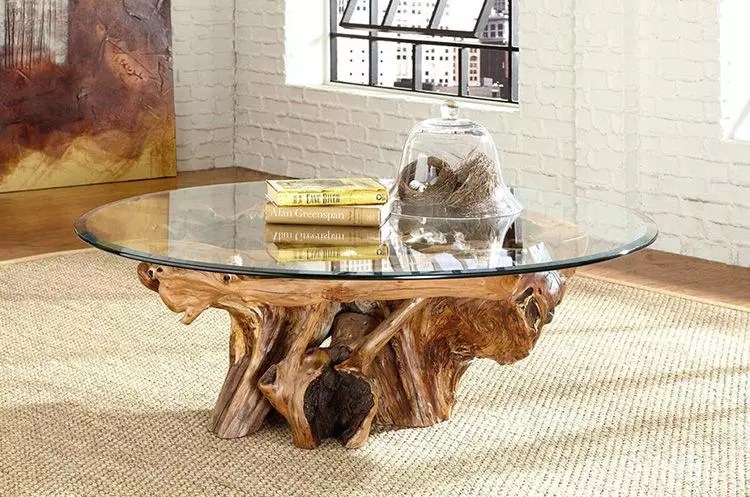
Decorating their home in a modern style, people began to pay more attention to models of coffee tables made of glass. They look quite "airy" due to their transparency. Nevertheless, the most unusual materials can be selected as a support at such tables - tree snags, deer antlers, corals and others.


metal
The metal is difficult to process, which is why the models of such coffee tables are expensive. They are also heavy in weight, which makes it difficult to move them around the room. But they are durable, they are not afraid of any damage.


Choosing a coffee table depending on the overall style of the room
Look at the examples of interior design, including the presence of a coffee table, in the catalog - you can see how diverse they can be (in form, materials, decor elements and purpose):


When choosing a coffee table for the living room, clearly consider what “duties” you assign to it.
Classical
The most ordinary small coffee table made of wood will best fit into the classic interior. An exception can only be the bright decor of the base and legs of the table, matched to match all other pieces of furniture and decoration. It is very important in such situations to take into account the careful selection of wood tones so that the furniture looks like a single set.


Provence
Pastel shades of furniture are considered a feature of the Provencal style, including naturalness (unpainted wood), carved legs at tables and antique design (artificial aging) are no less popular. For example, coffee tables that are massive in size will fit better in a large living room. But for a small room, small models are ideal. If you prefer French style, then these tables are for you:


Country
Most ethnic styles (by the way, which include country music) amaze with original ideas and unusual use of the most ordinary materials. Some surprise with bamboo models, others with multi-colored complex mosaics made of small shells. Country, on the other hand, is able to accept a table made of roughly hewn wood or logs into its interior. Also in appearance, models of this style are represented by the roughness of the surface of unpolished wood. See for yourself:


Modern
Where there is truly no end to the design fantasy, it is in a modern style. Fortunately, materials for the manufacture of such coffee tables can be found everywhere - wood, stone, glass, metal, plastic. The most important thing is to observe the conciseness of forms and lines. A little creativity and a unique coffee table will appear in your interior.


Pop Art
The main task of the pop art style is to remake ordinary things into something from the realm of fantasy. By creating such “works of art”, this style allows you to transform the gray everyday life with bright decor elements. Coffee tables are no exception. Designers do not spare inspiration, I improve existing simple things.


Loft
The presence of rough metal details and rough-hewn wood, as well as the creation of a peculiar kind of "street furniture" - this is all loft style. It is original and brutal. At the same time, everyone likes it without exception. If you see a coffee table resembling a cart, know this is also a loft. Many ideas came to the minds of designers when they visited "specific" places - semi-abandoned old factories and manufactories, it was there that they drew their inspiration.


Coffee table-transformer
When choosing a coffee table for, clearly consider what “duties” you assign to it. If you need a decorative element of the interior, then take a closer look at the tables of an unusual shape, which are often offered by various designers. However, if you want to get not only a coffee table, but also a dining or computer table in one person, then you should look at folding models -. With some effort, in just one minute, you can turn your nondescript coffee table into a full-fledged dining area for several people. Isn't that what you dreamed of?! It is great if such a model is on wheels - this will facilitate the movement of the table around the room.
![]()
![]()
![]()
![]()
![]()
DIY transformer table:
Coffee table as an element of the storage system
Its very name - "magazine" says that this table is designed to store magazines, as well as books, newspapers and other small items (remote controls, phone chargers, etc.). In order not to clutter up its surface, most models have shelves or drawers that create additional storage space for the necessary things. Such elements of the storage system will not necessarily be located outside - in front of everyone, they can also be built-in (hidden, secret), which only you will know about. Here are just a few models with original ideas:


DIY coffee table - video and drawings

| Materials and tools: | Progress: |
|---|---|
Prefabricated parts made of fiberboard or wood. 2 wheels. Special glue for wood. Drill and drill bits for it. Electric screwdriver, screwdrivers. Jigsaw, wood saw. Screws and dowels. Roulette and level. Sandpaper or grinder. Wooden hammer. | We cut out the details according to the drawing. We make holes for the tongues in a rectangular partition and in the center of the base of the countertop, at an approximate distance of 10 cm. Now, at a height of 36 and 48 cm, we make 2 holes on the partition itself for the subsequent fixing of 2 semicircular shelves on it. You can install dowels. We assemble the table, after making sure that the overall structure is even. We disassemble it again and make several holes in rectangular blanks (36, 48, 23 cm). We proceed to the final assembly. To do this, we sequentially assemble - the base, the central and lower partition, semicircular shelves, the upper partition and the tabletop itself. We assemble with a wooden hammer and tongues, planted on glue. We complete the assembly process by attaching the wheels to the screws (during the subsequent movement of the table, they should not touch the base). Everything - the table is ready! |
We invite you to watch a few videos with vivid examples of original coffee table models that you can make without leaving your home.


Making furniture with your own hands is not only a great way to save money, but also an opportunity to put your creativity into practice!
It's about making coffee tables with your own hands. Too many side tables do not exist. They can be placed next to the sofa to place a vase of flowers or a mug of tea, used as a bedside table or as a stand for houseplant pots. However, monotonous wooden tables are unlikely to revive a dull interior. I want something stylish and unexpected ...
Stylish do-it-yourself table made of wooden slats
This bench can serve as a coffee table, extra seating, or space for houseplants. Such a piece of furniture will “fit” well into almost any interior!

DIY coffee table photo
Materials:

Tools:

Step one: Using a hacksaw, cut the ends of two 2.5x7.5cm boards at a 45 degree angle. Cut out fragments from 2.5 × 5 cm bars, the length of which will correspond to the internal length of 2.5 × 7.5 cm blanks.

how to make a coffee table with your own hands. A photo
step two: Place 2.5x5cm blanks in the middle and 2.5x7.5cm around the edges. Make sure the ends of the inner rails are aligned.

Step Three: Measure the distance between the outermost 2.5x7.5cm boards and cut two blanks of this length from 2.5x10cm boards. They will serve as the lower supports for the bench. Secure them by screwing self-tapping screws into each longitudinal rail.
Step Four: Using the Kreg Jig, drill two pocket holes at each end of the support rails. These holes will be used to connect to the 2.5x7.5cm end pieces.
Tip: It's hard to give specific recommendations on how far from the edge to attach the Kreg Jig. This depends on the length of the screws used, the exact thickness of the board, etc. We advise you to pre-practice on unnecessary scraps of boards.

unusual coffee table with your own hands. A photo
Step five: Place 2.5x7.5 cm blanks along the edges of the structure. After making sure that their ends are at the same level, fix them with clamps.
Tip: If you are using softwood (such as pine) to make the table, place unnecessary scraps of boards under the clamp supports. Otherwise, traces of clamps will remain on the wood.
Step six: Securely attach the 2.5x7.5cm end pieces to the base of the bench by driving 3.5cm wood screws into the countersunk holes you made at the ends of the support rails earlier.

wooden coffee table. Master Class
step seven: Measure the width of the finished base to determine how long you need to cut 2.5 × 7.5 cm blanks for the ends of the bench. We recommend that you take a sip with a small margin in length, and then take your time to grind off the excess until you achieve the perfect fit.

Step eight: Moisten the ends of all rails with water and apply a small amount of Gorilla Glue.
Step nine: Install the end boards in their intended place and wrap the entire structure with a belt so that it does not fall apart until the glue dries. For reliability, you can additionally fix the ends with a few finishing nails.
Step ten: Sand the surface of the bench with 120 grit sandpaper to eliminate any unevenness at the joints. All gaps in the seams and recesses from the heads of nails (the latter must be recessed into the wood without fail) fill with putty. When the putty is dry, sand the surface again, this time with 220 grit sandpaper.
Step Eleven: Paint the bench. We advise you to sand the surface again before painting with 400 grit sandpaper and water.

Step twelve: On the lower support rails, fit the special mounting plates for attaching the legs. When fixing them, make sure that you drill holes in places where there are no already screwed screws. The distance from the mount to the edge of the bench base should be about 2.5 cm. Screw the legs themselves into the mounts.


Coffee table made of copper pipes. Master Class
The material for the manufacture of the next table can, perhaps, be called the most unexpected. This time we decided to tell you how to make a table out of ... copper tubes with your own hands.

Materials and tools:

The figure below shows all parts (pipes (A-E) and various fittings (F-H)) with their dimensions and quantities. All that's left for you to take pipe cutter and sit in front of the TV, which will brighten up the tedious cutting process a little. It's not hard, just a little boring. 😉


When all the blanks are ready, you can begin to assemble the lower part of the table. How to do this is shown in the figure.

Having collected the lower tier, you can proceed to the upper one. The only part not listed in the parts list are four pieces of 2.5 cm pipe that are placed in tees at the top of the corner posts. Without these inserts, you will not be able to put on decorative caps, because. the latter have the same diameter as the tees.

Reliable connection of the tubes to each other will ensure glue, but we recommend applying it only after the preliminary assembly of the structure, i.e. after you make sure that all the cut tubes are of the right length and fit well with each other.

Wooden shelves, which you can pre-paint if you wish, are fixed with special clamps that are placed on the underside of each board. Now you are ready to decorate your home with your new DIY table!


DIY lightweight cement table

Concrete countertops and other interior elements have recently become more and more popular. However, for all their attractiveness, they are not without a number of shortcomings. First, pouring large amounts of concrete can sometimes be quite expensive. Secondly, if we are talking about small side tables, another serious problem comes to light - such furniture turns out to be too heavy. On the one hand, there is a desire to get a good, solid thing, on the other hand, I want to be able to move a table made by myself without the help of professional movers. The found solution can be considered an insight.

Materials and tools:

Step one: Mark and cut the foam sheet. From a 120x240 cm piece, you can cut 18 squares 40x40 cm. Stacking them on top of each other, you get a 40x40x45 cm box.

do-it-yourself foam board. A photo
step two: Glue the cut pieces. 3M Super 77 spray adhesive is ideal for this. It is best to perform this stage of work outdoors. Don't forget to wear gloves and a long sleeve shirt. Apply an even layer of glue to one side of the first square, then do the same with the second. Wait ~15 seconds, then connect the squares, making sure their edges are joined. Repeat this until all the square blanks are connected into a single whole. Wait about 30 minutes before proceeding to step 3.

Step Three: Now the most interesting thing ... giving the resulting parallelepiped the outlines of the future table. We decided to make a table in the shape of a cylinder. You can come up with something more original or, on the contrary, keep the original block with right angles. Cutting foam is easy and fun. At first, your design will have a rough, angular look, but don't worry! After the table has been given the desired shape, it will be time for grinding. Using sandpaper 36 grit will quickly smooth out any bumps. As you get closer to the ideal, gradually move to sandpaper with a finer grit size. Don't aim for a super-smooth surface, at this stage it's just a matter of getting the desired shape.

Step four: The surface of the future table is polished, it is time to cement it. The first coat, applied throughout the foam mold, will fill in the voids and texture of the foam. You only have ~20 minutes, so act fast so you have time to iron out the bumps. When the applied cement mortar dries, you can apply the next layer. The number of layers depends on how smooth and even the surface you want to have in the final (as a rule, four to five layers are required). It should be remembered that the smoother the surface of the final layer before it dries, the less it will have to be sanded!
Tip: When preparing cement mortar, follow the manufacturer's instructions. You should not prepare more mortar than you need to apply one layer (for example, we used 220 ml of water and 450 g of cement). Make sure you don't forget to cover your workbench or workshop floor as this is a messy job.

Step five: After the last layer of cement has dried, you can sand the surface if desired. We wanted to achieve a glossy finish, at least on the top of the table, so we sanded it down using a variety of grit sandpaper, ranging from 100 to 2000.
Tip: If you are planning this operation, get a protective mask that will help you protect your lungs from cement dust.
(The table made in this project turned out to be very strong and strong, but at the same time it weighed no more than a kilogram.)

Do-it-yourself stump table
The material for the next table sometimes literally lies underfoot. Even residents of megacities, if desired, will be able to find a suitable stump.

log table. A photo
Materials and tools:
- wooden block;
- white acrylic paint;
- manual grinder;
- chisel;
- a hammer;
- decorative upholstery nails;
- molar tape.
Step one: Find a table base! This should not be an old rotten stump, but a freshly sawn block of wood. Let it dry for at least 6 months (there's nothing worse than waiting, but it's necessary) until the bark begins to peel off the trunk.
Step two: Using a chisel, gently remove the bark from the log in a downward motion. If the stump is dry enough, you won't have to use too much force.
Step three: Using a sander with medium grit sandpaper, sand the surface, removing the remaining bark and smoothing out sharp corners. Do not forget to sand the surfaces of the lower and upper cuts. Wipe the wood with a damp cloth.

Step Four: It's time for painting. We used a white semi-gloss paint that includes a primer (we needed three coats for full coverage). You can choose a different type and color of paint, focusing solely on your taste. Don't forget to pre-prime the surface of the wood. Make sure you don't forget to finish the bottom cut.
Step five: Get your decorative nails ready. Apply a strip of masking tape along the top edge of the side surface of the block of wood, thereby marking the place where the first row of nails will be located.

Step Six: Using a hammer, drive in the first row of decorative nails. To ensure that the distance from them to the upper edge is the same throughout the entire length of the “line” of nails, use the strip of masking tape you previously glued as a guide. After the first row is completed, repeat the same with the second and third row of nails (we needed almost 150 studs for three rows).
Tip: Cover the underside of the stump with furniture felt so you can move the table around the room without damaging the flooring.
The work is done. You can use the new piece of furniture and be proud that you made this charming coffee table with your own hands.


Coffee tables: do it yourself
Wooden table: how to make?
Many people are interested in how to make a wooden table with their own hands to get a model with an original appearance. Let's consider one of the options.

To make an original coffee table with your own hands, you should take beam with a section of 5x10cm. It is sawn into parts of the following length: 130cm - 9pcs, 21cm - 12pcs, 34cm - 2pcs.
The prepared beam is placed in three rows, leaving room for attaching the legs.

Remove the top two rows. The timber in the third row is slightly shifted to get an interesting appearance. Next, mark the places for attaching the transverse parts.
Lay the extreme bars of the second row and mark the places of the cuts. Then cuts are made circular saw or a hacksaw with a chisel.

The bars of the second row are fixed with screws.

The third row is laid, the parts are shifted and fixed.
An empty space is formed under the tabletop, in which they are fixed legs.
Wood is processed protective composition that preserves the grain of the wood.


The original model of a wooden coffee table with their own hands

First, to make a table with your own hands, prepare boards: 6pcs - 22.5x45cm, 2pcs - 22.5x41cm, 8pcs - 20x4cm, 8pcs - 40x4cm.

Planks 20x4 and 40x4 are glued in pairs. To ensure they are securely glued, they are clampedclamps.

While the blanks for the legs dry, collect box from the rest of the details. They are connected with carpentry glue and nailer.

legs attached to the box with countersunk screws. At the bottom between the legs put the crossbars.

Lid for a table made of wood is also made using boards 22.5x45cm. They are glued together, and then the resulting square is sawn into two triangles.

One triangle is fixed with screws, and rails are fixed on the second so that it is removable.

All parts are sanded and painted.


Stylish coffee table. Master Class

They start making a stylish table with their own hands from marking the sheet Chipboard 16mm thick. The center is found on the sheet at the intersection of two diagonals.

A nail is driven into the center, to which a thin rope or a harsh thread is tied.

Tie a pencil to the free end. This allows you to draw a circle.

If you want to make a table with your own hands not round, but more interesting, then the shape of the circle is changed by drawing bends.

The tabletop is cut out jigsaw or reciprocating saw.

Edges are processed sandpaper.
legs fasten with screws. If they are inclined, then the slope should be outward.

Table surface stain in the right color.

Simple shape coffee table

To make a coffee table with your own hands, take boards 40x15cm - 2pcs and 50x19cm - 2pcs. In addition, you will need legs and mounting plates.

On one of the boards they fix more plates for fixing legs. From the edges should retreat a little.

The sides and top of the table are fixed with wood glue.

It dries for about half an hour.


Do-it-yourself log table

A do-it-yourself coffee table with such an appearance will become a decoration for a summer house or a country house. Begin work with the assembly of the frame. To do this, take sheets plywood two centimeters thick. A base with dimensions of 60x80cm is cut out of them. A box 68 cm long, 45 cm wide and 40 cm high is attached to the base.

do-it-yourself log table. A photo
After that, cut thirty pieces of round logs 45 cm long and twenty-four round cuts, the thickness of which is 3 cm.
Harvested logs are attached around the perimeter of the box. Attached from below to the base rollers. They are installed, departing from the edge by three centimeters.

In addition to glue, it will be useful to fix the logs on the screws from below.

Installed on the box plywood cover. Rounds are glued on it. The space between them is filled with wood putty, which does not shrink when dried. Apply it in stages so that the previous layer has time to dry.

After the putty has dried, the surface polished. To do this, use a surface grinder. After that, the log table can be used.
Rustic table

If you are interested in how to make a table from wood cuts with your own hands, then you should read the instructions.

They start making such a coffee table with their own hands by choosing the right material.


Selected saw cut inspect for interesting details or parts that need to be removed.


Unnecessarily rough, protruding parts are cut off. On the side where the countertop will be, the surface align.


For work use cleaver, which moves at an angle of forty-five degrees.

The sides also need to be aligned.

All surfaces grind, using ever-decreasing grit.


Glossy varnish mixed with resin in equal proportions.

The resulting composition is applied to the wood in a thick layer. It will dry for a long time. If gaps appear during the drying process, they must be filled.


bottom side clean up. If there are voids in the tree, then they are filled with resin gradually until the hole is filled.


If there are air bubbles in the dried resin, then the surface is heated with a heat gun or burner.

A second layer of resin is applied and again left to dry for two days. The entire surface of the countertop must be glossy.

At the handles of the ax, a part is cut off at an angle of 22 degrees. The surface is sanded and painted in the desired color.


Mark out places for legs and make holes.


Glue is poured into the holes and the legs are installed. Each has a special pad.


White coffee table

They make such a coffee table with their own hands from plywood and glass. First, prepare a drawing and determine the dimensions. Then proceed directly to manufacturing.


handmade coffee table Blueprints
Plywood acts as a countertop box with partitions, covered with glass on top. Triangular legs are attached to it.


At the box, you can make a door to access what's inside, or raise the glass.


legsfor a table with your own hands, it is better to cut it out of fairly thick plywood. It must be remembered that double legs are easier to make than more single ones.


When all the parts are ready, they are assembled together and fastened. The table is painted or varnished.


DIY pallet table
If you know how to make a table from pallets with your own hands, you can get an interesting version of furniture for the home. Pallets must first be sanded, sawn into pieces and primed.


pallet table. Instruction
A table is assembled from the prepared material. To do this, attach the legs or wheels. The pallet itself or the surface assembled from individual boards can be used as a table cover.


After all the parts are connected, the structure needs to be painted or varnished. After that, the pallet table is ready.
The second version of the table from pallets
To make such a table with your own hands, you will need one or two pallets. First, you should draw a sketch of the future product, taking into account all sizes.


The table will have a shelf for small things under the tabletop. The design is assembled from prepared parts.


The surface is painted with black paint, but this is not the only possible option. There are many other decorating possibilities.


Coffee table stand
How to make a table out of copper pipes with their own hands, may be of interest to many craftsmen.

Pipes are first marked and cut. Then they are smeared epoxy glue and assemble the base for the table.


This base is applied to the board and the attachment points are circled. In these places you will need to drill holes by pipe diameter.

Four holes are drilled, but not through.

The board is impregnated polyurethane and cover stain.


The rest is collected from the pipes frame.


Legs and base cover paint in the color of the tabletop.

Made from a piece of cloth pocket, which is hung on the transverse parts of the legs.


All parts are assembled together, adding epoxy glue for reliability.


DIY marine-style table
Such a table from the old window frame looks very romantic. The frame is cleaned of dust. If required, replace the glass.

wooden surface stain white acrylic paint. After drying, the paint layer is treated with sandpaper so that the wood comes out. Also available in blue and white.

To make legs, take cutting and sawn into pieces of 34 cm. After that, it is treated with sandpaper to remove roughness.
The blanks are drilled in four places. Next, each leg is attached to the base, and the base with legs to the frame. All this is done with self-tapping screws.

The legs are covered with coarse rope.
For cleaned and defatted glass glue sea souvenirs and seafood. From above they must be covered with glass, which is cut out in the workshop to fit the frame.

Make a loop at one end of the rope. The rope is glued around the perimeter of the frame, leaving the loop free. When the second end reaches it, they tie an interesting sea knot.
