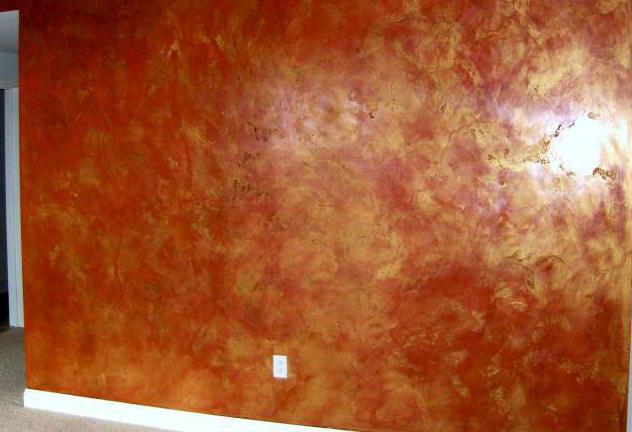
Decorative plaster is always an exquisite wall design. Its application is a laborious and expensive process, but the resulting coating is very strong and durable. There are several of the most popular application techniques, but with the advent of new plaster compositions, the variety of textures and patterns is also growing. In the article, we will consider the features of decorative wall plastering with our own hands.
Types of decorative plaster
For ease of storage, most decorative plasters are sold dry. These mixtures already include a plaster base and decorative fillers (sand, stone chips, fibers, antiseptic additives, dyes). The larger the size of the filler, the higher the consumption of the finished mixture per m2 and, accordingly, the more embossed the pattern.
- Decorative plasters are divided into 2 main types: facade and for interior work. In the first case, frost-resistant and moisture-resistant additives are added to the mixture. They are also more resistant to ultraviolet rays, which retains their color for many years even on southern facades.

Tip: when choosing decorative facade plaster, it is better to give preference to light and pastel shades. Even the highest quality composition with bright pigmentation begins to fade over time.
Decorative plasters for interior work are called interior and are divided by composition into:
- mineral. It prevents the appearance and spread of mold. High moisture resistance allows it to be used in rooms with high humidity. But due to low elasticity, cracks may appear at large temperature differences;
- acrylic. Good elasticity and durability of the coating made it one of the most popular. But it has 2 drawbacks: high cost and difficult to wash when dirty;
- silicate although it has a high price, but it is fully justified. The coating based on silicate plaster is very practical, durable and strong;
- silicone. Among all the above types - this is the most durable composition for interior work.

According to the type of pattern and texture obtained, all decorative plasters are divided into:
- structural coating. In its composition there is a filler of different properties and size - from fibers to pebbles. The most popular covering of this species is the bark beetle. It is made on a cement and synthetic basis. Application is the simplest of all types;
- mineral coating. It is made on the basis of marble chips, lime and cement, therefore it also has thermal insulation properties. And thanks to the modifiers in the composition, it has moisture-resistant properties. Has a small expense and is recommended for internal and external works;
- Venetian plaster. Known for several centuries. These compositions are very expensive, since the dusty fraction of marble is included in the composition, which, after application, creates the effect of walls with an overflow of natural stone. Applying it is difficult and very long, as several layers are made. Suitable for indoor use only.
Advantages of decorative plaster
- Plaster gives the appearance of the house nobility, makes the interior multifaceted. It will be an excellent base for any design, and the heterogeneity of the coating and colors will create a unique range of colors.
- Decorative plasters not only decorate hay, but also, due to their moisture-resistant properties, protect the base on which they are applied.
- Subject to the application technology, it will decorate the walls for many years, without the formation of cracks and rust, even in regions with harsh winters.

- Most of the popular textures of decorative plasters do not require special skills when applied. Therefore, the final cost, taking into account do-it-yourself work, competes with other wall and ceiling coverings.
- When using plaster with coarse-grained filler, very careful preparation of the walls is not required.
- To change the appearance of the room and the facade, it is enough to simply repaint the plaster. By changing the color, its relief and texture will remain.
DIY tools and materials for applying decorative plaster
Of course, the specific set of materials and fixtures will depend on the chosen decorative coating and the method of its application.
- Primer;
- finishing putty;
- decorative plaster;
- wax glossy or matte;
- spatulas of different sizes;
- brushes;
- bath for paint;
- rollers with a relief pattern;
- sponge, rags, etc.
Preparatory work before plastering the internal walls with your own hands
- If a plaster composition with a small relief is used, then the walls are prepared perfectly evenly - as if for painting.
- The finishing putty is applied in a very thin layer, its main goal is not to level the surface, but to close all the pores. After it dries, the surface is sanded with a paint grater or a fine-grained grater. As a result, dust is formed and if it is not removed, the decorative plaster will peel off in the future. Dust the wall with a primer.

- When applying the finishing decorative coating, it must be remembered that in one day it is recommended to make no more than two walls that are not adjacent to each other so as not to spoil the pattern in the corners.
- If plaster gets on the floor or other objects, it is recommended to wipe it immediately. Otherwise, it will harden and be removed only with a spatula, while there is a risk of scratching the surface.
Do-it-yourself decorative structural plaster
- This is the most preferred option for self-application if there is no experience.
- It is sold ready-made in plastic buckets of various sizes. For indoor work, the compositions are made on a water basis and therefore do not have a sharp unpleasant odor. In addition, all structural plasters are very flexible and easy to work with with any tool.

- For outdoor work, such compositions based on cement and lime are selected.
Stages of work
- Since the composition has bulk fillers, perfect surface leveling is not required in this case. The most important thing is that the surface is dust-free and dry. In addition, the primer also creates an additional moisture-resistant layer between the surface and the decorative coating, and also enhances their adhesion.
- Apply a decorative composition with a spatula, starting work from above and moving down. The first layer is very important. They align the inner and outer corners.
- You can level it with even straight movements, but it will look more advantageous if you apply it in chaotic directions. Such stripes will create a unique pattern.
- When the layer is completely finished over the entire area (and this should always be done at a time, otherwise the joint will be visible), it is left to dry completely. It is better not to rush and wait a day.
- Next, make the top layer, which is called the covering. Sometimes it turns out to be quite thick, especially when removing corners or niches. And it takes up to two days for it to dry completely.

- If the resulting coating seems too boring and uniform, it is additionally painted with a sponge, creating an imitation of highlights or scuffs.
- When the paint dries, the entire area is treated with protective wax.
DIY decorative textured plaster
- The complexity of the drawing, its volume and texture, will depend on the method of application and the tools used. The compositions for it may not have a filler, so even ordinary finishing plaster is suitable, with which a relief surface will be created.
- The most popular textured plaster designs are in the form of tree bark or compressed paper.
- The quality of the resulting coating will be affected by the composition of the plaster. So, the best relief and a guarantee against cracking can be achieved with polymer compositions. But in most cases, lime flour with various fillers is the basis.
Stages of work
- If the solution for plastering the walls was made by hand, then before starting the main work it is checked. They apply it to a section of the wall and see that it is not too liquid and does not drain, but it should not be too thick either, otherwise the plaster will lose its plasticity and will harden too quickly.
- It is desirable to carry out work together. While one applies and smoothes the composition, the other shapes it. If this is not possible, then the surface is immediately divided into several zones and they are made in stages. This is important, because the applied composition sets quickly, and the relief must be formed immediately.

- The plaster is applied to the wall. If it is fine-grained, then the layer is 2-3 mm, if the filling fraction is large, then the layer is equal to its thickness.
- Relief formation is a creative process and the final result will depend only on the flight of the master's imagination. Often, in the end, it is very different from what was originally intended.
But still, there are several common ways to create a decorative texture on plaster. For example:
- with a sponge. The sponge is moistened in a soapy water solution so that it does not stick to the plaster. And they press, as if pressing, and at the same time, turn in a circular motion. So they pass the entire area, leaving no uncultivated areas;
- with a grater. This is a special grater for decorative plaster. With its help, vertical furrows are applied that repeat the tree bark. Their configuration will change depending on the pressure and the angle of pressure;
- applying uneven bumps will be an exciting process. The consumption of plaster will be large, but in the end you will get a beautiful texture called a “fur coat”. Most often, it is done when plastering external walls with your own hands. Since the application is simple and a very noticeable heat-insulating layer is created on the facade.
To emphasize the texture, as a rule, finishing painting is carried out in 2 stages:
- at first, the entire surface and all recesses are very carefully painted over with a lighter tone;
- when the paint dries, only the protruding parts of the relief are painted over with a darker shade. If the area is small, then it is done with a brush, with large volumes it is more convenient to work with a smooth roller.

The final step is to apply a wax-based protective varnish.
DIY decorative plaster video
DIY decorative Venetian plaster
- Initially, it is sold in a transparent form as a ready-made solution in jars. If desired, it is tinted in any chosen shade.
- Walls for Venetian plaster are ideally prepared, since the applied layer has no relief.
- Suitable for use in residential areas and is made on the basis of natural materials: slaked lime, water and marble dust.
- In addition to high decorative qualities, Venetian plaster has high moisture resistance, is environmentally friendly, has no unpleasant odor and is fireproof.
Stages of work
- If the mixture is purchased in dry form, then immediately before starting work, it is diluted in such an amount that it is enough to cover the entire wall at a time. The mixture is gradually added to the water and mixed with a mixer. Color is added at the very end. The proportions are indicated on the packaging by the manufacturer; by consistency, it should be elastic and not liquid. At the same time, the temperature in the room in which the solution is prepared should not be lower than +10 °C.
- The first layer is made very thin and the entire area is evenly covered.

- The second layer should already create a pattern. To do this, the solution is applied with arbitrary smooth movements with a rubber spatula. Each layer is applied only after the previous one has completely dried (at least 6 hours).
- Venetian plaster involves at least 4 layers, but ideally there should be 12.
- The rich and deep color range of natural marble can be achieved if each layer has a different shade.
- For a beautiful glossy sheen, a protective wax is applied to the coating.
Lime decorative plaster
- This is an inexpensive way to decorate walls. Since the solution is prepared independently, and all the components for it are expensive. In addition, lime-based decorative plaster is environmentally friendly and does not have an unpleasant odor.
- Important: such a solution hardens much longer, so it is not recommended to apply a thick layer, otherwise it will “float”.

Do-it-yourself lime mortar for wall plastering
- Lime plaster is a composition of sand and slaked lime. These ratios can vary and are selected individually. So, if the solution does not stick to the wall as it should, lime should be added to it, and if it sticks too much to the spatula, then vice versa, add sand.
- First we extinguish the lime. The required amount of lime is poured into a container (any, except plastic), poured with warm water and tightly closed with a lid. When the boiling reaction is over, the lime is filtered through 2 layers of gauze. The resulting mass is set aside for a day to thicken.
- Sifted sand and a little water are added to lime and mixed until smooth. And gradually adding sand and water at the same time in small portions, the solution is brought to the desired consistency. Ready plaster can be used within 2 days.

Tip: if you want to make lime plaster with decorative relief or filling, you should not use it in its pure form. It is recommended to make lime-cement or lime-gypsum compositions.
Decorative wall plastering with cement mortar
Cement-based decorative plaster is used in most cases for facade cladding.
How to make a solution of cement plaster with your own hands
Cement, sand and water are used as the basis, in addition, various polymer additives and mineral fillers are added to the composition for relief.
The peculiarity of plastering walls with cement mortar with your own hands lies in a properly prepared mortar:
- too fat it will turn out if you overdo it with the amount of the binder component, in this case cracking may begin already during setting;
- skinny called plaster, in which there is a lot of water and mineral filler, and vice versa, there is little cement. This solution will quickly begin to flake off the surface;
- normal composition- in which the quality of cement and the fraction of sand filler are observed in the correct proportions.

Stages of applying decorative plaster on the facade with your own hands
- First, the facade is plastered with a starting putty and immediately a reinforcing mesh is sunk into this layer. This will level the walls (especially if the work is done on a foam block, foam plastic or foam plastic), and make a solid base for the decorative layer. Smooth out and leave to dry.
- The surface is primed, and as soon as it dries, they begin to apply the finishing layer.
- It is better to work together, as the mortar dries faster outdoors than indoors. First, a spray layer is applied to a section of the wall and evenly distributed. And instead of leveling, a special spatula or roller is used to create a pattern or relief.
- At the end, it is painted or coated with a protective agent.

Features of plastering walls with cement-sand mortar with your own hands
- If several layers are made and they are not uniform in thickness, then as a result, after drying, the effect of uneven staining with spots will be created.
- Too thin a layer will get wet from moisture, and emphasize possible uneven surfaces of the facade.
- When working at a negative air temperature. There is the thinnest ice on the wall and, lying on top of it, with spring warming, the plaster will begin to move away from the walls.
- And work in the heat leads to a very rapid drying of the solution and its cracking.
- If the tinting of the plaster is done independently, then the solution must be prepared for the entire surface. It is almost impossible to choose the exact shade on your own and there will be spots on the facade.
On the issue of wall decoration, those who want to save money are faced with the question of how to make decorative plaster with their own hands. It is not only fashionable, but also practical.
The main advantage of decorative finishes is breathability. Its indisputable advantage is that it allows you to hide all the irregularities of the wall. In case of contamination, it is easy to clean. Making plaster with your own hands is very simple. Having mastered several techniques for applying putty, you can achieve amazing results in the decoration of your home. The work done will satisfy every taste, decorate the room with made panels and compositions.
This type of repair work is relatively cheap if, doing everything with your own hands, you buy only the necessary materials for the composition of the plaster.
The walls must first be thoroughly cleaned of the old coating. Using the level, the evenness of the base is determined. If necessary, the surface is leveled by applying a layer of putty. After drying, it is primed. Now you can start applying the plaster.
Mixtures for decorative work can be bought in the form of a ready-made solution in the store. But it is best to use a do-it-yourself composition of dry putty. You can use a gypsum mixture, PVA glue. The composition should be diluted at the rate of 200 g of glue per 6 kg of gypsum with water in an amount of 2 liters.
A mixture for plaster is a pasty mass composed of a base and various fillers. For the first, ordinary dry putty is taken. It is cheaper, and on the basis of it you can independently prepare the desired composition. This method justifies itself with its economy. Dry putty is diluted in containers with water and gets to work.
Types of decorative plaster
Depending on the effect that will be obtained after plastering, and the components used when mixing the composition, the following types of plaster are distinguished:
- structural (with additions);
- textured (to obtain a smooth coating);
- Venetian (to create effects of antiquity).
- flock plaster
Structural plaster

Structural plaster is made on the basis of a cement-lime composition (mineral base) and synthetic latexes with the addition of granular elements:
- pebbles;
- granules;
- wood fibre.
For interior decoration, it is more convenient to use water-based structural plaster. Its distinctive feature is that it is more hygienic, does not leave a smell. The plasticity of the composition makes it convenient to apply such a plaster. It is sold ready-made, it does not need to be diluted, the consistency has the necessary concentration. Under structural plaster, it is not necessary to level the walls thoroughly, because it will hide all its defects after application to the surface. The main condition is that it be dry and clean. Before plastering work, be sure to prime the wall, dry it. After that, you need to apply the composition with a spatula on the surface with a thin layer. After 3 days, the plaster will dry out, but the final hardening will be achieved only after a week. Therefore, during this time, you need to be careful not to damage the plaster.
Textured plaster

With the help of textured plaster, it is possible to create a relief surface of the wall with an imitation of some material: burnt paper, wood, stone. Certain methods of applying the composition are used. The basis of the plaster is a lime mixture. Wood fibers, granite, marble, quartz chips are added as fillers. The use of polymeric materials as a basis allows you to create a more stable relief coating that will not crack. How to make textured plaster with your own hands?
Before applying the coating, the wall surface must be prepared. To do this, it is primed, a layer of paint with sand is applied to better bond the plaster to the base. Then a thin layer is applied with a spatula. Depending on the intended pattern, the number of layers may be more. It should be noted that the more layers, the thinner the coating thickness. Putty mass can be bought ready-made in the store, but it is better to do it yourself. Dry putty powder must be diluted with water and mixed. You can immediately add paint to the solution to obtain color in a ratio of 1:10, or after applying the plaster, apply a layer of paint with a brush, roller or sponge. The second option is preferable to achieve the effect of uneven coloring.
If a filler composition is used for plastering, it should be noted that the larger the filler grains, the more putty composition is required for work. It depends on what kind of drawing will be done. Rough terrain requires the choice of a large filler.
The texture of the decorative surface can be given with various tools. A striped texture can be created with a brush, spatula. Here you can show your imagination by making movements on the surface. To repeat the pattern, it is convenient to use a stamp or applicator. If, after applying the plaster, rub it with a plastic trowel, you can achieve such effects as “rain”, “lamb”, “carpet”.
"Rain" is formed when making movements up and down. By changing the angle of inclination diagonally, you can get an oblique rain. “Lamb” is performed in a circular motion, during which circular grooves are formed, resembling lamb hair. The “carpet” comes out after alternating transverse and longitudinal movements.
Before painting, the plaster should be allowed to dry for a day. On the dried layer of the coating, apply a layer of paint with a brush or roller. The advantage of this method over tinting is that after this operation, the surface can be leveled with sandpaper.
To give the surface the effect of dark grooves, you must first go through a layer of darker paint on the wall, let it dry. And then apply a light layer of paint on top with a semi-dry roller. You will get spectacular dark grooves.
In order to fix the color, to prevent the surface from staining clothes, you need to cover the plaster with a layer of varnish.
Venetian plaster

Venetian plaster allows you to create the effect of marble stone with the help of a transparent composition made from marble flour. It is made on the basis of lime and water emulsion. This finish requires a perfectly flat wall surface. But the effect of creating a marble mosaic exceeds all expectations. The marble surface made in this way is distinguished by its beautiful appearance, water resistance, and wear resistance.
How to make decorative plaster yourself so that it looks like marble? To do this, you need to clean the surface of the wall, level it, apply a special primer. Add the color scheme of the desired color to the plaster mass, stir and apply with a spatula to the surface in several thin layers. Sand the dry surface in a circular motion. Clean with a dry cloth from small particles. Apply a layer of wax on top with a damp sponge. It must be rubbed until a flat surface is indicated. This is a laborious process that requires patience and care so as not to erase the drawing.
Flock - plaster

The method involves creating a surface with the effect of velor, leather, wood, stone by spraying small particles. Initially, the wall is painted. After the paint has dried, a layer of glue is applied with a roller. And while the glue is not dry, you need to apply particles to the wall with a spray gun. The operation is carried out in tandem with a partner: one applies glue, the second sprays the particles with slow circular movements. Excess should be removed with a brush after drying. Finally, the surface is varnished.
The simplest and most affordable tools for creating drawings are a spatula, roller, brushes, stencil, ordinary cellophane. The stripes are created with a notched trowel.
With the help of a roller, the effect of fluffy velor is created, for this it is enough to walk with the roller 1 time. How to make plaster to get unusual effects? To do this, you can use a variety of improvised items.
Unusual colorful effects are obtained by rubbing movements with cellophane. You can create an unusual pattern with a sponge. It takes diligence and maximum imagination to get a beautiful decorative plaster.
The final step for all types of plaster is to apply paint with a brush or roller and coat with varnish so that the surface is reliably protected and the paint lasts longer. Covering walls with decorative plaster is not as difficult a process as it seems. You just need to know the sequence of work. And to create beautiful walls it is not at all necessary to call the masters. After studying the training material, you can cope with this task on your own. Each master creates a unique look of the room. Do-it-yourself decorative plaster in the interior gives freedom of creative imagination and maximum conditions for the implementation of a wide variety of ideas. There is a wide choice of materials for plaster works.
If the question arose about the decoration of the walls, we can say with confidence: the repair is close to completion. But it’s too early to relax, because this is one of the most crucial stages, especially if the finishing will be done by hand. And here the question is not so much in the technical side, but in the aesthetic! There are an infinite number of options, and everyone strives to be original in this matter, trying to embody their own ideas. Fortunately, today there is a wide choice of materials that allow you to realize the most daring ideas.
Do-it-yourself decorative plaster from ordinary putty can give the walls the most original look.
Plaster and putty as finishing materials
In general, plaster is a coarse, coarse-grained material intended for primary wall cladding, but decorative plaster has practically nothing to do with this and may well be prepared from ordinary putty. Putty, in turn, is just the material that is used to level the walls and hide minor defects. There are two types of putty:
Starting - eliminates cracks, scratches and other small surface defects.
Finishing - allows you to make the surface absolutely smooth. Prepares walls for painting, wallpapering, etc.
Often decorative plaster is created with finishing putty. Such a coating looks very impressive and allows you not to resort to expensive services of specialists in order to get rid of various defects. The decorative coating perfectly masks all the roughness.
Preparing for decorating
So, if you combine patience, diligence and your imagination, then do-it-yourself decorative plaster made from ordinary putty will turn the walls into a work of design art.
Getting started, you need to make sure that everything is prepared. Namely:
Materials for the preparation of decorative plaster;
Necessary tools for the work;
The surface of the walls is prepared (levelled);
Paint, if you wish, to give color to your creation.
Tools and textured rollers can be purchased at specialized stores, or you can use improvised means, remove the old coating of an existing roller and paste it with large-pore foam rubber or make holes in ordinary foam rubber in a chaotic manner. An interesting result can be achieved using an ordinary sponge, brush, polyethylene, but first things first.
Before starting finishing work, it is worth deciding not only what you want to do, but also how to do it. Recently, decorative putty plaster has often been used to implement the most daring ideas, but without certain skills it will be difficult. But if the difficulties do not frighten, you can safely get down to business.
Mark the leveled and cleaned surface, and paste over the boundaries of the plots gradually, section by section.
Preparing the mixture:
Putty, dry mix;
Grout for seams;
Ground (white).
We mix putty and primer so that the composition is the consistency of sour cream. If desired, you can add paint of the desired shade to this mixture. In order not to make a mistake with the density, you can first apply the composition to a small piece of drywall. If the mixture does not spread and is not very hard, we can assume that the decorative plaster made from ordinary putty, made by hand, is ready for application. Nothing complicated, as you can see, no.
There is also a recipe that can be used to prepare decorative plaster from gypsum putty:
6 kg of gypsum mixture (dry);
2 liters of water;
0.2 l of PVA glue.
Pour the gypsum mixture into the water and mix using a construction mixer until smooth, then add the glue and mix again. The mixture should be homogeneous and thick. To slightly change the consistency, if necessary, you can either dilute the mixture with water or add dry plaster.
Important! It is necessary to use the composition of gypsum putty within 20-30 minutes. Therefore, it is worth considering your capabilities and how much solution you need to prepare at a time.
How to make decorative plaster from ordinary putty
Unfortunately, it will not be possible to create complex textures and patterns on your own, without proper preparation, but everyone can reproduce simple reliefs, despite the fact that they look no less impressive and original. A decorative mortar is prepared from the usual putty and applied to the wall section with a layer of no more than 10 mm. Then the mixture should be given a little time to set, and start applying patterns.
Venetian decorative plaster
Do-it-yourself solutions are prepared from ordinary putty that can imitate valuable breeds of natural stones. And the walls finished with "Venetian" will look unforgettably beautiful, in the spirit of the Middle Ages.
Classical Venetian plaster is a mixture of sand made from natural stones (quartz, marble, malachite) and slaked lime with the addition of dyes.
You can take ready-made dry mix and add it to a container of water according to the manufacturer's instructions. Using a construction mixer, mix the mixture thoroughly. The solution should have the consistency of sour cream.
The application process is shown in the photo below.

Venetian plaster can only be used on perfectly flat, dry and clean surfaces.
Putty is taken in small portions, strokes are made with a spatula. Strokes can be made sweeping and small, you can imitate any material or create a repeating pattern. After finishing the first layer, it is allowed to dry thoroughly, then they are taken for the next one. The first layer is made continuous, subsequent, finishing, are applied with a flexible spatula. The layers are lightly rubbed to avoid unevenness.
The next step in decorating is sanding. The main thing here is not to overdo it and smooth out only the sharp protrusions so as not to damage the structure. Use for this coarse skin or mesh.
Then the surface can be painted. This is a crucial stage in the creation of the Venetian attire of the walls. Paint is applied in layers, and subsequent layers should differ in saturation from the first. The paint is applied quickly to small areas. You need to try to remove some of the color from the convex areas.
The completion can be the coating of the walls with acrylic varnish or the addition of a gilding effect. But you can leave everything as it is, it's a matter of taste.
Creating Venetian plaster is not an easy task and has many nuances, but with due diligence, it is subject to everyone.
Patterns, embossing, roller textures
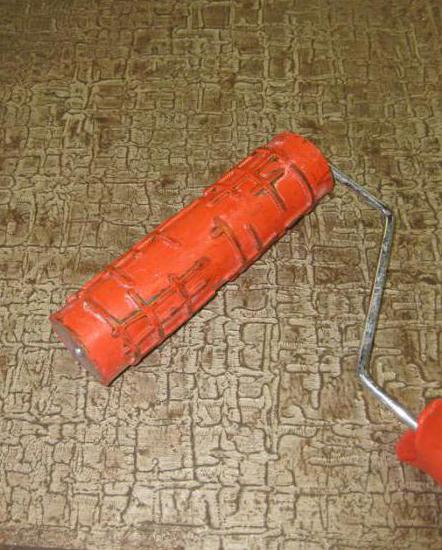
To create beautiful patterns, embossing, textures, decorative plaster from ordinary putty is also used. A roller covered with large-pore foam rubber or steel mesh is used to treat the surface of the applied plaster. What does it have to do with imagination: use different rollers, combine directions of movement, use textured rollers. You can make a textured roller yourself using:
Clothesline or cord to wrap around the roller. It will be a smooth winding or with a lot of overlaps, the designer decides.
Trowel decor

Also, an interesting pattern can be achieved with a trowel. The first layer is applied, and then the solution is gradually distributed over the trowel and transferred to the base. Trowel movements will create an unusual surface.
Another pattern using a trowel can be obtained by simply applying it in different places and pressing a little. The randomness of these movements will provide a non-repeating wall pattern.
bark beetle
Using wooden or plastic tools, you can recreate a common type of finish called bark beetle that resembles insect-eaten wood.
To do this, apply the composition to the surface of the wall and give it some time to grab. Then they take the tool and perform horizontal, vertical or circular movements.
Sponge and washcloth patterns

Decorative plaster will decorate the walls in the most original way. With your own hands, you can create a grainy texture from ordinary putty and a sponge. To do this, you just need to walk with a sponge over the entire surface, slightly pressing it against the wall.
Hatching
You can decorate the walls with a metal comb, “combing” the freshly applied plaster in different directions. You can get interesting "wicker" patterns. The directions of movements can be undulating, and circular, and semicircular, and crosswise. The putty is allowed to dry and cleaned with a rag to get rid of small particles not associated with the surface. Decorative plaster applied in this way, made with your own hands from ordinary putty, allows you to get patterns that are unlike any others.
snowball
The technique of execution is very similar to the creation of Venetian plaster. However, contrasting colors are used. The darker one is put in the first layer. And splashes are made in light tones. To simulate snowfall, the top layers are best done in white.
Silk
Another simple way to create a decorative surface. Using plastic film, you can get a pattern that resembles compressed silk. So:
First, we apply putty to the surface with an even layer about 2 mm thick.
Immediately after application, a plastic film is applied to the puttied area (this “canvas” does not need to be smoothed out, the more folds are formed, the more interesting the texture will turn out).
Having covered about a third of the surface, they begin to tighten the folds, twisting slightly, so new patterns will form on the putty (repeat the action until the entire wall is covered).
After 12-15 hours, remove the film. After that, let the walls dry for some more time.
After complete drying, the surface is slightly cleaned, removing break-off parts and smoothing out strongly protruding areas.
The next stage of work is painting the surface. Paint is applied with a roller or sponge. With a damp, clean sponge, some of the color is removed. To remove abundant accumulations of paint in the corners, they must be rubbed with a spatula wrapped in a clean rag. The finished surface is allowed to dry. Then, to enhance the effect of "silk", pearl paint is applied.
Ideas for patterns and textures
Having a good imagination and certain skills, you can create the most original patterns, a material that is very fertile in terms of creating new textures is decorative plaster from ordinary putty. Photos, videos, instructions will help to cope with any difficulties. The main ways to create original textures are given in the article, but there are many variations.
Conclusion

It is safe to say that with patience and a good imagination, wall decoration can be done independently, minimizing material costs for repairs. On the surface of the walls, you can create and embody any ideas you like. If there is an artist’s talent, then the used decorative plaster, created from putty with your own hands, will even allow you to reproduce paintings. Of course, to implement the most grandiose ideas, it is better to turn to professional finishers. But if, nevertheless, a decision is made to independently decorate the surfaces, and there is no special experience in this matter, it is worth practicing on a small piece of drywall and then boldly take on the main decor.
In the past few years, one of the most popular finishing materials has been decorative plasters. The modern construction market offers the buyer a huge number of different options for this material. They differ in composition, service life, appearance of the coating, and so on, but they have one thing in common - high cost. If the budget for repairs is limited, but there is a desire to create a truly original interior, you can try to make decorative plaster with your own hands. At the moment there are three main groups of decorative plasters.
Despite the different names, the composition of this type of decorative plaster remains virtually unchanged. It can be based on gypsum, cement, lime, or combinations thereof. The filler can be yellow river sand, flour or crumbs from various types of natural stones, for example, marble, granite, quartz, and so on. Optionally, polymer additives are added to the mixture to increase viscosity, antiseptic and moisture-resistant components.
The surface structure after drying directly depends on the type, quality and fraction of the filler. For example, in the most common structural bark beetle plaster, grains with a diameter of 1.5 to 5 mm can be present. Several particulate materials with different sizes are added to the "lamb" mixture.

Important! In any plaster mixture, the filler content should not exceed 70% of the total mass of the solution. Otherwise, the material will turn out to be too loose, and the coating will not meet modern technical standards.
Self-preparation of gypsum plaster
Gypsum decorative plaster is used most often. It dries quickly and is easy to apply and smooth out. There are two main options for its preparation:
- Simple. It consists of dry gypsum flour and lime dough. These materials are mixed in proportions of 1: 3, after which they are diluted with water. The liquid must be poured gradually until the consistency of the solution resembles thick sour cream. Color is added at the end, if necessary.
- With the addition of silicate material. The basis of the material is the same as in the first version, but liquid glass is additionally added. First, the base materials are mixed in proportions of 1:3.5, then silicate is added (about 5% by weight of the mixture) and diluted with water.
 In order for gypsum plaster to be plastic, all proportions must be strictly observed.
 On a note! If it was decided to make the mixture "from scratch", then you will have to make lime dough yourself. To do this, slaked lime and water are mixed in proportions of 3: 1, after which the container with the solution is covered and left to infuse for a day.
Gypsum mixtures are suitable for finishing work only in dry rooms, you can decorate both walls and ceilings.
Cement-sand mixture
A cheaper and more durable material is a cement-sand mortar. For its preparation - cement, sand and slaked lime are mixed in proportions of 1: 2: 1, after which silicate material is added (5% of the total mass). Finally, the mixture is diluted with water. The consistency should be such that the material is easy to pick up on a spatula, but not too liquid, it should not drain from the surface.
 The cement-sand mixture is quite simple to prepare yourself.
The very last step in the preparation of structural plasters is the addition of stone chips. Recall that its content should not exceed 70%.
If the question arose of how to make decorative plaster quickly and inexpensively, then the easiest option would be to buy a ready-made mixture, without natural stone additives, and a separate filler. Even under the condition that a ready-made mixture is purchased, the cost will still be lower than that of a structural composition with a filler already included in it. To prepare a mixture of such components, you just need to add flour or crumbs to the mixture and dilute it with water.
Textured plasters
In this case, we are talking about a material that contains fine-grained fillers, therefore, after drying, a flat surface is formed. This name was given to the plaster due to the fact that, until the moment of setting, various relief patterns are applied to the surface by means of graters, trowels, trowels, figured spatulas, brushes and rollers. The advantage of textured plasters over structural ones is that the master has the opportunity to implement his design solutions. At the same time, structural materials are easier and faster to apply.
VIDEO:
cooking recipes
For wet rooms and outdoor work, a cement-based material is used. On a standard bag of cement (weight 50 kg) add 10 kg of ordinary tile adhesive. After that, 0.5 kg of Rotband plasticizer is added to the mixture. Lastly, water is poured and the composition is thoroughly mixed.
For finishing surfaces inside dry rooms, a gypsum version is better suited. This will require 6 kg of dry ready-made gypsum-based plaster, 200 g of PVA glue and 2 liters of water. The manufacturing process is somewhat complicated and includes the following steps:
- First of all, 1.5 liters of water is poured into the dry mixture and thoroughly mixed until a homogeneous mass is formed.
- Then PVA glue is added to the remaining water and also mixed.
- At the end, you need to make a homogeneous mass of two mixtures, its consistency should resemble thick sour cream.
 Self-preparation of a solution of gypsum plaster, PVA glue and water
 Also, do-it-yourself decorative plaster is made on the basis of white Portland cement of a grade of at least 400. The most popular recipes for making 1 kg of such mixtures:
- 200 g of lime dough is mixed with 740 g of marble flour and 50 g of cement, at the end 10 g of manganese peroxide and a little water are added.
- 630 g of white sand, 150 g of crushed brick, 50 g of cement and 150 g of lime dough are mixed and 20 g of water are added.
- 180 g of marble flour, 600 g of lime sand, 80 g of cement and 120 g of lime dough are mixed and 20 g of water are added.
Should know! If liquid plasticizers are used, then their mass fraction should not exceed 1% of the total weight of the solution. Dry are added at the rate of 0.5 kg per 50 kg of cement.
Making Venetian decorative plaster
 Venetian decorative plaster creates an amazing print
 Such plasters are textured, but due to the great popularity and variety of the material, they are distinguished into a separate group. Before you make this type of plaster, you need to find out about its composition. It includes:
- Stone dust. Marble is usually used, but to reduce manufacturing costs, fine-grained granite, quartz, malachite and other natural stones are added to it. Since, after applying the plaster, it is treated with a trowel, it must be homogeneous, therefore it is better to use fillers of the finest fraction.
- Slaked lime. This substance acts as an astringent. Ready mixes in hardware stores contain acrylic resins instead of classic lime, but due to their absence on the market, the first option will be considered.
- Dyes. Previously, plant sap was used, but now they are being replaced with synthetic substances.
- Water. You can use ordinary running water, it is only important to make sure that its temperature is not lower than 10 degrees.
The classic recipe is as follows: stone dust and slaked lime are mixed in equal proportions, after which water is added until a homogeneous thick mixture is formed. Dyes, antiseptic and metallizing components are optionally added.
 The special technology of applying "Venetian" requires the presence of fillers in the mixture of the finest fraction
 There are two more recipes that involve the use of modern building materials:
- Finishing putty and white marble flour are mixed in proportions of 10: 1, after which water and color are added.
- For 7 kg of marble sand, add 1.3 kg of flour from a similar material, 700 g of white Portland cement of a grade of at least 400, and 1 kg of lime dough.
The proportions can be changed, depending on the desired effect and the characteristics of the surface to be treated, but this requires experience with plasters. A novice master is strongly recommended to mix the compositions strictly according to the above recipes.
Features of applying different types of decorative plaster
Each type of plaster requires the use of special tools and application methods, but preparatory work is mandatory for all.
 Self-decoration of walls with plaster requires knowledge of the methods of working with the material
 Preparatory stage
Plastering walls with any type of mixture begins from this stage. To carry it out, you will need the following tools and materials:
- sandpaper or grinder;
- narrow and wide spatulas;
- paint brush;
- polyethylene film and masking tape;
- putty and primer.
First of all, it is necessary to clean the surface from traces of corrosion, paint or wallpaper residues, and also dismantle all fasteners. Treat the surface with a grinder or sandpaper, and then remove the resulting dust with a vacuum cleaner or simply brush it off the walls. Repair the formed potholes and cracks with putty and wait until it dries.
VIDEO:
For applying decorative plaster, a wide spatula is used, on which the solution is collected. Then it is applied to the walls. Such plasters dry for a long time, so you can take your time and process the entire surface at a time. Approximately 1.5 mm layer of material is required to apply the pattern, so the thickness of the entire layer should be about 3 mm. At this stage, it is important to achieve complete coverage of the surface with a solution.
Without waiting for the material to dry, proceed to the next step. To carry it out, you will need a brush, rollers of various types or a trowel. Due to the relief patterns and irregularities on the surface of this material, the texture will appear on the plaster. Which tool to choose and how to use it is a personal matter for each master. The only rule is that you cannot push the solution deeper than 1.5 mm. Otherwise, after drying, the material will not gain strength and will peel off the walls.

A day after the completion of the work, the surface is primed, painted and waxed. You can touch it after about 48 hours.
Such plaster as "Venetian" is considered a false and professional material. But still, everyone can do it, the main thing is to follow the instructions below:
- The prepared solution is collected on a wide spatula and the surface is leveled with a conventional trowel.
- Then they take a special tool - a Venetian trowel and process the entire surface with it. You need to press the tool with medium force, and the movements should be chaotic.
- By the same principle, the second and third layers are applied at intervals of 8-10 hours.
- After that, you need to carry out the "iron". To do this, the Venetian trowel is strongly pressed against the surface to be treated and “passes” it over the entire area until a metallic sheen appears (hence the name of the process).
- Finally, the wall is waxed and polished with a soft wheel grinder.
VIDEO:
Summing up, we can say that cosmetic repairs in an apartment or house can be not so expensive. To do this, you need to try to do most of the processes yourself. Then the repair will bring a lot of positive emotions.
Photo gallery: decorative plaster in the interior (16 photos)
Decorative plaster compositions are the most popular material for unusual wall decoration. They allow you to create truly original interiors. The cost of such plasters is quite high. But we can quite save the budget for repairs if we apply them ourselves. It is not so difficult.
The main thing about decorative mixtures - what you need to know?
Decorative plaster (DSh) is a composition for finishing wall surfaces, consisting of a binder and special fillers. As the first, mineral (lime or cement) and synthetic (various resins - acrylic, polyvinyl acetate and others) components can be used. The function of fillers is usually performed by marble or granite chips, quartz, white sand, as well as combinations of these materials. LH with a mineral binder and coarse-grained additives are recommended for processing walls from the outside. But synthetic-based compositions and fine fraction fillers are more suitable for interior finishing activities.
Also in the described decorative compositions there is a pigment. It gives the mixture the desired color. The pigment is also synthetic and mineral (natural). Natural additives - indigo, ocher, cochineal, yellow minium, azurite, ground malachite, vivianite, charcoal and others, are prone to rapid burnout of LH. In addition, compositions with natural pigments are expensive. For this reason, plasters with synthetic coloring additives have become more widespread.
The texture of the described coating is formed using all kinds of granules, fibers, flakes, small gold balls. The most popular types of LH among home craftsmen are considered to be:
- Venetian compositions;
- flock mixes (coating with silk effect);
- bark beetle (walls after applying plaster become like tree bark);
- coatings with the texture of rain and rock;
- compositions with marble chips;
- texture compositions under the stone.
DSh is available in the form of dry mixes (they are diluted with water before use) or ready-to-use without any additional steps. The effect of using both types of plaster is the same. At the same time, ready-to-use compositions are more convenient for home craftsmen who decide to decorate the walls with their own hands.
Rules for processing walls with plaster - we are preparing thoroughly
Before using LH for its intended purpose, you need to understand the features of working with such compositions. First of all, let's find out what tools we need. Everything is simple here. We buy a scraper, a trowel, a drill with a mixing nozzle, a trowel, brushes, baths, rollers, combs, spatulas of various sizes. You may need other tools used for finishing work.
Then we proceed to prepare the walls for plastering. Their surfaces must be absolutely clean, dust-free and dry. If the walls are dotted with cracks, you will have to repair all existing defects. If necessary, we knock down the protrusions on the surface to be decorated and fill the depressions with a suitable composition. After that, we prime the cleaned base. This operation will protect the coating from moisture, deforming stresses, temperature changes, and strengthen the carrier layer.
We choose the primer taking into account what kind of decorative composition we use. Carefully read the instructions for the plaster! It indicates the recommended type of soil. A few more important points. The primer layer should have a thickness of no more than 20 mm. It should be very well compacted. If this is not done, the uniformity of the texture of the applied LH will be violated. In some cases, a layer of soil must be kept on the wall for several days, periodically spraying it with water.
If the plaster will be applied to drywall, wood, plywood sheets, wood-based panels (chipboard, OSB), they must be treated with deep penetration primers. Such bases are prone to deformation when decorative mixtures are applied to them. Also note that most modern LHs set within a few hours. However, they take 24-36 hours to dry. A complete hardening of the decorative composition is observed after 7-8 days.
How can a decorative composition be applied?
There are several options for processing the walls of the LH. The most popular ways of applying the composition are given below:
- spray technique;
- spraying;
- stretching (creating a relief with a trowel).
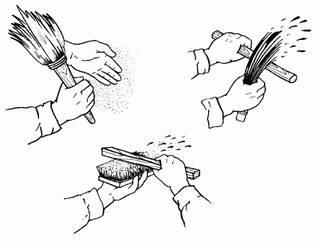
It is easiest for craftsmen to form the required spray coating. This technology is simple and clear. We take a suitable tool (for example, a brush or even an ordinary broom) in one hand. We dip it in a decorative composition. In the second hand we take a stick. We bring a broom (brush) to the treated surface. We hit the tool with a stick. As a result of the impact, splashes of the decorative mixture fly onto the wall. We get a coating with splashes and flakes of various sizes. We are waiting for this layer to dry. Then repeat the above procedure. We impose as many layers as we need, smoothing each of them with a roller or other device.
A variation of the classic spraying technique is the so-called Italian plastering. The order of work will be similar to that described above. But when decorating in Italian, we do not need to wait for the previous layers to dry. The next portion of the solution is applied to a damp surface. Note! This method of decorating involves applying layers of different shades. That is, if we first use blue plaster, a mixture of a different color is applied on top of it. The result is an original decor that can decorate any home.
Spraying technology is a fast and effective way to finish walls with a decorative mixture. But for its implementation it is required to rent or purchase a special installation. LH is poured into such equipment, and it applies plaster to the surface.
Spraying is carried out continuously. Work always starts at the top of the wall.
The spraying technique is indispensable when we use LH of different fractions and want to achieve a unique aesthetic effect. With its help, you can finish the walls in one tone, and the slopes on the windows and other architectural details - in another. Nuance. On the main surfaces, the composition is applied with a layer of about 3 mm, on auxiliary surfaces - no more than 1 mm in thickness.
Plaster mortar is often applied by pulling. This is an easy way to decorate walls. It is performed using a steel grater or a conventional trowel. Finishing is done strictly from the bottom up. We hold the tool in relation to the surface to be treated at a 60-degree angle. After applying the composition, we form the required pattern and texture using a plastic grater.
In the next section, we will look at common techniques for decorating walls with decorative mixtures. With their help, we can easily make the interior of your home individual and very attractive.
Rocks and rain on the walls of the dwelling - we will do it ourselves
Now let's see what techniques are used to create decorative relief surfaces using LH. There are many of them. A common option is the formation of a rock texture. This technique is ideal for beginners. The procedure is as follows:
- 1. We prepare the wall according to the algorithm we already know.
- 2. We process the surface with a decorative composition. We apply it with a layer of up to 3 mm using a trowel.
- 3. We distribute the LH along the wall (as evenly as possible). We create the drawing we need using the same ironing board.
The movements of the tool can be very different - horizontal, crosswise, herringbone, vertical and so on. We ourselves choose the appropriate relief and form it. In the case when the planned drawing does not work out, we quickly smooth out our art and try to create the original rock again. Note! The trowel should be rinsed after each individual section has been treated. Otherwise, it will simply stick to the plaster.

It is a little more difficult to apply LSH with rain. But this technique guarantees a more spectacular picture. The technology for creating rain is as follows. We mark the walls. We draw lines on them under a certain slope. They must have the same angle of inclination. And we take the distance between them within the size of three trowels. Stick masking tape on the line. We begin to apply plaster from the upper corner of the surface to be decorated with inclined stripes. We fill the space limited by two masking tapes. The working tool needs to be pressed against the wall a little.

As a result, we get a decor that looks like a hedgehog. But we want rain. Everything is elementary here. We wash the tool. We apply it to the plastered surface and smooth the mixture in one direction. Then, by analogy, we cover the remaining strips with a solution. When the LH dries, we remove the remaining minor defects and irregularities from the wall with a sandpaper or abrasive mesh. At the end of the work, we admire the rain that decorated our room.
5 Other Relief Image Techniques
The application of various types of decorative plaster can be performed using other methods. Let us briefly describe the commonly encountered types of wall treatment with the compositions in question:
- 1. Boulders. To create such a picture, we need to apply a trowel to the primed surface with a trowel. And then finish it with a brush. We hold the latter with respect to the wall at an inclination of 90 °. If you want to get sharply defined boulders, take a hard brush. The soft bristle tool allows you to make more blurry drawings.
- 2. Wave. We make notches on the wall, sprinkle it with water. We apply plaster in zigzag stripes. Then we smooth the resulting waves with a spatula or a trowel. This technique is often used when using Venetian plaster.
- 3. Travertine. We collect portions of the finishing tinted mixture in a certain color on a spatula. We throw them on the wall. After that, smooth the surface.
- 4. Broken stones. We process the walls with plaster. We are waiting for it to harden. We drive the tongues into the coating, chipping off small pieces of it. We get stones with crevices.
- 5. Furrows. The technique involves the use of bevels with semicircular teeth. The distance between the latter should be 1.5 cm. Before applying the LH, we must sharpen the teeth. We apply the plaster composition to the wall. Smooth it out right away. We apply the rule to the mixture and at an angle of 45 ° the bevel (sharpened part). We create furrows. The type of the latter will depend on what kind of malka (with what shape of cloves we use).
You can try more complex methods of applying LH. For example, hatching-bouffant.

This technique is performed only on a fresh coating, which is processed with a metal brush. After using it, we wait a day and remove poorly fixed pieces of plaster from the wall. Remove excess parts with a rag, spatula or ordinary sponge.
We apply a decorative mixture with a roller - features of the operation
Wall decoration of the LH can also be done with a paint roller. Although this tool is rarely used for decoration. It is not used when working with Venetian plaster. But for other decorative compositions (structural, textured), it is quite suitable. The algorithm for finishing with a roller is as follows:
- 1. We repair and clean the walls. We prime them twice.
- 2. We prepare the solution. Pour it into a wide container.
- 3. Dip the roller into the bath with the solution.
- 4. With sliding smooth movements, we apply the composition to the wall. Be sure to leave small indents from the ceiling, adjacent walls and floor.
The plaster is applied in strips at a time. The movement of the roller is from top to bottom. If the LH does not adhere well to the surface being trimmed, we wet the painting tool with water. By pressing the roller with different efforts, we obtain one or another coating structure. Its final form, in addition, depends on the speed of movement of the tool on the surface.

Choose the appropriate method and technique for applying decorative compositions and feel free to get to work. You will succeed!