If the bathroom, which should be a model of cleanliness and comfort, is associated with heavy air, damp towels and mold dangerous to health, and smells from the toilet are spreading throughout the house, then it's time to think about forced ventilation at home. Simply put, forced ventilation is the installation of exhaust equipment in the ventilation duct. In addition, coolers can be installed in a hole in the wall, which will ensure ventilation of rooms where there was no ventilation at all initially.
Features of ventilation of a bathroom in a private house
The air enters the bathroom and from other rooms. For ventilation, a small gap (2-2.5 cm) is left between both the floor and the door leaf or special ones are purchased, the canvas of which has round ventilation holes. Air escapes through an open ventilation duct. If the doors are solid, and a very responsible installer also did not leave a single gap, the bathroom will have to be left open for ventilation. The same goes for the toilet. With doors ajar and air flowing, unwanted odors will leave the room faster than if it were clogged. This is how natural works.
A well-designed ventilation system is an integral part of the bathroom or toilet.
This system is as simple as possible, but unreliable. In modern houses and cottages, ventilation is increasingly failing. Complicate work:
- Sealed doors and plastic windows;
- Reducing the lumen of the channel as a result of contamination with dust, dirt, cobwebs;
- Incorrectly designed hood;
- Windy weather;
- An uninsulated channel, inside which the air cools quickly and slowly rises.
Attention! When the fan is running, it is necessary to ensure the flow of air into the ventilated room. Otherwise, air exchange will not be effective.
If the device removes 100 m3 of air per hour, at least the same amount must be supplied, which is not possible with hermetically closed doors.
Forced ventilation: DIY
It is customary to separate the ventilation ducts of the kitchen and the bathroom by building codes, and the separate bath and toilet are usually combined with a common ventilation duct or a hole in the adjacent wall, which is covered with a decorative grille. Less often, each room is equipped with separate ventilation and its own exhaust “window”.

Varieties of fans for arranging a ventilation system
Types of exhaust devices for the bathroom and toilet:
- Axial fan (wall, ceiling) for channels 100, 125, 150 mm.
- Centrifugal fan (wall, ceiling) for channels 100, 125, 150 mm.
- Supply and exhaust heat exchangers, depending on the manufacturer and model, require one hole with a diameter of 215-225 mm or two 80-90 mm each with a distance of 200-350 mm between them. A device of this type provides supply and exhaust ventilation with the possibility of heating the incoming air.
Re-equipment of natural ventilation
If the bathroom already has natural ventilation, this will greatly simplify the work. It is enough to remove the grille, install a fan in the hole and connect it to the power supply.
Most often, it is necessary to equip ventilation from scratch when in a private house a room not previously provided for this becomes a bathroom. In this case, ventilation is done through a wall or ceiling (roof). Each method has its own nuances of advantages and disadvantages.
Advice. A check valve is a very useful thing when installing ventilation. It does not allow air from the street to get back into the house.
ventilation through the wall
This option has undeniable advantages. Good air exchange can be done where there is no duct system or the ability to build one. The whole installation process is quite simple and relatively cheap. Save space under the ceiling or in the attic. Of the minuses: natural ventilation is almost completely absent, since the channel is blocked by the blades; the likelihood of drips from condensation on the facade of the house; poor thermal insulation of the channel, which will be noticeable in severe frosts.

With a competent and careful approach, even a beginner can install a ventilation system
An exhaust hole is made on the wall opposite the door using a puncher or a powerful impact drill. There is a lot of dust and debris in the process of work, and the edges of the hole will most likely not be very smooth. Another thing is expensive, but almost perfect diamond drilling. The ventilation duct in the wall will be a pipe of a suitable diameter made of plastic or stainless steel. Around the circumference it is fixed with mounting foam. Outside the house, it is impractical to bring the pipe a long distance from the wall. You can cover the channel from the street with an ordinary grate with a visor or a check valve.
Attention! When choosing a place for drilling on a wall or ceiling, you should make sure that there are no electrical wiring and other communications on the site.
Ventilation through the roof
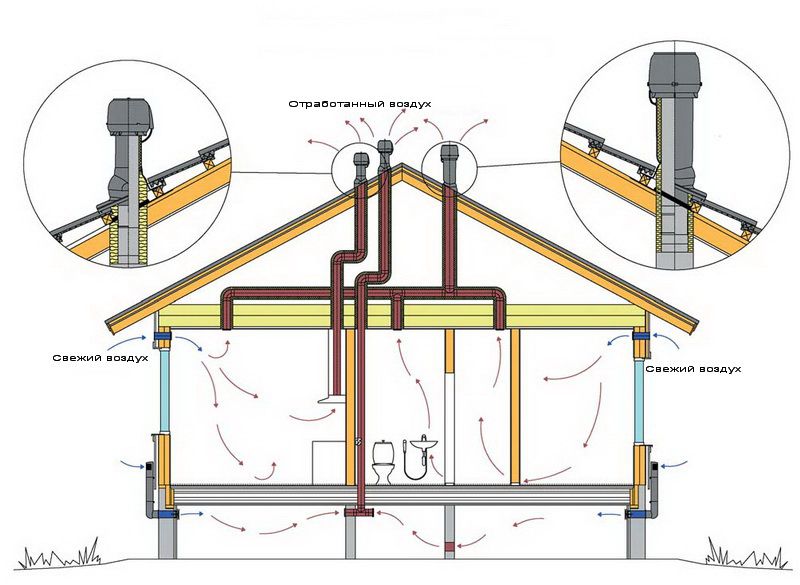
Another option: make a hole in the ceiling, from it, through the roof, bring the ventilation pipe to a height of about 3 m. It is recommended to use galvanized or plastic ones. Preferably no turns. Less resistance, better traction and ventilation. A diffuser is installed on the roof. The deflector is not needed, since ventilation is forced. The pipe is insulated with foiled mineral wool with a diameter of 50 mm. The seams are sealed with foil tape. If this is not done, condensation in cold weather cannot be avoided.
A home-made ventilation duct is attached strictly vertically with clamps to the rafters, or other durable structures in the attic. From the side of the bath, ventilation equipment is installed in the hole.
How long should the fan run
Usually the fan is connected with the light. The light turns on - the fan works, the light turns off, the device, respectively, and the air movement stops. This may not be enough for normal air exchange. In addition, it is not always convenient.
- There are several main ways to connect exhaust equipment:
- Along with the light. When connected to the light circuit, the device starts working at the moment the light is turned on;
- Simultaneously with the light with the possibility of manual shutdown. If necessary, you can disconnect ventilation and lighting if the device is equipped with a key or a cord on the case to turn off the power;
- Simultaneously with the light with automatic fan shutdown via humidity sensor and/or timer;
- Independent connection to a separate switch.
The operating time of the fan depends on the temperature and humidity conditions and the power of the device, and therefore in each case individually. Experts say that the best solution is to install a model with a timer and a humidity sensor. That is, every time after visiting the bathroom, the device works for some more time. How much, it is better to calculate individually. For example, the volume of the sanitary unit is 16 m3, and the productivity of the device is 120 m3/hour. It turns out that it takes 8 minutes to update the entire volume of air. The humidity sensor will not allow the device to turn off if the microclimate has not had time to normalize during this time.
Do-it-yourself fan installation
Immediately before installing the device, it is necessary to complete the preparatory work: equip or clean the ventilation duct, supply power. The next key point will be familiarity with the instructions.

Scheme of the ventilation system
The device is installed in the following sequence:
- Take off the front cover.
- Mark the junction with the wall and drill holes for the screws. Also, fans can be mounted on liquid nails, polymer glue, silicone.
- The device is installed in such a way that its working part is completely drowned in the channel.
- Fix on the surface of the wall or ceiling.
- Connect to power. The standard connection diagram for a model with a timer and a sensor looks like this: N to zero, L to phase, Ls to the phase that comes to the light bulb after the switch.
- Attach the front cover, which snaps into place or is screwed on with self-tapping screws.
- The last step is to check if the ventilation is working properly.
Advice. Natural and forced ventilation can work simultaneously. To do this, a special fan model is installed in a wide ventilation duct. In addition to the electrical part with blades, it is equipped with a grill for free air movement.
In general, it is not difficult to organize forced ventilation based on natural ventilation. Ventilation equipment from scratch will become more laborious, but even it can be done independently.
Video: Installing a fan in a bathroom or toilet
The bathroom, toilet, where unpleasant odors and condensate accumulate, most of all need an exhaust system. A high-quality hood provides a normal microclimate in the premises that meets sanitary and hygienic requirements. For you need to study the rules for installing a fan.
- a finely organized structure that affects the microclimate of the room. The appearance of mold in the bathroom indicates a malfunction of the ventilation system or the insufficiency of the existing one, errors during self-installation or design miscalculations. rising from hot water steam creates condensation that accumulates on the walls and eventually turns into a fungus. Cosmetic repairs will temporarily get rid of stains, so the problem is solved in the bud. It is also required to ensure air exchange, since the organization of a healthy microclimate for a person during baths and other procedures is impossible without this.
Sanitary requirements and norms
According to SNIP and other regulatory documents, to create forced air exchange in rooms with high humidity, fresh air is supplied, adhering to the following indicators:- 6–8 m3/hour per 1 cubic meter of bathroom space;
- 8–10 m3 / hour - for a combined bathroom.
Equipment performance calculation
Before buying equipment for the installation of forced ventilation of the toilet and bathroom, calculations are carried out. Knowing the exact volume, the purpose of the rooms, they choose the equipment that is optimal in terms of productivity (for details on how to calculate everything and install forced ventilation, read). Each room has its own air aeration ratio. The value indicates how many times the air supply is refreshed in one hour.Attention
A bathroom with a toilet is classified as a room with high humidity levels, the maximum allowable aeration ratio is equal to 10.
To calculate the productivity, usefulness of the hood, calculate the volume of the room by multiplying the height by the area. The resulting value is multiplied by the air exchange rate. The result, indicated in m3/h, indicates the minimum extractor power for the bathroom. For example, for a bathroom of 9 square meters. meters with a wall height of 2.5 meters perform the following calculations:
According to calculations, for a bathroom of 9 square meters. m will require a fan with a capacity of 100 ... 135 m³ / h. For ventilation systems with the effect of reverse draft, in order to overcome the resistance of the outlet, the calculated fan performance is increased by 30% Air holes are provided in advance, for which a two-centimeter gap is left between the door and the floor, lattice structures are installed at the bottom of the doors leading to the bathroom, or they are drilled holes.
How to make a forced system with your own hands?
 The ventilation ducts in the walls of the bathroom are usually not enough for the necessary air exchange, therefore, fans are installed to increase the efficiency of aeration. Design and installation is carried out independently, with preparatory work. For this:
 - Compare the diameter of the exhaust device with the size of the opening in the wall.
- The narrow entrance to the vent is expanded with a perforator.
- A plastic or corrugated pipe is inserted into the wide entrance.
- The gap between the pipe and the wall is sealed with mounting foam.
Place for installation
For the most productive work of ventilation, you need to choose a powerful installation and choose a place for installation. The hood is designed to remove warm humid air, the hood is mounted in the upper part of the wall opposite the front door. To ensure fresh air access to the room, a grate is built into the lower part of the door or a gap is left under the door, which allows fresh air to enter the room from the apartment. It is forbidden to install the fan near the sink, bathtub, toilet bowl and other sources of high humidity, as this causes a short circuit. For the same reason, the device is placed under the ceiling. To reduce noise, install a silicone gasket between the device and the wall. An electric hood is not installed in the toilet above the door, so as not to reduce the air flow.The fan is not installed near heating devices so that it does not overheat.
Diagnosis of the state of the ventilation duct
Before installing ventilation, carefully study the condition and arrangement of the ventilation output. To do this, check the draft - first with the window and doors open, then tightly closing the fresh air supply sources. A paper sheet, a lit match, a lighter are leaned against the ventilation shaft. The tongue of flame, shifted towards the ventilation duct, a piece of paper stuck to the hole indicates the presence of traction. To improve traction, check the ventilation shaft for the presence of debris left after the repair. Removing the obstruction will greatly improve the operation of the entire exhaust system.How to connect: circuit selection
Considering a typical apartment in a new building, it becomes clear that standard built-in ventilation is not able to cope with the removal of moisture from the bathroom. The exception is a private house where the toilet has a window. Often, when organizing forced ventilation, you need to find out the duration of the period of operation of the exhaust system. Typically, the fan is connected to a light switch, activating the device while a person is in the bathroom. But this is not enough to ventilate the room. The next way is to connect the device to an independent switch. But the visitor often forgets about such a trifle as the need to turn off or turn on the device. Therefore, it is necessary to install a fan with a humidity meter. The devices operate autonomously, remove excess moisture from the room, and do not require human intervention.
How to install a fan?
Starting to install the ventilation system, read the instructions for the device. It contains a step-by-step installation guide, which simplifies the work. In the absence of manufacturer's instructions or translation into the native language, the actions are performed in the following order:- remove the outer cover;
- the places where the fan is attached to the wall are lubricated with polymer glue, liquid nails or silicone;
- insert the device into the opening in the wall, completely hiding the working part, consisting of the blades and the engine;
- the body is pressed tightly to set the glue;
- to protect against insects and debris from entering the room from the ventilation shaft, a mosquito net is installed;
- the cover is put in place, fixed with self-tapping screws or dowels, which are supplied in the kit;
- the final stage is laying the wire, connecting the fan to the mains.
Components and materials of the system in apartments and private houses
 The ventilation system of combined or separate bathrooms in small apartments is a fan inserted into a hole in the wall. In large apartments - air ducts made of plastic, metal, mounted behind a false ceiling. In private houses it consists of the following elements:
- Air duct. Rectangular pipe with a length of 0.5, 1 or 2 meters. Installed under the ceiling, do not require extra space.
- Fan- external, protruding above the surface, or embedded. The first is used to ventilate a small room, the second - in complex multi-way systems.
- Swivel elbow for connecting corners of rectangular pipes. Vertical and horizontal models are produced.
- Connecting fitting. Matches straight sections of the ventilation system.
- Check valve. Prevents insects and debris from entering the room from the ventilation shaft (do it yourself?).
Operating rules
To extend the life of the equipment, preventive measures are regularly carried out.- The ventilation system is inspected for debris, dust and dirt are removed from the fan blades. This will ensure full air exchange, and the device will work at maximum power.
- Periodically check the draft in the bathroom, toilet, wash the mosquito net with warm water and detergent.
Untimely maintenance and cleaning of the exhaust system leads to failure of the entire system.
- Masters advise people who first encountered the installation of a ventilation system in the toilet and bathroom to ensure the supply of fresh air. Otherwise, the efficiency of the exhaust device is reduced to zero (?).
- It is not necessary to buy expensive large-sized systems. It is enough to choose a device, having previously correctly calculated the required power.
- The presence of an ionizer, an air purifier, an air conditioner, a household humidifier does not eliminate the need for ventilation installation, since none of the listed devices contributes to the flow of fresh air.
- When installing the fan, it is recommended to pay attention to the power of household electrical wiring. The device is characterized by two main parameters - power and pressure. These parameters depend on each other, they are taken into account in order to avoid damage to the cable due to network overload.
- After installation is completed, you need to check the operation of the fan by leaning a sheet of paper or bringing the included lighter. If the flame does not change position, a specialist is called in to fix the problem, especially with attachments built into the system - sensors, thermometers, remote controls, external interfaces.
Useful video
Below you can find detailed instructions for connecting and installing forced ventilation in the bathroom.In contact with
The toilet and bathroom in a wooden house suffer more from stagnant air than other rooms. With insufficient ventilation of the bathroom and bathroom, condensate accumulates on the pipes, and mold settles in blind corners. Unpleasant odors and dampness that irritate a person cause a natural desire to get rid of them as soon as possible. How to achieve pleasant freshness of air in the interior of a private wooden house?
We invite you to find out how ventilation is done in the bathroom with your own hands. Once you've received the theoretical guidance, you'll feel the urge to arm yourself with the tools and get down to practical action immediately.
Features of a bathroom in a private house
Wooden house bathroom
It is not appropriate for residents of city apartments to think about where sewage flows and how air is cleaned. Unlike them, the owner of the mansion is obliged to equip the ventilation of the bathroom in his private house on his own.
It is necessary to plan in advance what type of bathroom to build, based on the presence or absence of a centralized sewer system in the area.
You, as the owner of the house, will have to decide at the initial stage of construction whether forced ventilation of the bathroom is needed, or natural enough. To do this, simple calculations should be made so that the efficiency of air exchange complies with the norms of SNiP for ventilation of bathrooms.
But before you start building a ventilation system for a bathroom in a wooden house with your own hands, you first have to:

Ventilation of a bathroom in a modern wooden house
In ancient times, there was no such thing as ventilation of latrines, but in log houses the Russian stove served as a means of natural air purification. The stagnant air, along with the smells of the garbage pail, was drawn into the stove blew and carried out through the chimney.
Current building technologies deprive the walls of a wooden frame house of the ability to "breathe". And hermetic double-glazed windows even more so turn the dwelling into a kind of space station. To ventilate rooms, you can install windows with ventilation holes, but this method is not suitable for effective ventilation of a bathroom in a private house.
To be sure to get rid of stale air, you will have to make artificial ventilation in the bathroom with your own hands. Its essence is that the exhaust fan is built into the system, and it greatly enhances air exchange. The best option is to install a central fan in the attic. Additionally, you can equip the system with air condition sensors to optimize the fan operation.
A wooden house will shrink over time and its structures can move and damage the elements of the ventilation system. Consider this feature, and leave expansion gaps when laying air ducts.
When developing a ventilation system project, it is necessary to solve the issue of combining air ducts. For example, ventilation of bathrooms in public buildings should be carried out only by an independent system, and it is forbidden to combine it with a common one according to the norms of SNiP ventilation of bathrooms. But in private homes, such a precaution is unnecessary. It is enough to install a non-return valve on the ventilation duct, and the path to the living quarters will be cut off for smells from the toilet.
A good example of a combination of air ducts can serve as a bathroom, equipped as a backlash closet.
Backlash closet and elimination of odors from it
Toilets of this design are often seen in homes that do not have a sewer connection. Backlash-closet is one of the premises of the house, under which a cesspool for sewage is arranged. It is not difficult to build exhaust ventilation of such a bathroom in a wooden house with your own hands.
The principle of operation of the ventilation of a bathroom in a private house with a backlash closet is extremely simple. A vertical pipe, the so-called backlash channel, creates a draft so that the air from the restroom is drawn out. Traditionally, the backlash closet was built close to the stove, and the exhaust duct was built into the chimney masonry. Thus, the problems of heating the toilet and its ventilation were simultaneously solved.
If you decide to build a backlash closet in your house, take into account the following:
Determine the height of the ventilation pipe according to the same rules as the stove - the higher the better. Install a TsAGI deflector on its head to increase the upward air flow in the pipe due to the wind.
To ensure good traction during the period when the stove is not heated, you can install a low-power fan in the backlash channel and turn it on as necessary. A stylish ventilation grill with a fan in the bathroom will also serve as an interior decoration.
Air exchange calculation
Construction and sanitary standards strictly regulate the intensity of air exchange in the premises. In particular, the ventilation of bathrooms in public buildings must certainly be arranged according to the exhaust system and provide at least five air exchanges. This value shows that within an hour the air in the room should be completely updated five times.
For different types of premises, the standards are different, but there are some general recommendations.
The device of the ventilation system of the bathroom

It will be easiest for you to equip with your own hands the natural ventilation of a bathroom in a wooden house. To do this, make ventilation holes at the bottom and top of the walls of the room and equip them with gratings.
If natural ventilation is not enough, you will have to do forced ventilation in the bathroom of a wooden house. The air circulation in the system will be enhanced by the action of the fan, and odors and fumes will be removed through the network of ventilation ducts.
You can install a fan in the attic, and it will be common to the entire system. When installing it, observe the following safety measures:
- use only specialized fans with an increased fire protection class;
- place the air duct with the fan not on a wooden attic flooring, but on metal stands;
- for use in a wooden house, purchase air ducts only from non-combustible materials;
- If possible, the ventilation grill with a fan in your bathroom should be equipped with a fire damper.
In a small house, it is enough to put a fan right in the bathroom, at the air outlet to the ventilation duct. For convenience and energy savings, you can combine turning on the fan with lighting.
System health check

After installing the ventilation of the bathroom, it's time to check if it is functioning correctly. Light a match or candle and bring it close to the vent. With good draft, the flame will flutter and deviate towards the hole. The traction force should not decrease significantly even with the windows closed.
Following the recommendations, you will definitely be able to mount a bathroom ventilation system in a wooden house with your own hands! From now on, all the inhabitants of your home will be able to fully inhale the life-giving jets of fresh air.
To connect plumbing fixtures to the water supply network, a flexible water supply is used. It is in demand when connecting faucets, showers, toilets and other points of water intake, and greatly simplifies the installation process. Flexible piping is also used when installing gas equipment. It differs from similar devices for water in manufacturing technology and special safety requirements.
Characteristics and types
Flexible hose for plumbing is a hose of different lengths, made of non-toxic synthetic rubber. Due to the elasticity and softness of the material, it easily takes the desired position and allows installation in hard-to-reach places. To protect the flexible hose, the upper reinforcing layer is designed in the form of a braid, which is made of the following materials:
- aluminum. Such models withstand no more than +80 ° C and retain functionality for 3 years. In high humidity, aluminum braid is prone to rust.
- Of stainless steel. Thanks to this reinforcing layer, the service life of the flexible water supply is at least 10 years, and the maximum temperature of the transported medium is +95 °C.
- Nylon. Such a braid is used for the manufacture of reinforced models that can withstand temperatures up to +110 ° C and are designed for intensive use for 15 years.
Nut-nut and nut-nipple pairs are used as fasteners, which are made of brass or stainless steel. Devices with different indicators of permissible temperature differ in the color of the braid. Blue ones are used to connect to a pipeline with cold water, and red ones - to hot water.
When choosing a water supply, you need to pay attention to its elasticity, reliability of fasteners and purpose. It is also mandatory to have a certificate that excludes the release of toxic components by rubber during operation.
Features of gas connections
When connecting gas stoves, columns and other types of equipment, flexible connections are also used. Unlike models for water, they are yellow and are not tested for environmental safety. For fixing, end steel or aluminum fittings are used. There are the following types of devices for connecting gas appliances:
- PVC hoses reinforced with polyester thread;
- synthetic rubber with stainless steel braid;
- bellows, made in the form of a corrugated stainless steel tube.

Holding "Santekhkomplekt" offers engineering equipment, fittings, plumbing and fixtures for its connection to communications. The assortment is represented by products and materials of well-known foreign and domestic manufacturers. Discounts apply for bulk purchases, and product quality is confirmed by standard certificates. For information support and assistance, a personal manager is assigned to each client. The ability to arrange delivery within Moscow and to other regions of the Russian Federation allows you to quickly receive the purchased goods without any hassle.
Drainage is a hydro-reclamation measure to remove excess groundwater.
If water does not leave the territory of the site for a long time, soil gleying occurs, if shrubs and trees quickly disappear (wet), it is urgent to take measures and drain the site.

Reasons for waterlogging the soil
There are several reasons for waterlogged soils:
- clay heavy soil structure with poor water permeability;
- an aquiclude in the form of gray-green and red-brown clays is located close to the surface;
- high occurrence of groundwater;
- technogenic factors (construction of roads, pipelines, various facilities) that impede natural drainage;
- violation of the water balance by the construction of irrigation systems;
- the landscape area is located in a lowland, a beam, a hollow. In this case, precipitation and water inflow from higher places play an important role.
What causes excess moisture in the soil
You can see the results of this phenomenon yourself - trees and shrubs are dying. Why is this happening?
- the oxygen content in the soil decreases and the content of carbon dioxide increases, which leads to a violation of the processes of air exchange, water regime and nutrition in the soil;
- oxygen starvation of the root-forming layer occurs, which leads to the death of plant roots;
- the intake of macro and microelements by plants (nitrogen, phosphorus, potassium, etc.) is disrupted, because excess water washes out mobile forms of elements from the soil, and they become inaccessible for assimilation;
- there is an intensive breakdown of proteins and, accordingly, the processes of decay are activated.
Plants can tell at what level groundwater occurs
Take a close look at the flora in your area. The species inhabiting it will tell you at what depth the groundwater layers are located:
- top water - in this place it is best to dig a reservoir;
- at a depth of up to 0.5 m - grow marigold, horsetail, varieties of sedge - blister, holly, fox, Langsdorf reed grass;
- at a depth of 0.5 m to 1 m - meadowsweet, canary grass,;
- from 1 m to 1.5 m - favorable conditions for meadow fescue, bluegrass, mouse pea, rank;
- from 1.5 m - wheatgrass, clover, wormwood, plantain.
What is important to know when planning site drainage
Each group of plants has its own moisture needs:
- with a groundwater depth of 0.5 to 1 m, vegetables and annual flowers can grow on high beds;
- the depth of the water reservoir up to 1.5 m is well tolerated by vegetable crops, cereals, annuals and perennials (flowers), ornamental and fruit and berry shrubs, trees on a dwarf rootstock;
- if groundwater at a depth of more than 2 m, you can grow fruit trees;
- the optimal depth of groundwater for agriculture is from 3.5 m.
Do you need site drainage?
Record your observations at least for a while. You yourself will be able to understand how much drainage is needed.
Maybe it makes sense to simply redirect melt and sediment water along a bypass channel, and not let it flow through your site?
Perhaps it is necessary to design and equip a storm drain and improve the composition of the soil, and will this be enough?
Or is it worth making a drainage system only for fruit and ornamental trees?
The exact answer will be given to you by a specialist, whom we strongly recommend calling. But after reading this article, you will gain some awareness in this matter.
At the end of the technological and production tasks associated with the arrangement of the sewer system in an apartment building, an industrial building, as well as in a private household, it is required to test the system involved using the forced spill method. This task was applied to identify possible defects or improper installation of the entire sewer part involved and the act of testing the internal sewerage systems and drains will be material evidence of work on the acceptance of the facility.

Visual inspection should be accompanied by entering into the act of testing internal sewerage and drain systems according to SNIP, which is currently represented by the current regulation of the appendix of the D series, which corresponds to SP 73.13330.2012 "Internal sanitary systems of the building", recently a new one has been applied updated working version according to SNiP 3.05.01-85.
Many people associate an outdoor toilet in the country with an unpleasant smell, dirt and danger. But modern summer residents strive to make the most comfortable and safe place out of such a toilet.
The design is a small cabin, wooden or brick, inside there is a toilet bowl or a seat. Under the cabin is a cesspool, it is she, or rather, the accumulation of waste in it, that causes an unpleasant smell. In the process of decomposition, human waste releases a foul-smelling gas - methane, which, moreover, is also dangerous to health - when visiting the toilet, a person can lose consciousness.
Methane vapors penetrate wood and destroy it, as a result, wooden floors deteriorate and there is a risk of collapse of the structure. Hence the conclusion: it is necessary to prevent the accumulation of gases and ensure their free exit. For this, ventilation is needed in the outdoor toilet.
How is the outdoor toilet
The easiest way to lay the ventilation system is at the stage of building the toilet. In an existing booth, it will be a little more difficult to equip ventilation.

The device of the toilet in the country is simple:
- a cabin is being built above the ground;
- a cesspool is dug underground.
The easiest option is when the cesspool is located directly under the booth. This is a common option and easy to build with your own hands. But toilets are becoming more and more popular, the cabin of which is removed from the pit, you can install a toilet bowl in them, and organize sewage disposal through pipes. This is a much more complex design, involving the supply of water supply and sewerage.
Description of the ventilation system in the toilet
For best results, it is necessary to equip ventilation in both the booth and the cesspool.
There are two types of hood:
 Scheme of the ventilation system for the toilet in the country
 - natural;
- forced or mechanical.
Natural works thanks to the draft formed by the air flow. Warm air rises and cold air accumulates at the bottom. If you make two holes: one from above, the second from below, then the flow of cold air coming from the street will displace warm air with methane vapor through the upper passage.
To ensure the best traction, it is necessary to use a pipe, while its diameter must be at least 15 cm and a height of 2–2.5 meters. In general, it is considered optimal when the pipe protrudes at least 1.5 meters beyond the roof level.
Ventilation in the country toilet
Forced ventilation involves the connection of a fan that will promote air circulation inside the cabin. In order for the toilet to have fresh air, it is necessary to have a window for ventilation. You can combine both types of hood in the booth for best results, but it is strictly forbidden to install a fan in a cesspool - only a chimney.
What can you make a ventilation system with your own hands
In order to equip ventilation in a cesspool, the following materials will be needed:

- pipe, 110 mm in diameter and 2.5 m long;
- fasteners - 2-3 pieces;
- deflector - 1 pc.
For the ventilation system in the toilet you will need:
- pipe, 110–115 mm in diameter, 2.5 m long;
- connecting corner;
- decorative grille on the vent;
- clamps - 3-4 pcs;
- umbrella or deflector.
If a forced system is used, then a fan is also needed.
As a rule, toilets in the country have a small area, so the most primitive fan, whose power does not exceed 30 watts, will suffice. The form should be chosen depending on the place where it will be installed. It is most convenient to mount in the window. In this case, it is better to purchase a square model.

If you plan to install it in a wooden wall, then it will be easiest to cut a round hole. The fan will work for a long time, so it is better to choose a quality model that will last more than one year.
The fan will need electricity to operate. As a rule, its cut is brought to the toilet to provide lighting. The socket must be located in such a place that moisture does not get on it, it can be mounted in the wall and closed with a box.
The fan has a protective grill, which tends to get clogged. Therefore, you must not forget to clean it regularly, not only to ensure the smooth operation of the device, but also so that fresh air enters inside, and not polluted with dust.
How to make ventilation

Before starting work, prepare the necessary tools:
- bayonet shovel;
- drill - if the walls of the booth are wooden;
- perforator - if brick walls;
- hacksaw for metal;
- roulette;
- level;
- self-tapping screws.
DIY cesspool ventilation system
Using a bayonet shovel, a hole is dug above the pit, the diameter of which should be slightly larger than the size of the pipe. Such a hole should be made near the rear wall of the cabin so that the pipe can be conveniently fixed with clamps. Lower the pipe into the pit to a depth that is less than the maximum fill mark. That is, so that waste does not get into the ventilation shaft.

With the help of fasteners and clamps, the pipe is fixed on the wall of the booth. The bottom is dug in with earth. A deflector or umbrella is put on top.
The advantages of the deflector is that this device is able to increase traction up to 30% due to the force of the wind. Therefore, if possible, it is worth giving preference to a deflector, rather than an ordinary umbrella, which only protects from precipitation.
Such a simple do-it-yourself cesspit ventilation design will prevent an unpleasant smell in the toilet. If the cabin is not made airtight, there are slots, openings, windows that open, and the toilet bowl or seat has a tight lid, then only the hood from the pit will be enough. But, in this case, a mute unpleasant odor will still be present. If there is a need to get rid of it, then you should proceed to the equipment of the ventilation system inside the cabin.
Do-it-yourself ventilation in the toilet cubicle
Sequencing:

- on top, along the back wall of the toilet, a round hole is made according to the diameter of the prepared plastic pipe. It should be as high as possible, but at least 15 cm from the roof level. The hole is made with a drill or puncher;
- a corner pipe is installed in the resulting opening;
- the slots are blown with mounting foam;
- the main part of the pipe is attached to the corner element;
- with the help of clamps and fasteners, the pipe is fixed to the outer wall of the toilet;
- an umbrella or deflector is put on top;
- inside, the excess part of the pipe is cut off and closed with a decorative ventilation grill.
At the next stage, you need to make a hole at the bottom to ensure the flow of cold air:

- using a drill or puncher, a hole is drilled in the lower part of the wall, at a distance of 20–30 cm from the floor. It is better to choose the opposite wall, the one in which the pipe is installed;
- two decorative grilles are installed using self-tapping screws or other fasteners.
This is the final stage - the ventilation in the country toilet is ready.
If in the cold season it will blow strongly from the lower hole, then you can close it with a barrier.
Video: How to care for an outdoor toilet in the country?