A greenhouse in the country can be made from various materials. The choice will depend on the personal preferences of the owner of the site and the amount of free cash. With the help of wood, you can make a similar design quickly and without large financial costs.
Timber is a reliable material that can be purchased at almost any large hardware store. In terms of durability, the bars are slightly different from metal, but if they are treated with a special impregnation, it will be possible to extend the possible period of their service. Wooden greenhouses can last approximately 5-7 years, and in some cases even longer. Everything will depend on the climate of the area where the structure is installed.
To build a greenhouse, it is not necessary to purchase expensive wood species, as it will not last much longer. It is recommended to choose industrial grades of wood. In the selection process, attention should be paid to the quality of the material, technical parameters and the number of defects. For the manufacture of greenhouses, it is best to use a timber without knots, which is thoroughly dried.
Foundation for a wooden greenhouse
The base for the greenhouse must be reliable and stable. It is best to make a strip or brick foundation. Such designs have all the properties that are needed for a greenhouse. In addition, such foundations will not cost too much.
It is most preferable to opt for a tape basis. You will need to do the following:

- First of all, you need to fill the base with a depth of about 50-60 cm and a height of 20-30 cm above ground level.
- The structure will need to be reinforced to make it strong and prevent subsidence in the future. Such a base can be used for a greenhouse made of any material, so if in the future there is a desire to change the frame, then there will be no problems with this.
- After that, the foundation on the tape will need to be waterproofed to protect it from moisture for a long time and extend the overall service life.
The width and shape of the structure will depend on the size of the greenhouse and the load of the frame, so it will not be possible to make accurate calculations.
How to install a frame for a greenhouse with your own hands?
Wood is much easier to work with than other materials. Therefore, there will be no problems with the installation of the frame. First of all, you need to fix a beam on the base, which will be slightly wider than the rails used to build the frame.
In order to fix the base of the frame, you can use a corner made of metal, which must be installed in advance in the foundation. In this case, reinforcement, bolts or anchors can also be used. Before mounting the carrier rail, it will need to be treated with protective agents - antiseptics, drying oil and paint. This is done in order to ensure a long service life of the base of the greenhouse structure.

When the carrier rail is ready for installation, final measurements should be taken and work can begin. To fix the basis of the greenhouse structure and perform the rest of the work, you will need to use the following elements:
- electric drill;
- fasteners;
- a hammer;
- Bulgarian.
The base of the structure is attached around the perimeter of the foundation. It is necessary to check that the base is solid, and its sides are connected to each other. The simplicity of the process of mounting the frame of the greenhouse structure and its stability will depend on these values.
Next, the frame is installed. Installing it is quite simple, since the base has already been mounted on the foundation and firmly fixed. It remains only to take measurements and perform installation using the diagrams. The scheme itself can be seen in Fig. one.
All other elements of the wooden greenhouse, frames and vents, ceiling logs are fixed with self-tapping screws, clamps, corners and metal profiles.
Production of greenhouses of various designs
Before you start building a greenhouse, you should purchase all the necessary elements.
Standard small wood greenhouse

Figure 1. Scheme for a wooden frame.
The dimensions of the manufactured structure are 6x4 m. The product is covered with polycarbonate. To make such a greenhouse, you will need to perform the following steps:
- First of all, you will need to build a foundation. To do this, drill the soil 50-60 cm, pour the pillars through the pre-installed studs.
- On the poles, you need to assemble a strapping from a larch beam measuring 1x1 m. The strapping is attracted by nuts with washers to the posts.
- The frame is erected according to the scheme and fitted with studs. A diagram of such a design with all the necessary steps can be seen in Fig. 2.
Greenhouse made of wood according to Mittlider
The structure to be erected has the following dimensions: width - 4 m, length - 8.4 m, height in the ridge - 3.1 m. The structure will have several slopes of different heights and vents that are located under the ridge.
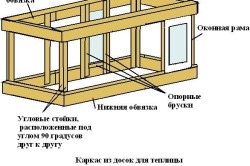
Figure 2. Scheme of the frame of the greenhouse on a wooden frame-base.
For the construction of the structure, you will need to use boards 0.5x1 m. The construction process is as follows:
- The foundation is built first. For a greenhouse of this type, a monolithic tape 35x20 cm, which is fixed with 8x4 mm reinforcement, is suitable. Outside, it must be impregnated with a special agent so that the base does not crumble in the future. The structure can be lined with natural stone.
- The frame is installed. Racks should be mounted every 70 cm.
- In the upper part of the greenhouse, vents are made. You can provide automation for their opening.
- Polycarbonate is fixed. In this case, it is important not to leave gaps.
- At the end, it is necessary to bring water supply into the greenhouse, install a large container and spread the pipes into several beds for drip irrigation.
For the manufacture of such a greenhouse structure, you will need to purchase approximately 2000 boards 0.5x1 m. To build doors and vents, you will need to purchase more small bars - 30x50 cm and 50x70 cm.
How to make a greenhouse for polycarbonate?
In this case, the frame will be made of wooden bars 45x45 cm. The length of the greenhouse is 8 m, the width is approximately 2.8 m. It can provide for the installation of two doors and several vents.
There should be a distance of no more than 1 m between the racks.

Each truss must be supported by several posts. The exception is the center pillar.
The sequence of actions will be as follows:
- The strapping in this case will be carried out using metal corners 45x45 mm or 50x50 mm. With the help of a grinder, an incision of a shelf of 12 cm should be made at a right angle. Thus, you can get a base on which the harness will be attached.
- After that, you need to paint the corners several times with anti-corrosion paint.
- Next, you need to hammer the bars into the ground, check their location with a building level, and then fix the strapping rails with self-tapping screws, docking them with each other.
- All joints will need to be reinforced with a metal plate.
- The lower trim along the entire perimeter is sewn up with galvanization and buried in the ground.
- Next, on the roof, it will be necessary to fix the polycarbonate with self-tapping screws with rubber washers, all other elements are fixed using a press washer.
- The end parts of the polycarbonate should be closed with a plastic corner. The sheets are overlapped, after which they are treated with silicone sealant along the edges.
- The lower harness is treated in several layers with an antiseptic agent, after which it is painted.
How to make greenhouses with your own hands under the film?

In this case, the greenhouse will be covered with a light film. The procedure will be as follows:
- A solid base is being made. The design will have a small weight, so you can weld ordinary home-made piles of small sizes. They can be made from metal corners 50x50 mm. The length of the elements should be 90 cm.
- Piles are covered with a primer in several layers and driven into the ground.
- The piles will need to be leveled using a laser level. After that, it will be possible to proceed to the assembly of the frame.
- Roof structures are installed. In this case, you can use plywood 8 mm thick, which is fastened with PVA glue and self-tapping screws.
- The next step is to install the sides for the beds. It is best to use slate 10 mm thick. From the side of the street near the slate, you can additionally lay the foam.
- After that, the crate is painted. It should be remembered that the boards before painting will need to be treated with an antiseptic. The paint should be applied in several layers.
- Frames for windows and doors are being assembled.
- The whole structure is covered with a light film.
- In the greenhouse itself, it will be necessary to pull the cables in order to be able to tie up the plants.
- Additionally, you can mount irrigation and automatic ventilation systems.
- If the greenhouse structure is being built in a cold region, another layer of film can be stretched inside it, fixing it to the crate with a construction stapler. Even in the case of using budget films, the effect can be immediately noticed.
How to build a portable greenhouse on foundation blocks?

The structure can be disassembled and carried due to its light weight. If the greenhouse needs to be moved from one place to another, a similar structure can be built. Its base will consist of several bars 15x15 cm. You can make it as follows:
- First of all, you need to dig a hole to a layer of sand, pour sand and gravel into it, carefully tamp and lay blocks of concrete.
- Next, you need to treat the bars with an antiseptic. After the product dries, the wood must be coated with bitumen on both sides.
- The frame is installed, after which it is treated with the same antiseptic.
- In the corners of the structure, braces 1 m high should be fixed.
- A template rafter is being made, with the help of which it will be possible to easily manufacture all the others in the future.
- Racks are prepared and installed.
- After the roof is built, it will be necessary to paint the end parts of the structure.
- The wooden greenhouse is covered with polycarbonate 5-8 mm thick.
- To insulate the structure, extruded polystyrene foam can be laid inside it. From the outside, cement blocks are installed.
What is the best way to cover the greenhouse?

Scheme of fastening a film wooden greenhouse: a - scheme of fastening racks, b - scheme of a device for lifting a film.
When the greenhouse structure is ready, you will need to decide on the material for covering it. A strong frame can withstand any weight, so you can choose from glass, film or other materials. The choice must be made based on the practicality and quality of the material. The following materials can be used:
- Film. Covering should be done sequentially, gradually passing through the slope from one side to the other. In stages, the film is fixed to the frame. It is recommended to cover the corner of the slope of the greenhouse structure with a visor, since the film is often damaged and moisture and cold air enter through the defects.
- Glass. If it was decided to cover the greenhouse with glass, special stops and glazing beads should be purchased. Glass is best ordered after the crate is fully installed, when the exact dimensions of the cells are known. The material must be firmly fixed. The seams can be treated with silicone or sealant to ensure the tightness of the structure and eliminate drafts.
- Polycarbonate. Covering a greenhouse made of wood with polycarbonate is quick and easy. To do this, use special rails and profiles, as well as fasteners that can be included with polycarbonate plates. This material is the most practical and modern, therefore it is recommended to cover the structure with it.
After the greenhouse body is covered with the selected material, the structure will need to be made airtight, heating and lighting devices installed in it, water for irrigation, and a ventilation system installed.
To date, there are a fairly large number of different schemes for greenhouses made of wood. You need to choose based on personal preferences. It is not difficult to make a greenhouse with your own hands, if you take into account all the existing nuances, follow the sequence of actions and have the tools and materials necessary for work.
A wood-framed greenhouse is an affordable and effective shelter option for plants. The right technology allows you to build a reliable greenhouse with comfortable conditions for plants with your own hands.
Functions and design features
A wooden greenhouse often has a rectangular shape, due to the convenience of construction and operation of such a structure. The base is a wooden frame made of bars. The greenhouse can be installed on the foundation or not create a foundation. For example, for a small structure, the size of which does not exceed 2x4 m, there is no need for a foundation, and at the end of the harvest, the greenhouse can be easily disassembled for storage. Larger greenhouses for plants require a base, which can be concrete, brick, or wood.
Small greenhouse can be easily disassembled for storage
The wooden framework is practical, convenient in operation, reliable. It is easy to mount any materials for covering the greenhouse on top of the frame. At the same time, the low cost of construction is an advantage of such a wooden structure.
The wooden structure has the following features:
- environmental friendliness, safety for plants;
- easy installation, simple assembly, convenient storage;
- high margin of safety for the durability of the structure;
- for the frame, you can use different types of wood;
- wood is an affordable and common material.
The wooden frame performs the main function of the support. Coating material, various devices are attached to it. The base, which is attached and installed on the foundation, is made of wood. Thus, wood is appropriate in the construction of the greenhouse and provides high performance of the finished structure.
Do-it-yourself drawings for making greenhouses from wood
Greenhouses made of wood may have a different shape, but in any case, the location of the structure should be taken into account. Depending on this, a drawing is selected, which is an important stage in the construction. The diagram reflects the dimensions of each element of the structure, the type of attachment of parts, the location of doors and vents.
The drawing of the greenhouse includes the main elements and their dimensions
With gable roof
The roof, which has two inclined surfaces, reduces the load on the frame of the greenhouse. The size of the structure can be different, but if the greenhouse is more than 4x8 m, then roof supports are installed inside. This ensures the strength of the roof under the influence of snow, rain and wind. At the same time, the drawing of a greenhouse with a gable roof is distinguished by many nuances, and during construction it is important to correctly calculate the angle of attachment of the supporting parts of the roof.
Double pitched roof for ease of use
Such a greenhouse has a high light transmission capacity. The upper corner of the connection of two roof planes is protected by a ridge. This is necessary when using any material for sheathing a structure. The corner ridge prevents moisture and dust from entering the greenhouse.
Shed roof option
The greenhouse attached to the house has a pitched roof. This roofing option is also optimal for free-standing structures, but it is important to take into account the main wind direction, which is typical for a particular region.
Wall-mounted design is convenient for a small area of \u200b\u200bthe site
The peculiarity of the greenhouse attached to the main building is good thermal insulation. Protection is provided due to the presence of a solid main wall on one side. Installation of such a structure does not require large expenditures, since the base is well fixed from the side of the building.
with arched roof
A greenhouse with a roof in the form of an arch can have a frame made of wooden beams, but the arches are made of bent metal pipes or PVC products. Polycarbonate or film are optimal for covering such a structure. Glazing an arched greenhouse is impossible, and the design is difficult to calculate the angles of the connection of the roof and walls.
The drawing of an arched greenhouse is complex, and calculation is important
Arched greenhouses are extremely difficult to create entirely from wood, and prefabricated structures are impractical. Therefore, a semicircular roof is rarely present in a wooden frame greenhouse.
with foundation
The strength of a large wooden greenhouse is often achieved by setting the frame on the foundation. The base can be made of concrete blocks, a combination of masonry and concrete pouring, as well as thick timber. In the first case, rectangular blocks are used, which are laid along the perimeter of the greenhouse in a trench. Fasten the elements with cement. If brickwork is used, then trenches should first be made around the perimeter of the future structure. Then the concrete mixture is poured onto a bed of gravel, and after it hardens, the brick is laid in two rows.
The brick foundation scheme involves several layers of materials
The base of the timber requires the creation of a trench of greater depth than the parameters of the wood. For example, for a beam with a section of 100x100 mm, a trench 150 mm deep is required. The width of the recess should be 70–80 mm larger than the width of the timber. Wooden elements are laid along the perimeter of the trenches, in which a layer of gravel and roofing material have been previously laid.
The scheme of a greenhouse with a foundation made of timber is simple to implement
The foundation of the timber is affordable, practical and easy to perform. In this case, it is best to use larch elements, which are distinguished by durability and hardness. Any wood should also be treated with antiseptics that protect the material from damage and decay.
Video: features of the concrete foundation for the greenhouse
without foundation
The foundation protects the frame of the greenhouse from moisture and decay, and also ensures the strength of the structure. A greenhouse without a base can be installed on supports in the form of columns of bricks or equip trenches using roofing material. This ensures the protection of the wooden frame from moisture and damage. The absence of any coatings under the frame makes the greenhouse less durable.
Film greenhouse can be built without a foundation
A construction without a solid foundation does not require a large complex of installation work. The structure is easy to disassemble for storage, replace the base elements or move to another location.
Photo gallery: wood greenhouse options
materials
A greenhouse for growing horticultural crops requires careful selection of materials for the frame and external cover. In this case, the frame can be made from any wood. If you need the most durable structure, then it is best to use larch bars. Pine boards are more affordable, low cost, easy to install.
Any wood is suitable for a greenhouse, but the choice depends on financial capabilities.
The main requirements for the frame material, that is, wood:
- lack of rot, cracks, a large number of flaws and knots;
- the cross section of the bars must be at least 50x50 mm;
- for the foundation, a bar with a section of 100x100 mm is used.
For the construction of the frame, the most affordable wood options are used. The use of valuable species (oak, beech) requires special equipment for their processing, and the high cost of the material makes construction unprofitable.
Any wood without rot is suitable for a greenhouse
The outer coating can be presented in the form of a dense film or polycarbonate. Glazing is also possible, but is more difficult. Glazed greenhouses are not practical and durable enough. Therefore, polycarbonate is a popular option for self-construction of a greenhouse. The advantages of polycarbonate are as follows:
- simple installation technology;
- strength, resistance to heavy loads;
- high light transmission ability;
- various color options;
- durability;
- easy assembly and dismantling of sheets.
For construction, you will need polycarbonate sheets with a thickness of 8–10 mm. Honeycomb elements withstand a significant load and therefore the greenhouse can not be dismantled for the winter. Installation of honeycomb sheets involves the use of thermal washers with special plugs that prevent moisture from entering the honeycomb. Bars, boards of any wood should not have defects, and they are used for fastening with self-tapping screws, metal corners, nails.
Calculation of the amount of materials
To determine the amount of material, you need to know the dimensions of the greenhouse. The most versatile designs with parameters of 3x6 m. A gable roof is a classic option, which requires bars with a section of 50x50, which are also used for the entire frame. Thus, the construction will require bars with a section of 100x100 m for the base, and their length is equal to the width and length of the greenhouse.
The dimensions indicated on the drawing make it easy to calculate the material
The calculation of polycarbonate is carried out by calculating the total coverage area. At the same time, the covering of the door, roof, vents, walls is taken into account. Fasteners should be purchased in excess, because during the construction process unforeseen situations may arise, breakage of screws or nails. When purchasing materials, it should be noted that the junction of two roof planes requires a special corner, a ridge.
Tools
Building a greenhouse made of wood with a foundation of timber involves the use of simple tools. The list includes the following accessories and consumables:
- building level, tape measure;
- wood saw;
- screws, self-tapping screws, thermal washers, nails;
- brush, wood preservative;
- screwdriver, hammer;
- pegs and rope;
- fine gravel, roll waterproofing.
All cutting, fastening devices must be quite sharp for high-quality installation of the greenhouse. This avoids damage to materials during operation.
How to build a wooden greenhouse with your own hands - step by step guide
Before installing the structure, a place for the greenhouse should be determined. The site should be well lit, bushes or buildings should not obscure the greenhouse. Rubbish, branches, cobblestones should be removed from the ground. Marking is carried out on a prepared flat surface. To do this, mark one of the corners of the perimeter of the greenhouse, install a peg with a rope attached to it. Then they stretch the rope to the next corner, mounting the peg. In a similar way, the boundaries of the base of the greenhouse are indicated.
Marking helps to create a smooth and stable structure
Before starting the assembly of the greenhouse, it is best to cut the timber for the foundation to the required dimensions, corresponding to the length and width of the perimeter. This allows you to install the base quickly and efficiently. And you should also treat all wooden parts with a wood preservative, taking into account the ends. After the product has dried, you can proceed with the installation.
The complex of works on the construction of a greenhouse made of wood includes the following steps:
- After marking, you need to dig a trench around the perimeter of the greenhouse, removing the top layer of soil. The parameters of the trench should be 50–70 mm larger than the cross section of the beam. Roofing material is laid on the bottom and walls with an overlap on the edges. A base is constructed from a bar, fastening the elements using the “half-tree” method. The foundation is additionally reinforced with metal corners.
The “half-tree” method allows you to securely fix the elements
- The finished foundation is laid on the roofing material, wrapping its edges and securing them with nails or staples. Irregularities are smoothed out by adding fine gravel or coarse sand under sheet waterproofing. At the corners of the installed base, reinforcing bars must be driven into the ground, which is necessary for the stability of the structure. Further, from a bar of a slightly smaller section than for the foundation, you need to assemble the same frame, which is the basis of the greenhouse. It is attached to a recessed frame with long self-tapping screws, metal strips.
The main frame provides protection and stability to the greenhouse
- The walls of the greenhouse are assembled from boards with a thickness of 35 mm or more. To do this, you need to determine the height of the structure. Two long boards are installed horizontally and they serve as the basis of the wall frame, and vertical elements are attached between them in increments of about 50-60 cm. The elements are fixed in pre-cut grooves, which facilitates assembly. Additionally, the frame is fixed with self-tapping screws. In this way, the two longest walls are assembled.
Mounting in grooves ensures the reliability of the greenhouse
- The end walls are made according to the drawing, providing for the space of the door. After that, it is necessary to assemble a system of rafters from the same boards that were used for the walls of the greenhouse. In this case, you also need to make grooves for attaching elements. The number of rafters corresponds to the number of vertical racks of the walls of the structure.
Rafters are the basis for covering the roof with external material
- Wind boards and a skate are mounted after the rafters. The elements are made from a single bar, polished well and fastened with self-tapping screws to the rafters. Wind boards allow you to sheathe the greenhouse with a film or polycarbonate with the highest quality.
In the diagram, the wind boards are highlighted in dark brown.
- From one of the ends of the greenhouse, vertical supports are installed, the distance between which allows you to mount the door. On the roof, you should also determine the location of the window. Then, a door frame is made from the bars, which is hung on hinges to vertical posts after the greenhouse is sheathed with polycarbonate or film. The window is mounted in a similar way, which can also have a special automatic opening mechanism.
The door frame must have parameters corresponding to the height of users
- Sheathing of the greenhouse with polycarbonate is carried out using thermal washers, which ensure the correct fastening of honeycomb sheets. In this case, it is important to tighten the washer well, but not overdo it, because this will lead to cracks in the material.
For fastening, elements with anti-corrosion coating are used.
Video: greenhouse construction
Greenhouse decoration inside and out
A greenhouse made of wood does not need special finishing, but covering all wooden parts with an antiseptic is a must. This prevents rotting and makes the structure durable. And it is also worth considering that when sheathing with polycarbonate, you need to fix a plastic skate at the top that protects the honeycomb material from moisture.
Corner profiles are required when installing a polycarbonate roof
The inside of the greenhouse should be cleaned regularly before planting and after harvest. This prevents the development of bacteria that adversely affect the growth of horticultural crops. Every year, after cleaning, all wooden elements are coated with an antiseptic, enhancing the protection of wood.
A greenhouse made of wood is convenient for growing any horticultural crops. Installation is simple, but the technology depends on the shape, design parameters. High-quality materials, accurate drawings, reliable tools are the key to building a durable greenhouse from any wood.
The frame for the greenhouse can be made of metal, wood and even PVC pipes. In this article, we will describe step by step the process of building a greenhouse from wood with our own hands. Such a frame will cost much less than a metal one, and with proper operation it will last much longer than a PVC structure.
The size and shape of the greenhouse
To accommodate two beds and a path between them, it will be enough to build a greenhouse width 2.4-3 m. Length buildings depends on the area of the land plot and the planned number of plants. The optimal length is 6 m. A greenhouse of this size is quite enough to provide a family of 4-6 people with fresh vegetables. Since cucumbers and tomatoes require different humidity and temperature conditions, a separate greenhouse will be required for each of the crops.Most often, a trapezoid shape with a gable roof is used for greenhouses. Wherein height structures for placing racks and climbing lashes of plants should be 1.8-2 m.
Is a foundation needed?
It is better to install a stationary glazed greenhouse or a structure made of heavy window frames on shallow or a pile foundation 40-60 cm high made of brick or concrete with a sand cushion. It should rise 30 centimeters above the soil level. The lower bearing bars of the greenhouse in it are attached to metal corners poured into the base of the foundation. A greenhouse on such a foundation will be warmer and more suitable for even the earliest planting of vegetables. If necessary, stove heating is installed in it with a chimney passing under the racks.When building a lightweight greenhouse sheathed with film, the foundation can be replaced timber strapping. Such a structure can be easily moved to another place or even transported to another site.
Laying timber strapping directly on the ground is not worth it - the tree will rot too quickly. Therefore, the distance from the soil to the beam should be 4-5 cm. metal corners 800-900 mm long. So that the metal in the ground does not rust, it is advisable to cover the corners with a primer. Under the bar to protect against moisture, you can lay a layer of roofing material.

Beam foundation
Then the wooden strapping is screwed to the metal corners on the anchor bolts, and the structure is hammered into the ground. In the future, the gap between it and the soil is covered with earth and compacted. You can also install the strapping on bricks, however, such a design will be less durable.
The binding must be placed strictly horizontally. Indeed, in the event of a skewed structure, there is a high probability of its collapse. Therefore, we check the horizontal laying of the strapping using the building level.
Required Materials
For the construction of a greenhouse, it is better to use pine or larch. These tree species are the most resistant to moisture and fungi. Bars made of birch or aspen will warp in a couple of years. In order for the structure to stand for as long as possible, and the tree does not rot, before assembling the frame, it is better to cover the bars with used machine oil, an antiseptic or a primer.For the frame we need:
Bar for strapping (base of the greenhouse) with a section of 100x100;
Bar 50x100: we will use it for racks;
Film or glass for cladding;
Boards or slate for the arrangement of the sides of the beds.
It is also desirable to sheathe the greenhouse itself at the level of the beds with boards - this will make it stronger and allow you to save on glass or film. Polycarbonate greenhouses are made arched. It is irrational to make a trapezoidal structure from this material - there will be too many scraps left.
Advice. When using an undried tree, the greenhouse can lead. This can be avoided by replacing the 100x100 beam with paired 100x50 beams fastened together with self-tapping screws. A similar option will be more durable.
Frame assembly. Step-by-step instruction
For a large greenhouse, it is better to prepare a detailed drawing (see photo).

Greenhouse drawing
1. The minimum angle of the greenhouse roof slope is 30°. In areas where there is a lot of snow, the roof slope should be steeper. Of course, this will require more materials, but the likelihood that a snow coat will push through the roof will be minimal.
2. The greenhouse can also be assembled from separate frames. In this case, it will be easier to repair it. Yes, and the frames from the roof can be removed for the winter.
3. We make the markup: we poke 4 pegs into the ground and stretch the twine between them. We level all sides with a building level. You can also check the horizontal and vertical arrangement of the bars with the help of diagonal strings stretched between the corners.
4. We fix the corner posts to the base with metal corners or dowels (wooden pins).

Fastening bars
5. Vertical cross braces are arranged in increments of 50-70 cm. They are also attached to the harness using metal corners. If you are familiar with carpentry firsthand, you can also use a notch to connect.

6. So that the frame does not loosen during assembly, all racks are additionally reinforced with slopes (see photo). After complete installation of the greenhouse, they are removed.

7. For a greenhouse with a length of 6 m in the center of the structure, it is necessary to provide two intermediate racks at a distance of 2 m from each other. Spacers under the upper logs will fit on them.

Intermediate posts in the center of the greenhouse
8. To give the greenhouse strength between the side posts, it is better to provide stiffeners (diagonal crossbars).

You can strengthen the structure with the help of diagonal crossbars.
9. Rafters - a system of inclined beams (legs), racks and struts for the roof - are assembled on the ground on a flat base. In order to assemble them perfectly evenly, a cord is pulled between the extreme rafters. For strengthening, it is better to immediately connect the trusses with transverse beams. (Farms are called supports assembled from bars on which rafter legs are laid).

truss system
10. With the help of metal corners, the finished truss structure is attached to the racks.

Fastening rafters to the frame

Rafter connection
11. Install in the greenhouse 2 doors in the end walls. The distance between the door supports is 80 cm. They are reinforced with additional strips. It is better to attach the door handle to an additional board attached to the main bar.
12. Ceiling lag and vents are mounted on clamps or self-tapping screws.
50+ photos of open-top greenhouses
Below you can view a gallery of greenhouses with an opening lid that you can make yourself. We collected photos from all over the Internet, below we indicated the sources from which we were able to determine authorship.
Mounting methods
How to fix an opening greenhouse cover
How to fix arcs or PVC pipes of a greenhouse under a film
|
clamps
|
Insert into the ground The method lies in the fact that we put PVC pipes on fittings driven into the ground. Instead of reinforcement, wooden rods can come off (enough for the season) Click on photo to enlarge
|


How to fix the film on the greenhouse
The easiest version of a greenhouse made of PVC pipes

Very simple greenhouse design. Easy to assemble and just as easy to take apart. It can be moved, enlarged, reduced.
It is cheap and easy to make .
Step by step photos. Click on them
How to make a greenhouse from willow or cedar branches.

Such a greenhouse is suitable for those who did not expect sudden frosts.
This mini greenhouse can be done in 45 minutes, according to the author of the photo. 
For the manufacture of arcs, not PVC pipes were used, but cedar branches, but I think that willow branches will also come down in our conditions. The branches are tied together with a nylon thread (it doesn’t matter what) to give an arched shape. When the arcs of branches are stuck into the ground, a bar is attached on top of them to give one damage, which is also attached to each arc.
To move such a greenhouse to another place, the author advises to put two long bars along the bases of the arcs, then tie each arc to these bars. As a result, we get something like a stretcher. Taking such a stretcher from both ends, you can quite easily pull our greenhouse out of the ground and move it to another place.
Below you can see step-by-step photos, to enlarge, just click on them.
Telescopic greenhouse or greenhouse
And here is a very interesting version of a telescopic greenhouse or greenhouse. He shifted the arcs and nothing interferes, below you can see the attachment mechanism, click on it to enlarge.


DIY convertible greenhouse
See step-by-step photos of making such a greenhouse. First we make a pallet for the soil, then we make a frame on which we will attach the arcs, and which will recline. Then we fasten this frame to the pallet on the hinges and cover with a film.

Step by step photos of manufacturing.
Click on gallery to enlarge
Straw or hay greenhouse.
As you can see, the photo shows a greenhouse, the walls of which are made of briquettes (or bales) of straw (hay). A frame with an opening top is simply piled on the walls of straw. The film rolls onto the bar. Such greenhouses are usually directed to the south. This design helps well when the slope of the soil in your area is directed to the north, in such cases the sun slightly heats the earth. Such a greenhouse will help you out in this situation.
![]()
(Dew Collector Greenhouse System by Roots Up)
 The greenhouse condenses up to 80 liters of water per day!!!
Soon, thanks to such greenhouses, Ethiopia will flood the world with food. The greenhouse was created for dry countries to solve the problem of drought.
During the day, steam accumulates in the upper part of the greenhouse. When night falls, special valves open to take in cold air, thanks to which the water vapor cools and condenses, after which the liquid enters a special storage tank.
Excess water left after watering can be used for drinking.
Portable greenhouse (greenhouse) from a barrel
Easy to make (45 minutes)
This portable greenhouse is suitable for growing seedlings, or plants such as parsley, cilantro, etc.

- 2 photos - we cut out square holes with a jigsaw in 1 quarter of the circumference of the barrel.
- 3 photos - a hole with a drill so that you can insert a jigsaw.
- 4 photos - holes in the bottom to drain water from the drainage.
- 5-6 photos - attach the handles on the sides for transfer.
- 7-12 photos we fix the film.
- 14 photos - drainage.
The greenhouse can be painted green to blend in with the dacha landscape.
Portable film greenhouse
As you can see from the photo, the greenhouse has a lightweight version. It does not have a massive base; it is attached to the ground with reinforcement fixed to the base. It is carried as on a stretcher with the help of two long boards nailed to the base. It will be useful to the gardener when it becomes necessary to close some weak plants at the time of a cold snap.


![]()
How to make automatic opening of the windows in the greenhouse?
A very interesting and simple design of the automatic opening of the window, depending on weather conditions. The principle is as follows. Between the large (3 l) and small (0.5 l) cans there is a tube in the form of a communicating vessel. A large bank is suspended from the base of the greenhouse, and a small one - to the window. Moreover, the small one should be balanced with the window in such a way that with a minimum amount of water in it, the window should be closed. In a hermetically sealed large jar when the temperature in the greenhouse rises. water due to atmospheric pressure moves into a small jar, opening the window


A simple greenhouse option side opening .
As you can see, a very simple film greenhouse design. Such a greenhouse can be easily moved and put in a new place.
![]()
Dome greenhouse from pipe scraps
it's ugly but it works
 The bloggers at booth555.com moved into a new home and had to do their own plumbing. As a result, they had a lot of pipe cuttings left, and they were used by an enterprising young family to create this greenhouse. The advantages of these pipes are that they are easy to bend and at the same time stable and easy to nail.
See step-by-step photos of creating a greenhouse.
As I understood from the translation of the article from English, the pipes are attached to wooden crossbars with adhesive tape. I didn’t really understand about the film, somehow the cuts of the film were fastened together, most likely the cord was threaded into the holes, and there is also a hint for 6 photos.
The film at the bottom is pressed against the ground with bricks, this makes it possible to lift the film up on hot days.
I could not translate the purpose of the star (in 4 photos), but I assumed that it was attached to the dome to give stability to the structure.
Write your options for assigning a star in the comments.
Lying greenhouse from a double-glazed window or a frame

The author of the blog doorgarden.com made on his site such a recumbent greenhouse made of a glass door (double-glazed window), into which a stone from under a lawn mower accidentally fell.
According to the author, such a greenhouse allows him to collect greens for salads in January, well, America, I can’t say exactly which state it is.
Look at the drawing of this greenhouse. Everything is very simple. As you can see from the photo, the double-glazed window is not attached to any hinges, it just lies, resting against the side board from slipping.
A double-glazed window can be replaced with any large glass or window frame.
In summer, in hot weather, when there is no need for such a greenhouse, you can throw it over strawberries to protect the berries from birds.
Photo source: doorgarden.com
Attention!!! An important point about greenhouses from window frames
Whatever frames are at your disposal, the transparent roof must be made folding (lifting up), and not hinged or folding, as on the right in Fig. Through any vertical gap, all the warm air will instantly escape and the plants will be hit by cold, and the horizontal one can be adjusted with props according to the weather and local conditions.
![]()
What should be the slope of the greenhouse cover?
Note: the optimal slope of the roof slope of a shed greenhouse from the vertical (90 degrees) is φ, where φ is the geographical latitude of the place; and (90 degrees)–φ is the angular height of the Sun at noon of the spring/autumn equinox. See below for a greenhouse with a heat storage.
Source of the last two paragraphs and photo: vopros-remont.ru
Cold greenhouse. (diagram-drawing)
DIY
 Auto photo of this cold greenhouse Vince Babak, growing vegetables for the school cafeteria, wondered if it was possible to grow fresh vegetables in early winter. After studying the literature on this topic, he created this winter cold greenhouse.
The greenhouse consists of a wooden frame and a glass cover. The glass of the lid should always be tilted to catch as many rays of the weak winter sun as possible.
The author claims that even in winter in sunny weather, this greenhouse can heat up to very high temperatures, so the lid must be able to open up. In order to regulate the temperature, a thermometer must be placed in the greenhouse (see photo 5), and it must also be a mechanism for fixing the open lid at different angles was made (see photo 4).
Vegetables that can be grown in early winter in a cold greenhouse
BUT still, the main secret of such a greenhouse is not in its device, but in the plants grown in it . These should be cold-tolerant plants. According to the author's research, five crops: spinach, green onions, mache, claytonia, and carrots can be successfully grown in the northern states of the United States. As well as arugula, Escarole, Mizuna, parsley, sorrel, European lettuce, mustard, spinach and turnips.
My advice: make a cardboard sheet, glued on one side with foil. At night, you can cover the greenhouse with this foil, which will reflect the heat coming from the ground back into the greenhouse.
Greenhouse made of window frame and hay
![]()
Greenhouse (greenhouse) In a plastic bottle
or "How to grow seedlings if the apartment is cold"
 It often happens in our domestic apartments that for growing seedlings the room is not warm enough. The way out of this situation can be such a greenhouse in a plastic bottle.
When sunlight enters such a greenhouse, the air in the greenhouse begins to heat up. and stays warm for a very long time, even after sunset .
An important advantage will be high humidity inside the bottle and, which will be created by heating the pre-wetted soil. Such humidity significantly accelerates the process of maturation of seedlings.
The manufacturing process is simple : cut the bottle, rinse, place the soil with the seeds inside and seal tightly with tape.
How to make a quick do-it-yourself greenhouse
Wooden lattice greenhouse
![]()
The advantages of such a greenhouse:
- - build quickly
- - stable
- - easy to manufacture
Minuses:
Not suitable for tall plants, can be used for growing early greens and seedlings.
Russian in-depth greenhouse on biofuels
About Russian pits
The simplest greenhouse is a lean-to, deepened into the ground, with biological heating. For its construction, a dry, well-lit and sheltered place is chosen. It is desirable that it be a low slope with a south direction. To protect the greenhouse from the wind, green spaces, fences or special reflective screens that are arranged on the north side can serve. Particularly handy are the swivel flat screens, painted in white, which make the most of the solar energy. Backlighting with reflected light increases the temperature in the beds by 2-3 °, which is equivalent to transferring your site, for example, from the Moscow region to the black earth regions of the country: Lipetsk or Voronezh.
Note: Any flat baking sheet lined with aluminum foil can be used.
Construction begins with a strapping device around the perimeter of a greenhouse of four sanded logs with a diameter of 10-14 cm. The north side of the strapping should be slightly higher than the south. On the south side, a groove (quarter) is selected in the harness to stop the frames.
At one time, the Russian greenhouse was a revelation for European farmers. It was from the “Russian pits” that the nobility of that time received a green onion, lettuce, dill, parsley, radish, strawberries to the table in winter.
The pit is dug to a depth of 70 cm. In diameter, it has the shape of a trapezoid. In dense soils, the walls can not be fixed, and in loose and floating soils, fastening with horizontal boards is used. To prevent the greenhouse from being washed away by rains, a drainage groove is arranged around it, which can be closed with wooden shields that facilitate approaches.
Frames for a greenhouse are most convenient with a size of 160x105 cm. They are made from bars 6x6 cm, connected for strength with wooden studs, and then properly stained with weatherproof varnish PF-166 (“6 = s”). Glasses are reinforced with putty or glazing bead. To drain rainwater, grooves are sawn in the lower bindings.
Biofuel in greenhouses is horse or cow dung. Horse is considered the best, it gives more heat. Harvest it in the fall. Manure is collected in piles and carefully insulated on all sides with straw, sawdust, peat and covered so that the manure does not freeze. In the spring, before stuffing the greenhouse, it is transferred to another, looser stack and warmed up. To do this, make several holes in it and pour a bucket of hot water into each, after which the stack is covered with burlap or matting. After two to four days, when the manure warms up to a temperature of 50-60 °, a greenhouse is stuffed with it. A colder one is laid at the bottom, and a hot one is placed on top and from the sides. After sedimentation, after two or three days, a new portion is added. The manure should lie loosely, and only at the walls it is necessary to slightly compact it so that voids do not form.
Greenhouses - pits were usually made 3-4, which ensured year-round use: while 1 pit was warmed up after refueling, the rest produced products. An indispensable condition for the successful operation of the Russian greenhouse is the lining of the entire complex of pits with a clay castle with a drainage ditch, otherwise the biofuel will turn sour.

To enlarge a photo click on it
After stuffing, the greenhouse is covered with frames and mats made of matting, straw or burlap. From above, on the heated manure, soil is poured - garden or soddy soil, compost or fertilized peat. On average, one frame needs 0.2 cubic meters. m of land. It is not recommended to exceed this amount, since under the weight of the earth the manure is compacted, the air flow to it is difficult, and it stops burning. For the same reason, do not over-moisten the soil.
A greenhouse of even such a simple design will make it possible to grow vegetables much ahead of schedule.
Greenhouse layout
where is the best place to put a greenhouse on the site

Many summer residents and villagers purchase ready-made greenhouses produced by factories and cooperatives. Their wide variety allows you to choose the design of the desired parameters. But if a greenhouse is made of timber with their own hands, then the owners are proud of the work, and the greenhouse comes out exactly the configuration that is needed in a particular case. This building is much cheaper than purchased.
- it is readily available, that is, it can be purchased everywhere, and its cost is low;
- no need to look for high quality material;
- wood must be properly dried and free of defects;
- no special skills are needed to assemble the frame;
- the material is non-toxic and environmentally friendly;
- The construction is solid and its service life is at least 5 years.
- to protect the frame from decay, it is necessary to treat it with a special compound;
- if it is necessary to move the structure or dismantle it, then this will not be easy to do;
- the environment negatively affects the tree (bad weather, microorganisms, moisture, insects, etc.);
- compared to metal, such structures ignite easily.
- illumination is one of the main conditions for raising productivity;
- the relief of the site - it is better to build a building on a hill;
- protection from gusts of wind - the installation is carried out near the fence;
- distance to the water source (if a centralized irrigation system is not equipped);
- soil composition.
- 1. For the base of the greenhouse, the soil is drilled and the posts are prepared, into which the studs are then inserted. The depth of the wells should be 0.6 m. The columns are poured with concrete.
- 2. On the completed foundation, a harness is assembled from bars 10 x 10 cm (for these purposes it is better to use larch). Holes are drilled in the harness, put on the studs protruding from the columns and attracted with a nut and washer.
- 3. A frame is erected and sheathed with polycarbonate.
- 4. Perform a gable roof and cover it with the same material.
- 1. Install the frame. The distance between the racks should be 72 cm. Soak everything with the Senezh-Bio mixture.
- 2. Air vents are organized in the upper part of the building (they act according to the drawing). For example, in the greenhouse in the drawing there are 4 windows with an area of 16 m². They are automated to open.
- 3. Polycarbonate is attached so that there are no gaps.
- 4. Start plumbing. To do this, they put a large capacity container and make pipes for drip irrigation of beds.
- 5. Install doors and windows.
- 1. Hammer the strapping bars into the ground, checking the correct installation with a level. They are fixed using self-tapping screws. Docking is done in half a tree.
- 2. The joints are reinforced with metal plates. Along the perimeter, the lower trim is sewn up with galvanization and buried in the ground.
- 3. Polycarbonate is fixed with self-tapping screws with washers. Rubber products are used for the roof. In other cases, self-tapping screws with press washers are used.
- 4. The end of the polycarbonate is closed with a plastic corner. The sheets are overlapped, processing them along the edges with a sealant.
- 5. Processing of the lower strapping is carried out with an antiseptic in two layers. After drying, it is painted.
- 1. They dig a ditch 60 cm deep, pour ASG into it, ram it. Three concrete blocks are laid on each side.
- 2. Two beams are treated with an antiseptic, and after it dries, their upper and lower sides are coated with bitumen.
- 3. Install the frame and treat it with an antiseptic.
- 4. Braces 1 m long are fixed in the corners of the greenhouse.
- 5. They make a rafter and make all measurements on it.
- 6. Cut out the racks and install them in the right places.
- 7. After the construction of the roof, its ends are painted.
- 8. The entire structure is covered with polycarbonate with a thickness of 4 to 8 mm.
- 9. Outside, blocks are installed around the perimeter, and EPS is used inside the structure. This will keep the greenhouse warm.
Show all
Positive and negative characteristics
Before starting the construction of a greenhouse, everything is well thought out. Measure the site and choose the location of the structure. They draw a sketch and make drawings, which indicate the exact dimensions of the building. This is necessary to calculate the amount of material.
A greenhouse can be made from PVC pipes, polycarbonate, window frames, boards, beams, etc. But most often a wooden beam is chosen for these works.
For a greenhouse with a frame, this material has several advantages:
It is worth noting that the tree, in addition to positive characteristics, has some disadvantages. Among the "cons" of greenhouses from the bars are:
How to choose the right place?
In addition to the shape, material and dimensions, one of the important points in the construction of a greenhouse is its location. After all, the ease of use, the ripening of vegetables, fruits and other plantings largely depend on this.
There are some factors that need to be taken into account when choosing the location of a greenhouse:
Most often, a greenhouse is located away from a tall building or trees. Natural light should constantly fall on the greenhouse during the day. Since it is difficult to install the structure on a hilly surface, a flat area is chosen for the greenhouse or a hilly one is leveled. If a greenhouse made of wood is unstable, then with a slight wind it can deform or collapse.
The installation of such a structure is not always possible. If the area is swampy, then it is impossible to build a greenhouse on it, because moisture accumulates in the lowland. If the soil on the site is sandy, then it is necessary to equip the foundation for the construction. It is best to place the greenhouse on a flat hill.
It should not be cool inside the greenhouse, and so that the cold does not penetrate inside, a fence is installed around or a low bush is planted. Heat loss is reduced by some reinforcement of the roof. If the body is covered with glass or film, then an additional layer of the same material is used.
Configuration and dimensions
Initially, they are determined with these parameters, since you should not overdo it. Indeed, for each variety of vegetables, completely different conditions are required. For example, tomatoes and cucumbers cannot be grown in the same building, since the latter require high humidity, and tomatoes cannot tolerate it. Therefore, two different structures are often built for them, which will be more useful than one large one.
The optimal size of such a structure is considered 3 x 6 meters. You can build a structure with other dimensions, for example, 6 x 20 or 5 x 4, it all depends on the size of the site itself and the requests of the owners. These dimensions are relevant if the greenhouse has the shape of a rectangle.
Many summer residents do not want to have a standard-shaped greenhouse. Therefore, the owners of the site of the structure have different configurations. If it is a geo-dome, then its dimensions are determined by measuring the diameter of the structure. To make it convenient to work in a greenhouse, its height should be 2.5 meters. The taller design will not retain heat and is unstable. If you want to make a gable roof, then the height of the greenhouse should not be more than 2 meters.
Greenhouse in the form of a geodome or a semicircle
Among the typical configurations, semicircular and arched are distinguished. They are practical and are not affected by gusts of wind. Snow does not accumulate on the roof, and the design is pleasing to the eye. This shape is easy to make from aluminum or plastic arcs, but not from wooden beams.
arched structure

Roof types
Most often, buildings have a single or gable roof. The first type of roof is used when the greenhouse is located near the house or adjacent to its wall. In other cases, the second type is used.
In areas with little snow, when the site is located far from the central water supply, structures with a horizontal roof are used. As it, a perforated film with holes through which rain penetrates is attached to the frame. This is how watering is done. But most often a flat roof is not used for greenhouses.
In a greenhouse with a pitched roof, it is convenient to grow plants near the walls of the structure, and use the internal area to the maximum. Various precipitations do not linger on the roof. Such structures can even be made in the form of a polyhedron.
Step by step instructions for building
For a standard greenhouse with a gable cover, the soil under the structure is first leveled. The base is laid out and bricks are laid out around the perimeter. If they want a stronger foundation, then it is poured with a concrete solution.
A box is assembled from a bar and installed. Door, wall and roof panels are assembled from the same material. The greenhouse is sheathed with polycarbonate, film or glass. All these works are done in calm weather. At the beginning of the winter season, the film is removed, as it cracks in the cold.
If an arch-type greenhouse is being built, then the foundation is made thoroughly for it. For year-round construction, the brick base is poured with concrete. Arch elements for the structure are made from fresh wood, as they are more flexible. Raise the frame and install the cover.
Before the construction of any structure, they purchase high-quality material, the necessary tools and select the type of frame. The drawing and detailed diagram of a wooden greenhouse are so simple that anyone can make them. Therefore, the construction is similar to the Lego constructor.
Drawing of a standard wooden greenhouse
Several building options
To build a standard greenhouse measuring 6 x 4 meters, a foundation of any type is suitable. Most often, a columnar base is used.
The construction process consists of the following steps:
Standard greenhouse
Greenhouse according to Mittlider
This design has dimensions of 6 x 8 m. According to this technology, this design has a gable roof, under the ridge of which there are vents.
Greenhouse drawing by Mittlider
Of the materials, boards 0.5 x 10 m (2 cubes), bars 30 x 50 and 50 x 70 cm were used. For the building itself, a monolithic strip foundation is first poured using reinforcement 4 x 8 mm. The width of the base is from 20 to 35 cm. Outside, the foundation is impregnated with Penetron so that it does not crumble. Subsequently, it is covered with stone.
Greenhouse according to Mittlider. Appearance
Greenhouse made of wood under polycarbonate
For its frame, a bar measuring 45 x 45 mm is used. The design has a length of 8 and a width of 2.7 m. 8 vents and 2 doors are installed in the structure. The distance between the posts is 1 m, and the truss rests on two of them.
For strapping, a metal corner with dimensions of 45 x 45 or 50 x 50 mm is used. To obtain the base, the grinder makes a 12 cm incision, bent at an angle of 90 ° and the base is obtained. It is on him that the harness is fixed. Paint the corner with an anti-corrosion compound.
Building under film
This design is not heavy. For it, piles are made of aluminum corners 5 x 5 cm, up to 90 cm long. They are covered with a primer and driven into the soil. Their alignment is carried out with a laser level and the assembly of the base begins.
To install the truss structure, 3 x 3 cm bars are required. They are sheathed with 8 mm plywood, which is connected with glue and self-tapping screws.
The frame is painted, but before that the tree is treated with an antiseptic. Collect frames for window leaves and doors. The whole structure is covered with foil. Inside the structure for tying plants, cables are pulled. Install an irrigation system. If the area is rather cold, then inside the structure the tension of the second layer of the film is carried out, which is fixed with a stapler to the frame.
Wooden frame for greenhouse
Portable facility
Any small wooden greenhouse is light, so its location is changed if necessary. This design has a foundation that can be easily disassembled. For example, bars measuring 5 x 5 cm are used as the base of such a greenhouse.
Such a foundation is not poured with concrete. To build such a greenhouse, the following steps are performed:
small portable greenhouse
From such a building material as wood, you can build a greenhouse not only in the form of a "house" or arch, but also a beautiful "pyramid" and a dome. The owner of the site makes the choice of design based on the size of his allotment, the amount of materials and his own taste. The greenhouse will delight not only the owner, but also his guests with a good harvest for a long time.