Probably everyone knows that the porch in any house must necessarily have functionality, and also harmoniously fit into the exterior of the building itself, because it is it that is considered a calling card. There are many different options for how best to implement the construction of a porch for a private house. All this directly depends on your taste, the chosen material and the general budget. With all this, we can easily say that building a strong and durable porch with your own hands is quite realistic.
The porch itself to the house consists of a completely open area, often with a staircase in front of the entrance to the inside of the house. It can be absolutely any shape, optionally with a canopy and even without, as well as made of different materials.

In principle, the entire structure of the porch to the house can be divided into three types:
1. Attached;
2. Built-in;
3. Simple.
How are they different?
Simple - this is a regular platform along with steps and always a canopy. During the assembly of this type of porch with your own hands, the most difficult thing is to fill the foundation, since it is necessary even for a simple wooden porch construction.
A do-it-yourself built-in porch is initially designed in conjunction with the house, so it is being built capitally.

The attached type does not have any external differences with the built-in type, the only thing is that it is slightly modified and slightly rebuilt. The advantage is that such a do-it-yourself porch can be easily attached with a slight alteration.

Remember! For any porch, a foundation is required, it is he who prevents the slightest deformation of the steps during seasonal temperature changes.
Building a foundation for all types of porch
The most important thing is that the main foundation of the porch to the house should be similar to the foundation of the house. If this is not the case, then during the sedimentation of the soil, winter frosts, your structure is simply deformed. It is also possible that during the settlement of the soil, your structure will move towards the house and then the foundation of the porch will suffer first of all, since it is less massive. To remedy this situation, minor repairs will not be enough and you will have to rebuild everything.

Since the glazed porch is not intended for habitation, and there is no huge furniture there, it is possible to use an ordinary concrete pad, which will be the foundation itself.
However, when choosing concrete, any brick (white, red) or facing stone, the foundation must be reinforced. The fact is that this design has a much greater load on the foundation itself than a wooden porch to the house.

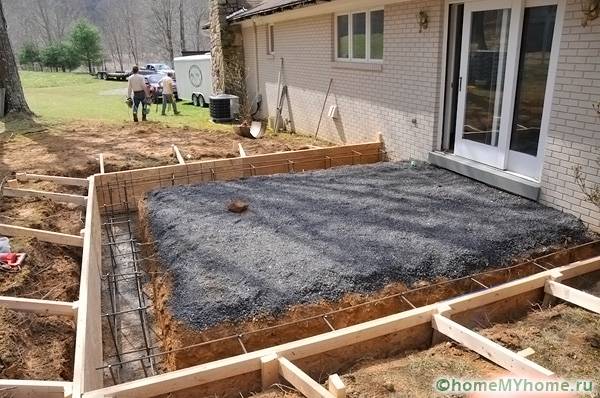
To arrange the foundation for the porch with your own hands, you must begin directly with the markup. To begin with, determine a rectangular area of the desired size, the main thing is not to forget that the porch itself must fit in here. Then, piles should be driven into each corner of the rectangle and then, along the contour, begin to dig a pit. Its depth should be no less than the main foundation.
Advice! You don't need to lay the foundation very deep. Of course, the load during the displacement of the foundation will become a little less, but it is simply impossible to avoid them completely, with the slightest subsidence of the soil or sudden changes in temperature.

If you decide to install a visor above the porch, then you will need to install supports, but the rectangle for the pit should be increased on all sides by another 20-30 cm, and the piles can be driven in after the porch is built.
In order to fulfill our plans, you will need to leave small rectangles of an unexcavated area (approximately 20x20, possibly 30x30 cm) at the points where the support will be installed a little later. Then it is necessary to drill wells at each site, install the support well, drive it in as much as possible and be sure to carefully fill it with concrete.

In this case, formwork is very suitable, although if the soil is stony, then in principle it is possible without it. To make it, you can use absolutely everything - chipboard, wood-laminated board and ordinary boards, which turned out to be superfluous after construction. The main thing to remember is that plywood (laminated board) and chipboard are quite hygroscopic, so during rains, groundwater rises, they will begin to spread quickly, which is why, after the concrete has hardened, it is recommended to remove the formwork.
In no case should you throw away the remaining trimmings of boards, which are conifers, because the lumber of this tree has only positive features: after being completely saturated with water, they become much stronger and retain their elasticity.

Advice! If there is a strong deformation in the soil, for example, if your house is located on a slope or on a mountain, then coniferous formwork works as a damper.
The most important and main element in the construction of the foundation of the porch with your own hands is waterproofing. In order to equip it, you need to lay the bottom in the pit with roofing material, and then the entire surface inside the formwork. Reinforcement is carried out using high quality bricks, on which it is necessary to lay a mesh and fix the grate with pre-prepared pieces of reinforcement.
Similarly to this principle, the pit is filled with several layers, which include bricks along with the grid, and then this structure is completely poured with concrete. To avoid the formation of voids, after each filled layer, it should be carefully tamped with a shovel.

Advice! In order to compact the concrete well, it is better to purchase an electric vibrocompactor, if you do not have one, then rent it.
Due to the fact that the concrete dries out for about a week, you will need to immediately level the surface of the foundation and be sure to cover it with roofing material with an overlap of about 50-60 cm from each edge, you can also take a regular building film. They will help protect the surface layer from any rain, as a large amount of water can make it brittle enough in the future, and then your foundation will simply be damaged.

If the need arises, then you can cut off the top in the finished timber, then the piles will be at the same level. But try to calculate the height of the supports taking into account the front door, so the height difference should be about 5 cm. The logs are attached using self-tapping screws or dowels - it depends on the material of your wall.
Porch to the house with their own hands. Projects. A photo
Often, traditional materials are used for construction:
- wood;
- white, red brick;
- facing stone;
- metal;
- high-quality concrete.

Do-it-yourself wooden porch
How to make a wooden porch with your own hands? Today it is the most common building material. This is due to the fact that the tree is quite simple to manufacture and therefore building a porch from it with your own hands is quite easy and fast. To do this, it is enough just to have a circular saw available (you can use the most common one, but it must be with the smallest teeth - this will help a lot in cutting accuracy), a special construction square and skillful hands.
Larch has long been considered the ideal material, followed by spruce and other conifers. Each of them is very durable and quite easy to process. The most interesting thing is that at the end of the impregnation, the material that is made from them is practically in no way inferior to oak or some other species that are several times harder.

Important to remember! To work with solid elements, you will need a good skill, the right tools, and most importantly, specific knowledge in this area. For example, the quality of drying oak material can only be determined by an experienced carpenter.

First of all, you will need to make a kosour (kosour). Since it is not very practical to make a porch to a wooden house with your own hands less than 120 cm wide, you will need at least three beams. It is best if the distance between them is about half a meter, so it will be much easier for you.
This approach will help provide your porch with strength, and most importantly, the durability of a self-made structure, regardless of how often the stairs will be used and with what weight load.

You need to know! The kosour is called the carrier beam, in which the teeth are cut, it is she who plays an important role inside the support. It is advisable to lay the steps only on the horizontal edges of these same teeth.
The bowstring (it is also called an inclined beam) must necessarily be several times thicker than the kosour itself. They are connected with cross beams. At the end, the required number of braids is fixed between them.
You will definitely need a square to cut out the ribs and make even steps. The void between the teeth, even if it is 5-6 mm, will quickly provide the steps with a slight subsidence on one side and swelling on the other. Sudden changes in temperature will greatly increase the difference in the levels of the steps.

It is customary to make the width of the steps according to the size of the foot of an adult, but it is better to take it with a margin, it is about 40 cm somewhere. The height between each step (riser) does not need to be more than 20 cm.
It should be remembered that the number of steps must necessarily be odd and for this one additional edge should be provided. With four steps or more, you will need to make a railing for the porch to the house.
With a glazed porch and a securely covered staircase from moisture, you can do without an overhang of steps. However, if the staircase is outside, then an overhang is simply necessary, since thanks to it, water will drip onto the lower step, and not between them into the riser.

Advice! The finished staircase should be installed according to a special principle so that the plane of the steps is slightly inclined (about 1-2 cm). This will help the water run down instead of pooling and forming ice.
The design is installed directly on a pre-prepared site, which is the foundation. To make your porch to the house as strong as possible, you should install the stairs exactly in the place in the foundation where the lower beam was previously laid along with the stringers. Also, with the help of it, you can push a small depression if the concrete is not completely frozen. Thus, you will get a fairly strong stop.

For flooring in the upper platform, you can take the material that was used for the stairs. In this case, there is only one requirement: it is recommended to use the widest and longest boards that are available, and make the joints as accurate as possible. When the boards are as close as possible to each other, you can not be afraid of deformation, even if the whole tree begins to dry out over time.
It will take about 3 to 7 days of work to equip a wooden porch with your own hands. It all depends on the size of your site, on the stairs and of course on the skills of working directly with the tree, but a beginner can handle it all. The most important thing is to divide the work into stages and do everything one by one, adhering to the recommendations and instructions.

metal porch
How to make a metal porch? The porch, which is made of metal, has a very big plus - it is mounted in about a few hours, if you know how to use electric welding in your work. In addition, a metal structure will cost several times cheaper if you do not buy forged elements. However, there are also disadvantages - you will have to assemble a standard porch with your own hands, and therefore it will not look very beautiful and original, unlike others. If you want to make a beautiful porch with your own hands, then you can buy forged products, but they will need to wait up to 4 weeks (it all depends on the volume of your order).

Do not be upset if the budget is limited, because even a primitive metal staircase can be made very imposing and beautiful, the main thing for this is desire and imagination. For the lightest option, channels, corners and necessarily filling material are used. They can be: porcelain stoneware, wood or chipboard.

For an ordinary metal porch, two channels of the same length will definitely be needed. They are attached parallel to each other at a distance that is equal to the size of the steps. After that, mark the corners and cut them to the same length as the steps, but at the same time adding a few centimeters along the edges to apply the weld.
In the same way, small pieces are cut off from the corners and these two segments are welded with the letter “G” (the edge-frame must be cut). The number of such details should equal the number of steps on your porch. Then they are closely welded to the channel, and as a result you get a high-quality metal oblique. Similarly to this principle, another oblique angle is made using the second channel.
After all these actions, the resulting elements must be connected in pairs from the side where the corners are cut to fit the width of the future staircase. This creates the contour of the steps, and the corner under the riser should turn upside down (thus creating a side).

Your staircase is almost ready. Now it all depends on your taste. The wooden step attached in any way to the resulting frame will look most beautiful. Even if you do not have much experience in working with welding, it will generally take 2-3 hours to assemble such a porch with your own hands.
Concrete porch
How to make a concrete porch? This option is considered a continuation of the laid foundation, but only with the reinforcement of all steps. This is done so that after a couple of months chips do not form due to constant heavy loads. Due to the fact that it is customary to cover a concrete porch with special facing tiles, gradually collapsing concrete immediately forms chips and then cracks in the lining itself.

On a pre-prepared foundation, you can assemble the formwork, which will be the bottom step. In this case, it should be borne in mind that the height of the step, due to the weight load, must necessarily be 2 cm more than the rest. Next, a similar procedure is carried out, as in the construction of a reinforced foundation for the porch. The only difference is that in this case there is no need to spare the reinforcement.
Advice! The resulting gap between the two foundations is recommended to be closed with mineral wool. This method will create a good expansion joint.

Formwork for steps can be prepared in advance - this will save time. However, it is much more reliable and easier to pour concrete into each step in turn, and even better if, before pouring a new step, the solution of the previous one will have time to set.
In the end, it is necessary to level the already completely frozen structure, and then cover it with any tile intended for a metal porch or stone.

The time spent on work directly depends on the use of full formwork, as well as on the formation of each step in turn or all at once. On average, you will need a week to work if you do everything at once, or a week for each step for the concrete to completely set.

Porch made of brick or stone
How to make a porch out of brick or stone? This is probably the most difficult version of the porch. This is because it is much easier to work with a brick foundation where you don't need precision than it is to lay out the stone as evenly as possible.

Bricks should only be laid if there are several assistants who will thoroughly mix the concrete all this time. With a stone, everything is much more complicated, because the chipped edges cannot be matched perfectly to each other. In general, if there is at least some experience in this activity and at least two people to help, then this type of porch should be abandoned immediately, otherwise you will simply waste your time and all the material.

It will be much easier to make a concrete staircase, and then match it with a step material that will be of a similar size. After that, they should be laid in one layer on the "frame" of concrete, which is pre-aligned. This method has a huge advantage, since, having made a mistake, you can easily chip off the lining of the desired area and re-finish.
Visor construction
The visor is primarily the protection of the platform and steps from various natural precipitation, as well as the ability to independently decorate the porch with your own hands in the house or in the country, beautifully and in a short time. Often it is made of durable metal pipes, coniferous trees or, in extreme cases, metal are used for the frame itself, but any wood or plexiglass is used for sheathing.

Peaks made of wood will need to be tinted at least 2 times annually or treated with special products instead, otherwise it will gradually dry out and then split longitudinally. When using plexiglass, it is better to make spans between them of about 0.7 m2. It is strongly not recommended to use glass, as it can easily crack in winter during snow or due to frame deformation.

The total area of \u200b\u200bthe visor must necessarily be half a meter larger than the porch itself, otherwise it will not be able to fulfill its main function - protection.
The easiest and fairly quick option is to make something that looks like a metal staircase. Then the distance between each step can be made approximately 0.5 m. In this case, you will no longer need L-shaped elements and a channel, because the load on the visor itself will be many times less and only the corners in the outer frame will be enough. But filling with wood or porcelain stoneware can easily be replaced with any other material.

When pouring the foundation, during the formation of the foundation, piles are necessarily installed, and it is precisely on them that a visor should be laid. In addition, it will help in the future to completely glaze the veranda in just a couple of days, if there is a desire.
For coating, it is better to take a metal sheet along with tiles, but it will be much more effective and beautiful if you use plexiglass and polycarbonate.

Advice! To avoid rust on a worn metal sheet, you can easily paint it with paint in several layers.
Be sure to make the visor pitched, and in the place where the lower edge will be, carefully weld a metal gutter with a slight slope. Fasten an ordinary chain at the very end, which will reach the ground and thus, water will not splash during rain. Due to the fact that water has excellent viscosity and easy fluidity, it will slowly flow down this chain. If you want to somehow get rid of the appearance of puddles near the porch, make drainage.

How to glaze a porch yourself
The most common option is a closed porch. In this case, the concrete and stone foundation, together with the visor and the stairs, is very popular, while it is necessarily attached to piles.

With the help of corners, which must match the height of the piles in the visor, a frame is formed. They are well welded to the piles, and then double frames made of wood with glass are inserted.
Advice! A glass sheet can be absolutely any height, however, the width should not be more than 120 cm, because the windage of this glass is high and even a light wind can severely damage it.

If the void between the piles turned out to be more than one meter, then break them with pseudo-piles. To do this, at the top and bottom, to the end of the piles, a corner is welded with a step inward, and then between them - a double angle, which will form pseudo-piles. Similarly, you need to divide the height, which forms a horizontal beam from several double corners. This will significantly reduce the load on the glass, and the design itself will look light and beautiful.

The most common mistakes that are made during the construction of the porch
1. Building a porch with your own hands using low-quality concrete (below grade 200). This concrete itself is quite friable, which is why it will be difficult to complete the cladding, since other mixtures have much higher strength after complete drying. In this case, temperature changes can seriously damage the lining. The foundation itself, which will subsequently remain open, will begin to collapse in the summer, and brick steps will collapse even faster.
2. Lack of good waterproofing. If waterproofing is not done in a timely manner in the porch to the house, this will lead to a huge accumulation of moisture below, as a result of which, during frosts, the structure will begin to gradually collapse. The steps will suffer the most, since it is they who get wet in the very first place.
3. Leveling of steps and plastering was done only a few days after the completion of concreting. If there is a long break in time, then all layers will cease to hold without additional gaps in the structure itself, or at best they will, but very weakly. Do not forget that the place where the plaster adheres together with the screeds is considered the most vulnerable.
4. The foundation was erected without reinforcement in the base. If you do not have fittings, then the porch to the house will simply be divided into two separate parts at the slightest subsidence. This would be impossible to repair.
5. Do-it-yourself porch was attached to the foundation of the house itself without special expansion joints. You can securely attach the porch only if the house with the porch has a joint foundation. If this is not done, then a sedimentary crack will appear right at the border of the two foundations. To avoid this, the seam of the facing brick or tile should be placed at one border, and the gaps should be filled with silicone sealant and in no case with grout.
So, you do not need any specific skills for building a porch with your own hands. Each operation is considered basic in construction and therefore everything is within the power of even a beginner with skillful hands.
Porch to the house with their own hands. Video
We will send the material to you by e-mail
To The stigma is a functional element of any household and is its hallmark. Such a structure should be located at the entrance to the building and fit into the created exterior of the building. By choosing the right material, you can build a luxurious porch to the house with your own hands. Projects, photos and design drawings can easily be found in our review. In addition to practical functions, this structure performs a decorative function. At the same time, the canopy and railings are decorated with beautiful carvings and other decorative elements.
In many buildings, the porch is part of the project and fits perfectly into the overall exterior.
The porch in a private house, photos of which can be viewed on the site, is an open area with a staircase in front of the entrance to the house. It can be of any shape, and also made of various materials.
Such a structure can be made in the following variations:


- the structure of the attached type is more mobile.

Useful information! To avoid skewed steps and cracks, a foundation must be installed.
Foundation: construction features for all types of porch
A strong foundation is needed to make a porch to the house with your own hands. Designs, photos and descriptions will help create a quality foundation.
Related article:
Do-it-yourself porch to the house: projects, photos of various types of porch
They will help you choose the best design of the porch of a private house with photos that can be found on the site. In this case, it is worth deciding on the material for the future design. Traditional options include wood, concrete, stone and brick, or metal.

Metal structures: the nuances of the device
Metal products are mounted using electric welding. The design is assembled from standard parts. If desired, you can use forging elements for a metal porch in a private house. The photo will allow you to choose interesting solutions.

Such a design is mounted in several stages:
- two channels are laid in parallel at a distance of future steps. Then a corner is cut to the size of the steps;
- a part equal to the height between the steps is cut off from the corner. Both elements are welded in the form of the letter G;
- L-shaped parts are attached to the channel;
- then the channel is connected using corners.

Ready. Steps made of any material are mounted on it. If more than three steps are provided, then railings are mounted. The visor completes the design.
Concrete options: design features
The concrete structure involves the continuation of the foundation in the steps. In this case, reinforcement is used, which will prevent the appearance of cracks. Such a structure requires additional cladding with stone or tiles.

Formwork is made for each step. The finished structure is covered with decorative material.
Useful information! The space between the foundations of the main building and the extension is sealed with mineral wool, which ensures better stability of the structure.

Do-it-yourself wooden porch for a private house: installation features
Do-it-yourself wooden porch to the house is popular. Projects and photos of such structures are diverse. The best material is larch and other conifers. For such raw materials, special protective impregnations are required.

Installation of a wooden structure consists of the following steps:
- the manufacture of stairs includes the formation of a bowstring. These elements are connected to the base;
- installation of the site consists of mounting the shelf boards to the finished base;
- steps are being installed. At the same time, steps and risers are attached with the help of self-tapping screws;
- the design is carried out with the help of railings and a canopy.
Useful information! The durability of the structure depends on the correct preparation and processing of wood. The material must be well dried.

Related article:
Porch made of brick or stone
It is very difficult to make brickwork for the porch, since the brick must be laid out perfectly evenly. It is even more difficult to lay a stone porch without certain skills. The chipped edges don't fit together.

Simple options include the construction of a concrete staircase and facing it with stone or brick.
Visor options
An important addition to the extension is the canopy over the porch. The photo on the site allows you to see interesting options for this element.

The visor is created from timber, metal, plexiglass or metal pipes. Wooden structures must be treated with special solutions every 2-3 years so that the wood does not deteriorate.

The visor should at least protrude half a meter beyond the area of \u200b\u200bthe main structure. Piles for the canopy supports are mounted at the stage of creating the foundation. Polycarbonate, plexiglass or tiles can be used as a coating. This element must have a pitched shape.
Useful information! A wooden structure or metal sheets can be coated with paint in several layers.

Which porch is better: glazed or open?
A closed porch is often used for a private house. Photos of projects can be found on the Internet. Most often, these are transparent structures made of metal and glass. The frame and piles are made of metal. The walls are made of glass. A roof of this design can be combined with a balcony on the second floor.

The glazed version is made with a concrete foundation, a canopy and a staircase. The frame is made with the help of corners. In this case, the corners are attached to the installed piles.
Save Time: Featured Articles Every Week by Mail

(2
ratings, average: 4,50
out of 5)
 A beautiful, reliable, comfortable, durable porch is impossible not to notice. And it is possible to enter the house and leave it only through a stepped extension from the outside. A porch is a business card of a homeowner. Made of stone, wood or metal, it complements the exterior of the house and gives the building a finished look. Providing a convenient passage to the dwelling, it is also designed to protect the doorway from sunlight, rain streams and heavy snowfall.
As a rule, when developing a project for a new country house or cottage, the construction of a porch is provided. But sometimes, for some reason, the building is erected without arranging the porch, and after some time it becomes necessary to attach it with your own hands. At first glance, adding steps to the front door is a rather troublesome and difficult task. However, even amateur builder.
Preparation and selection of material
A beautiful and practical porch to the door is built of stone and brick, concrete and wood. Original combinations of any material with forged elements harmoniously fit into the design of any country house. It is easier for a novice builder or homeowner without building skills to build a porch in a country house made of wood, since wood can be easily processed in any way, is relatively inexpensive and does not require complex skills and abilities. Wooden railings and a canopy, if desired, can be decorated with an exclusive carved pattern. Properly design a porch recommendations and drawings from the Internet help for your home.
Gallery: wooden porch in a private house (25 photos)


Varieties of wooden structures
Starting the construction of a wooden porch, you need to understand that the design must be strong and reliable. In the process of daily operation, the staircase to the entrance wears out much faster than the building itself. Most often, timber and a board made of larch, spruce or other coniferous wood are used to build a porch.
Structurally, there are several types of wings:

Properly selected design of a wooden porch emphasizes the integrity of the architectural style and the attractiveness of a private building.
Foundation laying
 Laying a solid and reliable foundation for any structure is required. A structure installed without a quality foundation warps, cracks and collapses. The choice of foundation for the porch is determined by several factors: the depth of groundwater, soil density, climatic conditions. The main aspect is the size and weight of the structure. A massive heavy porch made of brick or stone involves the construction of a strip or tile foundation, or a concrete pad. A light wooden porch is enough to install on piles.
There are no problems when the foundation for the manufacture of the porch is cast simultaneously with the construction of the house. Otherwise, before you build a porch, you need to decide how to make the base and whether to connect it with the house. When drafting an extension, its shape is determined: trapezoidal, radial, triangular or rectangular. As well as the direction of the steps. The flight of stairs can be one, lead to the front door from two opposite or adjacent sides (corner) or have several flights.
It is enough to install a light wooden staircase of several steps on a simple and inexpensive column foundation. For the manufacture of supports for a wooden flight of stairs, screw piles, concrete, monolithic or brick blocks, as well as asbestos-cement pipes, reinforced with reinforcement and filled with concrete, are used. Wooden piles, even soaked in oil and antiseptic, will last much less. On any supports buried below the freezing level of the soil, a horizontal strapping of timber is mounted.
More complex and massive wooden porches are installed on concrete pad. To do this, a foundation pit is dug to a depth of 30 to 40 cm according to the size of the porch and a wooden formwork is installed. The bottom is covered with a 10 cm layer of sand, gravel or broken brick and filled with 3 cm cement mortar. Then a reinforcing cage is installed and poured with a concrete mixture of 1 part of cement and 4 parts of sand and gravel. The formation of voids will prevent piercing with a thin rod in several places. The surface is leveled and left to solidify for 7-10 days.
Main elements
Today, country houses are most often built from timber, glued wood, rounded logs, gun carriages. A strong and durable porch for a wooden house can be built entirely of wood or emphasize its naturalness with stone trim.
The porch of any design consists of a horizontal platform and stairs:

Flights of stairs are installed on side inclined boards, strings. Steps to bowstrings are fastened with dowels, screws, studs or installed in specially cut grooves. More durable and reliable structures with steps laid in special triangular cuts on the sidewalls. This kind of bowstring, stringer, is used more frequently.
Kosour is simple stepped and more durable with "fillies". All dimensions of the kosour must be measured with special care. For the correct cutting of this most complex structural element, it is recommended to make a stencil from thick cardboard or plywood. Boards for bowstrings are taken without cracks and knots no thinner than 60 mm, with a width of 30 cm or more. With a span width of more than 1 meter, it is recommended to install 3 bowstrings or stringers.
Porch Assembly
A wooden porch will last longer if you follow some rules:
- The wood must be properly dried. After sawing, all structural elements are recommended to be sanded or sanded;
- All parts must be impregnated with an antiseptic, insect repellent and moisture-repellent solution before installation.
The flight of stairs can be open, without the installation of a riser, and closed. For rainwater runoff, treads can be installed with a slope of 1-2°. Kosour for a porch from a bar can be made of metal.
Stair assembly steps:

Assembly according to the tenon-groove principle using waterproof glue is considered the most reliable.
Regular updating of a paint and varnish covering keeps an attractive look.
It is easier for novice “dummies” builders to install treads on backing bars (surfs).
The roof of the attached porch can be installed as a canopy on the columns or attached with a canopy to the wall of the building.
The porch performs not only decorative functions. In winter, it protects the front door from snow drifts, and in summer - from rain or heat. It can be made of metal, stone, brick, concrete, but the best option for a wooden house would be a solid wood porch. You can build a porch to a wooden house with your own hands if you approach this matter prepared, and for this we recommend that you read our article.
Porch dimensions
For a free approach to the front door and its opening, you need free space. According to building codes, the upper platform of the porch, adjacent to a single-leaf door, should have a width of 1.6 m, to a double-leaf door - from 2 m. The distance from the door to the first of the steps is 1 m. To protect against rain and snow, a canopy over the porch is made slightly wider than the site (30 cm).Must be normalized width and height of steps, while the average step width of a person is taken as a basis. Their optimal height is 16-19 cm with a width of 25-33 cm. Since a person starts climbing stairs and finishes it with one foot, the number of steps should be odd.
Standard step sizes
In winter, the steps are often covered with ice, so the porch should be equipped with handrails. If there are more than 3 steps, their manufacture is mandatory. Standard railing height- 80-90 cm.
Important! The top platform of the porch should be 5-10 cm below the door threshold. Otherwise, during seasonal fluctuations in the soil, it may rise and block the door.
Foundation
The simplest foundation for a wooden porch are piles. They can be made from a wooden beam treated with an antiseptic or burned in a fire, or metal pipes. Depth such supports should be slightly lower (by 20-30 cm) than the level of soil freezing.To install piles, a small layer of sand is first poured into the pits prepared for them, and then gravel. Such a pillow will remove moisture from the supports and protect them from premature decay.

Porch foundation on wooden piles
After installing the supports and leveling them, the space between them and the ground is filled with concrete mortar. Extreme supports attached to the wall of the house with large nails or self-tapping screws. Further work should be carried out only after the concrete has completely cured.
Important! In the event that a concrete foundation is chosen for the porch, it is necessary to provide between it and the base of the house expansion joint. Otherwise, during seasonal ground movements, due to the difference in the load on the supports, the foundation at the junction with the structure may crack. To avoid moisture ingress, such an expansion joint can be filled with any flexible material (rubber gasket, mineral wool, etc.), and then closed with a flashing.

An expansion joint should be provided between the base of the house and the porch
What is a kosour?
The side sloping boards to which the steps are attached are called bowstrings. The steps in them can be inserted into special grooves cut in the bowstring, fastened with screws, dowels, studs or special steel fasteners.
stair bowstrings
But most often stairs are made, the bowstrings of which have cutouts on which the steps lie. This type of bowstring is called kosour.
Stairs with one stringer are rare. Most often, the steps are mounted on two or (if the span is large enough and ranges from 1.2-1.5 m) on three supports.


Making a kosour

Staircase on three stringers
All kosoura are divided into two main types:
Ordinary stepped; have cutouts of a triangular shape, placed at an equal distance from each other; a significant disadvantage of this method is the thinning of the wooden beam after cutting it;
FROM "fillies": small bars (dowels) to support the steps, which are inserted into the slots of the stringers; quite complex, but more durable design.

Kosour with fillies
The kosour is the most complex structural element, so its dimensions and the width of the cutouts should be measured with great care. To facilitate the process, you can use a stencil made from a piece of plywood or thick, even cardboard.
Horizontal cutouts for steps in the stringer should be equal tread(step width). The size of the vertical section is riser(step height).
Important! When measuring the size of a kosour or bowstring, it should be taken into account that the tread of the first step should become a continuation of the site.
So that the support beams do not bend under the weight of people walking up the stairs, the boards from which the bowstrings or stringers will be made must be thick enough - from 60 mm with width from 30 cm. They are made of high-quality hardwood (spruce, pine, maple, oak or beech), which does not have cracks and knots.
More durable and reliable are stringers made of a metal profile. For this you can use steel corners.

Stringers from the channel
Porch Assembly
Before starting the assembly, to protect it from decay, the wood should be carefully treated with any antibacterial agents and painted several times with drying oil or varnish.1. After the concrete mortar has hardened in the supporting pillars holes are punched for laying the upper part of stringers or aunts (they are attached without nails). The lower part of the bowstring should lie on support pads, resting on nickels.

Fastening the upper part of the stringer

Cuts for fastening the bottom of the stringer
2. On the supporting piles are placed lags and fastened with self-tapping screws. For their manufacture, 5-centimeter durable boards are used. They lay on the logs floorboards thickness from 2.5 cm.
3. To ensure ventilation between them, be sure to leave a small 20mm gap. The same gap is left between the steps and the tread. It is not necessary to make too large a distance between the boards - after all, during operation, the wood will dry out and the size of the cracks will increase.
4. Start laying steps from the bottom. If desired, you can do without risers, laying one tread.

Steps for the street porch can and should not be done
5. Treads and risers are attached to wide head screws. They are slightly (a couple of millimeters) recessed into the boards. For fastening, you can also use metal brackets. The ideal option would be to use boards with a tongue and groove system.

Fastening steps and risers
The construction of a durable and reliable porch protects against the effects of winds, snowstorms, and precipitation. In addition, the porch plays an aesthetic role at the main entrance to the house and is one of the significant foundations of the home.
Designing a wooden porch in a private house
The design of the porch should begin with the selection of a design that matches the exterior of the building. It is important to maintain proportions in relation to the size of the house. If the housing is built of timber or logs, strong wood would be the best option for making a porch.

Then, depending on your wishes and structural features of the structure, you need to decide on the shape of the porch, which can be:

The exact size and shape of the porch is calculated using driven pegs along the intended perimeter of the future structure.

The next step will be the design of steps and railings. If the porch has more than 3 steps, then the railing is a must. The structure itself can be of two types:

All dimensions and structural features must be recorded on paper in the form of a schematic drawing, which will avoid errors and errors during construction.
The porch is considered an outdoor structure, which is actively influenced by natural factors. Therefore, the wood for its manufacture must be durable and properly processed. Used materials, especially those with visible defects, are not recommended.

The main mistakes in the construction of a wooden porch are the following violations:

The optimal material for the construction of a wooden porch is considered to be high-quality wood from coniferous trees, oak.

Structural and technological features of the stairs
The number of stairs for a wooden porch depends on the height of the basement of the building. The structure must meet the safety requirement when moving at a certain angle to the horizontal. The best option would be the manufacture of stairs with wide and gentle steps. However, each specific case of installation of the structure requires the adjustment of certain parameters, namely:
- lifting height of the product;
- construction type;
- plan area;
- the steepness of the stairs;
- width, height and number of steps.

It should be noted that the construction of wooden stairs in terms of safety should be taken into account first of all when erecting a structure.
As a result of many years of practice, architects and architects around the world have come to the conclusion that the safety of the stairs, first of all, depends on the ratio of the height and width of the steps, regardless of the accessory and installation location of the product. For comfortable movement on the stairs, the ratio of the height of the march to its horizontal projection should be 1:2 - 1:1.75 (no steeper than 30 degrees). Stairs with greater steepness become not only inconvenient, but also dangerous.

As a rule, the height of the steps is not more than 20 and not less than 12 cm. Their width is observed within the size of a person's foot, but not less than 25 cm. In addition, the dimensions of the steps along the entire flight of stairs must be identical to each other. In order to calculate their number, the height of the base part should be divided by the selected step height. When designing stairs, it should be borne in mind that the material for manufacturing must have an increased coefficient of friction.

In winter, the surface of the flight of stairs can be partially protected from ice by installing a canopy. The best solution to this problem is electrical heating. It is worth remembering that the number of steps in one march should be an odd number.

To extend the life of wooden coatings, including stairs, it is necessary to treat them with antiseptics. In this case, the structure should be periodically tested and inspected. Whatever the strength of the wood, it is subject to decay due to weathering and deformation due to bark beetles.
Original and classic entrance surfaces
Wooden houses are often insulated with siding. It is reasonable to make decor in the appropriate style for the porch. The presented coating is used mainly in white or cream shades. It gives the building a pleasant appearance, additional insulation. In addition, siding, with its practicality, has a low cost.

The main benefits of front porch siding are:

Porch decking is still the most popular method of decorating the entrance area. This material organically fits into any facade.

For all types of porches, decking is great. This material has three main indicators of characteristics:
- difference in thickness (from 18 to 48 mm);
- different degree of surface roughness (smooth version, "velveteen", "scar");
- difference in profile (beveled models, grooved pattern and straight standard).
The terrace board can be made from various materials (larch, composite composition from tropical trees, from wood-polymer components). The most hardy is a board made of selected tropical wood. Its service life is from 50 to 80 years.

The main advantages of the deck board are the following:
- resistance to moisture and temperature changes;
- aesthetic appeal;
- not susceptible to damage as a result of exposure to insects and fungal formations;
- rough surface.

There are some disadvantages in the use of decking boards. These include:
- the possibility of the formation of resinous substances and splinters in larch materials;
- difficulties in processing board options from durable tropical trees;
- wood-polymer composite is less resistant to mechanical stress than a board made of natural wood.
Instructions in the photo, as a step-by-step implementation of the project for the design of a wooden porch
The presented photos clearly show the processes for making a porch with your own hands. Also, there are several options for finishing, arranging stairs (with and without railings), including original samples of a porch for a country house.


brick porch

For those who want to create a porch for the house with their own hands, it is recommended to follow the following rules:

By following simple tips and applying imagination, you can create an exclusive wooden porch with your own hands, which will emphasize the overall exterior of the building and become its real decoration.
The project of the porch of a wooden country house: drawing, porch design, calculation of the size of the height of steps for an external staircase, how to decorate the finished entrance area in front of the house in an original way with siding or decking, photo
Message
sent.